

 Rules
Rules
by Oldenginerod Today at 1:59 am
» Draco Goes Flying, But Misses the Eclipse
by HalfaDave Yesterday at 9:59 pm
» A prototype Cox Reed-valve marine engine
by davidll1984 Yesterday at 9:15 pm
» Enya .09 II Questions
by Surfer_kris Yesterday at 2:45 pm
» Wen Mac .049 - Conditioning.
by MauricioB Yesterday at 12:21 pm
» Happy 53rd birthday Mauricio!!!
by MauricioB Yesterday at 11:47 am
» Jim Walker Firebaby
by rdw777 Yesterday at 11:22 am
» Testers Sprite engine swap
by Greenman38633 Yesterday at 10:57 am
» UV Restore of Yellowed Decals
by Levent Suberk Yesterday at 8:59 am
» 22mm 2-blade nylon marine prop and solid-shaft drive
by roddie Yesterday at 6:46 am
» Post edit??
by roddie Yesterday at 5:33 am
» Original Super Power fuel formula?
by HalfaDave Wed Apr 17, 2024 7:28 pm


"Phred's Phault"
Page 3 of 7 •  1, 2, 3, 4, 5, 6, 7
 ![]()
Re: "Phred's Phault"
![]() Ken Cook Wed Nov 26, 2014 5:11 am
Ken Cook Wed Nov 26, 2014 5:11 am

Ken Cook- Top Poster

- Posts : 5442
Join date : 2012-03-27
Location : pennsylvania
Re: "Phred's Phault"
![]() roddie Wed Nov 26, 2014 7:21 am
roddie Wed Nov 26, 2014 7:21 am
Ken Cook wrote: As our circle marshal explicitly yells out "COMBAT!!!" This should be flying prior to Thanksgiving dinner. Ken
Hey Ken, That would be nice.. but it ain't gonna' happen..
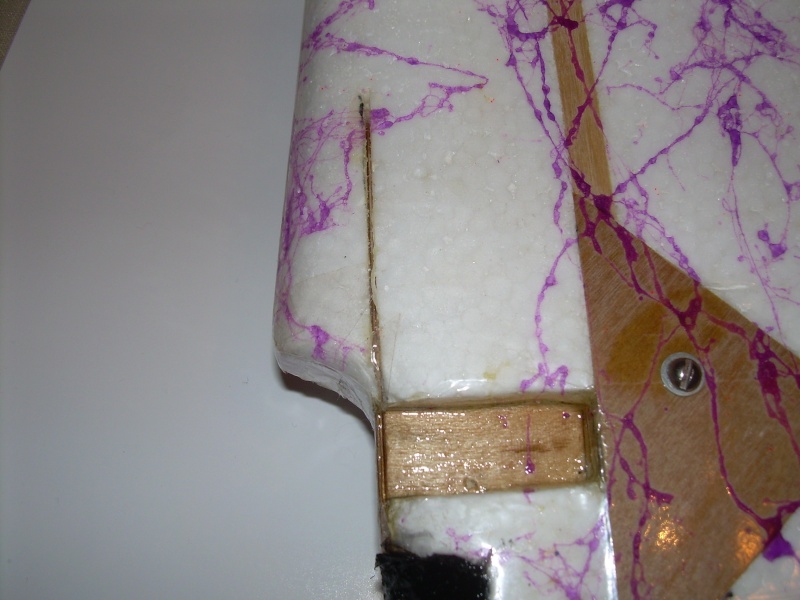
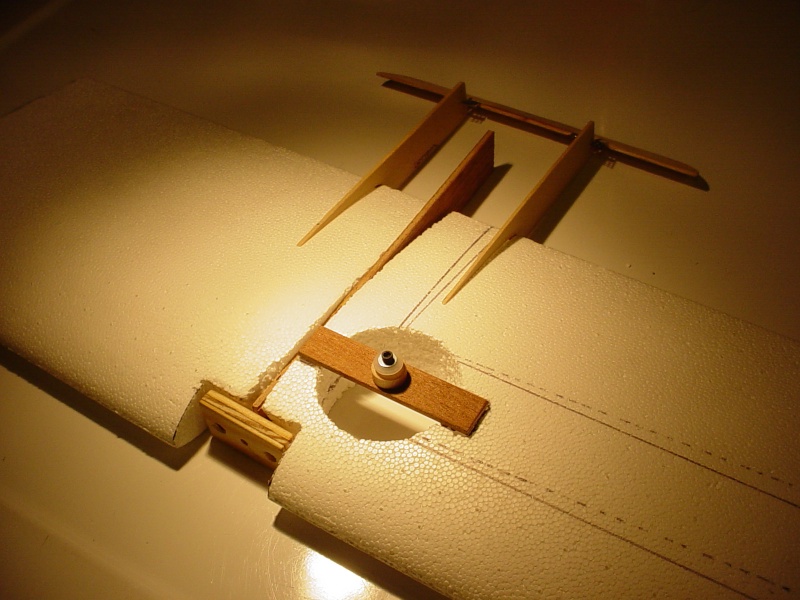
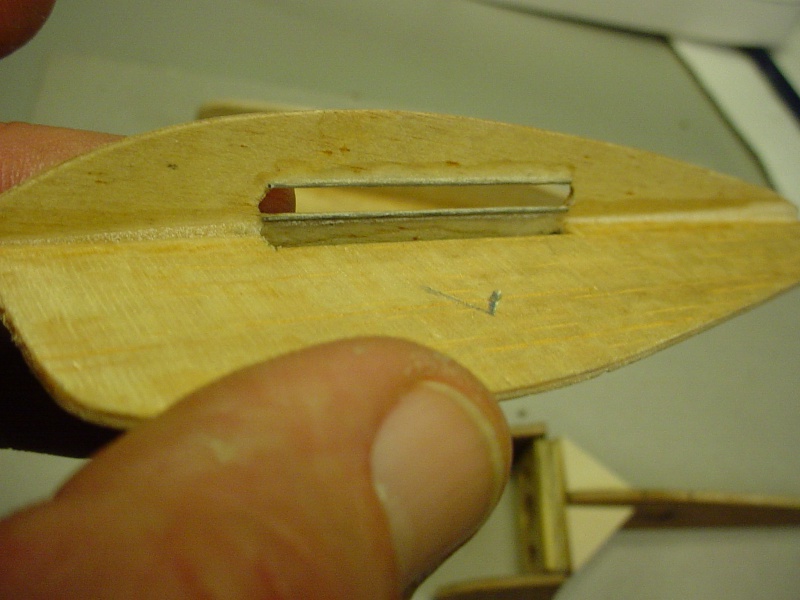
 Does the "gap" in the guide look ok to you? It's about 1/8" square using the safety-pin as a lateral set-point. Is this too much "slop" on a model this small?
I plan on making the line-connector ends off-set in length.. about 3/4" to 1" to prevent them from snagging on each other. The control-throws will be set very short to start with.. (pushrod on the inner-hole on the crank.. and outer-most hole on the horn).
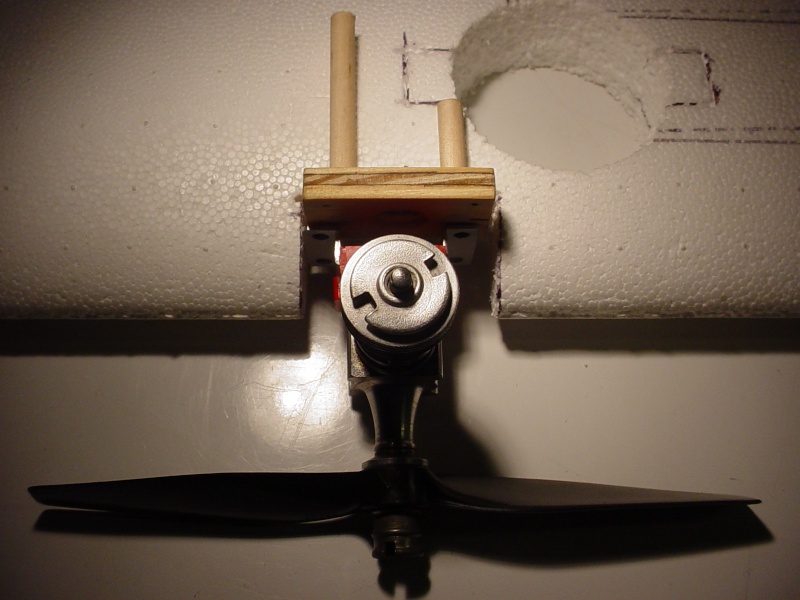
I drilled my firewall for running two pieces of 3/16" hardwood dowel, to pin back into the foam. One is shorter because it comes close the bellcrank plate.

The 290 mounts that I made, have a fairly wide spread. The hole pattern measures 1-1/16" x 17/32". I'd like to think that this might help to spread-out engine vibration a little better.. although I did not design them for that purpose. The 17/32" spacing is the same as the engine's case-screw spacing.. which I transferred to the firewall mount for simplicity. The 1-1/16" spacing was the narrowest I could achieve.. and still have room for mounting screws/washers to the firewall. This works out well from a streamlining standpoint, with the mount oriented horizontally.. but places the NVA vertically because the mounts will only fit between the molded-plastic ears on the back of a 290 style backplate.

roddie- Top Poster
- Posts : 8233
Join date : 2013-07-17
Age : 64
Location : N. Smithfield, Rhode Island -

Re: "Phred's Phault"
![]() Ken Cook Wed Nov 26, 2014 7:28 am
Ken Cook Wed Nov 26, 2014 7:28 am
Ken Cook- Top Poster
- Posts : 5442
Join date : 2012-03-27
Location : pennsylvania
Re: "Phred's Phault"
![]() roddie Wed Nov 26, 2014 7:45 am
roddie Wed Nov 26, 2014 7:45 am
Ken Cook wrote:My biggest concern would be a ground strike. I can see bad things happening with the way that firewall attaches. It looks like the entire assembly would just break out of the foam. Glassing the nose with some lightweight cloth and thinned white glue all around the firewall and back onto the wing would help. Even if you stuffed it, and the engine didn't break off, it could push back into the wing and certainly into your bellcrank area. I see a stress riser created from the corner of the firewall notch into the circular bellcrank cutout. Were going to keep our fingers crossed here and your not going to hit the ground. Keep saying that over and over. Ken
Thanks Ken, I'll see if I can work something out.. hopefully without adding too much weight.
roddie- Top Poster
- Posts : 8233
Join date : 2013-07-17
Age : 64
Location : N. Smithfield, Rhode Island -
Re: "Phred's Phault"
![]() GallopingGhostler Wed Nov 26, 2014 9:23 am
GallopingGhostler Wed Nov 26, 2014 9:23 am

GallopingGhostler- Top Poster

Posts : 5278
Join date : 2013-07-13
Age : 70
Location : Clovis NM or NFL KC Chiefs
Re: "Phred's Phault"
![]() OVERLORD Wed Nov 26, 2014 10:58 am
OVERLORD Wed Nov 26, 2014 10:58 am
and fix a piano wire skid to facilitate landings and prevent prop damage. Below 2 examples used on combat planes


OVERLORD- Diamond Member

- Posts : 1786
Join date : 2013-03-19
Age : 57
Location : Normandy, France
Re: "Phred's Phault"
![]() OVERLORD Wed Nov 26, 2014 11:01 am
OVERLORD Wed Nov 26, 2014 11:01 am
OVERLORD- Diamond Member
- Posts : 1786
Join date : 2013-03-19
Age : 57
Location : Normandy, France
Re: "Phred's Phault"
![]() getback Wed Nov 26, 2014 12:04 pm
getback Wed Nov 26, 2014 12:04 pm
 I have never worked with foam and don't think I want to at this point just my
  Getback
getback- Top Poster

Posts : 10095
Join date : 2013-01-18
Age : 66
Location : julian , NC
Re: "Phred's Phault"
![]() Ken Cook Wed Nov 26, 2014 12:46 pm
Ken Cook Wed Nov 26, 2014 12:46 pm
Ken Cook- Top Poster
- Posts : 5442
Join date : 2012-03-27
Location : pennsylvania
Re: "Phred's Phault"
![]() roddie Wed Nov 26, 2014 1:17 pm
roddie Wed Nov 26, 2014 1:17 pm
 I've been writing/thinking for the last two hours.. (see below RE;Lieven) Thanks guys! I've got some options.. but some I'm going to have to learn how to do.. if I try them. Ken, you mentioned thinned glue.. What type and thinner?
OVERLORD wrote:I see it now, your engine mount is, I think, not higher than the thickness of the wing at the cut out. No box then!!
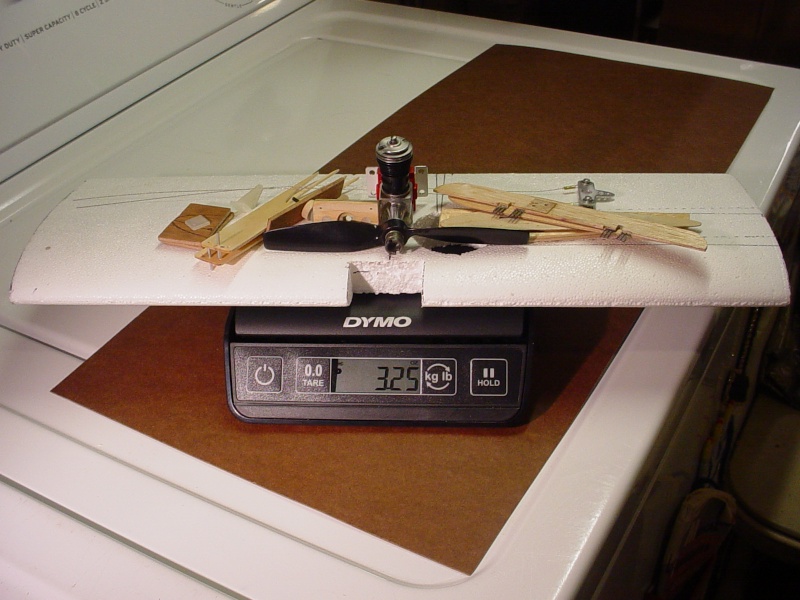
Correct Lieven. George's idea is one that I had already planned on.. but for a different reason. Since the firewall is set back.. the notch cut in the leading-edge leaves foam edges that would get rounded/chipped-off. I had planned to fill this area with 1/16" hard-balsa. Even if I opted for plywood.. I can't really "key-into" the firewall with them, for the rigidity that Ken's concerned about. I have the two forces of "squish" on a direct nose-in.. and "shear' with a more angular ground-strike, that are going to be problems with my mount, the way it is now. The hole for the bellcrank is a big issue here. It's too close to the firewall cut-out. The best single thing I can do, is to tie the firewall into the plywood bellcrank platform somehow. I have the Dremel-tool w/router kit for slotting.. maybe I could notch the firewall, slot the wing chordwise behind the firewall a few inches and lay-in some 1/8" sq. Spruce top and bottom? Whatever I do.. it's gotta' be lightweight. I'm already at 3-1/4 ounces.. less a pushrod, glue-up and covering.
roddie- Top Poster
- Posts : 8233
Join date : 2013-07-17
Age : 64
Location : N. Smithfield, Rhode Island -
Re: "Phred's Phault"
![]() roddie Wed Nov 26, 2014 1:26 pm
roddie Wed Nov 26, 2014 1:26 pm
getback wrote:Roddie , I know Ken knows what he is talking about , but I personally don't like the idea of the lead outs having no constrictions from each otherI don't see control with them going from side to side in a slot ? The mount I would glass in behind that mount and the sides I don't think I would worry to much about that added weight over strength value
Eric, the lateral slot for my lead-outs is only for fore-aft adjustment. Once balanced (at finish) their lateral location is pinned-in. I show a small safety-pin to be secured to the rib vertically for this.. but may do something different. Whatever it is.. the lead-out position will certainly be fixed.. and not sliding.
roddie- Top Poster
- Posts : 8233
Join date : 2013-07-17
Age : 64
Location : N. Smithfield, Rhode Island -
Re: "Phred's Phault"
![]() roddie Sun Dec 21, 2014 7:17 pm
roddie Sun Dec 21, 2014 7:17 pm
Ken Cook wrote: As our circle marshal explicitly yells out "COMBAT!!!" This should be flying prior to Thanksgiving dinner. Ken
2nd time I've quoted Ken.. Not much to report...

Econokote will cover this.. but it was a dumb mistake. I was planning on installing a central ply-rib that would key into my radial "290" engine mounting.. but I thought about the option of building a "box" that would tie-in the engine-mount/firewall, bellcrank-platform and the tail-booms. The foam core "panels" would then become "extensions" off the fuse.. instead of being an integral part of the airframe. I'll admit that it's an unorthodox construction for a wing.
 but it could also provide for a centralized bladder-bay. Some considerations... a "box" would have to be the width of the booms.. and ideally; the booms would extend forward to the firewall. The boom-spacing on this model is 2-3/8" on center. If I make inside cheek-blocks of balsa for the engine-mount.. they might provide a (edit) "crumple-zone" in the event of a "nose-in".
 I may re-build my tail-booms.. and go "full-chord" with some 3mm plywood that I have an abundance of. I can't really afford to buy 1/16" aircraft birch right now. This wood I got several years ago.. and it was actually used as packing material.. like part of a "crate". Well.. I saved it.. because it's useful where you need a little more strength.
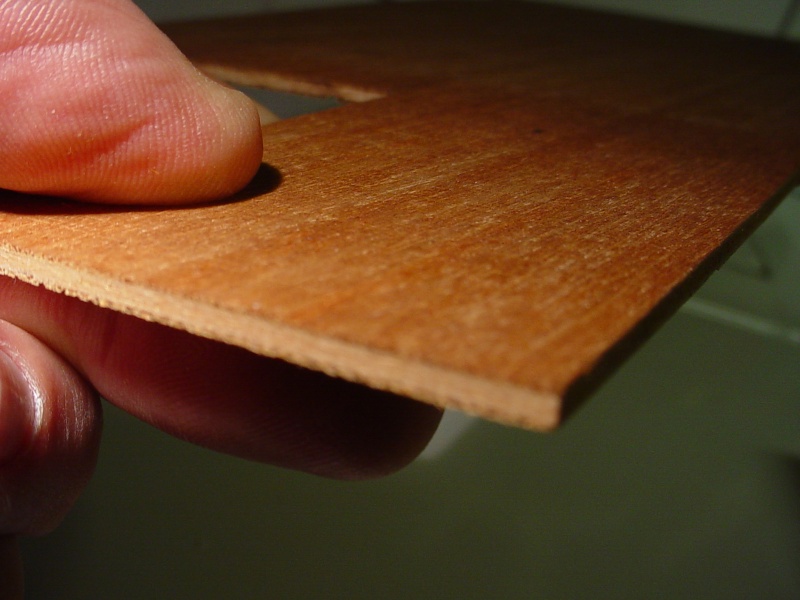
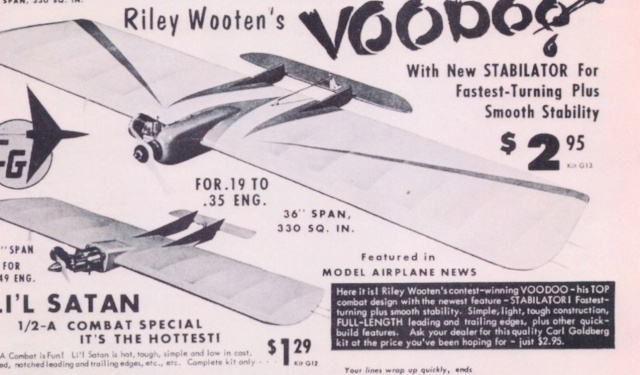
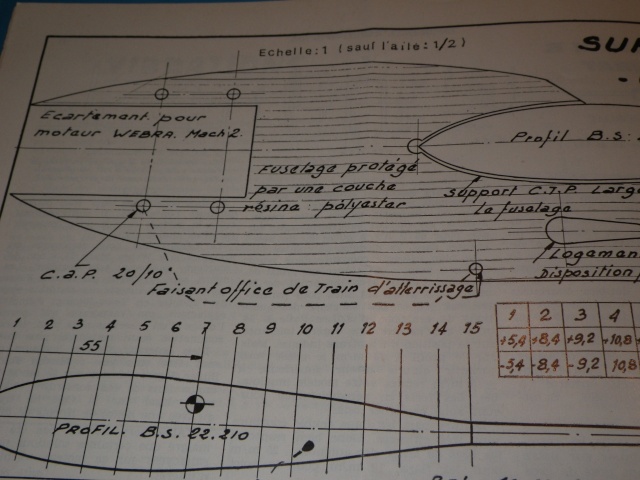
I have 3 or 4 full-sheets 12" x 24".. as well as several remnant sheets. It's "overkill" for this 1/2A VooDoo.. but I have a sheet in queue for the boom-stock for the "full-size" VooDoo build.. that Lieven sent me templates for. (Thanks Lieven!... to you; I have a full-template set.. and an illustrated "improvements" article.) That will be a much more "straight-forward" build than this one. Wing-tips, booms/tail-plane, bellcrank/engine mount.. and a good tank set-up.. and that should be good to go.. seeing that the wing is mostly built.
roddie- Top Poster
- Posts : 8233
Join date : 2013-07-17
Age : 64
Location : N. Smithfield, Rhode Island -
Re: "Phred's Phault"
![]() GallopingGhostler Sun Dec 21, 2014 9:33 pm
GallopingGhostler Sun Dec 21, 2014 9:33 pm
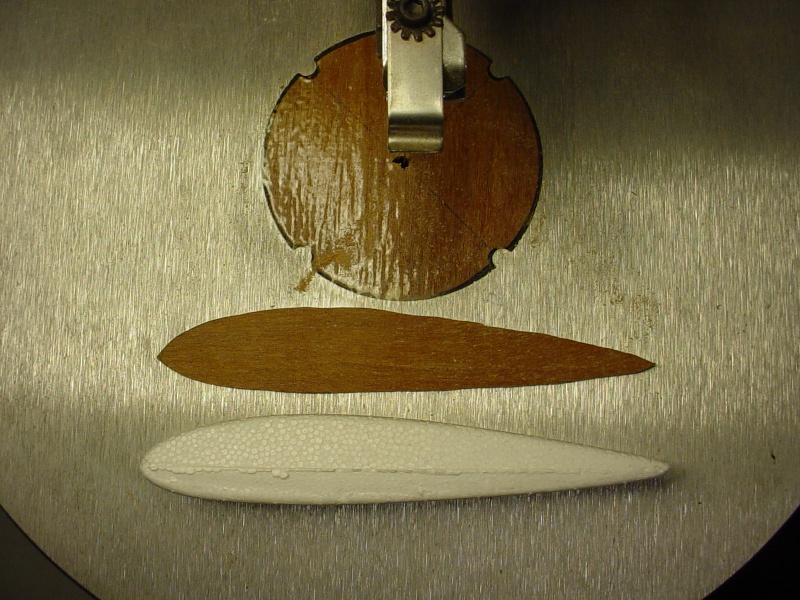
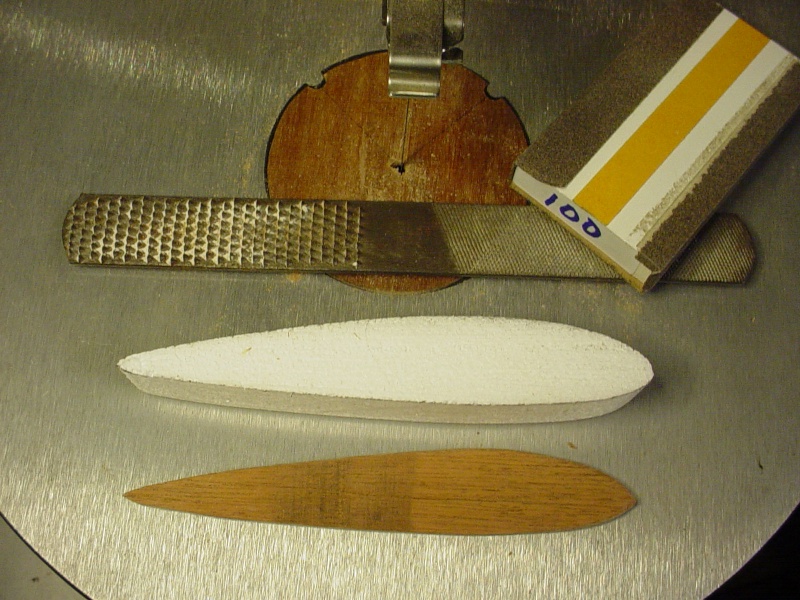
This is how I repair foam wings after crashes or severe hangar rash.

Additional note, if the marring is shallow I've used synthetic spackling to fill imperfections.
Last edited by GallopingGhostler on Mon Dec 22, 2014 6:28 am; edited 1 time in total (Reason for editing : Added additional comment.)
GallopingGhostler- Top Poster
-
Posts : 5278
Join date : 2013-07-13
Age : 70
Location : Clovis NM or NFL KC Chiefs
Re: "Phred's Phault"
![]() getback Mon Dec 22, 2014 8:02 am
getback Mon Dec 22, 2014 8:02 am
 MAN , I was wondering how that foamy was coming along , I know it is the busy time of the year for most people // I still got two wreaks I need to glue back together and some covering to do before I start ANYTHING else Eric
getback- Top Poster
-
Posts : 10095
Join date : 2013-01-18
Age : 66
Location : julian , NC
Re: "Phred's Phault"
![]() roddie Mon Dec 22, 2014 9:45 am
roddie Mon Dec 22, 2014 9:45 am
getback wrote:
I wish I could say I was more busy Eric... I hadn't touched this little foamie for weeks before attempting to cut that wing in half the other day. The table-saw was the only tool I had to make a perpendicularly square cut.
Thinking more on this... a single-central 3mm ply-rib should provide strength for two critical areas of this design; the firewall rearward.. and the bellcrank mount-plate which I could glue into a slot cut in the rib.
I had drilled the firewall for 1/4" dowels to pin-back into the foam.. If I only install the outboard (longer) one, it will lessen the chance of the firewall shearing into that open bellcrank-bay on the inboard panel. George's recommendation for boxing the firewall "forward".. and fairing into the leading-edge, will provide some more strength too.. as well as protecting the foam from dings in that area.
roddie- Top Poster
- Posts : 8233
Join date : 2013-07-17
Age : 64
Location : N. Smithfield, Rhode Island -
Re: "Phred's Phault"
![]() getback Mon Dec 22, 2014 11:27 am
getback Mon Dec 22, 2014 11:27 am
getback- Top Poster
-
Posts : 10095
Join date : 2013-01-18
Age : 66
Location : julian , NC
Re: "Phred's Phault"
![]() roddie Mon Dec 22, 2014 12:29 pm
roddie Mon Dec 22, 2014 12:29 pm
getback wrote:OK I see now y u cut the wing in 1/2 I must have missed something , It 's coming together just takes time . Could you cut a plastic round cylinder to fit the hole for strength ? I would have to look back to see why the hole was cut to begin with , Just a thought . Eric
That large hole is for the bellcrank.. which is enclosed in the wing.. along with the lead-outs. A "thru-hole" just seemed to be easier than trying to carve-out the foam down to a certain level.
I had previously thought about your recommendation for sleeving the hole with something. Probably just the front section.. which would need a slot cut for the forward lead-out to pass through.
roddie- Top Poster
- Posts : 8233
Join date : 2013-07-17
Age : 64
Location : N. Smithfield, Rhode Island -
Re: "Phred's Phault"
![]() roddie Mon Jan 12, 2015 1:26 pm
roddie Mon Jan 12, 2015 1:26 pm
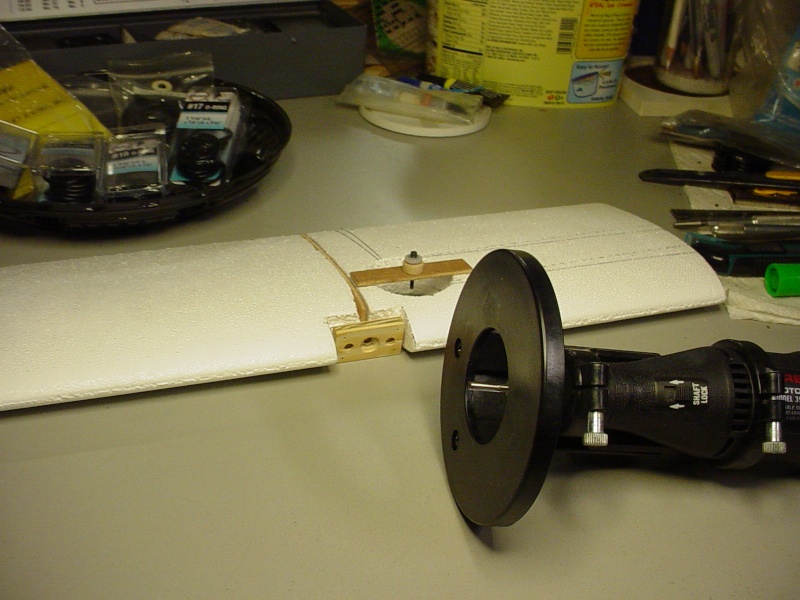
Maybe I can embarrass myself into picking up the pace. A central ply rib has been made, and cut back for the firewall to butt-up against with a pair of 3/4" long, 3/8" sq. spruce blocks epoxied vertically on the backside.
The bell-crank platform needs to be re-made longer on the inside, and a slot cut in the ply-rib to accept it. These combined joints will hopefully add some strength where the model needs it most.
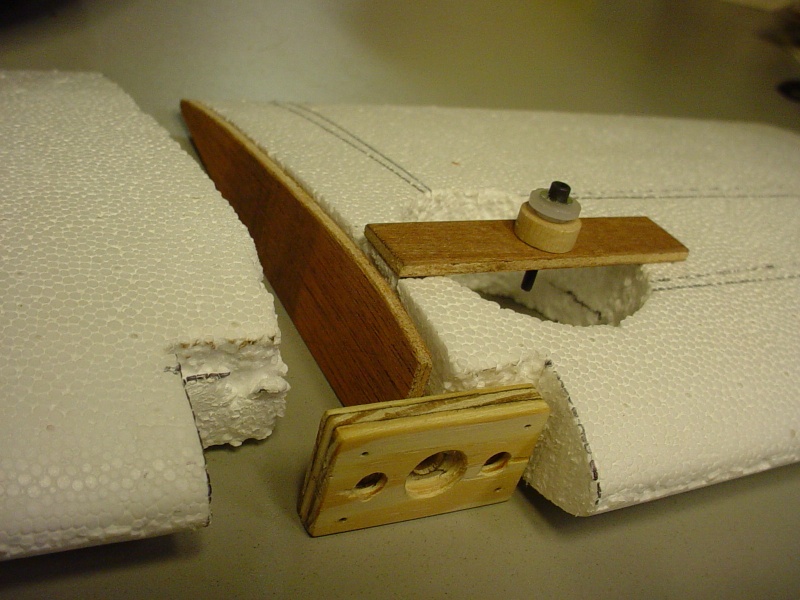
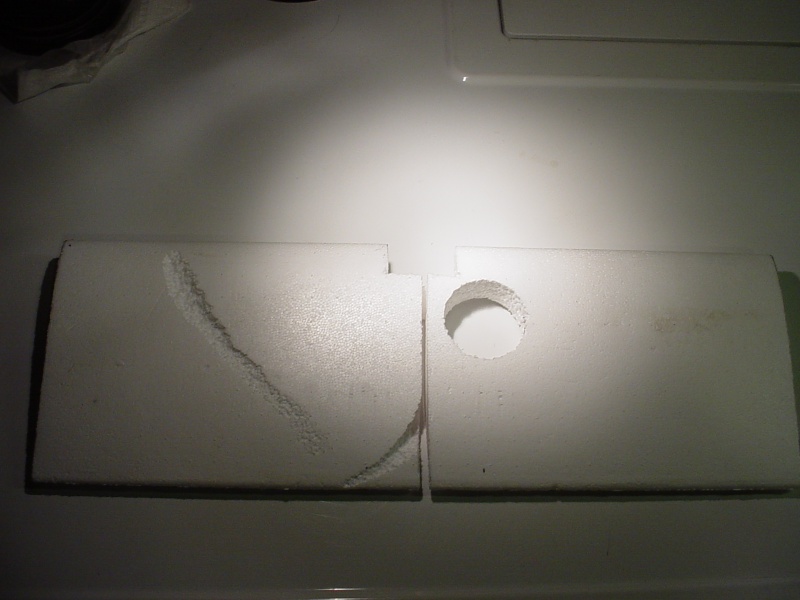
There's a couple crevices on the under side of the outboard wing. It happened when I cut the wing in half.. and I need to fill them. Maybe balsa dust mixed with white glue? I can't really afford to buy anything else right now.
roddie- Top Poster
- Posts : 8233
Join date : 2013-07-17
Age : 64
Location : N. Smithfield, Rhode Island -
Re: "Phred's Phault"
![]() KariFS Mon Jan 12, 2015 1:35 pm
KariFS Mon Jan 12, 2015 1:35 pm
KariFS- Diamond Member
- Posts : 2000
Join date : 2014-10-10
Age : 52
Re: "Phred's Phault"
![]() roddie Mon Jan 12, 2015 2:00 pm
roddie Mon Jan 12, 2015 2:00 pm
KariFS wrote:How about a handful (or less) of styrofoam crumbs mixed with glue? If you still have that circular piece you cut out to make the chamber for the bellcrank, that would probably be enough.
Yes.. thanks! I will be making foam dust when I use the router. It's a small total area of about .5 sq. inches. I thought about acrylic caulking too. I'll have to do a few tests to see how they sand-out. It will be covered at finish, with white Econo-Kote.
roddie- Top Poster
- Posts : 8233
Join date : 2013-07-17
Age : 64
Location : N. Smithfield, Rhode Island -
Re: "Phred's Phault"
![]() roddie Mon Jan 19, 2015 7:56 am
roddie Mon Jan 19, 2015 7:56 am
The left hand drawing shows a cutaway of the foam core with my proposed central plywood rib and lengthened bellcrank platform which runs through a slot in the rib.
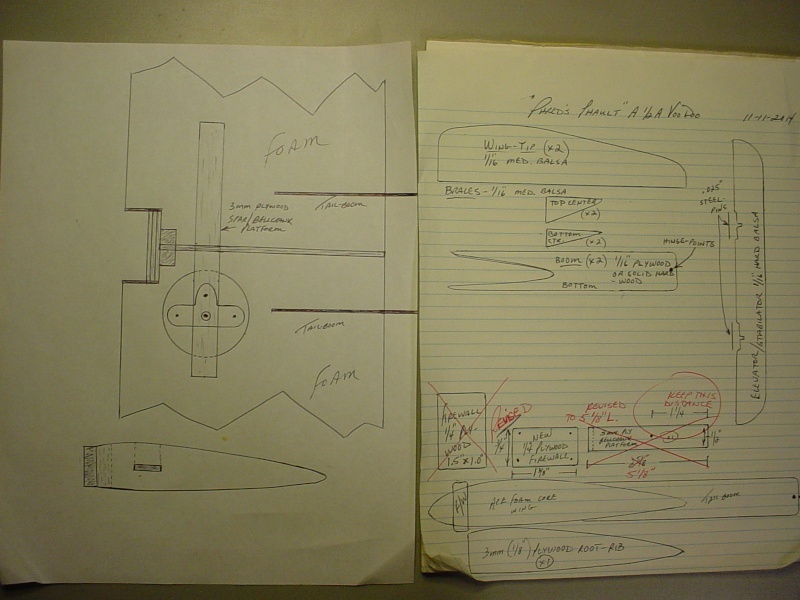
The 1/4" plywood firewall will butt against the front of the 3mm ply-rib and will have blocks on the backside for support. This establishes a central frame and spreads-out some of the stress-points enough (hopefully) to be more crash resistant. Besides being a much stronger bellcrank mount, this assembly may also help to dampen engine vibrations. The central rib also offers a good firm point on the underside, for bladder stand-offs.
roddie- Top Poster
- Posts : 8233
Join date : 2013-07-17
Age : 64
Location : N. Smithfield, Rhode Island -
Re: "Phred's Phault"
![]() roddie Wed Jan 21, 2015 7:16 pm
roddie Wed Jan 21, 2015 7:16 pm

roddie- Top Poster
- Posts : 8233
Join date : 2013-07-17
Age : 64
Location : N. Smithfield, Rhode Island -
Re: "Phred's Phault"
![]() KariFS Thu Jan 22, 2015 1:30 am
KariFS Thu Jan 22, 2015 1:30 am
You might want to consider options to somehow tie the tail booms into this main structure too, that way your styro wing cores would not have to carry that much force. Or maybe glue some strips of very thin plywood along the edges of the cut-outs?
KariFS- Diamond Member
- Posts : 2000
Join date : 2014-10-10
Age : 52
Re: "Phred's Phault"
![]() roddie Thu Jan 22, 2015 6:05 pm
roddie Thu Jan 22, 2015 6:05 pm
KariFS wrote:I'm no expert, but that does look good to me. Now you will have your bellcrank and engine tied together with hardwood structure. This is pretty much the same structure I have come up in my own trainer design, although mine is going to be 1/4" balsa sheet after all, the styro cores I mentioned earlier were too thick. But now, if your plane should happen to disintegrate mid air for any reason, at least your engine should stay in the end of the control lines and not fly away
You might want to consider options to somehow tie the tail booms into this main structure too, that way your styro wing cores would not have to carry that much force. Or maybe glue some strips of very thin plywood along the edges of the cut-outs?
I think I'll be ok with the tail-booms.. as they're notched (like the full-size VooDoo) as opposed to slotting the T/E to accept them (I think that's what you meant?) Still.. it's something to think about. I like Ken's method of installing a fuel-bladder inside the wing... but that's no longer an option with the mods I've made. I am also totally new to bladder-use and it's probably better anyway.. for it to be external until I get use to flying with one.
roddie- Top Poster
- Posts : 8233
Join date : 2013-07-17
Age : 64
Location : N. Smithfield, Rhode Island -
Re: "Phred's Phault"
![]() roddie Sat Jan 24, 2015 9:13 pm
roddie Sat Jan 24, 2015 9:13 pm
I plan on using a small safety-pin "vertically" through which both lines will run. The bottom "eye" of the safety-pin will be anchored into the foam using a long "hat-pin".. and the top.. well
 something that I hope will also allow for repositioning. The top has no foam behind the rib to anchor to.. because of the routed-out channel for the lead-out cables. Possibly a short #1 machine-screw/nut.
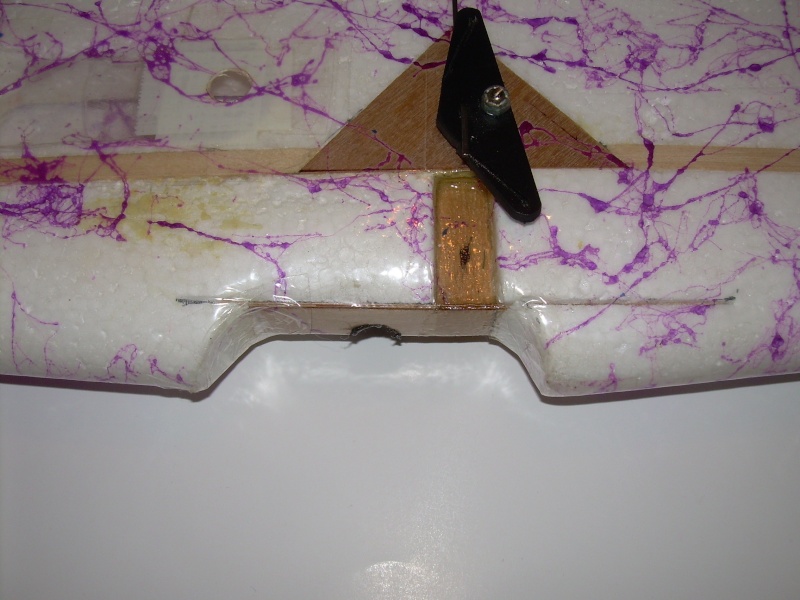
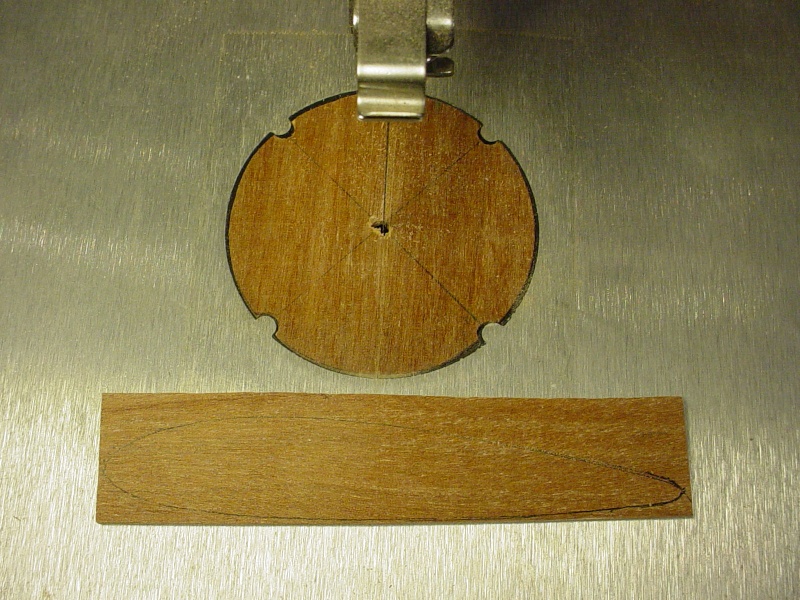
I cut two 3mm ply rib-shaped nose-blocks that will protect the leading-edge at the junction of the inset engine bay.. and will straddle the 1/4" ply engine mount and butt-up against the triangular blocks behind the mount. This all keys into the central 3mm ply-rib and bell-crank plate.
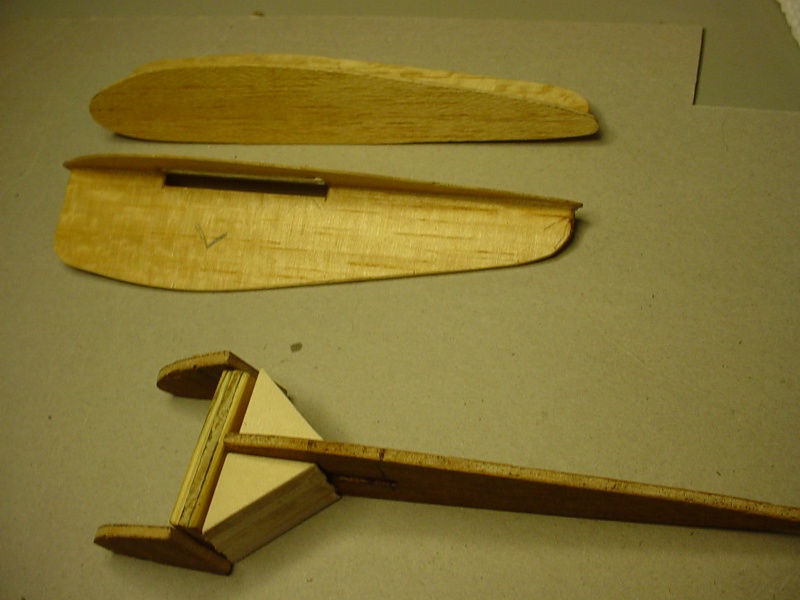
I need to trim the cores for the triangle braces and router the slots for the bell-crank plate to fit down into.. as well as the channel for the lead-outs running out to the inboard tip. Once the cores are glued to the central-rib, I can use my fixture to align and install the tail-boom/stab. assy.
roddie- Top Poster
- Posts : 8233
Join date : 2013-07-17
Age : 64
Location : N. Smithfield, Rhode Island -
Page 3 of 7 • 1, 2, 3, 4, 5, 6, 7 ![]()