Cox Engines Forum
You are not logged in! Please login or register.

Logged in members see NO ADVERTISEMENTS!


Ringmaster Jr Kit S5 - Page 3 Cox_ba12


Ringmaster Jr Kit S5 - Page 3 Pixel

Log in

I forgot my password

Search


Display results as :


Rechercher Advanced Search

Latest topics
» music vids.. some of your favorites
by Oldenginerod Today at 1:59 am

» Draco Goes Flying, But Misses the Eclipse
by HalfaDave Yesterday at 9:59 pm

» A prototype Cox Reed-valve marine engine
by davidll1984 Yesterday at 9:15 pm

» Enya .09 II Questions
by Surfer_kris Yesterday at 2:45 pm

» Wen Mac .049 - Conditioning.
by MauricioB Yesterday at 12:21 pm

» Happy 53rd birthday Mauricio!!!
by MauricioB Yesterday at 11:47 am

» Jim Walker Firebaby
by rdw777 Yesterday at 11:22 am

» Testers Sprite engine swap
by Greenman38633 Yesterday at 10:57 am

» UV Restore of Yellowed Decals
by Levent Suberk Yesterday at 8:59 am

» 22mm 2-blade nylon marine prop and solid-shaft drive
by roddie Yesterday at 6:46 am

» Post edit??
by roddie Yesterday at 5:33 am

» Original Super Power fuel formula?
by HalfaDave Wed Apr 17, 2024 7:28 pm

Cox Engine of The Month
April-2024
OVERLORD's

"Kress ducted fan with new Cox Conquest 15 RC"


PAST WINNERS
CEF Traveling Engine

Win This Engine!
Gallery


Ringmaster Jr Kit S5 - Page 3 Empty
Live on Patrol


Ringmaster Jr Kit S5

Page 3 of 4 Previous  1, 2, 3, 4  Next

Go down

Ringmaster Jr Kit S5 - Page 3 Empty Re: Ringmaster Jr Kit S5

Post  Mike1484 Fri Apr 12, 2019 11:20 am

A Fox .15 and a Ring Master Jr. go together like bacon and eggs . The old green head K&B .15 is another good choice . Their counter part .19's make the Jr. a rocket and the .09's a slug . The Tee Dee .09 should pull it around like the .15's . My choice is the Fox .15 X with out a muffler . The planes look great guys , get them finished and flying . We need action pictures!!

Mike1484
Mike1484
Mike1484
Gold Member
Gold Member

Posts : 296
Join date : 2011-10-28
Age : 75
Location : Northern Ohio

Back to top Go down

Ringmaster Jr Kit S5 - Page 3 Empty Re: Ringmaster Jr Kit S5

Post  NEW222 Fri Apr 12, 2019 12:18 pm

Thanks for the comments. It will be unmuffled for sure. When I get it finished and flying, I will try my best to get a few action shots. First though is I gotta get the engine running. IF the weather ever breaks here, I will be starting to work in the garage and running the engine there.
NEW222
NEW222
Top Poster
Top Poster

Posts : 3892
Join date : 2011-08-13
Age : 45
Location : oakbank, mb

Back to top Go down

Ringmaster Jr Kit S5 - Page 3 Empty Re: Ringmaster Jr Kit S5

Post  getback Fri Apr 12, 2019 2:38 pm

ar Chancey i hope the engine runs out good for you so ya can move on . sunny days coming !!
getback
getback
Top Poster
Top Poster

2022 Supporter

2023 Supporter

Posts : 10097
Join date : 2013-01-18
Age : 66
Location : julian , NC

Back to top Go down

Ringmaster Jr Kit S5 - Page 3 Empty Re: Ringmaster Jr Kit S5

Post  NEW222 Fri Apr 12, 2019 3:09 pm

Thanks Eric. Yep, still cold, windy and lightly snowing here. I can't wait to see teh sun again. The last time I saw it was last week in Las Vegas. And even then, there was not a whole lot of it there as I am used to.
NEW222
NEW222
Top Poster
Top Poster

Posts : 3892
Join date : 2011-08-13
Age : 45
Location : oakbank, mb

Back to top Go down

Ringmaster Jr Kit S5 - Page 3 Empty Re: Ringmaster Jr Kit S5

Post  roddie Sun Apr 14, 2019 8:59 pm

NEW222 wrote:Thanks Eric. Yep, still cold, windy and lightly snowing here. I can't wait to see teh sun again. The last time I saw it was last week in Las Vegas. And even then, there was not a whole lot of it there as I am used to.

Hey Chancey, I'm sending you some mild-weather. You should get it in a day or two. Make sure you're prepared.. because I can't guarantee how long it will last in a Canadian-Spring.. Smile You may only have a small-window to work with.. so you need to be ready. Smile

My S-5 had been built as-per the Sterling-plans and covered (by me..) with TF/Monokote years ago. It's been hangar'd for decades since being covered. I could strip the covering.. and re-glue all the joints.. but I'm not going to do that. The framework has aged Ambroid-cement construction. "Ambroid" model-cement was the standard "glue" in the 1950's for aero-modelers. It would be pointless to discuss modern compatible cellulose-adhesives.. as there likely aren't any marketed for our hobby.

"You" have the advantage of building a vintage-model.. with a clean-slate. Thumbs Up


roddie
roddie
Top Poster
Top Poster

Posts : 8233
Join date : 2013-07-17
Age : 64
Location : N. Smithfield, Rhode Island

http://www.stilburnin.com

Back to top Go down

Ringmaster Jr Kit S5 - Page 3 Empty Re: Ringmaster Jr Kit S5

Post  Ken Cook Sun Apr 14, 2019 10:01 pm

Roddie, the only concern I would have is the bellcrank. Slide a piece of music wire through your leadout terminations and give it a good pull. Listen for cracking and watch for flexing. Just remember this is a .15 size plane and not a .60 so no need to debone the wing.  The JR and the .35 used only single platform bellcrank attachments. If Ambroid was used for the plywood joint ( It was never intended for ply) it certainly would be the sacrificial element in the system. If I have to access this area through the sheeting, I mark out a nice square and use a straightedge to cut it out. Don't plunge your knife straight in. Hold the knife at a 45 deg angle all the way around the cut. By doing so, you can glue the piece directly back in without adding additional wood.
Ken Cook
Ken Cook
Top Poster
Top Poster

Posts : 5442
Join date : 2012-03-27
Location : pennsylvania

Back to top Go down

Ringmaster Jr Kit S5 - Page 3 Empty Re: Ringmaster Jr Kit S5

Post  ticomareado Mon Apr 15, 2019 7:25 am

I've done an S-1, a Jr. and a Yak 9 restoration. All of them looked like something out of a prison workshop or an unsupervised Cub Scout den when I started. Believe me; there is no substitute for removing the entire top side of wing center sheeting.
ticomareado
ticomareado
Account Under Review

Posts : 1089
Join date : 2013-10-03
Location : NC

Back to top Go down

Ringmaster Jr Kit S5 - Page 3 Empty Re: Ringmaster Jr Kit S5

Post  Ken Cook Mon Apr 15, 2019 3:31 pm

I have rebuilt many planes and anymore I will throw them out and build a new one. It's not cost effective and it takes too much time. Here's my Skylark I rebuilt last year. This particular model was flown at the 72 NATS. It was given to me covered in silkspan and Aero Gloss Stearman red. I picked every piece of the silkspan off with a #11 blade which took me hours. The entire plane was Ambroid and most everything fell apart. I completely took the entire fuse apart installing new firewalls and beams. I separated the top block from the sides and removed the belly sheeting. All new controls and leading edge sheeting. It was a total mess. All I can say is never again. https://www.facebook.com/PhillyFliersCL/photos/a.605410626195742/1228842563852542/?type=3&theater
Ken Cook
Ken Cook
Top Poster
Top Poster

Posts : 5442
Join date : 2012-03-27
Location : pennsylvania

Back to top Go down

Ringmaster Jr Kit S5 - Page 3 Empty I see a problem, do you???????

Post  NEW222 Mon Apr 15, 2019 3:55 pm

Ok. So, I do not know what I was thinking! So this past week, I was very happy to install the wing into my Ringmaster Jr. It all went very well. Last night, I even sanded it to get it ready for paint I was so happy. Then today while cleaning up / organizing teh mess in my model room, I looked at it again. Something was definately wrong, but what was it? I look the plane over again and could not see anything, but my gut told me otherwise. So on I go about tidying up then I see a wheel on my workbench. Put it away then think, 'hey, isn't this for my Ringmaster Jr? No, there's no gear on it. Wait a minute.... Just back things up a second.... Go grab the box, and open it. Yep, teh landing gear I fought with to both find and make was laying in the box. Problem is that it was supposed to be installed BEFORE the wing! So now I got this problem on my hands here. I really want landing gear on it so I can launch it if by myself. What are my current options to remedy this? I need help please. I looked at making a hole in teh fuselage, but was unsure of how big it would have to be. Glad we had a mini snowstorm this morning and a lot of wind to keep it cool as I was going to start painting, but will now postpone until I figure out the landing gear situation.
Ringmaster Jr Kit S5 - Page 3 56994110
NEW222
NEW222
Top Poster
Top Poster

Posts : 3892
Join date : 2011-08-13
Age : 45
Location : oakbank, mb

Back to top Go down

Ringmaster Jr Kit S5 - Page 3 Empty Re: Ringmaster Jr Kit S5

Post  NEW222 Mon Apr 15, 2019 3:58 pm

Would cutting the gear in the center be safe to do then drill a hole and install a brass tube in the fuselage for teh ends to slide into? It is the easiest and quickest solution I can think of. I know some gear is installed this way, and I would not have to modify anything.
NEW222
NEW222
Top Poster
Top Poster

Posts : 3892
Join date : 2011-08-13
Age : 45
Location : oakbank, mb

Back to top Go down

Ringmaster Jr Kit S5 - Page 3 Empty Re: Ringmaster Jr Kit S5

Post  Ken Cook Mon Apr 15, 2019 4:26 pm

When you do that, make certain you use 2 gear straps. One as low as you can place it on the fuse and the other as high. I also like to chamfer the hole with the tubing using a countersink as this allows some of the tight radius to nestle in. A single gear strap will eventually fail and the gear usually bends from using one pulling out of the tubing where it enters it.
Ken Cook
Ken Cook
Top Poster
Top Poster

Posts : 5442
Join date : 2012-03-27
Location : pennsylvania

Back to top Go down

Ringmaster Jr Kit S5 - Page 3 Empty Re: Ringmaster Jr Kit S5

Post  Cribbs74 Mon Apr 15, 2019 4:43 pm

I like to install a smallish piece of Hardwood square into the fuse and drill a hole though that for the gear. Balsa alone will allow the brass tube to flex and eventually break and the gear becomes wobbly.
Cribbs74
Cribbs74
Moderator

2022 Supporter

2023 Supporter

2024 Supporter

Posts : 11895
Join date : 2011-10-24
Age : 50
Location : Tuttle, OK

Back to top Go down

Ringmaster Jr Kit S5 - Page 3 Empty Re: Ringmaster Jr Kit S5

Post  NEW222 Mon Apr 15, 2019 4:47 pm

Well, thanks for confirming this with work-around solutions. I will then pick up a couple more straps as I only had the two I originally used in test fitting. Also, thanks for the hardwood idea, I will look to see where it is mounted, but I do believe in the plywood, and if not, I have some dowel I can drill and install.
NEW222
NEW222
Top Poster
Top Poster

Posts : 3892
Join date : 2011-08-13
Age : 45
Location : oakbank, mb

Back to top Go down

Ringmaster Jr Kit S5 - Page 3 Empty Re: Ringmaster Jr Kit S5

Post  ticomareado Mon Apr 15, 2019 4:48 pm

Ken is quite right about the cost (time and sometimes money) effective angle on rebuilds. Bob and I are just a little eccentric when it comes to that aspect though. I guess when you get right down to it, you could win a stunt contest with an electric powered plug and play Nobler ARF.
ticomareado
ticomareado
Account Under Review

Posts : 1089
Join date : 2013-10-03
Location : NC

Back to top Go down

Ringmaster Jr Kit S5 - Page 3 Empty Re: Ringmaster Jr Kit S5

Post  NEW222 Wed Apr 24, 2019 8:31 pm

Well, another update. Over the past few nights, I have been painting my Ringmaster. Today I cleared it and am currently waiting for it to dry so I can do a final assembly and take a few pictures. I will mount the engine for a picture, but will have to bench run it before installing it for a final time. I am just unsure of what type of fuel tank to put on it. So I am figuring that out hopefully in the next day or so. I will try and get a picture in a little while if the clear is dry to handle.
NEW222
NEW222
Top Poster
Top Poster

Posts : 3892
Join date : 2011-08-13
Age : 45
Location : oakbank, mb

Back to top Go down

Ringmaster Jr Kit S5 - Page 3 Empty Re: Ringmaster Jr Kit S5

Post  Ken Cook Wed Apr 24, 2019 9:29 pm

I personally would use any 2 oz. tank. A standard vented tank will work just fine, just launch slightly rich. I like to cap the top and leave the bottom open as this prevents siphoning after fueling and also improves fuel draw.  Throughout the run, the engine is going to run leaner and leaner therefore you need to sneak up on the needle. Keeping it rich at first and if needed dial it in. I might also recommend that you short tank it initially. Just put a ounce in it and take a test flight to insure that there's no wing warps and the wings are level in level flight. A plane that is flying outboard tip high can be a handful for several minutes especially when the power cuts.

If you decide to use a uniflow style tank, insure that the uniflow pipe is in clean air. A engine mounted on a profile can create turbulent air entering the uniflow pipe. So you can extend the uniflow pipe with a piece of fuel tubing by laying it directly onto the cylinder head or you can drill a piece of tubing through the fuse and have it point directly into the airstream on the inboard side. You can join this through pipe to the uniflow pipe using a small piece of fuel tubing. One advantage of using a uniflow style tank is that you don't need to use uniflow all the time. If uniflow is used, the tank is filled through the uniflow pipe, the bottom vent is capped and must remain capped at all times other than fueling. If you choose to use it as standard vent, cap the uniflow pipe and leave the overflow open.

           One factor that complicates matters is vibration. If the fuel is foaming, uniflow isn't going to work. A inline fuel filter can prevent bubbles that generate running issues. This goes for any style tank, if it's vibrating then you have to eliminate it by either changing props, try a lighter pitch, or insuring that your engine is firmly mounted. Adding pads either phenolic or aluminum under the engine lugs can ascertain a good solid mount. Just for the record, a Fox .15 prefers a light prop such as woodie.
Ken Cook
Ken Cook
Top Poster
Top Poster

Posts : 5442
Join date : 2012-03-27
Location : pennsylvania

Back to top Go down

Ringmaster Jr Kit S5 - Page 3 Empty Re: Ringmaster Jr Kit S5

Post  NEW222 Wed Apr 24, 2019 10:26 pm

Ken, when you mention the following 'A standard vented tank will work just fine, just launch slightly rich. ' Does that apply to a plastic tank with just two lines? I am confused as this is my first plane using an engine like this. The tank on my air car just uses two lines, one to the carburetor for fuel, and the other to the nipple on the exhaust. If so, do I just hook up the fuel line and leave the other line open, pointed to the top of the tank? Thank you.
NEW222
NEW222
Top Poster
Top Poster

Posts : 3892
Join date : 2011-08-13
Age : 45
Location : oakbank, mb

Back to top Go down

Ringmaster Jr Kit S5 - Page 3 Empty Re: Ringmaster Jr Kit S5

Post  Cribbs74 Wed Apr 24, 2019 11:25 pm

An open vented tank is usually in reference to a metal tank, but the same principle applies with a plastic tank. You just don’t have to cap off the line as there is only one vent. You could run a third line for uniflow and the plastic tank will allow that as it has provisions for a third uniflow line.
Cribbs74
Cribbs74
Moderator

2022 Supporter

2023 Supporter

2024 Supporter

Posts : 11895
Join date : 2011-10-24
Age : 50
Location : Tuttle, OK

Back to top Go down

Ringmaster Jr Kit S5 - Page 3 Empty Re: Ringmaster Jr Kit S5

Post  NEW222 Wed Apr 24, 2019 11:44 pm

Thank you.
NEW222
NEW222
Top Poster
Top Poster

Posts : 3892
Join date : 2011-08-13
Age : 45
Location : oakbank, mb

Back to top Go down

Ringmaster Jr Kit S5 - Page 3 Empty Finished!!!!!!!!!!!!!!!!!!

Post  NEW222 Fri Apr 26, 2019 4:17 pm
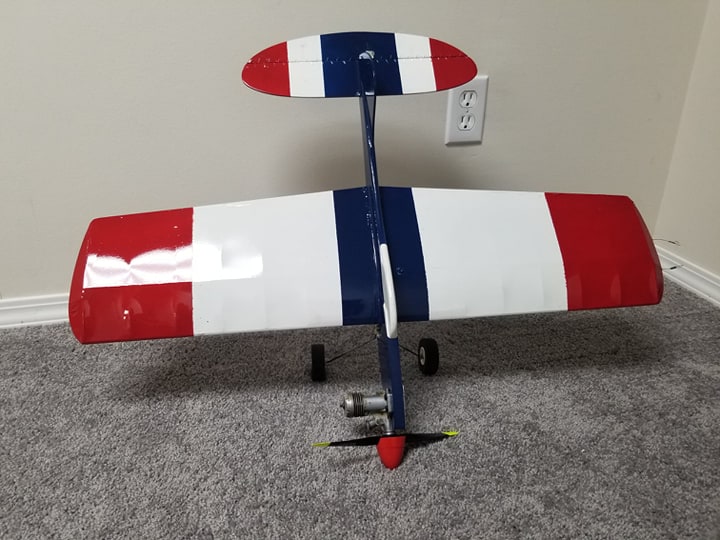
Without further ado.... Here it is all finished, Fox .15x engine mounted, and just needing a fuel tank that I may get tomorrow, or possibly have to build. But here it is finished.
Ringmaster Jr Kit S5 - Page 3 58420310
Ringmaster Jr Kit S5 - Page 3 58825810
NEW222
NEW222
Top Poster
Top Poster

Posts : 3892
Join date : 2011-08-13
Age : 45
Location : oakbank, mb

Back to top Go down

Ringmaster Jr Kit S5 - Page 3 Empty Re: Ringmaster Jr Kit S5

Post  akjgardner Fri Apr 26, 2019 6:16 pm

Hey Man, That looks Awesome
akjgardner
akjgardner
Diamond Member
Diamond Member

2023 Supporter

2024 Supporter

Posts : 1469
Join date : 2014-12-28
Age : 64
Location : Greensberg Indiana

Back to top Go down

Ringmaster Jr Kit S5 - Page 3 Empty Re: Ringmaster Jr Kit S5

Post  NEW222 Fri Apr 26, 2019 6:43 pm

Thank you.
NEW222
NEW222
Top Poster
Top Poster

Posts : 3892
Join date : 2011-08-13
Age : 45
Location : oakbank, mb

Back to top Go down

Ringmaster Jr Kit S5 - Page 3 Empty Re: Ringmaster Jr Kit S5

Post  TLAnderson Fri Apr 26, 2019 8:27 pm

Looks really good. Thumbs Up
TLAnderson
TLAnderson
Gold Member
Gold Member

Posts : 242
Join date : 2016-07-21
Location : Northern Wisconsin

Back to top Go down

Ringmaster Jr Kit S5 - Page 3 Empty Re: Ringmaster Jr Kit S5

Post  Marleysky Fri Apr 26, 2019 9:01 pm

You forgot to say....”Ta-dah”. Very Nice model.
Marleysky
Marleysky
Top Poster
Top Poster

2022 Supporter

Posts : 3618
Join date : 2014-09-28
Age : 71
Location : Grand Rapids, MI

Back to top Go down

Ringmaster Jr Kit S5 - Page 3 Empty Re: Ringmaster Jr Kit S5

Post  getback Sat Apr 27, 2019 8:01 am

Very Nice Chancey , i like the colors and placement . Good Fun !! Smoking
getback
getback
Top Poster
Top Poster

2022 Supporter

2023 Supporter

Posts : 10097
Join date : 2013-01-18
Age : 66
Location : julian , NC

Back to top Go down

Ringmaster Jr Kit S5 - Page 3 Empty Re: Ringmaster Jr Kit S5

Post  Sponsored content


Sponsored content


Back to top Go down

Page 3 of 4 Previous  1, 2, 3, 4  Next

Back to top

- Similar topics

 
Permissions in this forum:
You cannot reply to topics in this forum