

 Rules
Rules
Log in
Search
Latest topics
» How's the weather?by HalfaDave Today at 9:34 am
» Jim Walker Firebaby
by rsv1cox Today at 8:27 am
» Enya .09 II Questions
by sosam117 Today at 8:24 am
» music vids.. some of your favorites
by crankbndr Today at 8:03 am
» Draco Goes Flying, But Misses the Eclipse
by HalfaDave Yesterday at 9:59 pm
» A prototype Cox Reed-valve marine engine
by davidll1984 Yesterday at 9:15 pm
» Wen Mac .049 - Conditioning.
by MauricioB Yesterday at 12:21 pm
» Happy 53rd birthday Mauricio!!!
by MauricioB Yesterday at 11:47 am
» Testers Sprite engine swap
by Greenman38633 Yesterday at 10:57 am
» UV Restore of Yellowed Decals
by Levent Suberk Yesterday at 8:59 am
» 22mm 2-blade nylon marine prop and solid-shaft drive
by roddie Yesterday at 6:46 am
» Post edit??
by roddie Yesterday at 5:33 am
Cox Engine of The Month


CEF Traveling Engine


Win This Engine!

Live on Patrol


Custom made Cox engine with Kavan tank kit with sleeve throttle control
Page 1 of 1

Custom made Cox engine with Kavan tank kit with sleeve throttle control
![]() sosam117 Mon Aug 24, 2020 8:01 am
sosam117 Mon Aug 24, 2020 8:01 am
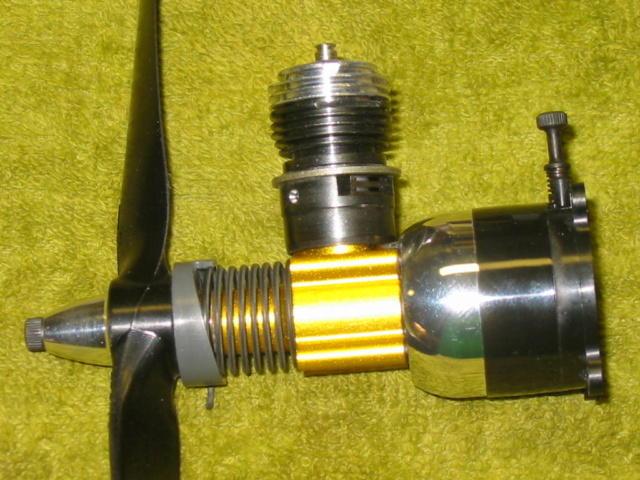
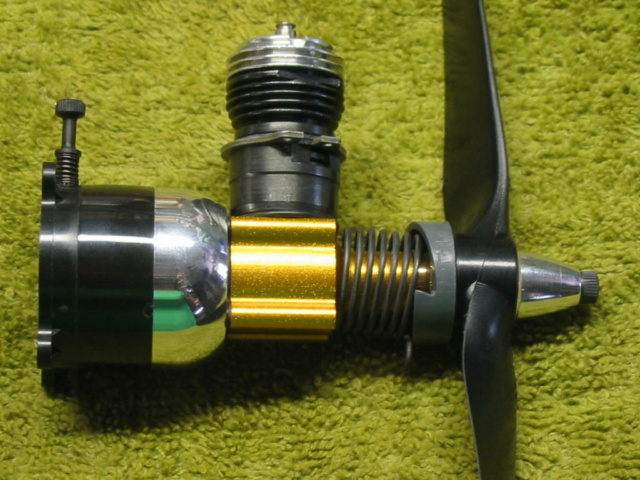
A custom made Cox engine with throttle sleeve control.
Baby Bee tank, high performance crank, Texaco back plate but the venturi hole enlarged (reamed) to .078 dia.
Fuel tank enlarged using the Kavan kit I purchased years ago from Hobby Lobby Int. in Tennessee.
I used gun bluing to blue the starter spring "black"
Prop is a Master Airscrew 7x4
Last thing was to shim the head for the correct port timing.
sosam117- Diamond Member

- Posts : 1275
Join date : 2016-03-23
Location : Suburb of Chicago, Illinois
Re: Custom made Cox engine with Kavan tank kit with sleeve throttle control
![]() Marleysky Mon Aug 24, 2020 9:03 am
Marleysky Mon Aug 24, 2020 9:03 am
Very nice looking combo! Are you gonna fly it in something or just display it?

Marleysky- Top Poster


Posts : 3618
Join date : 2014-09-28
Age : 71
Location : Grand Rapids, MI
Re: Custom made Cox engine with Kavan tank kit with sleeve throttle control
![]() sosam117 Mon Aug 24, 2020 9:59 am
sosam117 Mon Aug 24, 2020 9:59 am
Was made for a friend for a trade, along with a single cell lipo charger (Hitec -- I no longer used).
He knows how well I make custom engines.
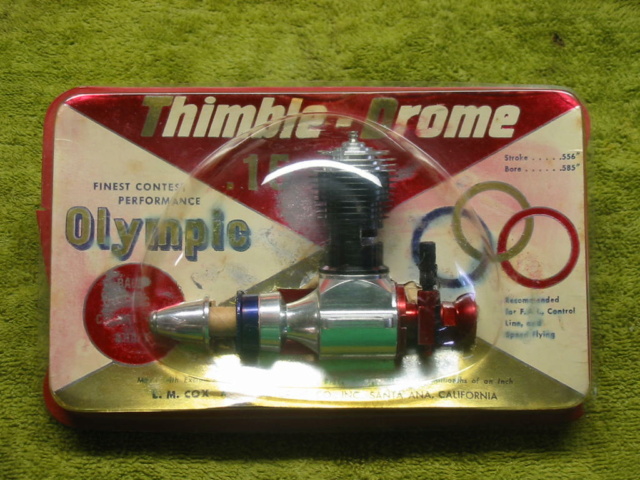
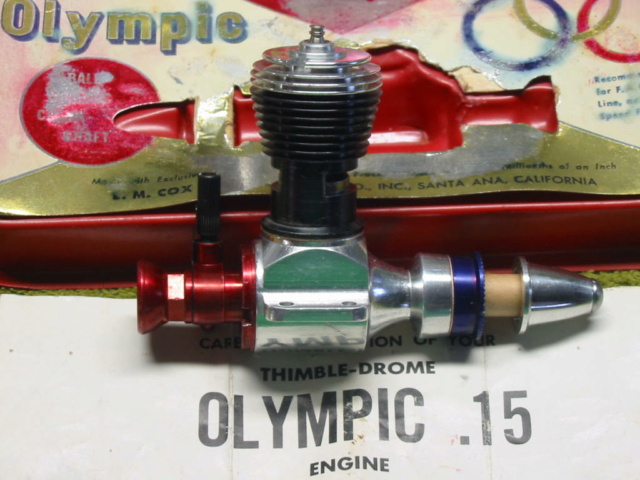
What I got for it was a Cox Thimble Drone .15 Olympic.
Also, in the deal was a Cox Tee Dee .09 ( in a jeweled case) gummed up and has a cracked plastic venturi.
And a Cox Tee Dee .010 missing back plate screws.
All three engines from the 1970s?
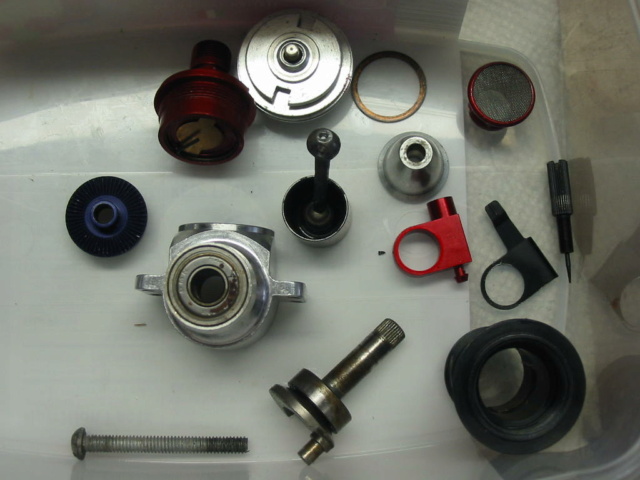
The .15 Olympic was run very little but had a problem.
The crank shaft didn't turn. I thought it was gummed up.
Problem was the ball bearings were rusted.
Ordered new bearings from Boca Bearings (better than original - ceramic balls for high temperatures and heavier loads - about $11.00 for each bearing).
Photo of torn down engine shows rust on the front bearing (also inside the bearing -- would not turn) and the back bearing was rusted to the crank.
Rebuilt the engine and reset the piston into the socket.
I made a piston reset tool years ago (.15 and .09 reset tools -- about 15 years) in a machine shop I worked at.
Had access to a furnace for heat treating, grinders, mills, etc.
Waiting on parts from Cox International and EX Model Engines for the Tee Dee .09 and Tee Dee .010 engines.
Rusted front and rear bearings --- not oiled after engine was run years ago?
Parts in tub have been ultrasonic cleaned.
Rebuilt Cox Thimble Drone .15 Olympic in original package ( the red outer sleeve was not photographed)
Olympic sitting on instruction manual out of package.
He knows how well I make custom engines.
What I got for it was a Cox Thimble Drone .15 Olympic.
Also, in the deal was a Cox Tee Dee .09 ( in a jeweled case) gummed up and has a cracked plastic venturi.
And a Cox Tee Dee .010 missing back plate screws.
All three engines from the 1970s?
The .15 Olympic was run very little but had a problem.
The crank shaft didn't turn. I thought it was gummed up.
Problem was the ball bearings were rusted.
Ordered new bearings from Boca Bearings (better than original - ceramic balls for high temperatures and heavier loads - about $11.00 for each bearing).
Photo of torn down engine shows rust on the front bearing (also inside the bearing -- would not turn) and the back bearing was rusted to the crank.
Rebuilt the engine and reset the piston into the socket.
I made a piston reset tool years ago (.15 and .09 reset tools -- about 15 years) in a machine shop I worked at.
Had access to a furnace for heat treating, grinders, mills, etc.
Waiting on parts from Cox International and EX Model Engines for the Tee Dee .09 and Tee Dee .010 engines.
Rusted front and rear bearings --- not oiled after engine was run years ago?
Parts in tub have been ultrasonic cleaned.
Rebuilt Cox Thimble Drone .15 Olympic in original package ( the red outer sleeve was not photographed)
Olympic sitting on instruction manual out of package.
sosam117- Diamond Member
- Posts : 1275
Join date : 2016-03-23
Location : Suburb of Chicago, Illinois
Re: Custom made Cox engine with Kavan tank kit with sleeve throttle control
![]() Iceberg Mon Aug 24, 2020 10:45 am
Iceberg Mon Aug 24, 2020 10:45 am
Hi Sosam
Nice looking motor with the Kavan tank extender. I was curious how many O-rings or Venturi gaskets did you use to seal it? I have a few of those tank extenders but I have a terrible time sealing the Venturi. Can you share your secret how you got it to work?
Thanks
Iceberg
Nice looking motor with the Kavan tank extender. I was curious how many O-rings or Venturi gaskets did you use to seal it? I have a few of those tank extenders but I have a terrible time sealing the Venturi. Can you share your secret how you got it to work?
Thanks
Iceberg

Iceberg- Gold Member

- Posts : 381
Join date : 2018-11-03
Location : Suva Fiji Islands
Re: Custom made Cox engine with Kavan tank kit with sleeve throttle control
![]() sosam117 Mon Aug 24, 2020 12:58 pm
sosam117 Mon Aug 24, 2020 12:58 pm
I make my own venturi gaskets out of medium size surgical tubing.
You can cut then to a size slightly thicker than the standard size gaskets that come with the kit.
All I do is insert a wooden dowel inside the surgical tubing now using a very sharp (new) Exacto knife.
Carefully roll the tubing across the table while the Exacto knife is cutting the tubing to the width I need for my venturi gasket.
When it is time to assemble the backplate, the Kavan extension section, and the Baby Bee tank.
I can feel the springy (spongy) feeling of the surgical gaskets and I can see about 1mm distance from the back plate/ Kavan extender / Baby Bee tank.
I hold the crank case in a rubber jawed vice (hobby 3rd hand type -- light clamping pressure) to help with the assembly.
1st is the crank case gasket, next is the plastic reed holder (but in this case, the reed is held by the spring reed holder), then the Baby Bee tank, then the Kavan venturi extension with the surgical gasket already applied ( I also put a small drop of light 3 in 1 oil on the gasket to help it stay in place.)
Now the Kavan outer tank extender. Make sure that you have the extender orientation the correct way!
I did a trial fit of this external ring, and it was undersized. It would not fit into the grooves of the Baby Bee tan nor the groove into the back plate.
To remedy the problem I placed the plastic ring into a pan of boiling water. the boiling water will do two things for me.
1st is it will soften up the plastic and 2nd will put the moisture back into the plastic making it less brittle ( I have done this on old plastic props with no problems.)
After removing the ring from the hot water quickly install the Baby Bee tank and the backplate to the Kavan plastic extender.
The plastic will be soft enough now to fit onto the mating parts. keep them together until the plastic ring coos back down to room temperature.
Last, with a dab (drop) of oil on the gasket (holding it there in the back plate) install the backplate to the Kavan ring.
With everything carefully aligned on the lightly clamped crank case and you can see a small space from Baby Bee tank / Kavan ring / backplate.
Now come the tough part (the screws). If your lucky enough, get one screw started (I start at the bottom left screw), next is the top right screw (just start this one as well), next is the bottom right screw (just start it!), last is the top left screw, just start this one as well.
Check to see if everything looks aligned up. Now just like you did to start the screws above screw them in, but not all the way, just a little at a time on each screw.
Keep doing it until you get all 4 screws tightened down together.
I know this might be a pain but every Kavan extender kit that I've done over the years I have never had problem when don this way. I have use (installed) seven Kavan kits ( this one will make # that I have purchased and installed from Hobby Lobby Int. over the years.
The surgical gaskets I have found to seal the air leaking problems. The Cox gaskets are not thick enough and most of the time the ones in the its are dried out and brittle.
The gaskets I make are about 1mm or so thick. I think the thick wall of the surgical tubing helps seal it as well?
You can cut then to a size slightly thicker than the standard size gaskets that come with the kit.
All I do is insert a wooden dowel inside the surgical tubing now using a very sharp (new) Exacto knife.
Carefully roll the tubing across the table while the Exacto knife is cutting the tubing to the width I need for my venturi gasket.
When it is time to assemble the backplate, the Kavan extension section, and the Baby Bee tank.
I can feel the springy (spongy) feeling of the surgical gaskets and I can see about 1mm distance from the back plate/ Kavan extender / Baby Bee tank.
I hold the crank case in a rubber jawed vice (hobby 3rd hand type -- light clamping pressure) to help with the assembly.
1st is the crank case gasket, next is the plastic reed holder (but in this case, the reed is held by the spring reed holder), then the Baby Bee tank, then the Kavan venturi extension with the surgical gasket already applied ( I also put a small drop of light 3 in 1 oil on the gasket to help it stay in place.)
Now the Kavan outer tank extender. Make sure that you have the extender orientation the correct way!
I did a trial fit of this external ring, and it was undersized. It would not fit into the grooves of the Baby Bee tan nor the groove into the back plate.
To remedy the problem I placed the plastic ring into a pan of boiling water. the boiling water will do two things for me.
1st is it will soften up the plastic and 2nd will put the moisture back into the plastic making it less brittle ( I have done this on old plastic props with no problems.)
After removing the ring from the hot water quickly install the Baby Bee tank and the backplate to the Kavan plastic extender.
The plastic will be soft enough now to fit onto the mating parts. keep them together until the plastic ring coos back down to room temperature.
Last, with a dab (drop) of oil on the gasket (holding it there in the back plate) install the backplate to the Kavan ring.
With everything carefully aligned on the lightly clamped crank case and you can see a small space from Baby Bee tank / Kavan ring / backplate.
Now come the tough part (the screws). If your lucky enough, get one screw started (I start at the bottom left screw), next is the top right screw (just start this one as well), next is the bottom right screw (just start it!), last is the top left screw, just start this one as well.
Check to see if everything looks aligned up. Now just like you did to start the screws above screw them in, but not all the way, just a little at a time on each screw.
Keep doing it until you get all 4 screws tightened down together.
I know this might be a pain but every Kavan extender kit that I've done over the years I have never had problem when don this way. I have use (installed) seven Kavan kits ( this one will make #
The surgical gaskets I have found to seal the air leaking problems. The Cox gaskets are not thick enough and most of the time the ones in the its are dried out and brittle.
The gaskets I make are about 1mm or so thick. I think the thick wall of the surgical tubing helps seal it as well?
sosam117- Diamond Member
- Posts : 1275
Join date : 2016-03-23
Location : Suburb of Chicago, Illinois
Re: Custom made Cox engine with Kavan tank kit with sleeve throttle control
![]() Iceberg Mon Aug 24, 2020 2:26 pm
Iceberg Mon Aug 24, 2020 2:26 pm
Appreciate the explanation! I've put 5 of these guys together sooner worked some didn't. I like your methodical steps. I calculate 10cc of fuel do should be good for another 45 seconds I think.
Ice
Ice
Iceberg- Gold Member
- Posts : 381
Join date : 2018-11-03
Location : Suva Fiji Islands
Re: Custom made Cox engine with Kavan tank kit with sleeve throttle control
![]() getback Tue Aug 25, 2020 4:54 am
getback Tue Aug 25, 2020 4:54 am
Nice looking engines Sosam117 You got a deal on that trade , Thanks for the explaining the tank extension installment / How long do you boil your older props? 

getback- Top Poster
-

Posts : 10097
Join date : 2013-01-18
Age : 66
Location : julian , NC
Re: Custom made Cox engine with Kavan tank kit with sleeve throttle control
![]() sosam117 Tue Aug 25, 2020 8:36 am
sosam117 Tue Aug 25, 2020 8:36 am
getback wrote:Nice looking engines Sosam117 You got a deal on that trade , Thanks for the explaining the tank extension installment / How long do you boil your older props?
I do my props like an egg. So, it's about 3 minutes (about) and I don't have plastic props throwing a blade (anymore)
Found out about the boiling the plastic props in the RC User Groups.
Also how to store them with water and a cool place in the zip lock bag to keep the moisture content high.
To keep them from getting brittle.
sosam117- Diamond Member
- Posts : 1275
Join date : 2016-03-23
Location : Suburb of Chicago, Illinois
Sponsored content
» Kavan Tank Extenders
» *Cox Engine of The Month* Submit your pictures! -November 2021-
» Throttle sleeve and fuel tank
» Throttle Sleeve, ACE OR COX Setup??
» How about an engine turned custom control line handle
» *Cox Engine of The Month* Submit your pictures! -November 2021-
» Throttle sleeve and fuel tank
» Throttle Sleeve, ACE OR COX Setup??
» How about an engine turned custom control line handle
Page 1 of 1
Permissions in this forum:
You cannot reply to topics in this forum