

 Rules
Rules
Log in
Search
Latest topics
» How's the weather?by HalfaDave Today at 12:02 pm
» Cox .35 and .40 in Nürnberg Toy Fair
by Levent Suberk Today at 11:57 am
» Wen Mac .049 - Conditioning.
by MauricioB Today at 11:39 am
» music vids.. some of your favorites
by HalfaDave Today at 11:23 am
» Enya .09 II Questions
by Surfer_kris Today at 10:59 am
» Jim Walker Firebaby
by rsv1cox Today at 8:27 am
» Draco Goes Flying, But Misses the Eclipse
by HalfaDave Yesterday at 9:59 pm
» A prototype Cox Reed-valve marine engine
by davidll1984 Yesterday at 9:15 pm
» Happy 53rd birthday Mauricio!!!
by MauricioB Yesterday at 11:47 am
» Testers Sprite engine swap
by Greenman38633 Yesterday at 10:57 am
» UV Restore of Yellowed Decals
by Levent Suberk Yesterday at 8:59 am
» 22mm 2-blade nylon marine prop and solid-shaft drive
by roddie Yesterday at 6:46 am
Cox Engine of The Month


CEF Traveling Engine


Win This Engine!

Live on Patrol


Enya Parts and information
Page 1 of 1

Enya Parts and information
![]() sosam117 Mon Sep 21, 2020 10:58 pm
sosam117 Mon Sep 21, 2020 10:58 pm
ffkiwi,
The engine mounts for the reed engines being either 4 holes or 2 holes really depend on the engine.
The 4 hole mount was for the 049 engines. The 2 hole mount was for the 06/08 engines.
I have lifted photos from a site that has the reed mounts.
The four hole mount is for the 049 engine.
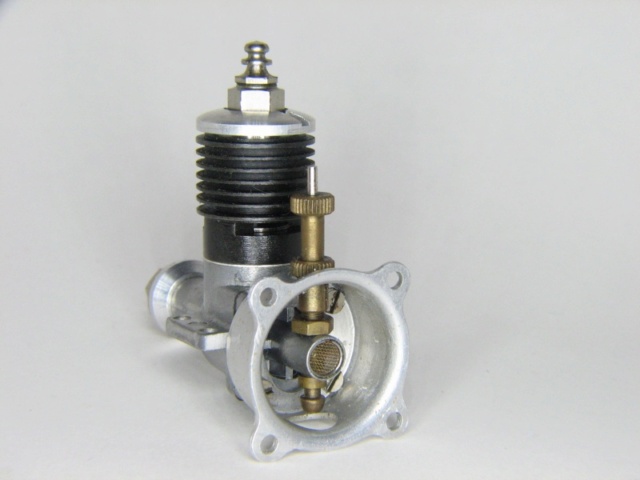
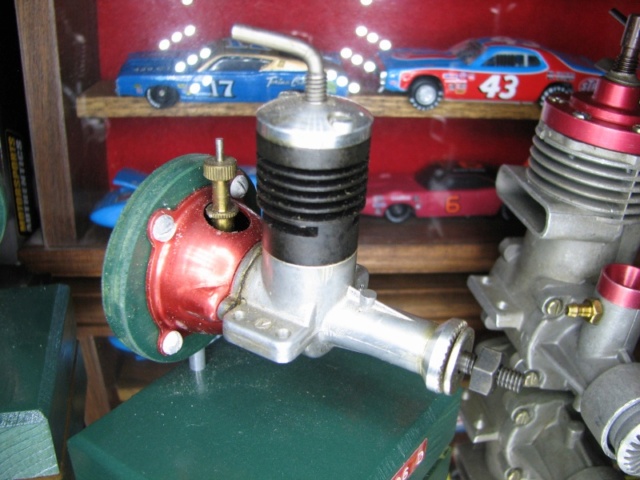
The one red mount is for a 06 reed and it has two holes to bolt to the back plate.
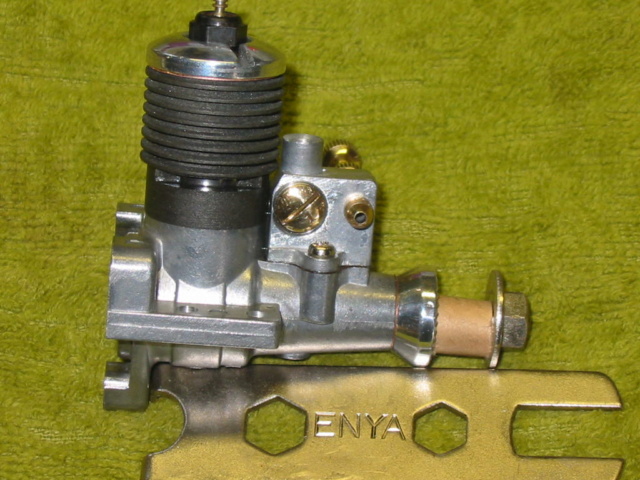
Here are photos of my Enya 10 glow.
As you notice the carb is not tilted forward, sot it is around 1970 -1980 version.
Later version had the carburetor tilted forward so a muffler could be installed.
This engine has the copper gasket installed under the cylinder head.


The engine mounts for the reed engines being either 4 holes or 2 holes really depend on the engine.
The 4 hole mount was for the 049 engines. The 2 hole mount was for the 06/08 engines.
I have lifted photos from a site that has the reed mounts.
The four hole mount is for the 049 engine.
The one red mount is for a 06 reed and it has two holes to bolt to the back plate.
Here are photos of my Enya 10 glow.
As you notice the carb is not tilted forward, sot it is around 1970 -1980 version.
Later version had the carburetor tilted forward so a muffler could be installed.
This engine has the copper gasket installed under the cylinder head.
Last edited by sosam117 on Tue Sep 22, 2020 11:36 pm; edited 1 time in total
sosam117- Diamond Member

- Posts : 1275
Join date : 2016-03-23
Location : Suburb of Chicago, Illinois
Re: Enya Parts and information
![]() ffkiwi Tue Sep 22, 2020 9:39 pm
ffkiwi Tue Sep 22, 2020 9:39 pm
As I thought and guessed in an earlier post-a different mount for the 049....has that one been stripped or were the 049 ones not colour anodised?.....I think if I get one I would anodise it red to match the 06 one..which is quite attractive. I have from time to time considered taking a mould of the 06 one and laying up a carbon-glass replica....I think there is enough material thickness in the original to make a glass-carbon copy feasible....it can join the list of back burner moulding projects of which I have far too many already...it does look from your pics that they are two entirely different units...and not produced from the same basic press form...
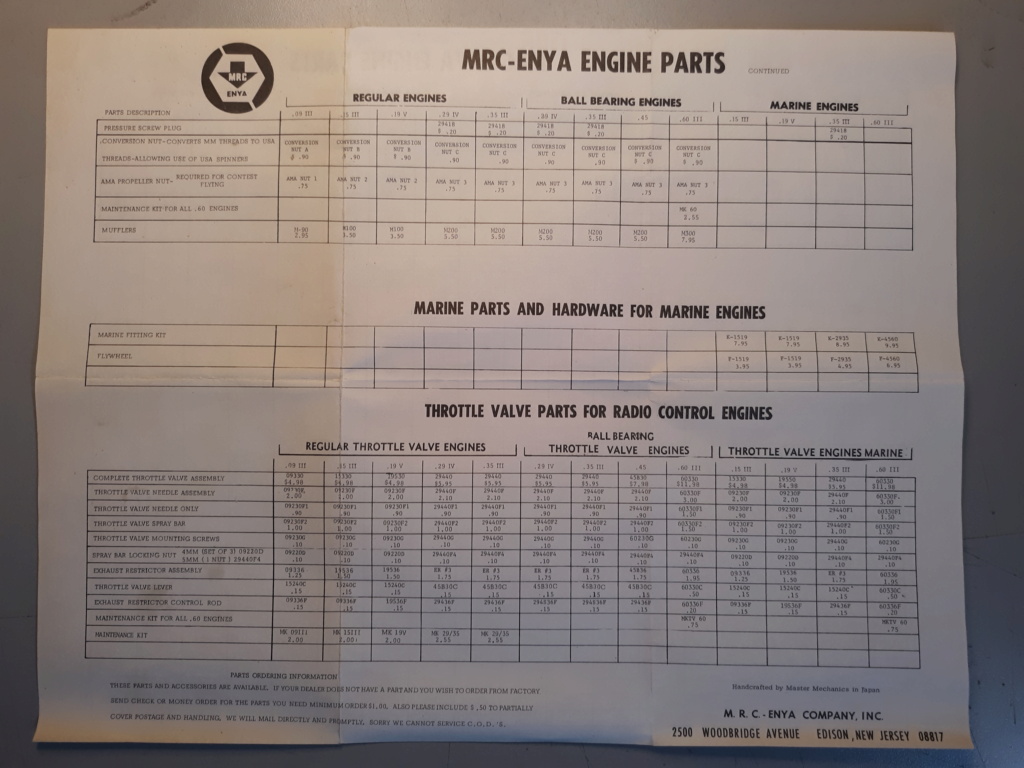
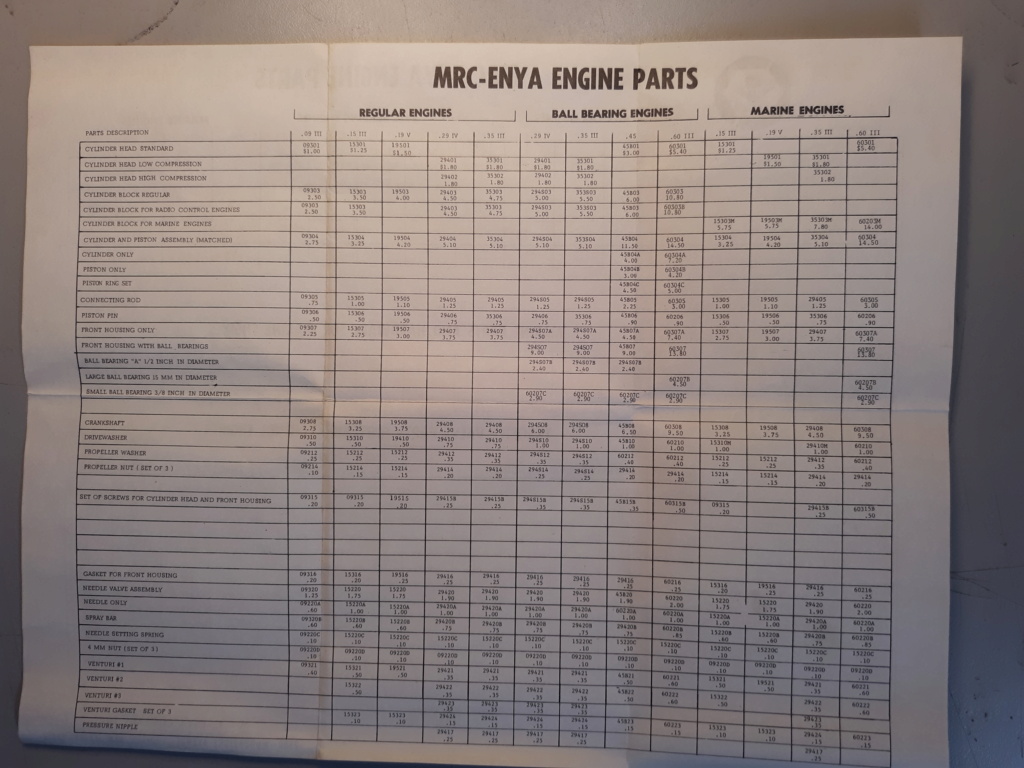
I need to find my NIB sample-and see if the leaflet has part numbers printed on it...its tucked away in a larger box of asstd engines somewhere I haven't managed to locate since my last housemove...
I need to find my NIB sample-and see if the leaflet has part numbers printed on it...its tucked away in a larger box of asstd engines somewhere I haven't managed to locate since my last housemove...

ffkiwi- Gold Member

- Posts : 356
Join date : 2018-07-10
Location : Wellington, NZ
Re: Enya Parts and information
![]() sosam117 Tue Sep 22, 2020 11:35 pm
sosam117 Tue Sep 22, 2020 11:35 pm
ffkiwi wrote:As I thought and guessed in an earlier post-a different mount for the 049....has that one been stripped or were the 049 ones not colour anodised?.....I think if I get one I would anodise it red to match the 06 one..which is quite attractive. I have from time to time considered taking a mould of the 06 one and laying up a carbon-glass replica....I think there is enough material thickness in the original to make a glass-carbon copy feasible....it can join the list of back burner moulding projects of which I have far too many already...it does look from your pics that they are two entirely different units...and not produced from the same basic press form...
I need to find my NIB sample-and see if the leaflet has part numbers printed on it...its tucked away in a larger box of asstd engines somewhere I haven't managed to locate since my last house move...
ffkiwi,
If you had access to a 3D printer, that would be the best way to make those mounts?
When I worked for Caterpillar, we had a 3d printer that we could make prototype parts with it.
Some parts we use a Romer arm with a Keyence Laser Tracker mounted to it.
First you open up the CAD folder to calibrate the laser and name the file that your going to make.
Then you place your part on the granite table, then you sweep your part with the laser tracker.
Go over to your computer and you will see a 3D view of your part.
You'll have to work with the CAD file to what you want. In this case, I would make the motor mount 1/8" thick (about 3mm).
So it would copy the one side like the other on the 3d printer. Just remember to add the holes in you CAD drawing.
You'll see the drop in the laser scan where the holes should be (from the outside scan).
Gee I miss working on that 3d printer ( my boss misses me doing that stuff -- only sent one person for the training - me).
I retired a year and a half later.
I was given 2 weeks training at Keyence in Itasca, Illinois (10 hour days -- Monday thru Friday)
I had a part time job using that knowledge to make carmates (floor mats) cargo mats and things like that for vehicles.
Covid-19 caused me to be get let go.
It was a good job. Go to the rental car agency, rent a new car (2019 or 2020 model).
Take it back to the factory, laser scan the floor mat area, trunk, fenders, windows, parts of the car to make the products for.
Then take the car back to the rental agency. Usually did two or three cars a day (or pickup trucks SUVs.)
(WeatherTech) Lasered floor mats for a perfect fit!
https://www.weathertech.com/floorliner-digitalfit/?utm_source=BingAds&utm_medium=CPC&utm_campaign=BrandDesktop&msclkid=261c03d5c25e1931b8845cbf0f7c16b0
sosam117- Diamond Member
- Posts : 1275
Join date : 2016-03-23
Location : Suburb of Chicago, Illinois
Re: Enya Parts and information
![]() ffkiwi Wed Sep 23, 2020 3:04 am
ffkiwi Wed Sep 23, 2020 3:04 am
Useful skillset you have there sosam117......we have a number of 3-D printer guys among our club members (Wellington MAC, NZ)-guess I ought to talk to them about feasibility...the scanning element would be the only aspect that might cause problems...I don't know how many-if any-have access to a 3D scanner...
ffkiwi
ffkiwi
ffkiwi- Gold Member
- Posts : 356
Join date : 2018-07-10
Location : Wellington, NZ
Re: Enya Parts and information
![]() gkamysz Wed Sep 23, 2020 7:49 am
gkamysz Wed Sep 23, 2020 7:49 am
The .049 mount is easily cut from metal. The .06 mount would need some more time if that shape is important. If plastic is acceptable, printing is the cheap and easy route today. Scanning isn't necessary if you can draw it in CAD.

gkamysz- Gold Member
- Posts : 377
Join date : 2018-02-22
Location : Chicagoland
Re: Enya Parts and information
![]() sosam117 Wed Sep 23, 2020 7:52 am
sosam117 Wed Sep 23, 2020 7:52 am
ffkiwi wrote:Useful skillset you have there sosam117......we have a number of 3-D printer guys among our club members (Wellington MAC, NZ)-guess I ought to talk to them about feasibility...the scanning element would be the only aspect that might cause problems...I don't know how many-if any-have access to a 3D scanner...
ffkiwi
The laser scanning makes it quick and easy.
If you have a CAD program, it can be done. It will just take a lot longer to do.
Every time Cat. got new equipment, they usually sent someone to get training for that equipment.
Years ago, everyone jumped at the chance to be the person to get trained.
Then Cat. changed their travel policy. If you were not traveling on your scheduled work hours, you didn't get paid.
So, if you work Monday - Friday 7:30am to 3:30pm and traveled to the training site during that time you got paid.
Most of the traveling time was on the weekend (time and a half on Saturday and double time on Sunday).
But that is not your regular scheduled time for work, so you didn't get any pay, you traveled for free (for the company - cost cutting).
I didn't care. It got me out and away from the plant to do something different and a new city to explore (on my own time.)
Cat. paid for the hotel, car (gas), and meals ( and any plane tickets/ train tickets).
In 2008 I spent a month of training at Taylor Hobson ( in Leicester England). They work 36 hours a week there! Done working at noon time on Friday (4 hours of work that day)
So from Friday at noon through the weekend I could do some sight seeing.
In 2012 I had two weeks in Hamburg (Germany for training). Again, I did sight seeing on the weekend.
My co-workers just didn't see that? If I'm not getting paid, I'm not going! Stupid?
Went to different Countries (England, Germany, France, Mexico, Japan, Norway, Chile) on Cat.'s money.
Didn't work the weekend -- no problem -- sight seeing!
I usually rented a car in the country I was in. My boss thought I was crazy?
The funniest time getting my rental was in France. A "just married" couple (from the U.S.) just filled out the paper work to get their rental car, went out to the lot to get the car. In the mean time I was getting my rental car (a Peugeot Turbo diesel -- sweet car!).
the young couple came back in and said we can't drive that car! There is no gear shift where is the P/D/N/L. there this stick on the floor? They couldn't drive a stick shift car! I had a small chuckle. You can get an automatic but have to ask for one.
The French agent muttered (shiftless Americans). I told the agent I'll take a manual transmission car!
After the training from Taylor Hobson, They offered me a job at their company as a service rep. for the U.S.
I was told that I have a good work attitude. I said thanks but maybe in five years? I'd have 30 years with Caterpillar in five years and I can retire with a full pension. They called my when those five years passed and asked if I still want to be the U.S. service rep. (I was surprised?) and I turned them down. I worked 5 more years for Cat. and retired (35 years).
sosam117- Diamond Member
- Posts : 1275
Join date : 2016-03-23
Location : Suburb of Chicago, Illinois
Re: Enya Parts and information
![]() GallopingGhostler Wed Sep 23, 2020 11:21 am
GallopingGhostler Wed Sep 23, 2020 11:21 am
Interesting work history, thanks for sharing, sosam117. You really did some neat stuff with interesting high tech methods.
In 1984, I was appointed by my manager as the CAD/CAM project engineer to develop the MIL-777D piping libraries on our then new 2nd generation Computervision system. I worked in Long Beach Naval Shipyard's Planning Department, Propulsion Piping Branch. I spent 4 years with DOD before returning to McDonnell Douglas.
Then, one could buy a CV system for $120k (inflation, now $300k), which included a color workstation, 3 black and white stations, 36" electrostatic plotter and a DEC VT100 text terminal. Yet this was considered cost effective over the previous McDonnell Douglas McAuto CAD mainframe based system the shipyard previously leased.
I got to go to all of the CAD training. Even could model 3D stuff. Spent a year working in the industrial engineering department working for the Air Force at now closed McClellan AFB in Sacramento, CA, at their air refitting facility (sorry, using Navy terms ). I was asked to show how they could set up a hangar with an F-111 on display for an official ceremony with seats for 100 important dignitaries. I quickly went to work on their CV system, did an isometric (3D) drawing with hidden line removal showing chairs, stands, an aircraft and walls of the hangar projected. Did it in several days.
My training enabled me to do this, I knew how to quickly create entities and clone them.
To my surprise, my supervisor told me when he came back from his upper manager presentation, comment received was that the only thing I did was play on the CAD system.
Tens of thousand dollars of software (CV was easier to use than Autocad!) plus training, and I get a negative dig for doing an excellent job. (You may wonder why I returned to McDonnell Douglas and stayed until their downturn.) Those Dilbert cartoons are true!


In 1984, I was appointed by my manager as the CAD/CAM project engineer to develop the MIL-777D piping libraries on our then new 2nd generation Computervision system. I worked in Long Beach Naval Shipyard's Planning Department, Propulsion Piping Branch. I spent 4 years with DOD before returning to McDonnell Douglas.
Then, one could buy a CV system for $120k (inflation, now $300k), which included a color workstation, 3 black and white stations, 36" electrostatic plotter and a DEC VT100 text terminal. Yet this was considered cost effective over the previous McDonnell Douglas McAuto CAD mainframe based system the shipyard previously leased.
I got to go to all of the CAD training. Even could model 3D stuff. Spent a year working in the industrial engineering department working for the Air Force at now closed McClellan AFB in Sacramento, CA, at their air refitting facility (sorry, using Navy terms
My training enabled me to do this, I knew how to quickly create entities and clone them.
To my surprise, my supervisor told me when he came back from his upper manager presentation, comment received was that the only thing I did was play on the CAD system.
Tens of thousand dollars of software (CV was easier to use than Autocad!) plus training, and I get a negative dig for doing an excellent job. (You may wonder why I returned to McDonnell Douglas and stayed until their downturn.) Those Dilbert cartoons are true!

GallopingGhostler- Top Poster


Posts : 5278
Join date : 2013-07-13
Age : 70
Location : Clovis NM or NFL KC Chiefs
Re: Enya Parts and information
![]() sosam117 Wed Sep 23, 2020 1:06 pm
sosam117 Wed Sep 23, 2020 1:06 pm
Yep,
I had a 8.5x11 inch picture hanging in my cubical.
It was a photo if Albert Einstein and his quote on it that said "Smart technology breads stupid people".
And another sign that had "Good" "Fast" "Cheap"
If you want it Good, it won't be fast or cheap.
If you want it Fast, it wont be good or cheap.
If you want it Cheap, it won't be good or fast.
If you took the time to read this (good)
You took time to read it (not fast)
Printed out on this piece of colored paper (not cheap)
I have my priorities.
Get it, Got it, GOOD!
sosam117- Diamond Member
- Posts : 1275
Join date : 2016-03-23
Location : Suburb of Chicago, Illinois
Re: Enya Parts and information
![]() sosam117 Thu Sep 24, 2020 7:32 am
sosam117 Thu Sep 24, 2020 7:32 am
I just purchased the two diesels (Ultra 11CXD with mufflers) that Ken Enya had the other day (09/21/20).
From his website.
Just got an update from Ken that it was delayed.
Shipment of my order will be delayed by a month to month and a half.
Looked on his website and now it has it where the Ultra 11CXD engines are "sold out".
I guess I got the last of the diesel engines?
Also ordered two of the glow Ultra 11CX and mufflers, which has the same delay time.
I guess that Ken has to build them? Though it seems he still has these available on his website?
Maybe I'll pick up "two" 15CX engines (before they're gone?)
sosam117- Diamond Member
- Posts : 1275
Join date : 2016-03-23
Location : Suburb of Chicago, Illinois
Re: Enya Parts and information
![]() roddie Sat Feb 06, 2021 3:15 pm
roddie Sat Feb 06, 2021 3:15 pm
I took a few photos of the literature and box of the Enya .19V (4006?) given to me by my Uncle Vin.. 30+ years ago.
This is the box it came in..

and the familiar disintegrated foam liner.
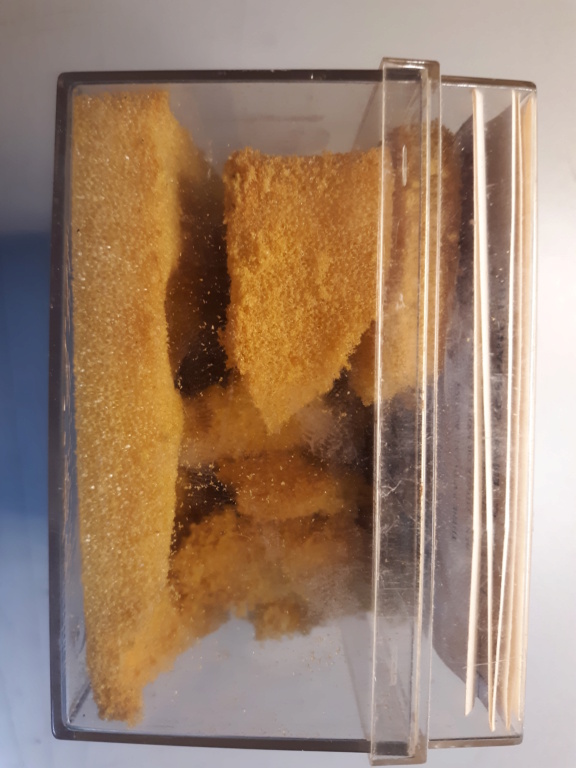
The engine is packed-away with others that were family hand-me-downs.. and photos of it are archived on a drive that I can't access via this workstation. (rolls eyes..)


This is the box it came in..

and the familiar disintegrated foam liner.

The engine is packed-away with others that were family hand-me-downs.. and photos of it are archived on a drive that I can't access via this workstation. (rolls eyes..)

roddie- Top Poster
- Posts : 8234
Join date : 2013-07-17
Age : 64
Location : N. Smithfield, Rhode Island -

Re: Enya Parts and information
![]() sosam117 Sun Feb 07, 2021 7:34 am
sosam117 Sun Feb 07, 2021 7:34 am
First thing I would do is remove the engine from that disintegrating foam.
Next check the engine over to see (and make sure) that none of the foam has gotten into the intake (carb) or exhaust port.
Then remove what is left of the foam out of the plastic box.
Now look over the engine. If it has a glow plug installed, remove it (with a glow plug wrench).
With the glow plug removed, it will be easier to check to see "if" the engine crank can turn?
Install a propeller on the front of the engine and try to turn it. Does it turn?
If it doesn't turn, put 2-3 drops of transmission oil into the glow plug hole of and one in the carburetor.
Next heat the engine up (while wearing gloves) until it gets warm and then see if the engine crankshaft will now turn (turning the prop.
Turn the prop several times to get the transmission oil worked through the engine to loosen up the "old" engine preservative oil ( or the old caster oil?)
When that has bee done, place the engine in a zip-lock bag, place it back into the plastic box and use "plain" paper to wrap around inside the box for storage.
That is how I store my engines. (if I didn't completely tear them down for a good cleaning).
sosam117- Diamond Member
- Posts : 1275
Join date : 2016-03-23
Location : Suburb of Chicago, Illinois
Re: Enya Parts and information
![]() Ken Cook Sun Feb 07, 2021 9:13 am
Ken Cook Sun Feb 07, 2021 9:13 am
I keep a fair amount of parts for my Enema collection. From the .09-.60. Screws are the biggest problems and having the proper JIS screwdrivers are a must have. The Enema uses a bolt on front end, if those screws come loose, the engine just stops. Imperative to keep that tight and sealed. Most of the time, Enya didn't use gaskets. Permatex anaerobic gasket maker works superb here. It's not a silicone rtv. It looks like red cake icing, the type used for writing happy birthday and such on cakes. It cures in the absence of oxygen, therefore, it only cures where it's needed to seal and it's service removeable and comes directly off when needed. RTV's can get into threads and cause a whole other problem. RTV not properly removed can tear the threads right out. Engines that have been sitting more than likely have the rod to the wrist pin connection glued together. This absolutely needs to be worked free as running it can do more harm then good. This requires the nose to be removed . If you need to remove it, don't just unscrew it and pull it apart. Pour a light machine oil or air tool oil around the perimeter where the gasket is, Remove all screws but reinsert one back into the nose just snug. Heat until the oil is smoking and give the case a twist rather than a pull.
I keep all my parts in these Stanley organizers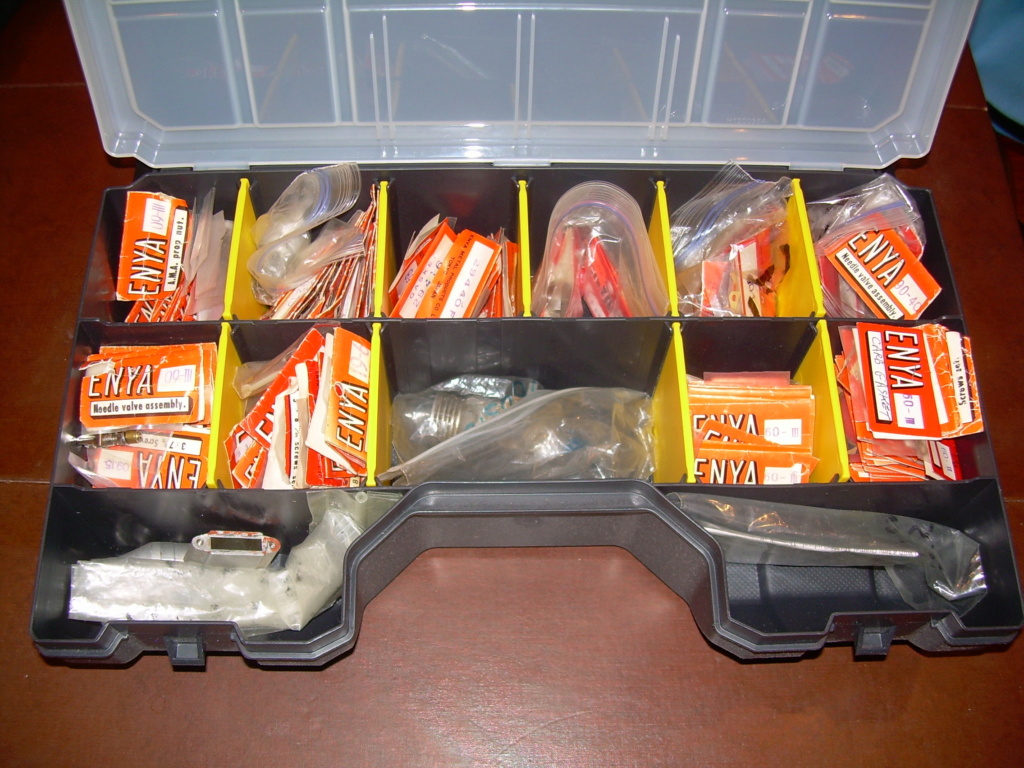 Enema parts on one side and OS on the other. I purchased all of these parts over the past years from various swap meets. MRC in the 70's was extremely problematic to get parts from. Everything was pony express as most hobby shops were not supplying parts for foreign engines. In the late 90's, Enya reissued the 5224. This inspired many including myself to buy one. I bought it for nostalgia vs using it. However, this generated enough interest and those in the control line community achieved a real benefit. Part availability increased 10 fold. Today, one can purchase parts easier for almost any Enya aside from the early mag cased versions.
I keep all my parts in these Stanley organizers
Enema parts on one side and OS on the other. I purchased all of these parts over the past years from various swap meets. MRC in the 70's was extremely problematic to get parts from. Everything was pony express as most hobby shops were not supplying parts for foreign engines. In the late 90's, Enya reissued the 5224. This inspired many including myself to buy one. I bought it for nostalgia vs using it. However, this generated enough interest and those in the control line community achieved a real benefit. Part availability increased 10 fold. Today, one can purchase parts easier for almost any Enya aside from the early mag cased versions. 
Ken Cook- Top Poster
- Posts : 5442
Join date : 2012-03-27
Location : pennsylvania
Enya 049/ 06/ 08 and .10 throttle valve translation
![]() sosam117 Sun Feb 07, 2021 10:18 am
sosam117 Sun Feb 07, 2021 10:18 am
I had a friend that cleaned an Enya .08-II T.V. and was having problems with the engine running after he reassembled it.
At idle the engine ran fine. When he opened it up to full throttle the engine stopped?
What he didn't know that he had the throttle barrel backwards.
Below is a diagram from one of my "Japanese" Enya .06-II engine's instruction manual.
I have not seen this part of the manual in the engines that I purchased here in the USA?
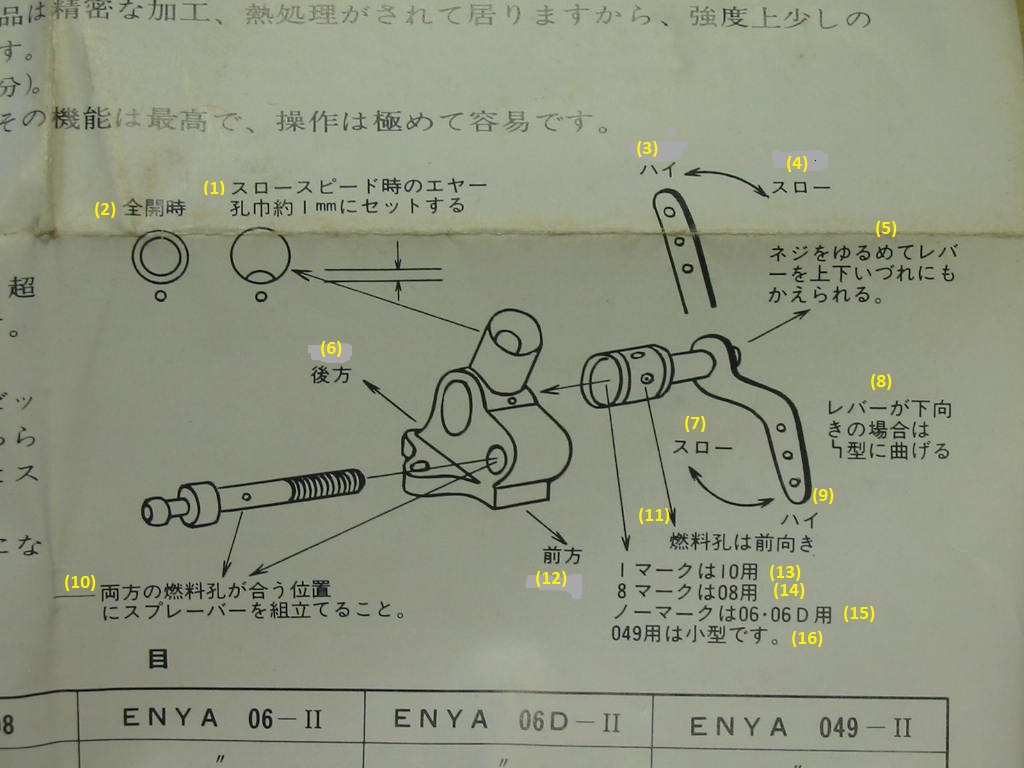
I have numbered the Japanese wording and translated to English.
see translation below:
1) Set the air hole width at slow speed to approximately 1 mm
2) When fully opened
3)High
4) Slow (throw)
5) Unscrew the screw to lift the lever.
6) Back
7) Slow (throw)
8.) If the lever is facing down, bend it into a “Y” form
9) High
10) Assemble the spray bar at the place where both fuel holes fit.
11) Fuel hole facing forward
12) Front
13) Mark is for 10
14) The mark is for 08
15) No mark is for 06-06D
16) For 049 is a small type.
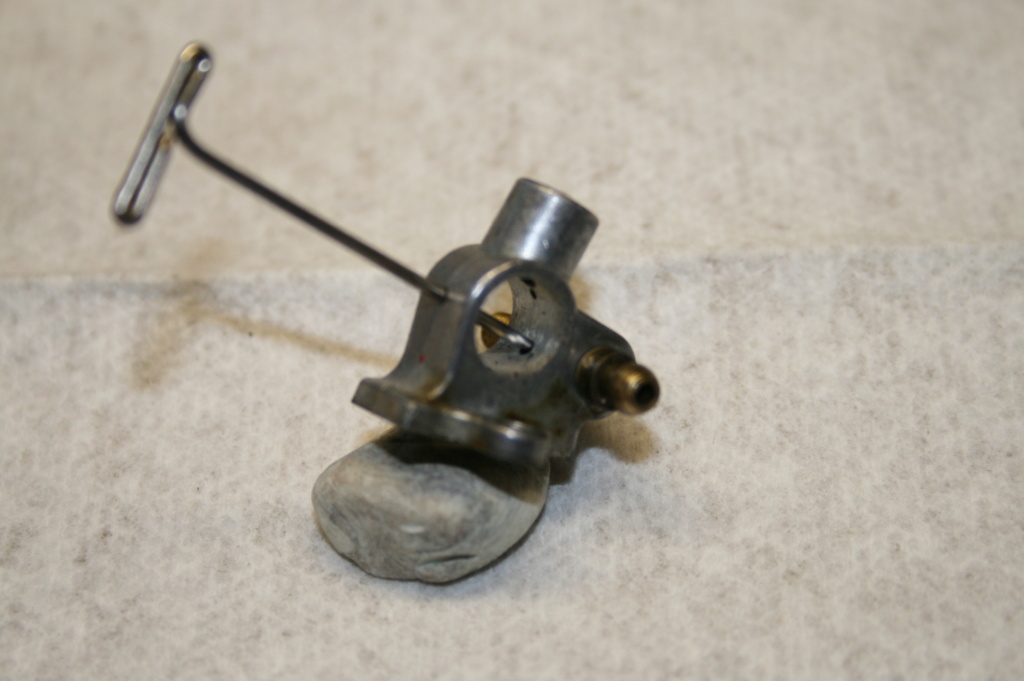
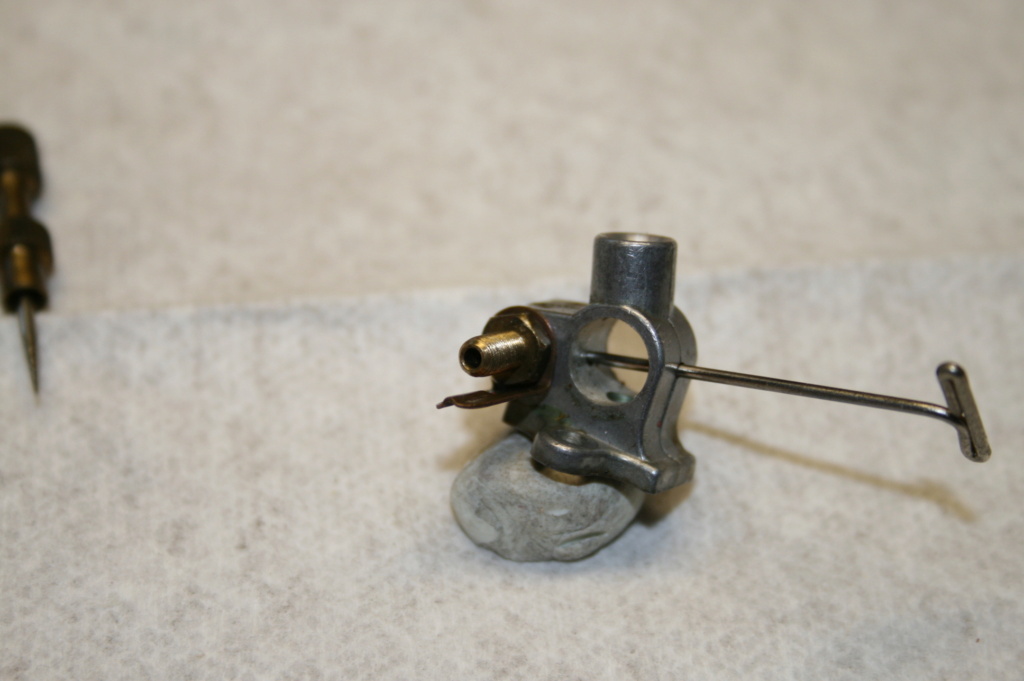
With the "old" spray bar, it was really important to line up the hole in the spray bar to the hole in the venturi housing.
Now with the newer spray bar, it is not as important.
see photo below of the old and new spray bar:

How to line up the "old" spray bar, there was a hole on the backside of the venturi.
What you did was to use a small pin through that hole to the front hole in the venturi to the hole in the spray bar.
see photo below for venturi to spray bar alignment on the "old" spray bar design:
At idle the engine ran fine. When he opened it up to full throttle the engine stopped?
What he didn't know that he had the throttle barrel backwards.
Below is a diagram from one of my "Japanese" Enya .06-II engine's instruction manual.
I have not seen this part of the manual in the engines that I purchased here in the USA?
I have numbered the Japanese wording and translated to English.
see translation below:
1) Set the air hole width at slow speed to approximately 1 mm
2) When fully opened
3)High
4) Slow (throw)
5) Unscrew the screw to lift the lever.
6) Back
7) Slow (throw)
8.) If the lever is facing down, bend it into a “Y” form
9) High
10) Assemble the spray bar at the place where both fuel holes fit.
11) Fuel hole facing forward
12) Front
13) Mark is for 10
14) The mark is for 08
15) No mark is for 06-06D
16) For 049 is a small type.
With the "old" spray bar, it was really important to line up the hole in the spray bar to the hole in the venturi housing.
Now with the newer spray bar, it is not as important.
see photo below of the old and new spray bar:
How to line up the "old" spray bar, there was a hole on the backside of the venturi.
What you did was to use a small pin through that hole to the front hole in the venturi to the hole in the spray bar.
see photo below for venturi to spray bar alignment on the "old" spray bar design:
sosam117- Diamond Member
- Posts : 1275
Join date : 2016-03-23
Location : Suburb of Chicago, Illinois
Re: Enya Parts and information
![]() roddie Sun Feb 07, 2021 6:19 pm
roddie Sun Feb 07, 2021 6:19 pm
sosam117 wrote:First thing I would do is remove the engine from that disintegrating foam.
Next check the engine over to see (and make sure) that none of the foam has gotten into the intake (carb) or exhaust port.
Then remove what is left of the foam out of the plastic box.
Now look over the engine. If it has a glow plug installed, remove it (with a glow plug wrench).
With the glow plug removed, it will be easier to check to see "if" the engine crank can turn?
Install a propeller on the front of the engine and try to turn it. Does it turn?
If it doesn't turn, put 2-3 drops of transmission oil into the glow plug hole of and one in the carburetor.
Next heat the engine up (while wearing gloves) until it gets warm and then see if the engine crankshaft will now turn (turning the prop.
Turn the prop several times to get the transmission oil worked through the engine to loosen up the "old" engine preservative oil ( or the old caster oil?)
When that has bee done, place the engine in a zip-lock bag, place it back into the plastic box and use "plain" paper to wrap around inside the box for storage.
That is how I store my engines. (if I didn't completely tear them down for a good cleaning).
This engine has been stored in a similar manner in which you describe. The "box" is more of a keepsake.. of that era.
Reading-through this thread.. I should source the JIS (Japanese Industrial Standard) screwdrivers that Ken mentioned.. as well as any replacement screws for my engine. Ken had mentioned the benefits of anaerobic gasket-sealant for model engines years ago I remember.
roddie- Top Poster
- Posts : 8234
Join date : 2013-07-17
Age : 64
Location : N. Smithfield, Rhode Island -
Re: Enya Parts and information
![]() sosam117 Mon Feb 08, 2021 6:38 am
sosam117 Mon Feb 08, 2021 6:38 am
roddie wrote:sosam117 wrote:First thing I would do is remove the engine from that disintegrating foam.
Next check the engine over to see (and make sure) that none of the foam has gotten into the intake (carb) or exhaust port.
Then remove what is left of the foam out of the plastic box.
Now look over the engine. If it has a glow plug installed, remove it (with a glow plug wrench).
With the glow plug removed, it will be easier to check to see "if" the engine crank can turn?
Install a propeller on the front of the engine and try to turn it. Does it turn?
If it doesn't turn, put 2-3 drops of transmission oil into the glow plug hole of and one in the carburetor.
Next heat the engine up (while wearing gloves) until it gets warm and then see if the engine crankshaft will now turn (turning the prop.
Turn the prop several times to get the transmission oil worked through the engine to loosen up the "old" engine preservative oil ( or the old caster oil?)
When that has bee done, place the engine in a zip-lock bag, place it back into the plastic box and use "plain" paper to wrap around inside the box for storage.
That is how I store my engines. (if I didn't completely tear them down for a good cleaning).
This engine has been stored in a similar manner in which you describe. The "box" is more of a keepsake.. of that era.
Reading-through this thread.. I should source the JIS (Japanese Industrial Standard) screwdrivers that Ken mentioned.. as well as any replacement screws for my engine. Ken had mentioned the benefits of anaerobic gasket-sealant for model engines years ago I remember.
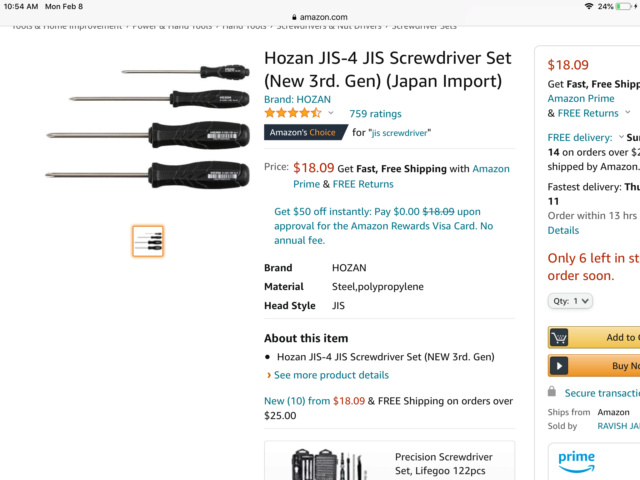
Yes, It is good to have the JIS (Japanese Industrial Standard) screwdrivers, besides the usual Philips head screw drivers.
My JIS screw drivers have black handles. I porposley did that so I know the difference from them and the std. Philips screw drivers.
When you try a Philips screw driver in a JIS screw, you can see the difference and how easy you could strip the head out.
Many people don't know the difference between the JIS screws and the std. Philips head screw.
You can see that when you see the head buggered up.
If I can, I sometimes swap out the JIS screws to Allen (cap) head screws.
If an item is coming from "Asia" they are all using the JIS standard.
It's a pain in the ass, but I use the JIS screw drivers more that the std. Philips screw drivers anymore.
Just make sure you pay for a "good" set of JIS screw drivers and not a cheap set.
sosam117- Diamond Member
- Posts : 1275
Join date : 2016-03-23
Location : Suburb of Chicago, Illinois
Re: Enya Parts and information
![]() Marleysky Mon Feb 08, 2021 10:04 am
Marleysky Mon Feb 08, 2021 10:04 am
After buggering the heads of a number screws on engines then reading a thread here, I ordered a set of JIS screwdrivers. Oh my what a difference in gripping power they have over the shelf Craftsman or Stanley sets I have. Well worth the money if you’re gonna play with Japanese precision engines, or most any imported product.

Marleysky- Top Poster

Posts : 3618
Join date : 2014-09-28
Age : 71
Location : Grand Rapids, MI
Re: Enya Parts and information
![]() sosam117 Mon Feb 08, 2021 12:36 pm
sosam117 Mon Feb 08, 2021 12:36 pm
Marleysky wrote:After buggering the heads of a number screws on engines then reading a thread here, I ordered a set of JIS screwdrivers. Oh my what a difference in gripping power they have over the shelf Craftsman or Stanley sets I have. Well worth the money if you’re gonna play with Japanese precision engines, or most any imported product.
That is a similar set that I have but mine have a tempered (hardened) tip ( made by a German company)
sosam117- Diamond Member
- Posts : 1275
Join date : 2016-03-23
Location : Suburb of Chicago, Illinois
Re: Enya Parts and information
![]() GallopingGhostler Tue Feb 09, 2021 12:26 am
GallopingGhostler Tue Feb 09, 2021 12:26 am
I went with the Japanese made Vessel J.I.S. screwdriver set I bought on Amazon 4 years ago, $16 with free shipping.
amazon.com - Vessel-220w Screw Driver Set, #B00E55DL4I
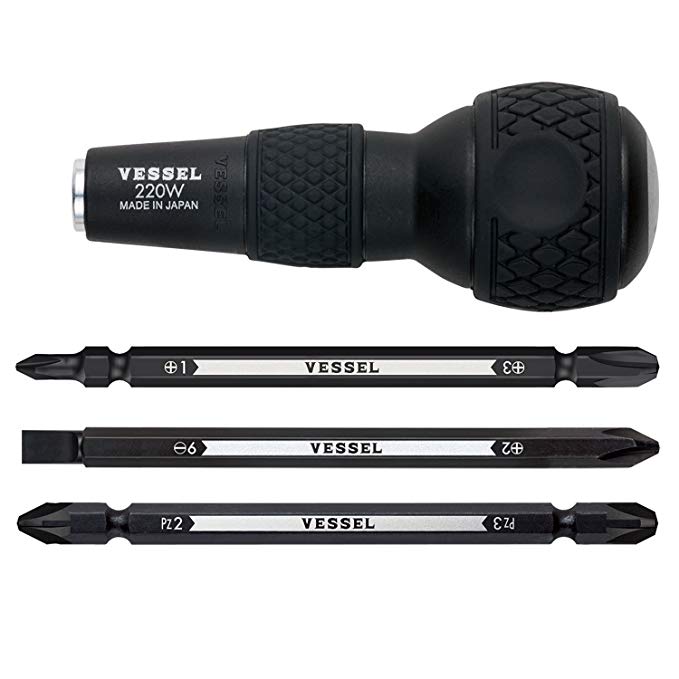
Full description is in: https://www.vesseltools.com/handtools/screwdrivers/ballgrip/220w-3-detail
I've found these useful on Japanese manufactured model airplane engines to motorcycles.
Speaking of chewed up Phillips screw heads on American engines, I've found the metallurgy used is very mild carbon steel, which deforms easily, doesn't take much to ruin screw heads. I agree with the suggestion to use hardened stainless or black socket head screws. They are much easier to loosen and don't get chewed up like the softer Phillips.
amazon.com - Vessel-220w Screw Driver Set, #B00E55DL4I
Full description is in: https://www.vesseltools.com/handtools/screwdrivers/ballgrip/220w-3-detail
I've found these useful on Japanese manufactured model airplane engines to motorcycles.
Speaking of chewed up Phillips screw heads on American engines, I've found the metallurgy used is very mild carbon steel, which deforms easily, doesn't take much to ruin screw heads. I agree with the suggestion to use hardened stainless or black socket head screws. They are much easier to loosen and don't get chewed up like the softer Phillips.
GallopingGhostler- Top Poster
-
Posts : 5278
Join date : 2013-07-13
Age : 70
Location : Clovis NM or NFL KC Chiefs
» Large parts ordered from Ken Enya (before Christmas)
» *** UPDATE *** Received my Enya parts order --- NOT EXACTLY ENYA'S TOP QUALITY?
» Enya Parts
» Most expensive Enya in my collection -- Enya 60XLF -GM- SB ring Rear Exhaust
» Vintage Tiger muffler/silencer for the Enya .09 or Enya .09-II engine.
» *** UPDATE *** Received my Enya parts order --- NOT EXACTLY ENYA'S TOP QUALITY?
» Enya Parts
» Most expensive Enya in my collection -- Enya 60XLF -GM- SB ring Rear Exhaust
» Vintage Tiger muffler/silencer for the Enya .09 or Enya .09-II engine.
Page 1 of 1
Permissions in this forum:
You cannot reply to topics in this forum