Log in
Search
Latest topics
» Jim Walker Firebaby by rsv1cox Today at 8:27 am
» Enya .09 II Questions
by sosam117 Today at 8:24 am
» music vids.. some of your favorites
by crankbndr Today at 8:03 am
» Draco Goes Flying, But Misses the Eclipse
by HalfaDave Yesterday at 9:59 pm
» A prototype Cox Reed-valve marine engine
by davidll1984 Yesterday at 9:15 pm
» Wen Mac .049 - Conditioning.
by MauricioB Yesterday at 12:21 pm
» Happy 53rd birthday Mauricio!!!
by MauricioB Yesterday at 11:47 am
» Testers Sprite engine swap
by Greenman38633 Yesterday at 10:57 am
» UV Restore of Yellowed Decals
by Levent Suberk Yesterday at 8:59 am
» 22mm 2-blade nylon marine prop and solid-shaft drive
by roddie Yesterday at 6:46 am
» Post edit??
by roddie Yesterday at 5:33 am
» Original Super Power fuel formula?
by HalfaDave Wed Apr 17, 2024 7:28 pm
Cox Engine of The Month
Keil Kraft Phantom Scratch build from start to flying.
Page 5 of 5
Page 5 of 5 •  1, 2, 3, 4, 5
 Re: Keil Kraft Phantom Scratch build from start to flying.
Woody wrote:Jim you have a point.944_Jim wrote:Woody,
Before you toss that Medallion .09, check the spraybar carefully. I picked up a few larger Medallions that failed to operate as expected. On tear-down I discovered they had RC spraybars. These sparybars spin in the red front case body to open/close the orifice in the venturi. Without related RC brackets/muffler, the spraybar is left to spin freely, and in my case(s), closed the venturi enough to prevent running on more than a prime. Mine also have sloppy conrod big-ends and slightly loose balljoints. I mention the last piece only to say these engines will run in worse shape than we prefer. Don't give up on it yet!
I got the engine to fire when primed bur would only do a fart.
Then I checked the spray bar and the hole was facing up and not down into the engine like it should do.
I connected a piece if fuel tubing to it and blew down it whilst screwing in the needle valve to check it worked okay open and closed.
It worked okay so I removed it and inserted it the correct way around.
I read that their should be a circlip to hold it in place?
Mine had no circlip but popped into place.
Once in itt could not rotate due to the hex nut.
I tried again with it and I got a three second run.
It would seem there is is fuel starvation for it to stop.
Is it the cirrect needle valve/ spray bar? Don,t know.
The prop is a 7x6 so not too large.
I notice when the engine gets too warm with the glow plug consistantly on, the engine is ecen harder to fire.
I have the glow plug glowing bright red but bang on 1.5 V measured across the plug with a DVM.
So it will run when cold for three seconds.
So it can run!
I take the point about cox engines still able to run even when in bad shape.
Its fuel...I am certain.
Just had a thunk!!!!
When I stripped it I noticed on the inside of the crankcase there us a semi circular dished out cavity for fuel entry when lined up with the piston cylinder which akso has a ground away dished out port.
I think they call this Schneurle porting?
Is that right! Is the medallion 09 schnearle ported?
Well any way ...to my point...
The cylinder seems to be affixed some how to the ouside finned housing.
This finned housing screws into the crankcase and it seems that to line up the crankcase port and piston cylinder port , one has to rely on the screw thread?
Thats a bit iffy?
I reckon the piston liner should be removable and held in place with the ports aligned then the finned housing screwed on.
That would explain NO FUEL.
Any thoughts in that?
I do not know but thinking aloud
Woody
The cylinder is one piece- No separate liner. (Not Schneurle). The port position can only be altered by changing the cylinder height using shims or removing material from the crankcase. To be honest, the position of the by-pass flutes shouldn't really make all that much difference. Some do say that having the exhaust ports fore and aft is best for ultimate performance, but the difference in power would be insignificant for general use.

Oldenginerod- Top Poster

- Posts : 3969
Join date : 2012-06-15
Age : 61
Location : Drouin, Victoria
 Re: Keil Kraft Phantom Scratch build from start to flying.
Rod.
Okay I am aware now. Thanks.
And now for something completely different!!!
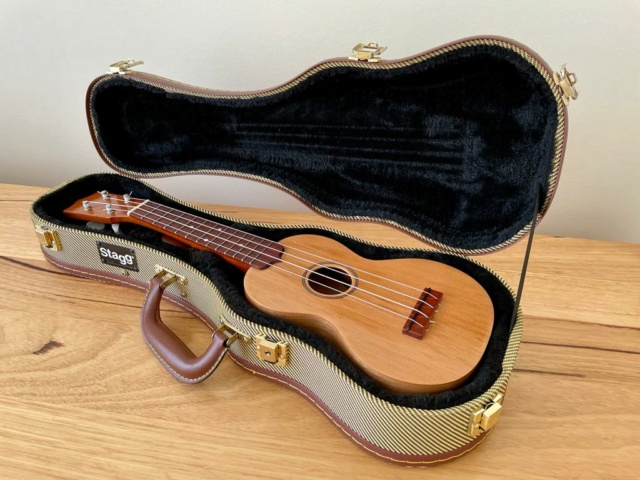
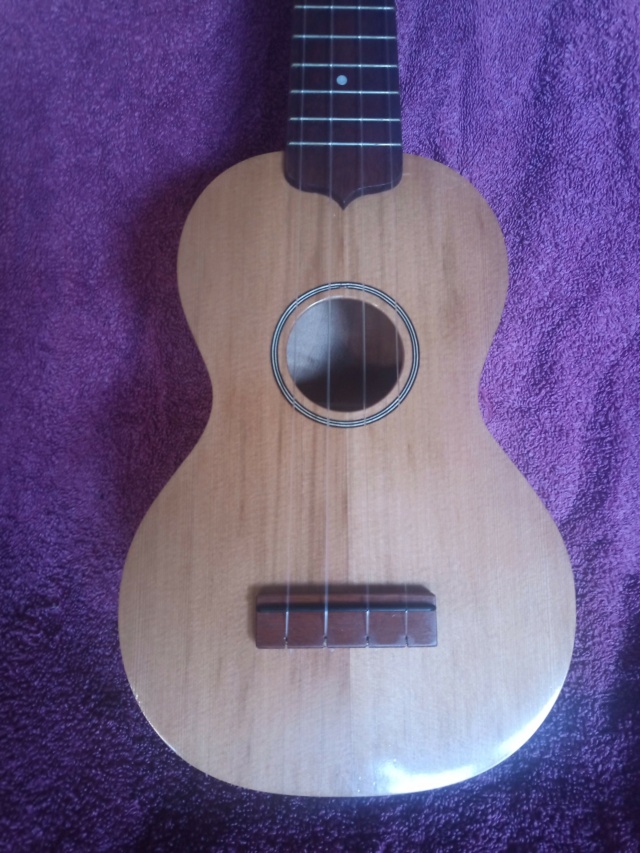
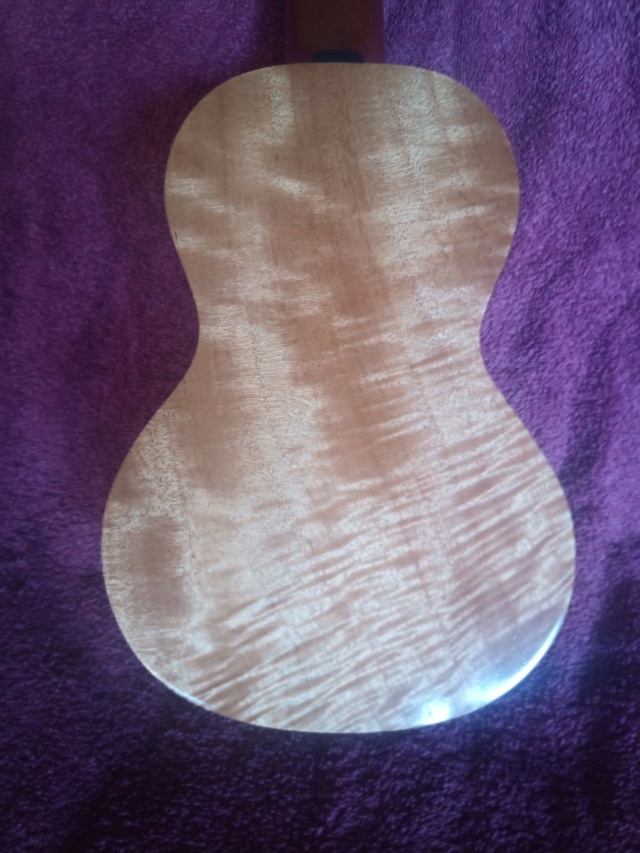
Here are a few pics of a simple Soprano uke I made for my daughter two years ago.
Cedar top and Queensland Maple back and sides.
It is as light as a feather and I really hate blowing my trumpet but it sounds as good as any Martin.
It sounds better than it looks.
I think I have some pics somewhere of the elaborate Tenor uke I made for my son.


Woody- Gold Member

- Posts : 133
Join date : 2022-04-20

Woody- Gold Member

- Posts : 133
Join date : 2022-04-20
 Re: Keil Kraft Phantom Scratch build from start to flying.
Woody,
That is some beautiful wood work there! I wish I had the patience to conquer an instrument...I'd love to play a Ukie. My mother gave me my maternal grandfather's ukelalie. I'm afraid it is too old/brittle to have professionally re-worked.
The spraybar/needle in your Medallion .09 happens to also have been used on the Medallion .049/.051. You are correct that a circlip belongs on it to retain it. But the spring/needle will also help keep it in place. I bought a couple 8n case I came across a Medallion without one, but I misplaced the puny things!
I've over-propped a few engines along the way, and I get 3 second runs as the engine runs on the slobbering prime. But the engine never gets up over prop-load to be able to pull fuel and keep running. I suspect your prop is too tall a pitch.
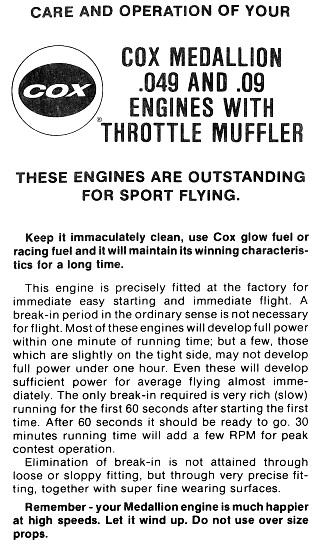
Look left, just under "more latest topics," and find "instruction sheets." There is one for the .09, and I think you'll see a 7x4 may have been specified for the engine. Maybe even 8x4. Try that engine again with a lower-pitched prop and some reading up in the instructions. Oh, and try known good fuel...that one is heartburn for sure, unless that same fuel runs another small engine as is.
_________________
Never enough time to build them all...always enough time to smash them all!
944_Jim- Diamond Member


Posts : 1950
Join date : 2017-02-08
Age : 59
Location : NE MS

GallopingGhostler- Top Poster


Posts : 5278
Join date : 2013-07-13
Age : 70
Location : Clovis NM or NFL KC Chiefs
 Re: Keil Kraft Phantom Scratch build from start to flying.
I was actually on the thought train that the prop is just too big for the engine.
I am used to diesels so expect it to swing no probs.
I have a 6" normally fitted to an 049 so I will try that.
Yes..FUEL...my 049 fires up on 10% nitro and runs perfect. I have added Nitro to the mix for the Medallion but she still does not want to know.
I will try with a smaller prop.
There is not a lot if compression to speak of.
I will report back .
Glad you like my Uke.
Woody

Woody- Gold Member

- Posts : 133
Join date : 2022-04-20
 Re: Keil Kraft Phantom Scratch build from start to flying.
Well blow me down.
The little sucker went like the clappers with a 6x3.
I got 1/2 a minutes good run till the tank ran out.
It sure screams and really loud.
I think I need ear defenders.
Thanks to this forum and you guys putting in your bits I got her running.
I am not used to Cox motors so need time to get to know them.
So the verdict is this ..
They do run okay even when tired...its a matter of getting them started.
The spray bar hole needs to face downwards.
The prop needs to be smaller than larger.
They need the correct fuel ( although I have not tried her on 10% nitro yet)
They need a positive user attitude and with sympathy!!!
They GO when they want to.
They are termed " She" because you never know what the heck they are going to do but when they do it, it fills our desires.
Fuel tubing!!!!
Any takes on this?
I am using really oversized tubing as it is all I can muster ATM.
I have a feeling that the tubing should be small OD and an ID that is a pig to get onto the fuel nipple and fuel tank tubes.
I think my fuel tubing is far too big.
Where can I get the right tubing?
A hearty thanks guys for pulling me through this.
This forum is the best.
Woody has been pleased and very happy.
Sorry....you will hopefully get used to my humour!

Woody- Gold Member

- Posts : 133
Join date : 2022-04-20
 Re: Keil Kraft Phantom Scratch build from start to flying.
Woody wrote:Well blow me down.
The little sucker went like the clappers with a 6x3.
I got 1/2 a minutes good run till the tank ran out.
It sure screams and really loud.
I think I need ear defenders.
Thanks to this forum and you guys putting in your bits I got her running.
I am not used to Cox motors so need time to get to know them.
So the verdict is this ..
They do run okay even when tired...its a matter of getting them started.
The spray bar hole needs to face downwards.
The prop needs to be smaller than larger.
They need the correct fuel ( although I have not tried her on 10% nitro yet)
They need a positive user attitude and with sympathy!!!
They GO when they want to.
They are termed " She" because you never know what the heck they are going to do but when they do it, it fills our desires.
Fuel tubing!!!!
Any takes on this?
I am using really oversized tubing as it is all I can muster ATM.
I have a feeling that the tubing should be small OD and an ID that is a pig to get onto the fuel nipple and fuel tank tubes.
I think my fuel tubing is far too big.
Where can I get the right tubing?
A hearty thanks guys for pulling me through this.
This forum is the best.
Woody has been pleased and very happy.
Sorry....you will hopefully get used to my humour!
There you go!!


Oldenginerod- Top Poster

- Posts : 3969
Join date : 2012-06-15
Age : 61
Location : Drouin, Victoria
 Re: Keil Kraft Phantom Scratch build from start to flying.
Oldenginerod wrote:Woody wrote:Well blow me down.
The little sucker went like the clappers with a 6x3.
I got 1/2 a minutes good run till the tank ran out.
It sure screams and really loud.
I think I need ear defenders.
Thanks to this forum and you guys putting in your bits I got her running.
I am not used to Cox motors so need time to get to know them.
So the verdict is this ..
They do run okay even when tired...its a matter of getting them started.
The spray bar hole needs to face downwards.
The prop needs to be smaller than larger.
They need the correct fuel ( although I have not tried her on 10% nitro yet)
They need a positive user attitude and with sympathy!!!
They GO when they want to.
They are termed " She" because you never know what the heck they are going to do but when they do it, it fills our desires.
Fuel tubing!!!!
Any takes on this?
I am using really oversized tubing as it is all I can muster ATM.
I have a feeling that the tubing should be small OD and an ID that is a pig to get onto the fuel nipple and fuel tank tubes.
I think my fuel tubing is far too big.
Where can I get the right tubing?
A hearty thanks guys for pulling me through this.
This forum is the best.
Woody has been pleased and very happy.
Sorry....you will hopefully get used to my humour!
There you go!!
But I cannot run it anymore.
The glow head has gone.
There has always got to be something to steal my thunder.
Okay...so it works.
I think the most sensible approach is to order a glow head that takes normal glow plugs.
I need a Cox spanner for 09 , an 09 piston reset tool, some proper tubing and maybe shims, gaskets etc so I will order the lot in one go from Canada and save a lot on postage.
There is a weird type washer thing behind the propeller nut thingey.
I do not know what its made of but it reduces crankshaft end float.
If someone can tell me what its called, i can order a few up.
I think I need to make a bigger fuel tank as the fuel went pretty rapidly.
Is this normal ? ( I mean are 09 Medallions know to use a lot of fuel)?

Woody- Gold Member

- Posts : 133
Join date : 2022-04-20
 Re: Keil Kraft Phantom Scratch build from start to flying.
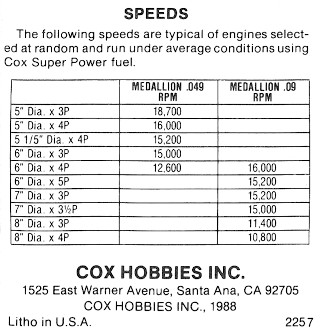
Woody, your prop choice of 6x3 is light. As seen in the chart, the 6x4 is the smallest recommended prop. On the other end, the 8x4 is the largest which I would never choose to use myself as it's too large. Basing your fuel use from the 6x3 prop would be incorrect as it's using more fuel due to higher rpm's. In addition, basing your time from a test stand is also incorrect. The plane is going to run leaner in the air thus also increasing fuel mileage. Your initial prop choice of 7x6 wasn't so far off in terms of diameter, the pitch was excessive. The Cox .09 is one of those engines with limited prop choices in my opinion. The 7" is the max in my opinion and the 6x3 is too light for it leaving limited choices in between. My experience is strictly with the TD and not so much the Medallion as I felt it was very under powered. I fly control line only. The TD is easier to tame down the power vs trying to extract blood from a stone using the Medallion. I like the Medallions quite a bit and I found them to be terrific choices for twin engine planes. If you want anemic engines to work well, install them on a twin and they do beautiful.
As for using standard plugs, this is fine if you can afford to lose 1000 rpm's. The Medallion is not a powerhouse. It's a mediocre sport engine so if your looking to achieve similar power if not more, you want to use a turbo plug head which is provided by Kamtechnik.com. Mind you that plugs are way up in price and turbo plugs are generally on the average $12 and more a piece. The turbo adapter is almost $14. All minus shipping of course. Keep in mind though, higher nitro percentages are also quite a bit harder on glow plugs which are almost not to mention extinct for the .09.
Fuel tubing as long as it fits the spraybar snugly really shouldn't be a issue. Obviously, too large of tubing doesn't fit the spraybar barb or tank vent tubes tightly will provide air leaks thus poor fuel draw. Fuel tubing length is more important, keep it as short as possible. Problems that occur with the Medallion are as Jim mentioned, clogged spraybar. Blowing through it of course to insure it's free is good. Pushing the proper sized wire through it is better. Placing a finger over the venturi and pulling a choke through it is critical. Make certain, it draws fuel all the way up to the spraybar prior to starting. Air leaks develop under the plastic body and around the spraybar. Make certain the collet holding the carb body on is snug. Also check to see if the plastic developed cracks around it as they will do so with age. You can audibly hear some leaks so carefully lend a ear when choking. A loose backplate can also cause fuel draw issues and also a feeling of poor compression.
Poor compression in Cox engine can be caused by poorly seated glow plugs. Either the head gaskets are compressed or the head itself isn't exactly flat or it's just loose. On a piece of glass place some fine sandpaper 400-600 grit on top of the glass and lap the mating surface of the plug on it. Clean it up and reinstall with NEW head gaskets. They will come loose at first but when snugged again, they have a tendency to stay fixed. If indeed the compression is on the lower side of the spectrum, use higher nitro to try and regain back some lost power.
Directly in front of the nose of the case and behind the drive washer is the thrust washer. It can be made of phenolic or stainless.
I also can't stress enough of the importance of using a good starter battery. Most problematic starts can be linked to this. Therefore, properly sized lead wires and new batteries are a must. The longer the clip is attached, the hotter the head gets, the more resistance and it all equates to a non start. These engines can easily be flooded and this hampers starting further as the plug is already taxied.

Ken Cook- Top Poster

- Posts : 5442
Join date : 2012-03-27
Location : pennsylvania
 Re: Keil Kraft Phantom Scratch build from start to flying.
For your interest. Foam R/C Phantom.
https://www.vintagemodelcompany.com/how-to-build-the-vintage-foam-phantom-online-instructions.html
https://www.vintagemodelcompany.com/how-to-build-the-vintage-foam-phantom-online-instructions.html

Oldenginerod- Top Poster

- Posts : 3969
Join date : 2012-06-15
Age : 61
Location : Drouin, Victoria
 Re: Keil Kraft Phantom Scratch build from start to flying.
Oldenginerod wrote:For your interest. Foam R/C Phantom.
https://www.vintagemodelcompany.com/how-to-build-the-vintage-foam-phantom-online-instructions.html
Well I guess it will sort out my engine problems!!

Woody- Gold Member

- Posts : 133
Join date : 2022-04-20
 Re: Keil Kraft Phantom Scratch build from start to flying.
Sounds like you have made good forward progress on the engine Woody… I think half the fun of a project like this is getting the engine to run right…. Even to tune it to how you want it to perform…. You’re getting some great advice…. There’s also lot’s of other good tidbits sprinkled throughout the forum that can be helpful….
Thanks for sharing the ukulele… I bet it sounds sweet …. Love the tiger figure on the back…Looks like some violin background ….. Light is good on stringed instruments, Helps a lot with tone and volume…
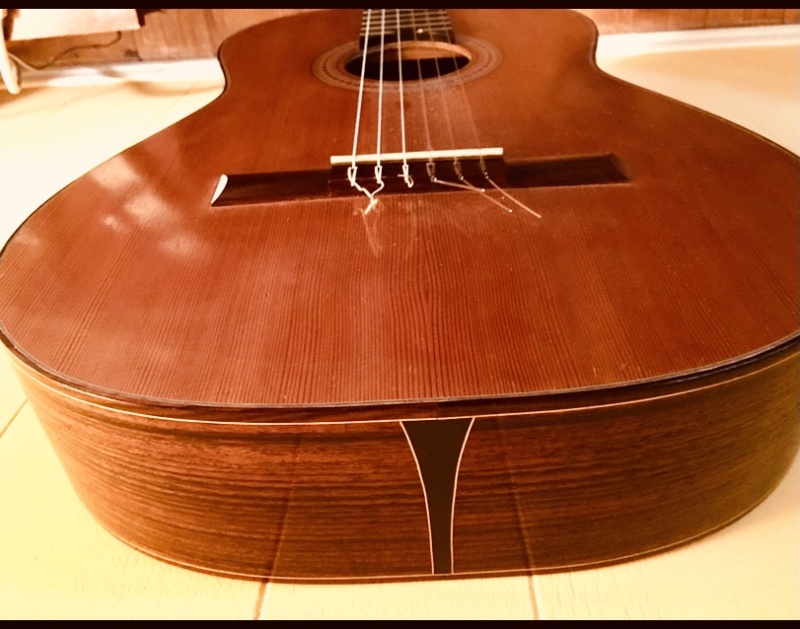
I built my guitar in ‘07….
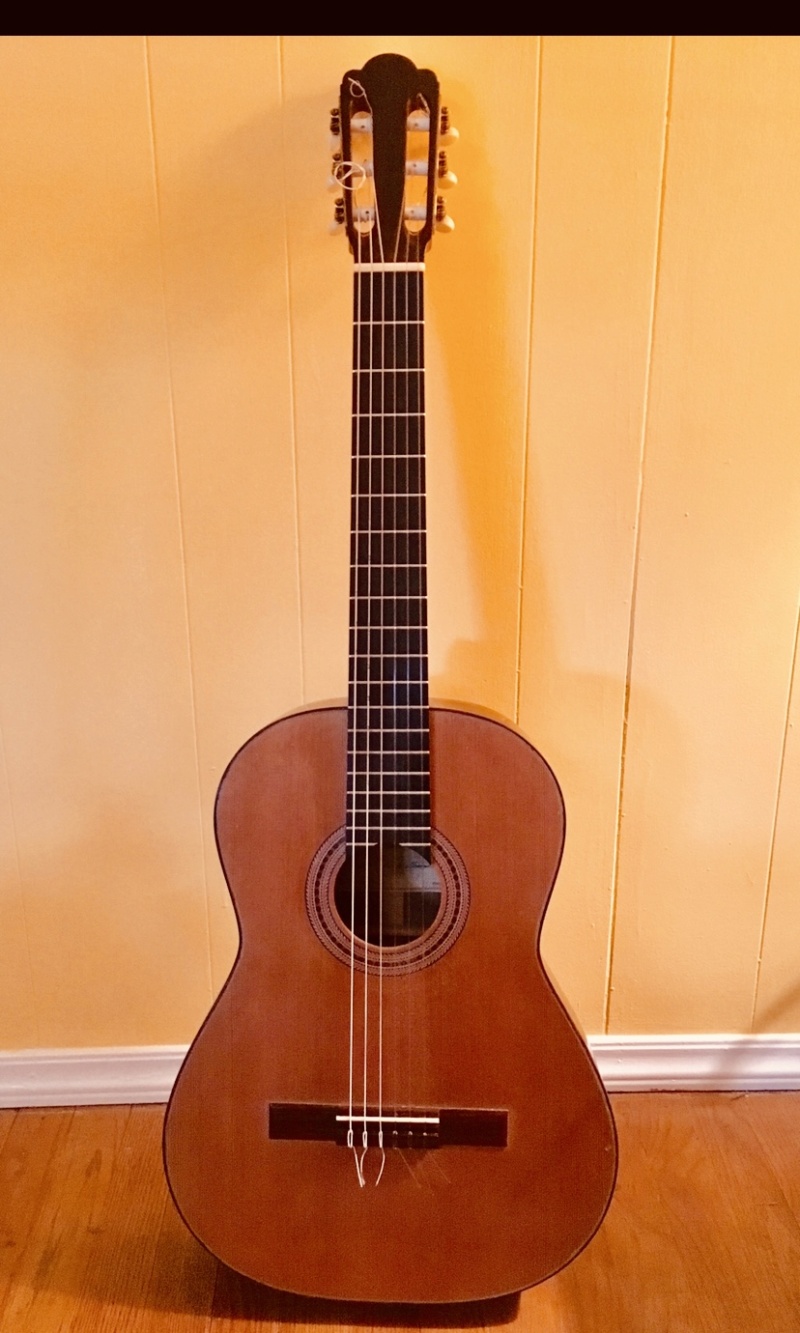
Here it is getting some the tone bars glued in….The rods are sprung between the two surfaces to press the wood into the lower table that is recessed to shape the top of the guitar…. It leaves the top in tension…,Wood is then carved away on the ends of the struts until it reaches the desired pitch…
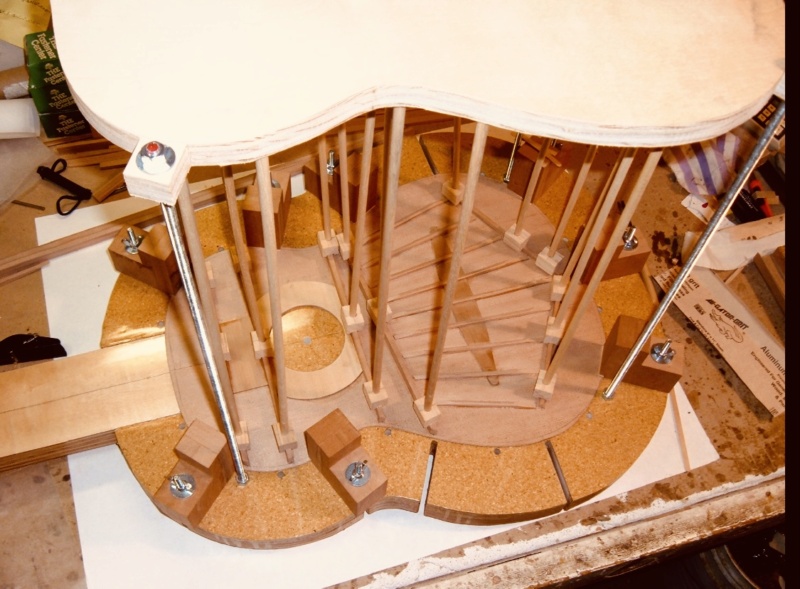
I would not have attempted something like this if it had not been for building a lot of model airplanes as a kid…. To me they were/are relative to many other things we experience
Thanks for sharing the ukulele… I bet it sounds sweet …. Love the tiger figure on the back…Looks like some violin background
I built my guitar in ‘07….


Here it is getting some the tone bars glued in….The rods are sprung between the two surfaces to press the wood into the lower table that is recessed to shape the top of the guitar…. It leaves the top in tension…,Wood is then carved away on the ends of the struts until it reaches the desired pitch…

I would not have attempted something like this if it had not been for building a lot of model airplanes as a kid…. To me they were/are relative to many other things we experience

rdw777- Diamond Member


Posts : 1248
Join date : 2021-03-11
Location : West Texas
 Re: Keil Kraft Phantom Scratch build from start to flying.
That is a beautiful classical guitar.
I bet it sounds as beautiful as it looks .
How long did it take you to make it!?
Wonderful craftsmanship.
You are beilliantly clever.
I bet it sounds as beautiful as it looks .
How long did it take you to make it!?
Wonderful craftsmanship.
You are beilliantly clever.

Woody- Gold Member

- Posts : 133
Join date : 2022-04-20
 Re: Keil Kraft Phantom Scratch build from start to flying.
I think Ken is spot on, speaking from personal experiences. Usually, I find engine reviews useful as they give a more quantitative view often substantiating personal observations, plus helps one to initially select prop sizes for their particular application.
Interestingly enough, I went back to the non-R/C standard Medallion instruction set. The R/C instructions Prop RPM table I showed in my previous post in this thread have all the same values as the standard Medallion, so those RPM numbers are inflated. Unfortunately, Cox copied the same values, so we have no typical RPMs for the muffled version. Equally frustrating is that the only source I know, Sceptre Flight has only one engine review (and, this is not a complaint as the proprietor has done an outstanding job in capturing as many engine reviews as he had available to him). This is the Medallion .09 R/C review by Peter Chinn's from 1967 Aeromodeller. He only states idle RPMs for the various props without any maximum RPM figures.
Sometimes poor performance data is not revealed because the company manufacturing the product also advertises in the magazine. One doesn't like biting the hand that feeds them.
However on a positive note, @Kim showed that his Medallion .15 R/C with older style throttle indeed can perform during his short lived stay at SMALL in Arkansas.
I can understand the diesel point of view if this is what one is most familiar with. They are definitely torque engines.
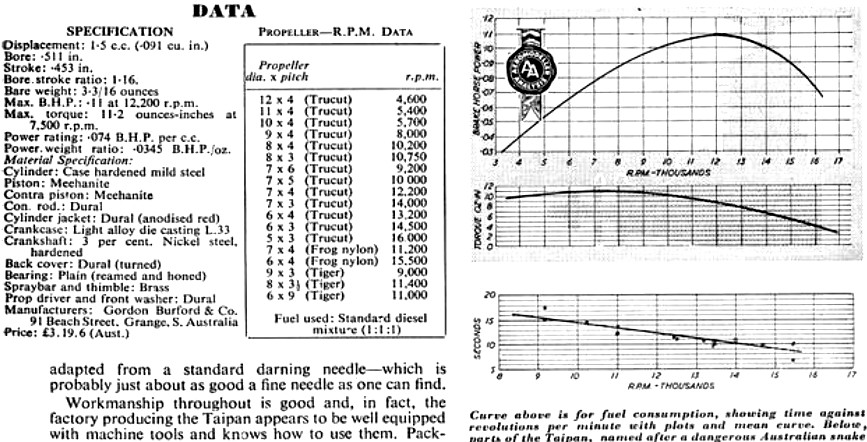
From http://sceptreflight.com/Model%20Engine%20Tests/Taipan%201.5.html - Taipan 1.5 cc (.09)
Also interestingly enough, the Medallion .09 R/C w/exhaust throttle muffler instructions specified Cox Super Power Fuel. Pointed out in this thread, it had 15% nitro.
https://www.coxengineforum.com/t10183-original-super-power-fuel-formula#128833
Later 1988 date with Leroy Cox no longer in control, I gather that some liberality was taken not necessarily the most optimal for performance leaving the user to figure out (15% nitro fuel and numbers for unmuffled Medallion), so they could sell fuel and engines.
Interestingly enough, I went back to the non-R/C standard Medallion instruction set. The R/C instructions Prop RPM table I showed in my previous post in this thread have all the same values as the standard Medallion, so those RPM numbers are inflated. Unfortunately, Cox copied the same values, so we have no typical RPMs for the muffled version. Equally frustrating is that the only source I know, Sceptre Flight has only one engine review (and, this is not a complaint as the proprietor has done an outstanding job in capturing as many engine reviews as he had available to him). This is the Medallion .09 R/C review by Peter Chinn's from 1967 Aeromodeller. He only states idle RPMs for the various props without any maximum RPM figures.
Sometimes poor performance data is not revealed because the company manufacturing the product also advertises in the magazine. One doesn't like biting the hand that feeds them.
However on a positive note, @Kim showed that his Medallion .15 R/C with older style throttle indeed can perform during his short lived stay at SMALL in Arkansas.

I can understand the diesel point of view if this is what one is most familiar with. They are definitely torque engines.

From http://sceptreflight.com/Model%20Engine%20Tests/Taipan%201.5.html - Taipan 1.5 cc (.09)
Also interestingly enough, the Medallion .09 R/C w/exhaust throttle muffler instructions specified Cox Super Power Fuel. Pointed out in this thread, it had 15% nitro.
https://www.coxengineforum.com/t10183-original-super-power-fuel-formula#128833
Later 1988 date with Leroy Cox no longer in control, I gather that some liberality was taken not necessarily the most optimal for performance leaving the user to figure out (15% nitro fuel and numbers for unmuffled Medallion), so they could sell fuel and engines.

GallopingGhostler- Top Poster


Posts : 5278
Join date : 2013-07-13
Age : 70
Location : Clovis NM or NFL KC Chiefs
 Re: Keil Kraft Phantom Scratch build from start to flying.
Woody,
A ready source of fuel line is as close as back surgery or a colonoscopy...wink at the nurse as she discards the IV tube. Ask gently if she'll remove the sharps and leave the tubes. Is it great stuff? Nope. Does it work? Yep!
Regarding your glowhead, hang on to it. If you have access to a drill press or lathe, you can convert your existing one to take a glow plug. I know a how-to thread exists somewhere...I think RCUniverse. I know the process has been linked to here before.
Congrats on the engine run!
_________________
Never enough time to build them all...always enough time to smash them all!

944_Jim- Diamond Member


Posts : 1950
Join date : 2017-02-08
Age : 59
Location : NE MS
 Re: Keil Kraft Phantom Scratch build from start to flying.
Thank you Woody, About 180 hrs over the course of a year… I kept a note book in case I ever want to build another…. Maybe a spruce top one day..

rdw777- Diamond Member


Posts : 1248
Join date : 2021-03-11
Location : West Texas
 Re: Keil Kraft Phantom Scratch build from start to flying.
944_Jim wrote:Woody,
A ready source of fuel line is as close as back surgery or a colonoscopy...wink at the nurse as she discards the IV tube. Ask gently if she'll remove the sharps and leave the tubes. Is it great stuff? Nope. Does it work? Yep!
Regarding your glowhead, hang on to it. If you have access to a drill press or lathe, you can convert your existing one to take a glow plug. I know a how-to thread exists somewhere...I think RCUniverse. I know the process has been linked to here before.
Congrats on the engine run!
Thats a good idea Jim.
I will register for a colonoscopy just to get the tubes!

Woody- Gold Member

- Posts : 133
Join date : 2022-04-20
Page 5 of 5 •  1, 2, 3, 4, 5
 Similar topics
» Keil Kraft Radian
» Keil Kraft Hurricane
» Scratch build BRM - a first
» (Another) Keil Kraft Hurricane Rebuild
» Scratch-Build 2021
» Keil Kraft Hurricane
» Scratch build BRM - a first
» (Another) Keil Kraft Hurricane Rebuild
» Scratch-Build 2021
Page 5 of 5
Permissions in this forum:
You cannot reply to topics in this forum

 Rules
Rules