Log in
Search
Latest topics
» Draco Goes Flying, But Misses the Eclipseby HalfaDave Yesterday at 9:59 pm
» A prototype Cox Reed-valve marine engine
by davidll1984 Yesterday at 9:15 pm
» music vids.. some of your favorites
by crankbndr Yesterday at 7:26 pm
» Enya .09 II Questions
by Surfer_kris Yesterday at 2:45 pm
» Wen Mac .049 - Conditioning.
by MauricioB Yesterday at 12:21 pm
» Happy 53rd birthday Mauricio!!!
by MauricioB Yesterday at 11:47 am
» Jim Walker Firebaby
by rdw777 Yesterday at 11:22 am
» Testers Sprite engine swap
by Greenman38633 Yesterday at 10:57 am
» UV Restore of Yellowed Decals
by Levent Suberk Yesterday at 8:59 am
» 22mm 2-blade nylon marine prop and solid-shaft drive
by roddie Yesterday at 6:46 am
» Post edit??
by roddie Yesterday at 5:33 am
» Original Super Power fuel formula?
by HalfaDave Wed Apr 17, 2024 7:28 pm
Cox Engine of The Month
Fixing the Shoestring
Page 1 of 1
 Fixing the Shoestring
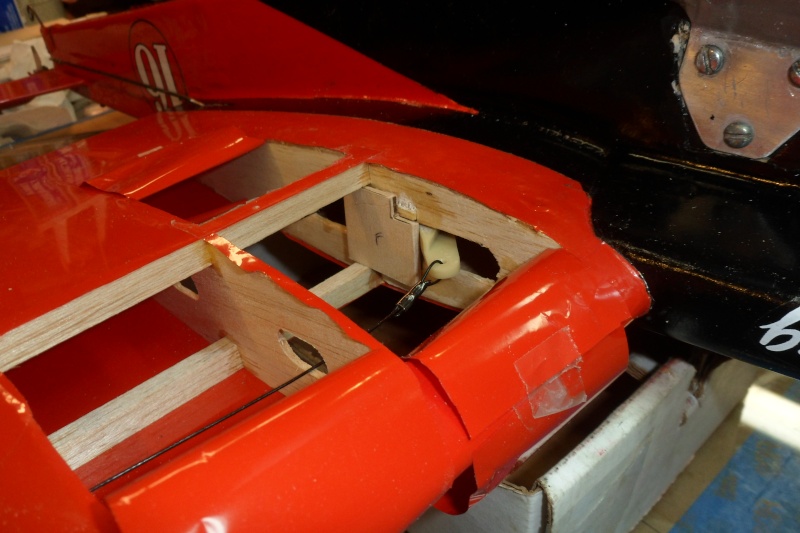
As I mentioned in the last flight report, I popped a leadout and did an inverted flop after a bunch of spectacularly tight outside loops. The controls were jammed, and I freed them and didn't think much of it until I got it home and cleaned it up. The bellcrank gets slightly stuck whenever I pull full Down. I had to use my cell phone camera and a flashlight to see why.
The first pic is the tip of the crank stuck in the hole of the #1 rib. The dark line is the control rod.
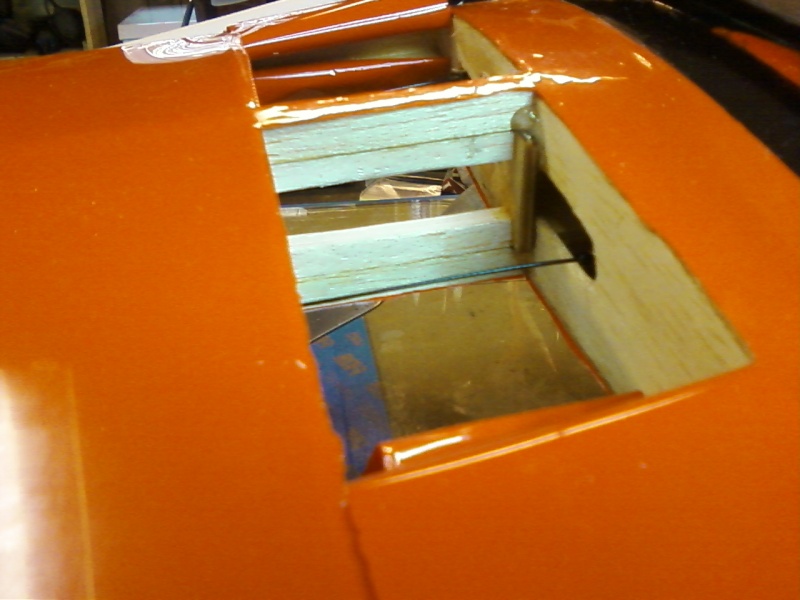
The second picture is the whole hole.


The bellcrank punched a hole in the #1 rib and it gets stuck in it. I thought about just adding a stop to the control rod to limit the throw. Then I made the mistake of posting that plan on the perfectionists' site, Stunthangar. Not a good way to fix it, the old dudes said, offering no good alternative, even after I asked. But I got to thinking... what the hell, I'll try something else. I don't want to cut open the center sheeting to patch the rib. It isn't much of a hole anyway. Maybe I can reach in with a q-tip and wipe a little CA around the inside edge of the hole to stiffen it before sealing the wing back up.
Anyway, I made a plate out of 1/8" birch that stops the crank in exactly the right place before it enters the hole. It also protects the other side of the crank from ever punching another hole in the rib. I didn't feel like gluing tonight, but I'll add some small braces to make sure it stays in place when I finish it tomorrow.
Here is my fix.

The first pic is the tip of the crank stuck in the hole of the #1 rib. The dark line is the control rod.
The second picture is the whole hole.


The bellcrank punched a hole in the #1 rib and it gets stuck in it. I thought about just adding a stop to the control rod to limit the throw. Then I made the mistake of posting that plan on the perfectionists' site, Stunthangar. Not a good way to fix it, the old dudes said, offering no good alternative, even after I asked. But I got to thinking... what the hell, I'll try something else. I don't want to cut open the center sheeting to patch the rib. It isn't much of a hole anyway. Maybe I can reach in with a q-tip and wipe a little CA around the inside edge of the hole to stiffen it before sealing the wing back up.
Anyway, I made a plate out of 1/8" birch that stops the crank in exactly the right place before it enters the hole. It also protects the other side of the crank from ever punching another hole in the rib. I didn't feel like gluing tonight, but I'll add some small braces to make sure it stays in place when I finish it tomorrow.
Here is my fix.

_________________
Don't Panic!
...and never Ever think about how good you are at something...
while you're doing it!
My Hot Rock & Blues Playlist
...and never Ever think about how good you are at something...
while you're doing it!
My Hot Rock & Blues Playlist

RknRusty- Rest In Peace

- Posts : 10869
Join date : 2011-08-10
Age : 68
Location : South Carolina, USA
 Re: Fixing the Shoestring
Looks good. Excellent idea.
Phil
Phil

pkrankow- Top Poster

- Posts : 3025
Join date : 2012-10-02
Location : Ohio
 Re: Fixing the Shoestring
Sorry you had to cut the covering. You wanted to check the bellcrank anyway so it was a dual purpose repair. Whatever keeps it flying man!
The fix looks solid.
Ron
The fix looks solid.
Ron

Cribbs74- Moderator


Posts : 11895
Join date : 2011-10-24
Age : 50
Location : Tuttle, OK
 Re: Fixing the Shoestring
All fixed. The stop plate is epoxied in place and I Titebonded two super lightweight balsa 1/4"x1/4" braces to to the spars to keep the plate jammed in place. It has beefier leadouts, and Monokote covers the surgical wounds, and I don't think they'll be visible unless I point them out.

Now, about the leadout popping. I had originally used 45# test 7 strand stainless wire coated with black nylon. The wire did not break. But I had made only two passes through the crimp tube, and the hard yank the other day had broken the nylon covering, allowing the wire to just slip out. The black nylon was still tightly crimped in the tube. As I mentioned in earlier posts, I have been worried about those leadouts since day one. After the first month of flying, I even did an exploratory surgery to inspect them and all looked good. So I relaxed.
I would like to have replaced them with .024" 7 strand(or whatever size the AMA recommends), but don't have any and my budget is frozen until next month. So for now, I used a 65# test version of the same thing and made three passes through the crimp tube. I'll fly it like that and replace them with the right stuff before the contest in October. I don't think they'll pop like that with three passes through the tube, and I'll inspect the visible parts before every flight until I can get the good stuff.
_________________
Don't Panic!
...and never Ever think about how good you are at something...
while you're doing it!
My Hot Rock & Blues Playlist
...and never Ever think about how good you are at something...
while you're doing it!
My Hot Rock & Blues Playlist

RknRusty- Rest In Peace

- Posts : 10869
Join date : 2011-08-10
Age : 68
Location : South Carolina, USA
 Re: Fixing the Shoestring
Repair looks good Rusty, I sometimes get that Duhhhhh feeling on Stunthanger to. they definitely make a guy feel out of there league. The standard leadout wire for a .35 sized plane is .027. I purchased a roll of stainless from my local fishing shop here in Albuquerque. Kind of pricey, something like 17 bucks, but will last me for a few planes. Good luck with it.
Jim Hayes
Jim Hayes

jhaye- Silver Member

- Posts : 89
Join date : 2012-09-08
Age : 59
Location : Albuquerque, NM
 Re: Fixing the Shoestring
Jimjhaye wrote:The standard leadout wire for a .35 sized plane is .027. I purchased a roll of stainless from my local fishing shop here in Albuquerque. Kind of pricey, something like 17 bucks, but will last me for a few planes. Good luck with it.
Jim Hayes
Not sure how much was on a roll, but 300' from McMaster-Carr of type 302 or type 304 .027 1x7 uncoated stainless (your choice) is $15.00
 Re: Fixing the Shoestring
Rusty -
Your repair looks quite solid. If you have any clear dope, touching up the edges of the monokote repair will help keep it from curling or letting oil seep under.
Your repair looks quite solid. If you have any clear dope, touching up the edges of the monokote repair will help keep it from curling or letting oil seep under.
 Similar topics
» Shoestring!!!!!!
» My Score!!!
» Help fixing model with very wrong CG
» Micro 12VDC Generator with a Cox .049 Sure Start Diesel Engine
» Fixing my handle, maybe this'll give you a good Yuk...
» My Score!!!
» Help fixing model with very wrong CG
» Micro 12VDC Generator with a Cox .049 Sure Start Diesel Engine
» Fixing my handle, maybe this'll give you a good Yuk...
Page 1 of 1
Permissions in this forum:
You cannot reply to topics in this forum

 Rules
Rules


