Log in
Search
Latest topics
» Enya .09 II Questionsby Surfer_kris Today at 10:59 am
» Wen Mac .049 - Conditioning.
by roddie Today at 10:54 am
» How's the weather?
by rsv1cox Today at 10:32 am
» Jim Walker Firebaby
by rsv1cox Today at 8:27 am
» music vids.. some of your favorites
by crankbndr Today at 8:03 am
» Draco Goes Flying, But Misses the Eclipse
by HalfaDave Yesterday at 9:59 pm
» A prototype Cox Reed-valve marine engine
by davidll1984 Yesterday at 9:15 pm
» Happy 53rd birthday Mauricio!!!
by MauricioB Yesterday at 11:47 am
» Testers Sprite engine swap
by Greenman38633 Yesterday at 10:57 am
» UV Restore of Yellowed Decals
by Levent Suberk Yesterday at 8:59 am
» 22mm 2-blade nylon marine prop and solid-shaft drive
by roddie Yesterday at 6:46 am
» Post edit??
by roddie Yesterday at 5:33 am
Cox Engine of The Month
Back to the Darkside….. Where’re the cookies?!?
Page 1 of 1
 Back to the Darkside….. Where’re the cookies?!?
Well, on to the next thing in the queue. Wanting something a little larger, I decided to go ahead and build the SIG Akromaster kit that I bought 35 years ago. I was originally planning on building it with a Cox Medallion .15 in it, but decided I needed something a little quieter. So, I sunk to committing Elektrickery. I had an electric motor that would do, so electric it is. I’m not going to put a whole lot of time into this one either, as I expect to be awfully hard on this one, too.
The first thing I did was cut out a new fuselage. I extended the tail by two inches, as the motor and battery would move the c.g. forward. I clamped the kit fuselage to the 3/8x 3” balsa sheet and traced the outline in pencil. Then moved things and traced again. Then changed my mind and traced again. I ended up raising the top of the fuse by ½” to make a little more room for the battery box. You can see the pencil marks as I changed my mind. You can also see the cutout for the battery box.


And the ply doublers for the front of the plane.

I built a battery box from 1/16” ply top and bottom, and a 1/8” lite ply side wall.


Here’re the doublers rough cut and the battery box sitting in place.

Jump forward ahead and the doublers and battery box are glued in place.


I glued balsa blocks on and shaped them into a not too hideous shape behind the firewall, and in from of the firewall to provide support for the firewall fore and aft.
Jump ahead again and the wing has been built with the exception of center sheeting, and the tail surfaces are finished. Here everything’s fit together while I take a break.


To be continued later,
The Not Too Hideous Mark
The first thing I did was cut out a new fuselage. I extended the tail by two inches, as the motor and battery would move the c.g. forward. I clamped the kit fuselage to the 3/8x 3” balsa sheet and traced the outline in pencil. Then moved things and traced again. Then changed my mind and traced again. I ended up raising the top of the fuse by ½” to make a little more room for the battery box. You can see the pencil marks as I changed my mind. You can also see the cutout for the battery box.


And the ply doublers for the front of the plane.

I built a battery box from 1/16” ply top and bottom, and a 1/8” lite ply side wall.


Here’re the doublers rough cut and the battery box sitting in place.

Jump forward ahead and the doublers and battery box are glued in place.


I glued balsa blocks on and shaped them into a not too hideous shape behind the firewall, and in from of the firewall to provide support for the firewall fore and aft.
Jump ahead again and the wing has been built with the exception of center sheeting, and the tail surfaces are finished. Here everything’s fit together while I take a break.


To be continued later,
The Not Too Hideous Mark
batjac- Diamond Member


Posts : 2333
Join date : 2013-05-22
Age : 61
Location : Broken Arrow, OK, USA
 Re: Back to the Darkside….. Where’re the cookies?!?
Well Mark You have done it again LOOKS Good !! I have one of those to build as soon as I get through with the BClown , did the wing build go smooth or maybe have some pointers ? Eric

getback- Top Poster


Posts : 10097
Join date : 2013-01-18
Age : 66
Location : julian , NC
 Re: Back to the Darkside….. Where’re the cookies?!?
Pointers? Yeah, don't use a 35 year old kit. After 35 years in the box, the trailing edge stock was very warped. I tried soaking it and then clamping it to dry out, but that didn't remove all of the warp. Most of it, but not all. Also, the wing rib sheets weren't stamped well, so I spent a good bit of time sanding the back to get the parts to pop out.
For building the wing, the kit includes fixtures to hold the leading edge and trailing edge in place for gluing. The ones in my kit were terrible die crushed. They were useless. So, I went back to the old fashioned method of aligning the tip ribs, and working my way along gluing ribs in towards the center.
Other than that, it's a straight forward kit. At least, I assume so. I didn't build it per the plans, naturally. I have a new Akromaster kit that I bought last year, and still plan on building for the Medallion .15, so it should go together much faster.
The Warped Mark

batjac- Diamond Member


Posts : 2333
Join date : 2013-05-22
Age : 61
Location : Broken Arrow, OK, USA
 Re: Back to the Darkside….. Where’re the cookies?!?
batjac wrote:Pointers? Yeah, don't use a 35 year old kit. After 35 years in the box, the trailing edge stock was very warped. I tried soaking it and then clamping it to dry out, but that didn't remove all of the warp. Most of it, but not all. Also, the wing rib sheets weren't stamped well, so I spent a good bit of time sanding the back to get the parts to pop out.
For building the wing, the kit includes fixtures to hold the leading edge and trailing edge in place for gluing. The ones in my kit were terrible die crushed. They were useless. So, I went back to the old fashioned method of aligning the tip ribs, and working my way along gluing ribs in towards the center.
Other than that, it's a straight forward kit. At least, I assume so. I didn't build it per the plans, naturally. I have a new Akromaster kit that I bought last year, and still plan on building for the Medallion .15, so it should go together much faster.
The Warped Mark
Maybe you should have cut yourself a new "kit" using the parts as patterns!
Phil

pkrankow- Top Poster

- Posts : 3025
Join date : 2012-10-02
Location : Ohio
 Re: Back to the Darkside….. Where’re the cookies?!?
pkrankow wrote:
Maybe you should have cut yourself a new "kit" using the parts as patterns!
Phil
Phil, I went to the local hobby shop to see if they had the right size t.e. material, but no good. I didn't have any in my woodpile either. For the Akromaster, SIG used non-standard sizes for the leading and trailing edge stock. I did have to cut some new ribs for the wing, as I made the longer wing version of the plane.
Eric, you do know about making the wing longer, don't you?
The No Good Mark

batjac- Diamond Member


Posts : 2333
Join date : 2013-05-22
Age : 61
Location : Broken Arrow, OK, USA
 Re: Back to the Darkside….. Where’re the cookies?!?
Nice build. Partial to the Acromaster as well. Got me a kit here too. Bought it about 15 years ago. Used it for templates, scratched one out, got out of flying for a bit, sold it 2 years ago, and am now regretting it. Should have kept it, but at least I have the original to use again as templates. Anyways, I will be watching this one.

NEW222- Top Poster

- Posts : 3892
Join date : 2011-08-13
Age : 45
Location : oakbank, mb

batjac- Diamond Member


Posts : 2333
Join date : 2013-05-22
Age : 61
Location : Broken Arrow, OK, USA
 Re: Back to the Darkside….. Where’re the cookies?!?
Not to worry Mark!
A TD can pull 9-10oz without issue. I am sure a .15 can pull 15oz or more easily.
Now.... I see you have chosen electric, that will add some weight quick. Can you muffle the medallion .15?
Ron
Edit: Mark poking around the internet I see other Akromasters that are close to 20oz and still fly well...
A TD can pull 9-10oz without issue. I am sure a .15 can pull 15oz or more easily.
Now.... I see you have chosen electric, that will add some weight quick. Can you muffle the medallion .15?
Ron
Edit: Mark poking around the internet I see other Akromasters that are close to 20oz and still fly well...

Cribbs74- Moderator


Posts : 11895
Join date : 2011-10-24
Age : 50
Location : Tuttle, OK
 Re: Back to the Darkside….. Where’re the cookies?!?
No Mark I no nothing about making the wing longer ? mine is 34" at 250sq. is that not enough ?

getback- Top Poster


Posts : 10097
Join date : 2013-01-18
Age : 66
Location : julian , NC
 Re: Back to the Darkside….. Where’re the cookies?!?
Ron, thanks for poking around the web. Now I don't feel too bad. I can probably come in close to 20. Since it's electric, I can skimp on the fuselage finishing and paint. It just needs to be enough to protect the balsa, not to fuel-proof the darn thing. I guess I just need to get used to building moderate sized models. By the way, I do have another kit that I plan to build with a muffled Medallion .15 engine. Maybe I'll move that to the head of the queue once I finish this one, as the building peculiarities and new ideas are fresh in my mind.
Eric, the standard wing is 34" at 250 sq.in. That's quite enough to fly well, as probably thousands of these have been built over the years at 34". But, you can get a free 4" extension of the wingspan for about 280 sq.in. wing area. In the instructions for building the Akromaster wing, they tell you to take a razor saw and cut off 1" from each end of the leading and trailing edge stock. If you leave that in and make up two extra R3 tip ribs and two extra R1 ribs, you get some free wing. You also have to make up a new bellcrank plate out of ply, but that's no biggie. You only really need one extra R1 rib, but I made two. One out of 1/16" to match the existing one, and one out of 1/4" for a center rib. I like to have the center rib thickness close to the fuselage thickness to make it more solid in the center. I had to get a little creative with the bellcrank location, but again it was no biggie. If you do a search on Stunt Hangar you'll get all the info on the wing stretch.
The

batjac- Diamond Member


Posts : 2333
Join date : 2013-05-22
Age : 61
Location : Broken Arrow, OK, USA
 Re: Back to the Darkside….. Where’re the cookies?!?
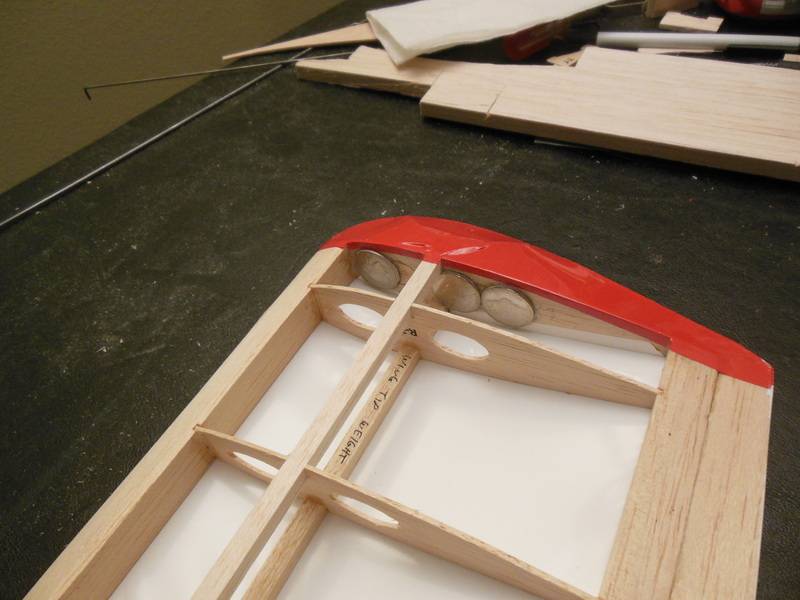
Well, I had a little time to get back to the plane. I started covering it with red and white Monokote in the traditional Batjac Aeroworks™ color scheme. I got the bottom of the wing and the wing tips covered before I realized I did something wrong. I have been known to finish the plane, and then realize that I forgot to add the tip weight before closing out the wing. So I quickly added this note:

Then I decided I might not notice the note before I started covering the wing again, so I made a bigger note.

The instructions said to use a half ounce of weight, and that works out to three nickels.
The Forgetful Mark

Then I decided I might not notice the note before I started covering the wing again, so I made a bigger note.

The instructions said to use a half ounce of weight, and that works out to three nickels.

The Forgetful Mark

batjac- Diamond Member


Posts : 2333
Join date : 2013-05-22
Age : 61
Location : Broken Arrow, OK, USA
 Re: Back to the Darkside….. Where’re the cookies?!?
Now that's a 15 cent plane for sure , Mark I looked over the instructions and there is nothing there about the wing stretch ? Thanks for the info I take a look a SH and just see I will probably stay with the planes for now though // as long as it flys I will bee excited  Heck I am already behind on winter building
  Edit ; well I reread your post Sorry I misunderstood
  I get it now man I am sloooow
 Edit ; well I reread your post Sorry I misunderstood
Last edited by getback on Fri May 22, 2015 8:50 am; edited 1 time in total (Reason for editing : to fix embarrasment)

getback- Top Poster


Posts : 10097
Join date : 2013-01-18
Age : 66
Location : julian , NC

batjac- Diamond Member


Posts : 2333
Join date : 2013-05-22
Age : 61
Location : Broken Arrow, OK, USA
 Re: Back to the Darkside….. Where’re the cookies?!?
Mark, I think it looks great. Ken

Ken Cook- Top Poster

- Posts : 5442
Join date : 2012-03-27
Location : pennsylvania
 Re: Back to the Darkside….. Where’re the cookies?!?
Looks great from here!

rogermharris- Platinum Member

- Posts : 503
Join date : 2015-03-17
Age : 61
Location : Long Branch, New Jersey
 Re: Back to the Darkside….. Where’re the cookies?!?
Mark,
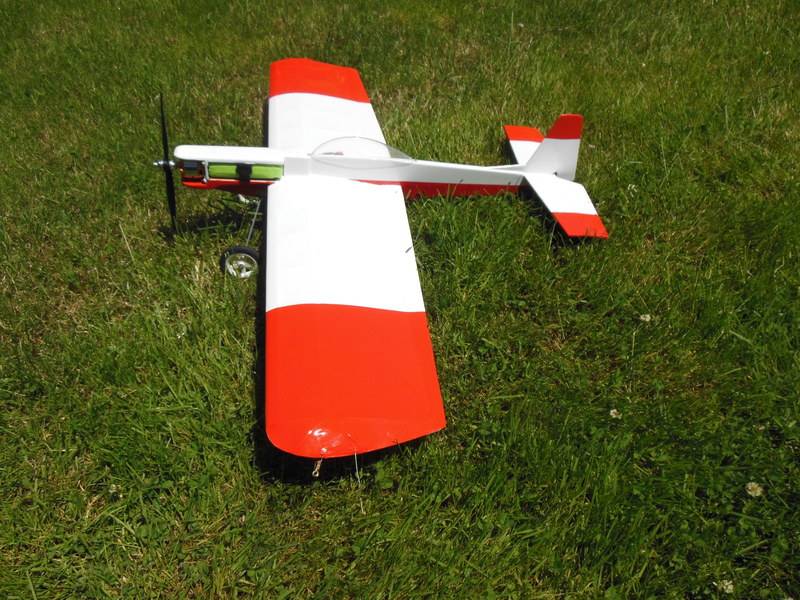
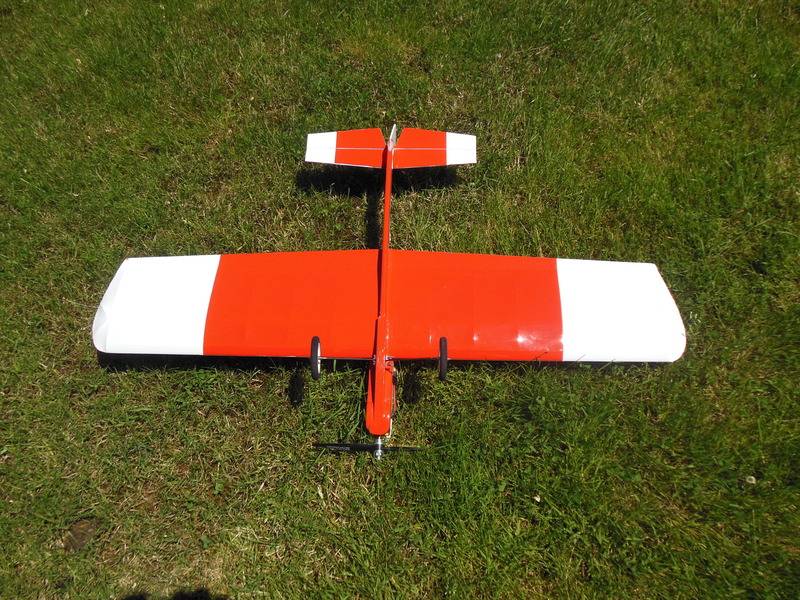
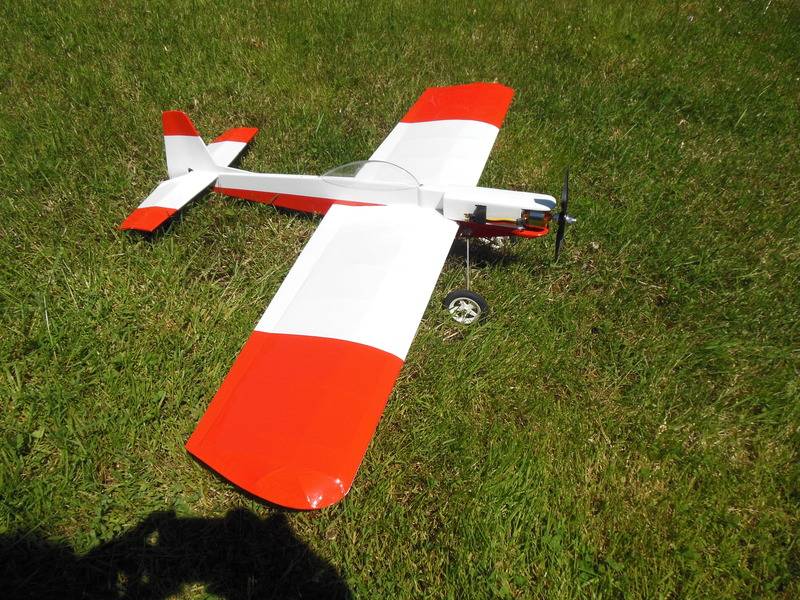
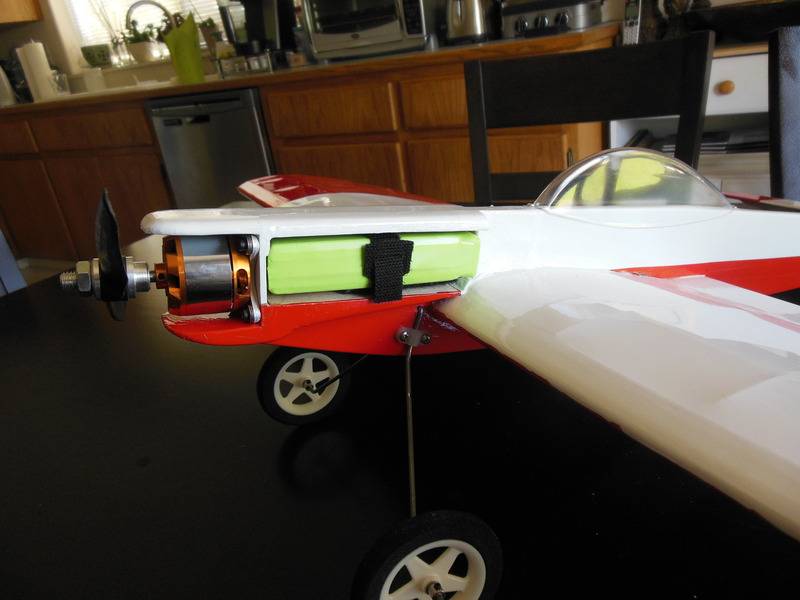
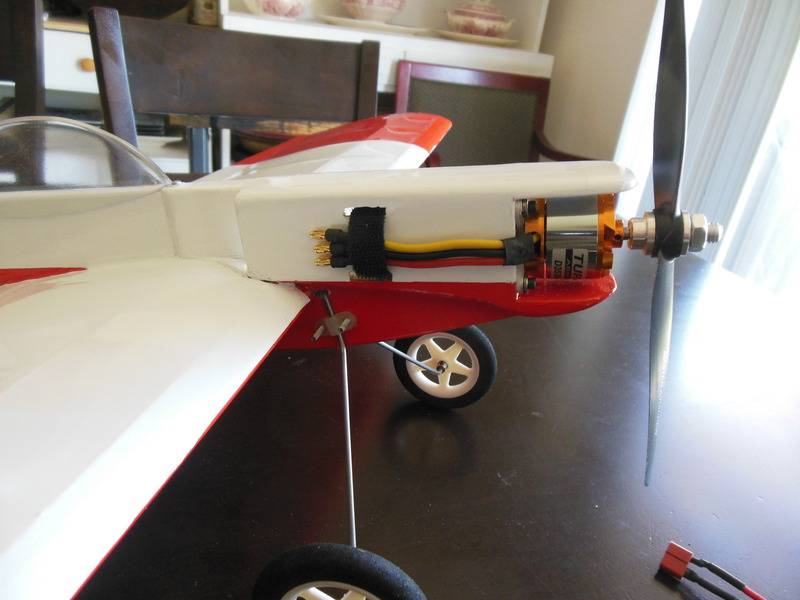
Hands down the cleanest electric installation I have ever seen on a profile. Pat yourself on the back for a job well done.
Let us know how that thing flys!
Ron
Hands down the cleanest electric installation I have ever seen on a profile. Pat yourself on the back for a job well done.
Let us know how that thing flys!
Ron

Cribbs74- Moderator


Posts : 11895
Join date : 2011-10-24
Age : 50
Location : Tuttle, OK
 Re: Back to the Darkside….. Where’re the cookies?!?
I built my last Akromaster using the increased wingspan. I think it is worth the effort. Power is a TT .10.
I would suggest for ANY kit that uses isometric instructions that you trace the parts on back of the instruction sheet so you can recreate parts if necessary.
Enjoy your Akro.
George
I would suggest for ANY kit that uses isometric instructions that you trace the parts on back of the instruction sheet so you can recreate parts if necessary.
Enjoy your Akro.
George

gcb- Platinum Member

- Posts : 908
Join date : 2011-08-11
Location : Port Ewen, NY
 Re: Back to the Darkside….. Where’re the cookies?!?
That it very clean and slick with the battery installment , Does she balance out good Mark ? Good Job Man !! 


getback- Top Poster


Posts : 10097
Join date : 2013-01-18
Age : 66
Location : julian , NC
 Similar topics
» Timer´s Nightmare (Frank Ehling) 1942
» Dabbling in the Darkside (other nitro engines)
» Shoestring flights - I brought it home! Now, can I do it again?
» I went back to the 50s and brought back a Prop Rod
» cox pee wee .020 back plate or fuel tank with back plate
» Dabbling in the Darkside (other nitro engines)
» Shoestring flights - I brought it home! Now, can I do it again?
» I went back to the 50s and brought back a Prop Rod
» cox pee wee .020 back plate or fuel tank with back plate
Page 1 of 1
Permissions in this forum:
You cannot reply to topics in this forum

 Rules
Rules