

 Rules
Rules
Log in
Search
Latest topics
» music vids.. some of your favoritesby Oldenginerod Today at 1:59 am
» Draco Goes Flying, But Misses the Eclipse
by HalfaDave Yesterday at 9:59 pm
» A prototype Cox Reed-valve marine engine
by davidll1984 Yesterday at 9:15 pm
» Enya .09 II Questions
by Surfer_kris Yesterday at 2:45 pm
» Wen Mac .049 - Conditioning.
by MauricioB Yesterday at 12:21 pm
» Happy 53rd birthday Mauricio!!!
by MauricioB Yesterday at 11:47 am
» Jim Walker Firebaby
by rdw777 Yesterday at 11:22 am
» Testers Sprite engine swap
by Greenman38633 Yesterday at 10:57 am
» UV Restore of Yellowed Decals
by Levent Suberk Yesterday at 8:59 am
» 22mm 2-blade nylon marine prop and solid-shaft drive
by roddie Yesterday at 6:46 am
» Post edit??
by roddie Yesterday at 5:33 am
» Original Super Power fuel formula?
by HalfaDave Wed Apr 17, 2024 7:28 pm
Cox Engine of The Month


CEF Traveling Engine


Win This Engine!

Live on Patrol


1/2A Minnow
Page 1 of 1

 1/2A Minnow
![]() modelbuilder49 Tue May 05, 2015 10:51 am
modelbuilder49 Tue May 05, 2015 10:51 am
Construction of the MINNOW
Saturday, April 18, 2015
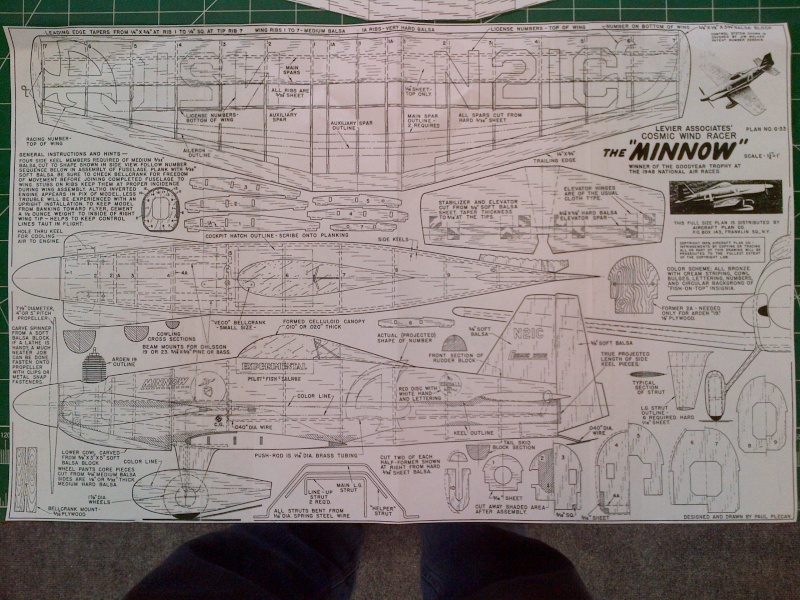
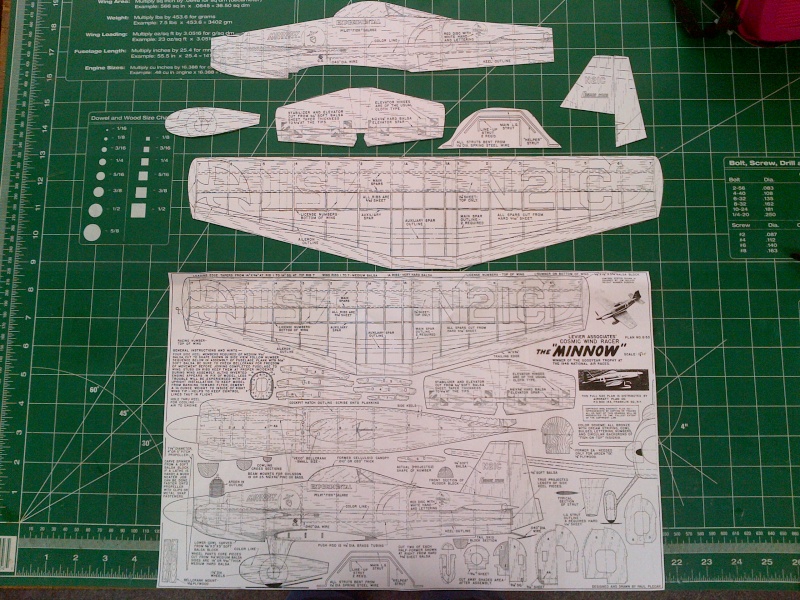
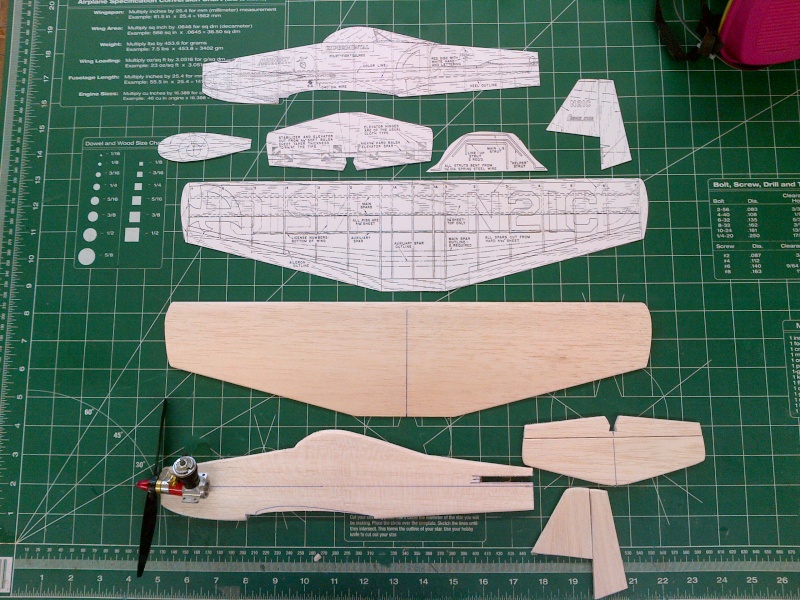
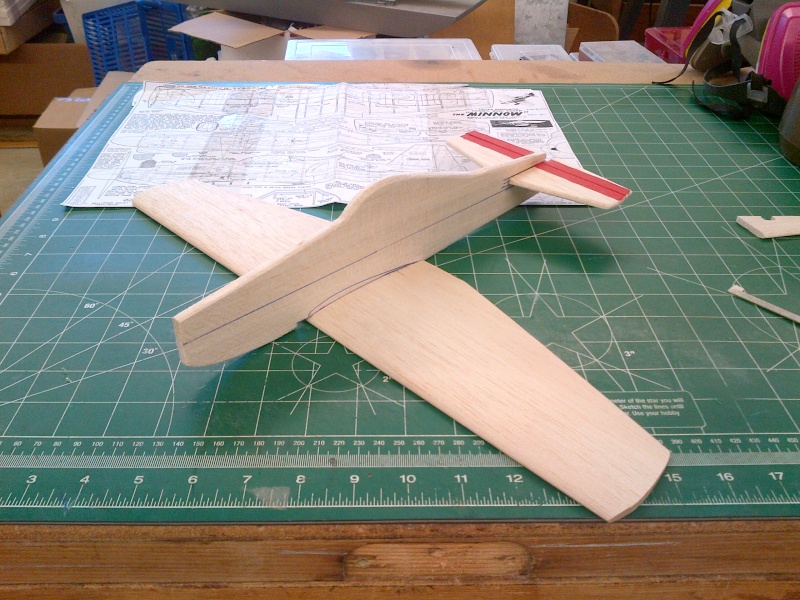
After completing the Komet ME-163, when I came back into the workshop, I pondered what the next project would be and decided that I would take a look on OuterZone and see what tickled my fancy. Well, I found the MINNOW, a .19 powered, 24” wingspan model by Paul Plecan from Aircraft Plan Company so I went into the house with the intent of downloading and printing the plan then making the necessary templates but ended up watching the movie “Paul Blart, Mall Cop”. It was most enjoyable but eventually I returned to the project at hand. I had to re-size the plans to comply with the minimum specs of the 1/2A’s for the Cox Profile Contest which specified that the plane be control line with a profile fuselage, a minimum 12” fuselage and 15” wingspan. When I had printed it to an acceptable size I returned to the workshop, taped the plan together, cutout the templates then began cutting out the parts for the MINNOW. This one looks a bit more realistic in size for the TEE DEE 051 and even the Black Widow engine. I’m leaning towards adding some maple motor mounts and some fuselage doublers and mounting the TEE DEE. Well, back to the assembly of the MINNOW. I used a piece of ¼” balsa for the fuselage, some 3/16” balsa for the horizontal and vertical stabilizers and a piece of Sig 4” preshaped airfoil balsa. I took a few minutes to take some pictures to document the build then I went to work sanding the all of the basic parts to an acceptable shape, then I used a strip of the homemade iron on hinge to join the elevator and horizontal stab before calling it quits for the evening.
Sunday, April 19, 2015
I returned to work on the MINNOW and again, used some iron on hinge to attach the elevator to the horizontal stab then fitted the wing and horizontal stab to the fuselage. Finally, I glued the wing and horizontal stab assembly to the fuselage using some thin CA in order to check the alignment and adjust as needed. I decided to cut a couple of 3/32” plywood fuselage doublers for the MINNOW and make the cut out for the Tee Dee 051. I did a bit of pre-shaping then glued them up using some Sig Bond Aliphitic glue and left them to dry overnight. I didn't add the hardwood maple mounts this time .... I hope I don't regret it but then again, I'm not all that sure I will need them anyway. Also, I wrote to the Cox Engine Forum and asked how someone could identify a .049 from a .051 and the key is the red body for the 051 or black body for the 049 and the ring around the bottom of the 051 piston. That was some good info that I did not know.
Monday, April 20, 2015
I completed the shaping of the fuselage doublers for the Tee Dee.
Tuesday, April 21, 2015
I resumed the process of assembling the MINNOW and made and mounted a modified landing gear. Using some 3/32” music wire, I decided to bend it and make it flat mounted to the bottom of the wing then glued some 3/32” x 1/8” balsa strips as braces and laid some 1/32” ply over the gaps. It may be overkill but it should be sufficient. At this point the Tee Dee 051 was satisfactorily fitted; now it’s time for making the control prior to finishing. I mounted the bellcrank, elevator and pushrod using a Brodak 1/2A bellcrank, p/n BB-390 then set up the controls using 015” cable for the leadouts and a piece of .054” music wire for the pushrod. As I was straightening up the workbench I decided to go through my stash of other 1/2A plans and templates and found that I really have quite a few! I resumed work setting up the controls and by 1510 the MINNOW was essentially ready for its finish.
Wednesday, April 22, 2015
I applied a coat of Coverite to the MINNOW and hung it up to dry.
Monday, April 27, 2015
After looking on the internet for a decent color scheme I began the day working to cover the MINNOW and by 1830 I had it covered with the red Monokote and was ready for the white trim and I was ready to take a break and relax because my back has been aching.
Tuesday, April 28, 2015
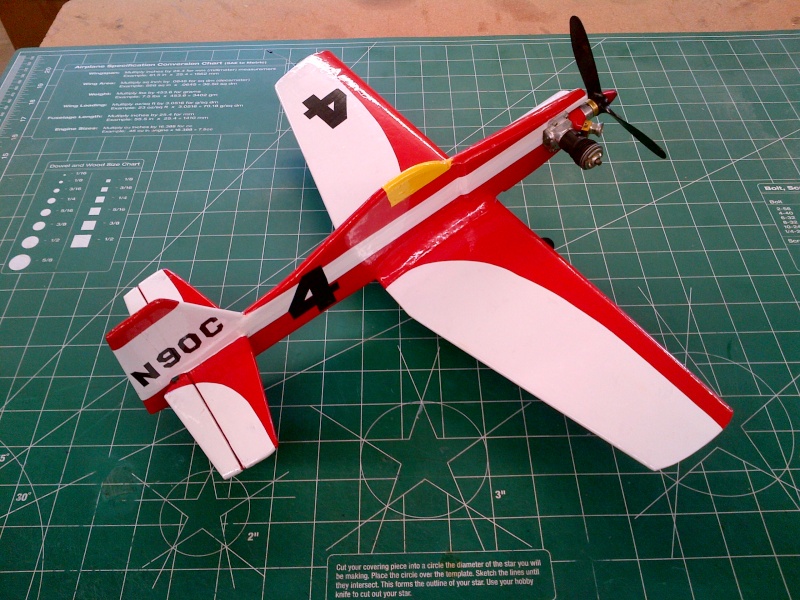
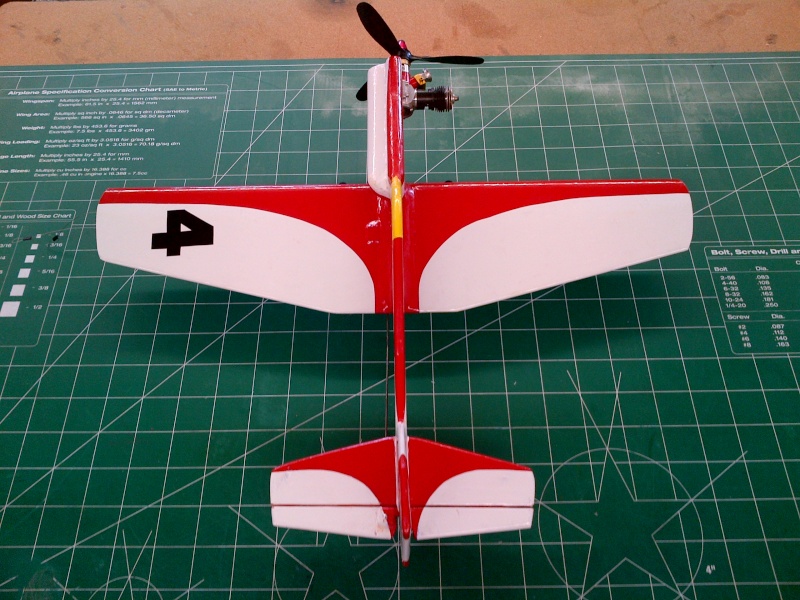
After scripture and coffee I came into the workshop with the goal of completing the MINNOW using iron on Monokote versus trim tape. Also, I received my order from Tower with the wheels I needed APC 6” propellers. I decided to use the Dubro #123MS wheels since they only weighed 1.1 grams each and it really looks nice. At first I mounted one of the new APC 6” propellers on the Tee Dee 051 but after looking in my bag of “goodies” I spotted a 3 bladed Thimble Drone prop and I thought it looked so kool that I just had to mount it. By 1630 the trim work was essentially complete; all I need now is a suitable fuel tank. Unfortunately I will probably have to come up with one of the small Perfect fuel tanks from somewhere. Oh well, this one really turned out well and I can only hope it flies just as well. I took a couple of pictures with a 3 bladed propeller mounted because it looked really kool.
Thursday, April 30, 2015
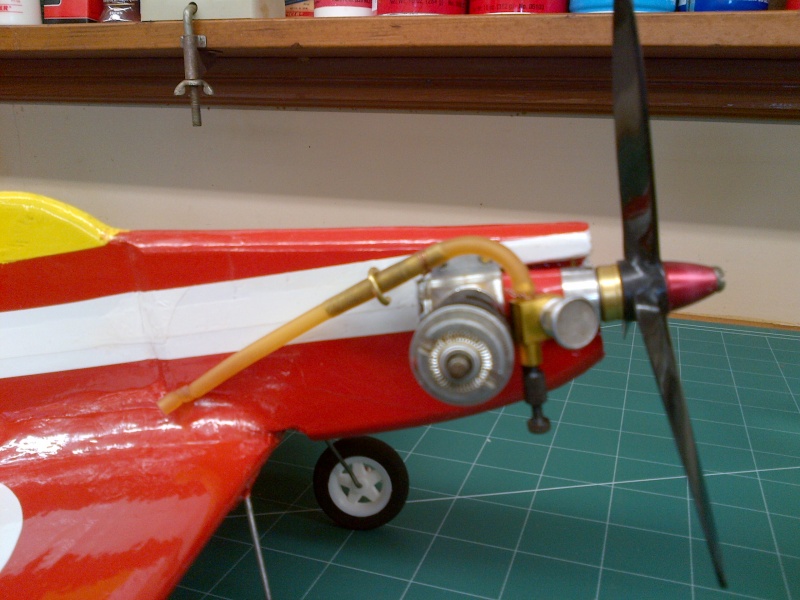
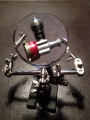
Good morning! After coffee and scripture I came into the workshop and basically just began the processes of the day. I went through another box of “goodies from back in the day” and I found a package of Sullivan Thin Wall Surgical Tubing, code STF, so I attempted making a bladder for the TEE DEE 051 that I mounted on the Minnow. I’ve never done this before so all I could do was copy what I saw in a picture that JPevlo posted on the Cox Engine Forum (https://i.imgur.com/3YI2w3e.jpg). I’m thinking I try it and see what it requires to make it work. I just hope it works! Anyway the final specs for the MINNOW are: is powered with a Tee Dee 051 and a Thimble Drone 3 blade 5 x 3 prop, 17” wingspan, 13.25” fuselage, 14.75” L.O.A., and an empty ready to fly weight of 5.2 ounce.


Saturday, April 18, 2015
After completing the Komet ME-163, when I came back into the workshop, I pondered what the next project would be and decided that I would take a look on OuterZone and see what tickled my fancy. Well, I found the MINNOW, a .19 powered, 24” wingspan model by Paul Plecan from Aircraft Plan Company so I went into the house with the intent of downloading and printing the plan then making the necessary templates but ended up watching the movie “Paul Blart, Mall Cop”. It was most enjoyable but eventually I returned to the project at hand. I had to re-size the plans to comply with the minimum specs of the 1/2A’s for the Cox Profile Contest which specified that the plane be control line with a profile fuselage, a minimum 12” fuselage and 15” wingspan. When I had printed it to an acceptable size I returned to the workshop, taped the plan together, cutout the templates then began cutting out the parts for the MINNOW. This one looks a bit more realistic in size for the TEE DEE 051 and even the Black Widow engine. I’m leaning towards adding some maple motor mounts and some fuselage doublers and mounting the TEE DEE. Well, back to the assembly of the MINNOW. I used a piece of ¼” balsa for the fuselage, some 3/16” balsa for the horizontal and vertical stabilizers and a piece of Sig 4” preshaped airfoil balsa. I took a few minutes to take some pictures to document the build then I went to work sanding the all of the basic parts to an acceptable shape, then I used a strip of the homemade iron on hinge to join the elevator and horizontal stab before calling it quits for the evening.
Sunday, April 19, 2015
I returned to work on the MINNOW and again, used some iron on hinge to attach the elevator to the horizontal stab then fitted the wing and horizontal stab to the fuselage. Finally, I glued the wing and horizontal stab assembly to the fuselage using some thin CA in order to check the alignment and adjust as needed. I decided to cut a couple of 3/32” plywood fuselage doublers for the MINNOW and make the cut out for the Tee Dee 051. I did a bit of pre-shaping then glued them up using some Sig Bond Aliphitic glue and left them to dry overnight. I didn't add the hardwood maple mounts this time .... I hope I don't regret it but then again, I'm not all that sure I will need them anyway. Also, I wrote to the Cox Engine Forum and asked how someone could identify a .049 from a .051 and the key is the red body for the 051 or black body for the 049 and the ring around the bottom of the 051 piston. That was some good info that I did not know.
Monday, April 20, 2015
I completed the shaping of the fuselage doublers for the Tee Dee.
Tuesday, April 21, 2015
I resumed the process of assembling the MINNOW and made and mounted a modified landing gear. Using some 3/32” music wire, I decided to bend it and make it flat mounted to the bottom of the wing then glued some 3/32” x 1/8” balsa strips as braces and laid some 1/32” ply over the gaps. It may be overkill but it should be sufficient. At this point the Tee Dee 051 was satisfactorily fitted; now it’s time for making the control prior to finishing. I mounted the bellcrank, elevator and pushrod using a Brodak 1/2A bellcrank, p/n BB-390 then set up the controls using 015” cable for the leadouts and a piece of .054” music wire for the pushrod. As I was straightening up the workbench I decided to go through my stash of other 1/2A plans and templates and found that I really have quite a few! I resumed work setting up the controls and by 1510 the MINNOW was essentially ready for its finish.
Wednesday, April 22, 2015
I applied a coat of Coverite to the MINNOW and hung it up to dry.
Monday, April 27, 2015
After looking on the internet for a decent color scheme I began the day working to cover the MINNOW and by 1830 I had it covered with the red Monokote and was ready for the white trim and I was ready to take a break and relax because my back has been aching.
Tuesday, April 28, 2015
After scripture and coffee I came into the workshop with the goal of completing the MINNOW using iron on Monokote versus trim tape. Also, I received my order from Tower with the wheels I needed APC 6” propellers. I decided to use the Dubro #123MS wheels since they only weighed 1.1 grams each and it really looks nice. At first I mounted one of the new APC 6” propellers on the Tee Dee 051 but after looking in my bag of “goodies” I spotted a 3 bladed Thimble Drone prop and I thought it looked so kool that I just had to mount it. By 1630 the trim work was essentially complete; all I need now is a suitable fuel tank. Unfortunately I will probably have to come up with one of the small Perfect fuel tanks from somewhere. Oh well, this one really turned out well and I can only hope it flies just as well. I took a couple of pictures with a 3 bladed propeller mounted because it looked really kool.
Thursday, April 30, 2015
Good morning! After coffee and scripture I came into the workshop and basically just began the processes of the day. I went through another box of “goodies from back in the day” and I found a package of Sullivan Thin Wall Surgical Tubing, code STF, so I attempted making a bladder for the TEE DEE 051 that I mounted on the Minnow. I’ve never done this before so all I could do was copy what I saw in a picture that JPevlo posted on the Cox Engine Forum (https://i.imgur.com/3YI2w3e.jpg). I’m thinking I try it and see what it requires to make it work. I just hope it works! Anyway the final specs for the MINNOW are: is powered with a Tee Dee 051 and a Thimble Drone 3 blade 5 x 3 prop, 17” wingspan, 13.25” fuselage, 14.75” L.O.A., and an empty ready to fly weight of 5.2 ounce.

modelbuilder49- Gold Member

- Posts : 290
Join date : 2013-09-12
Age : 75
Location : Titusville Florida
Re: 1/2A Minnow
![]() Cribbs74 Tue May 05, 2015 11:51 am
Cribbs74 Tue May 05, 2015 11:51 am
That Minnow looks fantastic, nice work!
If I can give one piece of advice and to save you some headaches... That NV will not work well with a bladder. You need to use a fine thread NV such as a KK or Texas Timers etc.
The regular course needle does not allow you to fine tune and it will be way too touchy.
Other than that it looks good to go!
Ron

Cribbs74- Moderator


Posts : 11895
Join date : 2011-10-24
Age : 50
Location : Tuttle, OK
KariFS- Diamond Member

- Posts : 2000
Join date : 2014-10-10
Age : 52
Re: 1/2A Minnow
![]() modelbuilder49 Tue May 05, 2015 12:25 pm
modelbuilder49 Tue May 05, 2015 12:25 pm
Thanks Ron! I didn't know  .... guess I'll be searching around for one of those needle assemblies
  ! Hopefully I'll find one before the deadline is too close otherwise I'll be searching for a suitable sized Perfect tank and I have no idea which one will be satisfactory for the mandatory 10 laps!! Oh well, glad it's a hobby!!
modelbuilder49- Gold Member
- Posts : 290
Join date : 2013-09-12
Age : 75
Location : Titusville Florida


navion34- Gold Member
- Posts : 208
Join date : 2012-09-09
Age : 60
Location : France
Re: 1/2A Minnow
![]() dckrsn Tue May 05, 2015 4:17 pm
dckrsn Tue May 05, 2015 4:17 pm
That Minnow is beautiful. Nice job.
A needle assembly like Ron mentioned, is available
here.
http://texastimers.com/
You might find one cheaper, used, for a few
bucks less, but I wouldn't fool around for a few bucks.
Bob
A needle assembly like Ron mentioned, is available
here.
http://texastimers.com/
You might find one cheaper, used, for a few
bucks less, but I wouldn't fool around for a few bucks.
Bob

dckrsn- Diamond Member
- Posts : 2750
Join date : 2010-10-21
Age : 71
Location : Long Island, New York
Re: 1/2A Minnow
![]() modelbuilder49 Wed May 06, 2015 9:11 am
modelbuilder49 Wed May 06, 2015 9:11 am
Thanks! I'll be looking forward to getting my hands on one of them!!dckrsn wrote:That Minnow is beautiful. Nice job.
A needle assembly like Ron mentioned, is available
here.
http://texastimers.com/
You might find one cheaper, used, for a few
bucks less, but I wouldn't fool around for a few bucks.
Bob
modelbuilder49- Gold Member
- Posts : 290
Join date : 2013-09-12
Age : 75
Location : Titusville Florida
Page 1 of 1
Permissions in this forum:
You cannot reply to topics in this forum