

 Rules
Rules
Log in
Search
Latest topics
» A choke-tube with velocity-stack configured Beeby roddie Today at 6:12 am
» Jim Walkers FireBee - This is going to be fun
by cstatman Yesterday at 6:58 pm
» Prop Rod - resto to a runner
by cstatman Yesterday at 6:56 pm
» Hawk had breakfast and then took a bath
by rdw777 Yesterday at 5:38 pm
» Jim Walker Firebaby
by rdw777 Yesterday at 4:58 pm
» WenMac 049 - Glow Plug & Head Gasket replacements?
by rdw777 Yesterday at 4:32 pm
» Nostalgia alert, my 1959 Corvette revisited
by rsv1cox Yesterday at 2:25 pm
» Prayers for my Wife Please
by akjgardner Yesterday at 10:28 am
» Cox prop rod
by Wiggy Fri May 17, 2024 4:30 pm
» "Red Neck" .049 elec. starter
by getback Fri May 17, 2024 7:19 am
» Cox prop rod
by Wiggy Fri May 17, 2024 5:35 am
» Looking For Comet Tri-Pacer
by latole Fri May 17, 2024 3:45 am


CEF Traveling Engine


Win This Engine!

Live on Patrol


Hyper Viper #3
Page 1 of 1

Hyper Viper #3
![]() 944_Jim Thu Nov 11, 2021 11:03 pm
944_Jim Thu Nov 11, 2021 11:03 pm
For some reason, I got caught up in the performance 1/2A models threads between here and Stunt Hanger a few weeks ago. So I started chasing down how to acquire an easy kill. My pre-determined specs were immediately and easily identifiable. First, I did not want a knock together slab wing/profile fuselage plane (sorry White Lightning, and 1/2A Nobler). Second, I did not want the subject to fly like a slab wing/profile fuselage plane. Third, I wanted wing area. I mean, I wanted something that looked like it needed to be built on an ironing board!
A bit more digging, a few emails, and then a phone call.
TADA (big fan fare and bright horns blaring)!
May I introduce you to "(benefactor's name redacted for his privacy) Phault II", carefully semi-assembled by the hands of Greg at Southeridge CNC. I will hint that Benefactor is a frequent Gentleman of the Forum, always willing to share knowledge and humor, and one I consider a battle-buddy in that we are both worn-out Veterans/Retirees.
This one took a strange turn in that normally I really enjoy the build. But this excersize is about getting into the air and flying a performance plane...not beating dust around a work bench. I was fine with the idea of home built, but once the deal was done, I am fully relaxed about cheating the build with my first ARC (almost ready to cover). Again...I just want to fly!
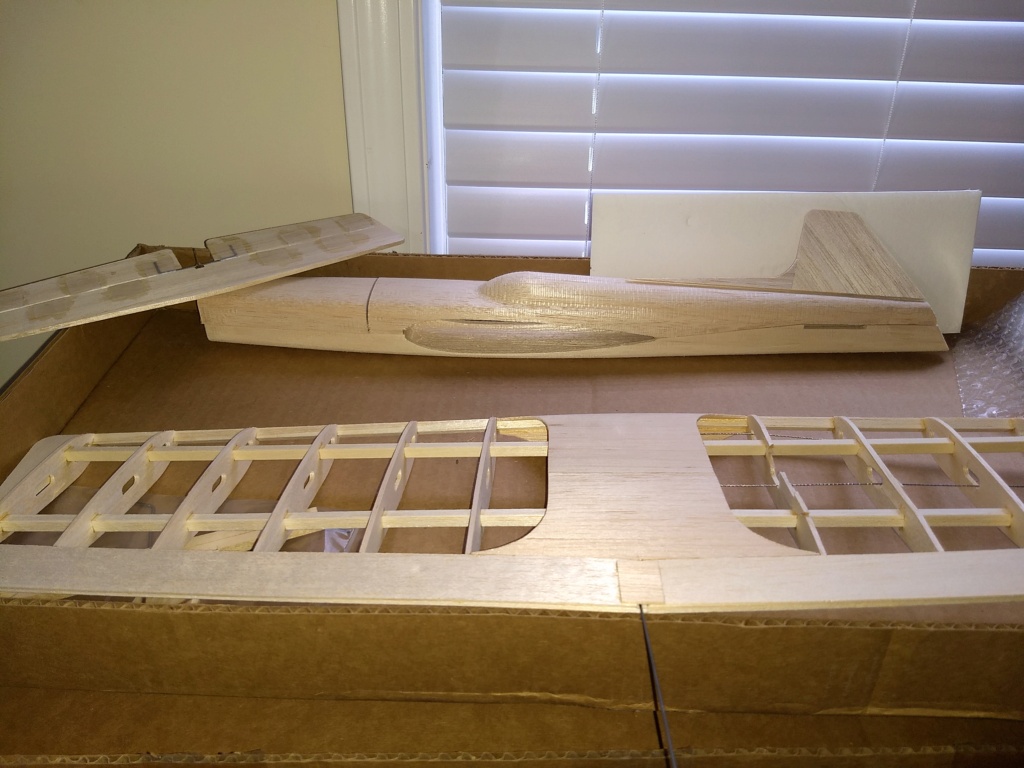
Fre, er, Benefactor out-did himself with shipping this one. The kit arrived in much better shape than I hoped for. While carefully unpacking and inspecting each component, I am amazed at the quality of workmanship, and have to wonder how Greg can do this at a profit. The wing incurred some minor damage, but only a couple of ribs will need fixing.
The CNC fuselage is gorgeous! So is the stabilizor with tight hinge-gap, and super-flippy-floppy elevator. A complete hardware kit rounds out an exceptional kit.
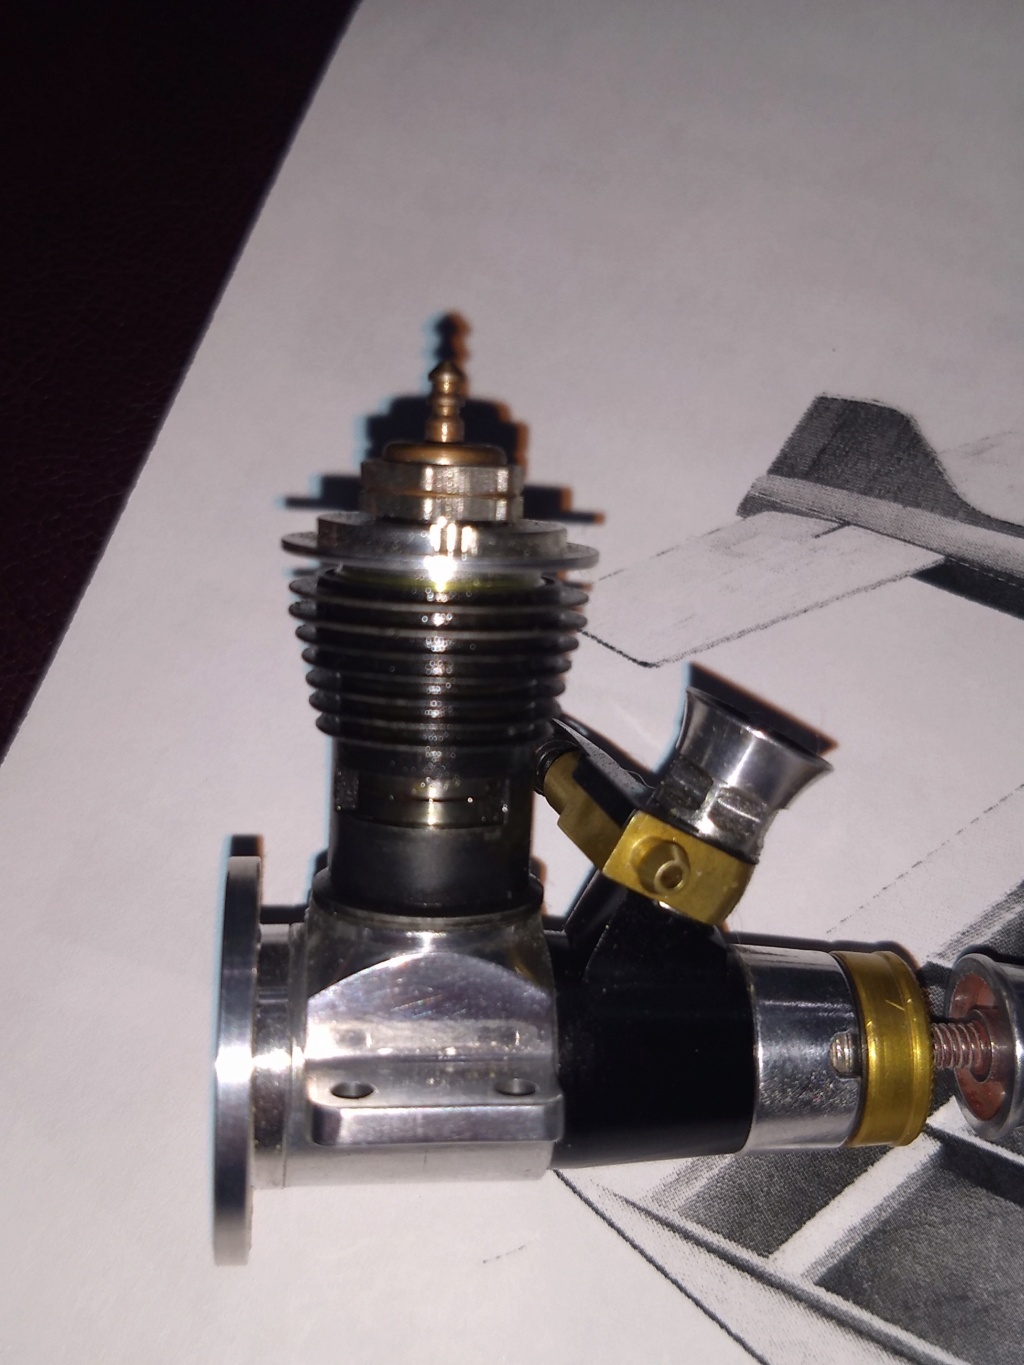
But then, hiding in a corner of the box I discovered a cube of bubble wrap. It was too solid and hefty to be only packing material. Some investigation revealed another first for Ole Jim...a Tee Dee. And this is no regular Tee Dee! I'm still in shock as I consider if this entire package will be dope and tissue, or my first Iron-on model. But just look at this engine...this one has the ring in the piston skirt...an 0.051!
Now to decide fix a few things, and decide on covering method. I hope to fly this Thanksgiving weekend...a bunch!
A bit more digging, a few emails, and then a phone call.
TADA
May I introduce you to "(benefactor's name redacted for his privacy) Phault II", carefully semi-assembled by the hands of Greg at Southeridge CNC. I will hint that Benefactor is a frequent Gentleman of the Forum, always willing to share knowledge and humor, and one I consider a battle-buddy in that we are both worn-out Veterans/Retirees.
This one took a strange turn in that normally I really enjoy the build. But this excersize is about getting into the air and flying a performance plane...not beating dust around a work bench. I was fine with the idea of home built, but once the deal was done, I am fully relaxed about cheating the build with my first ARC (almost ready to cover). Again...I just want to fly!
Fre, er, Benefactor out-did himself with shipping this one. The kit arrived in much better shape than I hoped for. While carefully unpacking and inspecting each component, I am amazed at the quality of workmanship, and have to wonder how Greg can do this at a profit. The wing incurred some minor damage, but only a couple of ribs will need fixing.
The CNC fuselage is gorgeous! So is the stabilizor with tight hinge-gap, and super-flippy-floppy elevator. A complete hardware kit rounds out an exceptional kit.
But then, hiding in a corner of the box I discovered a cube of bubble wrap. It was too solid and hefty to be only packing material. Some investigation revealed another first for Ole Jim...a Tee Dee. And this is no regular Tee Dee! I'm still in shock as I consider if this entire package will be dope and tissue, or my first Iron-on model. But just look at this engine...this one has the ring in the piston skirt...an 0.051!
Now to decide fix a few things, and decide on covering method. I hope to fly this Thanksgiving weekend...a bunch!
_________________
Never enough time to build them all...always enough time to smash them all!
944_Jim- Diamond Member


Posts : 1964
Join date : 2017-02-08
Age : 59
Location : NE MS
Re: Hyper Viper #3
![]() getback Fri Nov 12, 2021 6:01 am
getback Fri Nov 12, 2021 6:01 am
WOooo Lookie there man thats Nice !! Looking forward to the jump right to it Flight ! 


getback- Top Poster

-
Posts : 10167
Join date : 2013-01-18
Age : 66
Location : julian , NC
Re: Hyper Viper #3
![]() 944_Jim Wed Nov 24, 2021 6:47 pm
944_Jim Wed Nov 24, 2021 6:47 pm
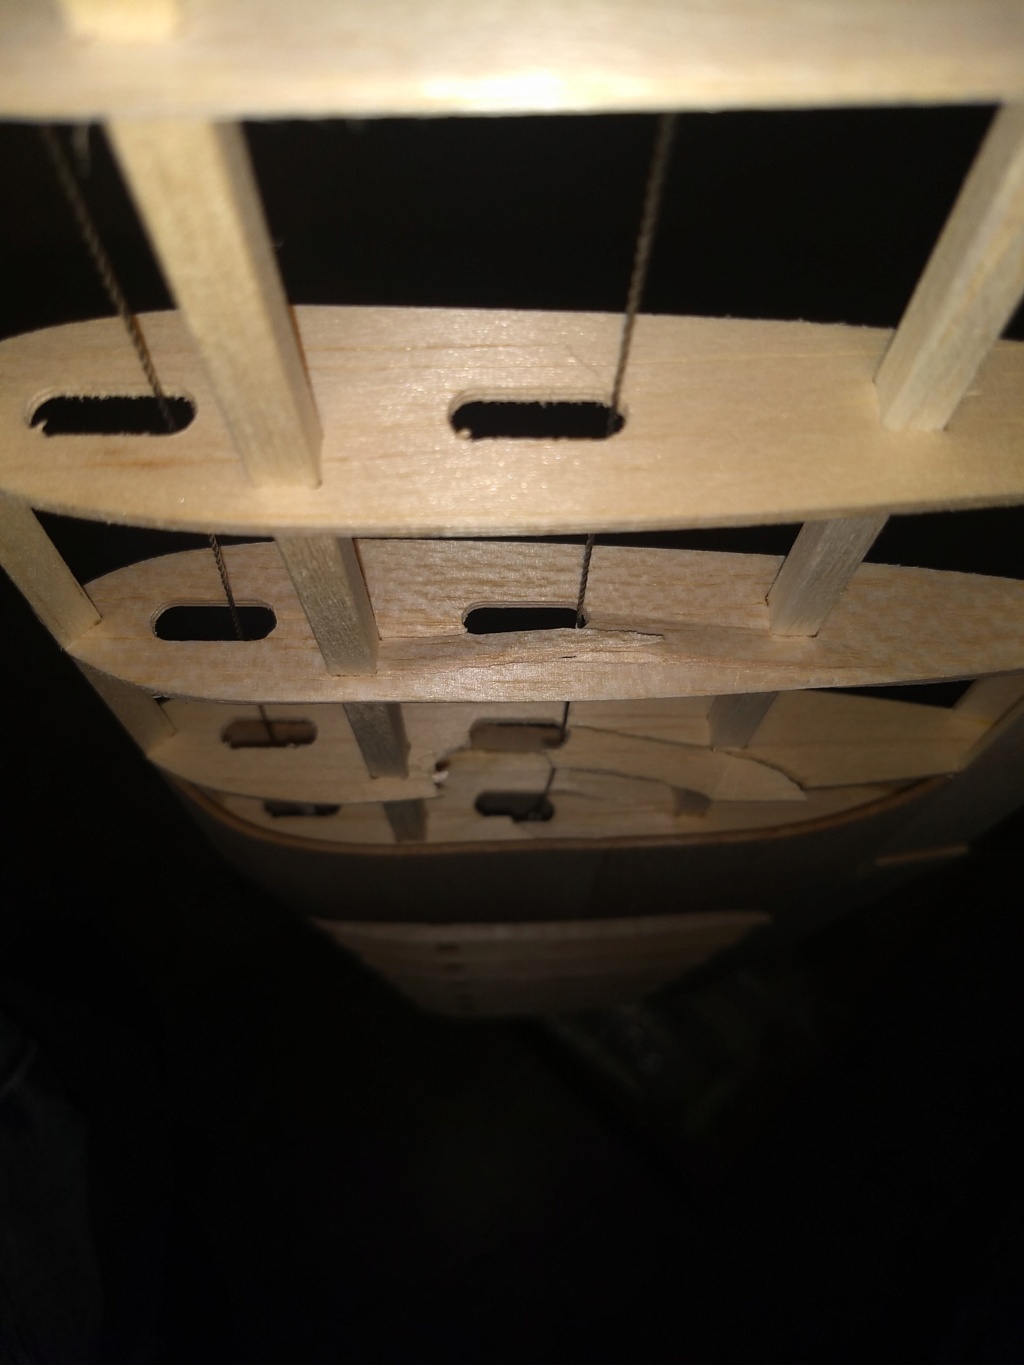
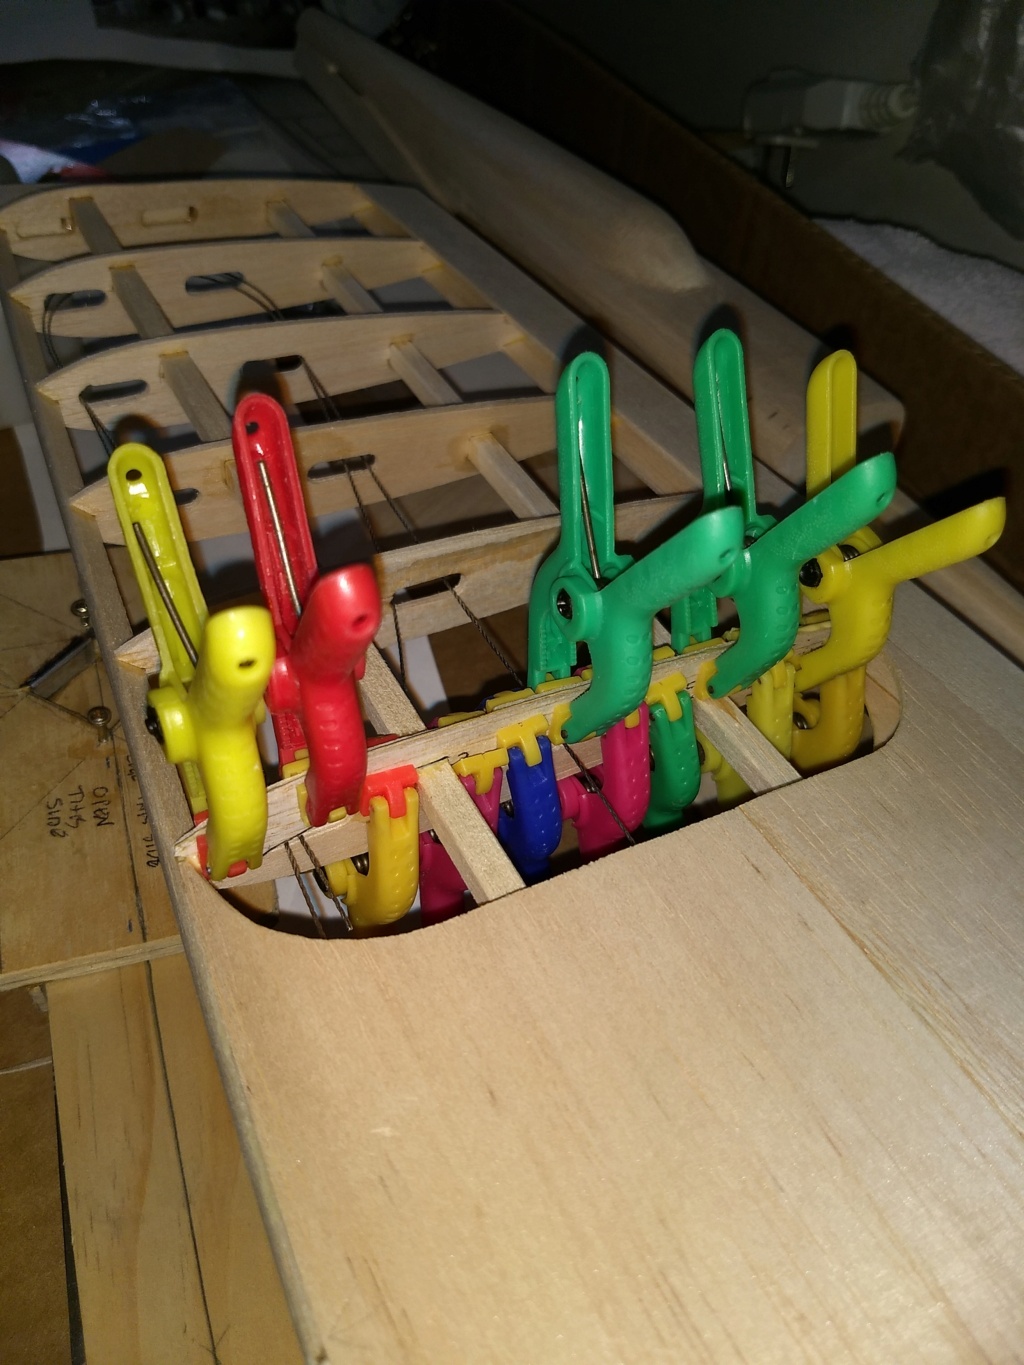
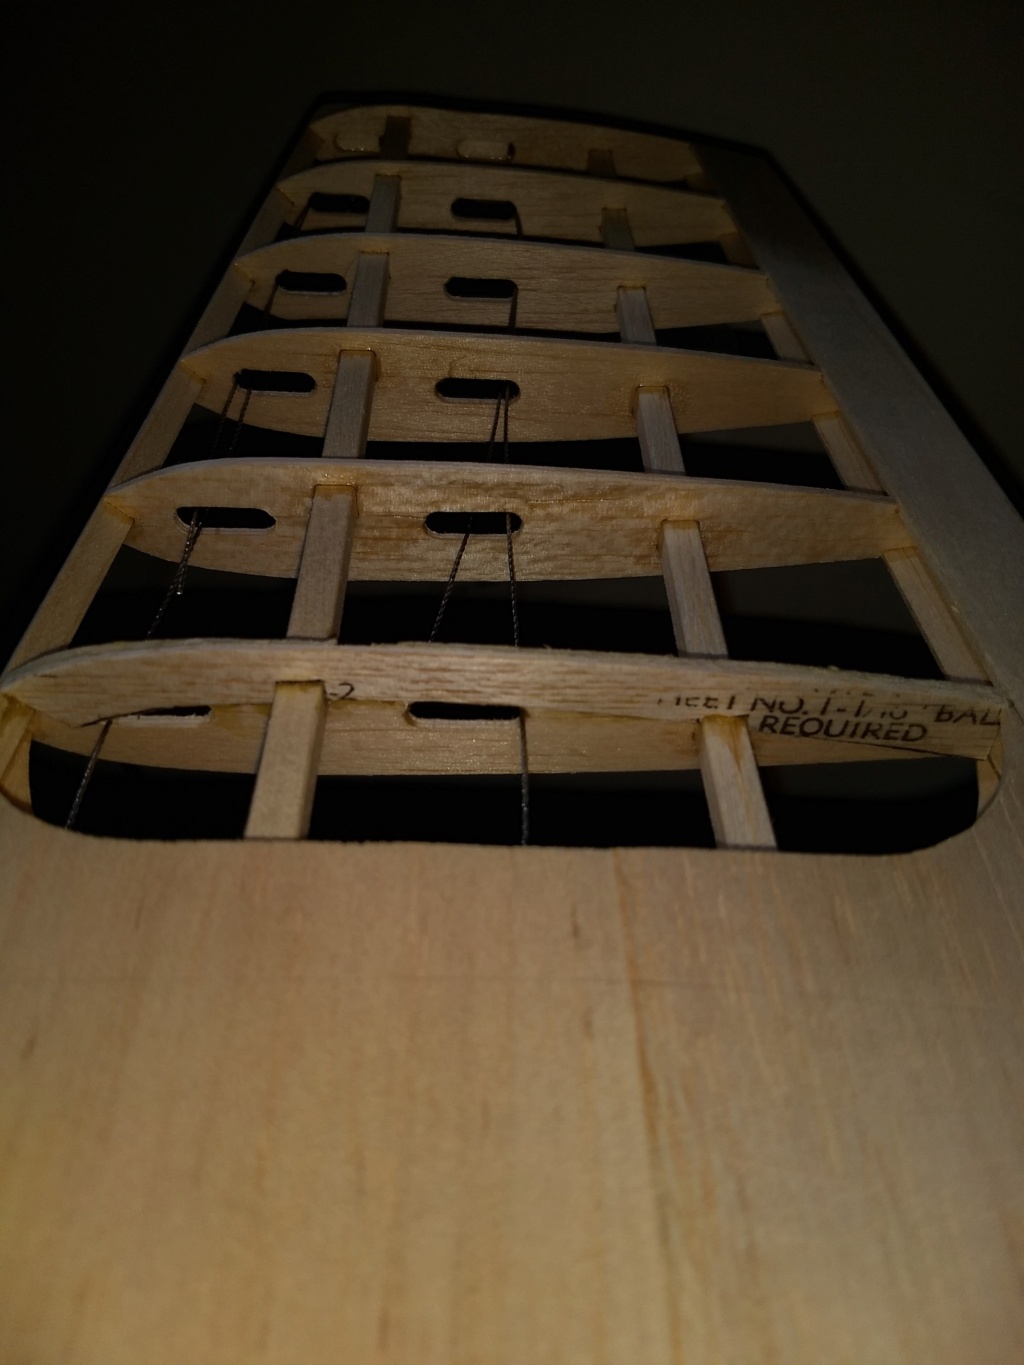
Ok...so some work has been done to repair the wing. I used a long Allen wrench to reach into the sheeted wing section and gently pulled a collapsed rib back into position. Some CA was dribbled in to stabilize that rib. The next rib going outboard was just folded in a bit, so I massaged that one back into shape, and some more CA was used to stabilize that one. The remaining damaged rib was really bad. Several pieces needed to be glued together into fewer, larger parts. Then they were assembled into the rib. Since there was a missing chunk, I chose to reinforce that rib with a splint on one side. For this more exposed and delicate repair, Tite-Bond II was used for it's "flexibility." I figured more CA would leave me with a very brittle and exposed rib.
_________________
Never enough time to build them all...always enough time to smash them all!
944_Jim- Diamond Member
-
Posts : 1964
Join date : 2017-02-08
Age : 59
Location : NE MS
Re: Hyper Viper #3
![]() 944_Jim Wed Nov 24, 2021 7:59 pm
944_Jim Wed Nov 24, 2021 7:59 pm
Fred told me he thinks this particular plane builds very nose heavy. He also strongly suggested a balloon tank instead of a metal one. I sat the engine rearward in the fuselage and saw I can move it back between 1/2"-3/4", and realized the fuel cell will not have much room inside the CNC machined nose block and fuselage. So I started thinking about other ways to get volume. My primary concern was if I removed the wood nose block, what would reinforce the fuselage? How could I accomplish maximizing volume AND not weaken the nose?
I did consider cutting a rear bulkhead and frontbulk head and sheet the "new nose block" with 1/16" balsa. This still leaves me with compartmentalizing and fuel proofing, yet doesn't provide a significant strengthener. So onto idea #2... create a new nose block with integrated tank. This DOES give me a longitudinal strengthener, with a thinner exterior veneer, and if done really well, will provide a fuel-proof cell within which to install a balloon tank, or even finish as a real tank. I think the balloon tank will drain the the last drop...a real tank won't without an angled outboard side wall. I'll consider the options IF I can make the piece well enough.
So to work...
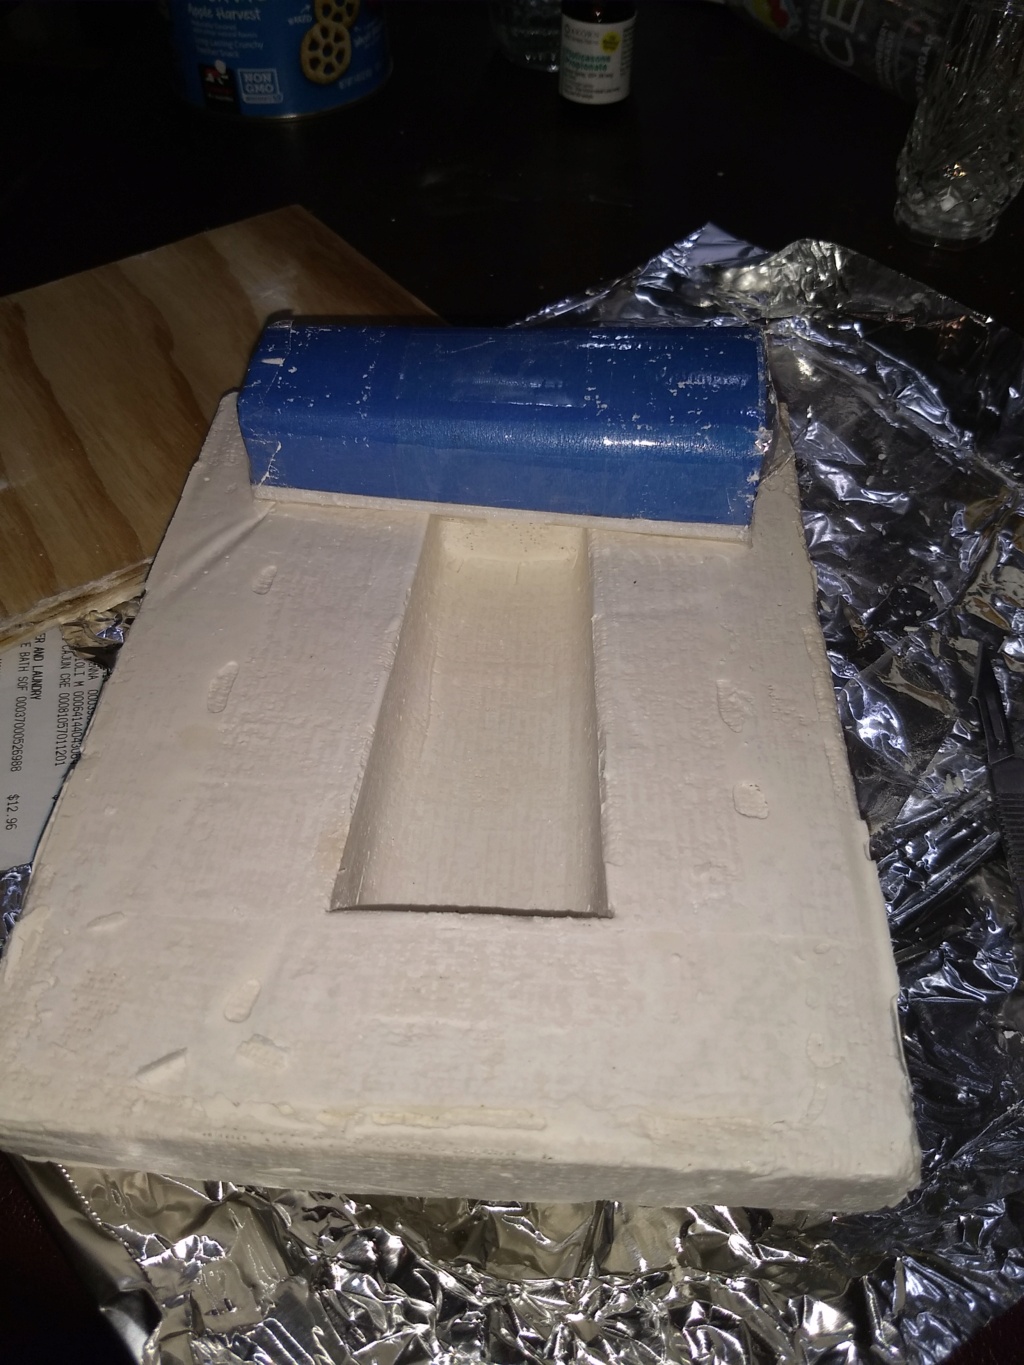
The original nose block was taped with low-tack blue masking tape (so it would hopefully peel off easily), and coated with one layer of packing tape. Then the "buck" was taped to a plywood plate (another packing tape layer) and greased with carnuba wax-bearing waterless car cleaner so plaster would not (hopefully) stick. Then plaster cast making gauze was cut into strips and laid over the buck. More plaster was mixed up and pushed into the casting material to drive out any air pockets/voids. The whole thing was left to "dry" for the last three days. Today I removed the still-humid mold from the "buck" while chatting with Fred...I thought it was poetic that he called to chat just as I was working his model!
The cast will sit on my hot water tank for the next few days to watch for shrinkage, cracking and (preferably) drying out to be the best casting mold I ever made. That last part is tongue-in-cheek...this is the first time I've tried this. I do admit the buck got a good dose of humidity, but I doubt there was any significant water leak into the balsa nose block. There was a bit of along-the-grain peeling of balsa as I removed the tape from the buck, but this isn't destined to be a hanger queen,.and it will sand out just fine if I need it. The fiberglass part will be made next week, after the mold finishes drying out.
The lower fuselage section has also gotten taped, and dams built around the sides to build the floor of the tank/fuel cell. I'm still up in the air regarding integral wet tank versus balloon cell. In the end, I hope to glue the "floor" into the engine cover/upper cell body. The whole thing should then glue over the engine/lower fuselage. The engine cover may get cut free from the tank so I can service the engine. This is all still in development mode
At this point no model parts have been harmed!
I did consider cutting a rear bulkhead and frontbulk head and sheet the "new nose block" with 1/16" balsa. This still leaves me with compartmentalizing and fuel proofing, yet doesn't provide a significant strengthener. So onto idea #2... create a new nose block with integrated tank. This DOES give me a longitudinal strengthener, with a thinner exterior veneer, and if done really well, will provide a fuel-proof cell within which to install a balloon tank, or even finish as a real tank. I think the balloon tank will drain the the last drop...a real tank won't without an angled outboard side wall. I'll consider the options IF I can make the piece well enough.
So to work...
The original nose block was taped with low-tack blue masking tape (so it would hopefully peel off easily), and coated with one layer of packing tape. Then the "buck" was taped to a plywood plate (another packing tape layer) and greased with carnuba wax-bearing waterless car cleaner so plaster would not (hopefully) stick. Then plaster cast making gauze was cut into strips and laid over the buck. More plaster was mixed up and pushed into the casting material to drive out any air pockets/voids. The whole thing was left to "dry" for the last three days. Today I removed the still-humid mold from the "buck" while chatting with Fred...I thought it was poetic that he called to chat just as I was working his model!
The cast will sit on my hot water tank for the next few days to watch for shrinkage, cracking and (preferably) drying out to be the best casting mold I ever made. That last part is tongue-in-cheek...this is the first time I've tried this. I do admit the buck got a good dose of humidity, but I doubt there was any significant water leak into the balsa nose block. There was a bit of along-the-grain peeling of balsa as I removed the tape from the buck, but this isn't destined to be a hanger queen,.and it will sand out just fine if I need it. The fiberglass part will be made next week, after the mold finishes drying out.
The lower fuselage section has also gotten taped, and dams built around the sides to build the floor of the tank/fuel cell. I'm still up in the air regarding integral wet tank versus balloon cell. In the end, I hope to glue the "floor" into the engine cover/upper cell body. The whole thing should then glue over the engine/lower fuselage. The engine cover may get cut free from the tank so I can service the engine. This is all still in development mode
At this point no model parts have been harmed!
_________________
Never enough time to build them all...always enough time to smash them all!
944_Jim- Diamond Member
-
Posts : 1964
Join date : 2017-02-08
Age : 59
Location : NE MS
Re: Hyper Viper #3
![]() balogh Wed Nov 24, 2021 11:24 pm
balogh Wed Nov 24, 2021 11:24 pm
Jim that 051 has an old stock thin wall tapered bore cylinder that will serve you for hundreds of hours in my experience. Most likely has a small oiling hole on the big end of the conrod. Also equipped with a Kamtechnik turbo head for Nelson plugs and a Kamtechnik radial mount for TeeDee snd Medallion engines..a very nice set of options for a precious engine..congrats!
Good luck with the build.
Good luck with the build.
balogh- Top Poster
-
Posts : 4755
Join date : 2011-11-06
Age : 65
Location : Budapest Hungary
Re: Hyper Viper #3
![]() Ken Cook Thu Nov 25, 2021 11:12 am
Ken Cook Thu Nov 25, 2021 11:12 am
I personally wouldn't want to be screwing around with a balloon tank. They inherently fail and being inside the plane could result in fuel everywhere. The balloon still needs a canister to hold it and the norm was a 35mm film canister which is practically the size of a metal tank anyhow. The benefit of a balloon is the run from start to the end. You won't achieve that using a metal tank but you can get it close if the tank has uniflow. It would be nice to post a pic of the engine crutch and fuse assembly. Your other pictures don't provide up close shots.
You really need to be able to make the tank adjustable up and down. Sometimes, the engine will need to be shimmed up off of the bearers due to not being able to change the tank height. Also if needed, you can flip the venturi assembly over which can change the height a slight bit as well. This can also result in changing the position where the needle exits the fuse so keep that in mind.
I would be interested in seeing what is there for real estate for a tank. Whatever you do, don't build the tank into the plane.

Ken Cook- Top Poster
- Posts : 5487
Join date : 2012-03-27
Location : pennsylvania
Re: Hyper Viper #3
![]() NEW222 Thu Nov 25, 2021 5:24 pm
NEW222 Thu Nov 25, 2021 5:24 pm
Looking like it will be a nice model when finished. While I have zero experience compared to Ken, I will second teh vote to NOT build the tank into the plane. Just in case you ever do need access, for whatever reason it may be, you will be cutting into the model, veurses making a hatch or such removable.

NEW222- Top Poster
- Posts : 3892
Join date : 2011-08-13
Age : 45
Location : oakbank, mb
Re: Hyper Viper #3
![]() Cribbs74 Fri Nov 26, 2021 3:10 pm
Cribbs74 Fri Nov 26, 2021 3:10 pm
I imagine the reason the balloon was suggested was due to fuel draw. TD’s are notorious for bad draw, however there are ways to improve this with some loss in power as the downside.
FVG is also correct in that it will build nose heavy, it is an exact replica of the plastic/foam model, but before chopping the nose see how it balances with the TD as its lighter than the original engine in the plastic version and it’s not made of plastic.
Ron
FVG is also correct in that it will build nose heavy, it is an exact replica of the plastic/foam model, but before chopping the nose see how it balances with the TD as its lighter than the original engine in the plastic version and it’s not made of plastic.
Ron

Cribbs74- Moderator
-
Posts : 11899
Join date : 2011-10-24
Age : 50
Location : Tuttle, OK
Re: Hyper Viper #3
![]() 944_Jim Fri Nov 26, 2021 4:18 pm
944_Jim Fri Nov 26, 2021 4:18 pm
Hi guys,
I hear what you are saying. Let me have a chance to make up the first part. Then I'll play Show-and-Tell so you can visualize the pieces.
I only say that because the original pieces are already prepared for being molds, so there isn't much to look at yet. Just a bunch of blue low tack masking tape and really slick packing tape for a release surface.
I do appreciate your attention and help!
Thanks.
Last edited by 944_Jim on Fri Nov 26, 2021 7:56 pm; edited 1 time in total
_________________
Never enough time to build them all...always enough time to smash them all!
944_Jim- Diamond Member
-
Posts : 1964
Join date : 2017-02-08
Age : 59
Location : NE MS
Re: Hyper Viper #3
![]() rsv1cox Fri Nov 26, 2021 6:28 pm
rsv1cox Fri Nov 26, 2021 6:28 pm
Where have I been!!!!!
Love picture #2 first post.
Go for it Jim. I'm a follower.
Bob
Love picture #2 first post.
Go for it Jim. I'm a follower.
Bob

rsv1cox- Top Poster
-
Posts : 10656
Join date : 2014-08-18
Location : West Virginia
» Cox me-109 stunt measures - for a friend - he wants to build one again !
» Cox Hyper Viper *** And Chipmunk, now
» Hyper Viper's 1st Flights
» Balsa Hyper Viper
» Southridge CNC Hyper Viper
» Cox Hyper Viper *** And Chipmunk, now
» Hyper Viper's 1st Flights
» Balsa Hyper Viper
» Southridge CNC Hyper Viper
Page 1 of 1
Permissions in this forum:
You cannot reply to topics in this forum