

 Rules
Rules
by rdw777 Today at 8:30 am
» Speed plane - Crispy but not too crispy
by rsv1cox Today at 6:43 am
» Project Cox .049 r/c & Citabrian Champion
by rsv1cox Today at 6:27 am
» Roddie-Rigger.. a 2005 original design
by rsv1cox Today at 6:23 am
» Three (only one left) Cox .020 silencers for sale.
by GallopingGhostler Today at 5:12 am
» *Cox Engine of The Month* Submit your pictures! -May 2024-
by Admin Today at 2:38 am
» Fox .35 Modifications
by GallopingGhostler Today at 12:20 am
» Post your Older ignition books
by lla Yesterday at 6:34 pm
» S1 Ringmaster
by Onelife Yesterday at 8:40 am
» O&R 23 & Brown Jr
by getback Yesterday at 7:47 am
» Introducing our Cox .049 TD Engines
by MauricioB Yesterday at 2:31 am
» Jim Walker Firebaby
by rdw777 Tue Apr 30, 2024 4:16 pm


Ringmaster
Page 1 of 2 • 1, 2 ![]()

Ringmaster
![]() Onelife Wed Oct 05, 2022 12:15 pm
Onelife Wed Oct 05, 2022 12:15 pm
Please I would really appreciate any and all help. And if There is a better way I am up for any improvements. And the horn also it’s the old wooden horn. The instructions aren’t very clear to me I’m sorry

Onelife- Gold Member

- Posts : 184
Join date : 2022-09-20
Re: Ringmaster
![]() GallopingGhostler Wed Oct 05, 2022 5:32 pm
GallopingGhostler Wed Oct 05, 2022 5:32 pm
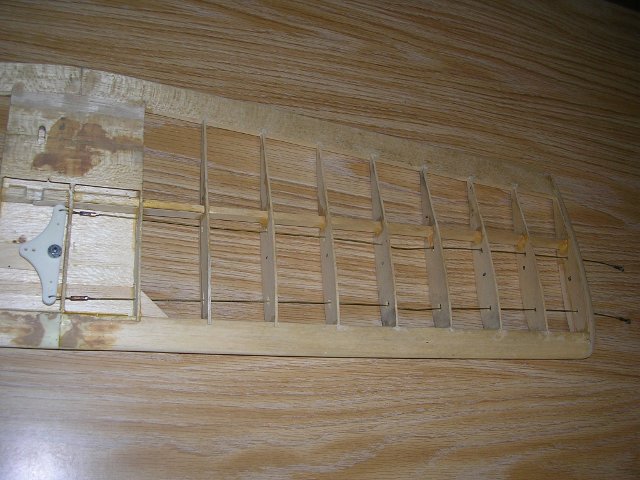
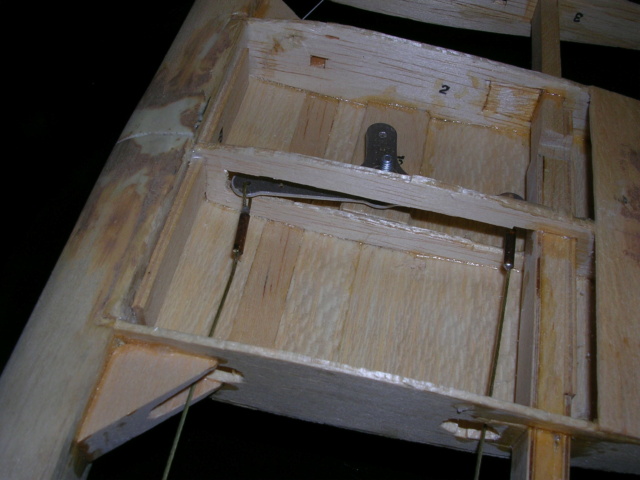
I have the original Kit S-1, bellcrank is mounted to a plywood platform with a bolt through the bellcrank bearing between ribs. (Reason for the odd patching is this was one already framed but not finished, mailed to me by a friend. I did a correction to building error to remove a wing warp and finished it. Photos of it are on Outerzone.)
I think that the plan on Outerzone for the later S-1A (revision, wing has planked leading edge), uses same bellcrank arrangement.
A later one revised by Pat King (plan on Outerzone) used a floating arrangement.

GallopingGhostler- Top Poster


Posts : 5318
Join date : 2013-07-13
Age : 70
Location : Clovis NM or NFL KC Chiefs
Re: Ringmaster
![]() Onelife Wed Oct 05, 2022 5:56 pm
Onelife Wed Oct 05, 2022 5:56 pm
That question might be confusing I mean is the rib notched out and the platform slid in the rib for extra support?
Onelife- Gold Member
- Posts : 184
Join date : 2022-09-20
Re: Ringmaster
![]() GallopingGhostler Wed Oct 05, 2022 6:06 pm
GallopingGhostler Wed Oct 05, 2022 6:06 pm
Following is a redrawn plan of the original S-1 plan in Italian, available on Hip Pocket Aeronautics. It numbers the plywood pieces as #3 and #4, and shows how they are assembled.
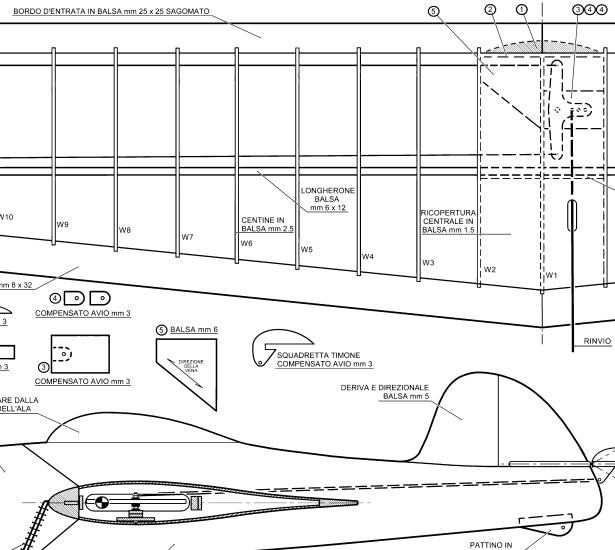
It is slightly different that mine, because I used a SIG bellcrank, which has a sufficient standoff.
You can obtain the drawing if you register (free) at Hip Pocket.
GallopingGhostler- Top Poster
-
Posts : 5318
Join date : 2013-07-13
Age : 70
Location : Clovis NM or NFL KC Chiefs
Re: Ringmaster
![]() Onelife Thu Oct 06, 2022 2:55 am
Onelife Thu Oct 06, 2022 2:55 am
Onelife- Gold Member
- Posts : 184
Join date : 2022-09-20
Re: Ringmaster
![]() getback Fri Oct 07, 2022 5:38 am
getback Fri Oct 07, 2022 5:38 am

getback- Top Poster

Posts : 10127
Join date : 2013-01-18
Age : 66
Location : julian , NC
Re: Ringmaster
![]() Onelife Fri Oct 07, 2022 12:51 pm
Onelife Fri Oct 07, 2022 12:51 pm
http://www.vuelocircular.es/RINGMASTER.pdf
Thank you. I’m still debating on location of leadouts. Either to go with the old plan or to modify it as on this plane. Any and all comments appreciated. Thanks again.
Onelife- Gold Member
- Posts : 184
Join date : 2022-09-20
Re: Ringmaster
![]() Ken Cook Fri Oct 07, 2022 3:40 pm
Ken Cook Fri Oct 07, 2022 3:40 pm
Using a large nylon horn is the ticket and use the hole furthest away from the hinge line to start. In addition, use a handle with 4" or less spacing. If the elevator is traveling more than 30 degrees each way, it's too much.
Having the proper engine on the Ring is also important. If this is a stock Sterling S1, keep the period engines, Mccoy's, Fox's, etc. These engines are 7oz's. Sterling used complete crap for plywood doublers and it's heavy. These can be substituted for 1/16" ply and the 1 1/2" motor mounts which are useless can also be lengthened into the fuse for better engine runs.
Foam wheels, no spinners, wood props, plastic tank, no rudder offset or engine offset all results in better performance than moving the leadouts.
If you haven't already, the spar in the Ringmaster is useless. I never use a spar in these type of wings because it only adds unnecessary weight. The solid leading edge is the backbone to this wing. The stock spar does nothing to strengthen the wing, it breaks every rib in the plane if you hit the ground. It's referred to as the "Rib Ripper". I fiberglass the trailing edge joint to prevent the wing from going forward in case of a strike.

Ken Cook- Top Poster
- Posts : 5461
Join date : 2012-03-27
Location : pennsylvania
Re: Ringmaster
![]() Onelife Fri Oct 07, 2022 5:57 pm
Onelife Fri Oct 07, 2022 5:57 pm
Onelife- Gold Member
- Posts : 184
Join date : 2022-09-20
Re: Ringmaster
![]() Yabby Fri Oct 07, 2022 6:55 pm
Yabby Fri Oct 07, 2022 6:55 pm
As above. thanks heaps Ken!Ken Cook wrote:I can offer some suggestions. For starters, the ....................
 I am about to start building a baby ringmaster from Outerzone plans and your thoughts and advice are greatly helpful to me also
 This type of advive is priceless as it helps me end up with a better model and I wont spend time doing things whilst building it that are going to directly contribute to its likely early demise. As you know, the build part is not my favourite part of the hobby.
  , simply as I just find it really hard to make things work out and align properly etc. And its the flying that gives me the rush, satisfaction and happiness. Your thoughts on the spars are very instructive and qualift my own thoughts on smallish built up wings as I tend not to use spars at all, and if necessary put small triangulated gussets on the front and back of the ribs on both sides. I have found doing this on my 15 Enya type Dominator and Warlord to provide a very solid and strong wing, hence I was going to take this approach to the baby ringmaster also.
Mine will not have wheels as it will have a TD049 that launchs straight from the edge of a launch table.
Thanks for contributing this type of advice!
 Its this type of stuff that many new to the sport and old farts like me coming back to the sport really get value from as to many of us, it is not intuitive, and having it explained helps produce better and easier builds and get to the part, well in my case anyway, that I love. Which is flying them, and even more I love is completing Unpowered Landings
 Thanks Ken

Yabby

Yabby- Platinum Member

-
Posts : 702
Join date : 2021-06-08
Location : Yorke Peninsula South Australia
Onelife- Gold Member
- Posts : 184
Join date : 2022-09-20
Re: Ringmaster
![]() Ken Cook Fri Oct 07, 2022 7:53 pm
Ken Cook Fri Oct 07, 2022 7:53 pm
When I use nylon hinges, I inspect every hinge and move each one in my hand first. There's flash on all of them and this won't wear in. Each hinge needs to be de flashed around the barrels. You can feel the hinge click as it snags the flash. I use 6 hinges for a Ring elevator. After it's cleaned up, I rough all sides of the hinge with coarse sandpaper, I then open every hole up with a small pin vise. I then oil the barrel and then I clean all glued edges of the hinge with lacquer thinner to remove oil and clean the glue surface.
Prepare the stab to elevator properly which means that the two have to meet perfectly square. Radius both leading edges. In addition, on the elevator half, I sink the barrels into leading edge. This not only looks better but it insures that there will be no binding after assembled. I glue the hinges in one side at a time.
Once the epoxy is mixed, it's important to have a Q-tip ready and some alcohol during this process. You don't need lots of epoxy, you just need to insure that you have enough to coat both sides and I use a thin metal spatula to insert the epoxy into the grooves. Thin 1/64 " ply can used in the form of a spreader as well to get the epoxy deep into the grooves. Once the grooves are filled up, hit this edge with a heat gun which will make the epoxy runny and water like. Now clean up the leading edge prior to inserting the hinge so that when you push the hinge into the groove, squeeze out won't go into the barrel. Make certain that each hinge is projecting out of the stab equally and it's at a right angle to the part to insure no binds will take place. All this sounds complicated but it's quite easy.
Ken Cook- Top Poster
- Posts : 5461
Join date : 2012-03-27
Location : pennsylvania
Re: Ringmaster
![]() Ken Cook Fri Oct 07, 2022 8:15 pm
Ken Cook Fri Oct 07, 2022 8:15 pm
Therefore, you don't need ribs that are 1/8" thick and solid. All you need is 3/32" on a .35 size model, 1/16" on a .15 size and you can even get by with 1/32" on a 1/2A. I prefer 1/16" just due to handling and sanding. You can remove almost the entire center of the rib and not compromise the compression strength. The triangulated gussets if one was requiring them would only be needed in the outside corners of the wing. As I mentioned above in my post is that the Ringmaster needs all the strength you can offer it in the trailing edge center joint. If it fails the entire wing goes forward and hinges on the center of the leading edge joint. You want the leading edge joint to break. If it breaks, it becomes a easy repair only requiring the sheeting to be fixed and not destructing the leading edge which is the strength of the final wing.
A 1/2A is a different story and it generally doesn't have enough momentum to totally destroy itself. Not that it can't happen. Bob Hunt has a great saying that is a tough one to swallow. If your plane survives a crash, it's built too heavy. Unfortunately, this is totally accurate.
Ken Cook- Top Poster
- Posts : 5461
Join date : 2012-03-27
Location : pennsylvania
Re: Ringmaster
![]() Onelife Fri Oct 07, 2022 8:27 pm
Onelife Fri Oct 07, 2022 8:27 pm
 [url=https://servimg.com/view/20452297/20][img]https://i.servimg.com/u/f18/20/45/22/97/
Oh never mind I figured it out you mean like just glue it to the stap and then the elevator. Got it
Onelife- Gold Member
- Posts : 184
Join date : 2022-09-20
Re: Ringmaster
![]() Yabby Sat Oct 08, 2022 4:52 am
Yabby Sat Oct 08, 2022 4:52 am
Ken Cook wrote:Yabby, a few things to note in regards to the Baby Ring. Starting with the .35 sized Ring, it flies well and does what its supposed to do but it's not real agile. As this model was scaled down to the Jr, and the Baby, the flying characteristics actually became worse. The Jr. is very nose heavy and the wingspan is lacking. All of them will fly better if made as light as possible. Your rib gussets front and rear are totally unnecessary and are doing nothing more than adding weight as it does little to nothing in providing strength. A rib does nothing more than hold the shape of the airfoil. The gussets your suggesting would only be effective to prevent the wing from side racking. The wing isn't subjected to these loads and are only placed in this situation if it bounces on it's wing tip. Perimeter gussets in the corners of the leading and trailing edge would be more then adequate.
Therefore, you don't need ribs that are 1/8" thick and solid. All you need is 3/32" on a .35 size model, 1/16" on a .15 size and you can even get by with 1/32" on a 1/2A. I prefer 1/16" just due to handling and sanding. You can remove almost the entire center of the rib and not compromise the compression strength. The triangulated gussets if one was requiring them would only be needed in the outside corners of the wing. As I mentioned above in my post is that the Ringmaster needs all the strength you can offer it in the trailing edge center joint. If it fails the entire wing goes forward and hinges on the center of the leading edge joint. You want the leading edge joint to break. If it breaks, it becomes a easy repair only requiring the sheeting to be fixed and not destructing the leading edge which is the strength of the final wing.
A 1/2A is a different story and it generally doesn't have enough momentum to totally destroy itself. Not that it can't happen. Bob Hunt has a great saying that is a tough one to swallow. If your plane survives a crash, it's built too heavy. Unfortunately, this is totally accurate.
Excellent Thanks Ken!! the explanation as to building built up Wings makes great sense and is very helpful guidance in general for building ribbed wings.
i am going to build a half A version and I will definitely take note of your advice in respect to building it as light as possible. I do have a pair of Enya 15-III 3303 engines from my youth that I couldnt destroy with a 100 ton press. and a newish OS 15, but they are sitting on the front of old school combat wings. :-) even if the Half A Ringmaster doesnt fly that great, it will be good to build one and have a go. That very much resonates with an old finished up Bike racer like myself. Much like a top racer told me when I was starting out, If you dont crash twice a season, your not going fast enough Both very realistic, pragmatic, and sometimes hard to swallow. Yabby
Yabby- Platinum Member
-
Posts : 702
Join date : 2021-06-08
Location : Yorke Peninsula South Australia
Re: Ringmaster
![]() Ken Cook Sat Oct 08, 2022 5:36 am
Ken Cook Sat Oct 08, 2022 5:36 am
Ken Cook- Top Poster
- Posts : 5461
Join date : 2012-03-27
Location : pennsylvania
Re: Ringmaster
![]() Yabby Sat Oct 08, 2022 6:37 am
Yabby Sat Oct 08, 2022 6:37 am
Great heads up, I will mod my build accordingly as it makes sense as you have explained. And flipping over on landing and landing nose sort of first can happen and that does stress the fuse between the engine and the wing. Especially if the doubler stops at the wing, its like a perferated tear here line. Ive learnt more about building models in the past two days here, than in the past fourty years. Thanks!


Yabby
Yabby- Platinum Member
-
Posts : 702
Join date : 2021-06-08
Location : Yorke Peninsula South Australia
Re: Ringmaster
![]() Onelife Sat Oct 08, 2022 3:49 pm
Onelife Sat Oct 08, 2022 3:49 pm
Onelife- Gold Member
- Posts : 184
Join date : 2022-09-20
Re: Ringmaster
![]() Ken Cook Sat Oct 08, 2022 6:56 pm
Ken Cook Sat Oct 08, 2022 6:56 pm
If you have none of these items, you can go caveman style and use the "Nicholson Mill". This is a great term I learned from Larry Scarinzi. The Nicholson is a file. Larry always makes me laugh when he's asked how did he shape the creations he made and he says the "Nicholson mill".
Ken Cook- Top Poster
- Posts : 5461
Join date : 2012-03-27
Location : pennsylvania
Re: Ringmaster
![]() Onelife Sat Oct 08, 2022 8:40 pm
Onelife Sat Oct 08, 2022 8:40 pm
But anyway I have a Scroll saw I could probably break up some kind of fence to cut them mounts out and add longer ones what do you think? Well sorry to bore you with my baggage but I appreciate your knowledge thanks.
Onelife- Gold Member
- Posts : 184
Join date : 2022-09-20
Re: Ringmaster
![]() Ken Cook Sun Oct 09, 2022 6:09 am
Ken Cook Sun Oct 09, 2022 6:09 am
Ken Cook- Top Poster
- Posts : 5461
Join date : 2012-03-27
Location : pennsylvania
Re: Ringmaster
![]() rsv1cox Sun Oct 09, 2022 8:23 am
rsv1cox Sun Oct 09, 2022 8:23 am
Bob

rsv1cox- Top Poster
-
Posts : 10578
Join date : 2014-08-18
Location : West Virginia
Re: Ringmaster
![]() Onelife Sun Oct 09, 2022 9:38 am
Onelife Sun Oct 09, 2022 9:38 am
Feel free to share some info on the 35 to please thank you. I went and got new NVA and gaskets for them and only run Brodak’s 29 % castor still runs like a champ.
Onelife- Gold Member
- Posts : 184
Join date : 2022-09-20
Re: Ringmaster
![]() Onelife Wed Oct 12, 2022 9:40 am
Onelife Wed Oct 12, 2022 9:40 am
Onelife- Gold Member
- Posts : 184
Join date : 2022-09-20
Re: Ringmaster
![]() rsv1cox Wed Oct 12, 2022 9:47 am
rsv1cox Wed Oct 12, 2022 9:47 am
Onelife wrote:What’s a good setup for bellcrank and pushrod? I was thinking of some kind of clevis instead of just having the bent music wire hanging there?
The metal (plastics are to clunky) ones on a threaded rod work well, metal to metal contact not being a problem in C/L. Also allows for some ajdustment. But the rods are generally to large in diameter to fit in the bell cranks hole, you would have to drill it out. Slide a sleeve over the clevis.
rsv1cox- Top Poster
-
Posts : 10578
Join date : 2014-08-18
Location : West Virginia
Page 1 of 2 • 1, 2 ![]()