

 Rules
Rules
Log in
Search
Latest topics
» Speed plane - Crispy but not too crispyby rsv1cox Today at 6:43 am
» Project Cox .049 r/c & Citabrian Champion
by rsv1cox Today at 6:27 am
» Roddie-Rigger.. a 2005 original design
by rsv1cox Today at 6:23 am
» Three (only one left) Cox .020 silencers for sale.
by GallopingGhostler Today at 5:12 am
» *Cox Engine of The Month* Submit your pictures! -May 2024-
by Admin Today at 2:38 am
» Fox .35 Modifications
by GallopingGhostler Today at 12:20 am
» Jim Walkers FireBee - This is going to be fun
by roddie Yesterday at 6:51 pm
» Post your Older ignition books
by lla Yesterday at 6:34 pm
» S1 Ringmaster
by Onelife Yesterday at 8:40 am
» O&R 23 & Brown Jr
by getback Yesterday at 7:47 am
» Introducing our Cox .049 TD Engines
by MauricioB Yesterday at 2:31 am
» Jim Walker Firebaby
by rdw777 Tue Apr 30, 2024 4:16 pm
Cox Engine of The Month


CEF Traveling Engine


Win This Engine!

Live on Patrol


The last of C.T. engine rebuilds --- The Cox Tee Dee .051 R/C
Page 1 of 1

The last of C.T. engine rebuilds --- The Cox Tee Dee .051 R/C
![]() sosam117 Tue Apr 02, 2024 8:04 am
sosam117 Tue Apr 02, 2024 8:04 am
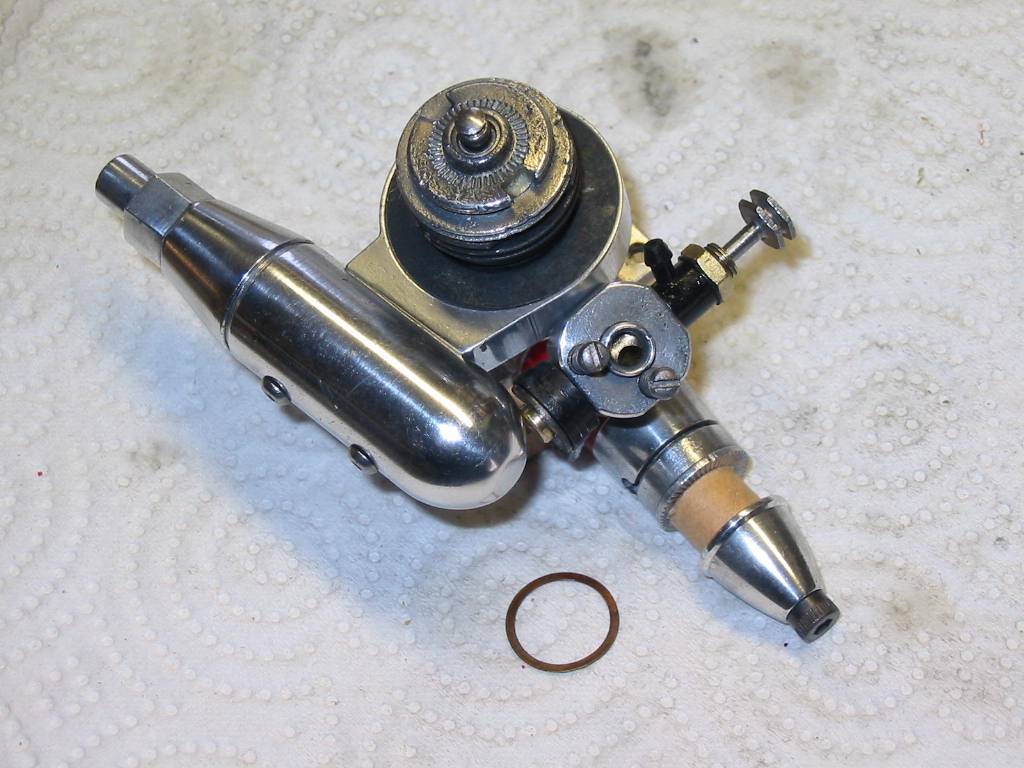
This is it ---- the last one before shipping them back to C.T.
The Cox Tee Dee .051 R/C:
The last diamond in the rough.
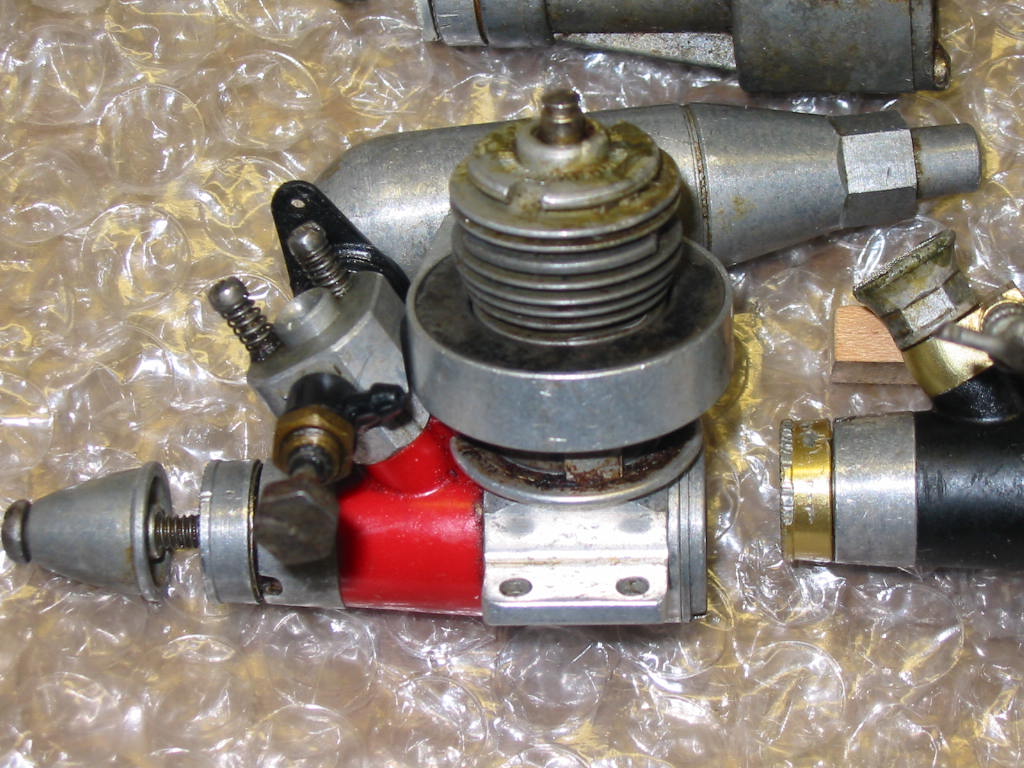
Overall condition was as usual --- piston stuck.
Removed the glow head, the backplate, the two screws from the carburetor, needle valve, the nut holding the fuel nipple, the fuel nipple, the "C" clip holding the throttle arm and the throttle arm.
Removed the prop driver by unscrewing the venturi body nut with the Cox wrench and popped the prop driver off.
Then I was able to remove the "Red" venturi body.
Then unscrewed the carb from the "Red" venturi body as the throttle barrel was stuck inside the carb.
I learned from previous cleanings that it is not a good idea to sonic clean the plastic parts as they get a "white" looking coating on them.
I clean then with a little Dawn dish soap (cutting grease power soap).
Everything that I could remove and that wasn't stuck I placed off on the side for a while.
I placed the parts that were stuck together into my sonic tank for 20 minutes (cleaning solution at 140°).
After the 20 minutes, the piston was free, the crank turned, the throttle barrel in the carb fell out during the sonic cleaning and was in the wire basket and no longer stuck in the carb.
As the engine was still "warm" from the sonic cleaning, it was easy enough to unscrew the cylinder and also, I was able to unscrew the two screws that held the exhaust stack to the barrel section of the muffler.
I placed all of the other parts into the sonic tank to be cleaned to match the other parts that were cleaned.
20 minutes @140° temp.
While those parts were cleaning (carb screws, glow head, needle valve, needle valve nut, spinner, prop driver, thrust washer, and backplate.
Washed the "Red" venturi body and fuel nipple in warm water with Dawn dish soap.
New I turned my attention to the cylinder sleeve for bluing.
Using my fine (stainless steel wire brush --- the fine wire is to get between the fins) and lightly brushed the cylinder to remove any rust off the cylinder. After the wire brushing, I clean the cylinder with Acetone using an acid brush, one of those cheap little brushes with the metal handle and I wear a pair of heavy cleaning gloves while doing this.
When I do the re-bluing of the cylinder, I use a neoprene hose that fits snugly into the cylinder sleeve so that the bluing will not damage the sleeve. The extra length of hose also gives you something to hold onto when re-bluing the cylinder.
I did the re-bluing three times ---- lightly wire brushed / cleaning with Acetone / re-bluing / wait 1 minute / rinse with cold water/ dry cylinder with heat gun (covering heat gun).
Each time it gets darker.
I did the same for the seal that is the top cover on the muffler to match the cylinder.
Well, the other parts in the meantime were done in the sonic tank.
Pulled them out and blew them off.
Next was to do some light buffing of the aluminum parts.
My favorite part on this engine is the muffler.
After all the aluminum was lightly buffed, they went back into a "clean" solution (as the other solution was rather dirty from before)
20 minutes @140° later -- the timer ticked off --- pulled the basket of aluminum parts up and blew them off.
The engine is now clean for the rebuild.
Quick steps to the assembly as it is similar to assembling any Tee Dee engine. Everything is given a light coating of Turbine oil during assembly.
1.) "Red" venturi body slipped onto the crankcase -- then venturi nut finger tightened to venturi body + 1/8 turn with Cox wrench.
Don't over tight or you will crack the venturi body as the aluminum will expand when engine is running, and the plastic won't.
Remember this also on the carburetor --- that is why many Tee Dee engines over time their venturi bodies crack!
2.) Insert crank into the crankcase --- I have a small had press with a fixture (I made) to now press the prop driver onto the crankshaft but don't forget to insert the thrust washer between the prop driver and the crankcase!
3.) Piston onto the crank pin.
4.) screw on the backplate.
5.)Assemble the carburetor back together (throttle barrel, servo arm, "C" clip, throttle screws, fuel nipple, and locking nut.
6.) Now for the needle valve --- with a dental pick, remove the old "O" ring
With the old one removed, lightly oil the new "O" ring and slide it up to where the old O"O ring was.

C.T. ---- with your engine, you have a spare "O" ring in a small 2-inch square envelope.
Now screw the needle valve into the carburetor.
7.) Screw the carburetor nut onto the carburetor then screw the carburetor onto the venturi body ("Red") and lock the carb in the correct position on the venturi body (to clear the muffler)
8.) Now for the deck height (timing) ---- see the other cleaning of C.T. engines to see how it is done.
Don't worry about the muffler at this moment.
9.) Deck height (timing) completed --- you didn't tighten everything down did you? Well, you'll have to unscrew the cylinder to install the muffler now.
Here I ran into a problem with the shim stock I used from Cox international.
The outside diameter protruded past the outside diameter of the cylinder.
The bottom part of the muffler sits down onto the crankcase and the top part of the muffler is spring steel (to make up any manufacturing tolerance "differences").
With the shim's diameter sticking out from the cylinder, it would not let the muffler seat where it was to be and messed up the assembly.
So, I used my small 5-inch diameter disc sander with 600 grit sandpaper and carefully reduced the outside diameter to 1/2 the original width (from i.d. to o.d.) so as to be the same outside diameter as the cylinder.
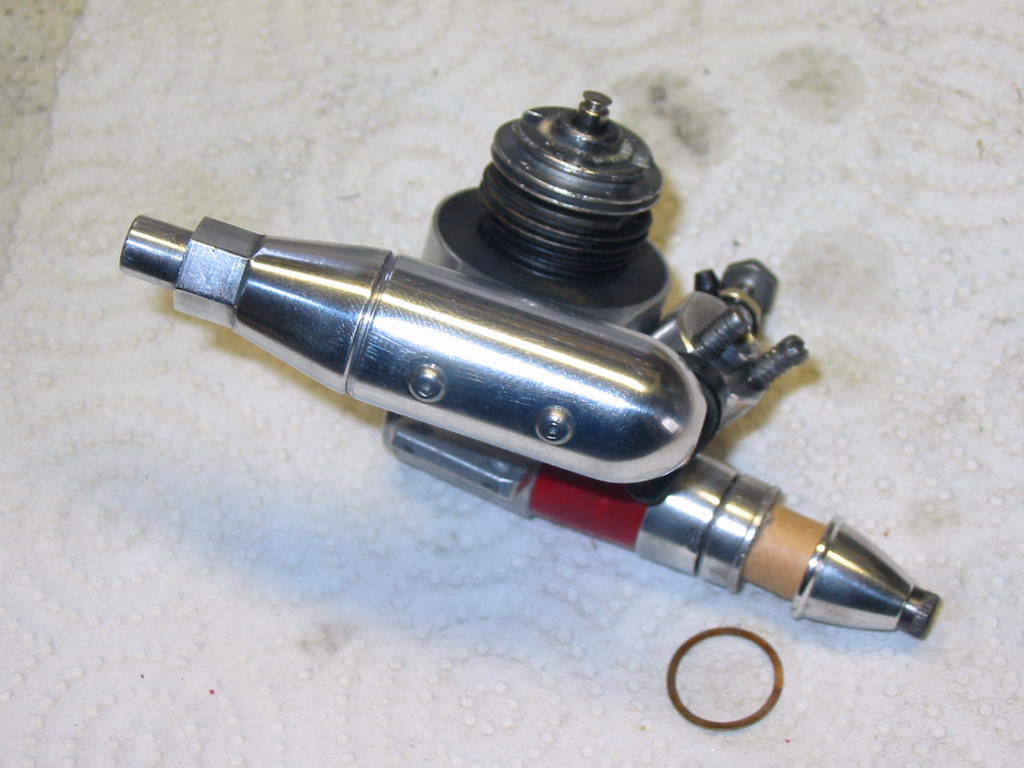
See the photo below of the shim between the crankcase and the cylinder --- after reducing the outside diameter.
You can see also the lower part of the muffler where it has to slip past the shim.

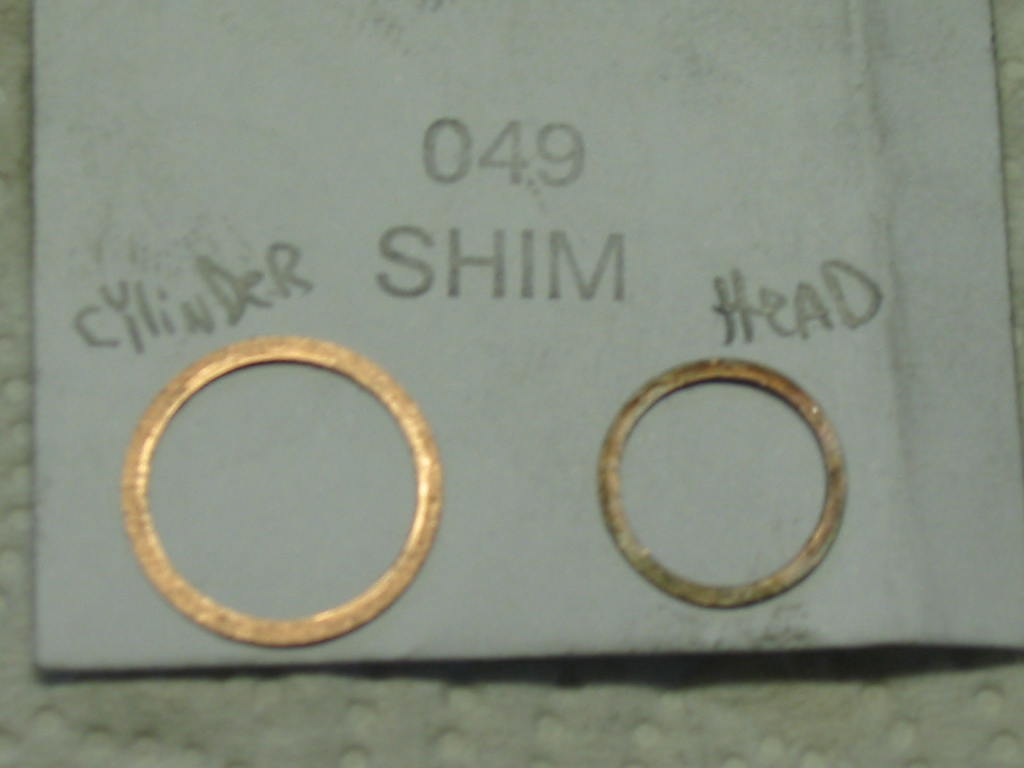
With the correct shim between the crankcase and the cylinder, the glow head shim is now not required.
But I have included it with the engine when shipped back to C.T. --- if he wants to use it?
Also, since I ordered the timing kit from Cox International (Burnie) which has "4" shims in the kit, I have one left that I'll send to C.T. as well.
Photo below is of the shims:
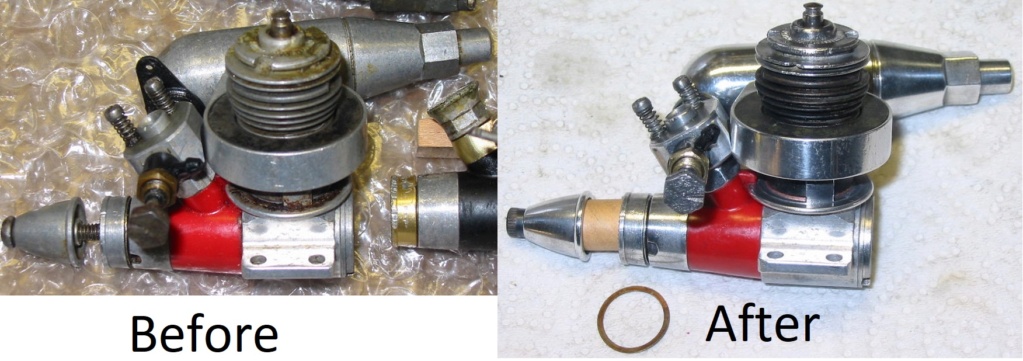
Now for the before and after photo:

I now have all of C.T.'s engines in one box and going to the post office to ship them to him!

The Cox Tee Dee .051 R/C:
The last diamond in the rough.
Overall condition was as usual --- piston stuck.
Removed the glow head, the backplate, the two screws from the carburetor, needle valve, the nut holding the fuel nipple, the fuel nipple, the "C" clip holding the throttle arm and the throttle arm.
Removed the prop driver by unscrewing the venturi body nut with the Cox wrench and popped the prop driver off.
Then I was able to remove the "Red" venturi body.
Then unscrewed the carb from the "Red" venturi body as the throttle barrel was stuck inside the carb.
I learned from previous cleanings that it is not a good idea to sonic clean the plastic parts as they get a "white" looking coating on them.
I clean then with a little Dawn dish soap (cutting grease power soap).
Everything that I could remove and that wasn't stuck I placed off on the side for a while.
I placed the parts that were stuck together into my sonic tank for 20 minutes (cleaning solution at 140°).
After the 20 minutes, the piston was free, the crank turned, the throttle barrel in the carb fell out during the sonic cleaning and was in the wire basket and no longer stuck in the carb.
As the engine was still "warm" from the sonic cleaning, it was easy enough to unscrew the cylinder and also, I was able to unscrew the two screws that held the exhaust stack to the barrel section of the muffler.
I placed all of the other parts into the sonic tank to be cleaned to match the other parts that were cleaned.
20 minutes @140° temp.
While those parts were cleaning (carb screws, glow head, needle valve, needle valve nut, spinner, prop driver, thrust washer, and backplate.
Washed the "Red" venturi body and fuel nipple in warm water with Dawn dish soap.
New I turned my attention to the cylinder sleeve for bluing.
Using my fine (stainless steel wire brush --- the fine wire is to get between the fins) and lightly brushed the cylinder to remove any rust off the cylinder. After the wire brushing, I clean the cylinder with Acetone using an acid brush, one of those cheap little brushes with the metal handle and I wear a pair of heavy cleaning gloves while doing this.
When I do the re-bluing of the cylinder, I use a neoprene hose that fits snugly into the cylinder sleeve so that the bluing will not damage the sleeve. The extra length of hose also gives you something to hold onto when re-bluing the cylinder.
I did the re-bluing three times ---- lightly wire brushed / cleaning with Acetone / re-bluing / wait 1 minute / rinse with cold water/ dry cylinder with heat gun (covering heat gun).
Each time it gets darker.
I did the same for the seal that is the top cover on the muffler to match the cylinder.
Well, the other parts in the meantime were done in the sonic tank.
Pulled them out and blew them off.
Next was to do some light buffing of the aluminum parts.
My favorite part on this engine is the muffler.
After all the aluminum was lightly buffed, they went back into a "clean" solution (as the other solution was rather dirty from before)
20 minutes @140° later -- the timer ticked off --- pulled the basket of aluminum parts up and blew them off.
The engine is now clean for the rebuild.
Quick steps to the assembly as it is similar to assembling any Tee Dee engine. Everything is given a light coating of Turbine oil during assembly.
1.) "Red" venturi body slipped onto the crankcase -- then venturi nut finger tightened to venturi body + 1/8 turn with Cox wrench.
Don't over tight or you will crack the venturi body as the aluminum will expand when engine is running, and the plastic won't.
Remember this also on the carburetor --- that is why many Tee Dee engines over time their venturi bodies crack!
2.) Insert crank into the crankcase --- I have a small had press with a fixture (I made) to now press the prop driver onto the crankshaft but don't forget to insert the thrust washer between the prop driver and the crankcase!
3.) Piston onto the crank pin.
4.) screw on the backplate.
5.)Assemble the carburetor back together (throttle barrel, servo arm, "C" clip, throttle screws, fuel nipple, and locking nut.
6.) Now for the needle valve --- with a dental pick, remove the old "O" ring
With the old one removed, lightly oil the new "O" ring and slide it up to where the old O"O ring was.
C.T. ---- with your engine, you have a spare "O" ring in a small 2-inch square envelope.
Now screw the needle valve into the carburetor.
7.) Screw the carburetor nut onto the carburetor then screw the carburetor onto the venturi body ("Red") and lock the carb in the correct position on the venturi body (to clear the muffler)
8.) Now for the deck height (timing) ---- see the other cleaning of C.T. engines to see how it is done.
Don't worry about the muffler at this moment.
9.) Deck height (timing) completed --- you didn't tighten everything down did you? Well, you'll have to unscrew the cylinder to install the muffler now.
Here I ran into a problem with the shim stock I used from Cox international.
The outside diameter protruded past the outside diameter of the cylinder.
The bottom part of the muffler sits down onto the crankcase and the top part of the muffler is spring steel (to make up any manufacturing tolerance "differences").
With the shim's diameter sticking out from the cylinder, it would not let the muffler seat where it was to be and messed up the assembly.
So, I used my small 5-inch diameter disc sander with 600 grit sandpaper and carefully reduced the outside diameter to 1/2 the original width (from i.d. to o.d.) so as to be the same outside diameter as the cylinder.
See the photo below of the shim between the crankcase and the cylinder --- after reducing the outside diameter.
You can see also the lower part of the muffler where it has to slip past the shim.
With the correct shim between the crankcase and the cylinder, the glow head shim is now not required.
But I have included it with the engine when shipped back to C.T. --- if he wants to use it?
Also, since I ordered the timing kit from Cox International (Burnie) which has "4" shims in the kit, I have one left that I'll send to C.T. as well.
Photo below is of the shims:
Now for the before and after photo:
I now have all of C.T.'s engines in one box and going to the post office to ship them to him!
sosam117- Diamond Member

- Posts : 1290
Join date : 2016-03-23
Location : Suburb of Chicago, Illinois
Re: The last of C.T. engine rebuilds --- The Cox Tee Dee .051 R/C
![]() rsv1cox Tue Apr 02, 2024 8:15 am
rsv1cox Tue Apr 02, 2024 8:15 am
It's always nice seeing these engines brought back to life Mike. Great job.
Bob
Bob

rsv1cox- Top Poster


Posts : 10578
Join date : 2014-08-18
Location : West Virginia
Re: The last of C.T. engine rebuilds --- The Cox Tee Dee .051 R/C
![]() Greenman38633 Tue Apr 02, 2024 9:09 pm
Greenman38633 Tue Apr 02, 2024 9:09 pm
Wow Mike. Awesome work. You really know your stuff. I had no idea. Thanks for the look and in depth explanation.
Mark
Mark

Greenman38633- Gold Member

- Posts : 142
Join date : 2024-02-05
Re: The last of C.T. engine rebuilds --- The Cox Tee Dee .051 R/C
![]() sosam117 Wed Apr 03, 2024 7:31 am
sosam117 Wed Apr 03, 2024 7:31 am
Greenman38633 wrote:Wow Mike. Awesome work. You really know your stuff. I had no idea. Thanks for the look and in depth explanation.
Mark
Just years (50 yrs.) of working, using and flying with Cox engines experience.
Also have quite a few Kustom Kraftsmanship engines as well and learned much from those engines. (and Kustom parts)
sosam117- Diamond Member
- Posts : 1290
Join date : 2016-03-23
Location : Suburb of Chicago, Illinois
Sponsored content
» *Cox Engine of The Month* Submit your pictures! -June 2015- *ENGINE GIVEAWAY*
» *Cox Engine of The Month* Submit your pictures! -June 2017- *ENGINE GIVEAWAY*
» **Black Lynx Engine Giveaway Jan-June 2023** Cox Engine of the Month
» *Cox Engine of The Month* Submit your pictures! -June 2018- *ENGINE GIVEAWAY*
» **Black Lynx Engine Giveaway June 2017** Cox Engine of the Month
» *Cox Engine of The Month* Submit your pictures! -June 2017- *ENGINE GIVEAWAY*
» **Black Lynx Engine Giveaway Jan-June 2023** Cox Engine of the Month
» *Cox Engine of The Month* Submit your pictures! -June 2018- *ENGINE GIVEAWAY*
» **Black Lynx Engine Giveaway June 2017** Cox Engine of the Month
Page 1 of 1
Permissions in this forum:
You cannot reply to topics in this forum