

 Rules
Rules
by rsv1cox Today at 12:18 pm
» audio-tach anyone?
by roddie Today at 11:14 am
» Jim Walkers FireBee - This is going to be fun
by rdw777 Today at 10:22 am
» Prayers for my Wife Please
by fit90 Today at 7:34 am
» Prop Rod - resto to a runner
by getback Today at 6:19 am
» WenMac 049 - Glow Plug & Head Gasket replacements?
by Ken Cook Yesterday at 7:50 pm
» 12 string guitar suggestions
by akjgardner Yesterday at 7:08 pm
» A choke-tube with velocity-stack configured Bee
by roddie Yesterday at 2:54 pm
» Hawk had breakfast and then took a bath
by rsv1cox Yesterday at 10:26 am
» Jim Walker Firebaby
by rdw777 Sat May 18, 2024 4:58 pm
» Cox prop rod
by Wiggy Fri May 17, 2024 4:30 pm
» "Red Neck" .049 elec. starter
by getback Fri May 17, 2024 7:19 am


Painting and covering
Page 1 of 2 • 1, 2 ![]()

Painting and covering
![]() andrew Wed Mar 18, 2020 5:13 pm
andrew Wed Mar 18, 2020 5:13 pm
https://aviataircraft.com/husky-paint-schemes/

andrew- Diamond Member

- Posts : 1814
Join date : 2011-08-11
Age : 76
Location : Western Kentucky -

Re: Painting and covering
![]() NEW222 Wed Mar 18, 2020 6:03 pm
NEW222 Wed Mar 18, 2020 6:03 pm

NEW222- Top Poster

- Posts : 3892
Join date : 2011-08-13
Age : 45
Location : oakbank, mb
Re: Painting and covering
![]() Kim Wed Mar 18, 2020 6:04 pm
Kim Wed Mar 18, 2020 6:04 pm

Kim- Top Poster


Posts : 8537
Join date : 2011-09-06
Location : South East Missouri
Re: Painting and covering
![]() OhBee Wed Mar 18, 2020 7:48 pm
OhBee Wed Mar 18, 2020 7:48 pm

OhBee- Platinum Member

- Posts : 698
Join date : 2016-03-23
Age : 73
Location : Minnesota
Re: Painting and covering
![]() Kim Wed Mar 18, 2020 8:13 pm
Kim Wed Mar 18, 2020 8:13 pm
OhBee wrote:Covering....my biggest fear. I have the supplies, but not the desire to ruin all the previous hard work getting this far! Last time I did this was 1966! So far just looking at it and thinking about it!.....what would be wrong with just sheeting a wing in 1/32 balsa? Can't be any heavier than silkspan and several coats of dope! I did that to my Lil Satan in the early 60"s after several nasty crashes led to a major rebuild. It still flew just fine fully sheeted.
Might work, I sheeted a Guillows P-51 back in the day, but that was the last time I can remember.
Kim- Top Poster
-
Posts : 8537
Join date : 2011-09-06
Location : South East Missouri
Re: Painting and covering
![]() OhBee Wed Mar 18, 2020 8:19 pm
OhBee Wed Mar 18, 2020 8:19 pm
OhBee- Platinum Member
- Posts : 698
Join date : 2016-03-23
Age : 73
Location : Minnesota
Re: Painting and covering
![]() Ken Cook Wed Mar 18, 2020 8:40 pm
Ken Cook Wed Mar 18, 2020 8:40 pm

Ken Cook- Top Poster
- Posts : 5495
Join date : 2012-03-27
Location : pennsylvania
Re: Painting and covering
![]() OhBee Wed Mar 18, 2020 9:44 pm
OhBee Wed Mar 18, 2020 9:44 pm
OhBee- Platinum Member
- Posts : 698
Join date : 2016-03-23
Age : 73
Location : Minnesota
Re: Painting and covering
![]() Kim Wed Mar 18, 2020 10:38 pm
Kim Wed Mar 18, 2020 10:38 pm
OhBee wrote:Was thinking of trying it that way Ken...thanks ! ...So you really only use the dope/ glue ,on the leading and trailing edges of the wing? You still dampen the silkspan first correct?
I do it all with clear dope. Put a coat around the outside perimeter of the wing, and let it dry. Then sand it smooth.
With this Brave, or Squaw, or Warrior or whatever it is, I cut a panel of covering for each side. I dip the panel in a cookie dish of water, then blot it on a double-thick strip of paper towels, so it's just damp when I lay it on the frame.
I then carefully go around the outside edge, brushing clear onto it. As soon as it looks like it's all stuck down, I flip it over and do the other side as quickly as possible.
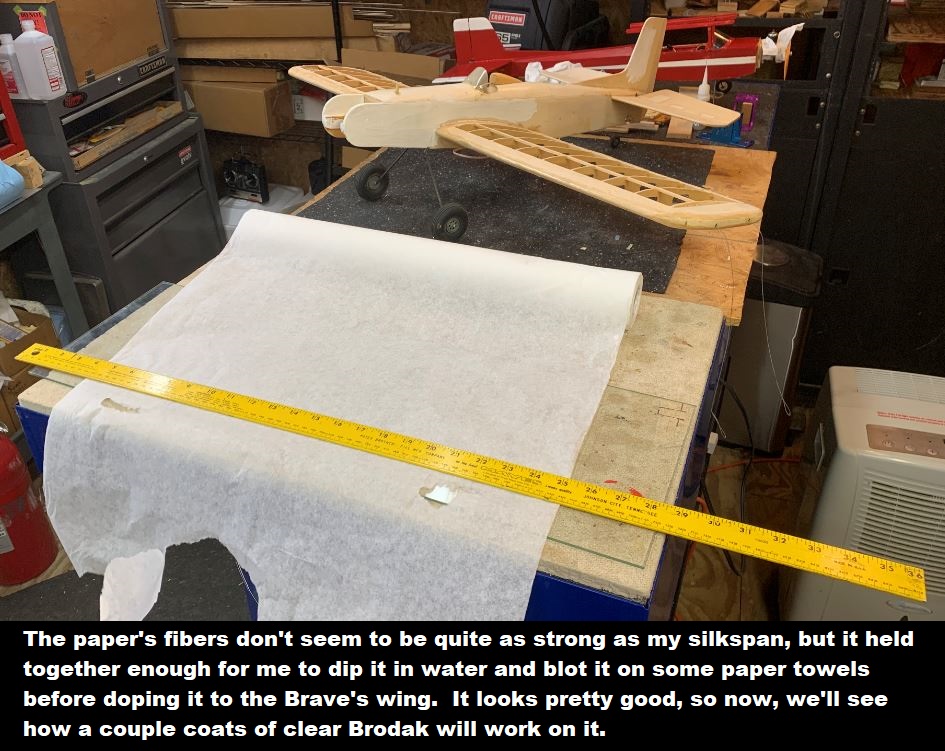
I had REAL good luck with this paper Andrew sent me as it drew up really nice. I'm gonna brush on lear dope oats with REAL LIGHT sanding in between, until I get a good enough gloss, then mask and shoot some color at it.
Kim- Top Poster
-
Posts : 8537
Join date : 2011-09-06
Location : South East Missouri
Re: Painting and covering
![]() OhBee Wed Mar 18, 2020 10:51 pm
OhBee Wed Mar 18, 2020 10:51 pm
OhBee- Platinum Member
- Posts : 698
Join date : 2016-03-23
Age : 73
Location : Minnesota
Re: Painting and covering
![]() andrew Wed Mar 18, 2020 11:06 pm
andrew Wed Mar 18, 2020 11:06 pm
Kim, glad the exam paper is working for you. I've had good results and it's a damn sight less expensive than the old silkspan.
andrew
Last edited by andrew on Wed Mar 18, 2020 11:22 pm; edited 1 time in total
andrew- Diamond Member
- Posts : 1814
Join date : 2011-08-11
Age : 76
Location : Western Kentucky -
Re: Painting and covering
![]() 944_Jim Wed Mar 18, 2020 11:15 pm
944_Jim Wed Mar 18, 2020 11:15 pm
944_Jim- Diamond Member
-
Posts : 1967
Join date : 2017-02-08
Age : 59
Location : NE MS
Re: Painting and covering
![]() OhBee Wed Mar 18, 2020 11:21 pm
OhBee Wed Mar 18, 2020 11:21 pm
OhBee- Platinum Member
- Posts : 698
Join date : 2016-03-23
Age : 73
Location : Minnesota
Re: Painting and covering
![]() andrew Wed Mar 18, 2020 11:35 pm
andrew Wed Mar 18, 2020 11:35 pm
944_Jim wrote:Have you guys discovered a grain to the paper? I figure it runs parallel with the length of the roll...not across the roll. At least that is how I've used it.
I treated it as running lengthwise down the roll.
OhBee: Normally, the "grain" should run in the longest direction -- for wings, that will be spanwise (end to end of the panel), not chordwise (front to back). Silk is applied the same way. Generally, the greatest shrinkage occurs grain wise. By applying the grain tip to root on wing panels, it will decrease the amount of sag in the bays (between the ribs). Although it's not foolproof, take a 2" square and tear it in half with fingers; take another 2" square and do the same, but with the tear at 90 degrees to the first square. The tear with the straighter edge and fewer fibers extending out runs parallel with the grain; the jagged tear with more fibers runs crosswise to the grain.
Chinese habotai silk shrinks about 8% lengthwise (running down the roll) and 1% in width (running across the roll)
andrew- Diamond Member
- Posts : 1814
Join date : 2011-08-11
Age : 76
Location : Western Kentucky -
Re: Painting and covering
![]() Kim Wed Mar 18, 2020 11:47 pm
Kim Wed Mar 18, 2020 11:47 pm
andrew wrote:Not to step on Kim's explanation, which is exactly the way I apply silkspan, but he meant to cover one side of one wing panel, then flip it over and cover the other side of the same panel. Apply the silkspan damp by sticking it down around the perimeter (no doping the open areas) then flip and apply. The silkspan is only damp, not doped all over. By applying to the other side quickly, the top and bottom will dry and shrink at the same time and rate, but since they're on the same panel, it will be less prone to warp due to uneven shrinkage.
Kim, glad the exam paper is working for you. I've had good results and it's a damn sight less expensive than the old silkspan.
andrew
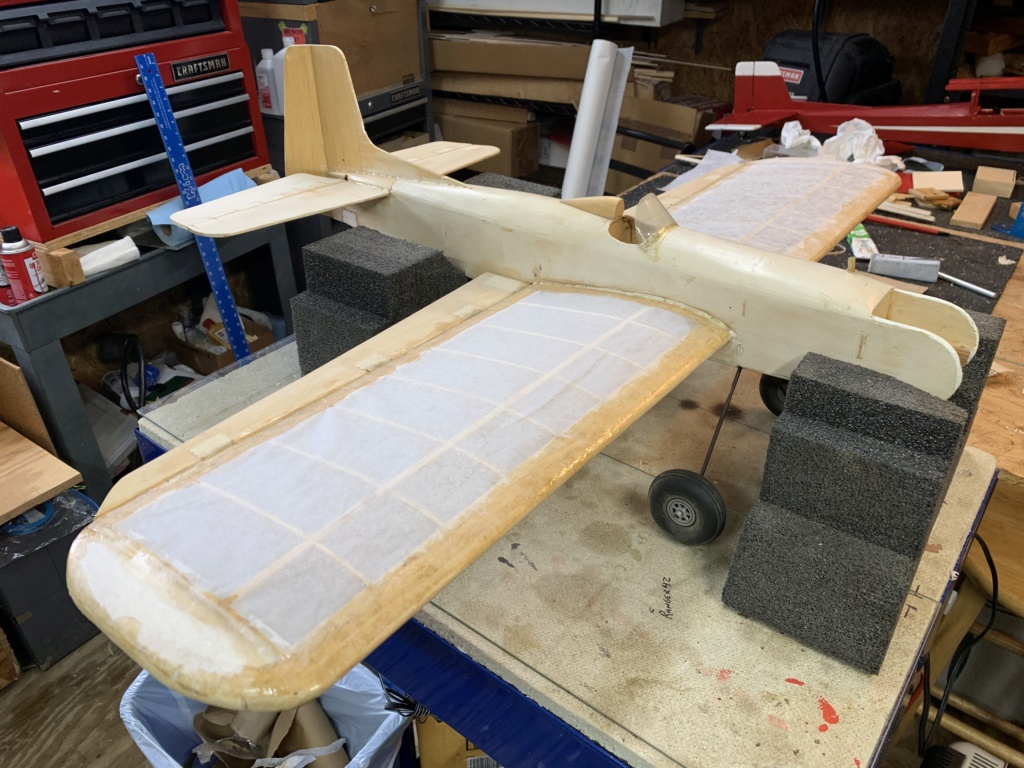
Yeah, I got some foam blocks that I use as an airplane holder (I'm a shameless dumpster diver!)

Kim- Top Poster
-
Posts : 8537
Join date : 2011-09-06
Location : South East Missouri
Re: Painting and covering
![]() Kim Wed Mar 18, 2020 11:54 pm
Kim Wed Mar 18, 2020 11:54 pm
andrew wrote:944_Jim wrote:Have you guys discovered a grain to the paper? I figure it runs parallel with the length of the roll...not across the roll. At least that is how I've used it.
I treated it as running lengthwise down the roll.
OhBee: Normally, the "grain" should run in the longest direction -- for wings, that will be spanwise (end to end of the panel), not chordwise (front to back). Silk is applied the same way. Generally, the greatest shrinkage occurs grain wise. By applying the grain tip to root on wing panels, it will decrease the amount of sag in the bays (between the ribs). Although it's not foolproof, take a 2" square and tear it in half with fingers; take another 2" square and do the same, but with the tear at 90 degrees to the first square. The tear with the straighter edge and fewer fibers extending out runs parallel with the grain; the jagged tear with more fibers runs crosswise to the grain.
Chinese habotai silk shrinks about 8% lengthwise (running down the roll) and 1% in width (running across the roll)
I looked for a grain, but couldn't detect any, tearing some test pieces in different directions. So far, it's drawing down nicely, but it's stuck to the Warrior, so we'll see. Gonna do that tear test again...in the morning!
Kim- Top Poster
-
Posts : 8537
Join date : 2011-09-06
Location : South East Missouri
Re: Painting and covering
![]() Levent Suberk Thu Mar 19, 2020 1:58 am
Levent Suberk Thu Mar 19, 2020 1:58 am
With thinner papers it is harder to tell the grain direction, heavier papers are more obvious and easier to determine.
Three quick tests to check for grain direction:
1) Tear Test – Take a sheet of paper and tear it horizontally and then vertically. One tear should have been straighter than the other. The tear that was straighter is parallel to the grain, the jagged tear is going across the grain.
2) Bend Test – Take a sheet of paper, bend the paper (don’t fold or crease it) horizontally and vertically. There will be less resistance in one direction than the other. The bend with less resistance is parallel to the grain.
3) Fingernail Test – Take a sheet of paper and using the fingernails of your thumb and middle finger pinch the paper and slide them across and then down the paper. One direction should produce a “wave”, the wave indicates that you went across the grain.
(Excerpt from https://printingpartners.wordpress.com/2013/06/06/paper-grain-direction/)

Levent Suberk- Diamond Member
- Posts : 2206
Join date : 2017-12-24
Location : Türkiye
Re: Painting and covering
![]() 944_Jim Thu Mar 19, 2020 4:09 am
944_Jim Thu Mar 19, 2020 4:09 am
So, between the barely observable tear test, and drop of fluid test, I determined it to go long. That's how I've been using it.
So I guess there is a concensus in that assumption.
944_Jim- Diamond Member
-
Posts : 1967
Join date : 2017-02-08
Age : 59
Location : NE MS
Re: Painting and covering
![]() Levent Suberk Thu Mar 19, 2020 5:57 am
Levent Suberk Thu Mar 19, 2020 5:57 am
Levent Suberk- Diamond Member
- Posts : 2206
Join date : 2017-12-24
Location : Türkiye
Re: Painting and covering
![]() Kim Thu Mar 19, 2020 7:33 am
Kim Thu Mar 19, 2020 7:33 am
Last edited by Kim on Thu Mar 19, 2020 9:57 am; edited 1 time in total
Kim- Top Poster
-
Posts : 8537
Join date : 2011-09-06
Location : South East Missouri
Re: Painting and covering
![]() Mike1484 Thu Mar 19, 2020 9:20 am
Mike1484 Thu Mar 19, 2020 9:20 am
Mike1484
Mike1484- Gold Member

- Posts : 296
Join date : 2011-10-28
Age : 75
Location : Northern Ohio
Re: Painting and covering
![]() getback Thu Mar 19, 2020 9:28 am
getback Thu Mar 19, 2020 9:28 am


getback- Top Poster
-
Posts : 10170
Join date : 2013-01-18
Age : 66
Location : julian , NC
Re: Painting and covering
![]() OhBee Thu Mar 19, 2020 2:15 pm
OhBee Thu Mar 19, 2020 2:15 pm
OhBee- Platinum Member
- Posts : 698
Join date : 2016-03-23
Age : 73
Location : Minnesota
Re: Painting and covering
![]() Ken Cook Thu Mar 19, 2020 3:03 pm
Ken Cook Thu Mar 19, 2020 3:03 pm
I prefer to lay the dampened silkspan onto the doped framework and brush through it with thinned dope. But, I only do this on the leading, trailing edges and tips. If the center section of the wing is sheeted, I pull the silkspan back and quickly brush the thinned dope onto the sheeting and lay the paper back and squeegee out the dope. In my earlier years, I would always have some slight bubbling which isn't always a easy fix. This insures that over solid sheeting the covering is fully attached.
Once the covering is applied and your ready for first coat of dope brush in this manner. With the brush full, start ON the trailing edge and brush in the same direction of the ribs up to the leading edge. When the bays are first coated, brush your leading and trailing edge out and DON't puddle dope at the intersection of the fuse to wing joint. This can cause blistering of the dope in the fillet of the fuse which doesn't generally appear until later as the gasses escape causing the covering and or dope to blister. When completed, I like to make passes over all of the rib tops with one more brush stroke of dope. The rib tops are the first to sand through so you can't apply enough dope there.
Second coat, you can brush the opposing direction from fuse out to tip. The reason I like to brush from trailing edge is due to puddling the dope. When you brush first coat in this manner, your forcing dope through the silkspan and it puddles underneath the covering along the rib.Brushing with the rib on first coat prevents this which seals and the second coat can progress. This can cause the covering to also pull down which you don't want or it can show through the finish appearing like a run in the paint.
Ken Cook- Top Poster
- Posts : 5495
Join date : 2012-03-27
Location : pennsylvania
Re: Painting and covering
![]() Kim Thu Mar 19, 2020 3:15 pm
Kim Thu Mar 19, 2020 3:15 pm
I lay the damp panel on the frame, and dope it's edges with 50-50 clear/thinner. This is where I'm gonna do good or mess up---you can't just swipe the brush along the edge 'cause the paper will wrinkle or come loose. I do some "strategic outward dabbing" to try to get it tacked down evenly, then hit it all the way around, brushing outward.
I had GREAT luck with this exam paper (knock on wood), and got it all to lay down pretty nicely.
Once dry, I start brushing on coats of Brodak Clear (AKA "Liquid Gold") 'till I get a shine I like or get enough of the whole deal and break out the paint gun. The longer you wait between coats, the better, but my aged irritability often wins out over my desire to be seen as a craftsman. Though, I got to admit, I REALLY like this part, as the paper starts making the plane look "airplaney".....
Forgot to mention, but you already know---the frame's ribs and anything the paper is gonna touch need to be sanded as smooth as possible before any of this happens.
Kim- Top Poster
-
Posts : 8537
Join date : 2011-09-06
Location : South East Missouri
Page 1 of 2 • 1, 2 ![]()
» Removing covering over covering or One bad bird!
» Opinions on airbrushes/spray guns
» painting round stuff..
» Canopy "painting" day..