

 Rules
Rules
Log in
Search
Latest topics
» Roddie-Rigger.. a 2005 original designby roddie Today at 11:21 pm
» A prototype Cox Reed-valve marine engine
by roddie Today at 10:50 pm
» Here we go again... another Lawn-Boy
by roddie Today at 9:36 pm
» My Cox .049 Marine inboard engine
by F4D Phantom II Today at 9:33 pm
» **VOTE-ON-THE-NEXT-COX-ENGINE-OF-THE-MONTH** (May 2024)
by Kim Today at 8:53 pm
» Help Pee Wee tank cap .020
by MauricioB Today at 8:45 pm
» Revivng Some Childhood Classics
by GTO455 Today at 8:11 am
» Jim Walkers FireBee - This is going to be fun
by rsv1cox Today at 7:29 am
» Post your Older books
by rsv1cox Yesterday at 7:51 pm
» EXTREMELY RARE COX THIMBLE DROME PROTOTYPE "BLACK WIDOW" GAS MODEL AIRPLANE
by rsv1cox Yesterday at 6:58 pm
» I brake for Turtles....
by rsv1cox Yesterday at 6:38 pm
» Ball - Socket Joints
by Ken Cook Yesterday at 3:06 pm
Cox Engine of The Month


CEF Traveling Engine


Win This Engine!

Live on Patrol


Cox .051 Tee Dee Repair
Page 1 of 1

 Cox .051 Tee Dee Repair
![]() GallopingGhostler Mon Jan 08, 2024 11:27 pm
GallopingGhostler Mon Jan 08, 2024 11:27 pm
Some of you may recall that last March, I had purchased a used Tee Dee .051 with a plastic RTF power pod for R/C glider use:
https://www.coxengineforum.com/t17192-thrust-angle-for-a-power-pod#222326
Today with the blowing snow in Clovis in blizzard conditions, I started on disassembling the engine for repair. To remove the prop thrust plate, I simply backed it off by loosening the venturi retainer collar (nut) with the Cox wrench. It cooperated quite nicely without due force.

Then using combination pliers, destructively twisted off the old non-repairable plastic venturi body.
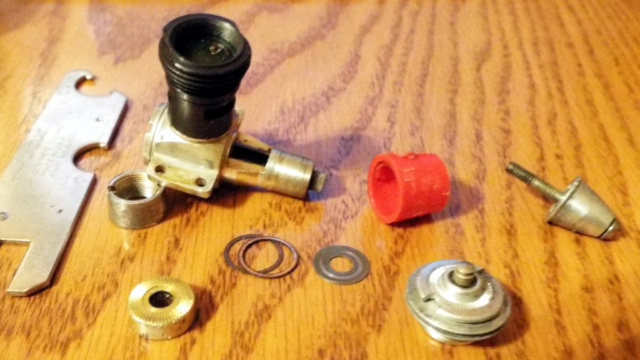
The engine is in good condition, has very good compression. Previous owner had 2 glow head gaskets installed, head is higher compression Tee Dee. But, the top of the piston is heavily carboned. Because the previous owner mounted this only on the power pod, which does not use the side mounting lugs, the holes are extremely clean, like new. The stainless steel prop thrust washer shows evidence of possibly electric starter use, as rubbing my thumbnail over the part polished by the crankcase, there is a slightly worn, polished groove. I don't think this would be present by hand starting with say, a Cox starter spring.
The crankcase shows some aging and can use exterior clean-up. the collar has some light tooling marks from Cox wrench use. I can clean these up with a little aluminum polish.
One thing I do not have is the needle valve ratchet spring, it did not come with the venturi or spring but have the needle valve and spraybar. I checked on E-Bay, the springs are now commanding a premium, say at least $20 plus shipping. I did find a packaged mislabled by Cox spring and needle setup for a reedie but labled for Tee Dee.
Undaunted, I may be able to come up with something that will work.
The brass prop thrust plate was manhandled with a set of pliers, marring it. If I had a lathe, could take off a couple thousandths of an inch off and reuse. But fortunately through a combination of purchases from Cox International and EX Model Engines, I have sufficient parts to restore this engine to perfect running condition.
Once I get the back off and further degreasing / cleaning, I will reset the socket.
https://www.coxengineforum.com/t17192-thrust-angle-for-a-power-pod#222326
Today with the blowing snow in Clovis in blizzard conditions, I started on disassembling the engine for repair. To remove the prop thrust plate, I simply backed it off by loosening the venturi retainer collar (nut) with the Cox wrench. It cooperated quite nicely without due force.
Then using combination pliers, destructively twisted off the old non-repairable plastic venturi body.
The engine is in good condition, has very good compression. Previous owner had 2 glow head gaskets installed, head is higher compression Tee Dee. But, the top of the piston is heavily carboned. Because the previous owner mounted this only on the power pod, which does not use the side mounting lugs, the holes are extremely clean, like new. The stainless steel prop thrust washer shows evidence of possibly electric starter use, as rubbing my thumbnail over the part polished by the crankcase, there is a slightly worn, polished groove. I don't think this would be present by hand starting with say, a Cox starter spring.
The crankcase shows some aging and can use exterior clean-up. the collar has some light tooling marks from Cox wrench use. I can clean these up with a little aluminum polish.
One thing I do not have is the needle valve ratchet spring, it did not come with the venturi or spring but have the needle valve and spraybar. I checked on E-Bay, the springs are now commanding a premium, say at least $20 plus shipping. I did find a packaged mislabled by Cox spring and needle setup for a reedie but labled for Tee Dee.
Undaunted, I may be able to come up with something that will work.
The brass prop thrust plate was manhandled with a set of pliers, marring it. If I had a lathe, could take off a couple thousandths of an inch off and reuse. But fortunately through a combination of purchases from Cox International and EX Model Engines, I have sufficient parts to restore this engine to perfect running condition.
Once I get the back off and further degreasing / cleaning, I will reset the socket.

GallopingGhostler- Top Poster


Posts : 5327
Join date : 2013-07-13
Age : 70
Location : Clovis NM or NFL KC Chiefs
Re: Cox .051 Tee Dee Repair
![]() balogh Tue Jan 09, 2024 3:17 am
balogh Tue Jan 09, 2024 3:17 am
I love these rehabilitation projects George, good for you.
The ratchet spring on the NV is a genuine component, but once you add the tight silicone tube for additional sealing of the NV stem, the spring is no longer needed, because the silicone tube keeps the NV set in place even under vibrating conditions. Anyways, if you still want but do not find the spring, I may send you one by post from Hungary...
For the removal of castor caked on the piston top and on the cylinder inside wall as varnish, I use simple , cold grease remover spray available for kitchen use...works perfect without consuming the cylinder material, unlike mechanical cleaning by the de-varnisher brush...
balogh- Top Poster

Posts : 4751
Join date : 2011-11-06
Age : 65
Location : Budapest Hungary
Re: Cox .051 Tee Dee Repair
![]() cstatman Tue Jan 09, 2024 10:14 am
cstatman Tue Jan 09, 2024 10:14 am
+1 for Balough's silicon tubing recommendation.
I've tried cutting and making my own 'ratchet spring' - after 3 protos, hours and hours of work, a small bit of tubing did exactly the trick.
Also - good on ya for another restoration.
I've tried cutting and making my own 'ratchet spring' - after 3 protos, hours and hours of work, a small bit of tubing did exactly the trick.
Also - good on ya for another restoration.

cstatman- Platinum Member

-
Posts : 536
Join date : 2021-02-17
Age : 59
Location : San Jose, CA
Re: Cox .051 Tee Dee Repair
![]() rdw777 Tue Jan 09, 2024 10:49 am
rdw777 Tue Jan 09, 2024 10:49 am
Nice project on a terrible weather day George…. The wind was howling here too!!
The assessment and rehab of your engine is interesting…. On the way to being fully restored and ready to run …. Good that it had a thrust washer installed, Probably saved the backplate from being damaged….I’ve never owned a TeeDee .049/.051…. But have a .010 and a few .020’s in that series…. Wonderful little engines…
The assessment and rehab of your engine is interesting…. On the way to being fully restored and ready to run
…. Good that it had a thrust washer installed, Probably saved the backplate from being damaged….I’ve never owned a TeeDee .049/.051…. But have a .010 and a few .020’s in that series…. Wonderful little engines…
rdw777- Diamond Member

-
Posts : 1311
Join date : 2021-03-11
Location : West Texas
Re: Cox .051 Tee Dee Repair
![]() GallopingGhostler Tue Jan 09, 2024 12:09 pm
GallopingGhostler Tue Jan 09, 2024 12:09 pm
András' excellent suggestion confirmed by Charles is the way I will go. I am more a practicalist than an idealist, deviations to make a solid running engine are the way to go. 
Robert, this is my first 0.8 CC Tee Dee. And, because it is the rarer .051 TD has me stoked.
Apparently the previous owner got a good bit of use out of it on a glider. I see possibilities with the power pod to even augment a standard R/C for fun.
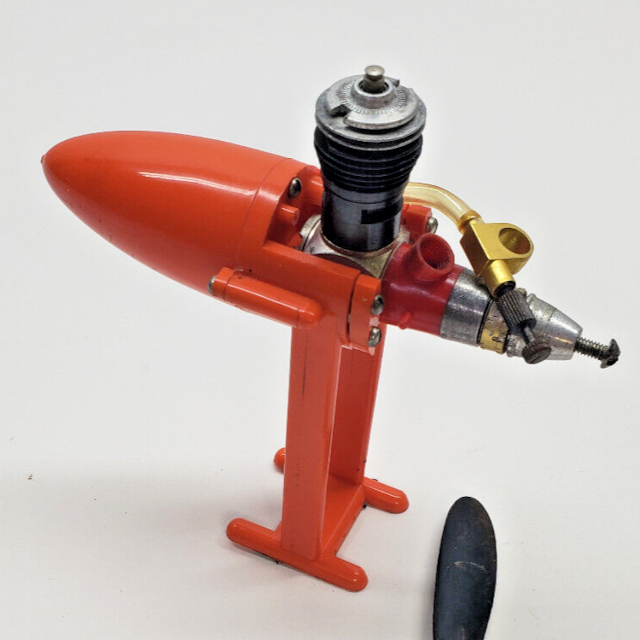
Here's my Medallion .049 with the custom engine bulkhead mount I got from Kamtechnik a little while ago.
Love the practicality of it, definitely an example of quality precision machining.
confirmed by Charles is the way I will go. I am more a practicalist than an idealist, deviations to make a solid running engine are the way to go. Robert, this is my first 0.8 CC Tee Dee. And, because it is the rarer .051 TD has me stoked.
Apparently the previous owner got a good bit of use out of it on a glider. I see possibilities with the power pod to even augment a standard R/C for fun.
Here's my Medallion .049 with the custom engine bulkhead mount I got from Kamtechnik a little while ago.
Love the practicality of it, definitely an example of quality precision machining.
GallopingGhostler- Top Poster
-
Posts : 5327
Join date : 2013-07-13
Age : 70
Location : Clovis NM or NFL KC Chiefs
» Hobby Lobby and the P-26 "peashooter" build
» Repair Tee Dee .01 tank
» Propeller repair
» Pee Wee backplate repair
» Wing repair
» Repair Tee Dee .01 tank
» Propeller repair
» Pee Wee backplate repair
» Wing repair
Page 1 of 1
Permissions in this forum:
You cannot reply to topics in this forum