

 Rules
Rules
Log in
Search
Latest topics
» **VOTE-ON-THE-NEXT-COX-ENGINE-OF-THE-MONTH** (May 2024)by 1/2A Nut Yesterday at 10:23 pm
» A prototype Cox Reed-valve marine engine
by F4D Phantom II Yesterday at 7:00 pm
» World's largest weathervane
by Cox International Yesterday at 5:51 pm
» Jim Walkers FireBee - This is going to be fun
by rsv1cox Yesterday at 5:27 pm
» Here we go again... another Lawn-Boy
by rsv1cox Yesterday at 6:50 am
» Norvel Needle Needed
by Greenman38633 Yesterday at 4:02 am
» My Cox .049 Marine inboard engine
by 1/2A Nut Wed May 08, 2024 11:41 pm
» Jim Walker Firebaby
by rsv1cox Wed May 08, 2024 7:26 pm
» Roddie-Rigger.. a 2005 original design
by roddie Wed May 08, 2024 7:04 pm
» music vids.. some of your favorites
by HalfaDave Wed May 08, 2024 6:55 pm
» Help Pee Wee tank cap .020
by rdw777 Wed May 08, 2024 1:30 pm
» Revivng Some Childhood Classics
by getback Wed May 08, 2024 8:21 am
Cox Engine of The Month


CEF Traveling Engine


Win This Engine!

Live on Patrol


Whirly Bird (TSA 700N Heli) build Finally!
Page 1 of 1

Whirly Bird (TSA 700N Heli) build Finally!
![]() TDbandit Tue Mar 22, 2016 8:49 pm
TDbandit Tue Mar 22, 2016 8:49 pm
Hi guys as promised here is the build of my TSA 700N helicopter build, bear with me because I have a mess load of pics to post (Have around 150 total) however not all will be posted for sake of size lol. The reason for me posting this build here is I just like to be different from time to time and I think it would be interesting to see one being built. I'm going to keep the text short again due to size so here we go!
First off, I have already assembled the kit, I was originally going to post as I progressed with the build but discovered that it would of been too tedious to do so so I went ahead and completed the build first, well... almost completed I'm still awaiting the FCU Flybarless unit or Flight Control Unit, receiver and such and the install of those will be posted as well.
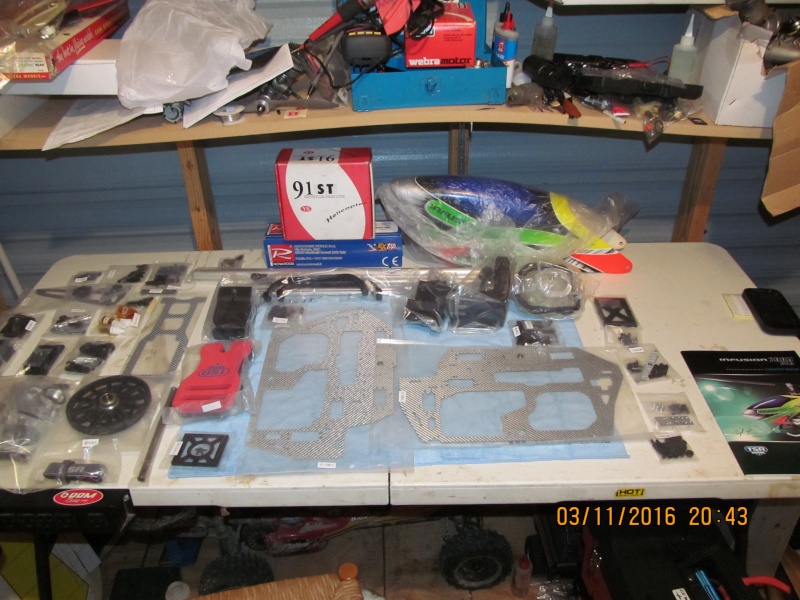
Anyway here is the first pic which is a layout of the kit contents, which is required to take an inventory of the parts.
All the bags are numbered which correlates with the build manual.
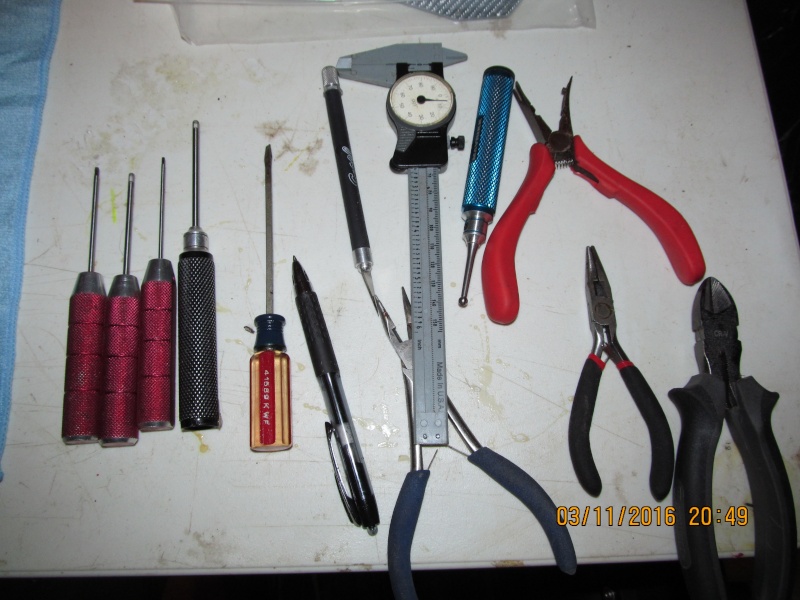
Next pic shows the required tools for assembly or most of them anyway the pic does not include my ball joint sizing tool or my electronic pitch (degree gauge)
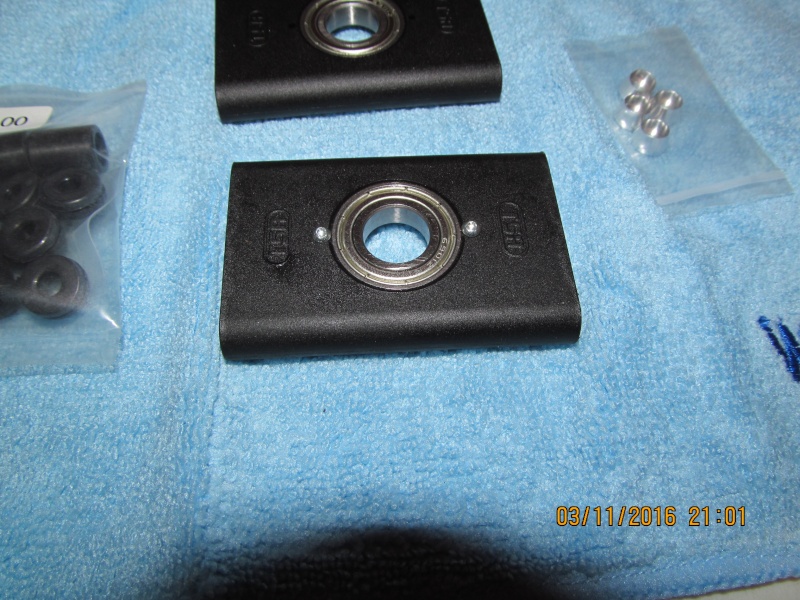
Now we have the main bearing blocks that the main rotor shaft (commonly called a mast) rides in. there is a right and wrong way to install these so care has to be taken to observe the manual and orientation. The top block as stated in the manual requires two small M2 button socket head screws to be installed to retain the top bearing since this model lacks a top stop collar for the mast. these attach to the side frames of the mechanics.

Here is a closer look of the top bearing block with the small M2 screws installed. I tell ya those suckers are in there!
Next is the beginning of the assembly of the side frames with the now completed bearing blocks. This is a spot where attention to the manual is required because while the side frames are identical, there is a right and left side which is dictated by the way the little flange bearing for the elevator bell crank is installed so make sure you get the right part number.
Here's a pic with the bearing blocks installed. One thing to note, always use locktite on any screw going into a metal part but not into plastic! If you need to thread lock a screw in plastic, use CA. thread locking compound attacks plastic.
In this pic, it shows the installation of the dampener grommet for the fuel tank.

Next up we have the support plates for the servos. since all flight loads are directly placed onto the servo's in a flybarless helicopter Meaning No fly bar, the servo's take a HUGE amount of punishment which requires metal gear hi torque servos and the plates help reduce the shear loads on the servo's output shaft. The plates them selves don't go on until the servo's are installed.
Only the standoff posts are installed now.

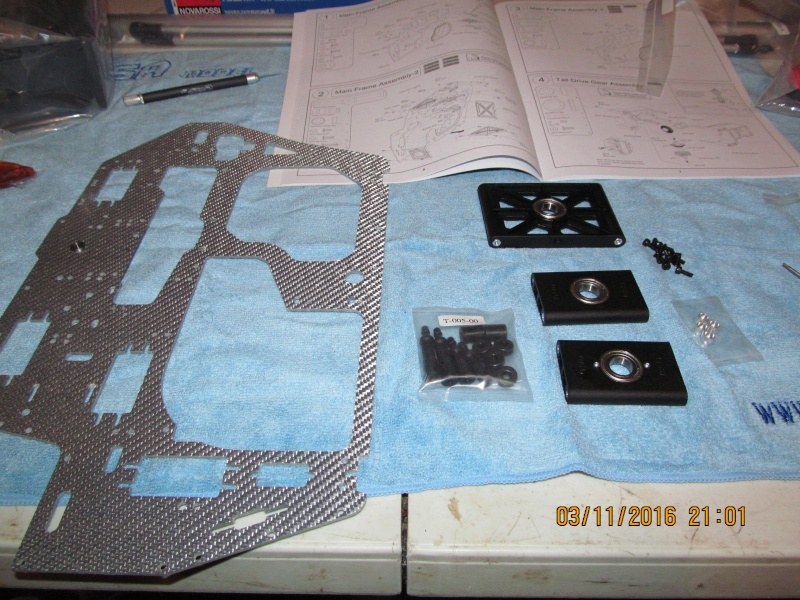
Now it is time for the reinforcing plates for the frames. these are necessary to help keep flex down so as to help prevent from blowing out the bearings. note the bearing blocks.
The drive and tail boom support block is next. This heli uses what is called a torque tube or drive shaft which is driven by the gear assembly you see in the pic. this is another component that receives a bit of punishment. The unit comes preassembled which is nice but it is a good idea to take it apart to make sure things are in good order before you install it in the frames.
Another view of the tail drive block.

Now the fuel tank gets checked out (another preassembled unit) Make sure the clunk moves around the tank.

Pic with the tail boom support/drive assembly installed in the frames along with the rear gyro mounting plate on top.
Top view showing the top bearing block and gyro mounting plate along with the top support plate.

The mechanics are coming together here is a side shot of the frames with the tank installed along with the canopy mounting posts and such. Again double check the manual and check off the steps as you go.
Now it is time to start assembling the drive system, this shows the components that involve the clutch bell and pinion assembly. note the strange holes in the edges of the clutch bell, those are for the magnets for the hall effect RPM governor which simply are glued into the pockets. care must be taken on magnet orientation btw or the governor will not work.

Pic of the pinion gear attached and locktited to the clutch bell with the support bearings and retaining collar. use locktite sparingly especially here so as to keep it out of the small bearing inside the clutch bell for the start shaft.
Finally the clutch bell is assembled in its support block note the coupling for the start shaft. (Note) if any one of you decide to build a TSA kit the clutch block is adjustable so make sure when it is installed that you don't tighten it down until you get the engine installed and the main gear in it. this so you can set the gear mesh. Stock gear ratio for the 700n TSA is 8.4.

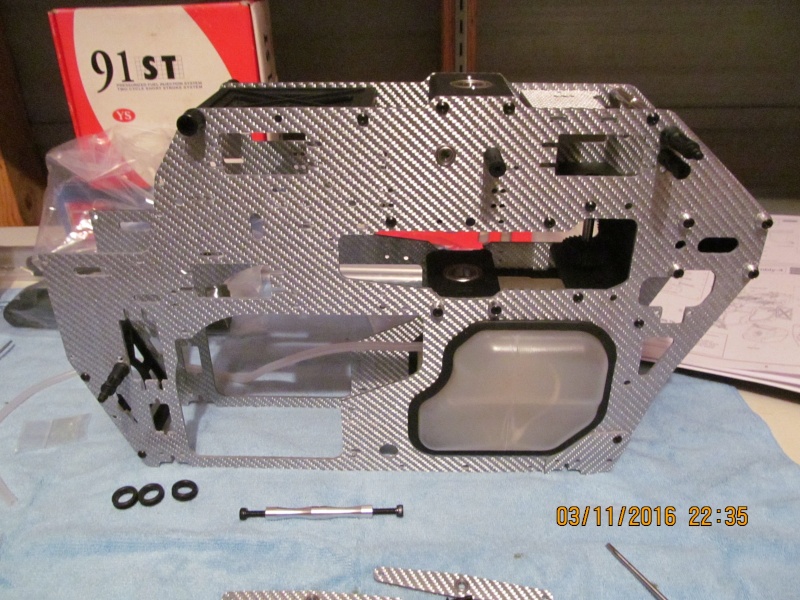
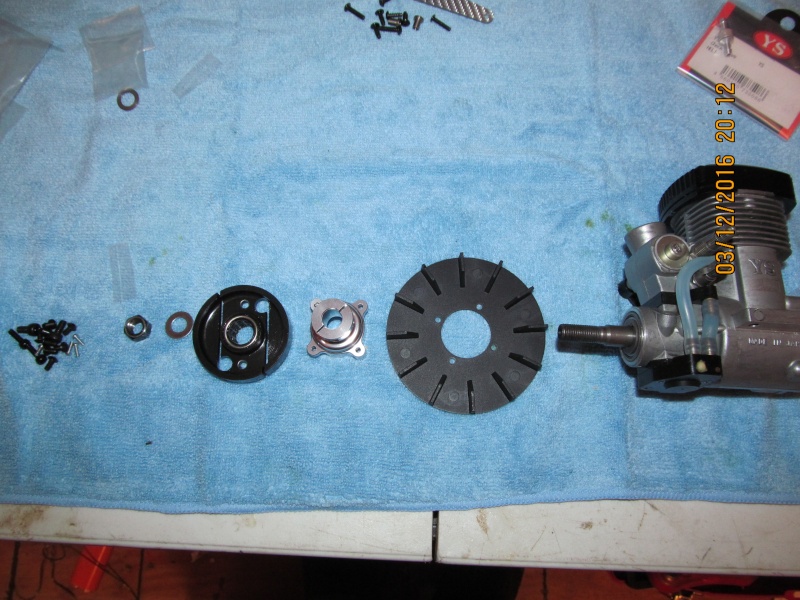
Now it is time to prep the engine, here is the engine, some might recognize it but for those that don't it's a YS .91ST which is pressure fuel injected. This is a line up of the fan and clutch components. Make sure you get the spacers in the right place.
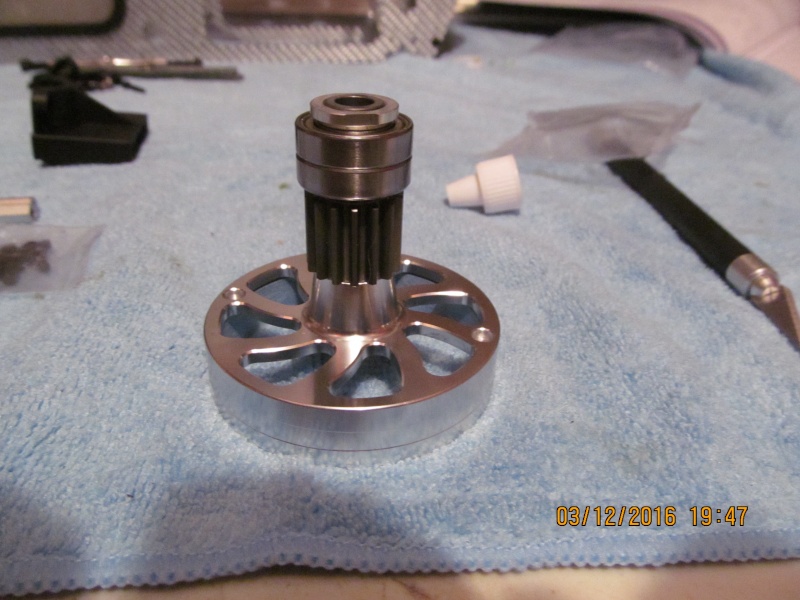
Here is the fan and hub assembled all locktited.
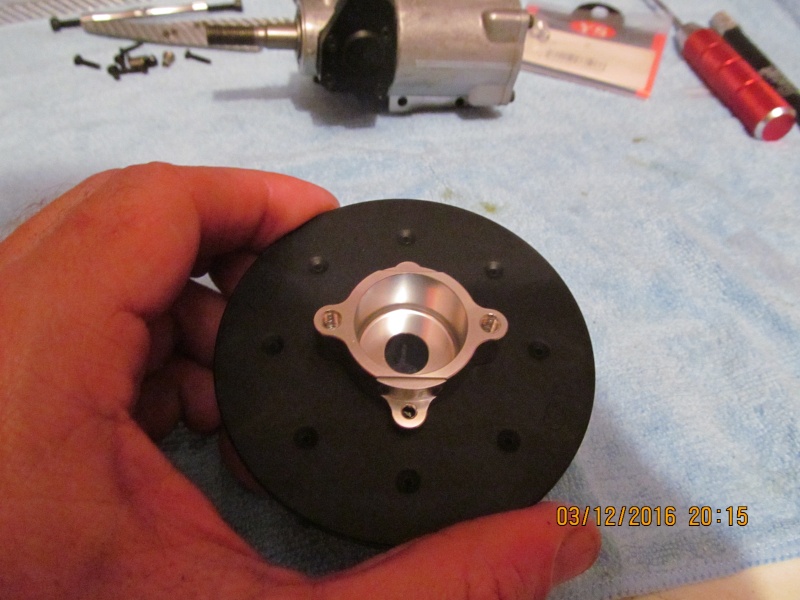
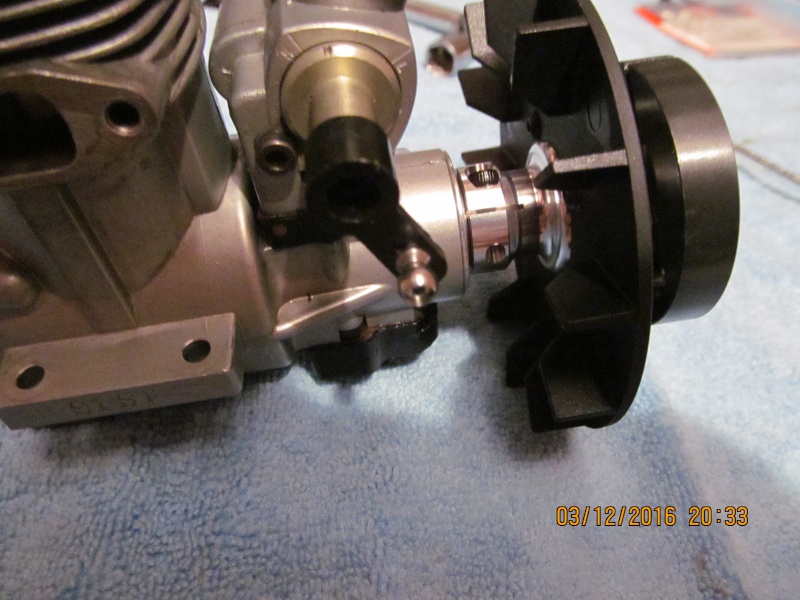
Not sure how this pic is going to come out but here is a close up of the fan hub attached to the engine, it uses a pinch bolt setup along with the crank nut. Install the hub and just snug up the pinch bolts then use the crank nut to seat the hub then tighten the pinch bolts. the manual says nothing about proper setup of the fan hub so this is how i've done it on other kits that use the same technique like my Trex 600N for example and btw the fan is not upside down lol.
Ok thats enough right now, I will post more tomarrow once i get home from work I have plenty more! lol.
Till then Take car all (The bandit goes and cools his fingers off in water)
First off, I have already assembled the kit, I was originally going to post as I progressed with the build but discovered that it would of been too tedious to do so so I went ahead and completed the build first, well... almost completed I'm still awaiting the FCU Flybarless unit or Flight Control Unit, receiver and such and the install of those will be posted as well.
Anyway here is the first pic which is a layout of the kit contents, which is required to take an inventory of the parts.
All the bags are numbered which correlates with the build manual.
Next pic shows the required tools for assembly or most of them anyway the pic does not include my ball joint sizing tool or my electronic pitch (degree gauge)
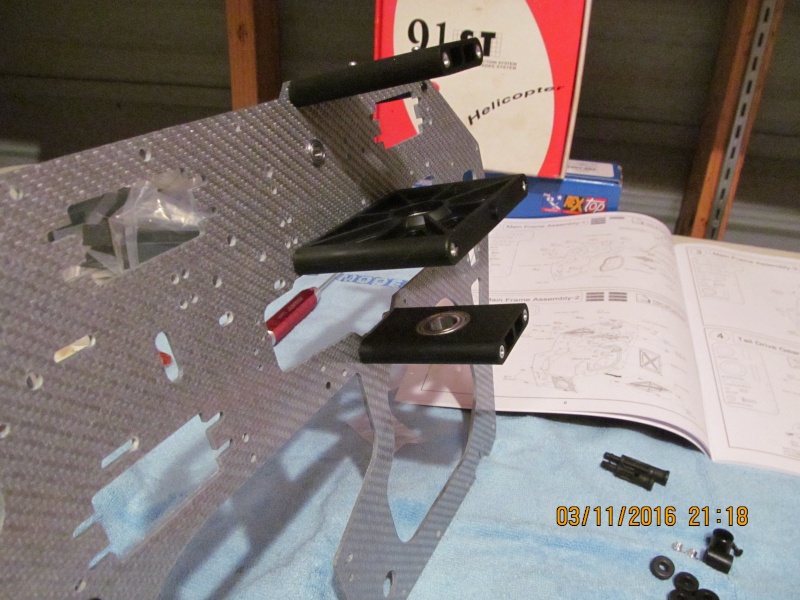
Now we have the main bearing blocks that the main rotor shaft (commonly called a mast) rides in. there is a right and wrong way to install these so care has to be taken to observe the manual and orientation. The top block as stated in the manual requires two small M2 button socket head screws to be installed to retain the top bearing since this model lacks a top stop collar for the mast. these attach to the side frames of the mechanics.
Here is a closer look of the top bearing block with the small M2 screws installed. I tell ya those suckers are in there!
Next is the beginning of the assembly of the side frames with the now completed bearing blocks. This is a spot where attention to the manual is required because while the side frames are identical, there is a right and left side which is dictated by the way the little flange bearing for the elevator bell crank is installed so make sure you get the right part number.
Here's a pic with the bearing blocks installed. One thing to note, always use locktite on any screw going into a metal part but not into plastic! If you need to thread lock a screw in plastic, use CA. thread locking compound attacks plastic.
In this pic, it shows the installation of the dampener grommet for the fuel tank.
Next up we have the support plates for the servos. since all flight loads are directly placed onto the servo's in a flybarless helicopter Meaning No fly bar, the servo's take a HUGE amount of punishment which requires metal gear hi torque servos and the plates help reduce the shear loads on the servo's output shaft. The plates them selves don't go on until the servo's are installed.
Only the standoff posts are installed now.
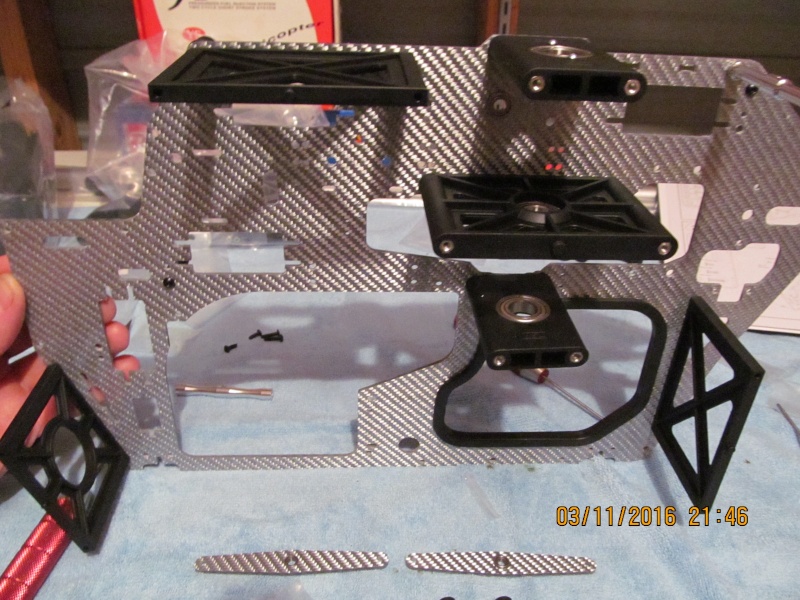
Now it is time for the reinforcing plates for the frames. these are necessary to help keep flex down so as to help prevent from blowing out the bearings. note the bearing blocks.
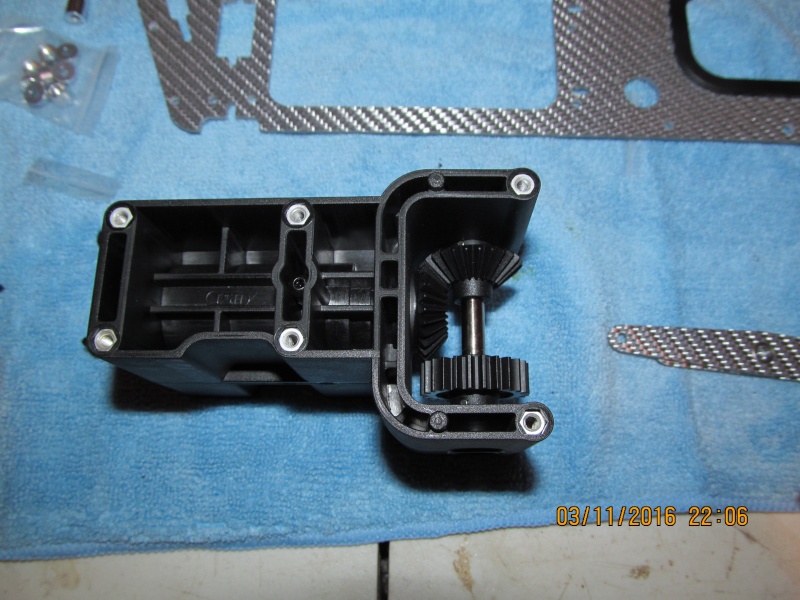
The drive and tail boom support block is next. This heli uses what is called a torque tube or drive shaft which is driven by the gear assembly you see in the pic. this is another component that receives a bit of punishment. The unit comes preassembled which is nice but it is a good idea to take it apart to make sure things are in good order before you install it in the frames.
Another view of the tail drive block.
Now the fuel tank gets checked out (another preassembled unit) Make sure the clunk moves around the tank.
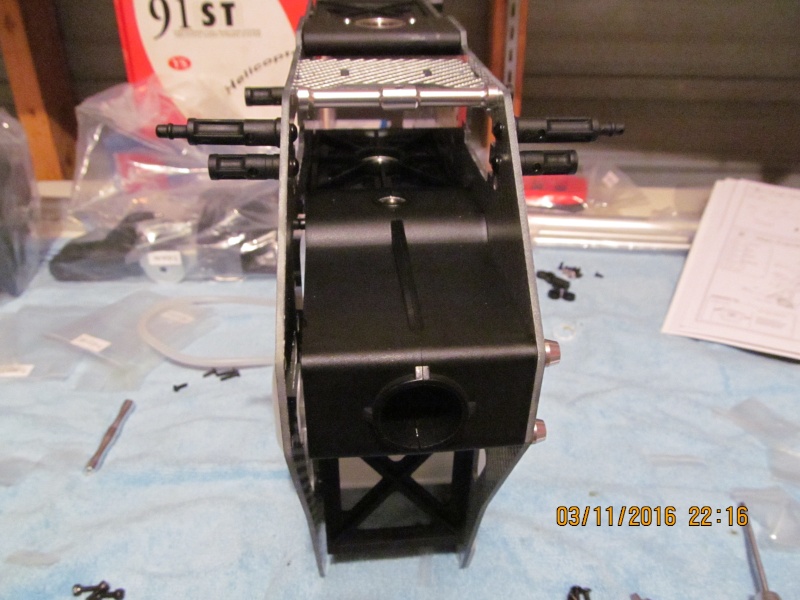
Pic with the tail boom support/drive assembly installed in the frames along with the rear gyro mounting plate on top.
Top view showing the top bearing block and gyro mounting plate along with the top support plate.
The mechanics are coming together here is a side shot of the frames with the tank installed along with the canopy mounting posts and such. Again double check the manual and check off the steps as you go.
Now it is time to start assembling the drive system, this shows the components that involve the clutch bell and pinion assembly. note the strange holes in the edges of the clutch bell, those are for the magnets for the hall effect RPM governor which simply are glued into the pockets. care must be taken on magnet orientation btw or the governor will not work.
Pic of the pinion gear attached and locktited to the clutch bell with the support bearings and retaining collar. use locktite sparingly especially here so as to keep it out of the small bearing inside the clutch bell for the start shaft.
Finally the clutch bell is assembled in its support block note the coupling for the start shaft. (Note) if any one of you decide to build a TSA kit the clutch block is adjustable so make sure when it is installed that you don't tighten it down until you get the engine installed and the main gear in it. this so you can set the gear mesh. Stock gear ratio for the 700n TSA is 8.4.
Now it is time to prep the engine, here is the engine, some might recognize it but for those that don't it's a YS .91ST which is pressure fuel injected. This is a line up of the fan and clutch components. Make sure you get the spacers in the right place.
Here is the fan and hub assembled all locktited.
Not sure how this pic is going to come out but here is a close up of the fan hub attached to the engine, it uses a pinch bolt setup along with the crank nut. Install the hub and just snug up the pinch bolts then use the crank nut to seat the hub then tighten the pinch bolts. the manual says nothing about proper setup of the fan hub so this is how i've done it on other kits that use the same technique like my Trex 600N for example and btw the fan is not upside down lol.
Ok thats enough right now, I will post more tomarrow once i get home from work I have plenty more! lol.
Till then Take car all (The bandit goes and cools his fingers off in water)

TDbandit- Platinum Member

- Posts : 897
Join date : 2014-12-01
Age : 52
Location : Riverdale Georgia
Re: Whirly Bird (TSA 700N Heli) build Finally!
![]() Marleysky Wed Mar 23, 2016 7:12 am
Marleysky Wed Mar 23, 2016 7:12 am
Hey! Nice to see you back on line. Reminds me of the Monty Python intro: and now for something completely different....... Always admired the mechanical bits and pieces of the heli's, but after having crashed a ton of them on "real flight" simulator, I've concluded that control line is best for me. Thanks for posting the pictures and we'll be waiting for more after your fingers cool off! 

Marleysky- Top Poster


Posts : 3618
Join date : 2014-09-28
Age : 71
Location : Grand Rapids, MI
Re: Whirly Bird (TSA 700N Heli) build Finally!
![]() TDbandit Wed Mar 23, 2016 10:59 am
TDbandit Wed Mar 23, 2016 10:59 am
I've been around just been real busy as of late lol.Marleysky wrote:Hey! Nice to see you back on line. Reminds me of the Monty Python intro: and now for something completely different....... Always admired the mechanical bits and pieces of the heli's, but after having crashed a ton of them on "real flight" simulator, I've concluded that control line is best for me. Thanks for posting the pictures and we'll be waiting for more after your fingers cool off!
I though something like this would be interesting here and to just add something different to the mix. I would love to get my hands on an Litemachines LMH-100 1/2A heli the early model of that series is the one that had the high performance crank equipped TD .051 in it. They flew good for what they were provided that you put a real gyro in it and it sounded like a extremely [bleep] off mosquito with rabies. I'll have more pics posted soon of the build.
My next build project is a Brodak ME-109 wit a fourstroke in it provided that i can find one "looking for a saito FA40 for it.
(Bandit)
TDbandit- Platinum Member
- Posts : 897
Join date : 2014-12-01
Age : 52
Location : Riverdale Georgia
Re: Whirly Bird (TSA 700N Heli) build Finally!
![]() getback Wed Mar 23, 2016 10:18 pm
getback Wed Mar 23, 2016 10:18 pm
Cool stuff Bandit , I haven't seen anyone build one of these before and find it very interesting . It doesn't look to bad if you keep with the instructions , but as Rene said flying the thing would be a different story  Thanks for the education and will bee waiting for the continuing
  Eric (someone hit the red by mistake I am sure sooo)
Thanks for the education and will bee waiting for the continuing 
getback- Top Poster
-

Posts : 10143
Join date : 2013-01-18
Age : 66
Location : julian , NC
Re: Whirly Bird (TSA 700N Heli) build Finally!
![]() RknRusty Wed Mar 23, 2016 11:33 pm
RknRusty Wed Mar 23, 2016 11:33 pm
That's pretty interesting. When you said, "the stock gear ratio for the 700n TSA is 8.4," did you mean 8:4? as a 1:2 step-down?
That's a scary big engine. here does the fuel injection pressure come from, a crankcase tap?
Looking forward to more... especially the flying part. Yeah, I'm pretty sure that reddie was a mistake.
That's a scary big engine. here does the fuel injection pressure come from, a crankcase tap?
Looking forward to more... especially the flying part. Yeah, I'm pretty sure that reddie was a mistake.
_________________
Don't Panic!
...and never Ever think about how good you are at something...
while you're doing it!
My Hot Rock & Blues Playlist
...and never Ever think about how good you are at something...
while you're doing it!
My Hot Rock & Blues Playlist

RknRusty- Rest In Peace

- Posts : 10869
Join date : 2011-08-10
Age : 68
Location : South Carolina, USA
Re: Whirly Bird (TSA 700N Heli) build Finally!
![]() TDbandit Thu Mar 24, 2016 11:16 am
TDbandit Thu Mar 24, 2016 11:16 am
@ Getback:
I've been flying RC heli's for quite a while and had quite a few different heli's My current fleet is my mid 80's vintage Kalt Baron 28 which is in the middle of being restored "very slowly though" Thunder Tiger Raptor .50 SE titan, Align Trex 600N and now this one TSA Infusion 700N which has a .91 size engine.
@RknRusty:
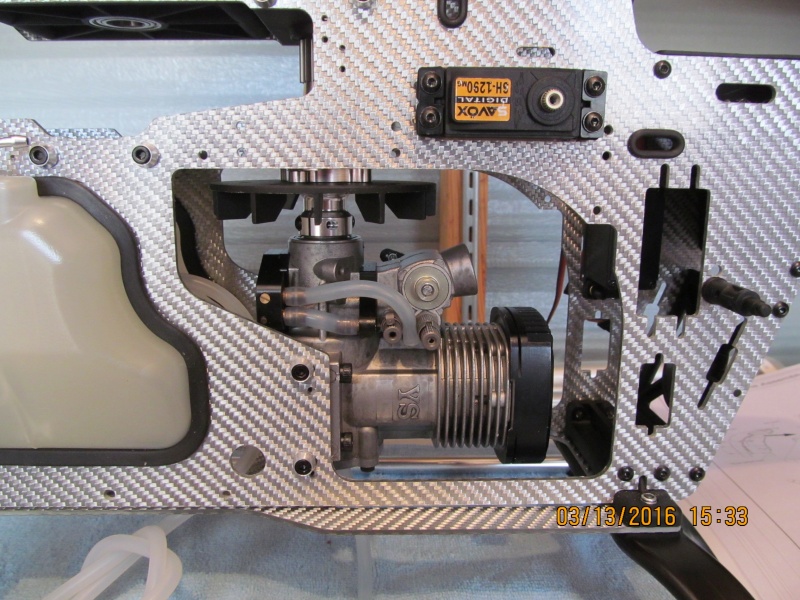
Yeah it is sorry ment 8.4:1. The engine is a YS .91 and it's fuel system is fed by pressure which is taken from a check valve equipped pressure tap in the center of the backplate that maintains a constant tank pressure of I think 12psi so the tank has to be quite tough and very air tight. Pressurized fuel is then fed to the regulator which is the big black part on the bottom of the engine and is pulse metered to the carb and is controlled through the three needles, The long needle is the hover needle or mid range, the small one on the bottom of the large needle is the high speed main jet needle and the tiny screw in the throttle barrel is the idle mixture. The engine likes 30% nitro/w 22% full synthetic low viscosity oil.
I'm planning on uploading some flight test video's soon (Bandit)
I've been flying RC heli's for quite a while and had quite a few different heli's My current fleet is my mid 80's vintage Kalt Baron 28 which is in the middle of being restored "very slowly though" Thunder Tiger Raptor .50 SE titan, Align Trex 600N and now this one TSA Infusion 700N which has a .91 size engine.
@RknRusty:
Yeah it is sorry ment 8.4:1. The engine is a YS .91 and it's fuel system is fed by pressure which is taken from a check valve equipped pressure tap in the center of the backplate that maintains a constant tank pressure of I think 12psi so the tank has to be quite tough and very air tight. Pressurized fuel is then fed to the regulator which is the big black part on the bottom of the engine and is pulse metered to the carb and is controlled through the three needles, The long needle is the hover needle or mid range, the small one on the bottom of the large needle is the high speed main jet needle and the tiny screw in the throttle barrel is the idle mixture. The engine likes 30% nitro/w 22% full synthetic low viscosity oil.
I'm planning on uploading some flight test video's soon (Bandit)
TDbandit- Platinum Member
- Posts : 897
Join date : 2014-12-01
Age : 52
Location : Riverdale Georgia
Re: Whirly Bird (TSA 700N Heli) build Finally!
![]() TDbandit Thu Mar 24, 2016 12:46 pm
TDbandit Thu Mar 24, 2016 12:46 pm
Ok time for another round of build pics, last pic was of a close up of the fan attachment to the engine so now we have *looks through the mess of pics in the file* ahh here we go..
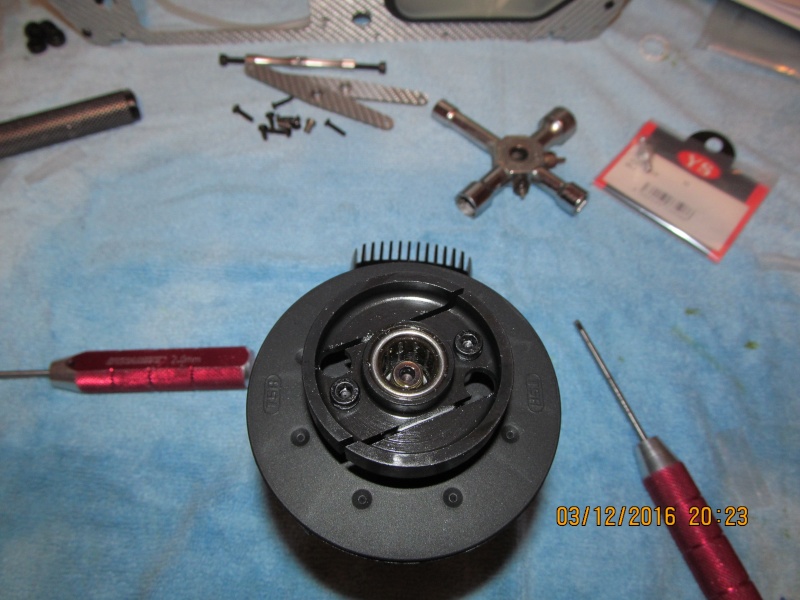
This isa look at the engine and fan assembly complete. Always remove the protective oil from the clutch before installing in the model, it will cause slippage and excessive heat which equals to a burnt out clutch later.

Top view of the clutch showing the one way bearing for the start shaft.
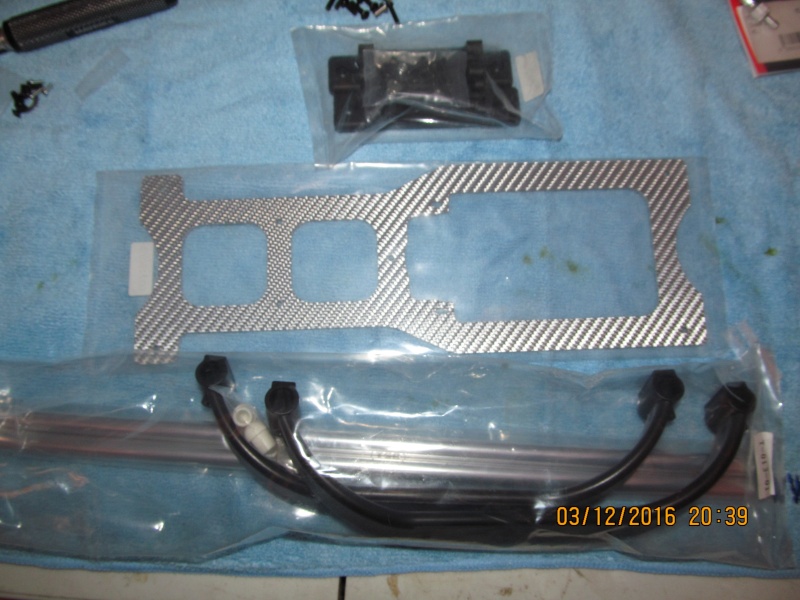
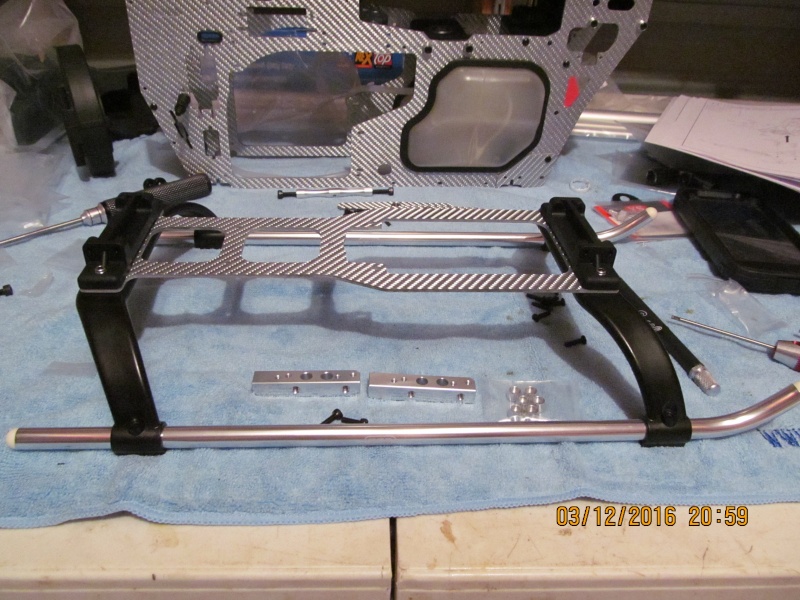
Next up after the engine is the assembly of the base plate with the landing skids, this shows the components which consists of the base plate *large silver plate in the middle* landing skid parts, the two mounting blocks and hardware.
First, according to the manual, the four M3 lock nuts are installed in to the blocks, these attach the base plate and landing skids later.

In this pic, it shows the blocks, base plat and skids assembled. They are assembled using four M3.12 socket head cap screws.
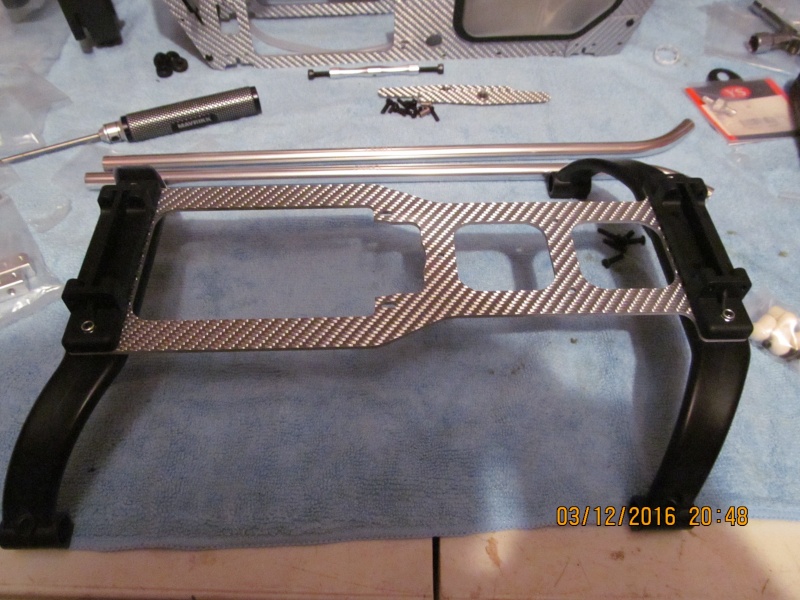
Now we have the rails installed with the next step layed out which involves the engine mount.
This is a step where attention has to be payed, The manual calls for the engine mounts to be attached to the base plate however while it shows and only shows the correct orientation of the mounts, the manual lacks text outlining the proper procedure on attaching and installing the mounts into the airframe. Proper procedure is to attach the mounts and lightly snug the screws in the slotted holes as to allow the mounts to move and align with the airframe sides when installed this has to be done so when the base plate assembly is installed in the airframe, the holes can be aligned for the side mount screws that will later anchor the engine and mounts to the sides.
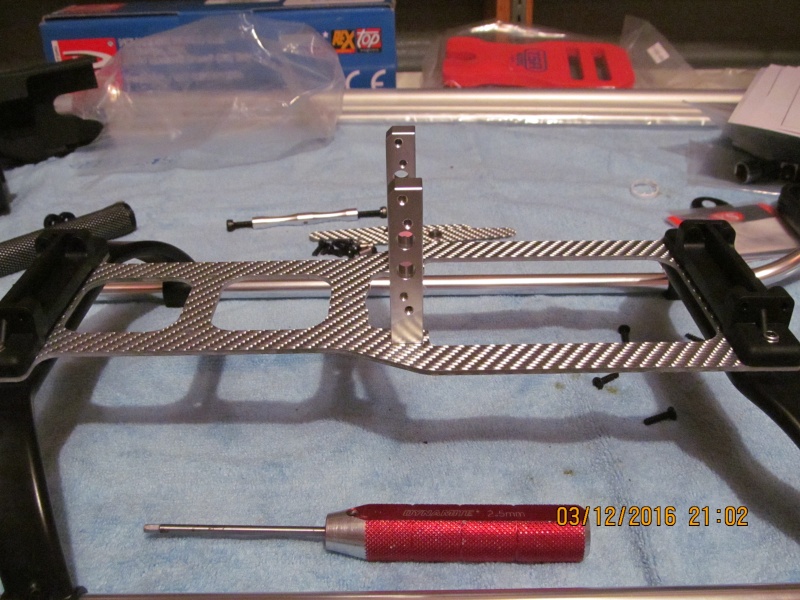
This is a closer look of the mounts, as stated the holes in the base plate for the engine mount rails are slotted. This is so you can adjust clearance for different gear ratios and set mesh. Remember to leave them slightly loose.

Now we have the base plate/landing skid assembly installed in the airframe, it is attached using eight M3 button head self tapping screws in the corners.
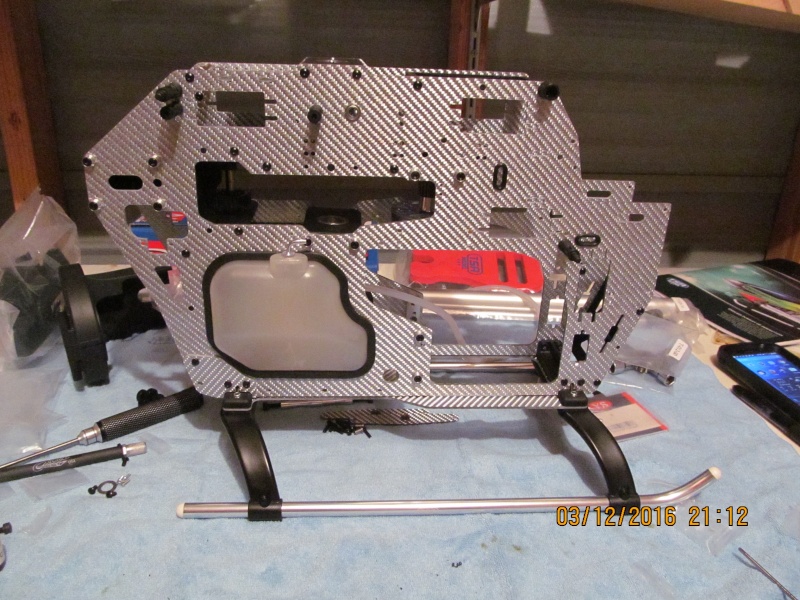
A closer look at the engine mounting rails installed in the frames, This kit came stock with a 8.4:1 ratio so the slotted holes were used in the frame sides. the slots are for 8.0-8.4 ratio's leave these slightly loose so when you install the engine, the rails will self align and not bind.

Ok next up we have the "ARE" (Anti-Rotation, Elevator) assembly that will later attach to the swash plate. (The swash plate is what provides control for the helicopter ALL helicopters have one, it converts stationary linear movement into rotating control inputs that the rotorhead can use which in turn moves the heli around. Think of the swash plate as kinda the mechanical brain of the the heli)
Ok got to stop for a while got called into work so I will have to continue this this evening, until then take it easy and happy flying!!
(Bandit)
This isa look at the engine and fan assembly complete. Always remove the protective oil from the clutch before installing in the model, it will cause slippage and excessive heat which equals to a burnt out clutch later.
Top view of the clutch showing the one way bearing for the start shaft.
Next up after the engine is the assembly of the base plate with the landing skids, this shows the components which consists of the base plate *large silver plate in the middle* landing skid parts, the two mounting blocks and hardware.
First, according to the manual, the four M3 lock nuts are installed in to the blocks, these attach the base plate and landing skids later.
In this pic, it shows the blocks, base plat and skids assembled. They are assembled using four M3.12 socket head cap screws.
Now we have the rails installed with the next step layed out which involves the engine mount.
This is a step where attention has to be payed, The manual calls for the engine mounts to be attached to the base plate however while it shows and only shows the correct orientation of the mounts, the manual lacks text outlining the proper procedure on attaching and installing the mounts into the airframe. Proper procedure is to attach the mounts and lightly snug the screws in the slotted holes as to allow the mounts to move and align with the airframe sides when installed this has to be done so when the base plate assembly is installed in the airframe, the holes can be aligned for the side mount screws that will later anchor the engine and mounts to the sides.
This is a closer look of the mounts, as stated the holes in the base plate for the engine mount rails are slotted. This is so you can adjust clearance for different gear ratios and set mesh. Remember to leave them slightly loose.
Now we have the base plate/landing skid assembly installed in the airframe, it is attached using eight M3 button head self tapping screws in the corners.
A closer look at the engine mounting rails installed in the frames, This kit came stock with a 8.4:1 ratio so the slotted holes were used in the frame sides. the slots are for 8.0-8.4 ratio's leave these slightly loose so when you install the engine, the rails will self align and not bind.
Ok next up we have the "ARE" (Anti-Rotation, Elevator) assembly that will later attach to the swash plate. (The swash plate is what provides control for the helicopter ALL helicopters have one, it converts stationary linear movement into rotating control inputs that the rotorhead can use which in turn moves the heli around. Think of the swash plate as kinda the mechanical brain of the the heli)
Ok got to stop for a while got called into work so I will have to continue this this evening, until then take it easy and happy flying!!
(Bandit)
TDbandit- Platinum Member
- Posts : 897
Join date : 2014-12-01
Age : 52
Location : Riverdale Georgia
Re: Whirly Bird (TSA 700N Heli) build Finally!
![]() RknRusty Thu Mar 24, 2016 2:48 pm
RknRusty Thu Mar 24, 2016 2:48 pm
Lookin' good so far. This thing definitely ain't for beginners.
Rusty
Rusty
_________________
Don't Panic!
...and never Ever think about how good you are at something...
while you're doing it!
My Hot Rock & Blues Playlist
...and never Ever think about how good you are at something...
while you're doing it!
My Hot Rock & Blues Playlist
RknRusty- Rest In Peace
- Posts : 10869
Join date : 2011-08-10
Age : 68
Location : South Carolina, USA
Re: Whirly Bird (TSA 700N Heli) build Finally!
![]() TDbandit Tue Apr 12, 2016 1:12 pm
TDbandit Tue Apr 12, 2016 1:12 pm
Long time no see, been busy lately so i haven't been able to post any on this thread. Just a note though that the model is complete and has had a test hover unforchantly I had no one around to help with a video *shrugs* I will get one posted eventually hopefully anyway, anyway here we go for the next round!
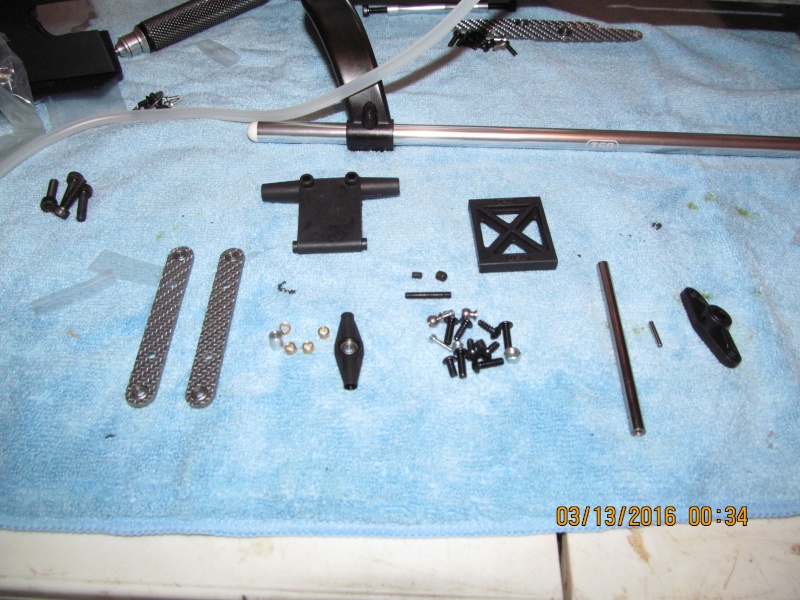
First pic for this group is the assembly of the "ARE" shaft which controls the elevator movement to the swashplate. It is a simple and straight forward process which consists of the shaft, lock pin and an M3 grub screw that goes in on the end of the shaft where the pin is to lock it in place, remember locktite.
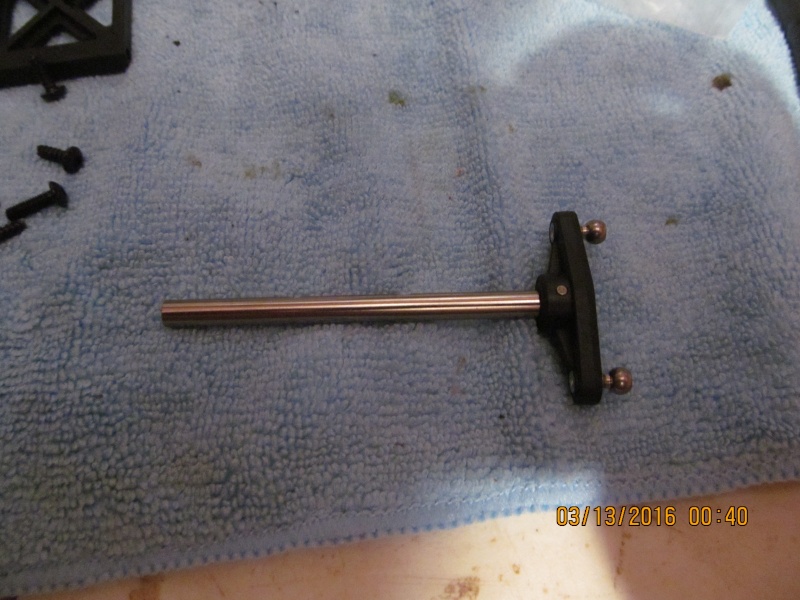
Here's an end view of the "ARE" shaft showing the grub screw, control arm and pivot balls.
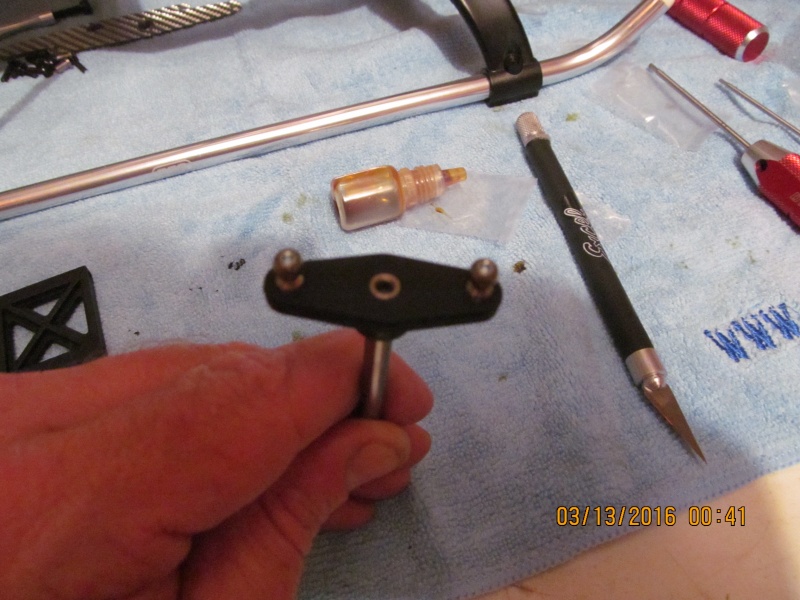
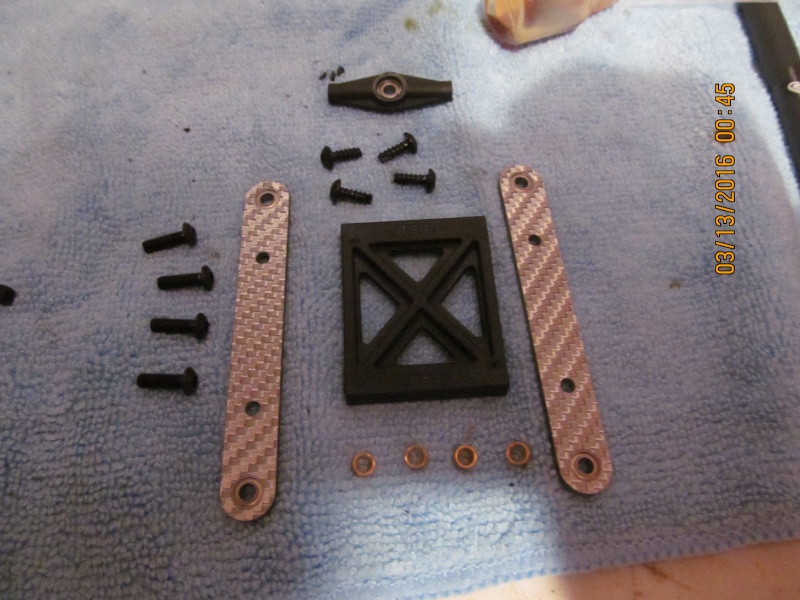
Next is the assembly of the actual "ARE" (Anti-Rotation Elevator) control link that goes to the swashplate. Assembly is simple and straight forward just make sure the carbon plates which have flange bearings, that the flanges of the bearings are pointed to the outside of the assembly Do not over tighten the screws.
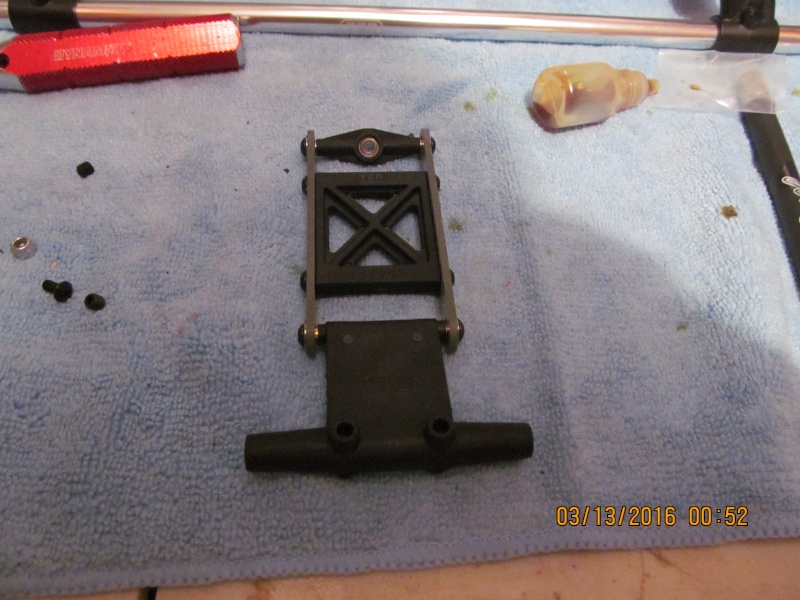
And here we have the completed "ARE" link assembly with the pivot arm that the "ARE" shaft goes through.
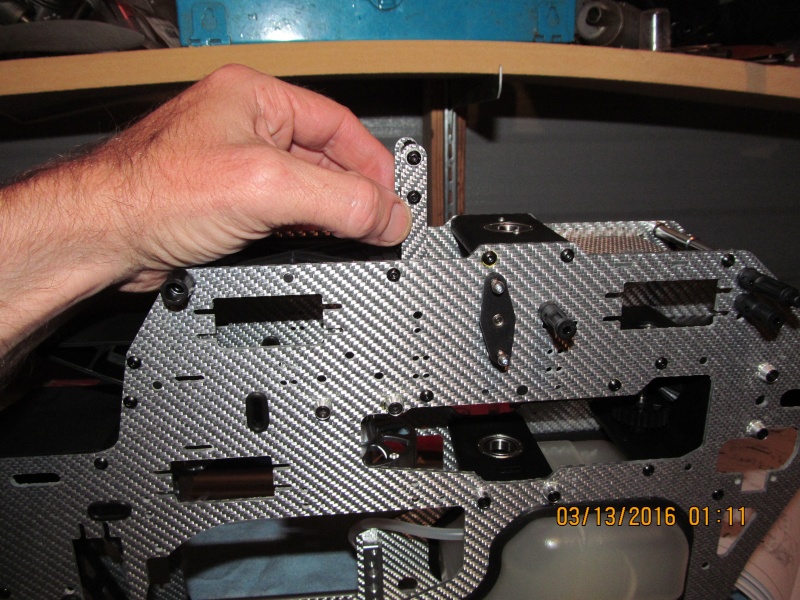
Here is a shot of the "ARE" assembly installed in the mechanics, Sorry ment to get a shot of the installation so here is a description;
Step one: Take "ARE" unit and with the pivot horn pointing to the front of the heli, slip it in from the top of the mechanics in between the two bearings that are in the frames (Note) it's a good idea to pre install the two M4-4 grub screws in the "ARE" horn first insuring they are on the top upon assembly, this helps keep from dropping them.
Step two: Next while supporting the "ARE" horn and with the front of the heli pointing towards you, slip the "ARE" control shaft through the brearings and "ARE" control horn from the right side assuring that all are correctly positioned and then tighten down the two M4-4 grub screws that were previously installed in the last step, taking care to make sure that the grub screws nestle down into the two blind drilled holes that are in the shaft, easiest way to accomplish this is to lightly rotate the shaft while slowly tightening the grub screws (you will feel it notch into the holes then tighten them down) proper installation is noted when the grub screws seat below the surface of the hole.
Step three: Now on the left side, thread lock and install a small M3-6 button head screw in the opposite side of the now installed "ARE" shaft and tighten it down insuring no thread lock gets into the bearing.
Step four: Test for free movement and you're done!
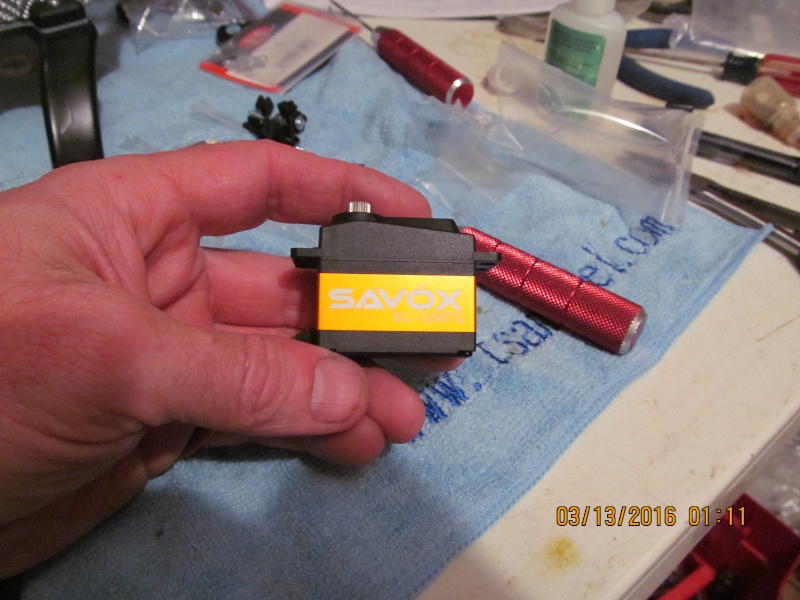
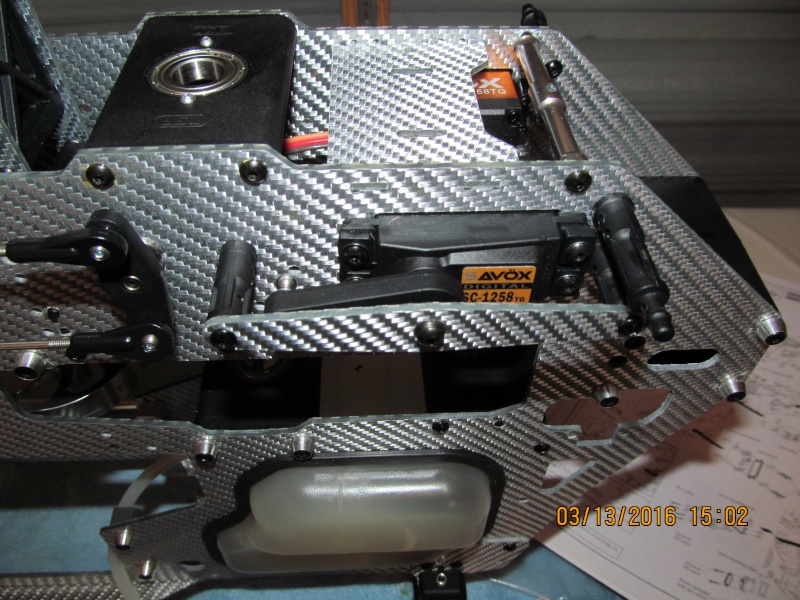
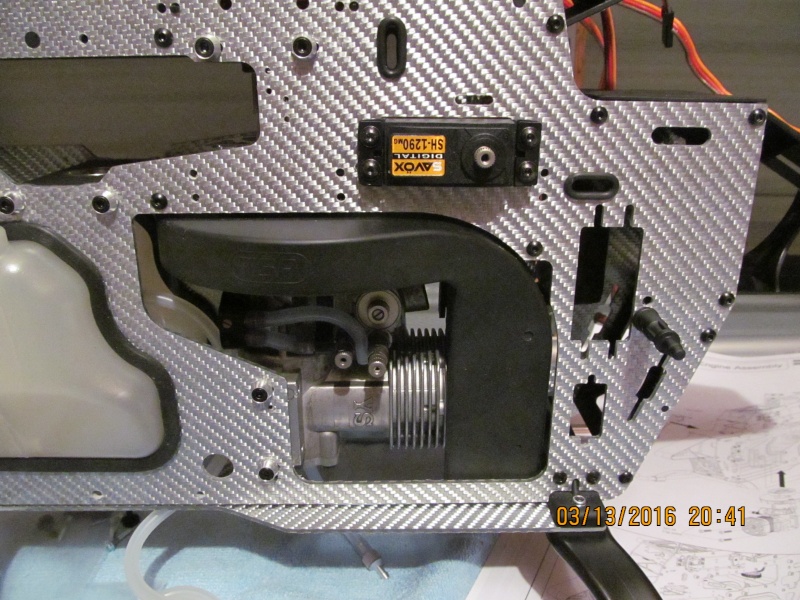
Now it's time for the installation of the servo's. I elected the Savox digitals, 1258TG (Titanium gear) for Cyclic and SH1290MG (Metal gear) for Tail control. When dealing with helicopters especially with the larger ones, it's a good idea to get the best servo's that you can afford and digitals with Metal gear trains are to be preferred. The reason being is helicopters are VERY hard on servo's especially the fly barless type and will literally destroy a cheap set of servo's in short order. Analog servo's will work but they lack the holding power that digitals have even a sport 20 dollar digital servo will out do a high end analog in holding power. Anyway here is a pic of one of the 1258TG servo's Very fast torque monsters. oh and if anyone tries digitals, don't worry about the Humm, it's normal.
Pic upload problem resolved!
Going to continue on in the next segment. (Bandit)
First pic for this group is the assembly of the "ARE" shaft which controls the elevator movement to the swashplate. It is a simple and straight forward process which consists of the shaft, lock pin and an M3 grub screw that goes in on the end of the shaft where the pin is to lock it in place, remember locktite.
Here's an end view of the "ARE" shaft showing the grub screw, control arm and pivot balls.
Next is the assembly of the actual "ARE" (Anti-Rotation Elevator) control link that goes to the swashplate. Assembly is simple and straight forward just make sure the carbon plates which have flange bearings, that the flanges of the bearings are pointed to the outside of the assembly Do not over tighten the screws.
And here we have the completed "ARE" link assembly with the pivot arm that the "ARE" shaft goes through.
Here is a shot of the "ARE" assembly installed in the mechanics, Sorry ment to get a shot of the installation so here is a description;
Step one: Take "ARE" unit and with the pivot horn pointing to the front of the heli, slip it in from the top of the mechanics in between the two bearings that are in the frames (Note) it's a good idea to pre install the two M4-4 grub screws in the "ARE" horn first insuring they are on the top upon assembly, this helps keep from dropping them.
Step two: Next while supporting the "ARE" horn and with the front of the heli pointing towards you, slip the "ARE" control shaft through the brearings and "ARE" control horn from the right side assuring that all are correctly positioned and then tighten down the two M4-4 grub screws that were previously installed in the last step, taking care to make sure that the grub screws nestle down into the two blind drilled holes that are in the shaft, easiest way to accomplish this is to lightly rotate the shaft while slowly tightening the grub screws (you will feel it notch into the holes then tighten them down) proper installation is noted when the grub screws seat below the surface of the hole.
Step three: Now on the left side, thread lock and install a small M3-6 button head screw in the opposite side of the now installed "ARE" shaft and tighten it down insuring no thread lock gets into the bearing.
Step four: Test for free movement and you're done!
Now it's time for the installation of the servo's. I elected the Savox digitals, 1258TG (Titanium gear) for Cyclic and SH1290MG (Metal gear) for Tail control. When dealing with helicopters especially with the larger ones, it's a good idea to get the best servo's that you can afford and digitals with Metal gear trains are to be preferred. The reason being is helicopters are VERY hard on servo's especially the fly barless type and will literally destroy a cheap set of servo's in short order. Analog servo's will work but they lack the holding power that digitals have even a sport 20 dollar digital servo will out do a high end analog in holding power. Anyway here is a pic of one of the 1258TG servo's Very fast torque monsters. oh and if anyone tries digitals, don't worry about the Humm, it's normal.
Pic upload problem resolved!
Going to continue on in the next segment. (Bandit)
Last edited by TDbandit on Wed Apr 13, 2016 1:40 pm; edited 1 time in total
TDbandit- Platinum Member
- Posts : 897
Join date : 2014-12-01
Age : 52
Location : Riverdale Georgia
Re: Whirly Bird (TSA 700N Heli) build Finally!
![]() getback Wed Apr 13, 2016 8:11 am
getback Wed Apr 13, 2016 8:11 am
Well Crap on the pcs. not working but I can wait I did so I would have time to read all the process ,, Good to hear you got her to together and have a test run in . Looking foreward to seeing some video of it flying but I understand when there is NO one around . Thanks for the update TDbandit . Eric 
getback- Top Poster
-
Posts : 10143
Join date : 2013-01-18
Age : 66
Location : julian , NC
Re: Whirly Bird (TSA 700N Heli) build Finally!
![]() TDbandit Wed Apr 13, 2016 2:45 pm
TDbandit Wed Apr 13, 2016 2:45 pm
Ok next segment, had an issue with my system which caused the upload problem so here is more of the build.
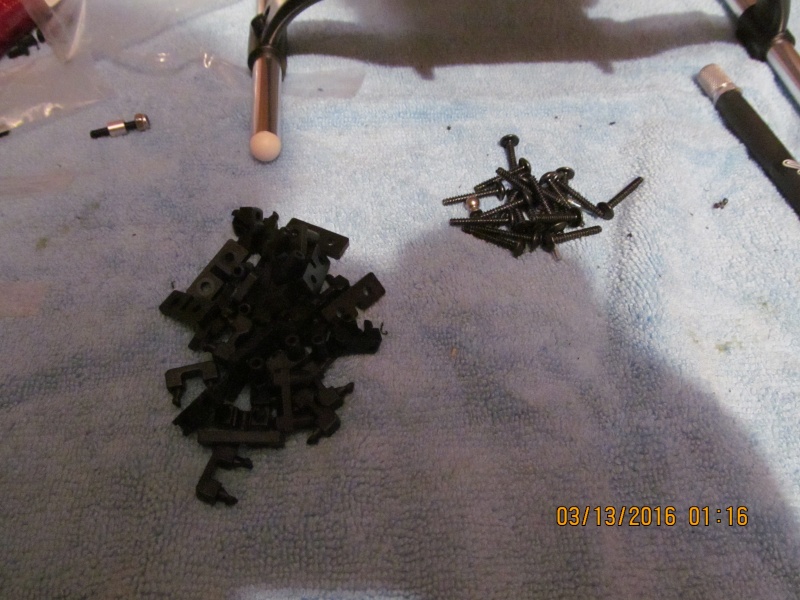
First pic shows the mounting hardware for the servo's yup boring pic but you got to have them if you are going mount them lol. Lotsa screws and mounting plates.
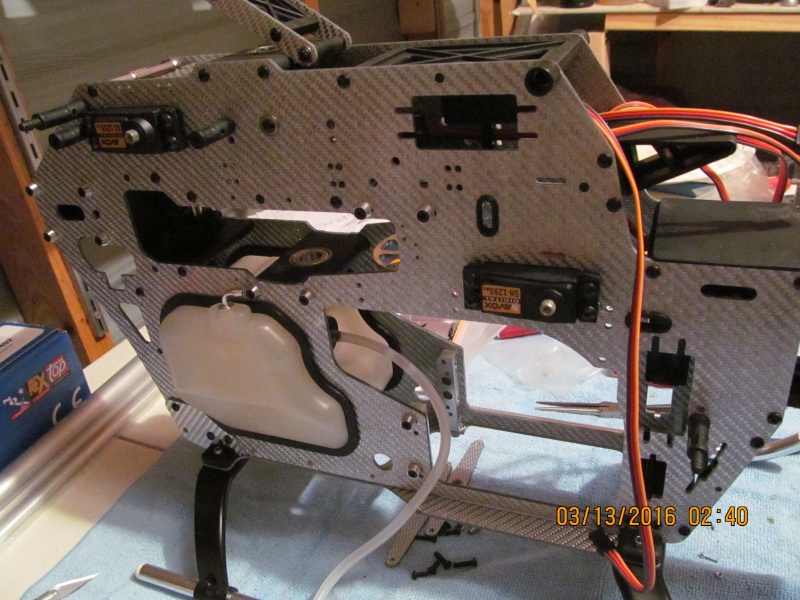
Here is a shot of some of the servo's installed. The kit provides servo wire clamps that snap to the side frames "No lip ties required"
governor RPM sensor was also installed which is not shown.
With the servo's installed, now it's time for the control horns. The kit provides horns for both JR and futaba, since I'm using Savox servo's which use the futaba 25 spline output shafts, I chose the futaba arms. The bag beside the arms is the hardware.
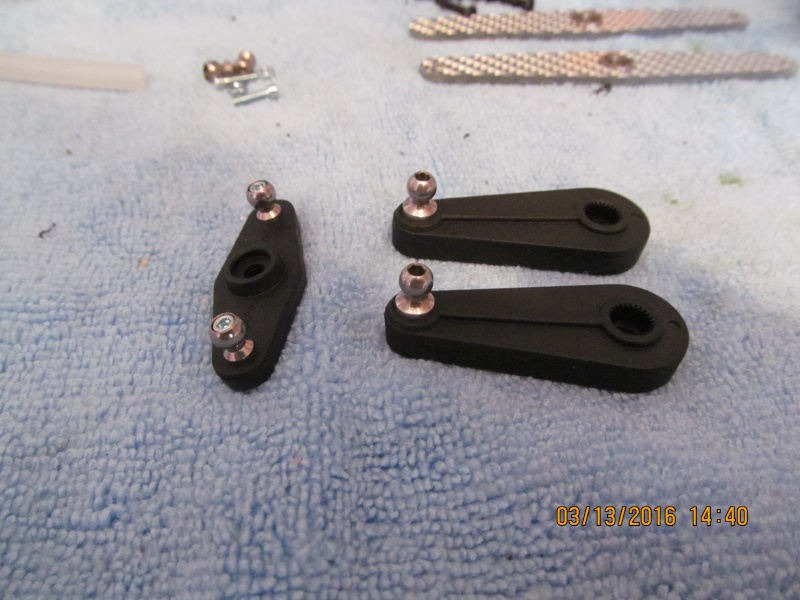
The long single sided arms are for the direct cyclic and the two sided one is the indirect cyclic arm.
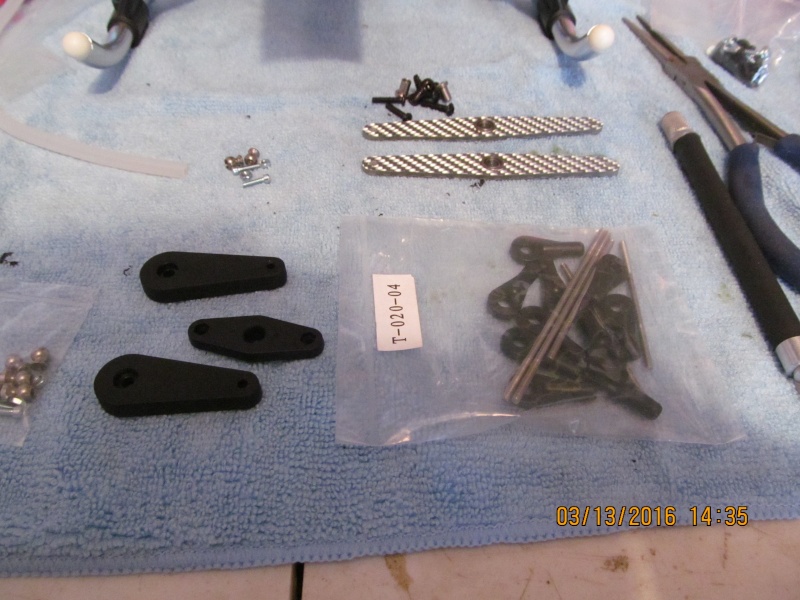
Here is a shot of the direct and indirect cyclic arms with the link balls installed. The fit of this kit is amazing.
Next, the links are made up and the servo arms are installed on the output shafts the links are not adjusted in this shot. The rule of 90 needs to be followed very closely here or control interaction problems will cause big head aches later. When installing the servo arms for one they are a VERY tight fit on the output shafts also make sure you plug your servos up and zero (center) them then try and get the arm as close to 90deg as possible, if one way doesn't line up right rotate it 180deg and try again. the indirect link had to be rotated 180deg but was very close to spot on when i found it. the one sided direct arms however, there is no way to get them exact so they will require you to adjust your neutral position in the servo's to make them exactly 90deg. if one is way off try installing it on the other side of the model. I had to swap sides to get them right. These techniques apply to all RC models and even C/L models. By the way when setting up servos. On multi sided arms you just simply rotate the arm (wheel) with the servo under power and neutral one hole at a time till one lines up. (Note) since I didn't have the FCU, receiver, battery and regulator as of the time of the build the arm positions were only approximate but were very close.

Here is a shot of one of the direct cyclic control servo's setup with the output arm support plate. This is an area where the servo is directly linked to the swashplate and ALL flight loads are place one these guys there fore the support plates help the servo's live longer and prevent the flight loads from trying to rip the output gear out of the case.
Now the engine is installed, as mentioned in earlier posts the mounting rails have to be loose enough to allow them to properly align when the engine is centered and tightened down one the engine is tightened push the engine away from the center of the frame to set it for the included 8.4:1 ratio then tighten down the side retaining screws and base plate screws.
Next is the installation of the fan shroud. This is a tricky point since this step is not clear at all on how it is installed. The best way I found was to leave the aluminum hex inserts out of the fan shroud and it went in FAIRLY easily. Once the shroud is in place align the two halvs and insert the hex inserts then slip it in place and fasten it down. Since I'm using the as some call the scary engine (YS .91), there is an insert that fits inside the shroud to help direct cooling air around the thinner cooling head found on YS engines. Air takes the path of least resistance so this insert is good to have or the air will simply go OVER the engines head and not through the cooling fins where it's supposed to go.
Ok this is enough for now since i have to get ready for work. look tomorrow for the next installment!
(Bandit)
First pic shows the mounting hardware for the servo's yup boring pic but you got to have them if you are going mount them lol. Lotsa screws and mounting plates.
Here is a shot of some of the servo's installed. The kit provides servo wire clamps that snap to the side frames "No lip ties required"
governor RPM sensor was also installed which is not shown.
With the servo's installed, now it's time for the control horns. The kit provides horns for both JR and futaba, since I'm using Savox servo's which use the futaba 25 spline output shafts, I chose the futaba arms. The bag beside the arms is the hardware.
The long single sided arms are for the direct cyclic and the two sided one is the indirect cyclic arm.
Here is a shot of the direct and indirect cyclic arms with the link balls installed. The fit of this kit is amazing.
Next, the links are made up and the servo arms are installed on the output shafts the links are not adjusted in this shot. The rule of 90 needs to be followed very closely here or control interaction problems will cause big head aches later. When installing the servo arms for one they are a VERY tight fit on the output shafts also make sure you plug your servos up and zero (center) them then try and get the arm as close to 90deg as possible, if one way doesn't line up right rotate it 180deg and try again. the indirect link had to be rotated 180deg but was very close to spot on when i found it. the one sided direct arms however, there is no way to get them exact so they will require you to adjust your neutral position in the servo's to make them exactly 90deg. if one is way off try installing it on the other side of the model. I had to swap sides to get them right. These techniques apply to all RC models and even C/L models. By the way when setting up servos. On multi sided arms you just simply rotate the arm (wheel) with the servo under power and neutral one hole at a time till one lines up. (Note) since I didn't have the FCU, receiver, battery and regulator as of the time of the build the arm positions were only approximate but were very close.
Here is a shot of one of the direct cyclic control servo's setup with the output arm support plate. This is an area where the servo is directly linked to the swashplate and ALL flight loads are place one these guys there fore the support plates help the servo's live longer and prevent the flight loads from trying to rip the output gear out of the case.
Now the engine is installed, as mentioned in earlier posts the mounting rails have to be loose enough to allow them to properly align when the engine is centered and tightened down one the engine is tightened push the engine away from the center of the frame to set it for the included 8.4:1 ratio then tighten down the side retaining screws and base plate screws.
Next is the installation of the fan shroud. This is a tricky point since this step is not clear at all on how it is installed. The best way I found was to leave the aluminum hex inserts out of the fan shroud and it went in FAIRLY easily. Once the shroud is in place align the two halvs and insert the hex inserts then slip it in place and fasten it down. Since I'm using the as some call the scary engine (YS .91), there is an insert that fits inside the shroud to help direct cooling air around the thinner cooling head found on YS engines. Air takes the path of least resistance so this insert is good to have or the air will simply go OVER the engines head and not through the cooling fins where it's supposed to go.
Ok this is enough for now since i have to get ready for work. look tomorrow for the next installment!
(Bandit)
TDbandit- Platinum Member
- Posts : 897
Join date : 2014-12-01
Age : 52
Location : Riverdale Georgia
Re: Whirly Bird (TSA 700N Heli) build Finally!
![]() TDbandit Sat Apr 16, 2016 10:09 pm
TDbandit Sat Apr 16, 2016 10:09 pm
Hi folks sorry for taking so long been busy, in fact, I'm up in Jefferson GA in a hotel while doing some aircraft work as I type this lol.
Anyway here is another installment in the build!
In the last installment, I showed the engine installation and completed the fan shroud which was a fun step lol now it is finally time to assemble the main and tail drive gear. This next pic shows the components of the drive assembly including the auto hub which disengages the main gear and clutch assembly from the rotor system so as to help reduce drag in order to help with auto rotations which is the heli's equivalent of an airplane gliding. Here it is.

The first step is to prep the auto hub by cleaning off the packing oil from the steel parts and then apply a thin coat of grease for the one way bearing.
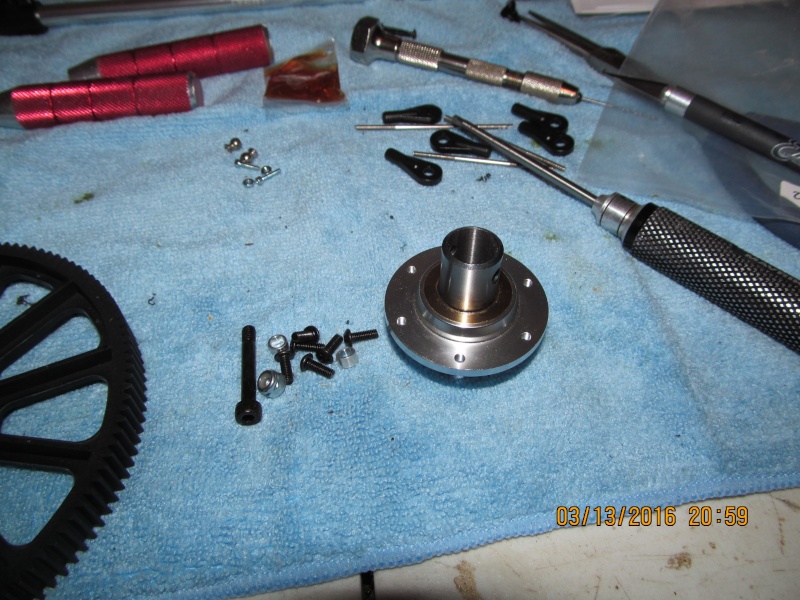
A shot of the main drive gear just before assembly which consists of five M3 button head cap screws installed through the main gear and into the auto hubs aluminum housing which are thread locked into place.
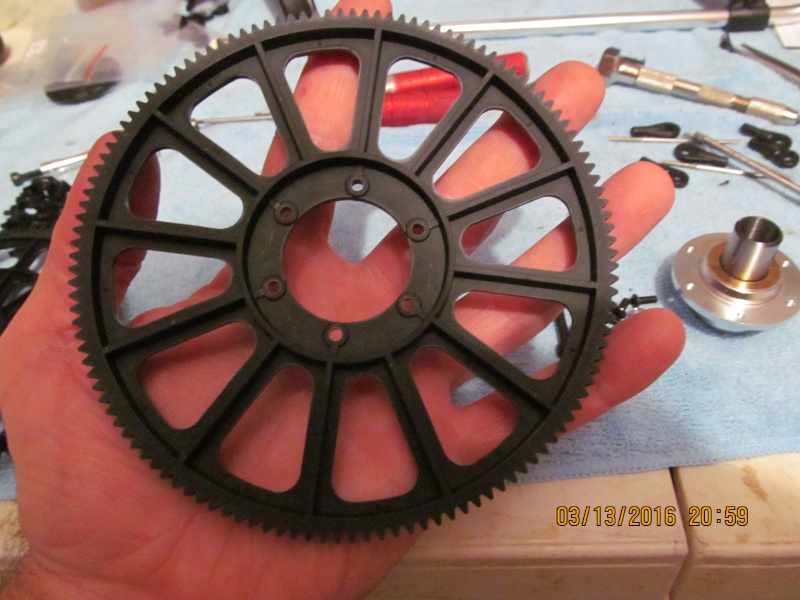
Now we have the gear assembly installed. Sorry My camera ran out of juice after I took the shot of the main gear. The tail rotor drive gear is the thinner slightly smaller gear on the bottom of the main gear. it simply installs by slipping it on the the protruding portion of the oneway sleeve and is secured by a single hardened M5 cap head bolt with crush sleeves. This bolt is commonly called the jesus bolt meaning if it lets go, down comes the copter since the main shaft will pull completely out and away from the mechanics along with the rotor hub and blades. Not a fun site so is good to be careful that you use the right bolt in this spot.

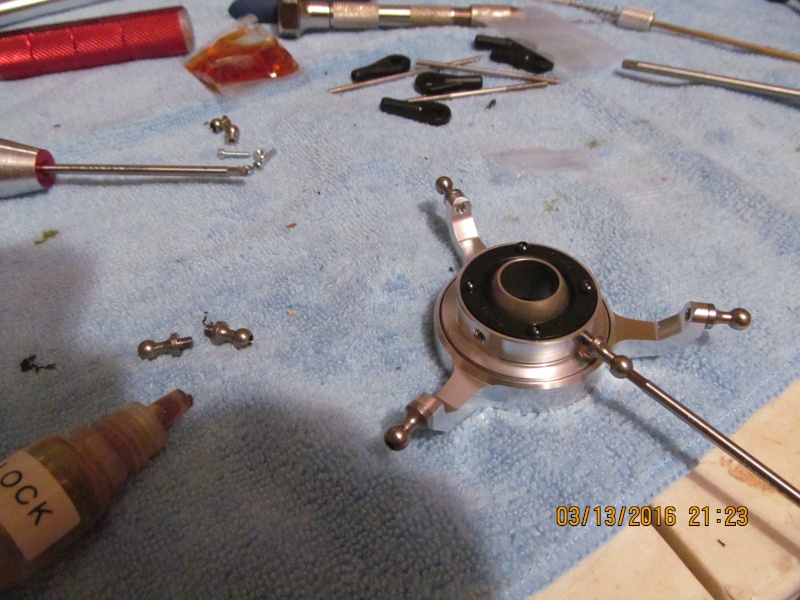
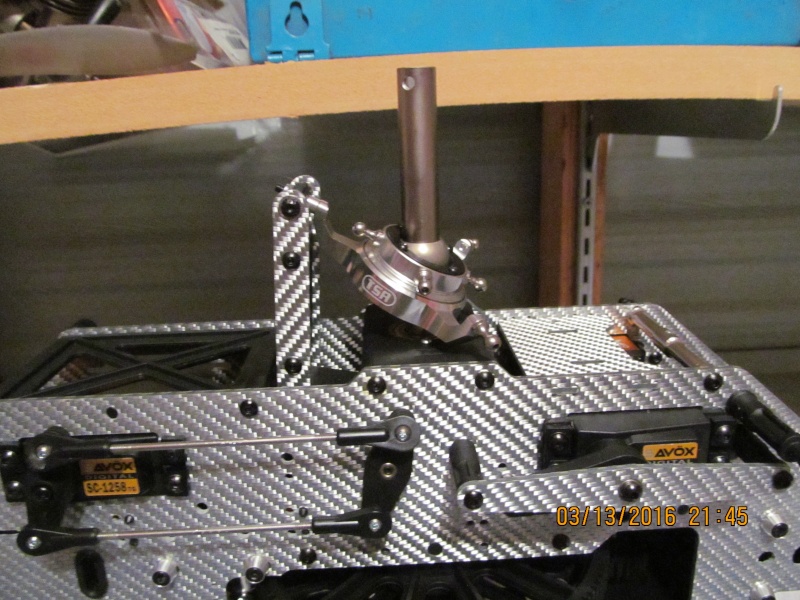
Finally it is time to assemble and install the heli's mechanical brain AKA the swashplate. Here is the first pic. This swashplate is set for 120deg CCPM which will be handled by it's FCU (Flight Control Unit) This heli is fly by wire BTW. Pretty nice piece of engineering.

Here in this pic I'm installing the control balls, (Note) I've installed one too many balls on the outer arms, instead there should be a single threaded rod and spacer which will attach the elevator side of the swash to the "ARE" link. Still neat though!
Now we have it installed on to the main shaft and hooked up to the "ARE" link the pitch and aileron links will be installed shortly.
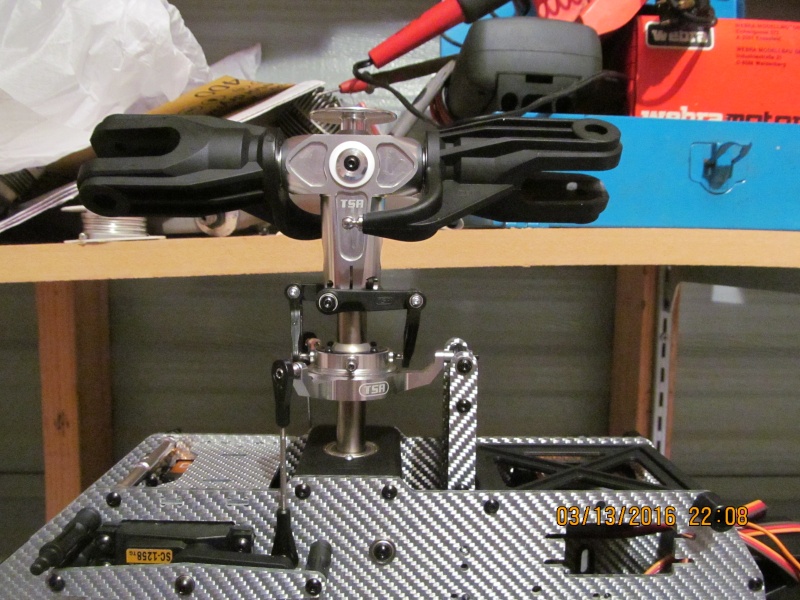
Now it's time for the main rotor head, this unit came pre-assembled in the kit but it is my habit to completely disassemble the head, check the bearing and thrust bearing for proper installation, grease and properly locktited but I was pleased to see that it was properly assembled infact it was a bear to take apart. Dis-assembling preassembled components is a good practice since there are times when the components arn't done properly so its goon insurance to know ahead of time lol.

And here it is installed! went together nicely. It uses two short M5 button head screws to attach the head to the main shaft. You MUST make sure these guys are thread locked and installed tightly. There are also two M3 pinch bolts that install on the bottom, make sure those are tight too, the pinch bolts are the heads first line of defense in the event that the two short Jesus bolts fail so make sure those are tight.
Ok time for me to hit the bed, got more plane work top do tomorrow so till next time!
(The bandit turns around and plops on the bed ZzZzZzZz)
Anyway here is another installment in the build!
In the last installment, I showed the engine installation and completed the fan shroud which was a fun step lol now it is finally time to assemble the main and tail drive gear. This next pic shows the components of the drive assembly including the auto hub which disengages the main gear and clutch assembly from the rotor system so as to help reduce drag in order to help with auto rotations which is the heli's equivalent of an airplane gliding. Here it is.
The first step is to prep the auto hub by cleaning off the packing oil from the steel parts and then apply a thin coat of grease for the one way bearing.
A shot of the main drive gear just before assembly which consists of five M3 button head cap screws installed through the main gear and into the auto hubs aluminum housing which are thread locked into place.
Now we have the gear assembly installed. Sorry My camera ran out of juice after I took the shot of the main gear. The tail rotor drive gear is the thinner slightly smaller gear on the bottom of the main gear. it simply installs by slipping it on the the protruding portion of the oneway sleeve and is secured by a single hardened M5 cap head bolt with crush sleeves. This bolt is commonly called the jesus bolt meaning if it lets go, down comes the copter since the main shaft will pull completely out and away from the mechanics along with the rotor hub and blades. Not a fun site so is good to be careful that you use the right bolt in this spot.
Finally it is time to assemble and install the heli's mechanical brain AKA the swashplate. Here is the first pic. This swashplate is set for 120deg CCPM which will be handled by it's FCU (Flight Control Unit) This heli is fly by wire BTW. Pretty nice piece of engineering.
Here in this pic I'm installing the control balls, (Note) I've installed one too many balls on the outer arms, instead there should be a single threaded rod and spacer which will attach the elevator side of the swash to the "ARE" link. Still neat though!
Now we have it installed on to the main shaft and hooked up to the "ARE" link the pitch and aileron links will be installed shortly.
Now it's time for the main rotor head, this unit came pre-assembled in the kit but it is my habit to completely disassemble the head, check the bearing and thrust bearing for proper installation, grease and properly locktited but I was pleased to see that it was properly assembled infact it was a bear to take apart. Dis-assembling preassembled components is a good practice since there are times when the components arn't done properly so its goon insurance to know ahead of time lol.
And here it is installed! went together nicely. It uses two short M5 button head screws to attach the head to the main shaft. You MUST make sure these guys are thread locked and installed tightly. There are also two M3 pinch bolts that install on the bottom, make sure those are tight too, the pinch bolts are the heads first line of defense in the event that the two short Jesus bolts fail so make sure those are tight.
Ok time for me to hit the bed, got more plane work top do tomorrow so till next time!
(The bandit turns around and plops on the bed ZzZzZzZz)
TDbandit- Platinum Member
- Posts : 897
Join date : 2014-12-01
Age : 52
Location : Riverdale Georgia
Re: Whirly Bird (TSA 700N Heli) build Finally!
![]() getback Sun Apr 17, 2016 9:41 am
getback Sun Apr 17, 2016 9:41 am
Boy there is a lot of mechanics in that thing , I bet your first build was s long one tring to get ever thing just right . That build is NOT some thing you would want to delay on getting back to as soon as possible , so as not to loose your place Looking good TDbandit . Eric
Looking good TDbandit . Eric
getback- Top Poster
-
Posts : 10143
Join date : 2013-01-18
Age : 66
Location : julian , NC
» Flight of my TSA 700N RC heli
» Workin' on my Whirly bird!
» Stuntman23 build - Finally working instead of talking
» CEF speed contest Design Discussions
» Flight aboard my Infusion 700N
» Workin' on my Whirly bird!
» Stuntman23 build - Finally working instead of talking
» CEF speed contest Design Discussions
» Flight aboard my Infusion 700N
Page 1 of 1
Permissions in this forum:
You cannot reply to topics in this forum