

 Rules
Rules
by balogh Today at 3:10 pm
» Cox powered jet-pump for model Sprint Boat
by roddie Today at 2:51 pm
» WHO NEEDS TANKS!!!?? Perfect Brand Tanks For Sale
by Cox International Today at 2:48 pm
» Fox .35 Modifications
by Onelife Today at 2:07 pm
» Prop Rod - resto to a runner
by cstatman Today at 2:03 pm
» Revivng Some Childhood Classics
by GTO455 Today at 2:01 pm
» Jim Walkers FireBee - This is going to be fun
by rsv1cox Today at 12:32 pm
» Roddie-Rigger.. a 2005 original design
by roddie Today at 11:52 am
» Jim Walker Firebaby
by rsv1cox Today at 10:12 am
» **VOTE-ON-THE-NEXT-COX-ENGINE-OF-THE-MONTH** (May 2024)
by rdw777 Today at 8:06 am
» A prototype Cox Reed-valve marine engine
by F4D Phantom II Yesterday at 7:00 pm
» World's largest weathervane
by Cox International Yesterday at 5:51 pm


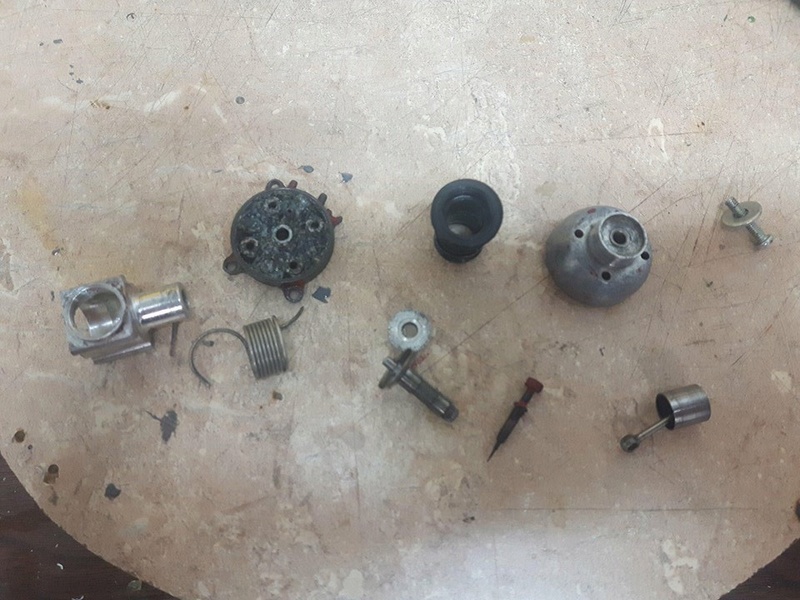
Babe Bee Restoration
Page 1 of 2 • 1, 2 ![]()

Babe Bee Restoration
![]() NEW222 Sat Apr 07, 2018 2:53 pm
NEW222 Sat Apr 07, 2018 2:53 pm

NEW222- Top Poster

- Posts : 3892
Join date : 2011-08-13
Age : 45
Location : oakbank, mb
Re: Babe Bee Restoration
![]() crankbndr Sat Apr 07, 2018 3:15 pm
crankbndr Sat Apr 07, 2018 3:15 pm
I don’t know how you clean that up.

crankbndr- Top Poster
- Posts : 3073
Join date : 2011-12-10
Location : Homestead FL
Re: Babe Bee Restoration
![]() rsv1cox Sat Apr 07, 2018 3:34 pm
rsv1cox Sat Apr 07, 2018 3:34 pm

rsv1cox- Top Poster


Posts : 10614
Join date : 2014-08-18
Location : West Virginia
Re: Babe Bee Restoration
![]() Marleysky Sat Apr 07, 2018 3:41 pm
Marleysky Sat Apr 07, 2018 3:41 pm

Marleysky- Top Poster
-
Posts : 3618
Join date : 2014-09-28
Age : 71
Location : Grand Rapids, MI
Re: Babe Bee Restoration
![]() 944_Jim Sat Apr 07, 2018 4:23 pm
944_Jim Sat Apr 07, 2018 4:23 pm
Owderblasting with old baking soda while be less aggressive. Only after an attempt with last month's box would I consider a more coarse material.
This may be a good time to consider a small rock tumbler. A DIY solution can be as simple as a small plastic coffee canister driven by a drill, and supported by a couple of cheesy wheels. Media can be used black beauty, baking owder or Walnut shells...even smashed, uncooked popcorn kernels.
Please share your final solution!
944_Jim- Diamond Member

-
Posts : 1957
Join date : 2017-02-08
Age : 59
Location : NE MS
Re: Babe Bee Restoration
![]() Marleysky Sat Apr 07, 2018 4:57 pm
Marleysky Sat Apr 07, 2018 4:57 pm
https://m.youtube.com/watch?v=DGT20ghWMZA
Marleysky- Top Poster
-
Posts : 3618
Join date : 2014-09-28
Age : 71
Location : Grand Rapids, MI
Re: Babe Bee Restoration
![]() NEW222 Sat Apr 07, 2018 6:04 pm
NEW222 Sat Apr 07, 2018 6:04 pm
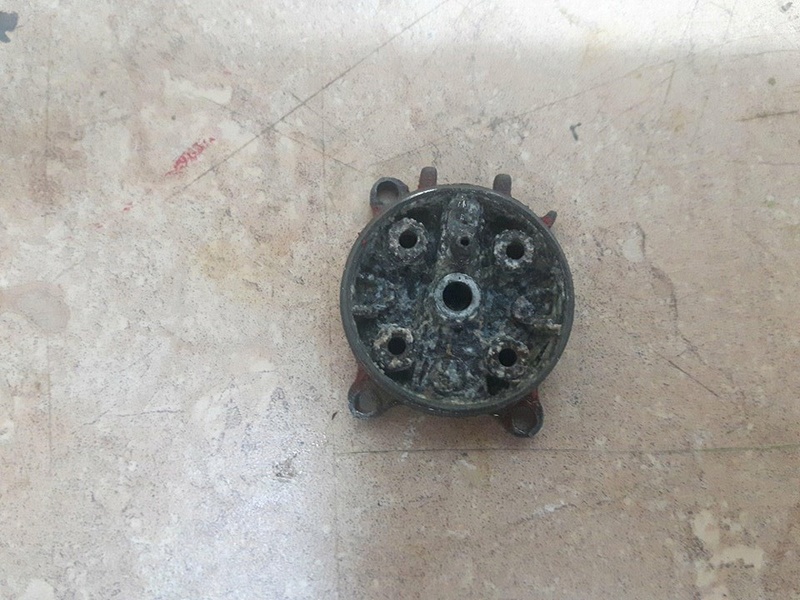
crankbndr wrote:Boy that backplate is the worst I’ve seen! Makes you wonder what fuel was used.
I don’t know how you clean that up.
Yep. I was wondering that myself. What was ever in that tank to make the backplate do that?
NEW222- Top Poster
- Posts : 3892
Join date : 2011-08-13
Age : 45
Location : oakbank, mb
Re: Babe Bee Restoration
![]() NEW222 Sat Apr 07, 2018 6:07 pm
NEW222 Sat Apr 07, 2018 6:07 pm
That was the only other thing I was possibly considering. The only thing that had stopped my thought of that was the tiny raised edge on teh outer edge for the tank to seal. I was concerned about damaging that area and not having a seal there. But seeing how you said you had done such in the past, I will reconsider it. Thanks.rsv1cox wrote:That is nasty. I have sandblasted them to good results. The only alternative that I can see considering it's condition. If you do, you will need small wires/toothpicks/needle in the holes to keep the media out, then blow out with compressed air really good.
NEW222- Top Poster
- Posts : 3892
Join date : 2011-08-13
Age : 45
Location : oakbank, mb
Re: Babe Bee Restoration
![]() NEW222 Sat Apr 07, 2018 6:11 pm
NEW222 Sat Apr 07, 2018 6:11 pm
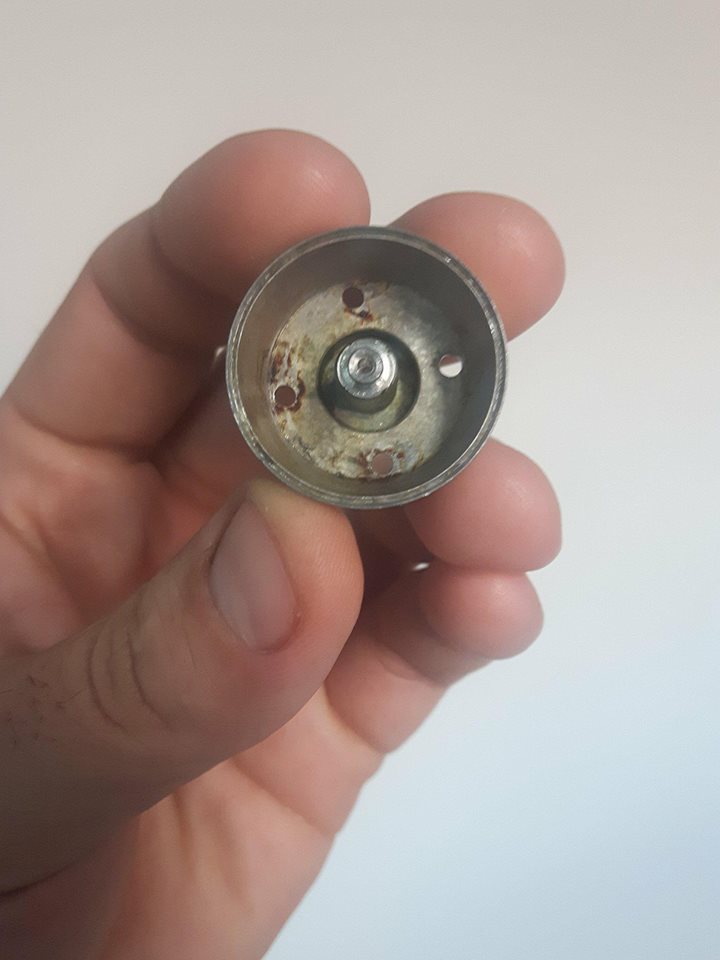
Marleysky wrote:Yeah man , That one looks Nasty. Does the tank interior look as bad? Hot soak in anti-freeze see if " it" is removable. As long as you get a good tank to backplate seal, venturi seal and the NV is clear thru the orifice it should work, it'll just look ugly, on the inside. Beauty IS only skin deep, with some Mothers and some 000 steel wool!
No, the tank and even the fuel line looked old, used, and worn, but nothing like this. These parts all sat in the crock pot of hot antifreeze for about 5 hours already, and it did not soften it up at all. Cleaning the inside of the fuel tank will be alright. Attached is a picture of inside the tank. Going to check out your DIY tumbler right away too. Thanks for the link.
Last edited by NEW222 on Sat Apr 07, 2018 6:33 pm; edited 1 time in total
NEW222- Top Poster
- Posts : 3892
Join date : 2011-08-13
Age : 45
Location : oakbank, mb
Re: Babe Bee Restoration
![]() NEW222 Sat Apr 07, 2018 6:17 pm
NEW222 Sat Apr 07, 2018 6:17 pm
944_Jim wrote:While I won't knock another person's experience, I would think sandblasting is a little rough for this light a material.
Owderblasting with old baking soda while be less aggressive. Only after an attempt with last month's box would I consider a more coarse material.
This may be a good time to consider a small rock tumbler. A DIY solution can be as simple as a small plastic coffee canister driven by a drill, and supported by a couple of cheesy wheels. Media can be used black beauty, baking owder or Walnut shells...even smashed, uncooked popcorn kernels.
Please share your final solution!
I was on the same thought of sandblasting being rough, but after reading Bobs post, I am less worried now. Powderblasting would be the best in my opinion. I like your homemade rock tumbler idea. And now that you mentioned it, I believe I have one outside somewhere which I may experiment with. But as for a final solution, a replacement will be on its way sometime this coming week, thanks to a friend. Thanks.
NEW222- Top Poster
- Posts : 3892
Join date : 2011-08-13
Age : 45
Location : oakbank, mb
Re: Babe Bee Restoration
![]() NEW222 Sat Apr 07, 2018 6:40 pm
NEW222 Sat Apr 07, 2018 6:40 pm
NEW222- Top Poster
- Posts : 3892
Join date : 2011-08-13
Age : 45
Location : oakbank, mb
Re: Babe Bee Restoration
![]() KariFS Sun Apr 08, 2018 5:39 am
KariFS Sun Apr 08, 2018 5:39 am
You don’t need to polish between the different sandpaper grits. But it is very important to clean up the surfaces so that none of the debris generated by the coarse sanding stays and messes up your fine sanding. I would skip the 400 and start with wet 800. After 1200 or 1500 you should get a nice shine with Mother’s.
I usually use just polishing paste on my engines, since I like to leave the original look on the machined surfaces, but the recent threads and pictures of mirror finishes have been an inspiration
Good Luck!
KariFS- Diamond Member
- Posts : 2004
Join date : 2014-10-10
Age : 52
Re: Babe Bee Restoration
![]() Oldenginerod Sun Apr 08, 2018 6:01 am
Oldenginerod Sun Apr 08, 2018 6:01 am

Oldenginerod- Top Poster
- Posts : 3974
Join date : 2012-06-15
Age : 61
Location : Drouin, Victoria
Re: Babe Bee Restoration
![]() KariFS Sun Apr 08, 2018 6:09 am
KariFS Sun Apr 08, 2018 6:09 am
KariFS- Diamond Member
- Posts : 2004
Join date : 2014-10-10
Age : 52
Re: Babe Bee Restoration
![]() rsv1cox Sun Apr 08, 2018 7:25 am
rsv1cox Sun Apr 08, 2018 7:25 am
NEW222 wrote:That was the only other thing I was possibly considering. The only thing that had stopped my thought of that was the tiny raised edge on teh outer edge for the tank to seal. I was concerned about damaging that area and not having a seal there. But seeing how you said you had done such in the past, I will reconsider it. Thanks.rsv1cox wrote:That is nasty. I have sandblasted them to good results. The only alternative that I can see considering it's condition. If you do, you will need small wires/toothpicks/needle in the holes to keep the media out, then blow out with compressed air really good.
There are different types of media, soda is very forgiving. The PSI is adjustable also, no need to blast at 100 PSI when 60 will do. It gets into those cast in nooks like nothing else. Like anything, proper media blasting takes a certain level of experience.
Bob
rsv1cox- Top Poster
-
Posts : 10614
Join date : 2014-08-18
Location : West Virginia
Re: Babe Bee Restoration
![]() getback Sun Apr 08, 2018 9:29 am
getback Sun Apr 08, 2018 9:29 am

getback- Top Poster
-
Posts : 10146
Join date : 2013-01-18
Age : 66
Location : julian , NC
Re: Babe Bee Restoration
![]() NEW222 Sun Apr 08, 2018 10:53 am
NEW222 Sun Apr 08, 2018 10:53 am
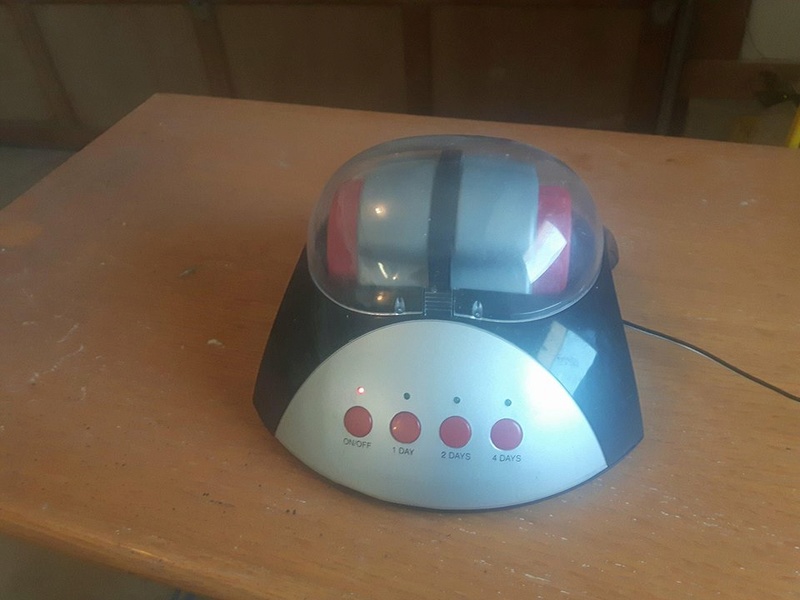
'As of last night, I decided to try a couple of things. I put the backplate in a salt and vinegar bath yesterday evening. Just a short while ago I removed it. The vinegar was very dirty looking. I rinsed it off and the white crusty stuff had looked like it disappeared. So, I rinsed it off and dried it with the ol' ladys hair drier. I then just as of 5 minutes ago, put it in my old rock tumbler with some 'kitty media'. So I will now let it run a few hours and see what it then looks like.'
NEW222- Top Poster
- Posts : 3892
Join date : 2011-08-13
Age : 45
Location : oakbank, mb
Re: Babe Bee Restoration
![]() NEW222 Sun Apr 08, 2018 10:54 am
NEW222 Sun Apr 08, 2018 10:54 am
getback wrote:I have seen this before and think it is corrosion from possible water , what i do is soak in Hobbies #9 for 15 mins. and scrub it with a small steel or brass brush , for the needle hole i use torch tip cleaners the smallest one will go through the passage (small hole at the air intake) then use fuel hose to blow through also check the fuel hose nipple to make sure its clear hold fingers to block off both sides of the venture (air intake) and blow with hose again through the needle hole . Hope that make any since(( you want get it all out but make it serveable ))
Thank you. It all makes sense! Appreciated.
NEW222- Top Poster
- Posts : 3892
Join date : 2011-08-13
Age : 45
Location : oakbank, mb
Re: Babe Bee Restoration
![]() roddie Sun Apr 08, 2018 12:11 pm
roddie Sun Apr 08, 2018 12:11 pm
A homemade "vibrating-bowl" type parts-cleaner (like the one in the video) looks fairly easy to make, but using a "vibrating-sander" as a means to power it, would be a bit LOUD to run for the extended periods.
A tumbler would probably get the job done fairly quickly and is a LOT quieter.
Best of luck with the restoration!

roddie- Top Poster
- Posts : 8303
Join date : 2013-07-17
Age : 64
Location : N. Smithfield, Rhode Island -

Re: Babe Bee Restoration
![]() NEW222 Sun Apr 08, 2018 1:57 pm
NEW222 Sun Apr 08, 2018 1:57 pm

NEW222- Top Poster
- Posts : 3892
Join date : 2011-08-13
Age : 45
Location : oakbank, mb
Re: Babe Bee Restoration
![]() NEW222 Sun Apr 08, 2018 1:59 pm
NEW222 Sun Apr 08, 2018 1:59 pm
NEW222- Top Poster
- Posts : 3892
Join date : 2011-08-13
Age : 45
Location : oakbank, mb
Re: Babe Bee Restoration
![]() Ken Cook Sun Apr 08, 2018 2:20 pm
Ken Cook Sun Apr 08, 2018 2:20 pm

Ken Cook- Top Poster
- Posts : 5478
Join date : 2012-03-27
Location : pennsylvania
Re: Babe Bee Restoration
![]() NEW222 Sun Apr 08, 2018 2:29 pm
NEW222 Sun Apr 08, 2018 2:29 pm
I was rather shocked at the pitting myself.
NEW222- Top Poster
- Posts : 3892
Join date : 2011-08-13
Age : 45
Location : oakbank, mb
Re: Babe Bee Restoration
![]() roddie Sun Apr 08, 2018 7:24 pm
roddie Sun Apr 08, 2018 7:24 pm
 ) back-plates are a lot tougher than the current-production plastic ones. Re-consider rebuilding the broken mount with some JB-Weld. A well-made repair will likely be stronger than the original back-plate material.
roddie- Top Poster
- Posts : 8303
Join date : 2013-07-17
Age : 64
Location : N. Smithfield, Rhode Island -
Re: Babe Bee Restoration
![]() NEW222 Sun Apr 08, 2018 7:54 pm
NEW222 Sun Apr 08, 2018 7:54 pm
NEW222- Top Poster
- Posts : 3892
Join date : 2011-08-13
Age : 45
Location : oakbank, mb
Page 1 of 2 • 1, 2 ![]()
» Bee Restoration
» covid 19 restoration
» Engine Restoration
» ED 2.46 Diesel (restoration)