

 Rules
Rules
Log in
Search
Latest topics
» **VOTE-ON-THE-NEXT-COX-ENGINE-OF-THE-MONTH** (May 2024)by 1/2A Nut Yesterday at 10:23 pm
» A prototype Cox Reed-valve marine engine
by F4D Phantom II Yesterday at 7:00 pm
» World's largest weathervane
by Cox International Yesterday at 5:51 pm
» Jim Walkers FireBee - This is going to be fun
by rsv1cox Yesterday at 5:27 pm
» Here we go again... another Lawn-Boy
by rsv1cox Yesterday at 6:50 am
» Norvel Needle Needed
by Greenman38633 Yesterday at 4:02 am
» My Cox .049 Marine inboard engine
by 1/2A Nut Wed May 08, 2024 11:41 pm
» Jim Walker Firebaby
by rsv1cox Wed May 08, 2024 7:26 pm
» Roddie-Rigger.. a 2005 original design
by roddie Wed May 08, 2024 7:04 pm
» music vids.. some of your favorites
by HalfaDave Wed May 08, 2024 6:55 pm
» Help Pee Wee tank cap .020
by rdw777 Wed May 08, 2024 1:30 pm
» Revivng Some Childhood Classics
by getback Wed May 08, 2024 8:21 am
Cox Engine of The Month


CEF Traveling Engine


Win This Engine!

Live on Patrol


vid showing "finished" belt-start conversion for my "red-neck" electric starter
Page 1 of 1

vid showing "finished" belt-start conversion for my "red-neck" electric starter
![]() roddie Sat Feb 03, 2024 7:35 pm
roddie Sat Feb 03, 2024 7:35 pm
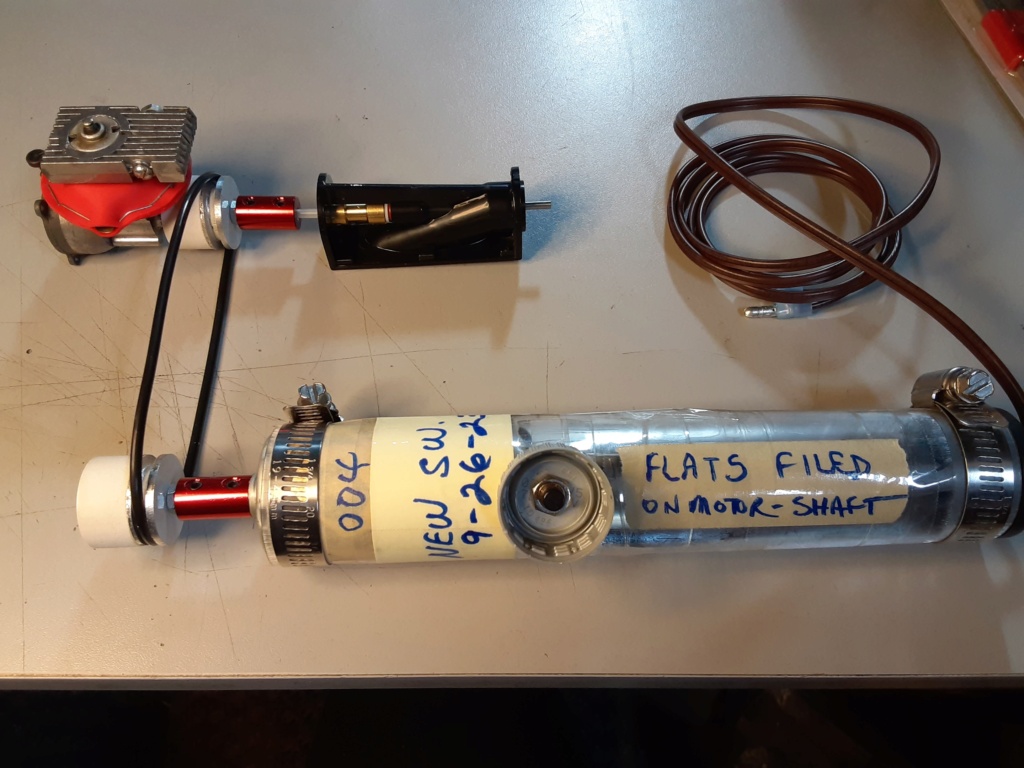
I've been working on a shaft-drive system for a Cox .049 Babe Bee engine which will require starting the engine via a "belt" (O-ring). There are flywheels that were purpose-designed by Cox, Dumas and Sterling for running an engine in a marine application. They all have a "groove" (like a pulley) for a belt to grip... or string to be wound-around. I decided to make my own flywheels using some small discs that I'd cut on a CNC mill.. years ago. The discs all have .125" dia. (1/8") center-holes to fit the Cox .049/.051 prop-screw which is a 5-40 size machine-screw.
Once I had the flywheel(s) configured, I devised a system to mount one to the engine.. along with a coupler for an output-shaft. The coupler receives 1/8" (3.17mm) shafts on both sides; secured via set-screws.
The engine side was made using a 1" long 5-40 cap-screw with its head cut-off. I then filed a "flat there" for the coupling's set-screw to bear-on. A 5-40 hex-nut locks the assembly against the engine's prop-drive plate.

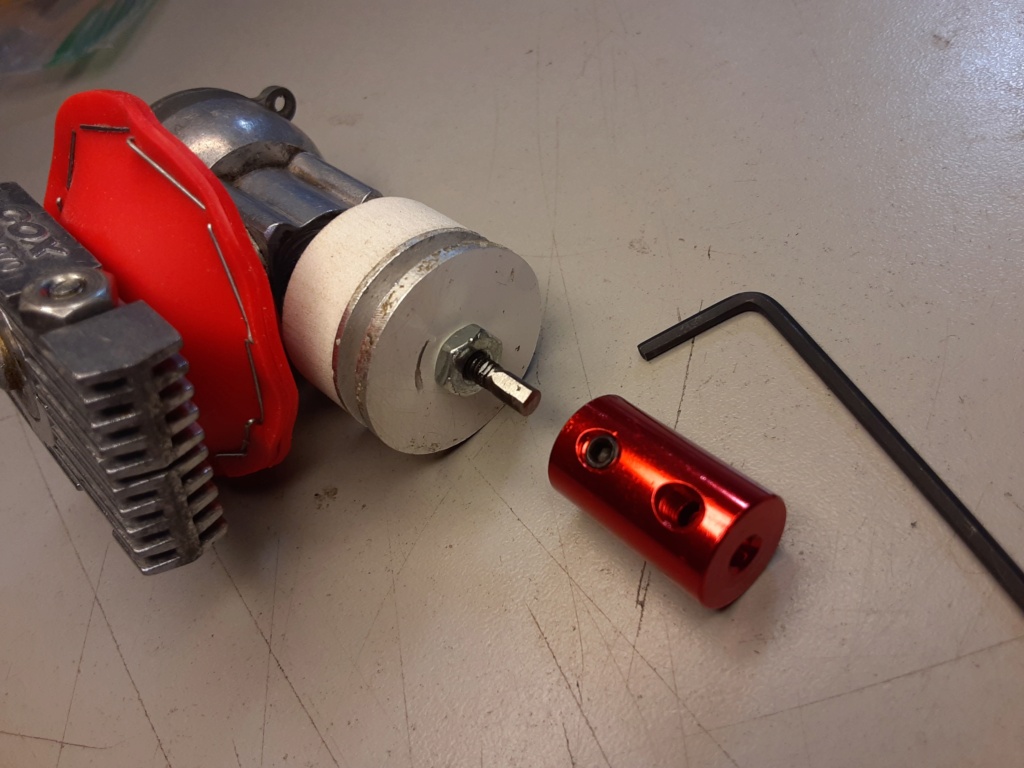
A repeat-assembly was made for the 1/8" dia. shaft on my electric starter's 540 series can-motor.
Here's the orig. thread for the starter alone back in 2013.
Below is a link to a short YouTube vid of a test I made this afternoon. I'm happy with the outcome.. and feel more positive about proceeding with a current project for an engine configured this way.
Once I had the flywheel(s) configured, I devised a system to mount one to the engine.. along with a coupler for an output-shaft. The coupler receives 1/8" (3.17mm) shafts on both sides; secured via set-screws.
The engine side was made using a 1" long 5-40 cap-screw with its head cut-off. I then filed a "flat there" for the coupling's set-screw to bear-on. A 5-40 hex-nut locks the assembly against the engine's prop-drive plate.


A repeat-assembly was made for the 1/8" dia. shaft on my electric starter's 540 series can-motor.

Here's the orig. thread for the starter alone back in 2013.
Below is a link to a short YouTube vid of a test I made this afternoon. I'm happy with the outcome.. and feel more positive about proceeding with a current project for an engine configured this way.
Last edited by roddie on Fri Feb 09, 2024 1:04 pm; edited 1 time in total

roddie- Top Poster

- Posts : 8301
Join date : 2013-07-17
Age : 64
Location : N. Smithfield, Rhode Island -

Re: vid showing "finished" belt-start conversion for my "red-neck" electric starter
![]() robot797 Sun Feb 04, 2024 5:44 am
robot797 Sun Feb 04, 2024 5:44 am
good job!

robot797- Platinum Member

- Posts : 750
Join date : 2013-07-28
Age : 33
» Jerobee electric to glow conversion nr 2
» JEROBEE electric to TeeDee conversion
» z-37 cmelak, rc electric to nitro conversion
» Cox Sky Cruisers Viper RC conversion build
» Electric to Glow conversion
» JEROBEE electric to TeeDee conversion
» z-37 cmelak, rc electric to nitro conversion
» Cox Sky Cruisers Viper RC conversion build
» Electric to Glow conversion
Page 1 of 1
Permissions in this forum:
You cannot reply to topics in this forum