

 Rules
Rules
by Ken Cook Today at 11:14 am
» Jim Walkers FireBee - This is going to be fun
by rsv1cox Today at 10:54 am
» Roddie's water-cooling bottle for bench-running
by getback Today at 7:35 am
» Jim Walker Firebaby
by getback Today at 7:00 am
» Norvel Needle Needed
by Ken Cook Today at 6:52 am
» My Cox .049 Marine inboard engine
by roddie Today at 1:48 am
» **VOTE-ON-THE-NEXT-COX-ENGINE-OF-THE-MONTH** (May 2024)
by MauricioB Yesterday at 7:39 am
» WHO NEEDS TANKS!!!?? Perfect Brand Tanks For Sale
by DanMc Fri May 10, 2024 9:07 pm
» A prototype Cox Reed-valve marine engine
by roddie Fri May 10, 2024 9:02 pm
» Piston to Cylinder - what's a good fit, what's bad?
by mike in SC Fri May 10, 2024 7:42 pm
» Cox powered jet-pump for model Sprint Boat
by roddie Fri May 10, 2024 2:51 pm
» Fox .35 Modifications
by Onelife Fri May 10, 2024 2:07 pm


Brodak Ringmaster S-1 build
Page 2 of 3 •  1, 2, 3
 ![]()
Brodak S-1 Build
![]() RK Flyer Sun Jul 12, 2015 2:25 pm
RK Flyer Sun Jul 12, 2015 2:25 pm
I just caught up with your build today, Its really great!!
Just one question, Did the Wing Jig come with the kit or is it something you made or bought? I have a lot of trouble making the built up wings.
Thanks & Looking forward to the rest of the story.
RK Flyer

RK Flyer- Gold Member

- Posts : 274
Join date : 2013-07-16
Location : Somerset, Kentucky
Re: Brodak Ringmaster S-1 build
![]() TDbandit Sun Jul 12, 2015 8:40 pm
TDbandit Sun Jul 12, 2015 8:40 pm
Thanks!RK Flyer wrote:Hello Bandit,
I just caught up with your build today, Its really great!!
Just one question, Did the Wing Jig come with the kit or is it something you made or bought? I have a lot of trouble making the built up wings.
Thanks & Looking forward to the rest of the story.
RK Flyer
The jig came from Brodak cost around 33 dollars and some change not including shipping very nice to have! Kinda like a dremel
once you use one you will always use one! (Bandit)

TDbandit- Platinum Member

- Posts : 897
Join date : 2014-12-01
Age : 52
Location : Riverdale Georgia
Re: Brodak Ringmaster S-1 build
![]() rogermharris Sun Jul 12, 2015 10:22 pm
rogermharris Sun Jul 12, 2015 10:22 pm
Looks like,something I should incorporate in the ribs for any kit I decide to lay out.
Looks to bee, essential especially when using CA.
rogermharris- Platinum Member
- Posts : 503
Join date : 2015-03-17
Age : 61
Location : Long Branch, New Jersey
Re: Brodak Ringmaster S-1 build
![]() TDbandit Mon Jul 13, 2015 12:13 am
TDbandit Mon Jul 13, 2015 12:13 am
Actually the rods are 5/16 however you could use 1/4" rods with modified end plates.rogermharris wrote:Mr bandit sir.... it looks like 1/4" rod for the wing jig?
Looks like,something I should incorporate in the ribs for any kit I decide to lay out.
Looks to bee, essential especially when using CA.
Jigs are nice since it really speeds up construction.
BTW sorry for the lack of pics tonight, my net is not doing well right now can't even upload my run video of the Traveling Engine so hopefully tomorrow night i'll be able to upload more. Till then take care! (Bandit)
TDbandit- Platinum Member
- Posts : 897
Join date : 2014-12-01
Age : 52
Location : Riverdale Georgia
Re: Brodak Ringmaster S-1 build
![]() getback Mon Jul 13, 2015 8:08 am
getback Mon Jul 13, 2015 8:08 am


getback- Top Poster


Posts : 10150
Join date : 2013-01-18
Age : 66
Location : julian , NC
Re: Brodak Ringmaster S-1 build
![]() Sig Skyray Mon Jul 13, 2015 8:10 pm
Sig Skyray Mon Jul 13, 2015 8:10 pm
Sig Skyray- Gold Member
- Posts : 222
Join date : 2015-04-02
Age : 62
Location : Lake Mary, FL
Re: Brodak Ringmaster S-1 build
![]() TDbandit Tue Jul 14, 2015 12:26 pm
TDbandit Tue Jul 14, 2015 12:26 pm
I'll see if I can get a few pics for ya. I've got some more Lines coming so I'll post some pics when i assemble the ends. (Bandit)getback wrote:Hello TD I think I can picture this in my mind But how bout a pic when you can // I want to learn so to get away from fishing line (( when covering it always freaks me out getting around those thinking I am either going to burn or weaking the line <<< , Thanks !! Eric
TDbandit- Platinum Member
- Posts : 897
Join date : 2014-12-01
Age : 52
Location : Riverdale Georgia
Re: Brodak Ringmaster S-1 build
![]() TDbandit Tue Jul 14, 2015 1:08 pm
TDbandit Tue Jul 14, 2015 1:08 pm
Thanks and yes it is, it's coming along well in fact I'm thinking about offering a building service in the near future, not sure when though since I've got to get my building where i do my work in insulated and climate controlled first the heat is unbearable even with fans running at night!!! Going to be near 103 here.Sig Skyray wrote:Nice work! Looks likes it coming along very nicely.


 (Bandit)
TDbandit- Platinum Member
- Posts : 897
Join date : 2014-12-01
Age : 52
Location : Riverdale Georgia
Re: Brodak Ringmaster S-1 build
![]() TDbandit Thu Jul 16, 2015 11:34 pm
TDbandit Thu Jul 16, 2015 11:34 pm
Here is a pic of what it should look like once you have both sides sheeted. (note) This is the top looks the same on both sides with the exception of the pushrod.
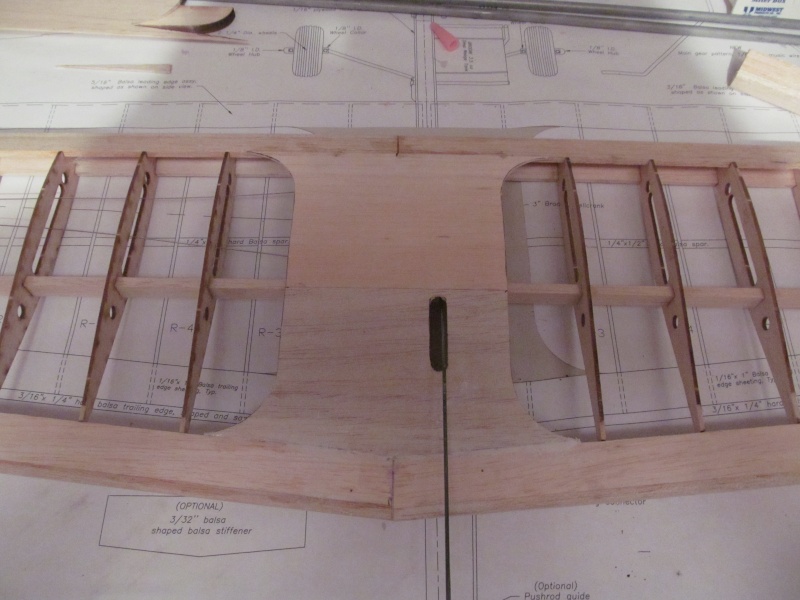
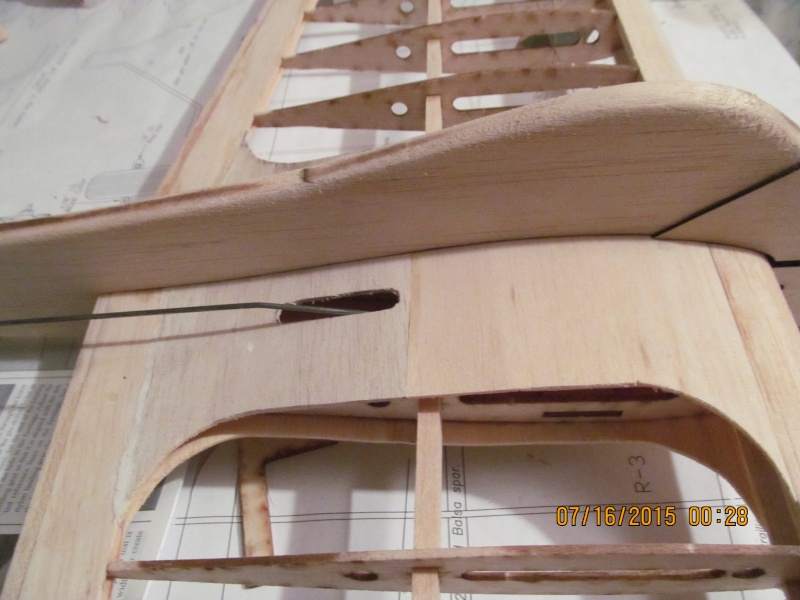
Now with the sheeting done, it is time now to do the wing tips. The wing tips consist of one solid 1/4 inch tip for the out board wing and one laminated built out of 4 pieces of 1/8 inch balsa sheet for the inboard panel. Check each end of the wing to make sure it is absolutely flat and then locate the wing tips and start with the outboard tip first lightly sand the tip to take the nubs from the laser cutting so it will sit flat and then locate the center of R-10 and glue the tip in place making sure it is straight. Next start with the inner panel tip find the four pieces of 1/8 balsa that will make up the tip for the adjustable lead out and lay the tip flat on a true surface and trial fit them together to get an idea how they lay out then stack them together following the directions in the manual making sure that the root end (part that will glue to R-10) is flat. For this step its a good idea to use a square to make sure that the lamination's are straight so the tip will sit at 90 deg in relation to R-10 then wick thin CA into the lamination's to glue the lamination's together and let dry. Once dry, thread the lead out cables through the slot that was built into the wing tip and test fit the tip onto R-10 and the adjustable lead out. (you may have to make some clearance for the securing bolt for the the adjustable lead out guide so it will move back and forth easily) once satisfied with the fit glue the tip in place insuring that it is straight this is very important. If it is not on straight and square, the lead out guide will bind up and also possibly interfere with the cables them selves. The easiest way I found was to set the tip in place and put the hex key that you use to loosen the guide securing bolt and try to move the guide back and forth while adjusting the tip once the guide moves back and forth with full travel without binding its straight. Shape the tips and glue a 1 oz weight to the underside of the wing tip on the outboard wing following the instructions making sure its in the general location where the adjustable weight box will be located. Here's what the lead out tip looks like. once all done shaping, final sand the entire wing
Next step is to build the adjustable weight box which i've yet to do since i'm waiting on some 1/4 oz weights so I have no pics for but will soon.
Now it's time for the fuselage:
Locate the fuselage and canopy then punch it out of their sheet then sand off the little nubs and glue the canopy in place using the plan for reference. then locate the doubler's for the front end and trial fit them in place and mark their location onto the fuselage then remove them. Take one of the doubler's and glue it in place on one side of the fuselage making sure no glue ends up in the slots for the rock maple engine barriers and clamp in place and allow to dry. Then take the before mentioned engine barriers and test fit them in place you may have to sand them so they will set flush with the fuselage, then glue them in place using 30 min epoxy and before the glue sets glue the other doubler in place then clamp and allow to dry. after everything is dry sand the doubler's to the fuselage. You will have to sand it now set the engine of your choice in place and locate the holes for the engine mound then drill the holes for the engine. Now is the time to do a basic shaping of the fuselage (Note aside from tapering the tail end of the fuselage do not shape the platform for the horizontal stab it has to be flat.)
Here is the fuselage after some basic sanding and shaping. (Note) I haven't drilled the holes out for my engine as of yet since it's attached to another plane

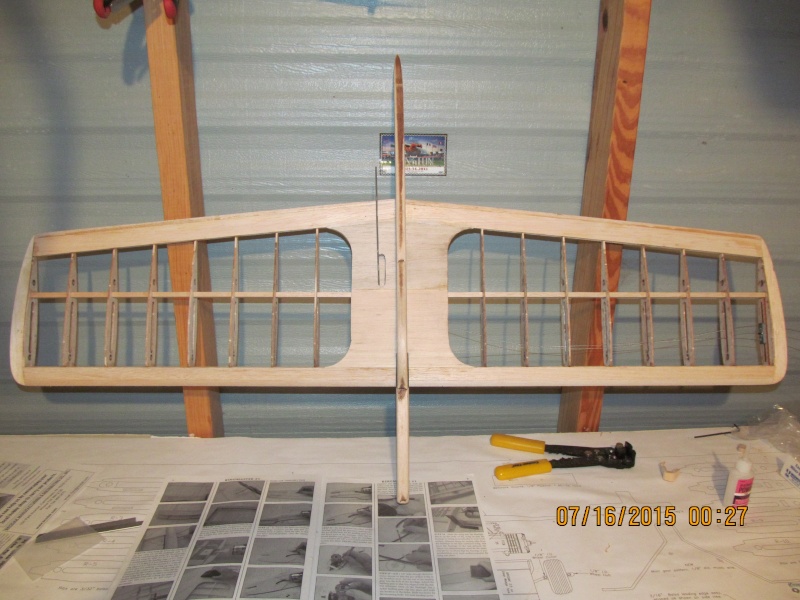
Now is a good time to test fit the wing to the fuselage and adjust as needed before drilling and attaching the landing gear. Here is how mine turned out, couldn't of asked for a better fit! It's also perfectly square

Another view of pushrod side.
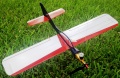
And now here we are to where I'm at at present starting to look like a Ringmaster! The wing is not glued in place as of yet still have more to do. More to come as I build
Now it's time for bed.. (The bandit falls asleep in chair)
TDbandit- Platinum Member
- Posts : 897
Join date : 2014-12-01
Age : 52
Location : Riverdale Georgia

cox24711- Platinum Member
- Posts : 722
Join date : 2014-01-18
Age : 21
Location : Noosa Queensland Australia
Re: Brodak Ringmaster S-1 build
![]() Cribbs74 Fri Jul 17, 2015 1:23 am
Cribbs74 Fri Jul 17, 2015 1:23 am
I really suggest you glass at least the TE. I would hate to see that beauty destroyed if you doink it.
This is a picture of a buddy of mines plane last fall. His engine cut out and it came down on the nose on soft grass. As you can see the TE split at the joint and the wing halves came forward. What you can't see is the rib damage.


Cribbs74- Moderator
-
Posts : 11897
Join date : 2011-10-24
Age : 50
Location : Tuttle, OK
Re: Brodak Ringmaster S-1 build
![]() gcb Fri Jul 17, 2015 6:45 am
gcb Fri Jul 17, 2015 6:45 am
Cribbs74 wrote:Looks good Bandit!
I really suggest you glass at least the TE. I would hate to see that beauty destroyed if you doink it.
This is a picture of a buddy of mines plane last fall. His engine cut out and it came down on the nose on soft grass. As you can see the TE split at the joint and the wing halves came forward. What you can't see is the rib damage.
Back in the fifties RMs were noted for breaking that way...so much so that many modelers inserted a piece of wire across the TE joint, extending ~3" then making a 90 degree bend (sorta like a big staple). This worked well as an after thought for ships that had already been built.
Some of us younger folks at the time did not understand double-cementing, etc. so often a three-point landing consisted of the engine and two wing tips.
George
gcb- Platinum Member
- Posts : 908
Join date : 2011-08-11
Location : Port Ewen, NY
Re: Brodak Ringmaster S-1 build
![]() TDbandit Fri Jul 17, 2015 11:34 am
TDbandit Fri Jul 17, 2015 11:34 am
That's my plan, while I haven't done it as of yet I'm going to be installing the optional LE T-brace that comes with the kit along with lightly glassing the TE along with the LE. I just got to find a good way to groove the LE for the brace going to be using 30 min epoxy for the brace. (Bandit)Cribbs74 wrote:Looks good Bandit!
I really suggest you glass at least the TE. I would hate to see that beauty destroyed if you doink it.
This is a picture of a buddy of mines plane last fall. His engine cut out and it came down on the nose on soft grass. As you can see the TE split at the joint and the wing halves came forward. What you can't see is the rib damage.
TDbandit- Platinum Member
- Posts : 897
Join date : 2014-12-01
Age : 52
Location : Riverdale Georgia
Re: Brodak Ringmaster S-1 build
![]() TDbandit Sun Jul 19, 2015 8:32 pm
TDbandit Sun Jul 19, 2015 8:32 pm
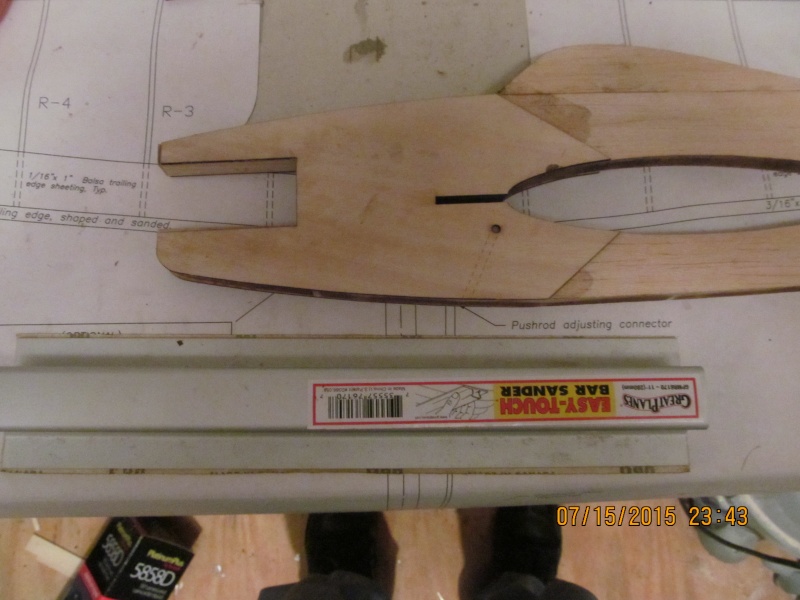
The Brodak Ringmaster kit comes with several options to improve the weak spots in the wing one of which I find most important is the T brace which is installed by splicing it in with the LE of the wing to help with the LE separation issue so here goes!...
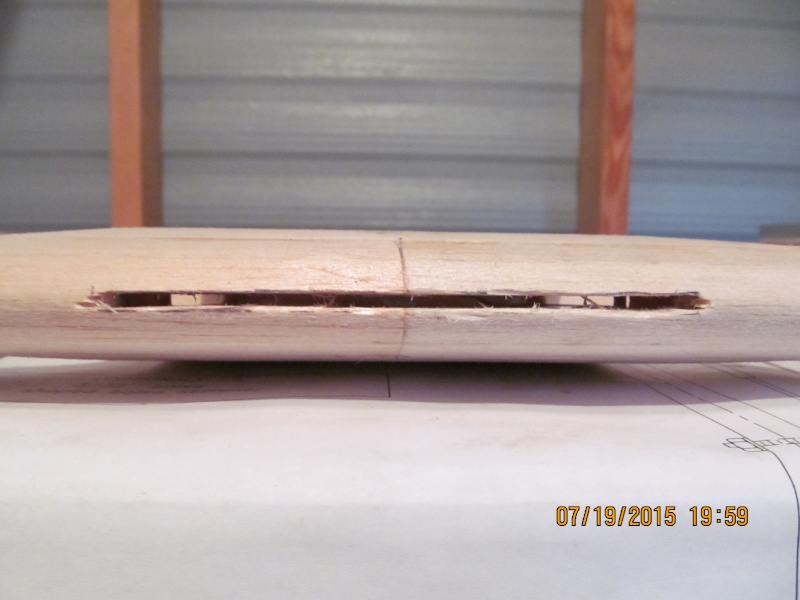
First of all while it's mentioned on the plans, there is no mention of the T brace installation in the Manual so you will have to install it on your own. It's installation involves slotting the LE of the wing after assembly and I feel the best way at doing this is to use the good ol Dremel with a cut off wheel. In the first step find the center line of the wing and the center of the LE (Tip) temperately install the wing in the fuselage and center it up then slide the T brace into the slot in the fuselage and use the brace to trace the center location for the brace on the LE and remove the wing then using the T brace again as a reference finish up tracing the brace's location. That's the easiest way I've found to do this
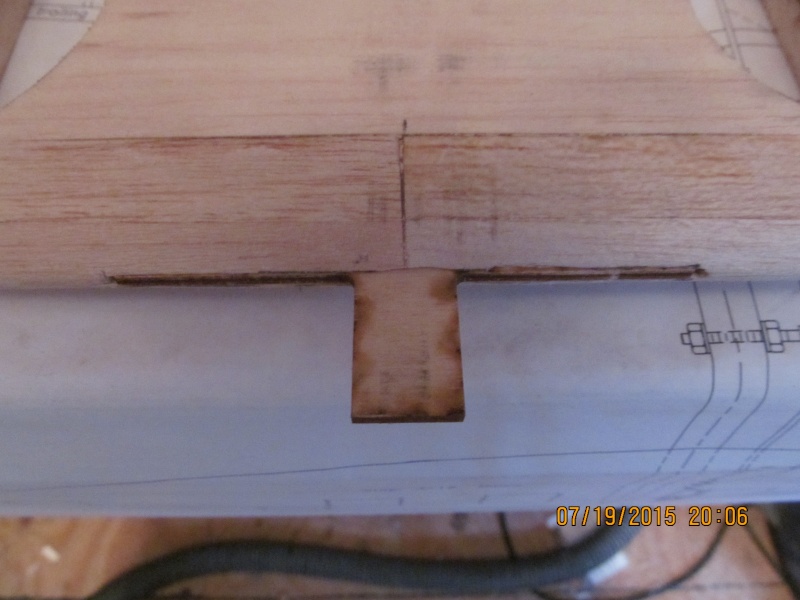
Here is a better view..

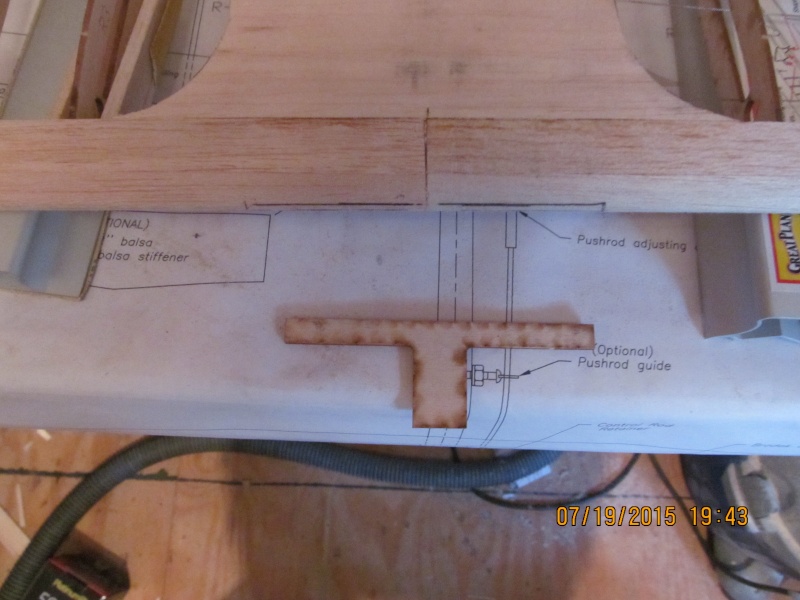
Next using a Dremel (Use safety glasses broken cutoff wheels love eyeballs!) Carefully cut the slot for the brace in the wing (Caution!! it will cut very fast so be careful if needed, make up a stand for the tool to help hold it steady) cut to the inside of the lines and start off narrow! Always better to have to open it up then end up with a sloppy fit! It is best that the brace has a slightly snug fit. Here is what it should look like when done...
Now test fit the brace into the slot again it should be snug not too tight! You may have to adjust the slot for a proper fit, Take you time! once satisfied dry fit the wing and T brace into the fuselage to make sure things line up and adjust as necessary and remove the wing. (Note) the slot in the fuselage is slightly longer than needed you will also find that the Tongue of the brace is wider than the fuselage. This is to allow some fudge factor for adjustment.
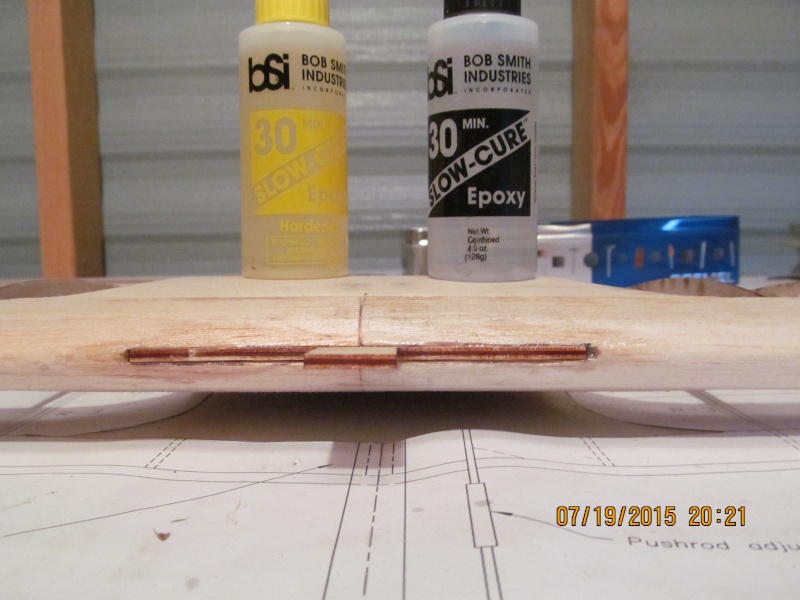
Once all is well, now it is time to glue the brace in place. Mix up some 30 min epoxy and using a mixing stick, put some epoxy into the slot making sure the glue makes contact throughout the slot but only use as much as needed. *epoxy is heavy and you don't need it dripping onto something it don't need to be dripping on too like the bell crank!* Then install the T brace and push it in till you just feel the edges of the brace and then allow to dry over night. (this is to allow it to blend into the LE without needing a lot of filler after sanding) There ya go, T brace installed! Next up building the weight box and Installing the wing then blending in the T brace with the fuselage!
Ok all I have right now, now waiting on the weights!
(Bandit)
TDbandit- Platinum Member
- Posts : 897
Join date : 2014-12-01
Age : 52
Location : Riverdale Georgia
Re: Brodak Ringmaster S-1 build
![]() RknRusty Sun Jul 19, 2015 8:43 pm
RknRusty Sun Jul 19, 2015 8:43 pm
Rusty
_________________
...and never Ever think about how good you are at something...
while you're doing it!
My Hot Rock & Blues Playlist

RknRusty- Rest In Peace

- Posts : 10869
Join date : 2011-08-10
Age : 68
Location : South Carolina, USA
Re: Brodak Ringmaster S-1 build
![]() TDbandit Sun Jul 19, 2015 8:51 pm
TDbandit Sun Jul 19, 2015 8:51 pm
Yeah apparently it's something new that they are now including with the kit, they don't explain it's installation very well thoughRknRusty wrote:Wow, in all of my kits, have never seen any such thing. Looks like you did a good job.
Rusty
it's a nice touch saves glassing. (Bandit)
TDbandit- Platinum Member
- Posts : 897
Join date : 2014-12-01
Age : 52
Location : Riverdale Georgia
Re: Brodak Ringmaster S-1 build
![]() Cribbs74 Sun Jul 19, 2015 9:03 pm
Cribbs74 Sun Jul 19, 2015 9:03 pm
That surely is something different. As you well know the Sterling kit used a biscuit. It's a good idea, I wonder if that same t brace could be used in the TE.
Good job with the installation.
Cribbs74- Moderator
-
Posts : 11897
Join date : 2011-10-24
Age : 50
Location : Tuttle, OK
Re: Brodak Ringmaster S-1 build
![]() TDbandit Sun Jul 19, 2015 9:14 pm
TDbandit Sun Jul 19, 2015 9:14 pm
Actually there is a type of brace shown on the plans it's a biscuit that's installed in the TE by trimming back R-1 and slipped in between the TE sheeting to join the two halves. Dummy me didn't install it I was but in my excitement I got too far along by the time i noticed my blunder so I'm going to just glass the TE. if you want I'll take a shot of the mod on the plans. These are all optional btw (Bandit)Cribbs74 wrote:I'll be darned,
That surely is something different. As you well know the Sterling kit used a biscuit. It's a good idea, I wonder if that same t brace could be used in the TE.
Good job with the installation.
TDbandit- Platinum Member
- Posts : 897
Join date : 2014-12-01
Age : 52
Location : Riverdale Georgia
Re: Brodak Ringmaster S-1 build
![]() RknRusty Sun Jul 19, 2015 9:32 pm
RknRusty Sun Jul 19, 2015 9:32 pm
Yep, that's right my Sterling Yak-9 did have a similar biscuit, how could I forget. It wedged into the backside of the LE joint. I love my only Sterling, it's one tough ol' plane. Always a crowd pleaser. It as my first 35 sized build and my first flapped plane too.Cribbs74 wrote:I'll be darned,
That surely is something different. As you well know the Sterling kit used a biscuit. It's a good idea, I wonder if that same t brace could be used in the TE.join the Ringmaster crowd
Good job with the installation.
_________________
...and never Ever think about how good you are at something...
while you're doing it!
My Hot Rock & Blues Playlist
RknRusty- Rest In Peace
- Posts : 10869
Join date : 2011-08-10
Age : 68
Location : South Carolina, USA
Re: Brodak Ringmaster S-1 build
![]() Cribbs74 Sun Jul 19, 2015 9:35 pm
Cribbs74 Sun Jul 19, 2015 9:35 pm
If you are in the mood it certainly could be beneficial to the thread.
I have well over 100 flights on my old Ringmaster (built in 1958) and I have plowed it in about 6 times. I glassed the TE, but if a cleaner mod is available I am all ears.
Ron
Cribbs74- Moderator
-
Posts : 11897
Join date : 2011-10-24
Age : 50
Location : Tuttle, OK
Re: Brodak Ringmaster S-1 build
![]() TDbandit Sun Jul 19, 2015 9:39 pm
TDbandit Sun Jul 19, 2015 9:39 pm
Ok I'll do it tonight in fact I'll go on and click off a pic of it now.Cribbs74 wrote:Yeah!
If you are in the mood it certainly could be beneficial to the thread.
I have well over 100 flights on my old Ringmaster (built in 1958) and I have plowed it in about 6 times. I glassed the TE, but if a cleaner mod is available I am all ears.
Ron
(Bandit)
TDbandit- Platinum Member
- Posts : 897
Join date : 2014-12-01
Age : 52
Location : Riverdale Georgia
Re: Brodak Ringmaster S-1 build
![]() TDbandit Sun Jul 19, 2015 10:32 pm
TDbandit Sun Jul 19, 2015 10:32 pm
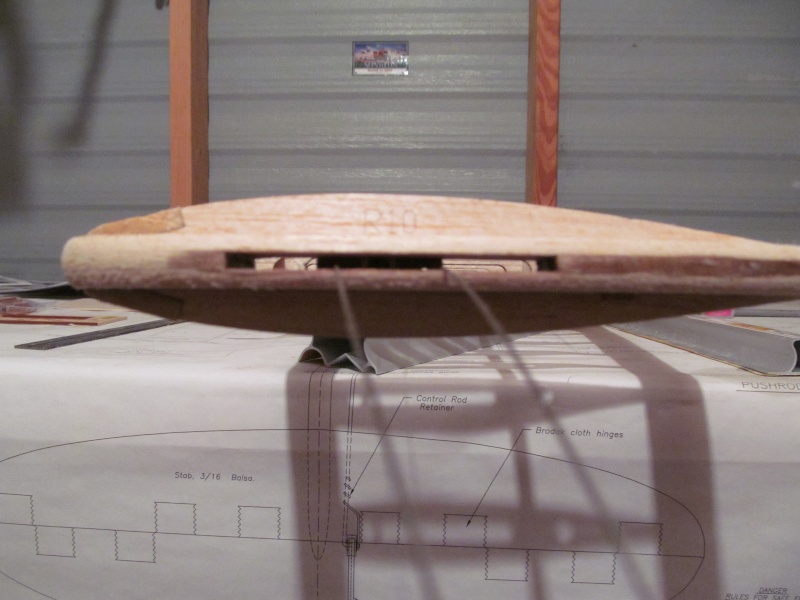
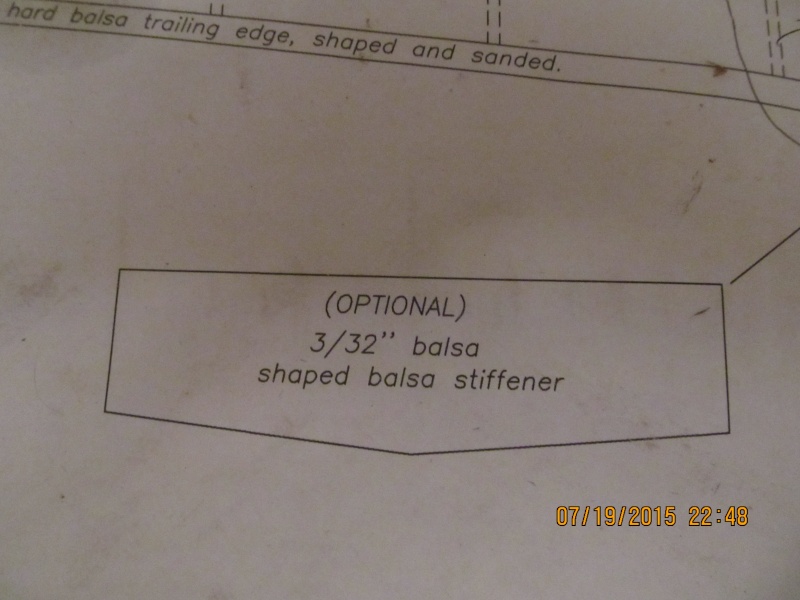
This is the other option for the wing however this has to be made by the builder and has to be done before R-1 is fully installed which involves trimming R-1 back and installing a shaped piece of 3/32 hard balsa im between the TE sheeting that butts up against both R-2 ribs and TE end strips. Here is a shot of the plans.. I have marked the plans for clarity.


I will be building a second brodak RM kit so i will incorporate this into it.
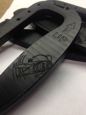
Oh before i forget here's a shot of the T brace test fitted into the fuse this is what it looks like..

(Bandit)
TDbandit- Platinum Member
- Posts : 897
Join date : 2014-12-01
Age : 52
Location : Riverdale Georgia
Re: Brodak Ringmaster S-1 build
![]() Cribbs74 Sun Jul 19, 2015 10:46 pm
Cribbs74 Sun Jul 19, 2015 10:46 pm
While I would personally use ply instead of 3/32 balsa, I think that it's a benedicial mod and very transparent. Glassing builds up the TE about 1/16" or so which makes for a tight fit into the fuselage.
The slotting of the LE makes for a nice tight joint.
Cribbs74- Moderator
-
Posts : 11897
Join date : 2011-10-24
Age : 50
Location : Tuttle, OK
Re: Brodak Ringmaster S-1 build
![]() TDbandit Sun Jul 19, 2015 11:17 pm
TDbandit Sun Jul 19, 2015 11:17 pm
I agree with ya on the ply. I'm trying to "Fox proof" it a little. I'm also going to be making some 7075-T6 aluminum engine barrier plates as well to help keep that thing stationary. going to be putting a 40th anniversary .35 on it which I've already at least mostly broken in looking for a NVA now to replace the stocker flat tip. (Bandit)Cribbs74 wrote:Thanks!
While I would personally use ply instead of 3/32 balsa, I think that it's a benedicial mod and very transparent. Glassing builds up the TE about 1/16" or so which makes for a tight fit into the fuselage.
The slotting of the LE makes for a nice tight joint.
'
TDbandit- Platinum Member
- Posts : 897
Join date : 2014-12-01
Age : 52
Location : Riverdale Georgia
Re: Brodak Ringmaster S-1 build
![]() getback Sun Jul 19, 2015 11:24 pm
getback Sun Jul 19, 2015 11:24 pm

getback- Top Poster
-
Posts : 10150
Join date : 2013-01-18
Age : 66
Location : julian , NC
Page 2 of 3 • 1, 2, 3 ![]()
» Up next: Brodak CL Baby Ringmaster/TD .051
» My Brodak Ringmaster S-1 finally finished!
» New Build, Brodak Shark 402
» Brodak Mustang Build