

 Rules
Rules
by Ken Cook Today at 8:04 am
» PT-19 Mayhem at Buder Park...a Decade Ago!!!!
by Kim Today at 7:41 am
» Project Cox .049 r/c & Citabrian Champion
by getback Today at 6:46 am
» Roddie's flat-bottomed boat..
by getback Today at 6:17 am
» Three -- sold out (making two more) Cox .010 Carburetors with wrench
by balogh Today at 12:34 am
» Joe Wagners Sioux
by GallopingGhostler Yesterday at 9:03 pm
» Happy Anzac Day!
by GallopingGhostler Yesterday at 4:16 pm
» Jim Walkers FireBee - This is going to be fun
by rsv1cox Yesterday at 12:27 pm
» Revivng Some Childhood Classics
by getback Yesterday at 7:31 am
» Fox .35 Modifications
by Ken Cook Yesterday at 3:16 am
» Introducing our Cox .049 TD Engines
by getback Fri Apr 26, 2024 6:20 am
» Cox powered jet-pump for model Sprint Boat
by roddie Thu Apr 25, 2024 10:25 pm


Brodak Ringmaster S-1 build
Page 1 of 3 • 1, 2, 3 ![]()

Brodak Ringmaster S-1 build
![]() TDbandit Tue Jul 07, 2015 10:04 pm
TDbandit Tue Jul 07, 2015 10:04 pm

TDbandit- Platinum Member

- Posts : 897
Join date : 2014-12-01
Age : 52
Location : Riverdale Georgia
Re: Brodak Ringmaster S-1 build
![]() rogermharris Tue Jul 07, 2015 10:14 pm
rogermharris Tue Jul 07, 2015 10:14 pm
rogermharris- Platinum Member
- Posts : 503
Join date : 2015-03-17
Age : 61
Location : Long Branch, New Jersey

getback- Top Poster


Posts : 10119
Join date : 2013-01-18
Age : 66
Location : julian , NC
Re: Brodak Ringmaster S-1 build
![]() TDbandit Wed Jul 08, 2015 9:55 am
TDbandit Wed Jul 08, 2015 9:55 am
It's coming, i'm gonna try and get some of the pics posted tonight.getback wrote:NO sneak preview ??

(Bandit)
TDbandit- Platinum Member
- Posts : 897
Join date : 2014-12-01
Age : 52
Location : Riverdale Georgia
getback- Top Poster
-
Posts : 10119
Join date : 2013-01-18
Age : 66
Location : julian , NC
Re: Brodak Ringmaster S-1 build
![]() TDbandit Thu Jul 09, 2015 9:24 am
TDbandit Thu Jul 09, 2015 9:24 am
*Pokes* Teaser eh??getback wrote:TEASER


Well here's the first few pics to start off!
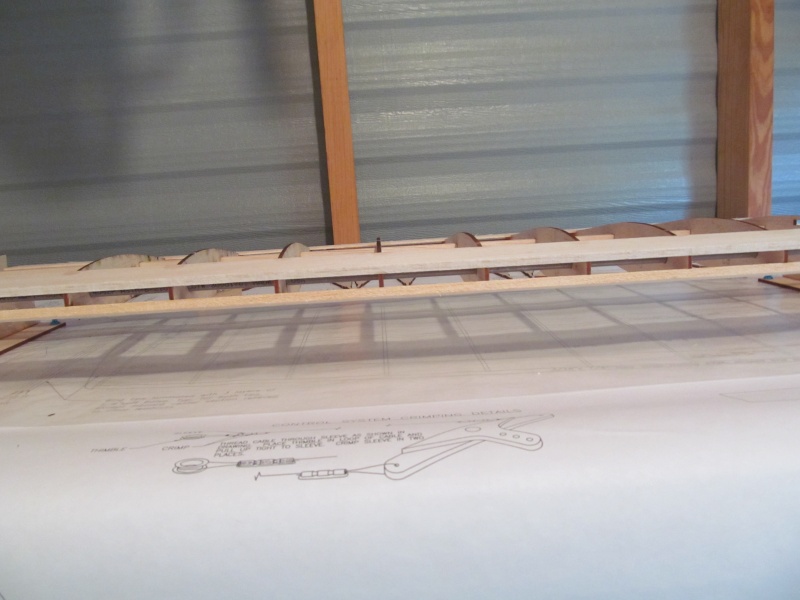
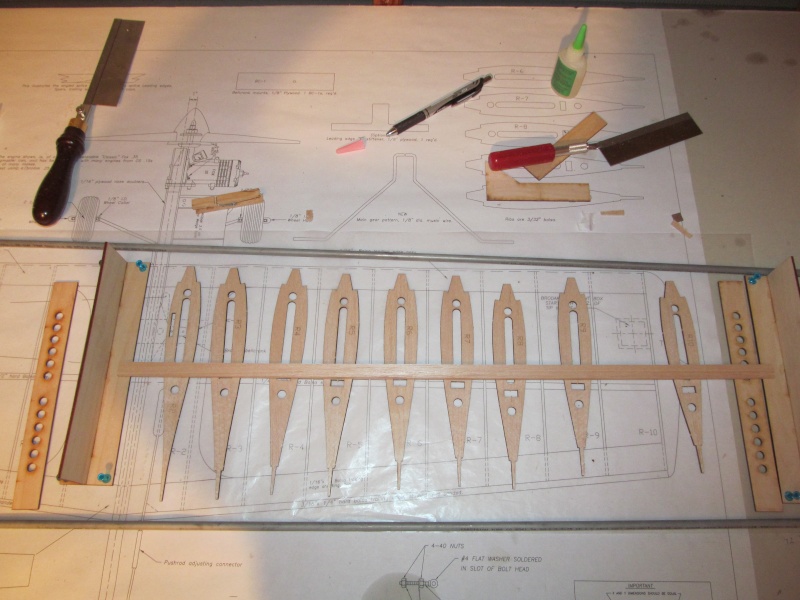
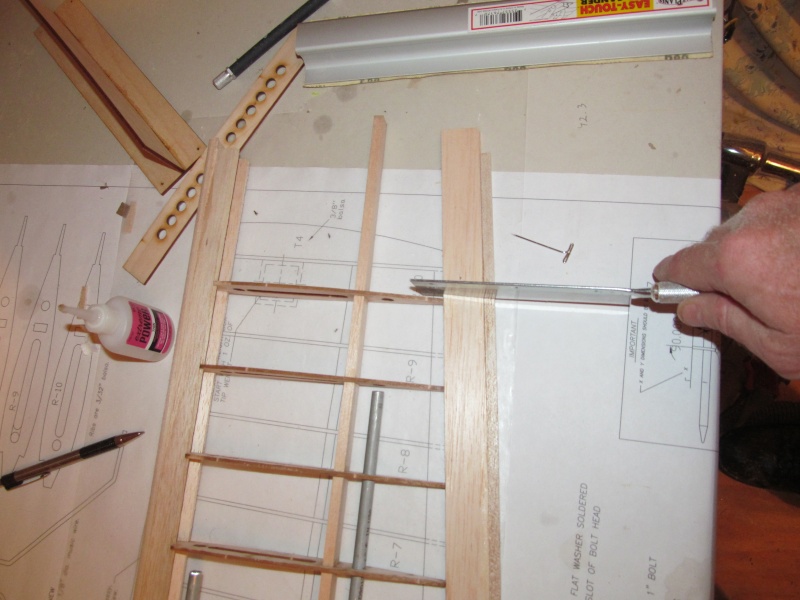
The first pic is the beginning of the inboard wing construction just before jig assembly which involves sliding the ribs R2-R10 onto the spar and sliding the rods for the jig in place then installing the end plates for the rods.
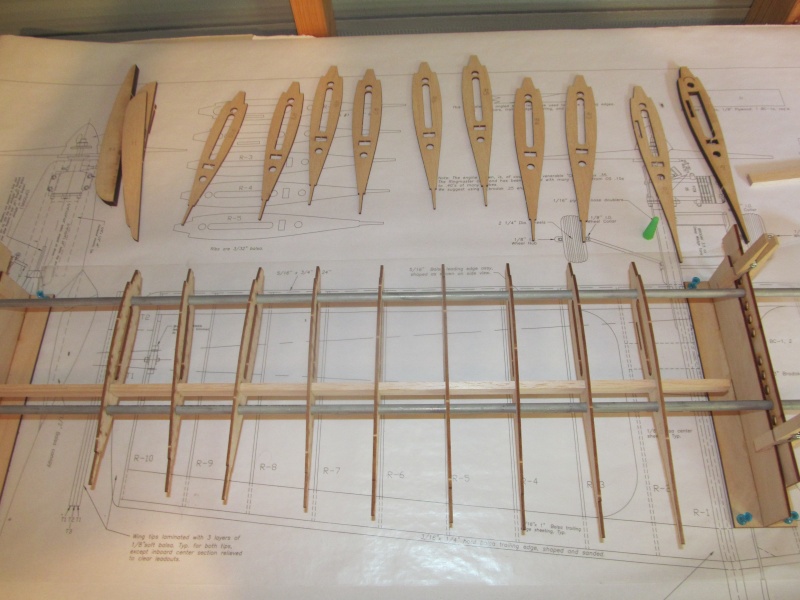
Next the ribs R2-R10 are installed on the jig and glued in place on the spar making sure the ribs are properly placed on the plans using the square provided with jig. Then the first of the LE and TE cap strips are glued in place insuring that the ribs are straight before gluing.
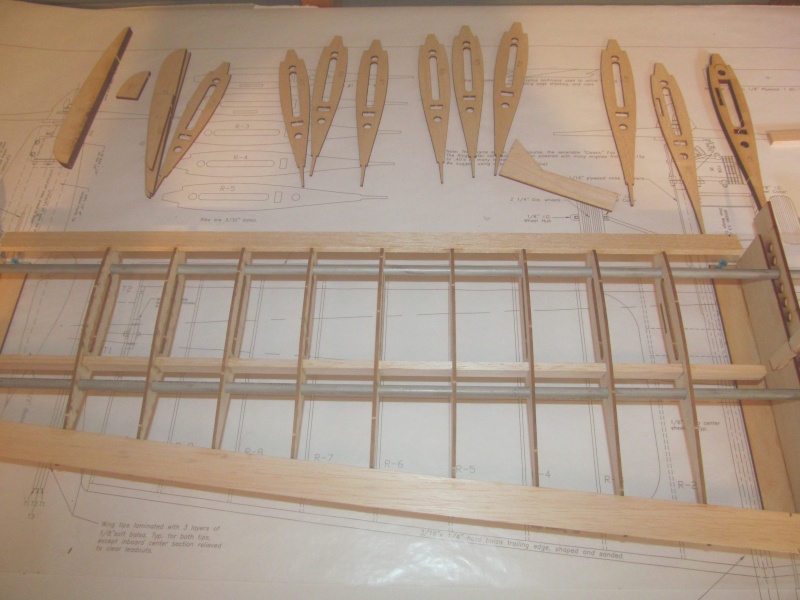
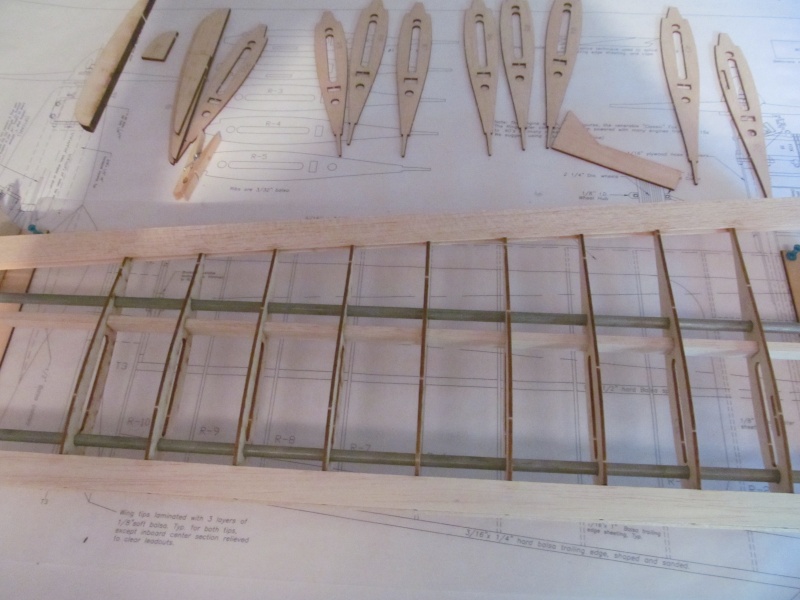
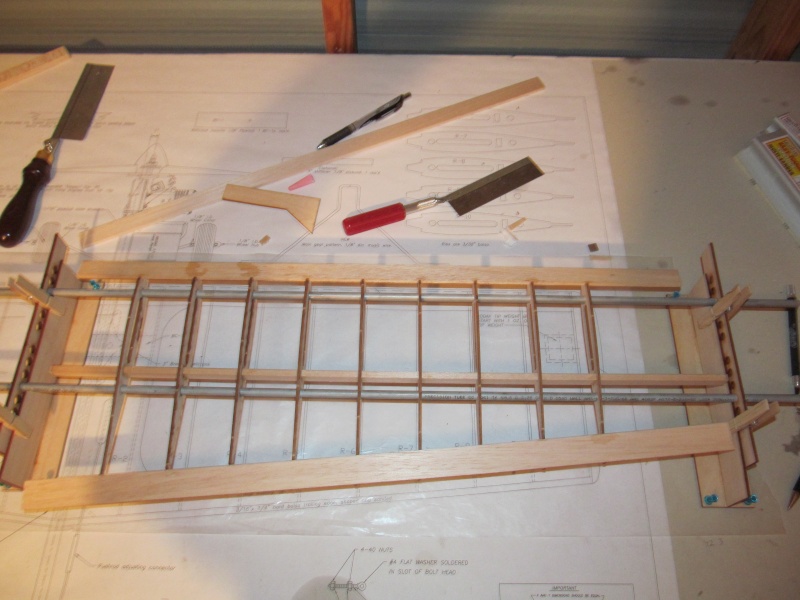
In pic no. three the ribs are glued to the spar and the first of the LE cap strip that will form the built up LE and the TE cap strip are in place. Next the wing is released from the jig support plates and turned over and the remaining LE and TE cap strips are glued in place.
Lots more pics coming up!
(Bandit)
TDbandit- Platinum Member
- Posts : 897
Join date : 2014-12-01
Age : 52
Location : Riverdale Georgia
Re: Brodak Ringmaster S-1 build
![]() getback Thu Jul 09, 2015 11:55 am
getback Thu Jul 09, 2015 11:55 am
getback- Top Poster
-
Posts : 10119
Join date : 2013-01-18
Age : 66
Location : julian , NC
Re: Brodak Ringmaster S-1 build
![]() TDbandit Thu Jul 09, 2015 2:44 pm
TDbandit Thu Jul 09, 2015 2:44 pm
No problem more pics are coming up tonight after I get home from work.getback wrote:BEAUTIFUL !!! Now that didn't hurt too bad did it? All kidding aside , it's good to see how other people build and get a little leaning experience , Thanks TD, Eric
(Bandit)
TDbandit- Platinum Member
- Posts : 897
Join date : 2014-12-01
Age : 52
Location : Riverdale Georgia
Re: Brodak Ringmaster S-1 build
![]() TDbandit Fri Jul 10, 2015 12:06 am
TDbandit Fri Jul 10, 2015 12:06 am
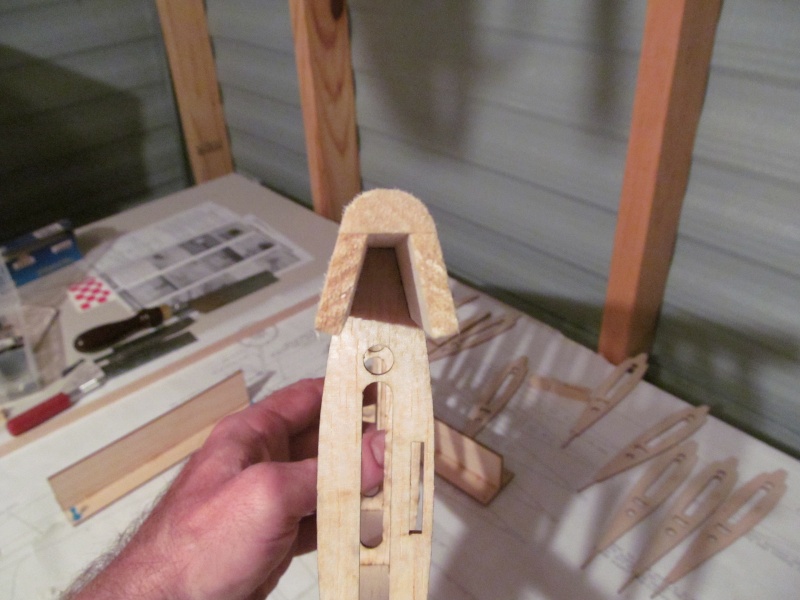
Pic four shows a frontal view of the built up LE, again make sure the ribs are straight!
Pic five shows the inner wing panel off the jig with the LE capped off awaiting sanding. When sanding the LE, start with the top and bottom and use a long "T" bar type sanding block. The Greatplanes Sanding bar is great for this and makes short work of the job. begin the sand with 80 grit. Then shape the front of the LE I used the multisander again from Greatplanes.
Number six shows a side view of the roughly shaped LE. It will require final sanding to fit the fuselage.
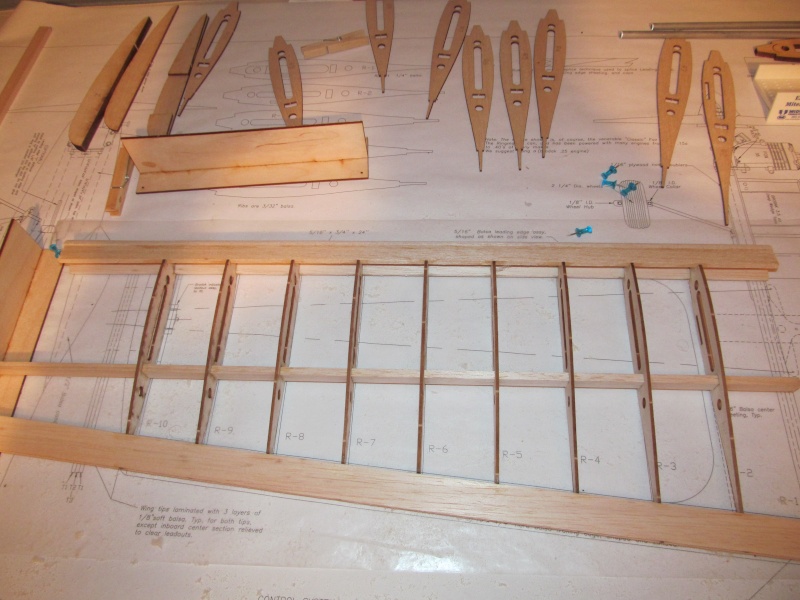
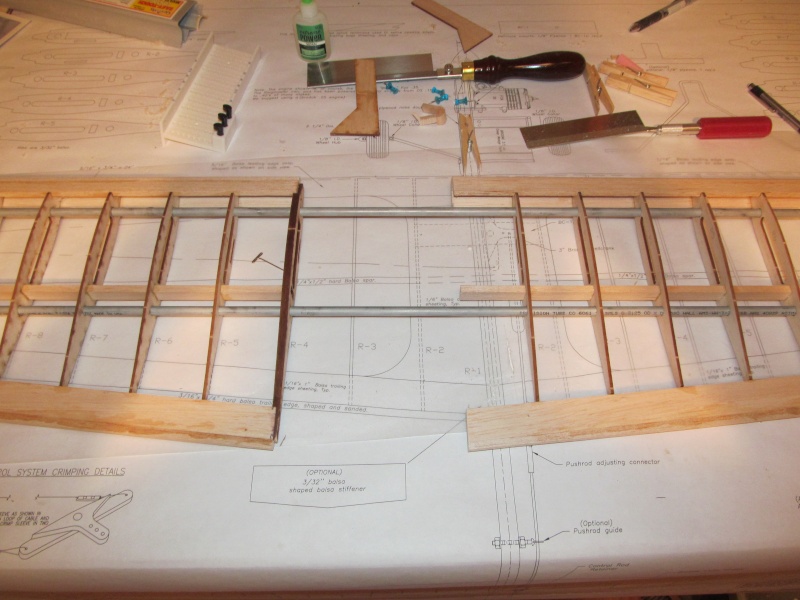
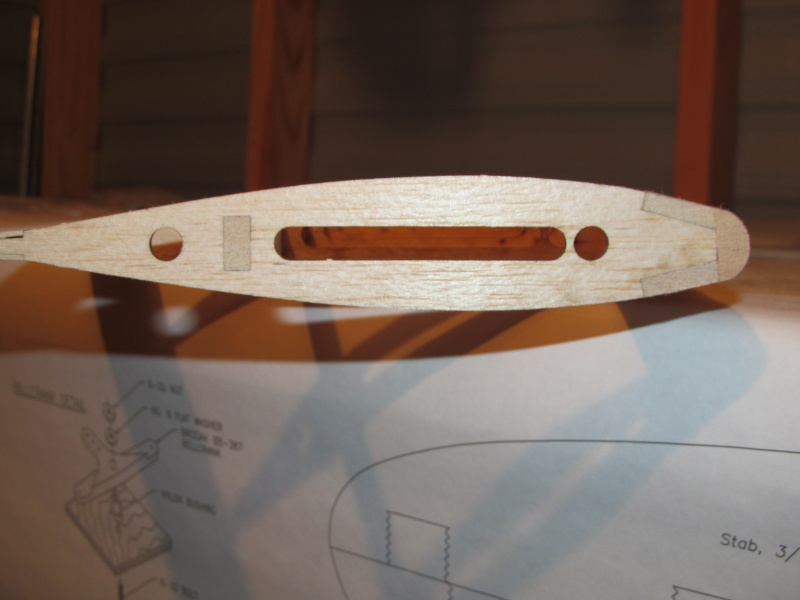
now were down to the center rib "R1" this is where you need to pay attention to the manual and study the plan since the manual is not very clear for this step. The way the manual states is to trim the spar, LE and TE to the fuselage center line on the plan which is clear enough but the way it says to install R1 is confusing since it says to to slide R1 onto the spar till the spar is half way through R1 and flush with the LE and TE. What it is really saying is to slide R1 onto the spar and into the LE and TE until the spar is halfway through R1 along with R1 protruding halfway out of the LE and TE. This is a very important step since R1 will act kinda like a centering block for the outer wing panel which will plug into R1 so it is important that R1 is straight. This is also a good time to slide BC-1 (Bellcrank mount) into the slot in the wing just make sure you get the hole in the right spot and do not glue. The manual does not say to install BC-1 in this step but believe me, it is a good idea to do this because the manual calls to install BC-1 AFTER the wing panels are joined together. They state to install the Bellcrank mount once the wing is joined together and they put a note that goes like this "You may have to bend things around to get BC-1 in", LOL well let me tell you you WON'T get it in without breaking something so take it from me and save yourself some broken balsa and aggravation and slide the bellcrank in once you install R1 ! OK enough with this, on to the next one.
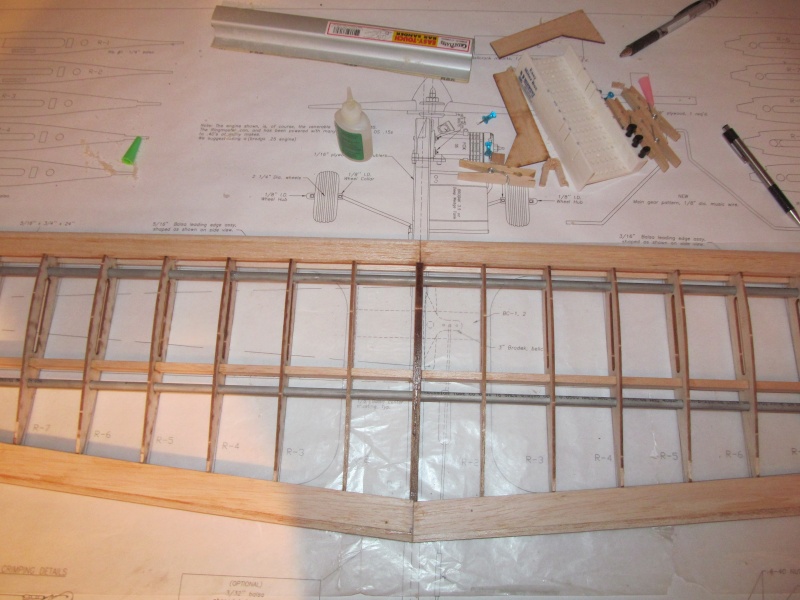
Now it's time to build the outer wing panel so here is it's beginning with the jig parts not yet assembled. the construction is same as the inner panel with the exception of R1 which is already installed in the inner panel.
The outer wing panel almost finished with basic build.
Now for the fun part, Time to join the wing together. once the LE is shaped and off the jig lay the panel on the outer panel side of the plan and line up the wing as close as you can to the outline of the plan. Once done measure and carefully cut the LE, TE and spar again to the center line of fuselage on the plans this is also a good idea to glue the end strips to the TE of the wing once complete sand and center the wing root joint ensuring the center joint is straight, then slide the two rods from the jig halfway through the inner wingpanel "the one with R1 and then side the outer wing panel onto the jig rods and carefully slide the wing together making sure BC-1 slides through the lower slots in the ribs and the ends of R1 slide into the LE and trailing edge of the outer wing panel you may have to sand to get the wing to join flush. Mine just took a little tweak and perfect fit! Once satisfied glue the outer wing panel to R1 making sure the spar plugs well into R1 use thick CA for this. Remove the rods!
((Note)) I know you don't see BC-1 in the wing , That is because dumb butt me didn't realize the suprize BC-1 had in store for me when I joined the wing and i managed to break R2 pretty bad trying to get that thing in yup balsa gremlin bit me good lol
Here is the wing joined together
Well this is the last pic for the night. Got plenty more to come cyaz! (The bandit passes out)
TDbandit- Platinum Member
- Posts : 897
Join date : 2014-12-01
Age : 52
Location : Riverdale Georgia
Re: Brodak Ringmaster S-1 build
![]() Cribbs74 Fri Jul 10, 2015 12:56 am
Cribbs74 Fri Jul 10, 2015 12:56 am
Something you may already know, but I thought I would mention is the LE and TE like to come apart right where the split is. This usually happens when you nose it in. A quick remedy is to glass over the LE and TE split with some epoxy soaked fiberglass tape.
To compound the problem, the wing spar likes to tear out the ribs when the wing comes forward. The Sterling version came with a solid LE and because it was so strong you could omit the spar.
Just something to think about.
I have seen many a Ringmaster nose in and lose the wing even when the crash was minor.
Ron

Cribbs74- Moderator
-
Posts : 11895
Join date : 2011-10-24
Age : 50
Location : Tuttle, OK
Re: Brodak Ringmaster S-1 build
![]() rogermharris Fri Jul 10, 2015 7:22 am
rogermharris Fri Jul 10, 2015 7:22 am
i have been thinking about fixtures and sanding blocks to make things go easier. it's nice that they lay the ribs out for it.
what king of glue are you using? i have always used titebond.
rogermharris- Platinum Member
- Posts : 503
Join date : 2015-03-17
Age : 61
Location : Long Branch, New Jersey
Re: Brodak Ringmaster S-1 build
![]() TDbandit Fri Jul 10, 2015 10:47 am
TDbandit Fri Jul 10, 2015 10:47 am
The glues I'm using is Sigbond, thick, medium and thin CA and 30 min . (Bandit)
TDbandit- Platinum Member
- Posts : 897
Join date : 2014-12-01
Age : 52
Location : Riverdale Georgia
Re: Brodak Ringmaster S-1 build
![]() Ken Cook Fri Jul 10, 2015 6:27 pm
Ken Cook Fri Jul 10, 2015 6:27 pm

Ken Cook- Top Poster
- Posts : 5455
Join date : 2012-03-27
Location : pennsylvania
Re: Brodak Ringmaster S-1 build
![]() RknRusty Fri Jul 10, 2015 8:16 pm
RknRusty Fri Jul 10, 2015 8:16 pm
How many 1/4 oz. weights do you need. I can probably round up enough for you. I'll check tomorrow. Got a sticky note to remind me.
Rusty
_________________
...and never Ever think about how good you are at something...
while you're doing it!
My Hot Rock & Blues Playlist

RknRusty- Rest In Peace

- Posts : 10869
Join date : 2011-08-10
Age : 68
Location : South Carolina, USA
Re: Brodak Ringmaster S-1 build
![]() RknRusty Fri Jul 10, 2015 8:24 pm
RknRusty Fri Jul 10, 2015 8:24 pm
Spray it with Windex or something with ammonia in it, then use a hair dryer on high heat to get it hot while you counter bow it, and hold it in place until it cools. The ammonia releases the lignin fibers that hold the wood's shape, and it gets very plastic with heat. That's the way I understand it, but it does work well. Finish all sanding before you reshape it, because sanding can cause warpage too. It's worth trying first without the ammonia too.TDbandit wrote:... I'm presently trying to figure out how to remove the warp. It's not too bad but its there enough that it may hurt flight performance... (Bandit)
Ken taught me to use a couple of long CF rods, arrow shafts, or something stiff and straight. Lay one over each wing near the last rib, resting on the LE and TE. Then eyeball them just like you would eyeball the stab and wing to make sure they are parallel.
Rusty
_________________
...and never Ever think about how good you are at something...
while you're doing it!
My Hot Rock & Blues Playlist
RknRusty- Rest In Peace
- Posts : 10869
Join date : 2011-08-10
Age : 68
Location : South Carolina, USA
Re: Brodak Ringmaster S-1 build
![]() TDbandit Fri Jul 10, 2015 8:45 pm
TDbandit Fri Jul 10, 2015 8:45 pm
Dunno i'm gonna start out with 1/2 to 1 oz and go from there. I need especially one so I can set the weight box up Been waiting on brodak to get some in. If you do send me some i'll grab you some from brodak when they come in to replace the ones you send me. By the way you told me a while back about the 1/2A day you were going to attend. Is it still on? (Bandit)
TDbandit- Platinum Member
- Posts : 897
Join date : 2014-12-01
Age : 52
Location : Riverdale Georgia
Re: Brodak Ringmaster S-1 build
![]() RknRusty Fri Jul 10, 2015 9:21 pm
RknRusty Fri Jul 10, 2015 9:21 pm
I have 1/2A Day on my calendar for Saturday September 26, but it has a "?" next to it. I'll find out for sure at our meeting on the 25th of this month. We can stage at my house and drive up to Huntersville together and make a weekend of fun out of it.
Rusty
_________________
...and never Ever think about how good you are at something...
while you're doing it!
My Hot Rock & Blues Playlist
RknRusty- Rest In Peace
- Posts : 10869
Join date : 2011-08-10
Age : 68
Location : South Carolina, USA
Re: Brodak Ringmaster S-1 build
![]() TDbandit Fri Jul 10, 2015 9:27 pm
TDbandit Fri Jul 10, 2015 9:27 pm
Cool I'll try that, like i said it's not real bad but it's bad enough to be noticed. The arrow shaft trick I use while working on experimental full size aircraft to check wood airframe components and works really well. I'll go on and finish up the fuselage and shape er up before treating the warp. Again thanks manRknRusty wrote:Spray it with Windex or something with ammonia in it, then use a hair dryer on high heat to get it hot while you counter bow it, and hold it in place until it cools. The ammonia releases the lignin fibers that hold the wood's shape, and it gets very plastic with heat. That's the way I understand it, but it does work well. Finish all sanding before you reshape it, because sanding can cause warpage too. It's worth trying first without the ammonia too.TDbandit wrote:... I'm presently trying to figure out how to remove the warp. It's not too bad but its there enough that it may hurt flight performance... (Bandit)
Ken taught me to use a couple of long CF rods, arrow shafts, or something stiff and straight. Lay one over each wing near the last rib, resting on the LE and TE. Then eyeball them just like you would eyeball the stab and wing to make sure they are parallel.
Rusty
TDbandit- Platinum Member
- Posts : 897
Join date : 2014-12-01
Age : 52
Location : Riverdale Georgia
Re: Brodak Ringmaster S-1 build
![]() TDbandit Fri Jul 10, 2015 9:33 pm
TDbandit Fri Jul 10, 2015 9:33 pm
Cool! along with my wildcat and skyrays, I may bring along my Super Clown and maybe we can maiden it up there possibly my ringmaster too since it will be finished.RknRusty wrote:Okay, I'll find them tomorrow and box them up.
I have 1/2A Day on my calendar for Saturday September 26, but it has a "?" next to it. I'll find out for sure at our meeting on the 25th of this month. We can stage at my house and drive up to Huntersville together and make a weekend of fun out of it.
Rusty
TDbandit- Platinum Member
- Posts : 897
Join date : 2014-12-01
Age : 52
Location : Riverdale Georgia
Re: Brodak Ringmaster S-1 build
![]() TDbandit Fri Jul 10, 2015 11:26 pm
TDbandit Fri Jul 10, 2015 11:26 pm
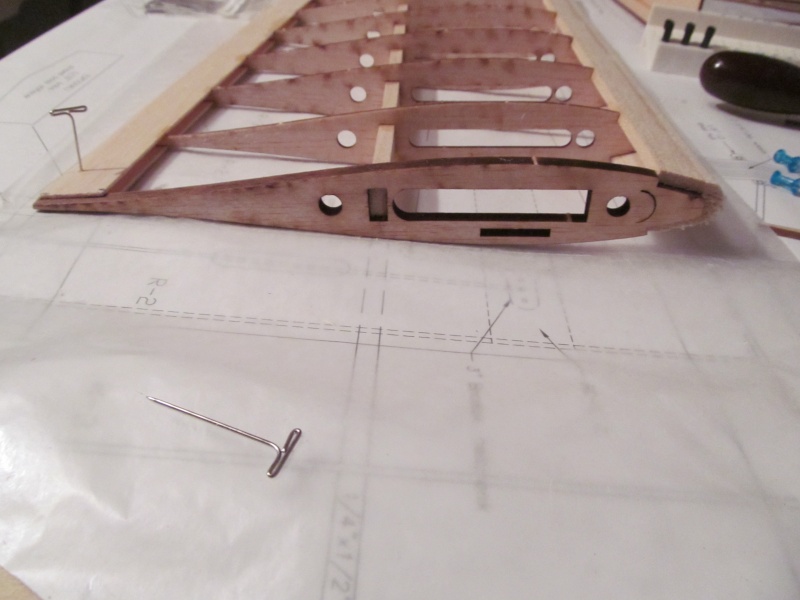
Once the wing is properly joined, next is the time to trim the excess off the wing tips to prepare the tips for the leadout guide and wing tips. You can leave the jig rods in the wing to help with support as I did. The use of a razor saw is best for this step once trimmed sand the tips till they are flush and nice and straight.
Here's a side view of the tip after sanding. Once done with this step. remove the guide rods from the jig.
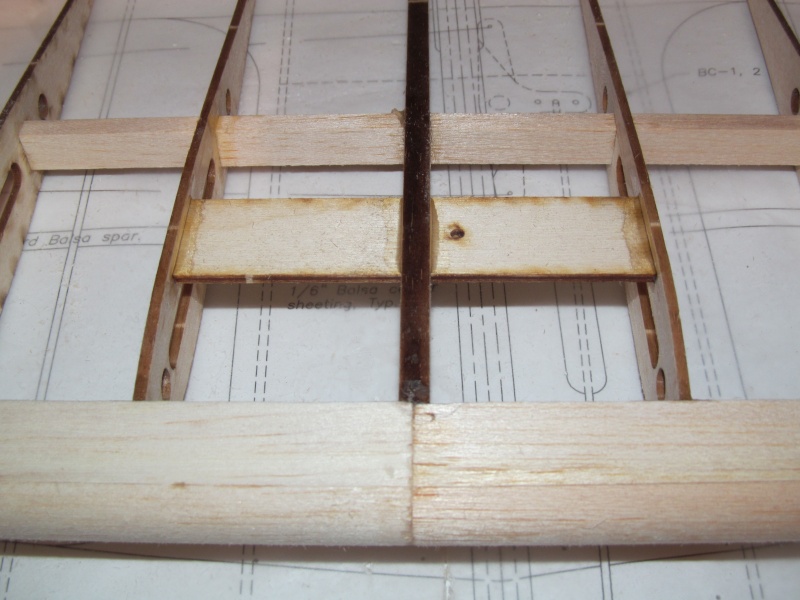
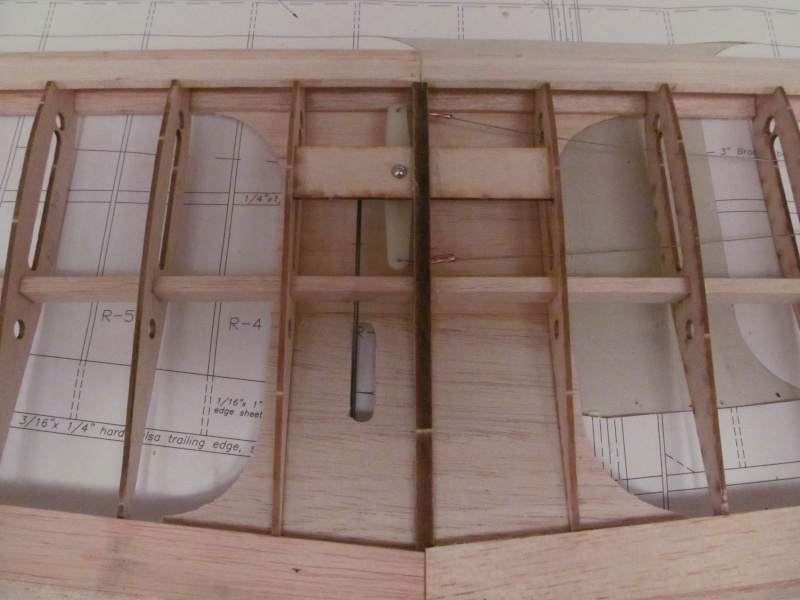
Here is BC-1 installed and glued in place. the bellcrank mount needs to be slid into place during while joining the wing once the wing is joined togeather provided that the hole is in the right place, you can center the mount in its slots and glue it in place Sigbond, tightbond and medium CA works well. Once in place and the glue has dried install the bellcrank and leadouts following the directions or your directions lol.

Here is another view of BC-1 (note) wing is upside down.
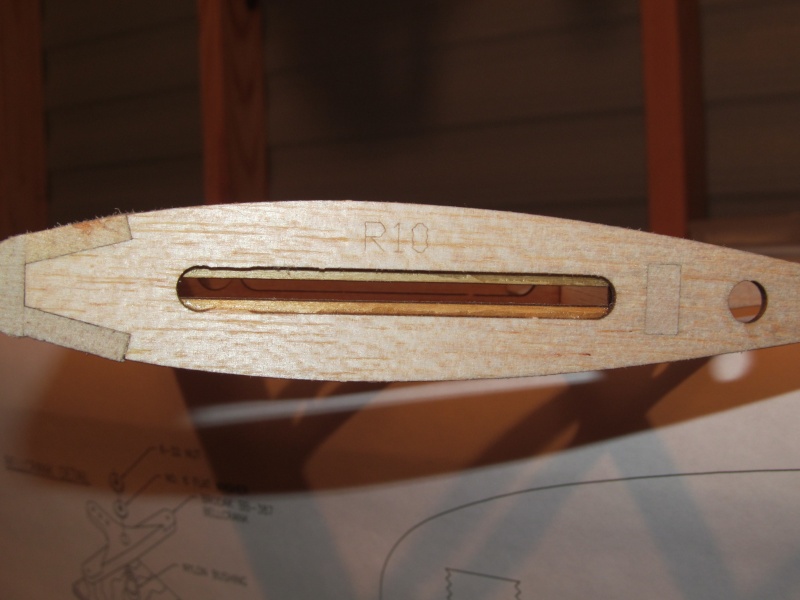
Now it's time to begin installing the adjustable leadout that comes in the kit. The rail has to be shaped to fit R10 but before you glue the rail in you need to take a hobby knife with a #11 blade and trim R10 so the slot runs across the tip to do this you need to murge the guide rod hole closest to the LE. Once done take the already shaped leadout rail and glue it in place making sure that the rail slot is centered in the slot in R10 and straight very important or you will have problems with the leadout guide moving it's full travel in both ways.
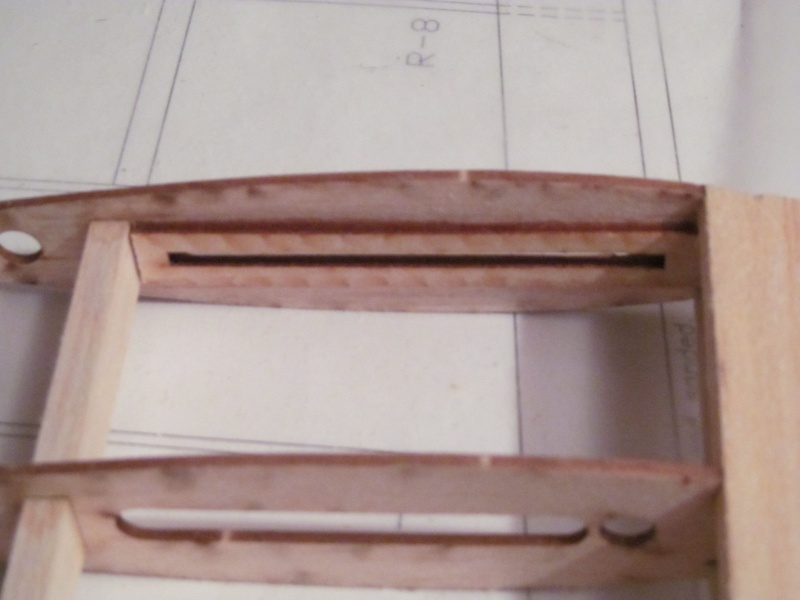
Here is what the guide rail for the leadout should look like when properly installed.
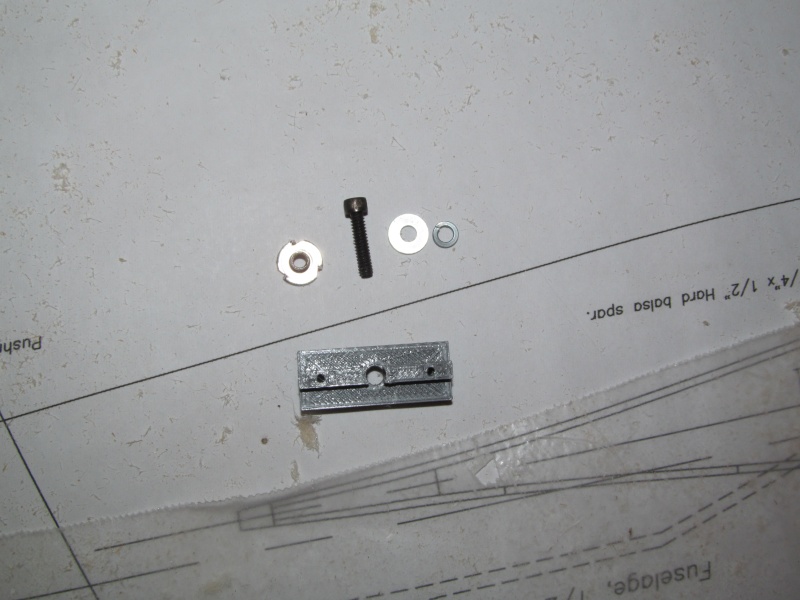
Now for the guide it's self make sure you have all the components. First order of buisness is to insert the guide in the slot of the guide rail and slide it back and forth for it's full travel making sure that it moves smoothly, you might have to lightly sand the slot to make it smooth. I had to a little at the ends. Once satisfied remove the guide and lightly sand the back of the guide then put a small dot of thick CA on each side of the bottom side of the blind nut with the anchoring prongs making sure no CA gets into the threads then insert the blind nut then taking a washer use the bolt to pull the blind nut into place and remove the bolt. Once the glue sets up install the guide and install the securing bolt and then again slide the guide back and forth to make sure the guide does not bind. adjust as necessary.
Here is what the guide looks like installed from the inside.
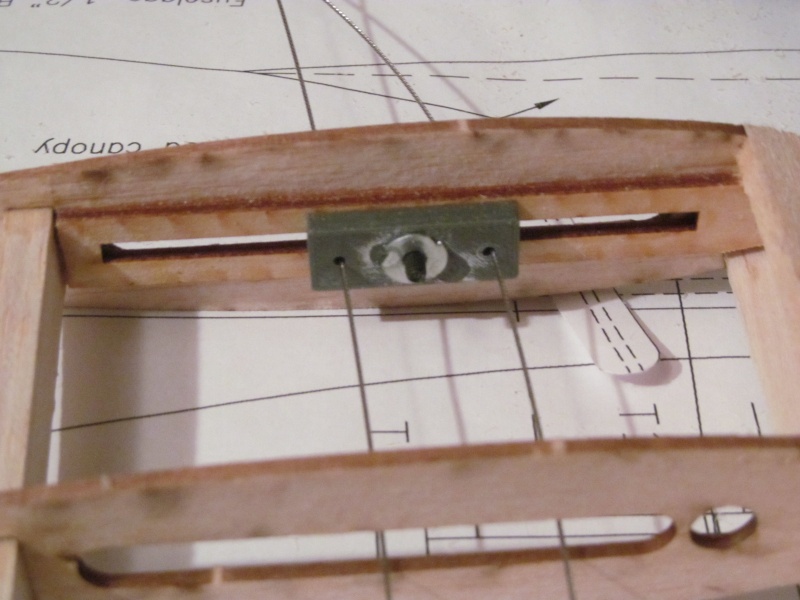
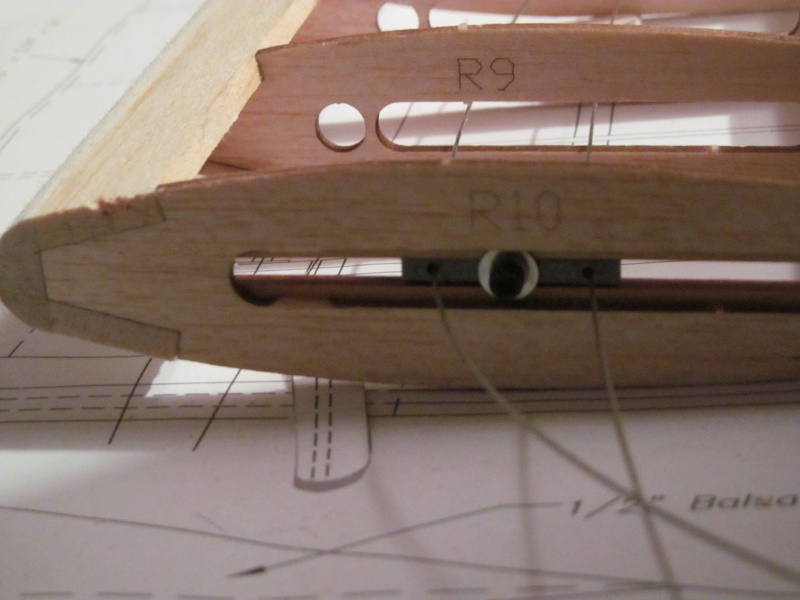
And from the outside (note) do not forget the lock washer.
Ok here's the last of the pics again for the night now i'm off to bed got work early cyaz guys! (The bandit gets up, walks a few steps and flunks over snoring)

TDbandit- Platinum Member
- Posts : 897
Join date : 2014-12-01
Age : 52
Location : Riverdale Georgia
Re: Brodak Ringmaster S-1 build
![]() RknRusty Fri Jul 10, 2015 11:33 pm
RknRusty Fri Jul 10, 2015 11:33 pm
Sleep tight.
_________________
...and never Ever think about how good you are at something...
while you're doing it!
My Hot Rock & Blues Playlist
RknRusty- Rest In Peace
- Posts : 10869
Join date : 2011-08-10
Age : 68
Location : South Carolina, USA
Re: Brodak Ringmaster S-1 build
![]() getback Sat Jul 11, 2015 7:06 am
getback Sat Jul 11, 2015 7:06 am
getback- Top Poster
-
Posts : 10119
Join date : 2013-01-18
Age : 66
Location : julian , NC
Re: Brodak Ringmaster S-1 build
![]() TDbandit Sat Jul 11, 2015 11:15 pm
TDbandit Sat Jul 11, 2015 11:15 pm
Once you have the Leadout guide in place the next step is to setup and install the push rod into the bellcrank. Unforchantly I forgot to get a pic of this step so I'll try and describe it so here goes...
Find the push rod with the *Z* bend in it and bend it according to the pattern on the plans. Once done, install the pushrod in the middle hole (Note) you will need to cut a clearance slot in the spar to allow the pushrod proper movement. Remove only as much as needed to do this. Once satisfied soak the cutout in thing CA to strengthen the spar. Test the pushrods movement.
Next it's time to add the center sheeting. For this step it calls in the manual to cutout the sheeting pattern in the center of the plans, if you don't want to do this, you can set some tracing paper onto the plans and trace it out then transfer the pattern onto some poster board to make a template. Lay the pattern onto the 1/16" balsa sheeting and trace out the first half of the center sheeting for the top of the wing then use a sharp #11 knife and cut out the first half of the sheeting cut just outside the lines. once done Trace out the secound part of the center sheeting making sure to trace the exit hole for the pushrod and cut it out. Once both parts are cut out lay the pattern out and place the two parts you just cut out and locate the butt joint. adjust to fit the pattern and glue both parts together using thin CA then test fit the sheeting on the wing *you may have to sand to fit*
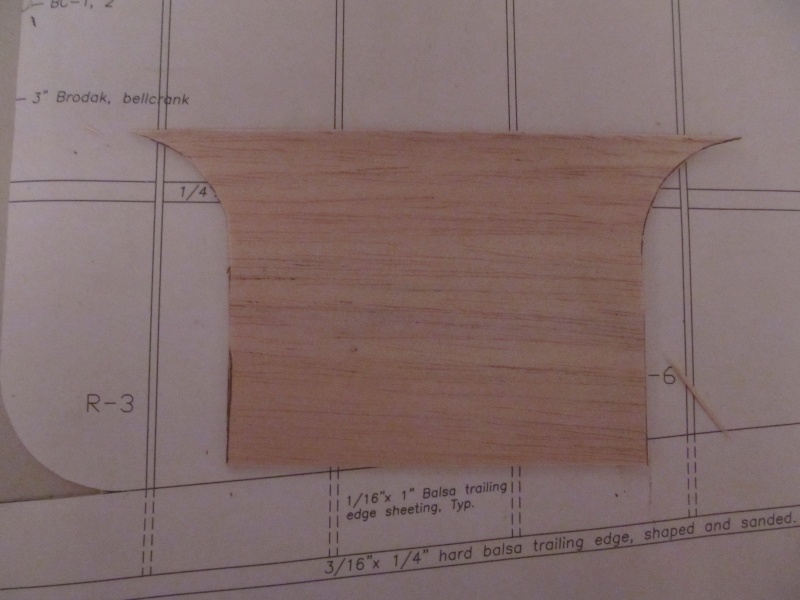
Here is the sheeting completed (Note) this is the bottom sheeting but is done the same way.
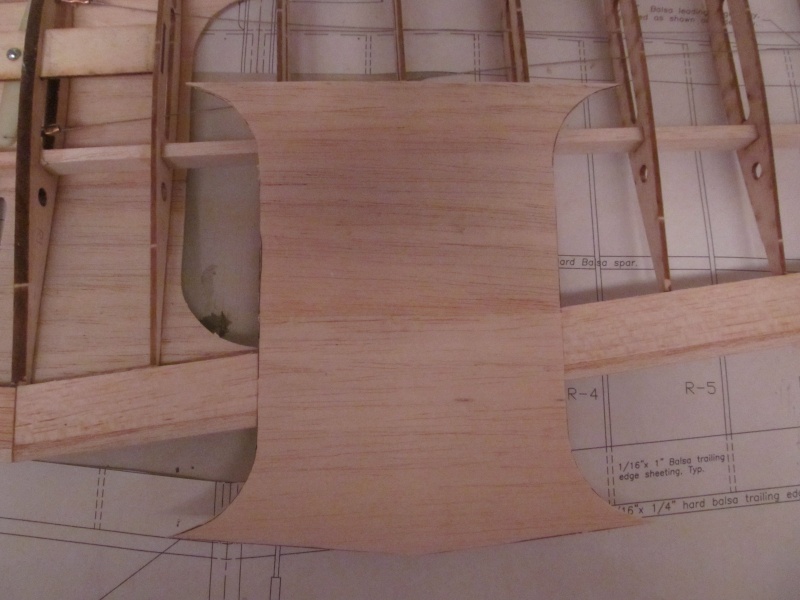
Once satisfied glue the sheeting in place using CA. It is easiest to do this from the bottom of the wing after tacking the corners ( note the bellcrank and leadouts)
Well that's it for me tonight I'll post some more pics tomorrow nite folks. (The bandit flunks onto the bed)
TDbandit- Platinum Member
- Posts : 897
Join date : 2014-12-01
Age : 52
Location : Riverdale Georgia
Re: Brodak Ringmaster S-1 build
![]() getback Sun Jul 12, 2015 6:55 am
getback Sun Jul 12, 2015 6:55 am
getback- Top Poster
-
Posts : 10119
Join date : 2013-01-18
Age : 66
Location : julian , NC
Re: Brodak Ringmaster S-1 build
![]() TDbandit Sun Jul 12, 2015 12:43 pm
TDbandit Sun Jul 12, 2015 12:43 pm
Nope the plans just show the pattern, The manual says to put it down in two pieces which makes it hard to fit it right. I like to do it in one peice because it's easier to fit. I cut just outside the lines just for that purpose so I can sand to fit (always better to have it a little too long or big than too small) Cutting just outside the lines is one of the secrets of scratch building or building from a print board kit Sanding to fit about always produces a much better fit than just cutting and sticking saves more botched parts too.getback wrote:I like the way you glue the two sheets together , fit then , glue on my B clown it didn't say to but from now out will try and remember this , I think it will make it come out better with the fitting (( was that in the plans to do it that way ? I need a tooter on doing the lead out wire and clamp too that was a real pain for me to try and hold the wires and clamp with only a hand and a half ( the numb left hand fingers ) makes it hard but there has got to bee another way ! Eric
The way I did the crimps is I made a simple jig that holds the bellcrank steady to free up my hands I use a peg pressed in a board that's held by a clamp for doing flying wires. The peg is for the eyelet. (Bandit)
TDbandit- Platinum Member
- Posts : 897
Join date : 2014-12-01
Age : 52
Location : Riverdale Georgia
Page 1 of 3 • 1, 2, 3 ![]()
» Up next: Brodak CL Baby Ringmaster/TD .051
» My Brodak Ringmaster S-1 finally finished!
» New Build, Brodak Shark 402
» Brodak Mustang Build