

 Rules
Rules
by aspeed Today at 8:06 pm
» Happy Anzac Day!
by 706jim Today at 6:44 pm
» Project Cox .049 r/c & Citabrian Champion
by MauricioB Today at 4:08 pm
» Jim Walkers FireBee - This is going to be fun
by rsv1cox Today at 3:56 pm
» Revivng Some Childhood Classics
by rsv1cox Today at 7:17 am
» Introducing our Cox .049 TD Engines
by getback Today at 6:20 am
» Roddie's flat-bottomed boat..
by Levent Suberk Today at 12:23 am
» Cox powered jet-pump for model Sprint Boat
by roddie Yesterday at 10:25 pm
» Micro Draco Gets to Fly on a Beautiful Morning.
by rdw777 Yesterday at 8:15 pm
» Jim Walker Firebaby
by rdw777 Yesterday at 8:06 pm
» Hydro-bat by Vic Smeed: engine probs
by GallopingGhostler Yesterday at 5:12 pm
» Roddie-Rigger.. a 2005 original design
by roddie Yesterday at 3:39 pm


Brodak Ringmaster S-1 build
Page 2 of 3 •  1, 2, 3
 ![]()
Re: Brodak Ringmaster S-1 build
![]() TDbandit Sun Jul 19, 2015 8:51 pm
TDbandit Sun Jul 19, 2015 8:51 pm
Yeah apparently it's something new that they are now including with the kit, they don't explain it's installation very well thoughRknRusty wrote:Wow, in all of my kits, have never seen any such thing. Looks like you did a good job.
Rusty
it's a nice touch saves glassing. (Bandit)

TDbandit- Platinum Member

- Posts : 897
Join date : 2014-12-01
Age : 52
Location : Riverdale Georgia
Re: Brodak Ringmaster S-1 build
![]() Cribbs74 Sun Jul 19, 2015 9:03 pm
Cribbs74 Sun Jul 19, 2015 9:03 pm
That surely is something different. As you well know the Sterling kit used a biscuit. It's a good idea, I wonder if that same t brace could be used in the TE.
Good job with the installation.

Cribbs74- Moderator


Posts : 11895
Join date : 2011-10-24
Age : 50
Location : Tuttle, OK
Re: Brodak Ringmaster S-1 build
![]() TDbandit Sun Jul 19, 2015 9:14 pm
TDbandit Sun Jul 19, 2015 9:14 pm
Actually there is a type of brace shown on the plans it's a biscuit that's installed in the TE by trimming back R-1 and slipped in between the TE sheeting to join the two halves. Dummy me didn't install it I was but in my excitement I got too far along by the time i noticed my blunder so I'm going to just glass the TE. if you want I'll take a shot of the mod on the plans. These are all optional btw (Bandit)Cribbs74 wrote:I'll be darned,
That surely is something different. As you well know the Sterling kit used a biscuit. It's a good idea, I wonder if that same t brace could be used in the TE.
Good job with the installation.
TDbandit- Platinum Member
- Posts : 897
Join date : 2014-12-01
Age : 52
Location : Riverdale Georgia
Re: Brodak Ringmaster S-1 build
![]() RknRusty Sun Jul 19, 2015 9:32 pm
RknRusty Sun Jul 19, 2015 9:32 pm
Yep, that's right my Sterling Yak-9 did have a similar biscuit, how could I forget. It wedged into the backside of the LE joint. I love my only Sterling, it's one tough ol' plane. Always a crowd pleaser. It as my first 35 sized build and my first flapped plane too.Cribbs74 wrote:I'll be darned,
That surely is something different. As you well know the Sterling kit used a biscuit. It's a good idea, I wonder if that same t brace could be used in the TE.join the Ringmaster crowd
Good job with the installation.
_________________
...and never Ever think about how good you are at something...
while you're doing it!
My Hot Rock & Blues Playlist

RknRusty- Rest In Peace

- Posts : 10869
Join date : 2011-08-10
Age : 68
Location : South Carolina, USA
Re: Brodak Ringmaster S-1 build
![]() Cribbs74 Sun Jul 19, 2015 9:35 pm
Cribbs74 Sun Jul 19, 2015 9:35 pm
If you are in the mood it certainly could be beneficial to the thread.
I have well over 100 flights on my old Ringmaster (built in 1958) and I have plowed it in about 6 times. I glassed the TE, but if a cleaner mod is available I am all ears.
Ron
Cribbs74- Moderator
-
Posts : 11895
Join date : 2011-10-24
Age : 50
Location : Tuttle, OK
Re: Brodak Ringmaster S-1 build
![]() TDbandit Sun Jul 19, 2015 9:39 pm
TDbandit Sun Jul 19, 2015 9:39 pm
Ok I'll do it tonight in fact I'll go on and click off a pic of it now.Cribbs74 wrote:Yeah!
If you are in the mood it certainly could be beneficial to the thread.
I have well over 100 flights on my old Ringmaster (built in 1958) and I have plowed it in about 6 times. I glassed the TE, but if a cleaner mod is available I am all ears.
Ron
(Bandit)
TDbandit- Platinum Member
- Posts : 897
Join date : 2014-12-01
Age : 52
Location : Riverdale Georgia
Re: Brodak Ringmaster S-1 build
![]() TDbandit Sun Jul 19, 2015 10:32 pm
TDbandit Sun Jul 19, 2015 10:32 pm
This is the other option for the wing however this has to be made by the builder and has to be done before R-1 is fully installed which involves trimming R-1 back and installing a shaped piece of 3/32 hard balsa im between the TE sheeting that butts up against both R-2 ribs and TE end strips. Here is a shot of the plans.. I have marked the plans for clarity.

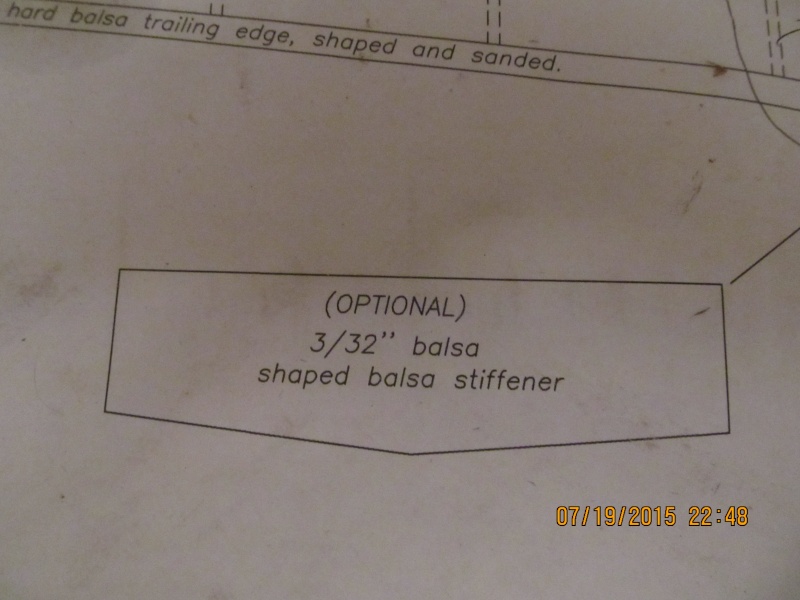

I will be building a second brodak RM kit so i will incorporate this into it.
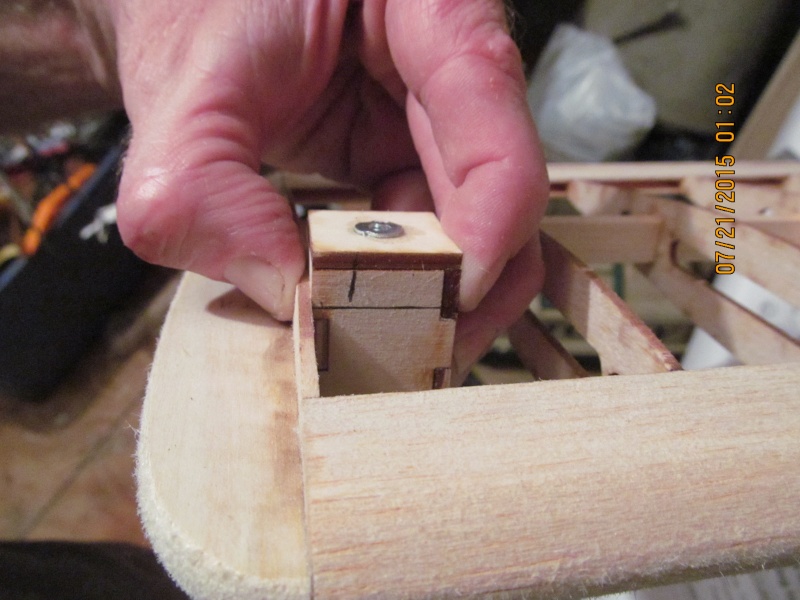
Oh before i forget here's a shot of the T brace test fitted into the fuse this is what it looks like..

(Bandit)
TDbandit- Platinum Member
- Posts : 897
Join date : 2014-12-01
Age : 52
Location : Riverdale Georgia
Re: Brodak Ringmaster S-1 build
![]() Cribbs74 Sun Jul 19, 2015 10:46 pm
Cribbs74 Sun Jul 19, 2015 10:46 pm
While I would personally use ply instead of 3/32 balsa, I think that it's a benedicial mod and very transparent. Glassing builds up the TE about 1/16" or so which makes for a tight fit into the fuselage.
The slotting of the LE makes for a nice tight joint.
Cribbs74- Moderator
-
Posts : 11895
Join date : 2011-10-24
Age : 50
Location : Tuttle, OK
Re: Brodak Ringmaster S-1 build
![]() TDbandit Sun Jul 19, 2015 11:17 pm
TDbandit Sun Jul 19, 2015 11:17 pm
I agree with ya on the ply. I'm trying to "Fox proof" it a little. I'm also going to be making some 7075-T6 aluminum engine barrier plates as well to help keep that thing stationary. going to be putting a 40th anniversary .35 on it which I've already at least mostly broken in looking for a NVA now to replace the stocker flat tip. (Bandit)Cribbs74 wrote:Thanks!
While I would personally use ply instead of 3/32 balsa, I think that it's a benedicial mod and very transparent. Glassing builds up the TE about 1/16" or so which makes for a tight fit into the fuselage.
The slotting of the LE makes for a nice tight joint.
'
TDbandit- Platinum Member
- Posts : 897
Join date : 2014-12-01
Age : 52
Location : Riverdale Georgia
Re: Brodak Ringmaster S-1 build
![]() getback Sun Jul 19, 2015 11:24 pm
getback Sun Jul 19, 2015 11:24 pm


getback- Top Poster

-
Posts : 10114
Join date : 2013-01-18
Age : 66
Location : julian , NC
Re: Brodak Ringmaster S-1 build
![]() Cribbs74 Mon Jul 20, 2015 12:01 am
Cribbs74 Mon Jul 20, 2015 12:01 am
TDbandit wrote:I agree with ya on the ply. I'm trying to "Fox proof" it a little. I'm also going to be making some 7075-T6 aluminum engine barrier plates as well to help keep that thing stationary. going to be putting a 40th anniversary .35 on it which I've already at least mostly broken in looking for a NVA now to replace the stocker flat tip. (Bandit)Cribbs74 wrote:Thanks!
While I would personally use ply instead of 3/32 balsa, I think that it's a benedicial mod and very transparent. Glassing builds up the TE about 1/16" or so which makes for a tight fit into the fuselage.
The slotting of the LE makes for a nice tight joint.
'
Good call on the aluminum. ST and PA needles work well for me. The new Fox needle is good as well, not sure if they are available anymore though.
Cribbs74- Moderator
-
Posts : 11895
Join date : 2011-10-24
Age : 50
Location : Tuttle, OK
Re: Brodak Ringmaster S-1 build
![]() TDbandit Mon Jul 20, 2015 12:32 am
TDbandit Mon Jul 20, 2015 12:32 am
I don't think they are, I've been looking and haven't found any. Last time i talked to Fox they said that they were flat out of parts including the NV's and unless the economy improves and jobs start coming back, they have no plans on making any more in the foreseeable future. Still looking though. (Bandit)Cribbs74 wrote:TDbandit wrote:I agree with ya on the ply. I'm trying to "Fox proof" it a little. I'm also going to be making some 7075-T6 aluminum engine barrier plates as well to help keep that thing stationary. going to be putting a 40th anniversary .35 on it which I've already at least mostly broken in looking for a NVA now to replace the stocker flat tip. (Bandit)Cribbs74 wrote:Thanks!
While I would personally use ply instead of 3/32 balsa, I think that it's a benedicial mod and very transparent. Glassing builds up the TE about 1/16" or so which makes for a tight fit into the fuselage.
The slotting of the LE makes for a nice tight joint.
'
Good call on the aluminum. ST and PA needles work well for me. The new Fox needle is good as well, not sure if they are available anymore though.
TDbandit- Platinum Member
- Posts : 897
Join date : 2014-12-01
Age : 52
Location : Riverdale Georgia
Re: Brodak Ringmaster S-1 build
![]() TDbandit Thu Jul 23, 2015 12:16 am
TDbandit Thu Jul 23, 2015 12:16 am
The kit comes with two control horns, one which is the stock sterling style which i know I can use and another that is an updated one with three holes observe:
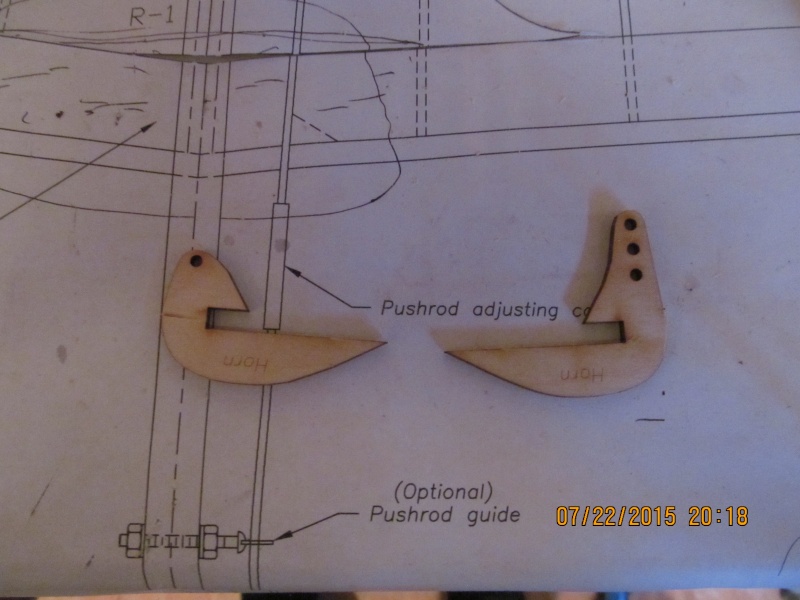
My question is in the interest of keeping it OTS legal, Can I use the modded horn or do I have to stick with the original style due to the fact that they want the model as close to the original design on the outside as possible. The control horn is a visible component and the modded one is not original so I'm concerned about using it (I want too because it will allow for more throw control) I plan on using this model for OTS after I get my bearings and don't want to install it only to have them kick it out of a contest because of a horn. I appreciate the input guys! (Bandit)
TDbandit- Platinum Member
- Posts : 897
Join date : 2014-12-01
Age : 52
Location : Riverdale Georgia
Re: Brodak Ringmaster S-1 build
![]() Cribbs74 Thu Jul 23, 2015 12:55 am
Cribbs74 Thu Jul 23, 2015 12:55 am
Unless your modification alters the design in a way that makes the plane fly better than originally designed
then it won't be knocked. That is what I have experienced, keep in mind each OTS event varies by region.
That said, the horn you choose is up to you. If it were me I would go Nylon. If you want to use a ply one then the longer one is better. Bushing it will make it last longer. If you don't bush it then make it part of your pre-flight inspection each and every time you fly.
I am assuming you have flown a Ringmaster before and as you know they work best with minimal elevator deflection 20-25 degrees. The longer horn will aid in that goal. Using the innermost hole on the bellcrank helps in keeping the throw tamed.
Hope that helps a little.
Ron
Cribbs74- Moderator
-
Posts : 11895
Join date : 2011-10-24
Age : 50
Location : Tuttle, OK
Re: Brodak Ringmaster S-1 build
![]() Ken Cook Thu Jul 23, 2015 3:56 am
Ken Cook Thu Jul 23, 2015 3:56 am
I would recommend not to use a wooden horn as failure will come quite quickly. The older Sterling wood horn was tough, it would fail at the glue joint or the hole. This newer laser cut plywood will fail even quicker and I've seen it many times. Use Nylon and you will have better adjustment and longevity. The secret to a Ringmaster is making the controls as slow as possible and making the elevator move as little as possible with a large horn. This requires a 1/64" ply pad under and above the horn otherwise the horn will pull through the elevator, There's a lot of stress on the horn with the large elevator and flexing takes place usually cracking the elevator if the ply pads aren't used. Too many times the elevator is flipping too far and fast. It stops the plane like a brake. Fast flying and slow inputs are essential otherwise it drops like a stone.
Ken

Ken Cook- Top Poster
- Posts : 5449
Join date : 2012-03-27
Location : pennsylvania
Re: Brodak Ringmaster S-1 build
![]() TDbandit Fri Jul 24, 2015 1:11 pm
TDbandit Fri Jul 24, 2015 1:11 pm
Thanks man for the advice, I intend on installing a smith needle in it as soon as i'm able to get one however i'm gonna have to stick with the flat tip needle until I can. I've already clipped it down and put an L bend in it. Also I would like to find a high Zoot crank for it too but it appears that there are none available now outside of engines I though about having the stock crank balanced but it seems there is just not enough meat for it so I decided against it.Ken Cook wrote:While I'm not a huge fan of the Fox needle valve, your flat tip works well provided you seal it. I like it better than the tapered replacement and it screws in farther than the tapered replacement version. The flat tip is no longer available nor is the tapered version. Randy Smith needles are far superior if he has them. The Fox has a turned down spraybar in the center which can easily be done on a Tiger needle. RSM provides a Tiger copy. They stay put. If the Fox needle is to be used, I highly suggest clipping it down and bending it out of the way. I said it many times on here, choose not to and the plane will do it for you. It will snap clean off flush with the spraybar. Hopefully you had a good needle setting or you will be packing it up and heading for home if you don't have another. Finding 3-48 screws in long lengths are a tough find, I made some needles by grinding a point onto the 3-48 screw. The screws fit tighter in the spraybar and are stronger.
I would recommend not to use a wooden horn as failure will come quite quickly. The older Sterling wood horn was tough, it would fail at the glue joint or the hole. This newer laser cut plywood will fail even quicker and I've seen it many times. Use Nylon and you will have better adjustment and longevity. The secret to a Ringmaster is making the controls as slow as possible and making the elevator move as little as possible with a large horn. This requires a 1/64" ply pad under and above the horn otherwise the horn will pull through the elevator, There's a lot of stress on the horn with the large elevator and flexing takes place usually cracking the elevator if the ply pads aren't used. Too many times the elevator is flipping too far and fast. It stops the plane like a brake. Fast flying and slow inputs are essential otherwise it drops like a stone.
Ken
I have decided not to use the ply horn and will opt for the nylon one instead for fear of deflection and load issues. another issue i've noticed is the balsa for the elevator is a little on the soft side so i'm planning on putting a 1/64 ply strip bout 1/2 inch wide that will be integrated in with the horn doubler that will go down the center of the elevator from LE to TE to help stiffen it up a bit. (Bandit)
TDbandit- Platinum Member
- Posts : 897
Join date : 2014-12-01
Age : 52
Location : Riverdale Georgia
Re: Brodak Ringmaster S-1 build
![]() TDbandit Sat Jul 25, 2015 12:31 am
TDbandit Sat Jul 25, 2015 12:31 am
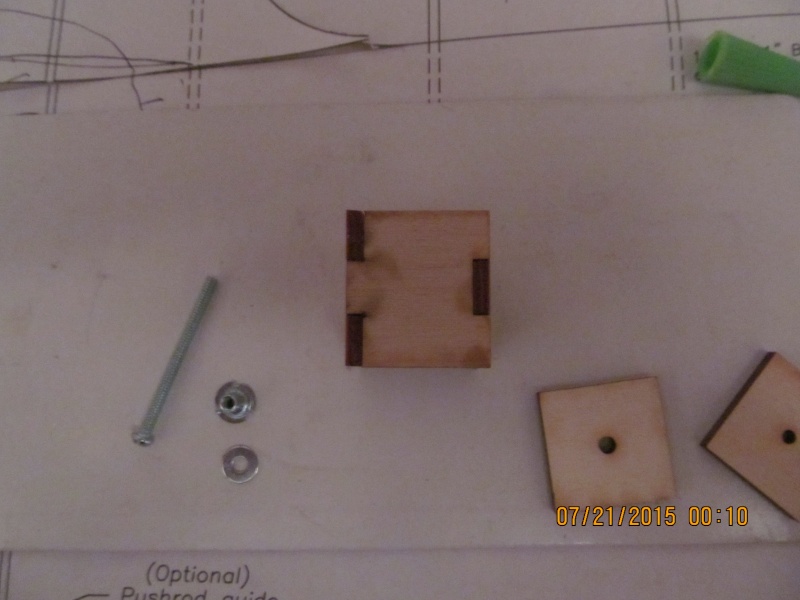
First of all, the weight box is an optional item there fore has it's own instructions separate from the build manual and it's construction is quite simple.
First, find all the parts for the eight box, you should have six components along with a 4-40 screw, washer and blind nut and lay them out to get an idea how things go together. ((Note)) the instructions say to use one 1/4 oz weight (the weight that has the hole in the center not a sticky weight) to help square up the sides however I found that the weight is not necessary for it's construction.
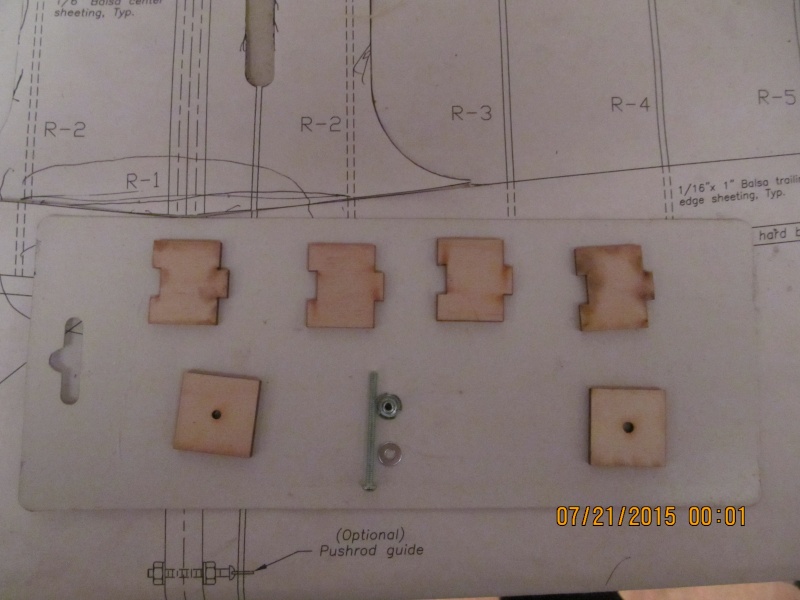
Next lightly sand the ends of the box sides to remove any burrs then take a steel scale with true edges and slip the first two sides together, square them up using the steel rule then glue together. Once done the box goes together quire easy just keep the side at 90 deg glue the remaining sides together and use a rubber band to hold together till dry.
Here is a side view of the box once the glue dries.
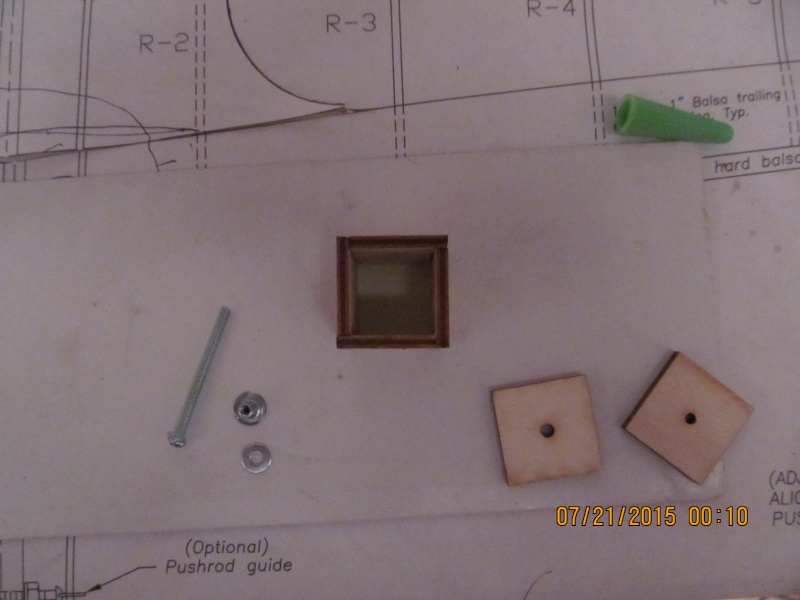
And now an end view. Also take note of the two ends which are identical except the holes "Pay attention to this" the end with the larger hole is for the top and is where the blind nut lives which gets glued into place later, the one with the smaller hole is the bottom and is the hatch which does NOT get glued and must remain free so it can be removed for weight adjustment.
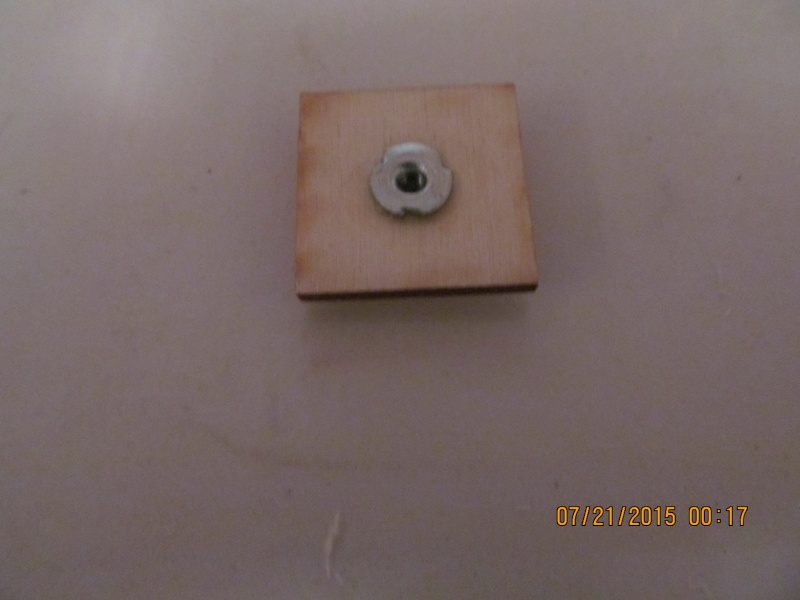
Now find the top (The one with the large hole) and using the bolt supplied and washer install the blind nut by tempararly putting the top and bottom on each end of the box and install the blind using the bottom to help pull the blind nut in place. lock the blind nut in place with a couple of drops of medium CA being careful as to not get any CA in the threads of the blind nut.
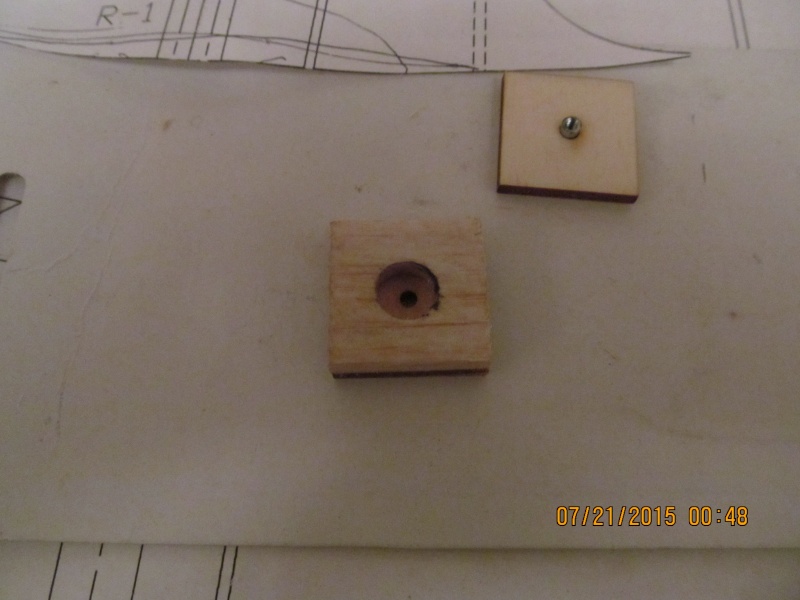
Now its time to make the box cover hatch, Find the bottom (one with the small hole) and locate some 1/4" balsa. Then cut yourself a piece that is roughly the same size of the hatch bottom (Should be slightly bigger for shaping to fit) and lay the piece of balsa on the hatch till its roughly equal and then using the hatch bottom as a template, mark where the hole will be drilled then remove the balsa and drill a 1/8 hole. Then take the bolt and slip the washer onto the bolt the slip it through the hole that you just drilled in the balsa cap and using the washer as a template, draw a circle them remove the bolt and washer. This is for the hole to clear the washer for the securing bolt for the weight box hatch.

Now ream the hole to match the washer, once satisfied glue the balsa cap to the ply hatch centering up the hole in the hatch with the hole in the cap. Use thin CA to strengthen and fuel proof the hole.
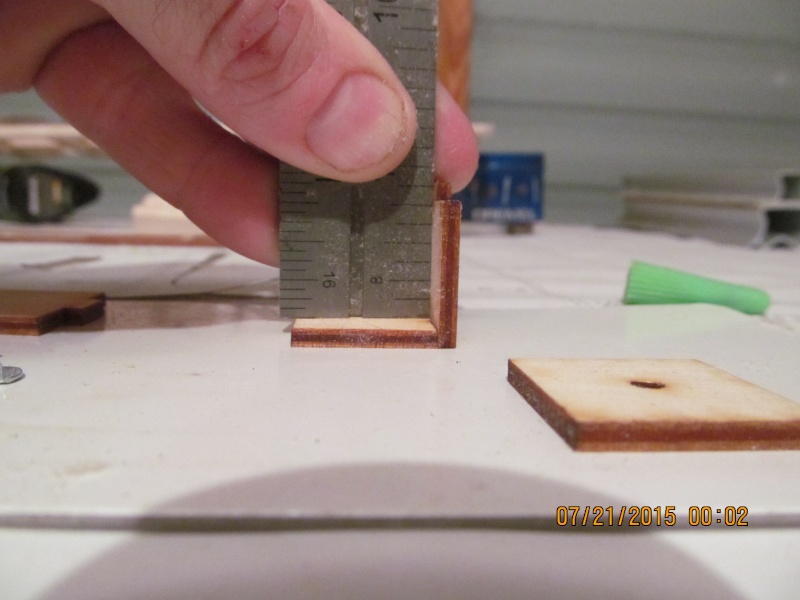
Now temporarily assemble the weight box using the securing bolt to hold the ends together then true them up best you can and snug the bolt. The using a sanding block blend in the sides and ends. once done and with the box still assembled, test fit the box in the wing mark the box as necessary in order to trim the box so the top of the box will be 1/4 inch below the top surface of the wing, For the Ringmaster you will have to trim it down. Remove the box and disassemble...
Ok this is the final pic for the night there will be more tomorrow! OK now time for some ZZZZZZZ's (The bandit turns and flunks down on the bed)

Now
TDbandit- Platinum Member
- Posts : 897
Join date : 2014-12-01
Age : 52
Location : Riverdale Georgia
Re: Brodak Ringmaster S-1 build
![]() Ken Cook Sat Jul 25, 2015 4:03 am
Ken Cook Sat Jul 25, 2015 4:03 am
Ken Cook- Top Poster
- Posts : 5449
Join date : 2012-03-27
Location : pennsylvania
Re: Brodak Ringmaster S-1 build
![]() TDbandit Sat Jul 25, 2015 9:36 pm
TDbandit Sat Jul 25, 2015 9:36 pm
Didn't think of that, heck I might go a step further and cut a stud and thread it into the blind nut then put a jam nut on the other side and use a lock nut on the hatch end would make it easier to slip the weights in. (Bandit)Ken Cook wrote: If possible, I would remove the blind nut. Sand the mating face of a Nyloc nut and epoxy it to the top of the box if there's enough room. Vibrations make the screw fall out during flight and out goes the weights and the door to hold them in. If that's not an option, after the weight is installed determine how long the space is from the weight to the underside of weight box lid and cut a piece of fuel tubing and place it on the screw. This will provide enough resistance to keep the screw from walking out. Ken
TDbandit- Platinum Member
- Posts : 897
Join date : 2014-12-01
Age : 52
Location : Riverdale Georgia
Re: Brodak Ringmaster S-1 build
![]() TDbandit Fri Jul 31, 2015 11:14 pm
TDbandit Fri Jul 31, 2015 11:14 pm
TDbandit- Platinum Member
- Posts : 897
Join date : 2014-12-01
Age : 52
Location : Riverdale Georgia
Page 2 of 3 • 1, 2, 3 ![]()
» Up next: Brodak CL Baby Ringmaster/TD .051
» My Brodak Ringmaster S-1 finally finished!
» brodak stunt man build
» New Build, Brodak Shark 402