

 Rules
Rules
by getback Today at 2:32 pm
» Roddie's flat-bottomed boat..
by OVERLORD Today at 2:20 pm
» PT-19 Mayhem at Buder Park...a Decade Ago!!!!
by Kim Today at 7:41 am
» Project Cox .049 r/c & Citabrian Champion
by getback Today at 6:46 am
» Three -- sold out (making two more) Cox .010 Carburetors with wrench
by balogh Today at 12:34 am
» Joe Wagners Sioux
by GallopingGhostler Yesterday at 9:03 pm
» Happy Anzac Day!
by GallopingGhostler Yesterday at 4:16 pm
» Jim Walkers FireBee - This is going to be fun
by rsv1cox Yesterday at 12:27 pm
» Revivng Some Childhood Classics
by getback Yesterday at 7:31 am
» Fox .35 Modifications
by Ken Cook Yesterday at 3:16 am
» Introducing our Cox .049 TD Engines
by getback Fri Apr 26, 2024 6:20 am
» Cox powered jet-pump for model Sprint Boat
by roddie Thu Apr 25, 2024 10:25 pm


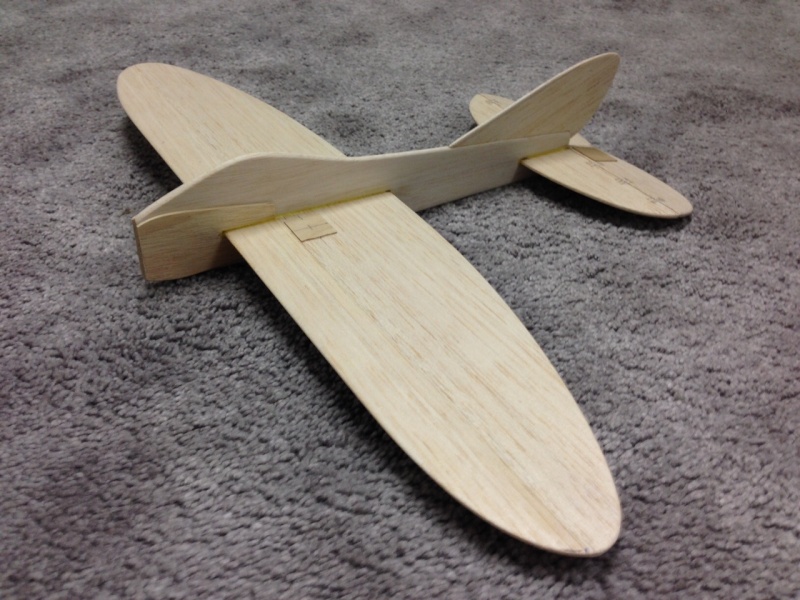
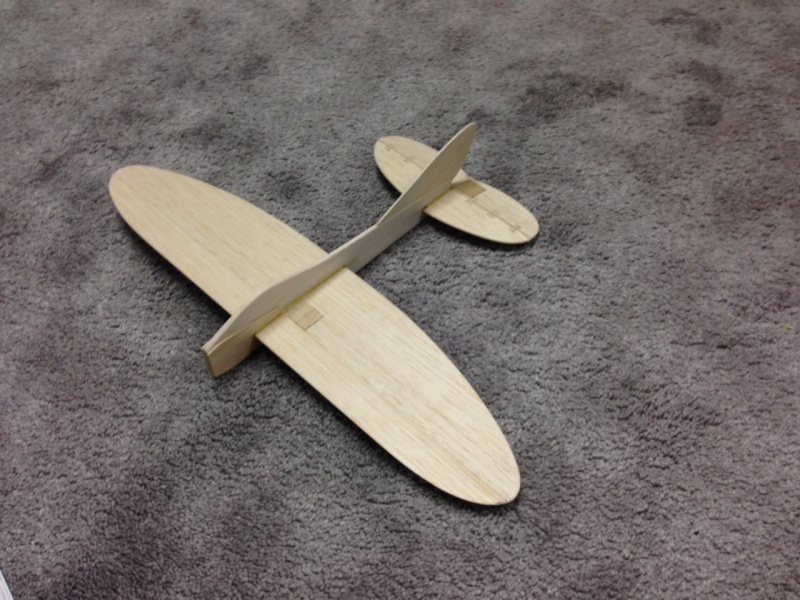
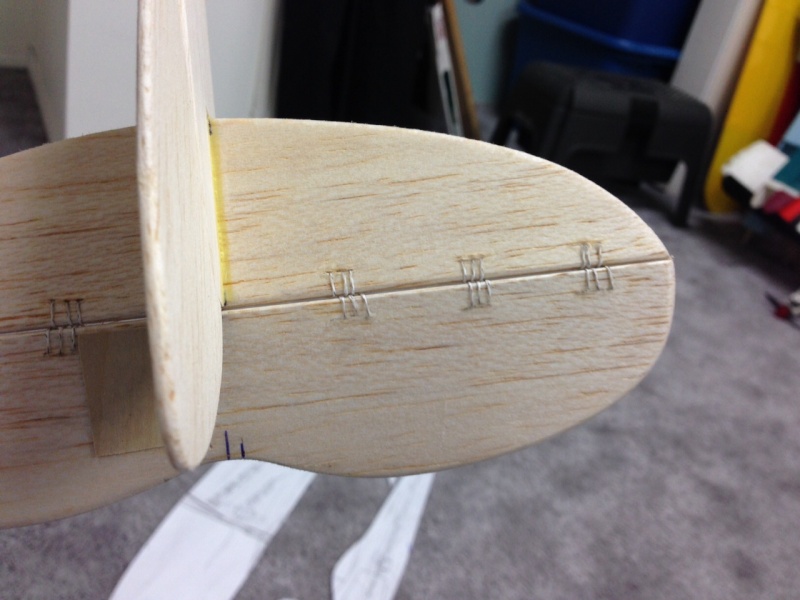
Now Complete : New Build And New Hinge Technique, Pics Now Added

Now Complete : New Build And New Hinge Technique, Pics Now Added
![]() NEW222 Thu Sep 24, 2015 9:05 pm
NEW222 Thu Sep 24, 2015 9:05 pm
Last edited by NEW222 on Sat Oct 17, 2015 11:09 am; edited 2 times in total

NEW222- Top Poster

- Posts : 3892
Join date : 2011-08-13
Age : 45
Location : oakbank, mb
Re: Now Complete : New Build And New Hinge Technique, Pics Now Added
![]() NEW222 Thu Sep 24, 2015 9:44 pm
NEW222 Thu Sep 24, 2015 9:44 pm
NEW222- Top Poster
- Posts : 3892
Join date : 2011-08-13
Age : 45
Location : oakbank, mb
Re: Now Complete : New Build And New Hinge Technique, Pics Now Added
![]() pkrankow Thu Sep 24, 2015 10:22 pm
pkrankow Thu Sep 24, 2015 10:22 pm
The washer used is the weight in steel. It isn't a washer in this application, it just happens to look like one. The weight can look like anything you need it to look like.
Phil

pkrankow- Top Poster
- Posts : 3025
Join date : 2012-10-02
Location : Ohio
Re: Now Complete : New Build And New Hinge Technique, Pics Now Added
![]() NEW222 Thu Sep 24, 2015 10:51 pm
NEW222 Thu Sep 24, 2015 10:51 pm
NEW222- Top Poster
- Posts : 3892
Join date : 2011-08-13
Age : 45
Location : oakbank, mb
Re: Now Complete : New Build And New Hinge Technique, Pics Now Added
![]() NEW222 Sat Sep 26, 2015 1:03 am
NEW222 Sat Sep 26, 2015 1:03 am

NEW222- Top Poster
- Posts : 3892
Join date : 2011-08-13
Age : 45
Location : oakbank, mb
Re: Now Complete : New Build And New Hinge Technique, Pics Now Added
![]() KariFS Sat Sep 26, 2015 6:09 am
KariFS Sat Sep 26, 2015 6:09 am
Example:
http://www.amazon.com/Adhesive-Wheel-Balancing-Weights-Strips/dp/B00AKXC54Q
KariFS- Diamond Member

- Posts : 2002
Join date : 2014-10-10
Age : 52
Re: Now Complete : New Build And New Hinge Technique, Pics Now Added
![]() Ken Cook Sat Sep 26, 2015 6:52 am
Ken Cook Sat Sep 26, 2015 6:52 am
Last edited by Ken Cook on Sat Sep 26, 2015 10:46 am; edited 1 time in total

Ken Cook- Top Poster
- Posts : 5455
Join date : 2012-03-27
Location : pennsylvania
Re: Now Complete : New Build And New Hinge Technique, Pics Now Added
![]() getback Sat Sep 26, 2015 9:19 am
getback Sat Sep 26, 2015 9:19 am

getback- Top Poster


Posts : 10120
Join date : 2013-01-18
Age : 66
Location : julian , NC
Re: Now Complete : New Build And New Hinge Technique, Pics Now Added
![]() Ken Cook Sat Sep 26, 2015 10:28 am
Ken Cook Sat Sep 26, 2015 10:28 am
Ken Cook- Top Poster
- Posts : 5455
Join date : 2012-03-27
Location : pennsylvania
Re: Now Complete : New Build And New Hinge Technique, Pics Now Added
![]() NEW222 Sat Sep 26, 2015 10:51 am
NEW222 Sat Sep 26, 2015 10:51 am
@getback - what did you mean by saying "I would have trimmed those platforms for the bellcrank /control horn they look well square ?" I am curious. Do you mean round them off? If so, yes, I got lazy last night....
@ Ken Cook - I had thought of adding a hardwood LE and TE to the tail surfaces, but since it was my first time I was just happy to try the hinge method. I will definitely think about it on future builds. As this winter, I plan on building a Pinto Stunter, and will most definitely install them on it!
NEW222- Top Poster
- Posts : 3892
Join date : 2011-08-13
Age : 45
Location : oakbank, mb
Re: Now Complete : New Build And New Hinge Technique, Pics Now Added
![]() NEW222 Sat Sep 26, 2015 10:52 am
NEW222 Sat Sep 26, 2015 10:52 am
NEW222- Top Poster
- Posts : 3892
Join date : 2011-08-13
Age : 45
Location : oakbank, mb
Re: Now Complete : New Build And New Hinge Technique, Pics Now Added
![]() getback Sat Sep 26, 2015 12:41 pm
getback Sat Sep 26, 2015 12:41 pm
 Eric
Eric
getback- Top Poster
-
Posts : 10120
Join date : 2013-01-18
Age : 66
Location : julian , NC
Re: Now Complete : New Build And New Hinge Technique, Pics Now Added
![]() fredvon4 Sat Sep 26, 2015 3:29 pm
fredvon4 Sat Sep 26, 2015 3:29 pm
However you can accomplish the same idea with what is on hand or easy to make the size you need
I find that a sheet of 1/64th ply can be used for all sorts of strengthening without a steep weight penalty
I also sand it pretty thin but it still has a harder face than the attached balsa
I also do a lot of wood work with western cedar (a relatively soft wood) and sometimes the table saw gives me a very thin 1"or 2" tall cut off 3 or 4 feet long...I am talking 1/16" or thinner. I have used these strips exactly as Ken suggests and as fuselage rear end quasi doublets. Easy to sand but more dent resistant than the balsa. You could do the same with thin fir and pine strips off a side of a 2X4

fredvon4- Top Poster
-
Posts : 4001
Join date : 2011-08-26
Age : 68
Location : Lampasas Texas
Re: Now Complete : New Build And New Hinge Technique, Pics Now Added
![]() NEW222 Tue Sep 29, 2015 9:31 pm
NEW222 Tue Sep 29, 2015 9:31 pm
NEW222- Top Poster
- Posts : 3892
Join date : 2011-08-13
Age : 45
Location : oakbank, mb
Re: Now Complete : New Build And New Hinge Technique, Pics Now Added
![]() NEW222 Tue Sep 29, 2015 9:33 pm
NEW222 Tue Sep 29, 2015 9:33 pm
NEW222- Top Poster
- Posts : 3892
Join date : 2011-08-13
Age : 45
Location : oakbank, mb
Re: Now Complete : New Build And New Hinge Technique, Pics Now Added
![]() cox24711 Wed Sep 30, 2015 5:31 am
cox24711 Wed Sep 30, 2015 5:31 am
a aussie 50 cent or 20 cents i used on my plane the same as yours rk flyer sent it to me and it flyes wellNEW222 wrote:Ok. Quick question regarding wingtip weight. The plans call for a 1" o.d. washer for wingtip weight. So I Googled washer sizes. There are 2 washers in question. The first is 15/16" o.d., and the second is 1 1/16" o.d.. So, as it is a 1/2 a plane, which would be better to pick up for the weight, assuming they are the same thickness? One site shows them as the same thickness, the other shows the smaller one at a slight bit thinner. Or would this slight difference be negligible? Also included with the plans was a note telling me that it will fly with a Babe Bee, but would haul some rear end with a Black Widow or Golden Bee. I have a Babe Bee, and Black widow that I can use, but I am really hoping that my new parts-built engine will be close to the balance point, as I am loving this engine.

cox24711- Platinum Member

- Posts : 722
Join date : 2014-01-18
Age : 21
Location : Noosa Queensland Australia
Re: Now Complete : New Build And New Hinge Technique, Pics Now Added
![]() NEW222 Wed Sep 30, 2015 4:33 pm
NEW222 Wed Sep 30, 2015 4:33 pm
NEW222- Top Poster
- Posts : 3892
Join date : 2011-08-13
Age : 45
Location : oakbank, mb
Re: Now Complete : New Build And New Hinge Technique, Pics Now Added
![]() Oldenginerod Wed Sep 30, 2015 4:58 pm
Oldenginerod Wed Sep 30, 2015 4:58 pm
Rod.

Oldenginerod- Top Poster
- Posts : 3970
Join date : 2012-06-15
Age : 61
Location : Drouin, Victoria
Re: Now Complete : New Build And New Hinge Technique, Pics Now Added
![]() NEW222 Wed Sep 30, 2015 6:45 pm
NEW222 Wed Sep 30, 2015 6:45 pm
NEW222- Top Poster
- Posts : 3892
Join date : 2011-08-13
Age : 45
Location : oakbank, mb
A Little Update
![]() NEW222 Mon Oct 12, 2015 8:40 pm
NEW222 Mon Oct 12, 2015 8:40 pm
NEW222- Top Poster
- Posts : 3892
Join date : 2011-08-13
Age : 45
Location : oakbank, mb
Re: Now Complete : New Build And New Hinge Technique, Pics Now Added
![]() Ken Cook Wed Oct 14, 2015 4:26 pm
Ken Cook Wed Oct 14, 2015 4:26 pm
Any trim should be masked off and the trim side of the tape should be painted down with an additional coat of clear prior to color. If the color is already on and your going to another color, that transition should be masked and once again the side of the tape receiving the new color should be brushed down with a line of clear to prevent bleed under the tape and it also makes a crisp line when the tape is removed. Color can be completed.
Depending on your initial prep, and the continuous sanding that you should've been doing the color coat at this point should look very smooth and shiny. Humidity has a lot to do with the overall shine but as I mentioned Sig dries the slowest and it generally doesn't blush. You can offer more fuel proof qualities and also shine to the finish if you give the model a top coat of clear. Brushing this on however doesn't always offer good results as dope instantly attacks the underlying coats. Spraying it on is the way to go. I have brushed it on, but I only thin the material enough so that when I go back into the work the brush doesn't drag. If you brush the opposing way it will remove the paint you just cleared over. It can be brushed on though but you always need to keep an extremely wet edge and your brush should be loaded with material. You can puddle the dope and brush it out, just not back and forth strokes. having a squirrel hair brush about 1" wide can yield good results. Ken
Ken Cook- Top Poster
- Posts : 5455
Join date : 2012-03-27
Location : pennsylvania
Re: Now Complete : New Build And New Hinge Technique, Pics Now Added
![]() NEW222 Fri Oct 16, 2015 6:55 pm
NEW222 Fri Oct 16, 2015 6:55 pm
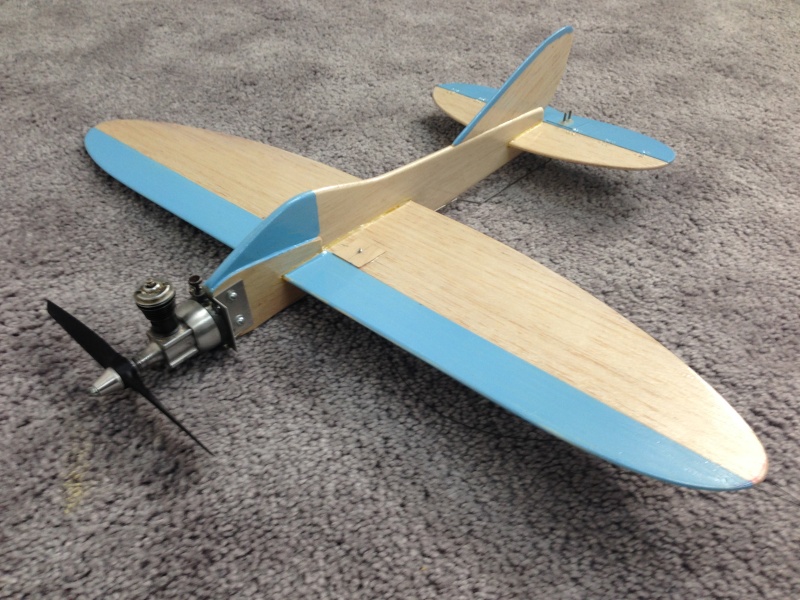
16-10-2015 : Ok. Well back from outside yet again. I took the advice of a local modeler and went out and bought a can of Minwax Polyurethane Clear today and just sprayed on a coat. I will have to let it sit and dry a bit before assembling the plane. I cannot wait to take a few pictures when it is completed. Anyways, just a little progress update.
NEW222- Top Poster
- Posts : 3892
Join date : 2011-08-13
Age : 45
Location : oakbank, mb
Re: Now Complete : New Build And New Hinge Technique, Pics Now Added
![]() getback Sat Oct 17, 2015 9:22 am
getback Sat Oct 17, 2015 9:22 am
 getback
getback- Top Poster
-
Posts : 10120
Join date : 2013-01-18
Age : 66
Location : julian , NC
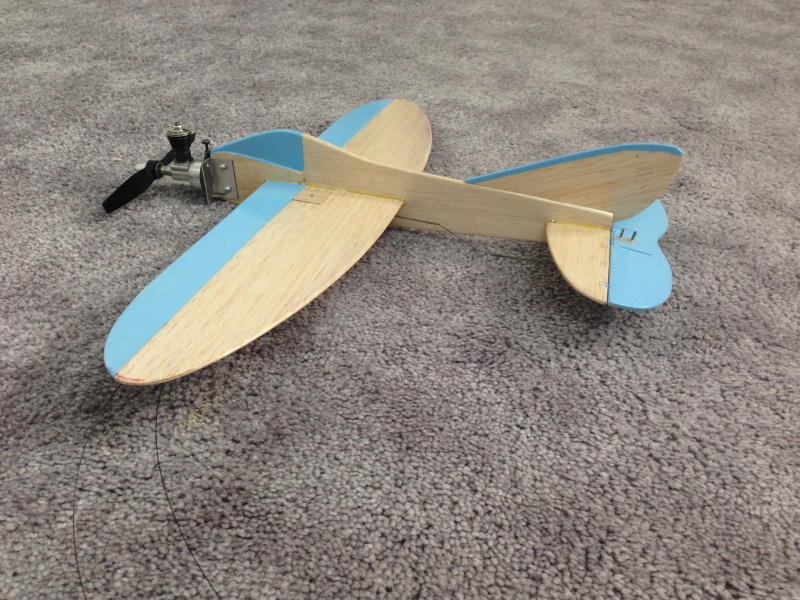
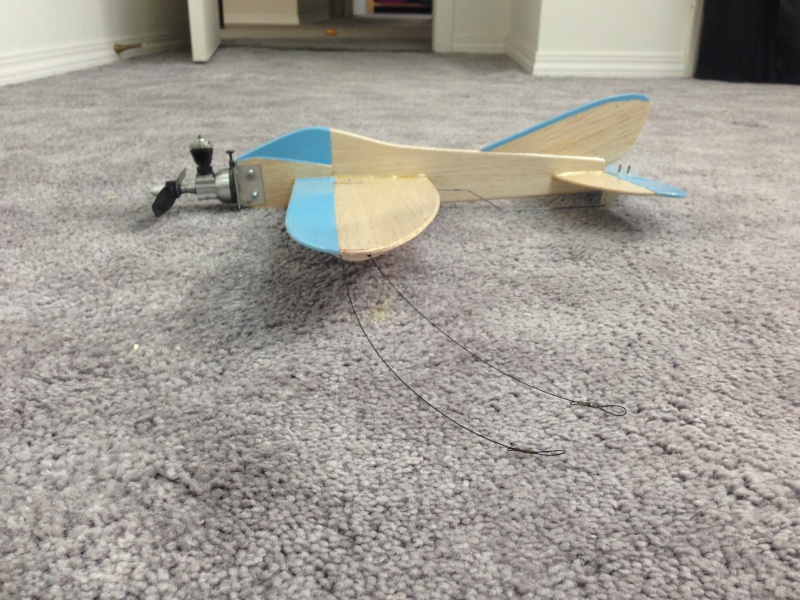
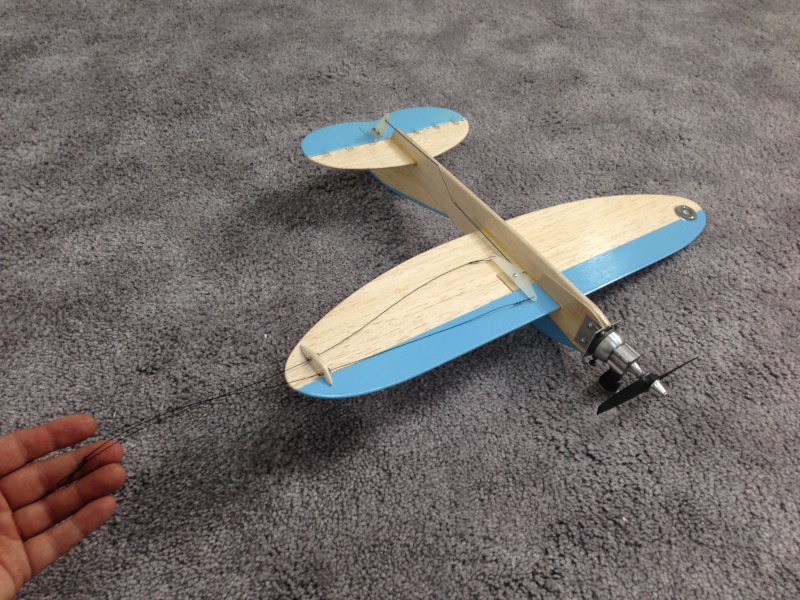
Done, finally!
![]() NEW222 Sat Oct 17, 2015 11:04 am
NEW222 Sat Oct 17, 2015 11:04 am
NEW222- Top Poster
- Posts : 3892
Join date : 2011-08-13
Age : 45
Location : oakbank, mb
Re: Now Complete : New Build And New Hinge Technique, Pics Now Added
![]() getback Sat Oct 17, 2015 1:00 pm
getback Sat Oct 17, 2015 1:00 pm

getback- Top Poster
-
Posts : 10120
Join date : 2013-01-18
Age : 66
Location : julian , NC
Sponsored content
» (Trade) "W" element glow heads (pics added)
» Cloth hinge material
» Guillows Cessna 150 build circa 1970 (Build Log)
» FF trim tab 'hinge'