

 Rules
Rules
Log in
Search
Latest topics
» Project Cox .049 r/c & Citabrian Championby rdw777 Today at 9:00 am
» Fox .35 Modifications
by rdw777 Today at 8:51 am
» Jim Walkers FireBee - This is going to be fun
by rdw777 Today at 8:30 am
» Speed plane - Crispy but not too crispy
by rsv1cox Today at 6:43 am
» Roddie-Rigger.. a 2005 original design
by rsv1cox Today at 6:23 am
» Three (only one left) Cox .020 silencers for sale.
by GallopingGhostler Today at 5:12 am
» *Cox Engine of The Month* Submit your pictures! -May 2024-
by Admin Today at 2:38 am
» Post your Older books
by lla Yesterday at 6:34 pm
» S1 Ringmaster
by Onelife Yesterday at 8:40 am
» O&R 23 & Brown Jr
by getback Yesterday at 7:47 am
» Introducing our Cox .049 TD Engines
by MauricioB Yesterday at 2:31 am
» Jim Walker Firebaby
by rdw777 Tue Apr 30, 2024 4:16 pm
Cox Engine of The Month


CEF Traveling Engine


Win This Engine!

Live on Patrol


Stuka Restoration
Page 2 of 2
Page 2 of 2 •  1, 2
1, 2
short hi jack
![]() fredvon4 Thu Feb 25, 2016 1:35 pm
fredvon4 Thu Feb 25, 2016 1:35 pm
Stuntflyr AKA Chris
you said "We built to Nats competitive Golden Bees from reading an article and following the directions!
Chris..."
Would that have been Paul Gibeault's Mouse racing engine set up recipe/hints?
If true, much discussed here over the years, and a few links still in a few threads to his recommended set up and modifications
If not true, could you remember what article

fredvon4- Top Poster


Posts : 4002
Join date : 2011-08-26
Age : 68
Location : Lampasas Texas
"Deletion fairings" and antenna detail
![]() bottomgun Sun Feb 28, 2016 9:36 pm
bottomgun Sun Feb 28, 2016 9:36 pm
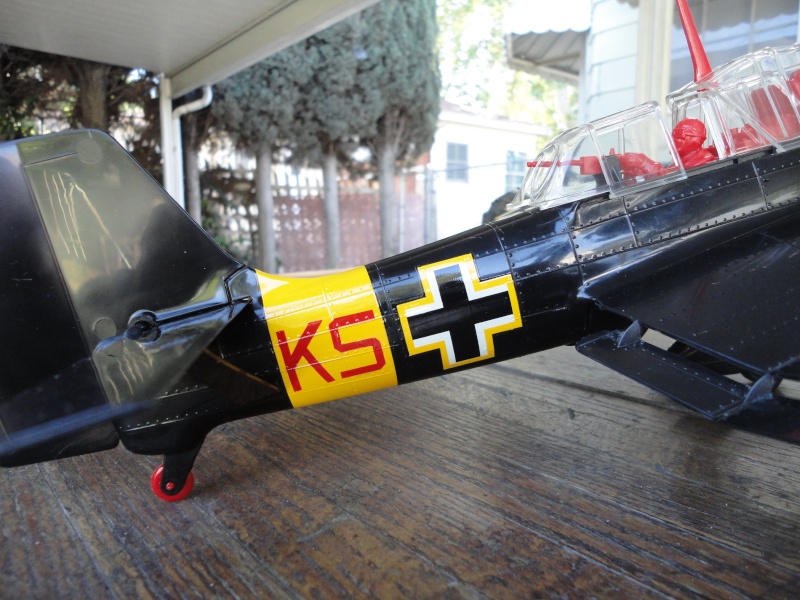
For now I went with making small fairings from the prop hubs to imitate what the crews of the real Stukas did in the field early in the war when they disabled the wing sirens. Good enough excuse to cheat for now. I can always take them off when I find better repros or originals for a decent price.

I also painted the antenna today. Since it was molded in black, a white base coat is always used, otherwise you'll be putting on unwanted extra coats of red just to bring up the color.


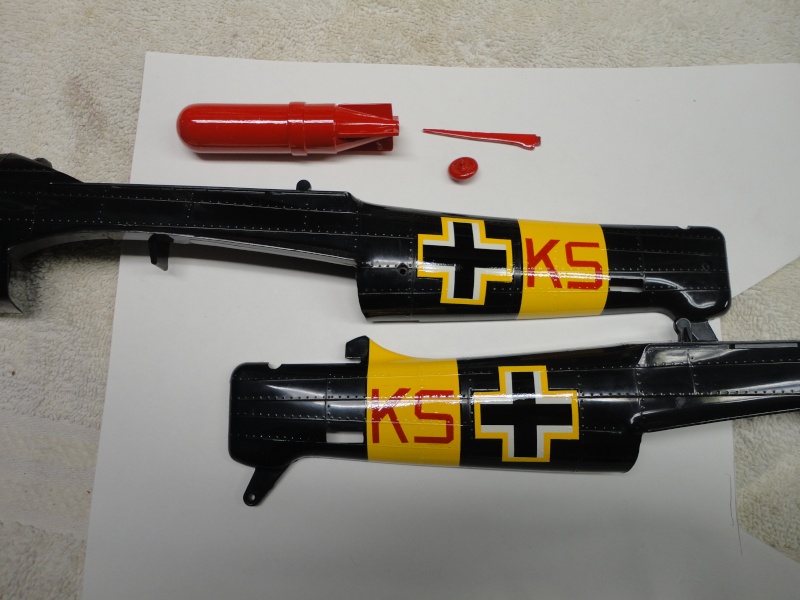
I'm having some stencils made by S&W Plastics for the red "KS" letter emblems because making them traditionally by hand proved to be a difficult task. It'll cost me about ten bucks but it will be much easier and more accurate to use since I've come this far, and I don't want to mess it up and have to start over again. Should have them by tomorrow or Tuesday. The neat thing about living in So Cal is there are many services that cater to our kind of hobby and so far every place I've gone to get supplies or services are within 15 minutes from me.

I also painted the antenna today. Since it was molded in black, a white base coat is always used, otherwise you'll be putting on unwanted extra coats of red just to bring up the color.


I'm having some stencils made by S&W Plastics for the red "KS" letter emblems because making them traditionally by hand proved to be a difficult task. It'll cost me about ten bucks but it will be much easier and more accurate to use since I've come this far, and I don't want to mess it up and have to start over again. Should have them by tomorrow or Tuesday. The neat thing about living in So Cal is there are many services that cater to our kind of hobby and so far every place I've gone to get supplies or services are within 15 minutes from me.

bottomgun- Gold Member

- Posts : 131
Join date : 2012-12-27
Age : 66
Location : Southern California
Re: Stuka Restoration
![]() stuntflyr Mon Feb 29, 2016 8:57 pm
stuntflyr Mon Feb 29, 2016 8:57 pm
fredvon4 wrote:Stuntflyr AKA Chris
you said "We built to Nats competitive Golden Bees from reading an article and following the directions!
Chris..."
Would that have been Paul Gibeault's Mouse racing engine set up recipe/hints?
If true, much discussed here over the years, and a few links still in a few threads to his recommended set up and modifications
If not true, could you remember what article
It was a guy named Morey from SoCal that was a WWII fighter pilot and big into C/L Racing in the 80's and 90's. I moved away and lost touch but may be able to find the article in storage sometime.
Chris...

stuntflyr- Gold Member
- Posts : 266
Join date : 2012-01-18
Age : 65
Location : Tucson, Arizona
More work
![]() bottomgun Fri Mar 11, 2016 3:37 pm
bottomgun Fri Mar 11, 2016 3:37 pm
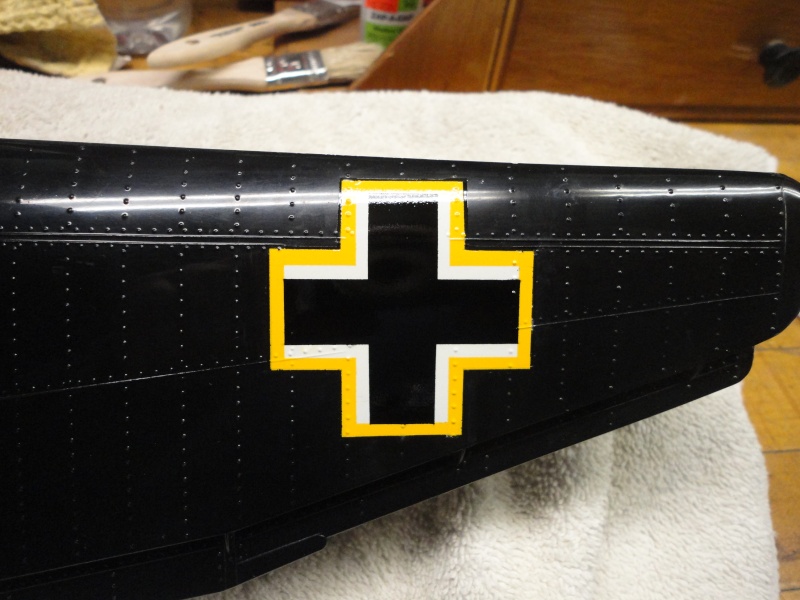
Well, I finally got the stencils made for the "KS" symbols and painted them. Unfortunately they did not work as good as my tape I normally use for preventing bleed through. When I peeled off the stencils it was a total mess. I didn't bother to take pics. I went ahead and completely stripped off the work (including crosses) on both fuse halves and started over. This time what I did was to trace out the letters from a remaining extra stencil that was provided to me and drew out the letters individually on Frog Tape. They were then cut out using (always) a fresh #11 Exacto blade and applied to the surface and painted separately as seen in the photos. It worked this time but this procedure was VERY difficult to do. Last pic shows the final black painted crosses I did this afternoon. All I need to do now is give it about three coats of Superpoxy Clear coat and I can start to assemble the plane.


bottomgun- Gold Member
- Posts : 131
Join date : 2012-12-27
Age : 66
Location : Southern California
Re: Stuka Restoration
![]() akjgardner Fri Mar 11, 2016 5:06 pm
akjgardner Fri Mar 11, 2016 5:06 pm
Very Nice. Looking foward to seeing the finished product.

akjgardner- Diamond Member


Posts : 1470
Join date : 2014-12-28
Age : 64
Location : Greensberg Indiana
Re: Stuka Restoration
![]() rsv1cox Sat Mar 12, 2016 5:31 am
rsv1cox Sat Mar 12, 2016 5:31 am
Yes, looks great. Hard work is it's own reward.
I think your using acrylics and enamels. Any problems with the Frog tape lifting? Would it work with dope?
Bob
I think your using acrylics and enamels. Any problems with the Frog tape lifting? Would it work with dope?
Bob

rsv1cox- Top Poster
-
Posts : 10578
Join date : 2014-08-18
Location : West Virginia
Re: Stuka Restoration
![]() bottomgun Sat Mar 12, 2016 9:37 pm
bottomgun Sat Mar 12, 2016 9:37 pm
I'm using Tamiya acrylic enamels. They airbrush very smoothly and dry fast. I clear coat with fuel proof epoxy clear to protect it because even Iso Alcohol will rub the finish right off if not protected. I had no problem with Frog Tape lifting paint with either acrylics or oil base enamels. I also really like using Scotch Painter's masking tape. I just used Frog tape on an electric powered old timer R/C aircraft using nitrate dope for some color trim and had no problems.
bottomgun- Gold Member
- Posts : 131
Join date : 2012-12-27
Age : 66
Location : Southern California
Clear coating finished
![]() bottomgun Mon Mar 14, 2016 9:29 pm
bottomgun Mon Mar 14, 2016 9:29 pm
I sprayed on my Superpoxy clear coat this morning on my emblems and small parts. I'll let it cure for another day and then I get to assemble this thing!
bottomgun- Gold Member
- Posts : 131
Join date : 2012-12-27
Age : 66
Location : Southern California
Stuka completed
![]() bottomgun Tue Mar 15, 2016 7:53 pm
bottomgun Tue Mar 15, 2016 7:53 pm
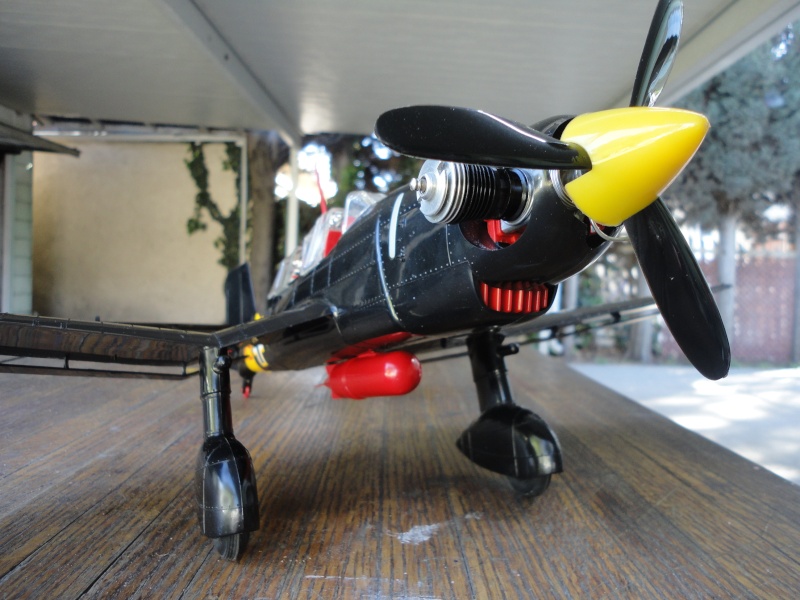
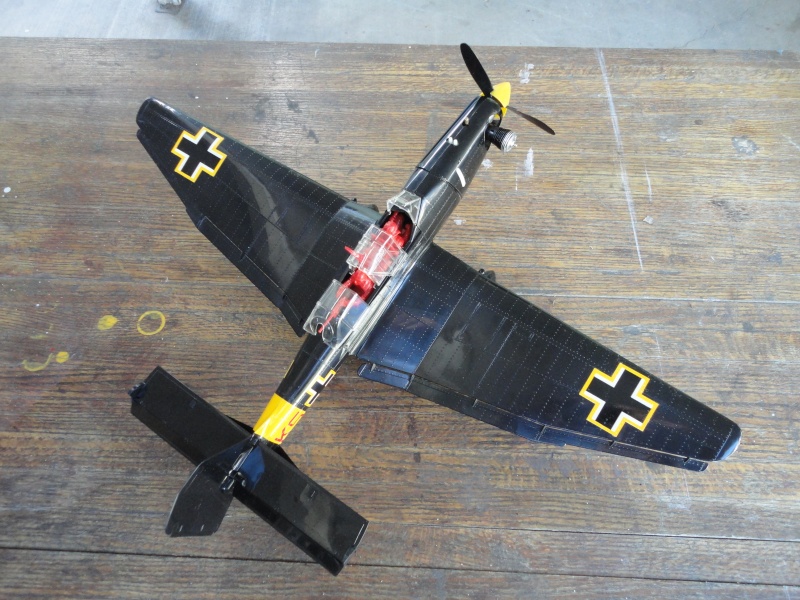
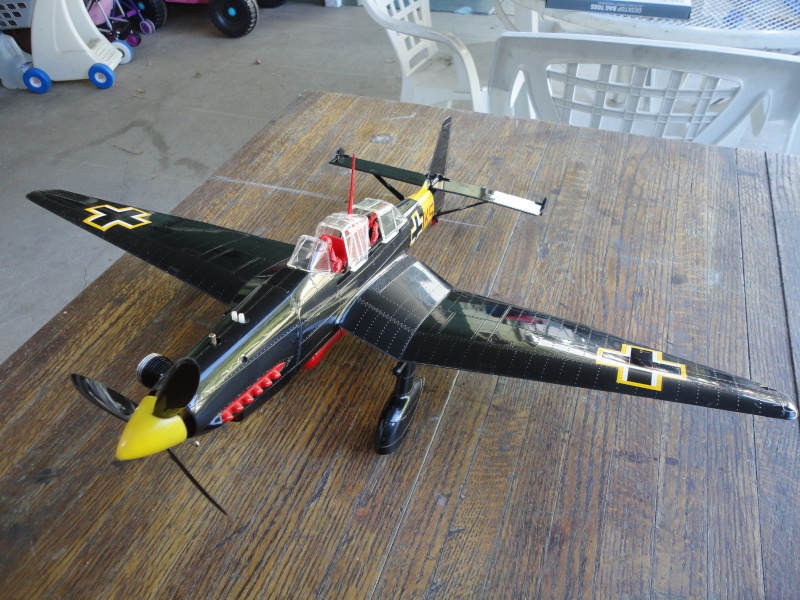
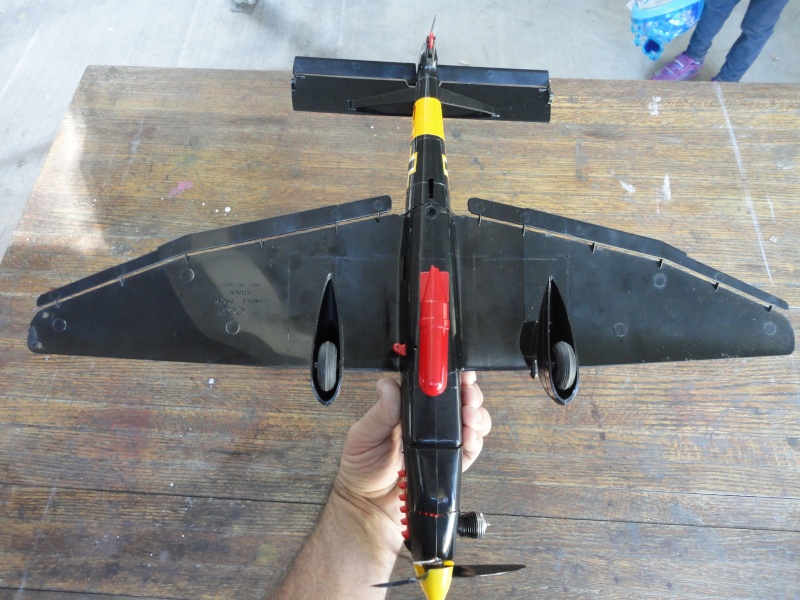
I put it together this morning. It wasn't as hard to reassemble as I thought it would be. I would say that it was a little easier than the A-25.


bottomgun- Gold Member
- Posts : 131
Join date : 2012-12-27
Age : 66
Location : Southern California
Re: Stuka Restoration
![]() Marleysky Tue Mar 15, 2016 9:33 pm
Marleysky Tue Mar 15, 2016 9:33 pm
looking good! Pictures are great, bet it looks even better up close in person! 

Marleysky- Top Poster
-
Posts : 3618
Join date : 2014-09-28
Age : 71
Location : Grand Rapids, MI
Re: Stuka Restoration
![]() Mark Boesen Tue Mar 15, 2016 11:20 pm
Mark Boesen Tue Mar 15, 2016 11:20 pm
it do look good!!!!!! so now i gotta ask, whats the next project?
Mark Boesen- Top Poster
- Posts : 3977
Join date : 2011-09-01
Age : 65
Location : Rockford, Il -

Re: Stuka Restoration
![]() getback Wed Mar 16, 2016 12:10 pm
getback Wed Mar 16, 2016 12:10 pm
FANTASTIC !! you do really nice work , and if you don't mind did your come with the canopy windshields or did ya purchase them ? I COULD STAND A SET . Thanks ,  Eric
Eric
Eric 
getback- Top Poster
-
Posts : 10127
Join date : 2013-01-18
Age : 66
Location : julian , NC
Re: Stuka Restoration
![]() bottomgun Wed Mar 16, 2016 1:08 pm
bottomgun Wed Mar 16, 2016 1:08 pm
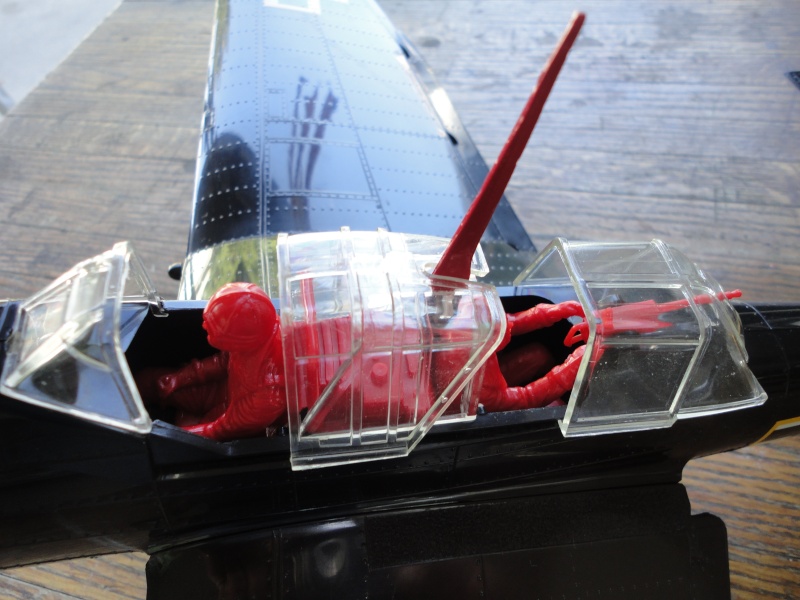
Thanks for the compliments all! The canopy pieces are the original ones that came with the plane. Only things that I purchased that were missing were the antenna, bomb, and poorly made wing props that were not worth the price. I might consider flying this one but again, with all the work involved it would most likely be a show piece.
Unless I get another project plane, and I probably will, the next project coming up would be this:
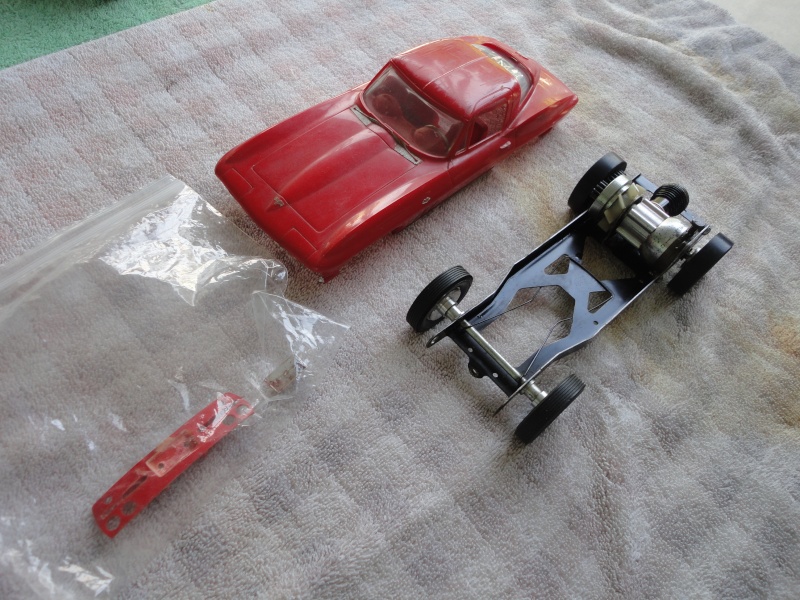
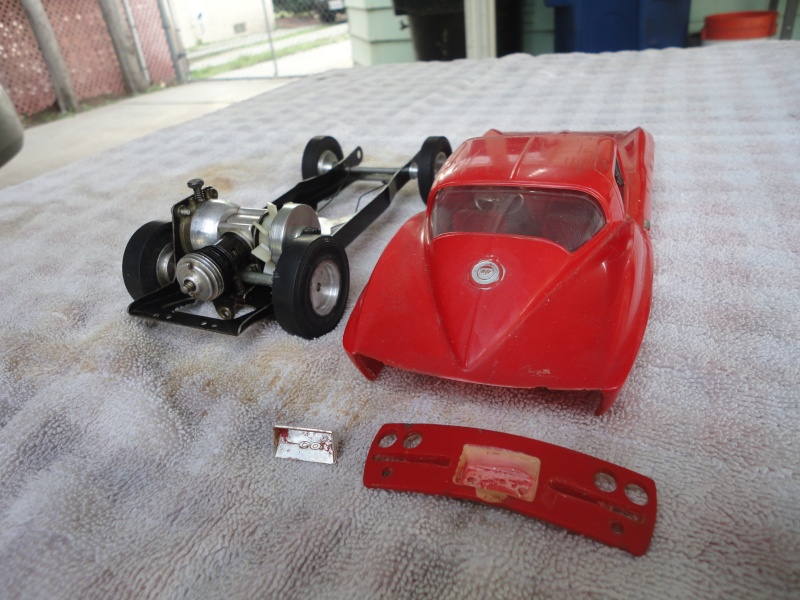
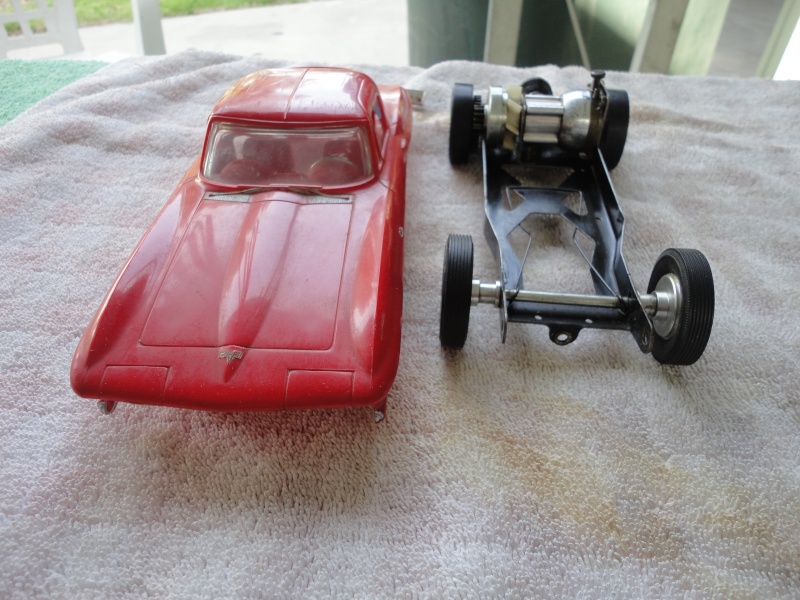
This will be a departure from what I normally do but it's a good challenge. I already went through the motor and fired it up recently to test it and it works fine. I have an NOS tether bracket for it for circle runs. The rear valance is there but the front valance and all external chrome except the rear license plate is missing. Very hard to find separate parts and usually the only way is to purchase a second car which are no longer cheap, at least out here. Both rear body clips where they snap onto the chassis are broken off which is common. I can rebuild those with no problem. The front brackets are complete and unbroken which is good. I'm thinking of buying a 1/18th scale Corvette by Maisto or any decent maker within this size and grafting the parts onto this one. I'm open to any suggestions on this build!
Unless I get another project plane, and I probably will, the next project coming up would be this:
This will be a departure from what I normally do but it's a good challenge. I already went through the motor and fired it up recently to test it and it works fine. I have an NOS tether bracket for it for circle runs. The rear valance is there but the front valance and all external chrome except the rear license plate is missing. Very hard to find separate parts and usually the only way is to purchase a second car which are no longer cheap, at least out here. Both rear body clips where they snap onto the chassis are broken off which is common. I can rebuild those with no problem. The front brackets are complete and unbroken which is good. I'm thinking of buying a 1/18th scale Corvette by Maisto or any decent maker within this size and grafting the parts onto this one. I'm open to any suggestions on this build!
bottomgun- Gold Member
- Posts : 131
Join date : 2012-12-27
Age : 66
Location : Southern California
akjgardner- Diamond Member
-
Posts : 1470
Join date : 2014-12-28
Age : 64
Location : Greensberg Indiana
Re: Stuka Restoration
![]() OVERLORD Wed Mar 16, 2016 1:46 pm
OVERLORD Wed Mar 16, 2016 1:46 pm
akjgardner wrote:Nice Job on both of them
It is definitely. I admire your paint job on the Stuka. I'm sure the Corvette will be as beautiful when finished!!
Is there room for a heat sink?

OVERLORD- Diamond Member
- Posts : 1789
Join date : 2013-03-19
Age : 57
Location : Normandy, France
Re: Stuka Restoration
![]() bottomgun Wed Mar 16, 2016 2:13 pm
bottomgun Wed Mar 16, 2016 2:13 pm
There may be room for a small aftermarket heat sink although it would be a real challenge to clear the body clip brackets. I know that when running these it is best to get it going and turn it loose or some overheating could quickly ensue.
bottomgun- Gold Member
- Posts : 131
Join date : 2012-12-27
Age : 66
Location : Southern California
Page 2 of 2 • 1, 2
» Bob V’s Next car restoration
» Bee Restoration
» box restoration
» Engine Restoration
» covid 19 restoration
» Bee Restoration
» box restoration
» Engine Restoration
» covid 19 restoration
Page 2 of 2
Permissions in this forum:
You cannot reply to topics in this forum