

 Rules
Rules
Log in
Search
Latest topics
» Simple Glidersby getback Today at 7:13 am
» Cox PT-19 Wing
by getback Today at 6:24 am
» Foam hand kids glider converted to 0.049 CL
by getback Today at 6:23 am
» Roddie-Rigger.. a 2005 original design
by getback Today at 6:17 am
» Golden Bee basic running problem
by roddie Yesterday at 10:51 pm
» Weird search for a single comic from an old Mad Magazine
by Kim Yesterday at 1:44 pm
» Scientific "Zipper" Build...Zipper Flys!.
by getback Yesterday at 7:27 am
» Cox .049 Tee Dee engines back in stock (limited availablility)
by GallopingGhostler Yesterday at 1:05 am
» Very off-topic.........Time passes and not always for the best......
by rsv1cox Thu Jul 25, 2024 2:47 pm
» Jim Walker Bonanza etc.
by rsv1cox Wed Jul 24, 2024 6:30 pm
» Throttles for Cox Tee Dee .049 / .020 / .010 engines --- videos
by sosam117 Wed Jul 24, 2024 8:54 am
» Introducing our Cox .049 TD Engines
by Admin Tue Jul 23, 2024 2:00 am
Cox Engine of The Month
July-2024
robot797's
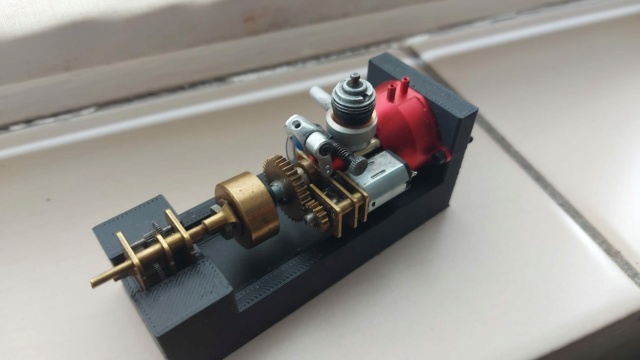
"ULTIMITE COX 010: it has a clutch, E starter, throttle, exhaust, aluminum tank, aluminum venturi, gearbox with forward and reverse, and now its on a custom drawn and printed stand"

PAST WINNERS
robot797's
"ULTIMITE COX 010: it has a clutch, E starter, throttle, exhaust, aluminum tank, aluminum venturi, gearbox with forward and reverse, and now its on a custom drawn and printed stand"
PAST WINNERS
CEF Traveling Engine


Win This Engine!

Live on Patrol


testors mccoy repair project
Page 1 of 1

testors mccoy repair project
![]() chevyiron420 Fri Oct 13, 2017 11:33 pm
chevyiron420 Fri Oct 13, 2017 11:33 pm
After reading the other threads here I got motivated to fix two engines I have with broken cranks. Both engines cranks were heat colored where they broke, but the shaft wasnt tight. To me it looked like a lack of lube. I noticed there is no lube groove in the thrust face in the case. It looks to me that when the shaft is pulled forward under thrust no oil could get in there.
Phil

Phil


chevyiron420- Gold Member

- Posts : 251
Join date : 2015-01-28
Age : 66
Location : Barney Georgia
Re: testors mccoy repair project
![]() roddie Sat Oct 14, 2017 12:03 pm
roddie Sat Oct 14, 2017 12:03 pm
Hey Phil, Maybe a small (as in very small..) V-notch/relief at the top of the face would be enough to get some oil in there? A triangular jewelers-file or very-fine small square-file would do it. Lap it in with some rouge using the replacement crank and flush everything out completely with solvent afterward.

roddie- Top Poster

-
Posts : 8461
Join date : 2013-07-17
Age : 64
Location : N. Smithfield, Rhode Island -

Re: testors mccoy repair project
![]() fredvon4 Sat Oct 14, 2017 2:32 pm
fredvon4 Sat Oct 14, 2017 2:32 pm
I have absolutely zero experience with ANY Testors 1/2a engine
But I do remember well that as youngsters we had no earthy idea about fuel or oil content
I have oft wondered how many we burned up just cus the hobby shoppe had the high nitro stuff and we did not know better
perhaps the Testors could benefit from a oil ingress slot of some sort...but I really bet just running the correct fuel oil combo works as designed

fredvon4- Top Poster

Posts : 4004
Join date : 2011-08-26
Age : 69
Location : Lampasas Texas
Re: testors mccoy repair project
![]() chevyiron420 Sat Nov 18, 2017 10:04 pm
chevyiron420 Sat Nov 18, 2017 10:04 pm
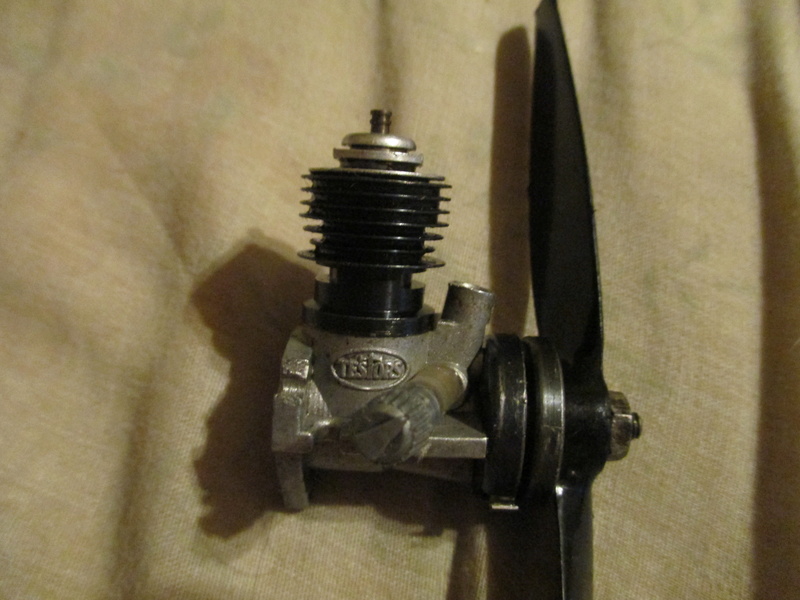
Just a small update on the testors engine rebuild. I have been working on it, and have it assembled. I have replaced the crank, prop drive, back plate, cylinder\piston combo. I have been quiet about it cause its giving me trouble getting the performance and consistency out of it. I will post more as I figure it out.
Phil

Phil


chevyiron420- Gold Member
- Posts : 251
Join date : 2015-01-28
Age : 66
Location : Barney Georgia
Re: testors mccoy repair project
![]() Ken Cook Sun Nov 19, 2017 3:15 am
Ken Cook Sun Nov 19, 2017 3:15 am
Phil, the discoloration as you mention is more than likely not a result of overheating but a result of hardening. I've seen this on many of these cranks and seeing that a mild steel is used, this is a result of case hardening. The color is used as a indicator during heat treating. You can't fully harden mild steel but you can make it very brittle which is typically what is noted with these engines. Any small engine is going to result in poor performance if there's a bind. In my opinion, if the shaft wasn't getting oil or lack of, it's going to seize. If your experiencing problems as a result of it being tight, is it a result of you replacing the crank with another? If so, polish up the crank a bit. If you have access to a drill press, you can chuck up the prop end and polish using fine paper, starting with 400 and some oil. Spend a bit more time at the intersection where the crank web meets the shaft and avoid putting a radius at the crank window. Once cleaned up check the smoothness and fit in the case. If needed, a little aluminum polish with the crank in the case might be needed. I like to touch the inner face of the shaft hole on the inside of the case with a countersink to reduce a bit of drag when the crank is seated. I use a Weldon countersink rather than a fluted countersink, due to it leaving a nice chatter free surface.
Do you have additional engines to compare rpm numbers with? I would certainly lap the glow plug flat which will not only flatten the seat, it will raise compression slightly. Do this with a piece of sandpaper on glass and use a rotating motion keeping the plug flat. I would also do this to the front of the crankcase to prevent any drag there as well. The head gaskets of these engine were typically aluminum as well and they don't generally fair well if repeatedly tightened. Piston fit is equally as important. I fabricate a high tech tool to lap the piston. This is a piece of tubing with masking tape wrapped around the top of it. I press the piston onto the tape making sure it fits snug over the tape. You can insert the piston upside down into the cylinder and using metal polish, twirl the tubing while moving the piston up and down. Don't bring the skirt up high in the cylinder bore . Keep the bottom of the piston skirt no higher than the exhaust port and spend a bit of time here relieving the lower portion of the cylinder. At this point, I like to run a Davis Diesel bore brush up and down in the cylinder. This will improve rpm's by reducing drag down low. Clean the parts in hot soapy water , dry and reassemble.
Do you have additional engines to compare rpm numbers with? I would certainly lap the glow plug flat which will not only flatten the seat, it will raise compression slightly. Do this with a piece of sandpaper on glass and use a rotating motion keeping the plug flat. I would also do this to the front of the crankcase to prevent any drag there as well. The head gaskets of these engine were typically aluminum as well and they don't generally fair well if repeatedly tightened. Piston fit is equally as important. I fabricate a high tech tool to lap the piston. This is a piece of tubing with masking tape wrapped around the top of it. I press the piston onto the tape making sure it fits snug over the tape. You can insert the piston upside down into the cylinder and using metal polish, twirl the tubing while moving the piston up and down. Don't bring the skirt up high in the cylinder bore . Keep the bottom of the piston skirt no higher than the exhaust port and spend a bit of time here relieving the lower portion of the cylinder. At this point, I like to run a Davis Diesel bore brush up and down in the cylinder. This will improve rpm's by reducing drag down low. Clean the parts in hot soapy water , dry and reassemble.

Ken Cook- Top Poster
- Posts : 5542
Join date : 2012-03-27
Location : pennsylvania
Re: testors mccoy repair project
![]() Oldenginerod Sun Nov 19, 2017 4:35 am
Oldenginerod Sun Nov 19, 2017 4:35 am
Just make sure you have the correct head/gasket set-up. As Ken mentioned, they use a thick aluminium gasket on some heads, but there are some heads which use no gasket at all. A ridge on the alloy head seats directly in the cylinder. If you have used a gasket with a head designed to run without a gasket then you will be way down on compression.
Rod.
Rod.

Oldenginerod- Top Poster
- Posts : 3985
Join date : 2012-06-15
Age : 61
Location : Drouin, Victoria
Re: testors mccoy repair project
![]() getback Sun Nov 19, 2017 7:24 am
getback Sun Nov 19, 2017 7:24 am
Hey Phil , is that new back plate replacement BENT or distorted ? from the look of the Pic. , it may bee dragging on the CS con rod . Or i am not seeing it right ? 

getback- Top Poster
-

Posts : 10280
Join date : 2013-01-18
Age : 66
Location : julian , NC
Re: testors mccoy repair project
![]() chevyiron420 Sun Nov 19, 2017 5:16 pm
chevyiron420 Sun Nov 19, 2017 5:16 pm
Im gonna post a video of it running in another thread.
chevyiron420- Gold Member
- Posts : 251
Join date : 2015-01-28
Age : 66
Location : Barney Georgia
Re: testors mccoy repair project
![]() chevyiron420 Sun Nov 19, 2017 5:55 pm
chevyiron420 Sun Nov 19, 2017 5:55 pm
Ken Cook wrote: Phil, the discoloration as you mention is more than likely not a result of overheating but a result of hardening. I've seen this on many of these cranks and seeing that a mild steel is used, this is a result of case hardening. The color is used as a indicator during heat treating. You can't fully harden mild steel but you can make it very brittle which is typically what is noted with these engines. Any small engine is going to result in poor performance if there's a bind. In my opinion, if the shaft wasn't getting oil or lack of, it's going to seize. If your experiencing problems as a result of it being tight, is it a result of you replacing the crank with another? If so, polish up the crank a bit. If you have access to a drill press, you can chuck up the prop end and polish using fine paper, starting with 400 and some oil. Spend a bit more time at the intersection where the crank web meets the shaft and avoid putting a radius at the crank window. Once cleaned up check the smoothness and fit in the case. If needed, a little aluminum polish with the crank in the case might be needed. I like to touch the inner face of the shaft hole on the inside of the case with a countersink to reduce a bit of drag when the crank is seated. I use a Weldon countersink rather than a fluted countersink, due to it leaving a nice chatter free surface.
Do you have additional engines to compare rpm numbers with? I would certainly lap the glow plug flat which will not only flatten the seat, it will raise compression slightly. Do this with a piece of sandpaper on glass and use a rotating motion keeping the plug flat. I would also do this to the front of the crankcase to prevent any drag there as well. The head gaskets of these engine were typically aluminum as well and they don't generally fair well if repeatedly tightened. Piston fit is equally as important. I fabricate a high tech tool to lap the piston. This is a piece of tubing with masking tape wrapped around the top of it. I press the piston onto the tape making sure it fits snug over the tape. You can insert the piston upside down into the cylinder and using metal polish, twirl the tubing while moving the piston up and down. Don't bring the skirt up high in the cylinder bore . Keep the bottom of the piston skirt no higher than the exhaust port and spend a bit of time here relieving the lower portion of the cylinder. At this point, I like to run a Davis Diesel bore brush up and down in the cylinder. This will improve rpm's by reducing drag down low. Clean the parts in hot soapy water , dry and reassemble.
Thanks for the input Ken. I have been over this thing three times now. I had some shaft end play issues at first due to a defective prop drive hub\clutch, but it has plenty of shaft clearance. The piston fit may have been a little snug at first. I think most of the problem now is the worlds worst NVA. It does run a bit better on 20% nitro, but does not equal the performance of my other engines. I mounted up one of my other engines yesterday with the same fuel and prop. It needled easily and quickly right to 15250 rpm and stayed there for the whole run. That engine has always been like that though. I like to see about 14500 rpm and as steady as I can get, with my 10% fuel and 6x3 cox prop.
chevyiron420- Gold Member
- Posts : 251
Join date : 2015-01-28
Age : 66
Location : Barney Georgia
Re: testors mccoy repair project
![]() chevyiron420 Sun Nov 19, 2017 6:02 pm
chevyiron420 Sun Nov 19, 2017 6:02 pm
Eric, its just the bad side lighting in here making it look warped. its good.getback wrote:Hey Phil , is that new back plate replacement BENT or distorted ? from the look of the Pic. , it may bee dragging on the CS con rod . Or i am not seeing it right ?
Phil
chevyiron420- Gold Member
- Posts : 251
Join date : 2015-01-28
Age : 66
Location : Barney Georgia
Re: testors mccoy repair project
![]() chevyiron420 Sun Nov 19, 2017 6:06 pm
chevyiron420 Sun Nov 19, 2017 6:06 pm
Rod, you are right about the different glow head set ups. Most of my glow heads are from pipe bomb engines I bought from testors, and use the thick gasket. They are also faster than the older style.Oldenginerod wrote:Just make sure you have the correct head/gasket set-up. As Ken mentioned, they use a thick aluminium gasket on some heads, but there are some heads which use no gasket at all. A ridge on the alloy head seats directly in the cylinder. If you have used a gasket with a head designed to run without a gasket then you will be way down on compression.
Rod.
Phil
chevyiron420- Gold Member
- Posts : 251
Join date : 2015-01-28
Age : 66
Location : Barney Georgia
Re: testors mccoy repair project
![]() Oldenginerod Mon Nov 20, 2017 3:16 am
Oldenginerod Mon Nov 20, 2017 3:16 am
Phil. You're definitely going to need more nitro than 10%. My new Testors P-40 I got as a kid ran a couple of times on the small amount of fuel supplied but never started again for years until I discovered Cox 25% nitro fuel. I'd been trying 5% which I was using in larger engines with absolutely no luck. Not even a pop. I'd be trying a hotter brew. I'll make comment on the engine run video in that thread.
Rod.
Rod.
Oldenginerod- Top Poster
- Posts : 3985
Join date : 2012-06-15
Age : 61
Location : Drouin, Victoria
Wen-Mac/Testors radial mount
![]() roddie Fri Nov 24, 2017 8:04 pm
roddie Fri Nov 24, 2017 8:04 pm
Just thought I'd throw this out there. My Wen-Mac Mark XI engine's case had one radial-mount which was not drilled-through. The correct size drill is a #40 (.098") drill to "chase" the hole.
before drilling..

after drilling..

I intend to run this engine.. and also the Testors/McCoy variant that I rebuilt recently. For simplicity-sake; I plan to mount them radially to a block of hardwood.
before drilling..

after drilling..

I intend to run this engine.. and also the Testors/McCoy variant that I rebuilt recently. For simplicity-sake; I plan to mount them radially to a block of hardwood.
roddie- Top Poster
-
Posts : 8461
Join date : 2013-07-17
Age : 64
Location : N. Smithfield, Rhode Island -
Re: testors mccoy repair project
![]() roddie Fri Nov 24, 2017 9:09 pm
roddie Fri Nov 24, 2017 9:09 pm
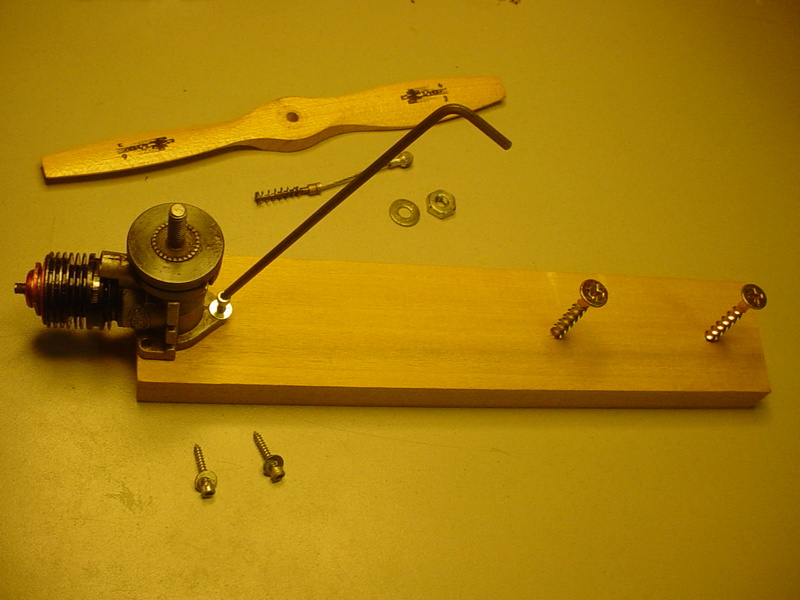
okay.. I said that I planned to mount the engine(s)... so I made-up a mount tonight.
This is my Wen-Mac/Testors (rotary-valve) .049 bench-mount.. or should I say "deck-post" mount.. I haven't worked-out the fuel-tank mounting yet.. but I'll come up with something..

It's good and sturdy.. screwed into a block of Poplar. The "Testors/McCoy engine is mounted.. but I'll probably run the Wen-Mac Mark XI first. I want to find a better fitting piston-rod for the Testors engine. I have a Testors "Pipe-Bomb" (reed-valve) engine soaking in penetrant.. in an effort to free it up, so I can check the "play" in its conrod. Then it's a question of the best piston/cylinder fit. These engines are new to me. Aluminum head-gaskets.. different cylinders.. I'm not sure.. but I don't think that "any" of the cylinders had any sort of special-porting like the Cox cylinders.. "let alone" sub-port induction..
  Has anyone heard of any "hop-ups" for these engines? Removing material from the bottom of the piston-skirts.. etc.?
This is my Wen-Mac/Testors (rotary-valve) .049 bench-mount.. or should I say "deck-post" mount..


It's good and sturdy.. screwed into a block of Poplar. The "Testors/McCoy engine is mounted.. but I'll probably run the Wen-Mac Mark XI first. I want to find a better fitting piston-rod for the Testors engine. I have a Testors "Pipe-Bomb" (reed-valve) engine soaking in penetrant.. in an effort to free it up, so I can check the "play" in its conrod. Then it's a question of the best piston/cylinder fit.
These engines are new to me. Aluminum head-gaskets.. different cylinders.. I'm not sure.. but I don't think that "any" of the cylinders had any sort of special-porting like the Cox cylinders.. "let alone" sub-port induction..
roddie- Top Poster
-
Posts : 8461
Join date : 2013-07-17
Age : 64
Location : N. Smithfield, Rhode Island -
Re: testors mccoy repair project
![]() Oldenginerod Fri Nov 24, 2017 11:58 pm
Oldenginerod Fri Nov 24, 2017 11:58 pm
It was common for the WenMac/Testors engines to have undrilled radial mounts. These engines were generally used in RTF models and rarely were mounted radially in earlier versions. Many WenMacs had one (left hand I think) mounting hold drilled oversize to pass the fuel line through, using it as a support bracket.
Piston to rod fit was extremely variable in these engines. Some had heaps, some had little. They can't be swaged to tighten the joint like a Cox. That's why I went through my assortment for Phil, finding him the tightest joint I had.
The porting in these cylinders is quite substantial, although are only a single cut either side, having no "additional" boost flutes like some Cox. In comparison to an equivalent Cox cylinder (No. 1) the bypass ports were much deeper. I've never looked into the possibility of SPI on one of these, but I think trying to hop one up would be a waste of time as you would probably break a crank/rod. They are generally pretty reliable in standard form but have very little margin-of-error.
Oldenginerod- Top Poster
- Posts : 3985
Join date : 2012-06-15
Age : 61
Location : Drouin, Victoria
» McCoy BabyMac Tank Repair
» Testors/McCoy Spraybar ID
» Testors/McCoy Spraybar ID
» testors mccoy 049 cylinders
» 1972 Testors McCoy .29 and .40
» Testors/McCoy Spraybar ID
» Testors/McCoy Spraybar ID
» testors mccoy 049 cylinders
» 1972 Testors McCoy .29 and .40
Page 1 of 1
Permissions in this forum:
You cannot reply to topics in this forum