

 Rules
Rules
Log in
Search
Latest topics
» Roddie-Rigger.. a 2005 original designby getback Today at 6:17 am
» Foam hand kids glider converted to 0.049 CL
by roddie Today at 4:33 am
» Cox PT-19 Wing
by latole Today at 4:28 am
» Golden Bee basic running problem
by roddie Yesterday at 10:51 pm
» Simple Gliders
by rdw777 Yesterday at 6:25 pm
» Weird search for a single comic from an old Mad Magazine
by Kim Yesterday at 1:44 pm
» Scientific "Zipper" Build...Zipper Flys!.
by getback Yesterday at 7:27 am
» Cox .049 Tee Dee engines back in stock (limited availablility)
by GallopingGhostler Yesterday at 1:05 am
» Very off-topic.........Time passes and not always for the best......
by rsv1cox Thu Jul 25, 2024 2:47 pm
» Jim Walker Bonanza etc.
by rsv1cox Wed Jul 24, 2024 6:30 pm
» Throttles for Cox Tee Dee .049 / .020 / .010 engines --- videos
by sosam117 Wed Jul 24, 2024 8:54 am
» Introducing our Cox .049 TD Engines
by Admin Tue Jul 23, 2024 2:00 am
Cox Engine of The Month
July-2024
robot797's
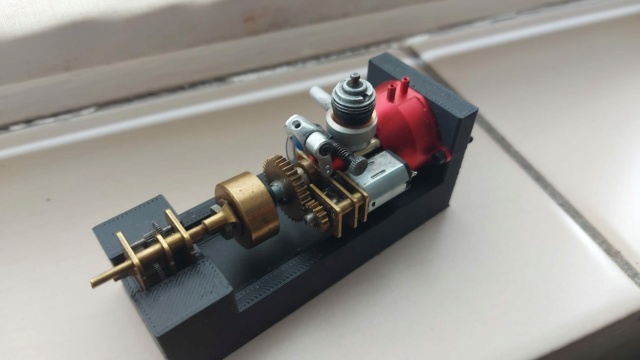
"ULTIMITE COX 010: it has a clutch, E starter, throttle, exhaust, aluminum tank, aluminum venturi, gearbox with forward and reverse, and now its on a custom drawn and printed stand"

PAST WINNERS
robot797's
"ULTIMITE COX 010: it has a clutch, E starter, throttle, exhaust, aluminum tank, aluminum venturi, gearbox with forward and reverse, and now its on a custom drawn and printed stand"
PAST WINNERS
CEF Traveling Engine


Win This Engine!

Live on Patrol


More KK Radians
Page 1 of 1

More KK Radians
![]() ian1954 Tue Jan 21, 2020 2:30 pm
ian1954 Tue Jan 21, 2020 2:30 pm
As mentioned in a previous post
https://www.coxengineforum.com/t13198-kk-radian
I got hold of two more Radian kits - one an original Keil Kraft and the other a Belair laser cut kit.
The KK Radian + (with electrickery) flies really smoothly and had so much pull on 35ft lines that my clubmates suggested increasing to 42ft lines. ALmost consistently wet and windy weather coinciding with available flying days have prevented me trying this but the Radian is definitely one of my favorite planes.
My original Radian flew on 7ft lines (yes 7ft) with a Cox Medallion/Hiscott combination. Even with the additional weight of battery, receiver and 4 servos - it flew and left the ground with aplomb.
Back to the new builds - one will have a PAW engine and the other a Cox.
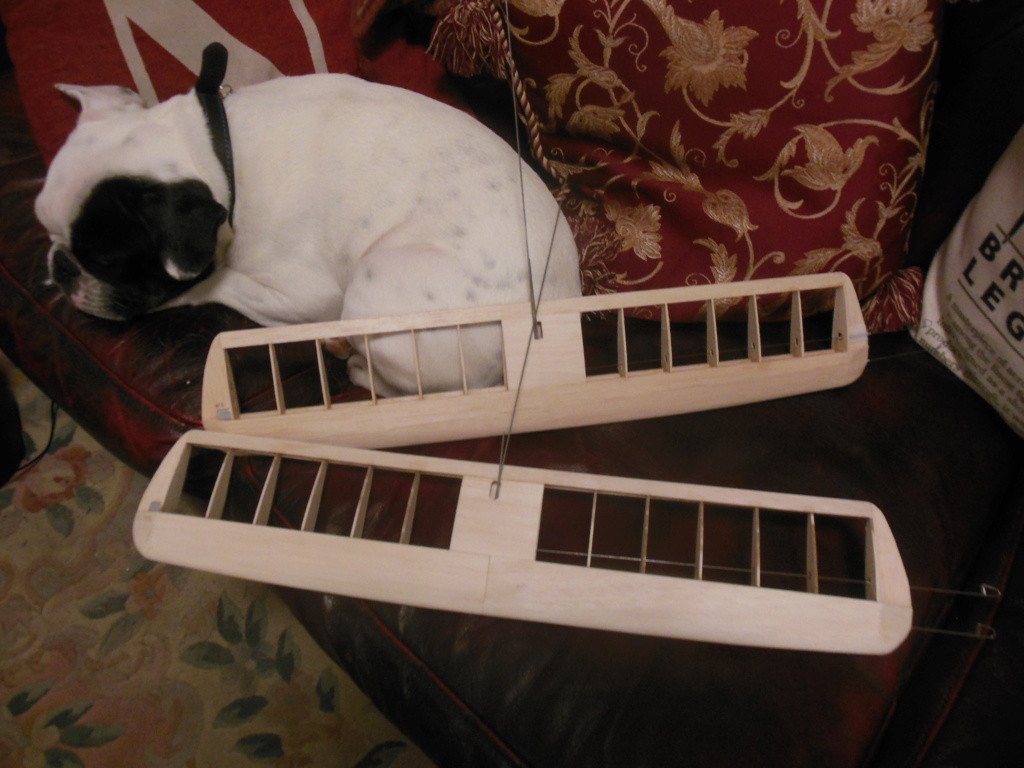

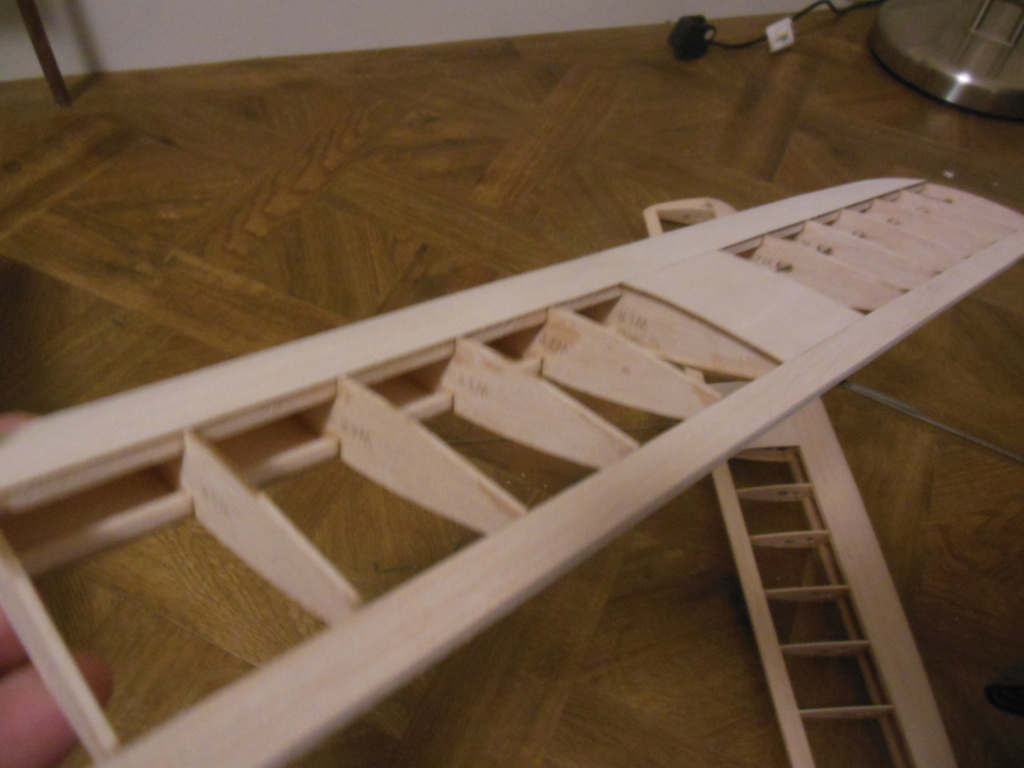

I really like these wings they are light and very strong.
https://www.coxengineforum.com/t13198-kk-radian
I got hold of two more Radian kits - one an original Keil Kraft and the other a Belair laser cut kit.
The KK Radian + (with electrickery) flies really smoothly and had so much pull on 35ft lines that my clubmates suggested increasing to 42ft lines. ALmost consistently wet and windy weather coinciding with available flying days have prevented me trying this but the Radian is definitely one of my favorite planes.
My original Radian flew on 7ft lines (yes 7ft) with a Cox Medallion/Hiscott combination. Even with the additional weight of battery, receiver and 4 servos - it flew and left the ground with aplomb.

Back to the new builds - one will have a PAW engine and the other a Cox.


I really like these wings they are light and very strong.

ian1954- Diamond Member

- Posts : 2688
Join date : 2011-11-16
Age : 69
Location : England
Re: More KK Radians
![]() 944_Jim Tue Jan 21, 2020 6:34 pm
944_Jim Tue Jan 21, 2020 6:34 pm
Is this the $70 kit advertised on eBay, or the one advertised on FaceBook from Canada?
I like it a lot,.and plan one building one once I thin down my "to be build."
I like it a lot,.and plan one building one once I thin down my "to be build."
944_Jim- Diamond Member


Posts : 2000
Join date : 2017-02-08
Age : 59
Location : NE MS
Re: More KK Radians
![]() ian1954 Tue Jan 21, 2020 6:40 pm
ian1954 Tue Jan 21, 2020 6:40 pm
944_Jim wrote:Is this the $70 kit advertised on eBay, or the one advertised on FaceBook from Canada?
I like it a lot,.and plan one building one once I thin down my "to be build."
Latest source
https://www.vintagemodelcompany.com/kk-radian.html
ian1954- Diamond Member
- Posts : 2688
Join date : 2011-11-16
Age : 69
Location : England
Re: More KK Radians
![]() 944_Jim Tue Jan 21, 2020 7:18 pm
944_Jim Tue Jan 21, 2020 7:18 pm
Thanks for the heads-up.
Good for Stan! This has to be a new addition to his line...I didn't see it at Christmas-time. His kits are supposed to be really nice.
Good for Stan! This has to be a new addition to his line...I didn't see it at Christmas-time. His kits are supposed to be really nice.
944_Jim- Diamond Member
-
Posts : 2000
Join date : 2017-02-08
Age : 59
Location : NE MS
Re: More KK Radians
![]() dirk gently Wed Jan 22, 2020 3:59 am
dirk gently Wed Jan 22, 2020 3:59 am
ian1954 wrote:As mentioned in a previous post
Back to the new builds - one will have a PAW engine and the other a Cox.
It looks like it even has four paws!

dirk gently- Gold Member

- Posts : 430
Join date : 2012-02-03
Age : 41
Location : Poznań
Re: More KK Radians
![]() getback Wed Jan 22, 2020 9:22 am
getback Wed Jan 22, 2020 9:22 am
I agree those are some strong looking wings , good job Ian . 

getback- Top Poster

-
Posts : 10277
Join date : 2013-01-18
Age : 66
Location : julian , NC
Re: More KK Radians
![]() ian1954 Wed Jan 22, 2020 10:45 am
ian1954 Wed Jan 22, 2020 10:45 am
dirk gently wrote:ian1954 wrote:As mentioned in a previous post
Back to the new builds - one will have a PAW engine and the other a Cox.
It looks like it even has four paws!
I had rested the wings against the cushion and then went to find the camera. When I returned, my little prodigious gas passer had decided to rearrange them.
ian1954- Diamond Member
- Posts : 2688
Join date : 2011-11-16
Age : 69
Location : England
Re: More KK Radians
![]() ian1954 Wed Jan 22, 2020 11:00 am
ian1954 Wed Jan 22, 2020 11:00 am
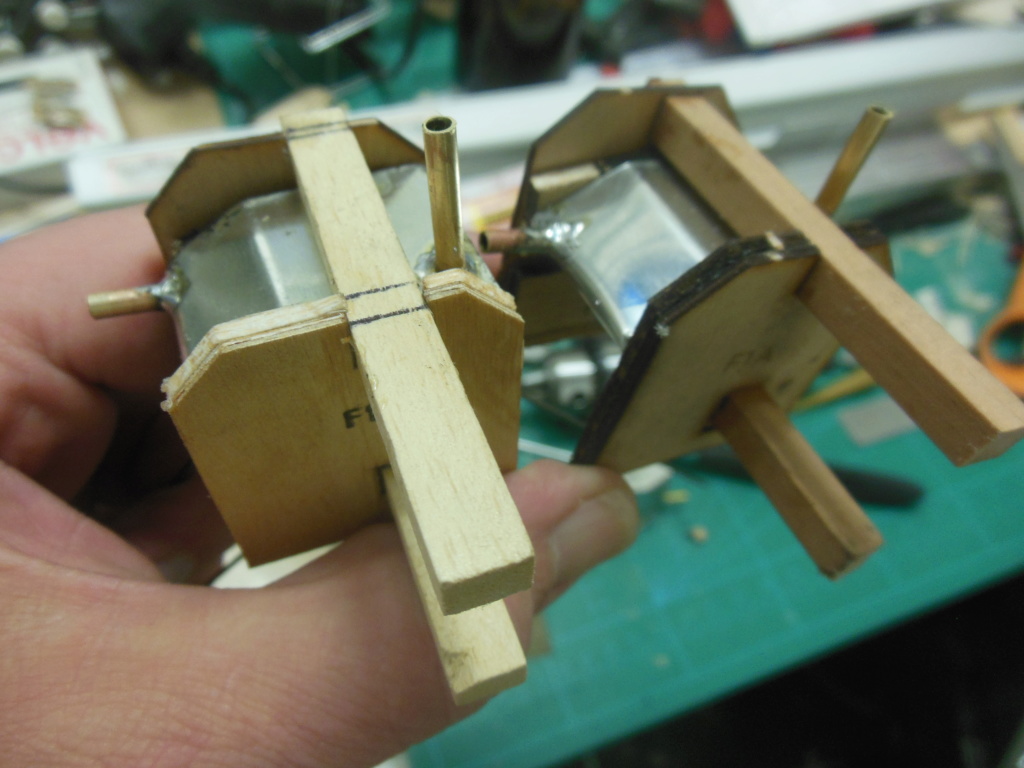
Now for the tanks.
The original plan just says 1/2A stunt tank. The plan for the "Kittywasp" has exactly the same tank and says Mercury economy wedge 7cc. These tanks are sold still as Mercury small but cost £10 each (plus postage). I remembered seeing one in another of my kits and so dragged it out. £10 seems alot for such a small tank.

So out came the tin plate and four strips - 2 x 1" and 2x 5/8" taken from it.


£1.99 for the sheet of tinplate and enough metal to make 5 tanks.
A bit of folding and trimming
Into the vice for soldering

All tested for leaks and ready for installation
The original plan just says 1/2A stunt tank. The plan for the "Kittywasp" has exactly the same tank and says Mercury economy wedge 7cc. These tanks are sold still as Mercury small but cost £10 each (plus postage). I remembered seeing one in another of my kits and so dragged it out. £10 seems alot for such a small tank.


So out came the tin plate and four strips - 2 x 1" and 2x 5/8" taken from it.


£1.99 for the sheet of tinplate and enough metal to make 5 tanks.
A bit of folding and trimming

Into the vice for soldering

All tested for leaks and ready for installation

ian1954- Diamond Member
- Posts : 2688
Join date : 2011-11-16
Age : 69
Location : England
Re: More KK Radians
![]() Marleysky Wed Jan 22, 2020 11:17 am
Marleysky Wed Jan 22, 2020 11:17 am
Ian, Nice job on making your own tank. I really like that design, adjustments can be made to fit the airframe while maximizing fuel capacity and flight time! 

Marleysky- Top Poster
-
Posts : 3618
Join date : 2014-09-28
Age : 71
Location : Grand Rapids, MI


ian1954- Diamond Member
- Posts : 2688
Join date : 2011-11-16
Age : 69
Location : England
Re: More KK Radians
![]() akjgardner Tue Jan 28, 2020 2:42 pm
akjgardner Tue Jan 28, 2020 2:42 pm
I Really Really Really like this Airplane... Very Nice Job on the build
akjgardner- Diamond Member
-
Posts : 1527
Join date : 2014-12-28
Age : 64
Location : Greensberg Indiana
Re: More KK Radians
![]() ian1954 Fri Feb 07, 2020 6:35 am
ian1954 Fri Feb 07, 2020 6:35 am
I covered the wings with some of that heat shrinky stuff. Don't ask me which one, it is not monokote, but from odds and ends that I acquired years ago with no labels but very, very cheap.

Now back to the fussylages. These are fiddly models to build and it would probably be easier to completed the build and then cover it, The problem I have is that I err on the clumsy side and sanding and finishing a complete model is almost certainly going to end up with dings and breakages.


Now back to the fussylages. These are fiddly models to build and it would probably be easier to completed the build and then cover it, The problem I have is that I err on the clumsy side and sanding and finishing a complete model is almost certainly going to end up with dings and breakages.
ian1954- Diamond Member
- Posts : 2688
Join date : 2011-11-16
Age : 69
Location : England
balogh- Top Poster
-
Posts : 4803
Join date : 2011-11-06
Age : 65
Location : Budapest Hungary

Kim- Top Poster
-
Posts : 8590
Join date : 2011-09-06
Location : South East Missouri
Re: More KK Radians
![]() getback Fri Feb 07, 2020 10:17 am
getback Fri Feb 07, 2020 10:17 am
Tanks look great Ian and the planes are coming along very good , i like the colors
getback- Top Poster
-
Posts : 10277
Join date : 2013-01-18
Age : 66
Location : julian , NC
Re: More KK Radians
![]() 944_Jim Fri Feb 07, 2020 3:46 pm
944_Jim Fri Feb 07, 2020 3:46 pm
Sweet hinge work! I can't wait to watch the videos.
I need to economize my construction. Two of one kit seems to be the most effect for the clocktime!
I need to economize my construction. Two of one kit seems to be the most effect for the clocktime!
944_Jim- Diamond Member
-
Posts : 2000
Join date : 2017-02-08
Age : 59
Location : NE MS
Re: More KK Radians
![]() ian1954 Sat Feb 08, 2020 10:40 am
ian1954 Sat Feb 08, 2020 10:40 am
Now some of you may be wondering why I refer to the fuselage as the "fussylage". This is the the third(and fourth time) I have built this model and this is the section of assembly that I do not look forward to.
There are several problems to overcome here and I only hope my description of them makes some sense.
The first is - cover the wing before fitting or not? It would probably be easier not to and would make gluing the wing in place a much simple task removing the need to remove covering to get a good glue joint.
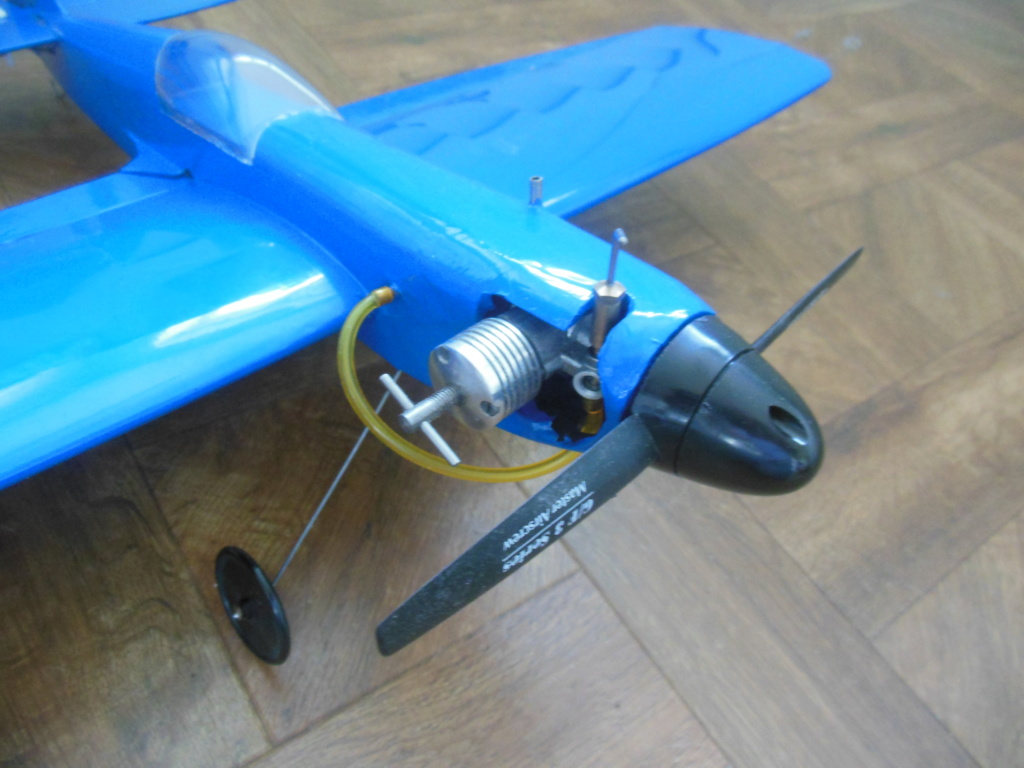
When you look at the pictures below, you will see that the pushrods create a problem! Now a warning here - the pushrods are 14 swg - use anything thcker and you will not be able to apply a temporary bend to wiggle the pushrod through the fussylage to the elevator.
Why do you have to bend it? Because the undercarriage is in the way and this is stitched and glued to one of the formers.

The pushrod also has to exit at the rear side of the fussylage and needs to be encouraged by further bending to pass through all the formers and exit at the slot.

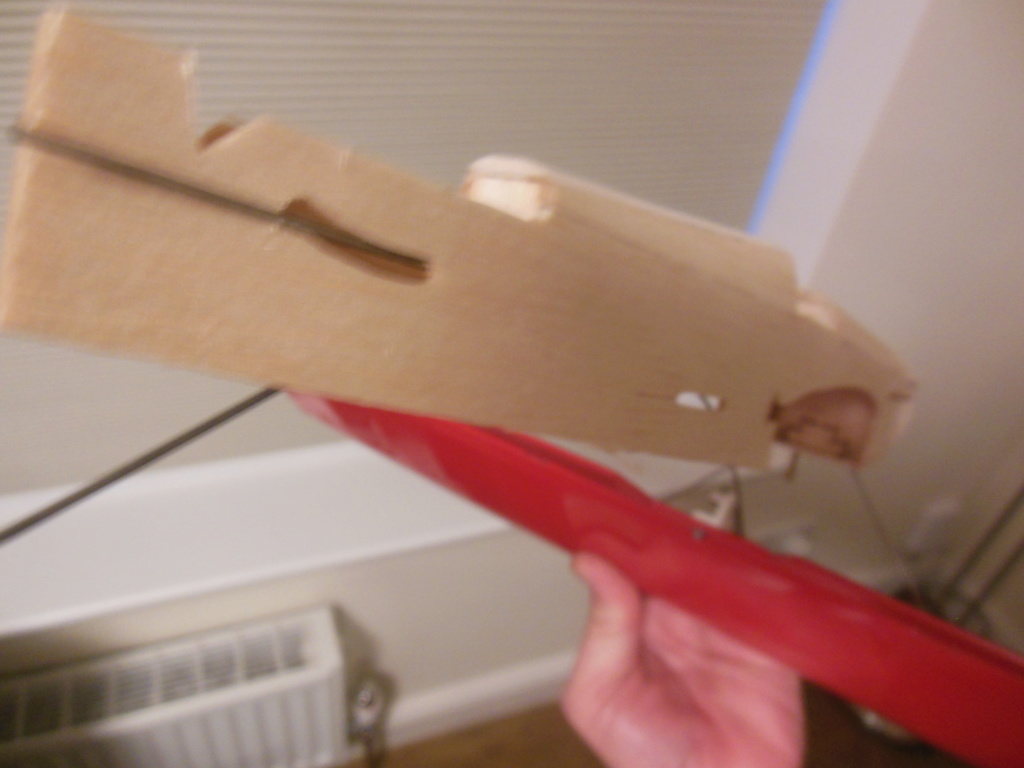
It is not all over yet. The wing has to be continually eased in and out for a neat fit and to get a close joint with the fussylage followed by trimming away the covering.
Now back to covering or not. Covering the wing first makes it easier to avoid the wing snagging on ribs etc. while all this manipulation is going on.
I often thing that it would be easier to build the fussylage around the wing but keeping it straight would be difficult. Also to leave off the upper decking before the wing is fitted bit there is no strength in the fussylage until that has been applied. I also prefer to get all the rough shaping and sanding done while I can still hold the fussylage and avoid clouting the wing.
Glueing the wing to the fussylage is also a tad fraut at this stage. The pushrod is through the slot at the rear end and is forcing the wing out of line. It needs to be bent at the end through the slot to get a straight run through the fuselage in exactly the right position for full forward and aft movement. Not easy if the wing is not firmly attached! This required the use of rubber bands to hold the wing and get the alignment and then careful use of some fine nosed pliers,

The wing could then be glued in place.
This took me about 6 hours but I am finding (as an answer to Jim) that the second model is done far quicker as I am more prepared. About half the time.

There are several problems to overcome here and I only hope my description of them makes some sense.
The first is - cover the wing before fitting or not? It would probably be easier not to and would make gluing the wing in place a much simple task removing the need to remove covering to get a good glue joint.
When you look at the pictures below, you will see that the pushrods create a problem! Now a warning here - the pushrods are 14 swg - use anything thcker and you will not be able to apply a temporary bend to wiggle the pushrod through the fussylage to the elevator.
Why do you have to bend it? Because the undercarriage is in the way and this is stitched and glued to one of the formers.

The pushrod also has to exit at the rear side of the fussylage and needs to be encouraged by further bending to pass through all the formers and exit at the slot.


It is not all over yet. The wing has to be continually eased in and out for a neat fit and to get a close joint with the fussylage followed by trimming away the covering.
Now back to covering or not. Covering the wing first makes it easier to avoid the wing snagging on ribs etc. while all this manipulation is going on.
I often thing that it would be easier to build the fussylage around the wing but keeping it straight would be difficult. Also to leave off the upper decking before the wing is fitted bit there is no strength in the fussylage until that has been applied. I also prefer to get all the rough shaping and sanding done while I can still hold the fussylage and avoid clouting the wing.
Glueing the wing to the fussylage is also a tad fraut at this stage. The pushrod is through the slot at the rear end and is forcing the wing out of line. It needs to be bent at the end through the slot to get a straight run through the fuselage in exactly the right position for full forward and aft movement. Not easy if the wing is not firmly attached! This required the use of rubber bands to hold the wing and get the alignment and then careful use of some fine nosed pliers,

The wing could then be glued in place.


This took me about 6 hours but I am finding (as an answer to Jim) that the second model is done far quicker as I am more prepared. About half the time.


ian1954- Diamond Member
- Posts : 2688
Join date : 2011-11-16
Age : 69
Location : England
Re: More KK Radians
![]() Cribbs74 Sat Feb 08, 2020 4:51 pm
Cribbs74 Sat Feb 08, 2020 4:51 pm
Excellent work! I really like your custom tanks.

Cribbs74- Moderator
-
Posts : 11904
Join date : 2011-10-24
Age : 50
Location : Tuttle, OK
Re: More KK Radians
![]() ian1954 Tue Feb 11, 2020 3:43 pm
ian1954 Tue Feb 11, 2020 3:43 pm
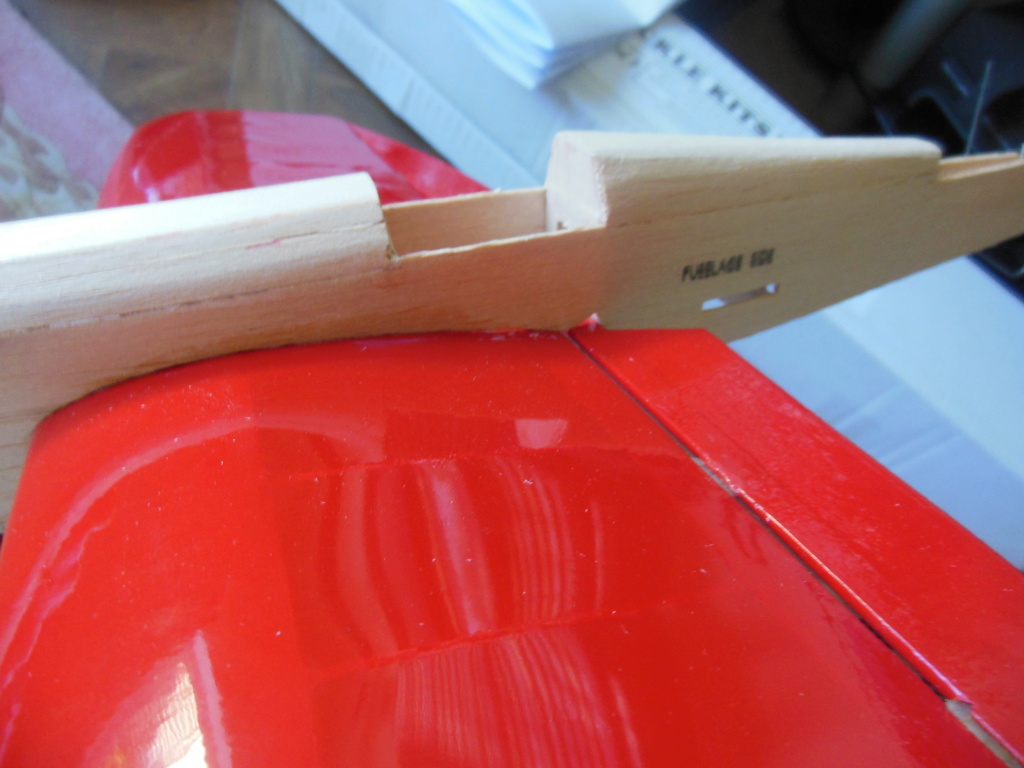
In other members postings, I have often referred to the difficulty I have with canopies. I look at the neat lines on Mauricos models canopy fitment with great regard.
I have ruined numerous canopies - split them, over trimmed them, messed up gluing them in and trod on a few.
I have devised a way of making it a little easier (not perfect but easier) and provide a backup fitment in the event of me ruining one.
in this instance, two Radian kits from different manufacturers - the canopies are a different shape although the fitment area remains the same.
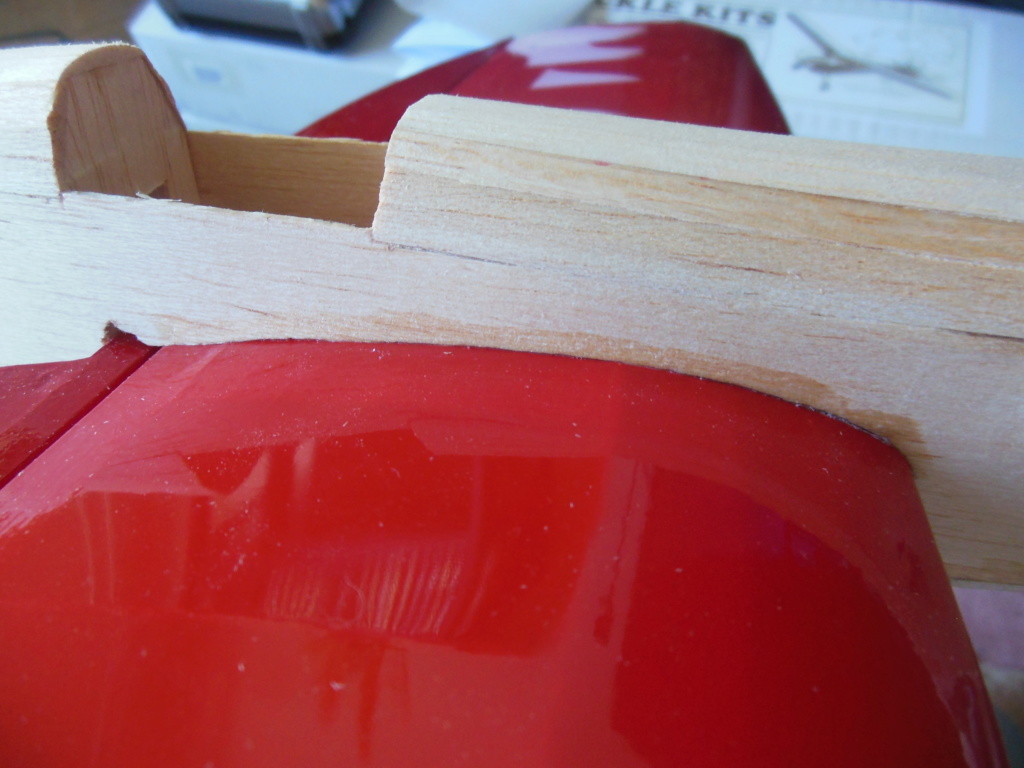
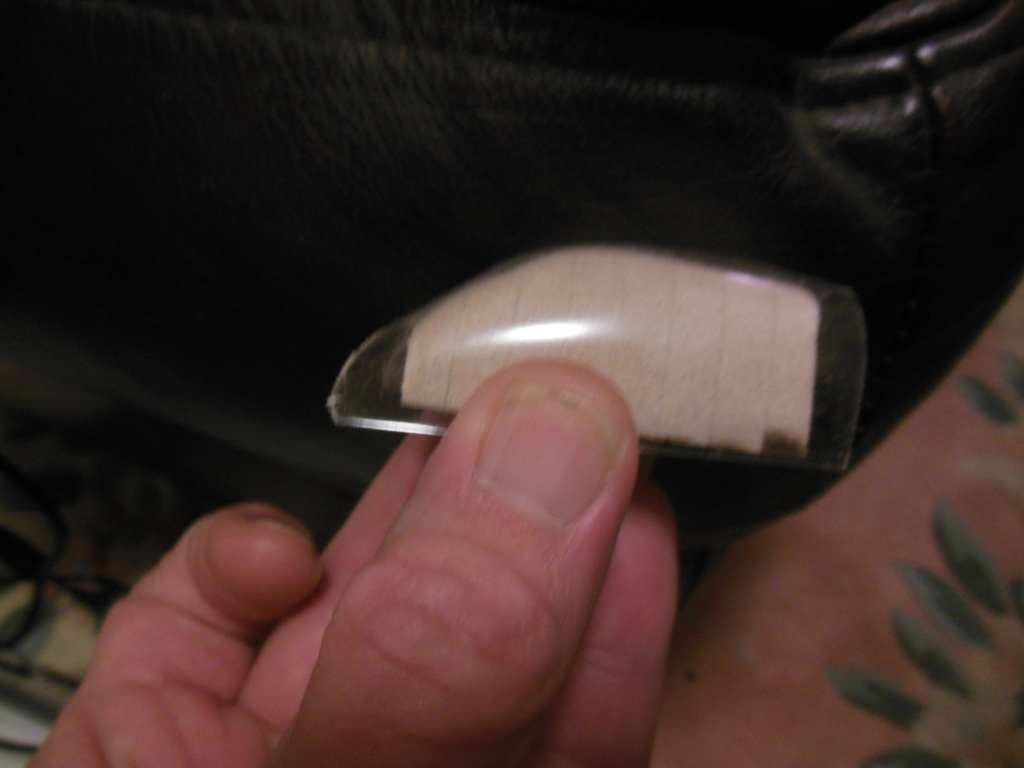
So I cut 1/4" balsa sheet into slabs to follow the canopy profile in fit into to opening.

Then sand it to shape.
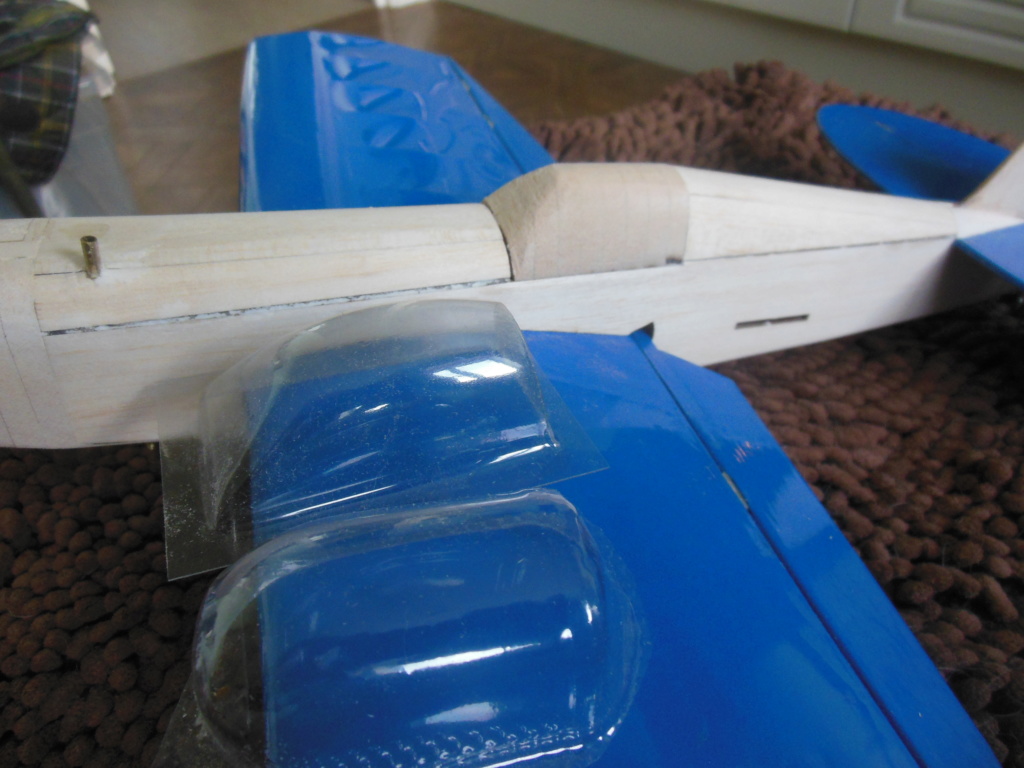
This way if I mess up the canopy I can paint this and stick it in. I suppose I could also use it as a plug to shape a new one but my attempts at this have not been too sucessful.
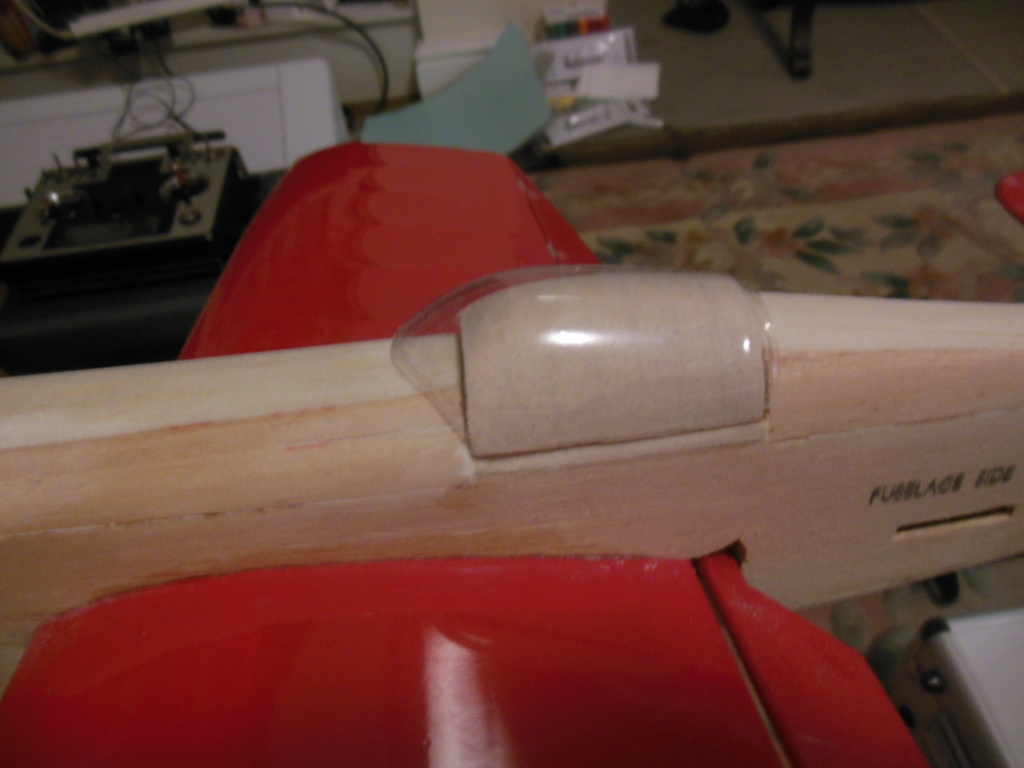
Using the shape lets me trim the canopy.
This works fine for everything except where the canopy overlaps the "bonnet" but it helps.
I have ruined numerous canopies - split them, over trimmed them, messed up gluing them in and trod on a few.
I have devised a way of making it a little easier (not perfect but easier) and provide a backup fitment in the event of me ruining one.
in this instance, two Radian kits from different manufacturers - the canopies are a different shape although the fitment area remains the same.
So I cut 1/4" balsa sheet into slabs to follow the canopy profile in fit into to opening.

Then sand it to shape.

This way if I mess up the canopy I can paint this and stick it in. I suppose I could also use it as a plug to shape a new one but my attempts at this have not been too sucessful.
Using the shape lets me trim the canopy.

This works fine for everything except where the canopy overlaps the "bonnet" but it helps.

ian1954- Diamond Member
- Posts : 2688
Join date : 2011-11-16
Age : 69
Location : England
Re: More KK Radians
![]() getback Wed Feb 12, 2020 7:44 am
getback Wed Feb 12, 2020 7:44 am
Thats a great idea Ian , i have seen a tool that works kind of the same way , but can't find it right now . Did you glue them blocks together after fitting? 
getback- Top Poster
-
Posts : 10277
Join date : 2013-01-18
Age : 66
Location : julian , NC
Re: More KK Radians
![]() ian1954 Wed Feb 12, 2020 9:18 am
ian1954 Wed Feb 12, 2020 9:18 am
getback wrote:Thats a great idea Ian , i have seen a tool that works kind of the same way , but can't find it right now . Did you glue them blocks together after fitting?
They were glued together before fitting and then tack glued in place for sanding. 80 grit followed by 150 and then 240.
Then cut out with a razor blade at the tack joints.
ian1954- Diamond Member
- Posts : 2688
Join date : 2011-11-16
Age : 69
Location : England
Re: More KK Radians
![]() Mike1484 Wed Feb 12, 2020 11:31 am
Mike1484 Wed Feb 12, 2020 11:31 am
Looking good Ian . I like the P.A.W. diesel model . I have several P.A.W.'s and I like them all . Keep up the good work .Nice tanks !
Mike1484
Mike1484
Mike1484- Gold Member
- Posts : 300
Join date : 2011-10-28
Age : 75
Location : Northern Ohio
Re: More KK Radians
![]() ian1954 Mon Feb 17, 2020 10:27 am
ian1954 Mon Feb 17, 2020 10:27 am
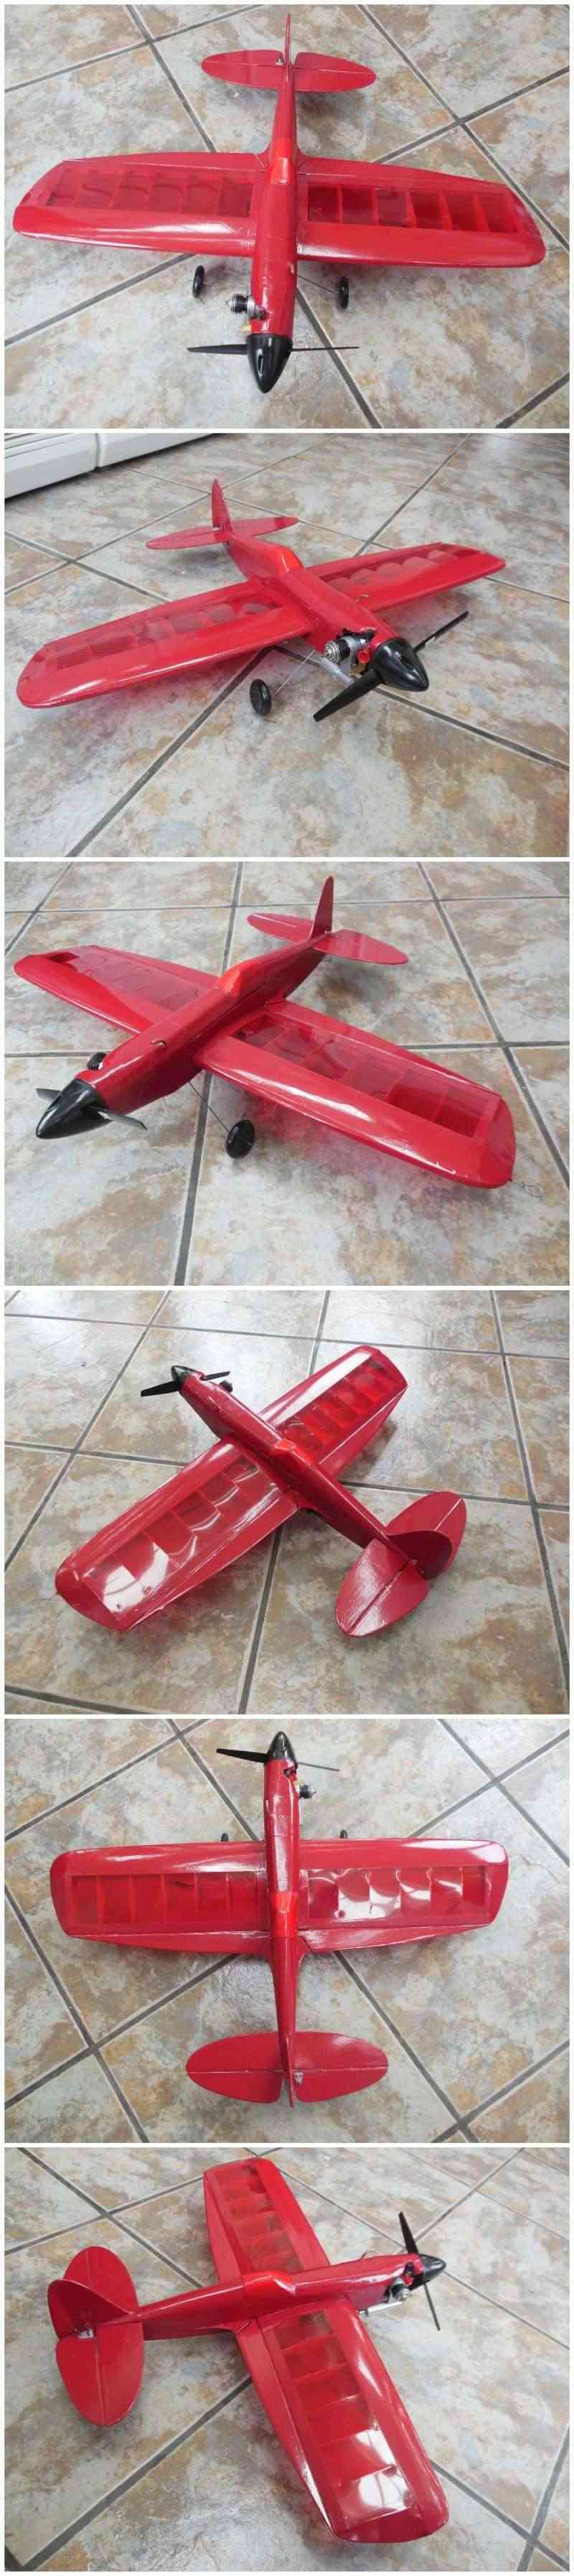
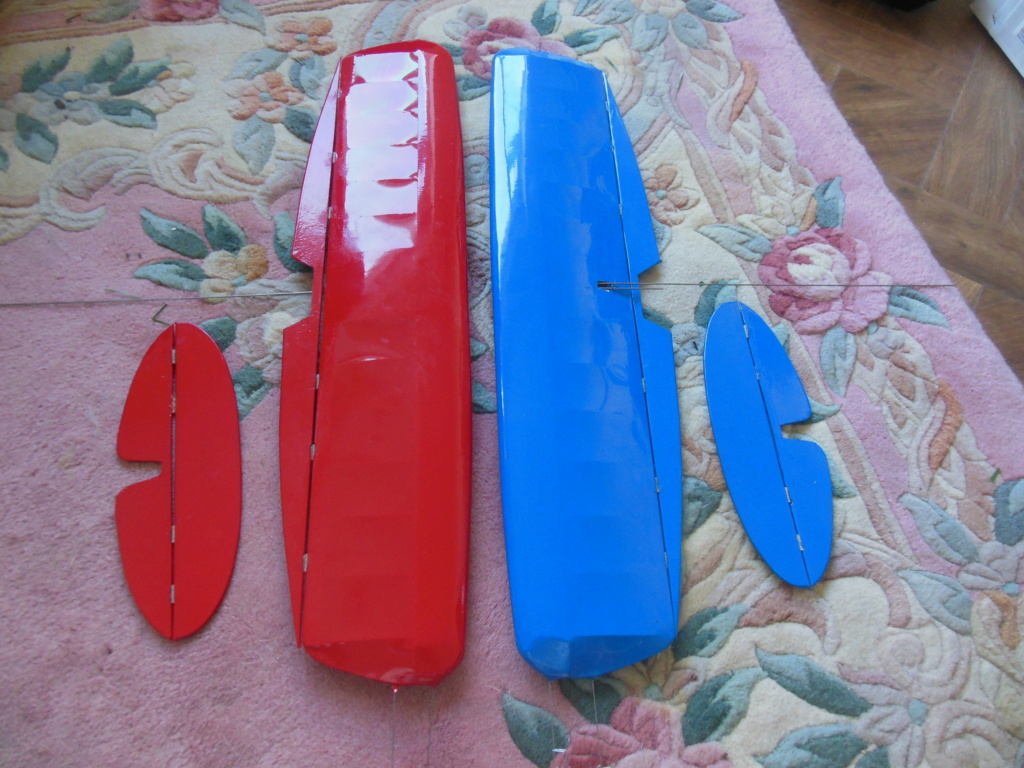
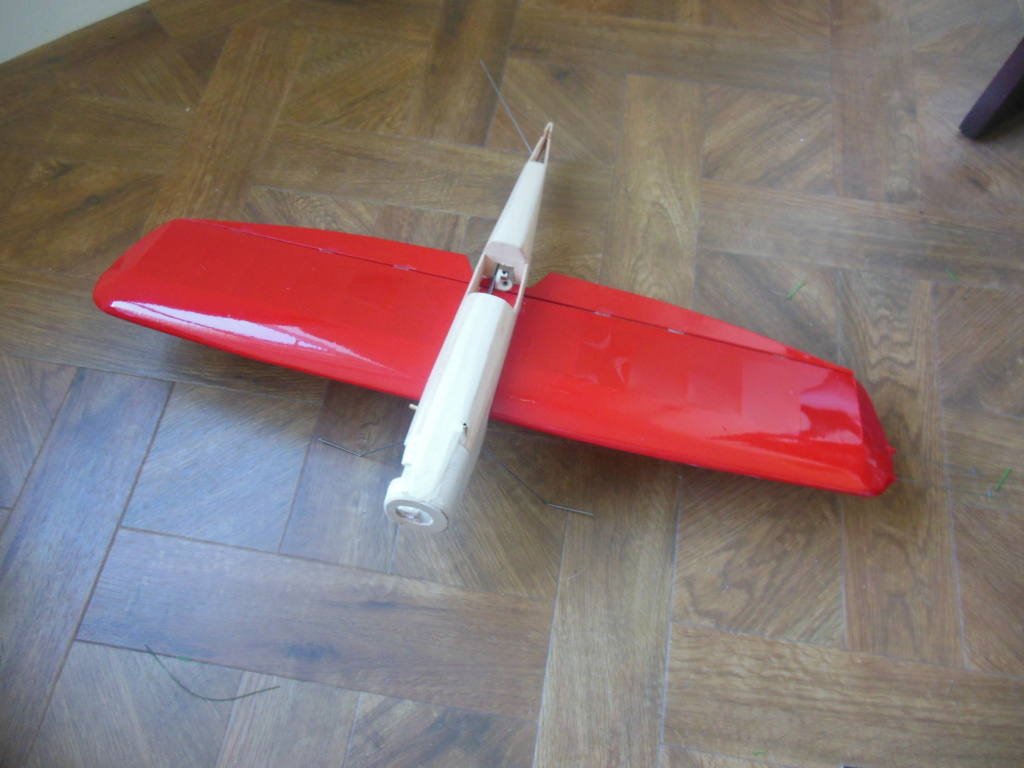
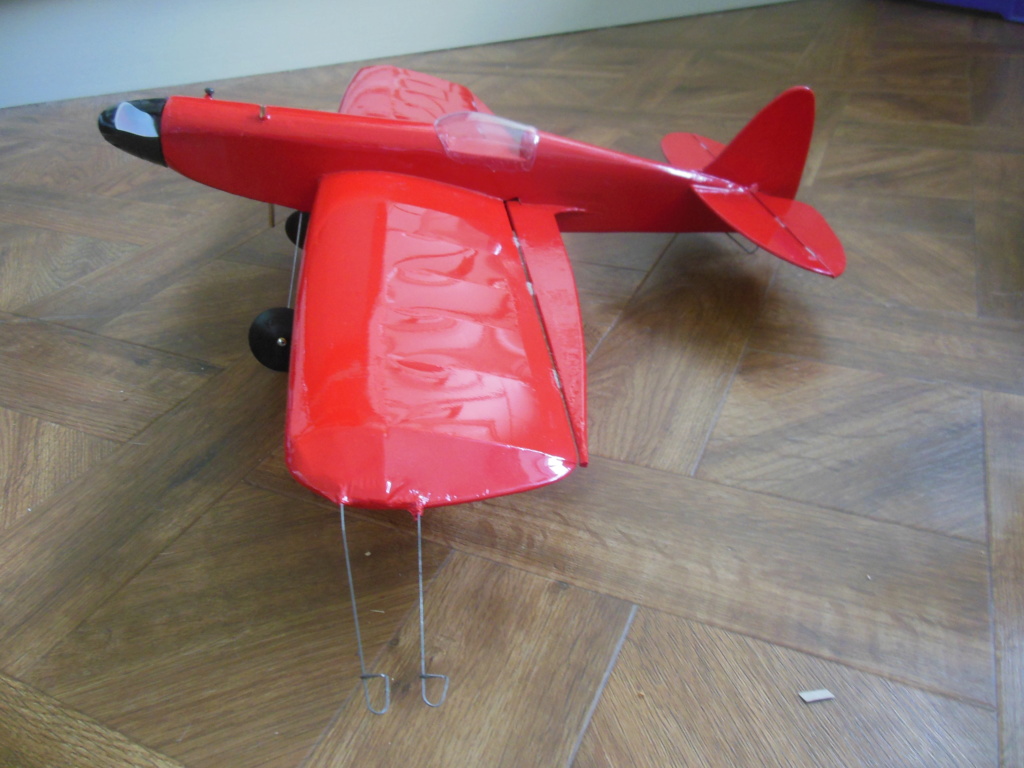
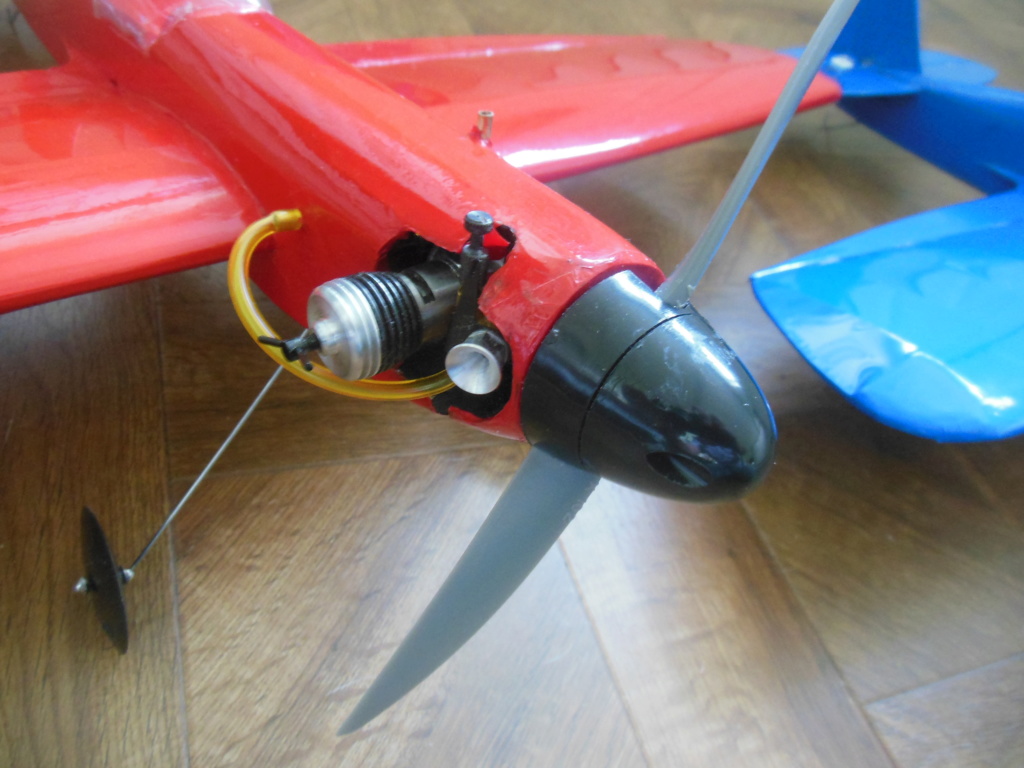
Almost ready to fly. Still mulling over decorations and trim but finished.

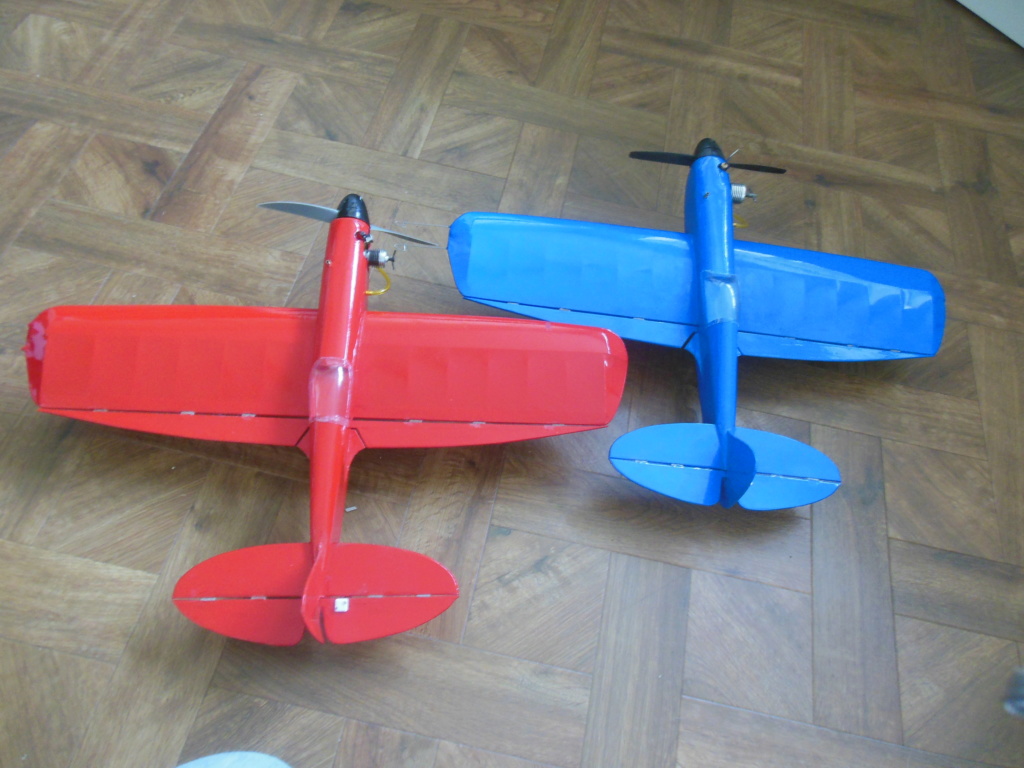
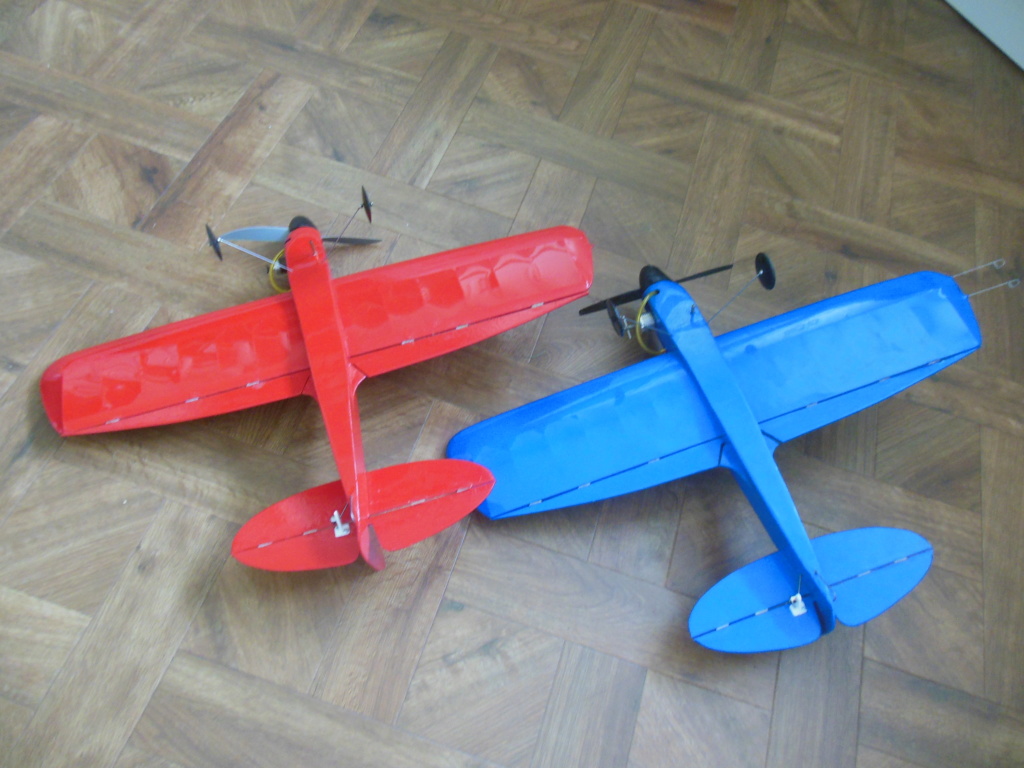
The blue one with the PAW engine weighs 80z (228g)
The red one with the Cox thingy weighs 7 3/4oz (220g)


The blue one with the PAW engine weighs 80z (228g)


The red one with the Cox thingy weighs 7 3/4oz (220g)


ian1954- Diamond Member
- Posts : 2688
Join date : 2011-11-16
Age : 69
Location : England
dirk gently- Gold Member
- Posts : 430
Join date : 2012-02-03
Age : 41
Location : Poznań
Page 1 of 1
Permissions in this forum:
You cannot reply to topics in this forum