

 Rules
Rules
Log in
Search
Latest topics
» Simple Glidersby rdw777 Today at 6:25 pm
» Foam hand kids glider converted to 0.049 CL
by rdw777 Today at 6:11 pm
» Weird search for a single comic from an old Mad Magazine
by Kim Today at 1:44 pm
» Scientific "Zipper" Build...Zipper Flys!.
by getback Today at 7:27 am
» Cox .049 Tee Dee engines back in stock (limited availablility)
by GallopingGhostler Today at 1:05 am
» Very off-topic.........Time passes and not always for the best......
by rsv1cox Yesterday at 2:47 pm
» Golden Bee basic running problem
by 944_Jim Yesterday at 12:44 pm
» Roddie-Rigger.. a 2005 original design
by roddie Wed Jul 24, 2024 11:48 pm
» Jim Walker Bonanza etc.
by rsv1cox Wed Jul 24, 2024 6:30 pm
» Throttles for Cox Tee Dee .049 / .020 / .010 engines --- videos
by sosam117 Wed Jul 24, 2024 8:54 am
» Introducing our Cox .049 TD Engines
by Admin Tue Jul 23, 2024 2:00 am
» Project Cox .049 r/c & Citabrian Champion
by getback Mon Jul 22, 2024 4:14 pm
Cox Engine of The Month
July-2024
robot797's
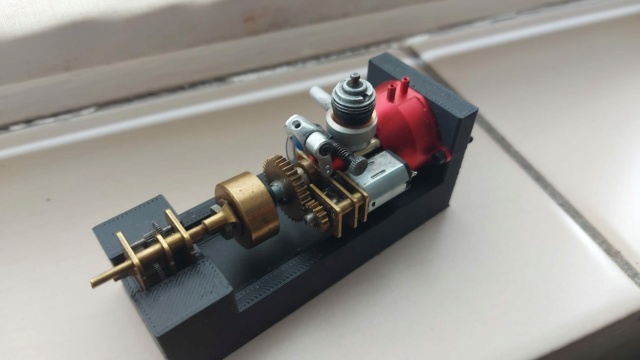
"ULTIMITE COX 010: it has a clutch, E starter, throttle, exhaust, aluminum tank, aluminum venturi, gearbox with forward and reverse, and now its on a custom drawn and printed stand"

PAST WINNERS
robot797's
"ULTIMITE COX 010: it has a clutch, E starter, throttle, exhaust, aluminum tank, aluminum venturi, gearbox with forward and reverse, and now its on a custom drawn and printed stand"
PAST WINNERS
CEF Traveling Engine


Win This Engine!

Live on Patrol


Unscrewing Cylinder
Page 1 of 1

Unscrewing Cylinder
![]() Coxfledgling Sun Jan 10, 2021 3:13 am
Coxfledgling Sun Jan 10, 2021 3:13 am
Saw a thread about chap unscrewing 049 cylinder with the Cox spanner across the exhaust ports.
DONT, as ports damaged and "repair' needed.
Some cylinders have flats at the top which are ideal for this job needing the glow head to be removed first using the Cox spanner, or not.
To unscrew the cylinder I use some leather belt to protect and grip the cooling fins, and use some good pliers to clamp same.
Some heat will also help.
Hope this is helpful.

Coxfledgling- Gold Member

- Posts : 375
Join date : 2021-01-10
Location : Near Caernarfon, Snowdonia, Wales, UK
Unscrewing Pee Wee Cylinder
![]() bsadonkill Thu Dec 15, 2022 3:36 am
bsadonkill Thu Dec 15, 2022 3:36 am
I had the same ideal. Using some type of strap wrench for removing .020 Pee Wee cylinders. I did damage a cylinder by using the exhaust port wrench. They bur the cylinder very easily. The older cylinders do not have the flats made into the top for this purpose. Also does anyone know a good way of removing a bur from a cylinder. I tried using 600 grit sandpaper wrapped around a dowel rod. I ended up removing to much material. Could not get the engine to run after that. 
bsadonkill- Bronze Member

- Posts : 48
Join date : 2022-12-10
Location : GARDENCITY IDAHO
Re: Unscrewing Cylinder
![]() getback Thu Dec 15, 2022 6:19 am
getback Thu Dec 15, 2022 6:19 am
maybe this will help >> https://www.coxengineforum.com/t11522-deburring-inside-of-cylinder?highlight=deburring+a+cly 

getback- Top Poster


Posts : 10276
Join date : 2013-01-18
Age : 66
Location : julian , NC
Re: Unscrewing Cylinder
![]() sosam117 Thu Dec 15, 2022 6:57 am
sosam117 Thu Dec 15, 2022 6:57 am
Coxfledgling wrote:Saw a thread about chap unscrewing 049 cylinder with the Cox spanner across the exhaust ports.
DONT, as ports damaged and "repair' needed.
Some cylinders have flats at the top which are ideal for this job needing the glow head to be removed first using the Cox spanner, or not.
To unscrew the cylinder I use some leather belt to protect and grip the cooling fins, and use some good pliers to clamp same.
Some heat will also help.
Hope this is helpful.
Heat from a paint stripping heat gun or covering heat gun is my friend when taking things apart!
sosam117- Diamond Member

- Posts : 1310
Join date : 2016-03-23
Location : Suburb of Chicago, Illinois
Re: Unscrewing Cylinder
![]() balogh Thu Dec 15, 2022 9:52 am
balogh Thu Dec 15, 2022 9:52 am
All my prior attempts to wind a leather band whatsoever around the cylinder and use pliers to remove it were missing the result, because the leather belt would slip on the fins no matter how I de-greased them, and because I simply do not have the guts to press pliers, even though with a leather belt between its beaks, on the COX cylinders!!!
So, about a year ago I decided to make my own flats onto the top fin of old-stock cylinders, and no matter how under-tooled I am, let alone my limited manual skills, I have managed to file the flats on many cylinders by today, so that I can remove the 049/050/051 cylinders with the stock wrench having the opening for the flats...not one cylinder I filed the flats on was messed up while filing, so far my hit rate is 100%
You may want to read the relevant thread here...skip all my trials until I arrived at the solution, where I shove an exacto-blade between the top and 2nd fin, so that my file will work on the top fin only, without hurting the 2nd fin:
https://www.coxengineforum.com/t15723-flats-on-top-cylinder-fin-for-cox-wrench-diy?highlight=flats
I repaired the filing marks on fins with gun-blue subsequently, so telling a cylinder with stock flats from a cylinder with flats I filed on them on the kitchen table is not easy.
I noted that top fins with the flats made on them by COX are a tad thicker than the old stock fins without the flats, but even these thinner fins with flats I filed on them are strong enough to withstand the wrench torque without getting damaged.
Good luck..
balogh- Top Poster
-
Posts : 4803
Join date : 2011-11-06
Age : 65
Location : Budapest Hungary
Re: Unscrewing Cylinder
![]() Admin Thu Dec 15, 2022 10:30 am
Admin Thu Dec 15, 2022 10:30 am
I'm going through the trouble of removing a cylinder right now. Used the leather wrapped around the cylinder with pliers, tried a pair of wooden blocks in a vice, applied heat with a pencil torch... won't budge. Same issue with the cylinder slipping with leather or the wood blocks tightened just to the point where I can feel the cylinder being squeezed out of round while moving the piston up and down while tightening. Tried penetrating oil a few times, heat a few times, tried tightening and loosing a junk glow head on it several times to try to get some back and forth force on the case/cylinder threads.... nothing.
The cylinder is a close to mint condition, and is hoping to be used on an engine I'm attempting to restore. So, inserting anything into the exhaust ports or cutting flats is out of the question. I also want to limit how much it slips in the leather and wood to avoid the bluing from wearing off on the edges of the fins.
That bastard is tight!

Admin- Administrator
- Posts : 6490
Join date : 2010-07-27
Location : Roseville, Minnesota -

Re: Unscrewing Cylinder
![]() Surfer_kris Thu Dec 15, 2022 10:40 am
Surfer_kris Thu Dec 15, 2022 10:40 am
Don't use any vice or pliers! 
The idea is to make a leather strap that is self-clamping, much like the tools use for removing oil filters on cars. Some fine emery cloth towards the cylinder will also stop the leather from slipping.
The idea is to make a leather strap that is self-clamping, much like the tools use for removing oil filters on cars. Some fine emery cloth towards the cylinder will also stop the leather from slipping.


Surfer_kris- Diamond Member
- Posts : 1909
Join date : 2010-11-20
Location : Sweden
Re: Unscrewing Cylinder
![]() HalfaDave Thu Dec 15, 2022 2:02 pm
HalfaDave Thu Dec 15, 2022 2:02 pm
Hi Admin,
Try this:
-wrap the cylinder/glowplug with a damp folded paper towel. ~1in dia. or so.
-heat the case, to 'scare' any castor goo.
-throw it in the freezer for whatever hours. The frozen wrapped paper towel will be your 'hand vice'.
- with gloves, they should just twist off.
-repeat as you learn, the heat cycle, is what breaks the joint.
I prefer the Surfer kris methods. Way easier in the long run.
I think Leroy Cox would like us to file flats on those cylinders...
With respect,
Dave
P.S. I just proof read this, and it would make no sense to non Cox people !
HalfaDave- Platinum Member

- Posts : 608
Join date : 2022-12-06
Location : Oakville, Ontario
Re: Unscrewing Cylinder
![]() Admin Thu Dec 15, 2022 2:46 pm
Admin Thu Dec 15, 2022 2:46 pm
Surfer_kris wrote:Don't use any vice or pliers!
The idea is to make a leather strap that is self-clamping, much like the tools use for removing oil filters on cars. Some fine emery cloth towards the cylinder will also stop the leather from slipping.
I made one of those some years back. It'll remove your typical cylinder, but I couldn't get it to get off those impossibly tight ones without slipping. I may need to try some emery cloth and just touch up the bluing afterwards.
You also have to be careful not to distort the cylinder (particularly the thin metal between the exhaust ports) by twisting it too hard.
Admin- Administrator
- Posts : 6490
Join date : 2010-07-27
Location : Roseville, Minnesota -
Re: Unscrewing Cylinder
![]() Surfer_kris Thu Dec 15, 2022 2:52 pm
Surfer_kris Thu Dec 15, 2022 2:52 pm
Sounds like you just need more heat. 
The thermal expansion is higher for aluminium, so heat the crankcase rather than the cylinder.
The thermal expansion is higher for aluminium, so heat the crankcase rather than the cylinder.
Surfer_kris- Diamond Member
- Posts : 1909
Join date : 2010-11-20
Location : Sweden
Re: Unscrewing Cylinder
![]() Levent Suberk Thu Dec 15, 2022 2:56 pm
Levent Suberk Thu Dec 15, 2022 2:56 pm
Admin wrote:Surfer_kris wrote:Don't use any vice or pliers!
The idea is to make a leather strap that is self-clamping, much like the tools use for removing oil filters on cars. Some fine emery cloth towards the cylinder will also stop the leather from slipping.
I made one of those some years back. It'll remove your typical cylinder, but I couldn't get it to get off those impossibly tight ones without slipping. I may need to try some emery cloth and just touch up the bluing afterwards.
You also have to be careful not to distort the cylinder (particularly the thin metal between the exhaust ports) by twisting it too hard.
Try to soak leather in water, fins bites leather more in this way. If don't work then try rubber strip instead of leather.
Levent Suberk- Diamond Member
- Posts : 2228
Join date : 2017-12-24
Location : Türkiye
Re: Unscrewing Cylinder
![]() bsadonkill Fri Dec 16, 2022 1:15 am
bsadonkill Fri Dec 16, 2022 1:15 am
A lot of advice and examples. I defiantly have to try the leather strap method with some heat. Thanks to all that replied:siterocks:
bsadonkill- Bronze Member
- Posts : 48
Join date : 2022-12-10
Location : GARDENCITY IDAHO
Re: Unscrewing Cylinder
![]() batjac Fri Dec 16, 2022 2:43 pm
batjac Fri Dec 16, 2022 2:43 pm
Surfer_kris wrote:
The idea is to make a leather strap that is self-clamping, much like the tools use for removing oil filters on cars. Some fine emery cloth towards the cylinder will also stop the leather from slipping.
Kris, what dimensions are the strap? It looks like about 3/4" x 6" or so? I'll stop in at the local leather store when I'm over there. They should have some scraps that I can buy.
The Moo Mark
batjac- Diamond Member
-
Posts : 2356
Join date : 2013-05-22
Age : 61
Location : Broken Arrow, OK, USA
Re: Unscrewing Cylinder
![]() Surfer_kris Fri Dec 16, 2022 3:12 pm
Surfer_kris Fri Dec 16, 2022 3:12 pm
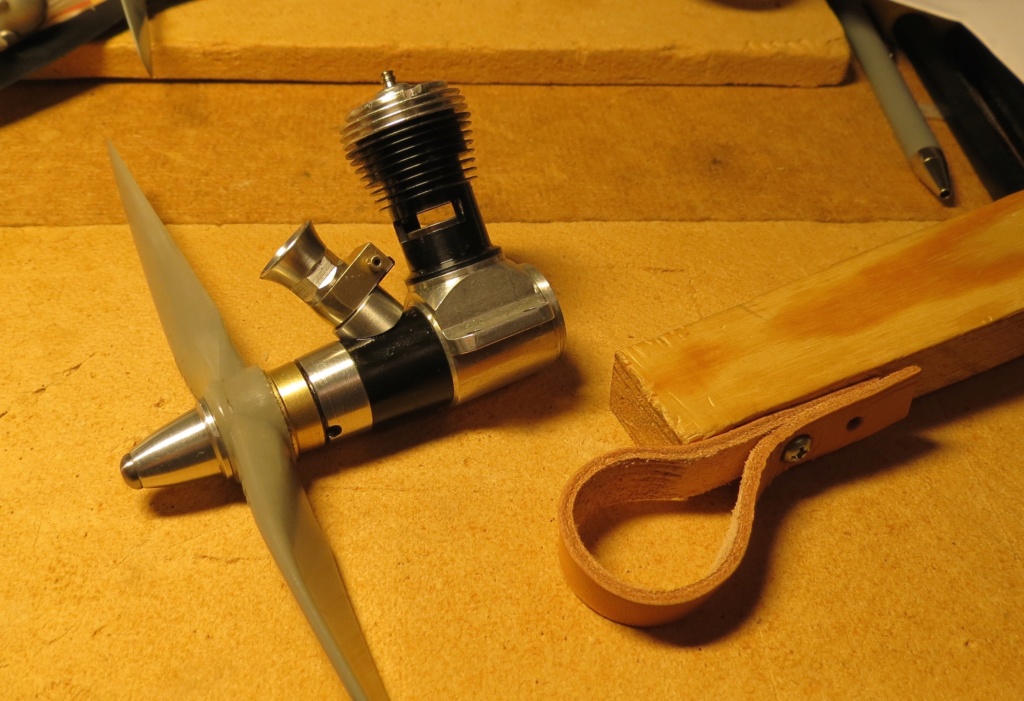
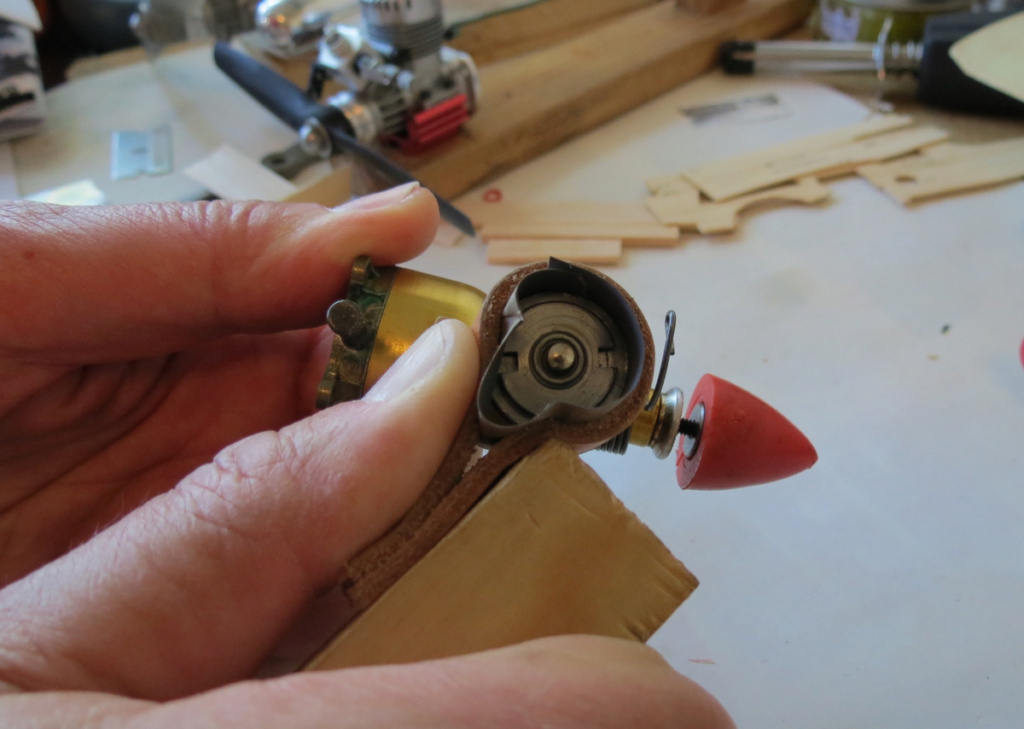
The dimensions are not critical, but the one in the pictures is about 10mm (0.4") wide and about 4" long. I have made a few holes in the strap and can adjust the length depending on the cylinder diameter (mostly Webra, Paw and different Cox engine sizes).
It was a 5 minute job from scrap pieces (wood and leather I had lying around), but it has served me very well.
It was a 5 minute job from scrap pieces (wood and leather I had lying around), but it has served me very well.
Surfer_kris- Diamond Member
- Posts : 1909
Join date : 2010-11-20
Location : Sweden
Re: Unscrewing Cylinder
![]() sosam117 Fri Dec 16, 2022 4:43 pm
sosam117 Fri Dec 16, 2022 4:43 pm
Surfer_kris wrote:The dimensions are not critical, but the one in the pictures is about 10mm (0.4") wide and about 4" long. I have made a few holes in the strap and can adjust the length depending on the cylinder diameter (mostly Webra, Paw and different Cox engine sizes).
It was a 5 minute job from scrap pieces (wood and leather I had lying around), but it has served me very well.
The other material you could try is an old belt from a vacuum cleaner or anything similar that is 10mm wide and 2mm thick.
I purchased this tool in the photo from a small pluming shop that sold three of them as a set.
The small on in the photo, then a larger one and then even a larger one.
The strap is the look and feel like an automotive type of belt and it grips the cylinder very well because it has a weave in the strap.


I used the small strap to loosen up the aerators on the faucets around the house to clean/change the screens.
Also, good to loosen up lids off of jars. These old hands just don't have the strength they use to have.
sosam117- Diamond Member
- Posts : 1310
Join date : 2016-03-23
Location : Suburb of Chicago, Illinois
» Cox. 049 Surestart engine's glow head unscrewing
» Cylinder Performance Figures
» Anyone know what this item is?
» WTB cox 051 TD cylinder
» i think i have a rare COX item
» Cylinder Performance Figures
» Anyone know what this item is?
» WTB cox 051 TD cylinder
» i think i have a rare COX item
Page 1 of 1
Permissions in this forum:
You cannot reply to topics in this forum