

 Rules
Rules
Log in
Search
Latest topics
» Stealth SB-Xby Admin Today at 8:28 pm
» ST .35 STUNT / VOODOO / ZERO POINT ZERO NITRO
by TD ABUSER Today at 7:45 pm
» SUPERTIGER .15 PROJECT
by TD ABUSER Today at 7:42 pm
» For sale -- Cox Custom Carburetors for Tee Dee engines
by sosam117 Today at 5:23 pm
» WHERE ARE YOU BUYING YOUR FUEL AND GLOW PLUGS...?
by TD ABUSER Today at 4:35 pm
» Waiting for Engines from Ken Enya
by sosam117 Today at 4:33 pm
» Unusual Cox 049 cylinder - Need help identifying
by anm2 Today at 4:12 pm
» Jim Walker Bonanza etc.
by rsv1cox Today at 2:57 pm
» What's the Best Reed for Cox Reed Valve Engines.
by roddie Today at 1:37 pm
» Fuel choice
by 1975 control line guy Yesterday at 4:01 pm
» "Fall S.M.A.L.L." Video 3.
by GallopingGhostler Yesterday at 2:37 pm
» Gifted Fox
by Ken Cook Yesterday at 11:12 am
Cox Engine of The Month
August-2024
balogh's

"Cox TD09 R/C Beast of Burden featuring Kamtechnik head and DIY metallic fuel nipple"

PAST WINNERS
balogh's
"Cox TD09 R/C Beast of Burden featuring Kamtechnik head and DIY metallic fuel nipple"
PAST WINNERS
CEF Traveling Engine


Win This Engine!

Live on Patrol


The CEF Reed Speed Contest… a very late entry
Page 1 of 1

The CEF Reed Speed Contest… a very late entry
![]() duaneh Tue Feb 15, 2022 11:12 pm
duaneh Tue Feb 15, 2022 11:12 pm
Since Roddie posted his build of Rare Bear, I’ve been researching the old threads of the Reed Speed contest. It happened before I was a member here, so this was all news to me. I love the concept; build scale models and then race them. I’m sorry I missed it.
But, I need little excuse to build something, so why not build a profile model that conforms to the Reed Speed rules? And since it’s a race, why not a model of the world’s most successful race plane? The one that took first place in every race it entered.
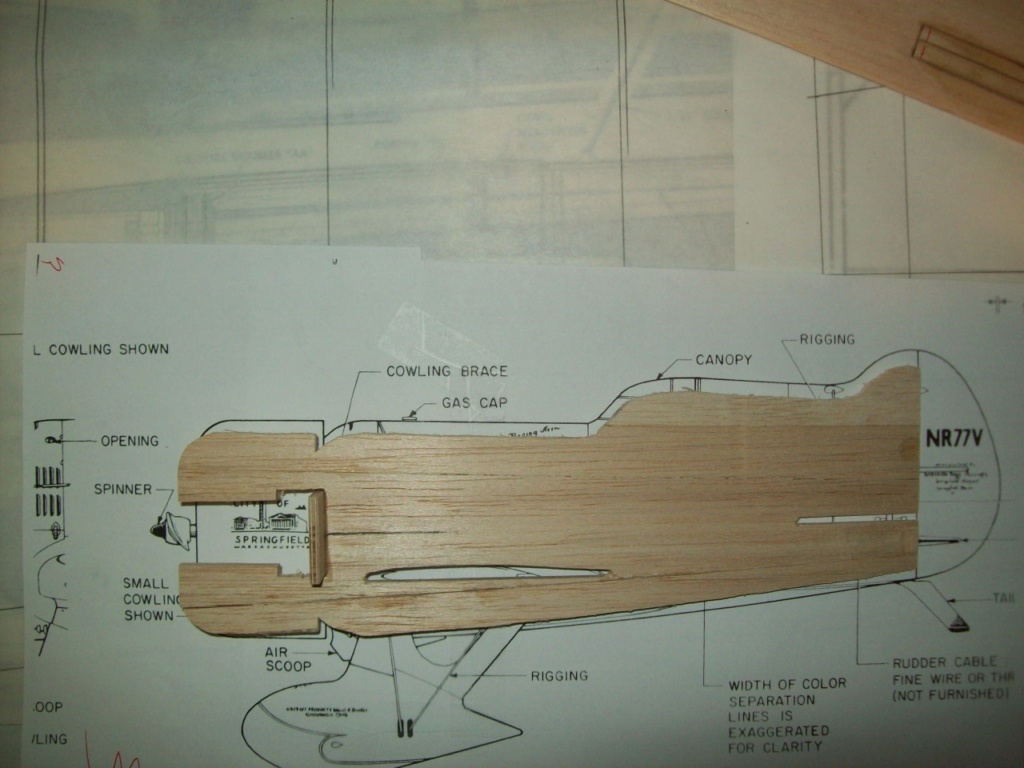
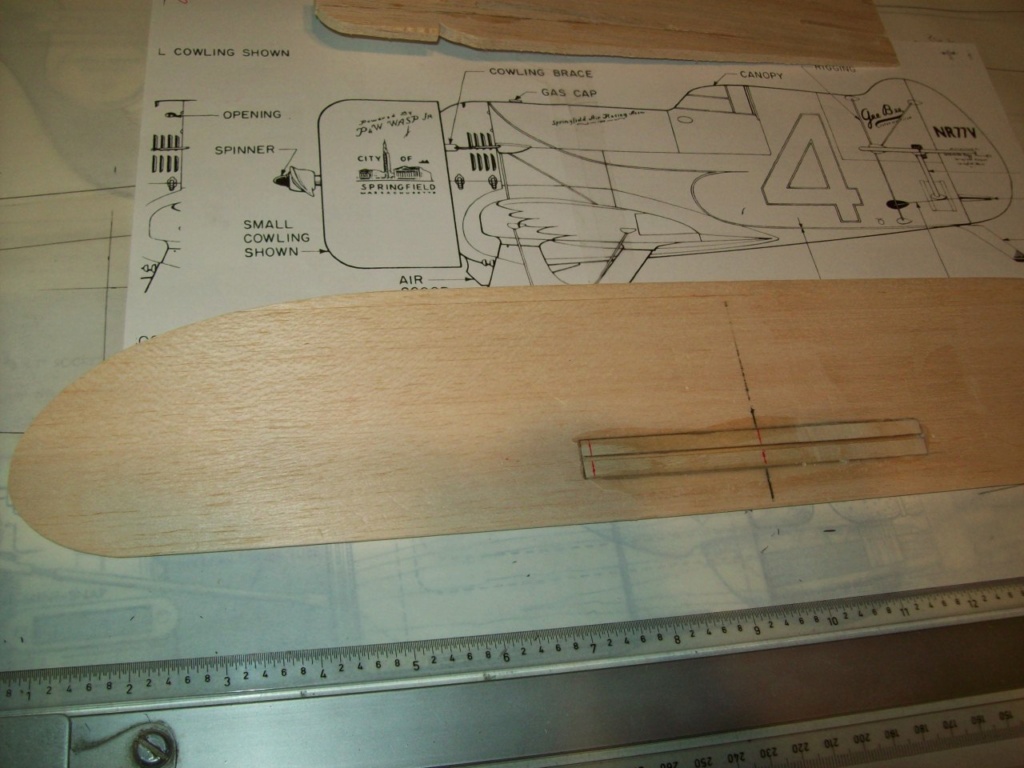
Like Roddie told us, it starts with a 3-view.

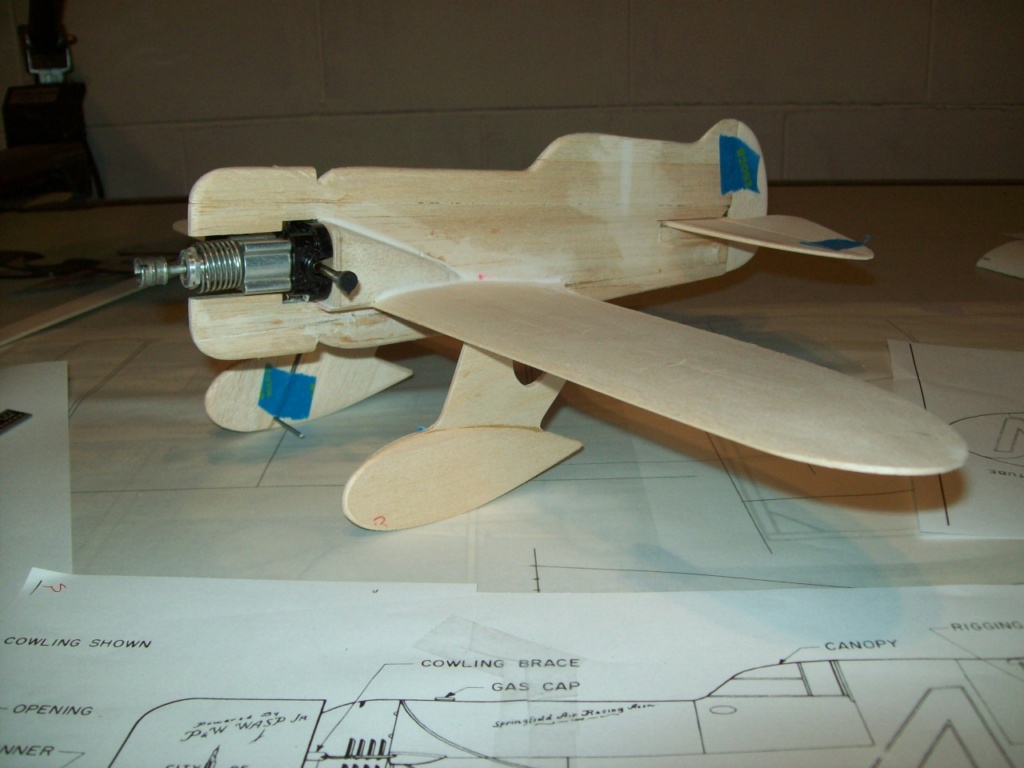
The rules specify a 15” min. span, and 45 Sq. In. min. wing area. After some figuring, I determined that an 18” span would give me an area of 52 Sq. In. So, I laid that out on a piece of SIG airfoiled balsa. Had to add a ¼” strip to the TE.

The fuselage needs some changes. I want the wing and the stab to be more nearly in line with the engine. So, I took out a little of the fuse depth, and lowered the stab.
But, I need little excuse to build something, so why not build a profile model that conforms to the Reed Speed rules? And since it’s a race, why not a model of the world’s most successful race plane? The one that took first place in every race it entered.
Like Roddie told us, it starts with a 3-view.

The rules specify a 15” min. span, and 45 Sq. In. min. wing area. After some figuring, I determined that an 18” span would give me an area of 52 Sq. In. So, I laid that out on a piece of SIG airfoiled balsa. Had to add a ¼” strip to the TE.

The fuselage needs some changes. I want the wing and the stab to be more nearly in line with the engine. So, I took out a little of the fuse depth, and lowered the stab.

duaneh- Gold Member

- Posts : 216
Join date : 2019-04-06
Re: The CEF Reed Speed Contest… a very late entry
![]() getback Wed Feb 16, 2022 5:54 am
getback Wed Feb 16, 2022 5:54 am
Looking Good duaneh ! I have always thought they were some pretty wild looking plane design . Should bee a good build . 

getback- Top Poster


Posts : 10326
Join date : 2013-01-18
Age : 67
Location : julian , NC
Landing Gear
![]() duaneh Sat Feb 19, 2022 7:01 pm
duaneh Sat Feb 19, 2022 7:01 pm
Since the Gee Bee landing gear is such an important part of the “look”, I want to replicate it. I also want it to be removable for service. With its small and thin wing, I don’t expect this plane to slow down much for landing. The gear has to be strong enough to withstand abrupt “arrivals”.
I started by making a grooved landing gear block and epoxied it into the wing.
With that done, I glued the wing in place, then bent and fitted the wire gear.
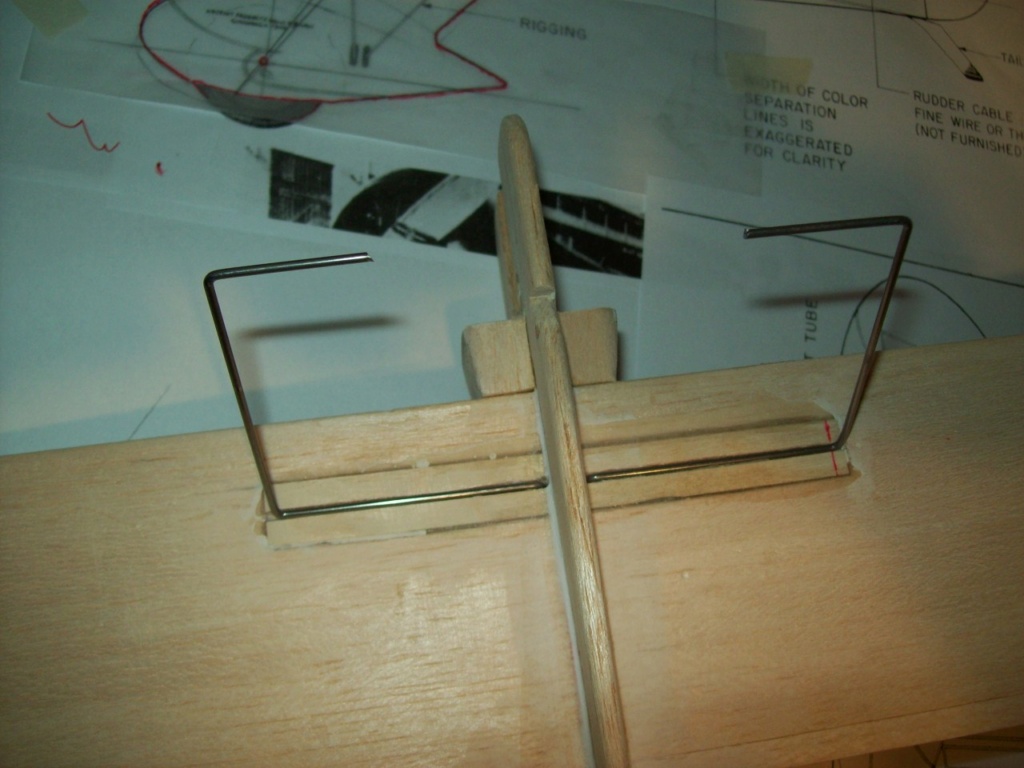
The gear wire will go thru the wing and into ply blocks that are glued to the side of the fuse.

The blocks will be hidden behind the firewall support fairings.

I am not going to carve the huge Gee Bee wheel pants and gear leg fairings. A profile plane can have profile wheel pants, right?
These will be lightly attached to the gear legs with silicone, and removed for flight. I couldn’t think of a good way to keep the rear leg of the fairing from punching into the wing when the torsion wire flexes on landing.
Even in profile form, I think it captures the “look” pretty well.
I started by making a grooved landing gear block and epoxied it into the wing.

With that done, I glued the wing in place, then bent and fitted the wire gear.

The gear wire will go thru the wing and into ply blocks that are glued to the side of the fuse.

The blocks will be hidden behind the firewall support fairings.

I am not going to carve the huge Gee Bee wheel pants and gear leg fairings. A profile plane can have profile wheel pants, right?
These will be lightly attached to the gear legs with silicone, and removed for flight. I couldn’t think of a good way to keep the rear leg of the fairing from punching into the wing when the torsion wire flexes on landing.
Even in profile form, I think it captures the “look” pretty well.

duaneh- Gold Member
- Posts : 216
Join date : 2019-04-06
Re: The CEF Reed Speed Contest… a very late entry
![]() getback Sun Feb 20, 2022 7:31 am
getback Sun Feb 20, 2022 7:31 am
I like the way you did the landing gear , That should do the trick and the profile is right on time too ! 
getback- Top Poster
-
Posts : 10326
Join date : 2013-01-18
Age : 67
Location : julian , NC
Aargh!
![]() duaneh Thu Feb 24, 2022 10:44 pm
duaneh Thu Feb 24, 2022 10:44 pm
I messed up.
I was so focused on the wingspan and wing area requirements that I didn’t pay attention to the one about minimum length. The Reed Speed contest rules specify at least 12” from the drive hub to the rear of the model.
Well, guess what? My Gee Bee is 11-1/4”.
What to do… I could just leave it alone, since it isn’t a real entry.
But no, rules are rules, even imaginary ones. I need to add ¾” to the length.
A few seconds with the razor saw, and the deed is done.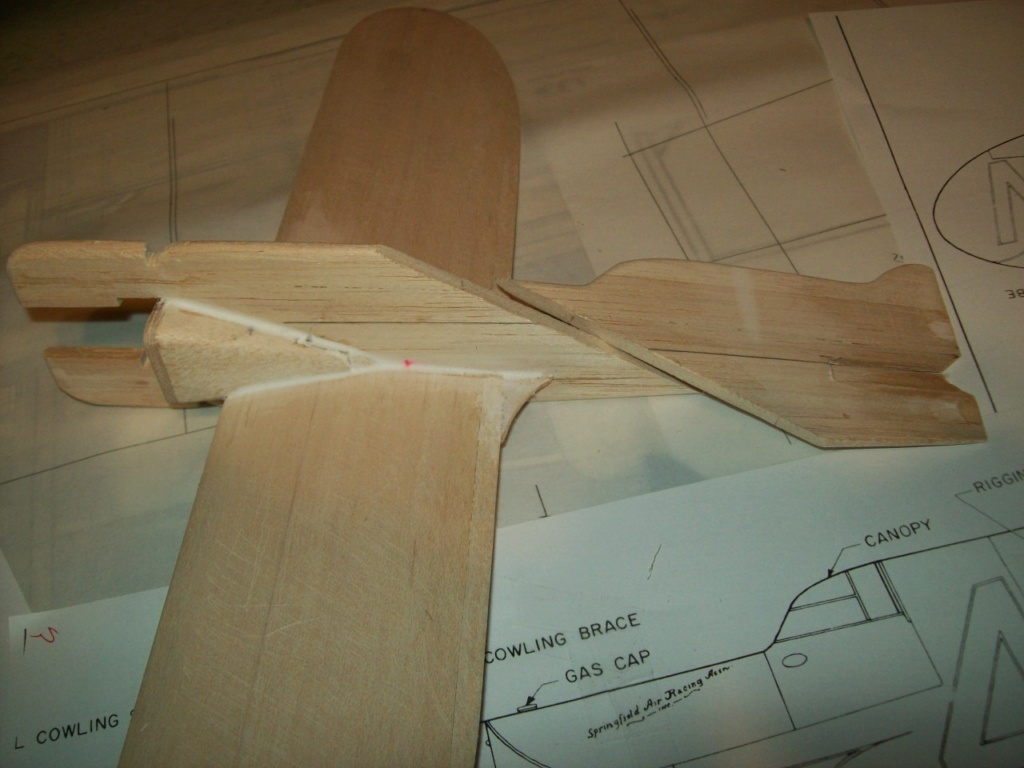
I glued in a balsa strip to add the needed length, and sanded the joint smooth.

With the added length in front of the cockpit, it retains the aft cockpit location so characteristic of the Gee Bee racers.
I was so focused on the wingspan and wing area requirements that I didn’t pay attention to the one about minimum length. The Reed Speed contest rules specify at least 12” from the drive hub to the rear of the model.
Well, guess what? My Gee Bee is 11-1/4”.
What to do… I could just leave it alone, since it isn’t a real entry.
But no, rules are rules, even imaginary ones. I need to add ¾” to the length.
A few seconds with the razor saw, and the deed is done.

I glued in a balsa strip to add the needed length, and sanded the joint smooth.

With the added length in front of the cockpit, it retains the aft cockpit location so characteristic of the Gee Bee racers.
duaneh- Gold Member
- Posts : 216
Join date : 2019-04-06
Re: The CEF Reed Speed Contest… a very late entry
![]() Cribbs74 Thu Feb 24, 2022 11:01 pm
Cribbs74 Thu Feb 24, 2022 11:01 pm
You went from an “R2” to a Z. Looks good.

Cribbs74- Moderator
-
Posts : 11906
Join date : 2011-10-24
Age : 50
Location : Tuttle, OK
Re: The CEF Reed Speed Contest… a very late entry
![]() getback Sun Feb 27, 2022 4:59 am
getback Sun Feb 27, 2022 4:59 am
I must say thats a unique way of splicing a extension in the fuse .Did you just CA that back together ? 
getback- Top Poster
-
Posts : 10326
Join date : 2013-01-18
Age : 67
Location : julian , NC
Re: The CEF Reed Speed Contest… a very late entry
![]() rsv1cox Sun Feb 27, 2022 9:46 am
rsv1cox Sun Feb 27, 2022 9:46 am
Love your Gee Bee and the fix blends right in. Nice job. Eager to see the final product.

rsv1cox- Top Poster
-
Posts : 10928
Join date : 2014-08-18
Location : West Virginia
Re: The CEF Reed Speed Contest… a very late entry
![]() duaneh Sun Feb 27, 2022 9:40 pm
duaneh Sun Feb 27, 2022 9:40 pm
Eric – yes, just CA’ed the extension in.
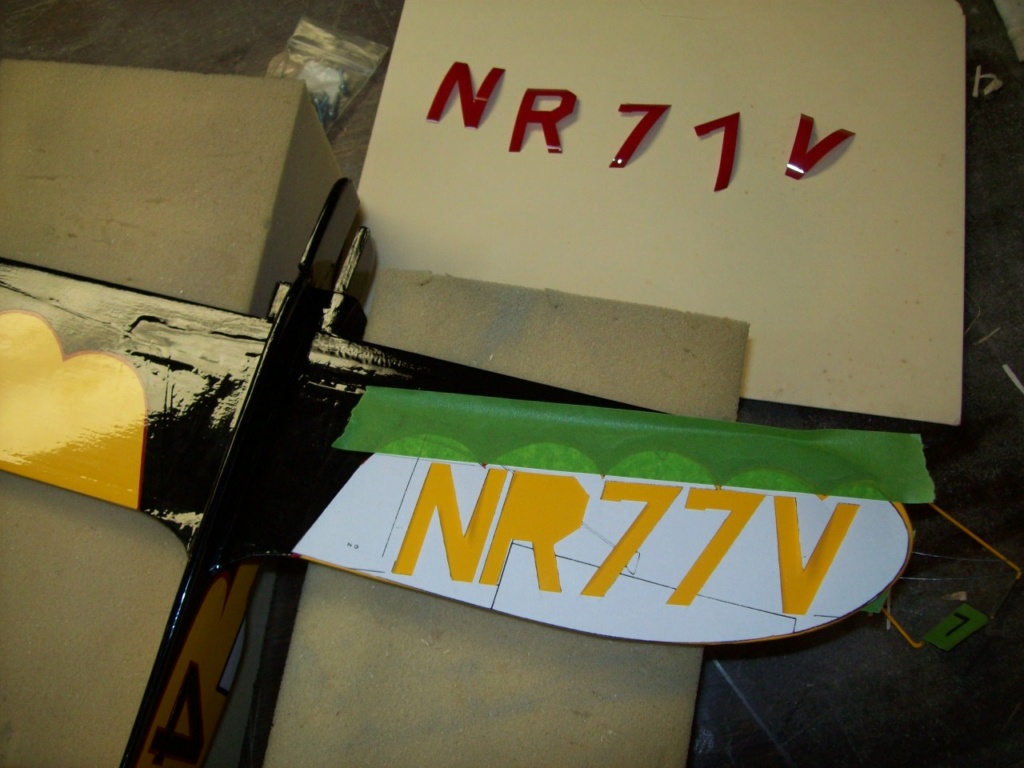
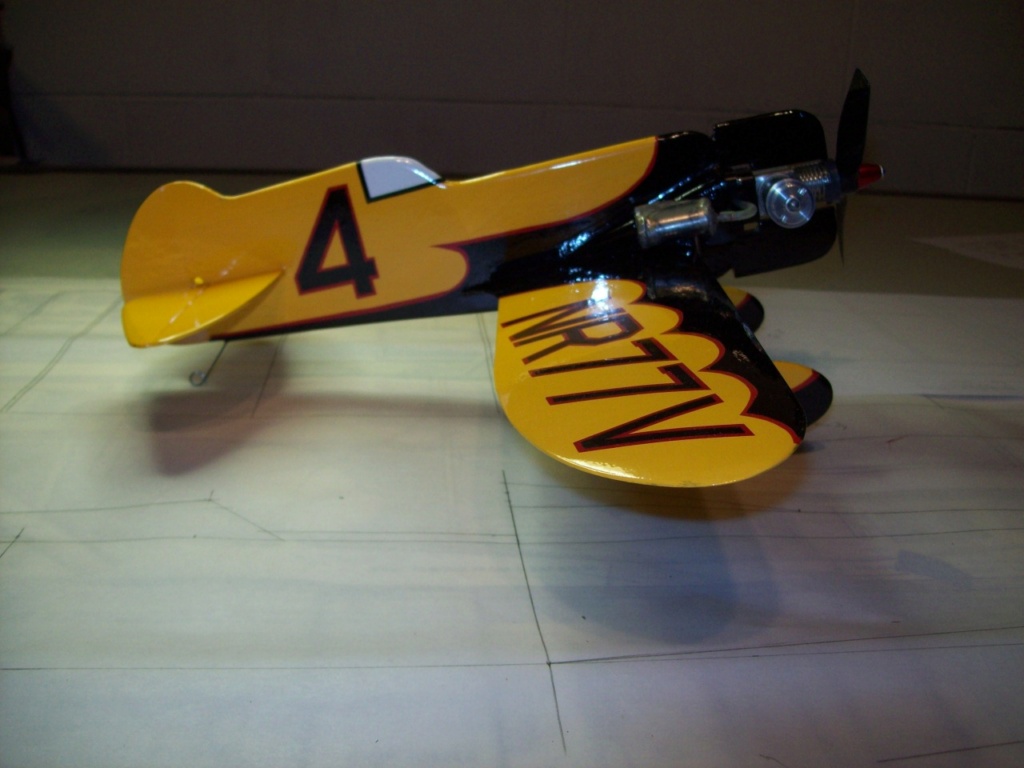
With that done, I glued the stab & rudder on, and it’s time to cover it. The full scale ‘Z’ was yellow & black, with a red stripe to separate the colors. The red stripe is going to be tricky. I thought about leaving it out, and doing a yellow & black bumblebee. But, I think I can cut it out, even though some of it will be freehand.
Graphics are the easy part. Rather than make a thin stripe, I just cut 2 sets of numbers & letters. Then I’ll iron the black right over the red.
I put the yellow on the fuse first, then cut the red, and ironed it on, leaving plenty of excess.
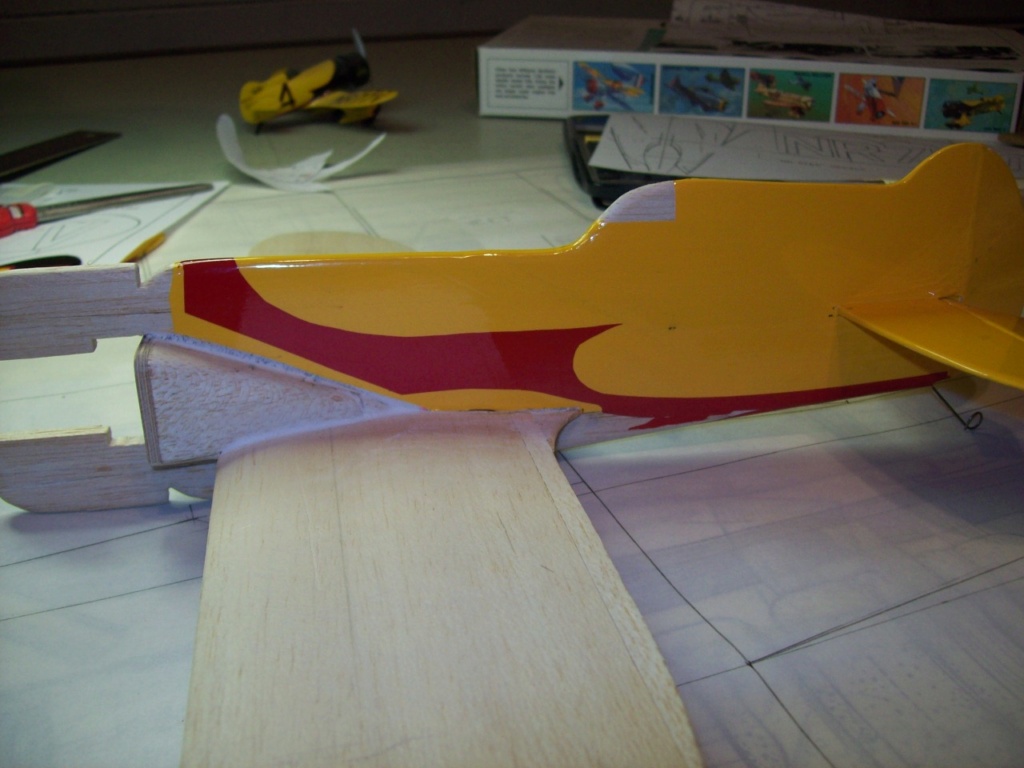
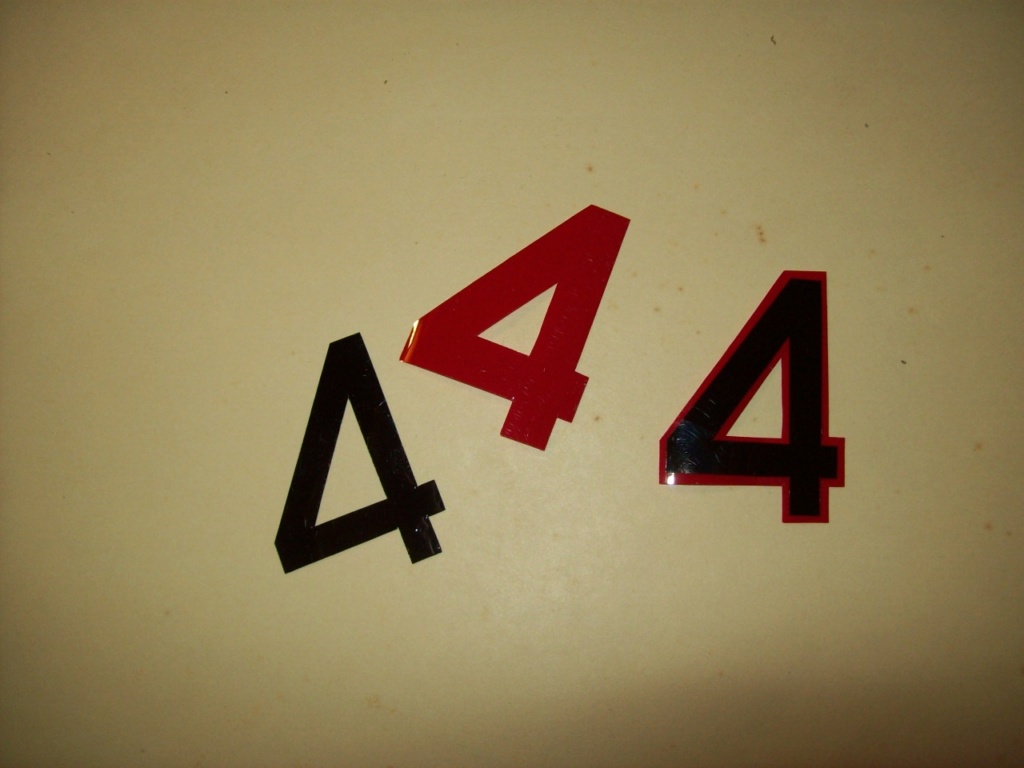
Then the black. This pattern was cut freehand, just trying to stay 1/16” inside the previous cut. You can see the imperfections, but It’ll do. I added the race number, and the canopy.
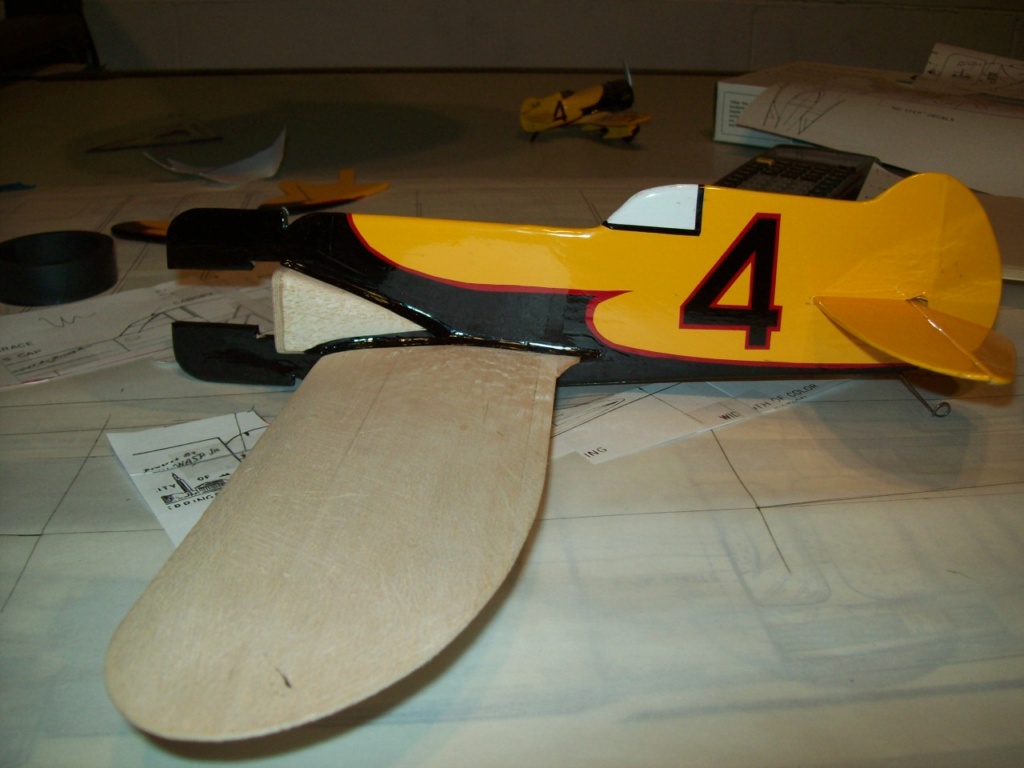
You can see my scale reference in the last picture, it’s a small die-cast replica.
With that done, I glued the stab & rudder on, and it’s time to cover it. The full scale ‘Z’ was yellow & black, with a red stripe to separate the colors. The red stripe is going to be tricky. I thought about leaving it out, and doing a yellow & black bumblebee. But, I think I can cut it out, even though some of it will be freehand.
Graphics are the easy part. Rather than make a thin stripe, I just cut 2 sets of numbers & letters. Then I’ll iron the black right over the red.

I put the yellow on the fuse first, then cut the red, and ironed it on, leaving plenty of excess.

Then the black. This pattern was cut freehand, just trying to stay 1/16” inside the previous cut. You can see the imperfections, but It’ll do. I added the race number, and the canopy.

You can see my scale reference in the last picture, it’s a small die-cast replica.
duaneh- Gold Member
- Posts : 216
Join date : 2019-04-06
Finished!
![]() duaneh Wed Mar 02, 2022 8:33 pm
duaneh Wed Mar 02, 2022 8:33 pm
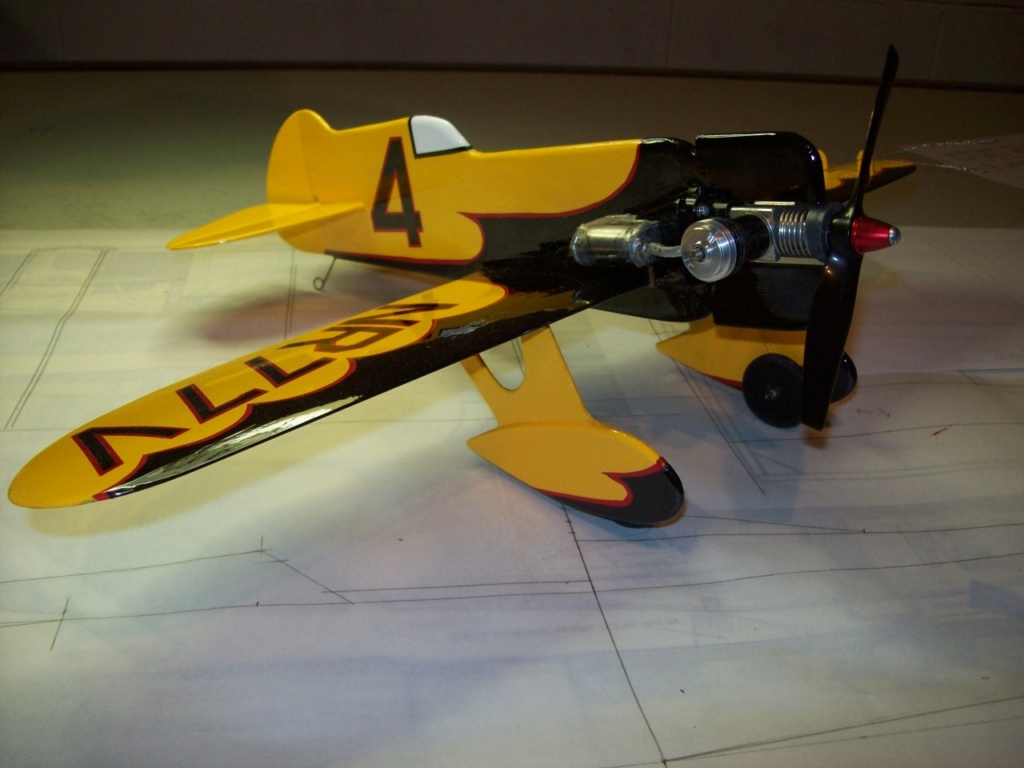
The wing trim was done in the same way as the fuse; yellow first, the the red edging, the the black.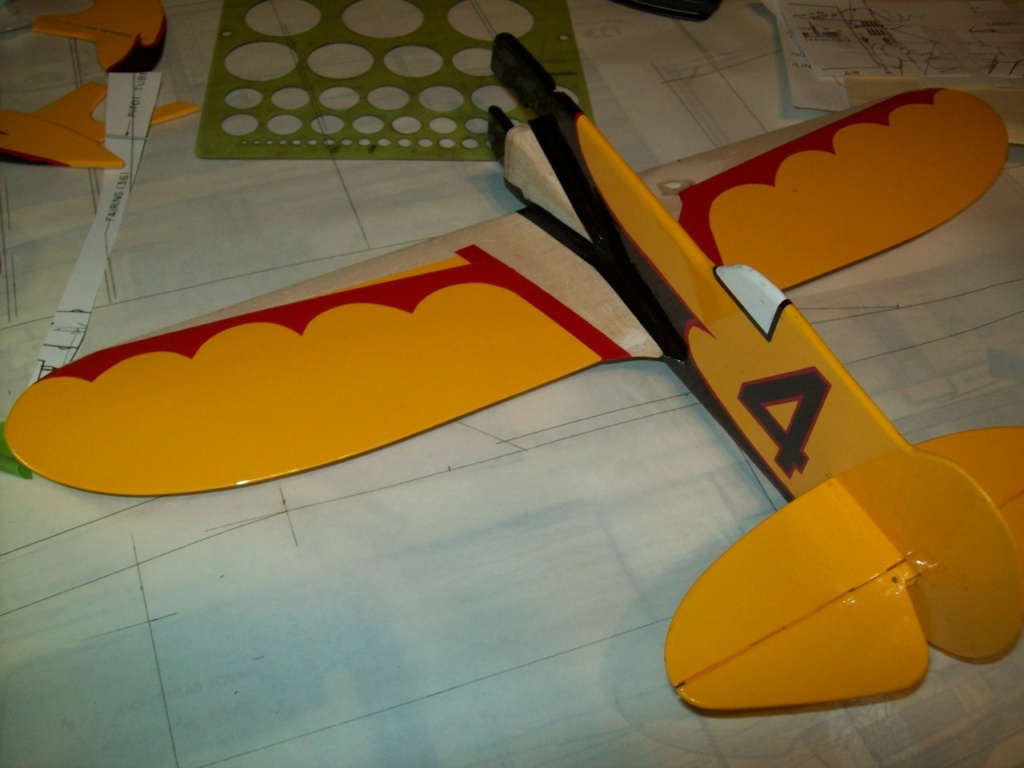
I used a copy of the drawing as a template for positioning the numbers.
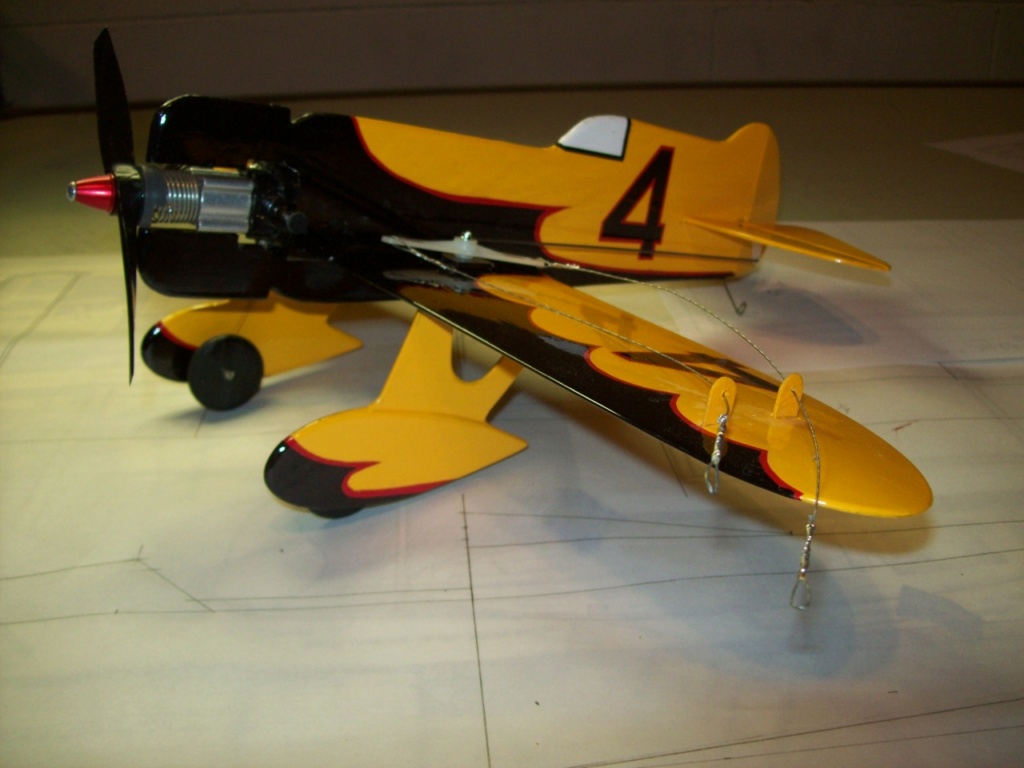
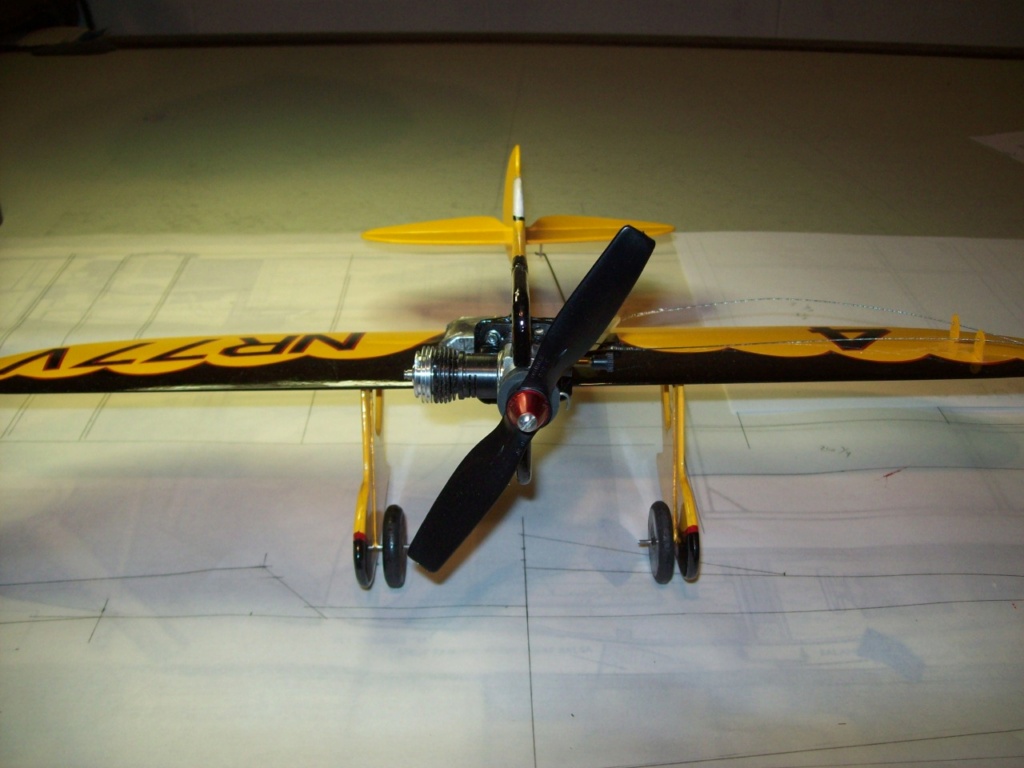
Then it was just a matter of installing the control system, and assembling all of the parts.

This is an interesting view. The wings appear too long, but are to scale. It's the profile fuse that causes the illusion. The portly fuse on the actual 'Z' was as wide as the black trim.


I used a copy of the drawing as a template for positioning the numbers.

Then it was just a matter of installing the control system, and assembling all of the parts.


This is an interesting view. The wings appear too long, but are to scale. It's the profile fuse that causes the illusion. The portly fuse on the actual 'Z' was as wide as the black trim.


duaneh- Gold Member
- Posts : 216
Join date : 2019-04-06
» Tether Car Speed entry
» March Engine of the month submissions, post them here!
» What is it???
» COX Flight Contest: What's Your Entry?
» CL Contest at Catoosa, OK in late Sept.
» March Engine of the month submissions, post them here!
» What is it???
» COX Flight Contest: What's Your Entry?
» CL Contest at Catoosa, OK in late Sept.
Page 1 of 1
Permissions in this forum:
You cannot reply to topics in this forum