

 Rules
Rules
Log in
Search
Latest topics
» Golden Bee basic running problemby roddie Yesterday at 10:51 pm
» Simple Gliders
by rdw777 Yesterday at 6:25 pm
» Foam hand kids glider converted to 0.049 CL
by rdw777 Yesterday at 6:11 pm
» Weird search for a single comic from an old Mad Magazine
by Kim Yesterday at 1:44 pm
» Scientific "Zipper" Build...Zipper Flys!.
by getback Yesterday at 7:27 am
» Cox .049 Tee Dee engines back in stock (limited availablility)
by GallopingGhostler Yesterday at 1:05 am
» Very off-topic.........Time passes and not always for the best......
by rsv1cox Thu Jul 25, 2024 2:47 pm
» Roddie-Rigger.. a 2005 original design
by roddie Wed Jul 24, 2024 11:48 pm
» Jim Walker Bonanza etc.
by rsv1cox Wed Jul 24, 2024 6:30 pm
» Throttles for Cox Tee Dee .049 / .020 / .010 engines --- videos
by sosam117 Wed Jul 24, 2024 8:54 am
» Introducing our Cox .049 TD Engines
by Admin Tue Jul 23, 2024 2:00 am
» Project Cox .049 r/c & Citabrian Champion
by getback Mon Jul 22, 2024 4:14 pm
Cox Engine of The Month
July-2024
robot797's
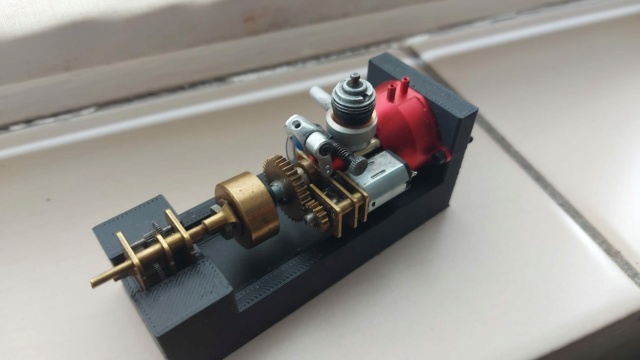
"ULTIMITE COX 010: it has a clutch, E starter, throttle, exhaust, aluminum tank, aluminum venturi, gearbox with forward and reverse, and now its on a custom drawn and printed stand"

PAST WINNERS
robot797's
"ULTIMITE COX 010: it has a clutch, E starter, throttle, exhaust, aluminum tank, aluminum venturi, gearbox with forward and reverse, and now its on a custom drawn and printed stand"
PAST WINNERS
CEF Traveling Engine


Win This Engine!

Live on Patrol


My cox 0.49 medallion
Page 1 of 1

My cox 0.49 medallion
![]() Tomcox1977 Fri Aug 19, 2022 5:32 pm
Tomcox1977 Fri Aug 19, 2022 5:32 pm


Hi guys, my name is Tom, I'm new to the forum, I have 6 cox engines that I'm refurbishing little by little, I'll upload pictures from the renovation process in an orderly manner, in the meantime, I'm attaching pictures of the medallion 0.49 engine I would appreciate it if someone who repaired such a 0.49 cox medallion engine would also upload photos and also if they could give tips thanks Tom

Tomcox1977- New Member

- Posts : 3
Join date : 2022-08-16
Age : 24
Location : Israel
Re: My cox 0.49 medallion
![]() rsv1cox Fri Aug 19, 2022 6:42 pm
rsv1cox Fri Aug 19, 2022 6:42 pm
Hi Tom, welcome to the forum.
First of all do not crock pot with antifreeze boil either of those engines, a popular cleaning method here. And do not use heat of any kind when cleaning/freeing stuck engines with plastic parts. Instead, buy some Berrymans parts cleaner and soak each for 15-20 minutes, remove and use a tooth brush to clean, soapy water/clean water rinse and blow dry with compressed air.
Spray RemOil in all the openings filling the intake and carefully rock the propeller back and forth without forcing. If you do not get any movement, carefully apply heat from a soldering iron or gun to the glow heads intersection with the cylinder staying away from any plastic part. Use a Cox wrench (fully circled if available) to remove the head. Add some Remoil directly to the top of the piston and try rocking back and forth again. If no luck, clean off the top of the piston and apply a clean soldering iron directly to the top of the piston, perhaps 30 seconds. It should loosen at this point. Seldom is it necessary to remove the back plate on the case.
Whatever you do, do it slowly and carefully.
When the engine is clean and free to move, quickly flip the prop in each direction clockwise/counterclock wise expelling the excess oil from the crankcase. You can use the correct Cox tool to remove the prop drive washer and plastic intake in desired. Always nice to do. If you can, remove the cylinder and rear plate, remove the piston and crank and carefully clean both.
Evapo-rust gel is an option but it will remove any anodizing and will lighten the finish (bluing) on the cylinder.
If all else fails, you might try a hair drier, a heat gun even on a low setting can really get away from you. These Medallions etc. are after-all designed to stand some heat. But I would be careful. The above has always worked for me and I have never had to resort to heat. But on Babe Bee's and the like heat is definately your friend.
Others will check in with additional methods.
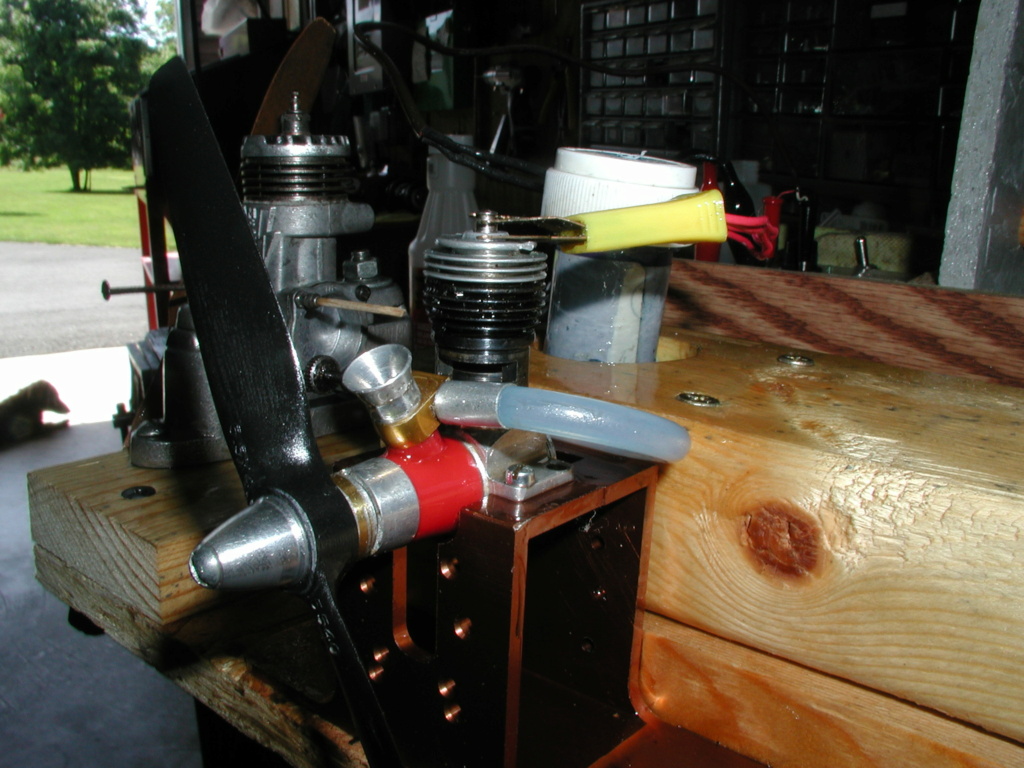
Fred's engine enjoying a little love with Spike the dog laying well clear. Good luck.
First of all do not crock pot with antifreeze boil either of those engines, a popular cleaning method here. And do not use heat of any kind when cleaning/freeing stuck engines with plastic parts. Instead, buy some Berrymans parts cleaner and soak each for 15-20 minutes, remove and use a tooth brush to clean, soapy water/clean water rinse and blow dry with compressed air.
Spray RemOil in all the openings filling the intake and carefully rock the propeller back and forth without forcing. If you do not get any movement, carefully apply heat from a soldering iron or gun to the glow heads intersection with the cylinder staying away from any plastic part. Use a Cox wrench (fully circled if available) to remove the head. Add some Remoil directly to the top of the piston and try rocking back and forth again. If no luck, clean off the top of the piston and apply a clean soldering iron directly to the top of the piston, perhaps 30 seconds. It should loosen at this point. Seldom is it necessary to remove the back plate on the case.
Whatever you do, do it slowly and carefully.
When the engine is clean and free to move, quickly flip the prop in each direction clockwise/counterclock wise expelling the excess oil from the crankcase. You can use the correct Cox tool to remove the prop drive washer and plastic intake in desired. Always nice to do. If you can, remove the cylinder and rear plate, remove the piston and crank and carefully clean both.
Evapo-rust gel is an option but it will remove any anodizing and will lighten the finish (bluing) on the cylinder.
If all else fails, you might try a hair drier, a heat gun even on a low setting can really get away from you. These Medallions etc. are after-all designed to stand some heat. But I would be careful. The above has always worked for me and I have never had to resort to heat. But on Babe Bee's and the like heat is definately your friend.
Others will check in with additional methods.
Fred's engine enjoying a little love with Spike the dog laying well clear. Good luck.


rsv1cox- Top Poster


Posts : 10851
Join date : 2014-08-18
Location : West Virginia
Re: My cox 0.49 medallion
![]() 944_Jim Fri Aug 19, 2022 9:19 pm
944_Jim Fri Aug 19, 2022 9:19 pm
Welcome to CEF, Tom!
My name is Jim, and I'm a Coxoholic. I've been addicted.to.th3se engines since childhood, and still have a few from way back then.
Bob has served you well. His perspective is saving you effort and provides a piece worth showing off, and will provide a quick, easy way to run it. I find no fault in his advice.
I love these little engines too. But I'm primarily a function over form kind of guy. So my answer is from a "I want it running" mentality. In other words "no knock on my friend's advice."
Alibi alibi, alibi:
I'm also bad about over-analyzing stuff. Really!
I would do a quick external dry cleanup (old toothbrush works) provided the piston is high in the travel and blocking the exhaust ports without exposing the SPI...that is, the exhaust port gap below the piston (if any). Then, once dry brushing the abrasive crap away, I would disassemble as much as possible. I would NOT consider using a dry-rotted plastic "front case," as they are readily available from Exmodelengines, Cox International, and MECOA. The rest can be cleaned in pieces and reassembled with a fresh plastic front end. For any sticky parts, heat is your friend...but it will ruin that white-ash front end. If you cause no damage removing the front end, then by all means, test run with that bleached plastic...but be prepared to let it go.
All the parts will be better cleaned in parts than whole. This isn't like disassembling a Honda DOHC 6 cylinder CBX engine (many, many fewer parts in the Cox engine). The trick is to clean it enough so no damage is incurred as it is disassenbled. The more you take apart, the more you can target the filth and target lube. Once the delicate plastic part is removed, you can use Berryman's or Fantastic 409 to really clean the metal parts. Wash and dry anything that water touched...period..Even 70% rubbing alcohol will.remove a significant amount of water if you don't have a compressor. Oil all parts with light machine oil or castor oil as you reassemble. Your fuel will oil everything as you run it. Store it oiled using any available light oil so nothing rots until next use. Even a few drops of automatic transmission fluid (ATF) will be better than nothing...or air tool oil...or 3-in-1 oil...just something light that doesn't gum up until next run.
The ball joint under the piston is a place I would carefully check, as well as front case bushing wear (where the crank rides) and piston-to-cylinder slop. The glowhead can be checked once clean, and "bubbled clean" with some good old fashioned alcohol to clean, and then a D cell battery to burn off the alcohol and junk. Watch out that you don't burn your fingers! Once all parts are clean, then reassemble and perform "break-in," just because you never know what you have until it is running. A 5x3 prop will be good. Run rich at first, then lean out as you learn the engine.
Who cares if cleaning etches the black off the cylinder (I don't)...that can be fixed later IF the engine is worth the extra effort (another cleaning cycle). Bob can speak on using blueing chemicals much better than I can. He really does a fantastic job reconditioning model engines.
So, in short, you now have the two extremes recommended. I strongly suspect your solution will fall cleanly (hahaha) in the middle.
Enjoy the toy!
PS...the engine manual is in the INFO section, just below "Latest Topics." It will give you good guidance too.
_________________
Never enough time to build them all...always enough time to smash them all!
944_Jim- Diamond Member

-
Posts : 2000
Join date : 2017-02-08
Age : 59
Location : NE MS
Re: My cox 0.49 medallion
![]() Tomcox1977 Sat Aug 20, 2022 12:08 am
Tomcox1977 Sat Aug 20, 2022 12:08 am
Hi Jim, good morning this week I am supposed to receive 4 engines from my friend in the north of my country for overhaul including a new plastic front and a key to open the cylinder and cylinder and then I can disassemble thanks for the offer
Tomcox1977- New Member
- Posts : 3
Join date : 2022-08-16
Age : 24
Location : Israel
Re: My cox 0.49 medallion
![]() Tomcox1977 Sat Aug 20, 2022 12:13 am
Tomcox1977 Sat Aug 20, 2022 12:13 am
rsv1cox wrote:Hi Tom, welcome to the forum.
First of all do not crock pot with antifreeze boil either of those engines, a popular cleaning method here. And do not use heat of any kind when cleaning/freeing stuck engines with plastic parts. Instead, buy some Berrymans parts cleaner and soak each for 15-20 minutes, remove and use a tooth brush to clean, soapy water/clean water rinse and blow dry with compressed air.
Spray RemOil in all the openings filling the intake and carefully rock the propeller back and forth without forcing. If you do not get any movement, carefully apply heat from a soldering iron or gun to the glow heads intersection with the cylinder staying away from any plastic part. Use a Cox wrench (fully circled if available) to remove the head. Add some Remoil directly to the top of the piston and try rocking back and forth again. If no luck, clean off the top of the piston and apply a clean soldering iron directly to the top of the piston, perhaps 30 seconds. It should loosen at this point. Seldom is it necessary to remove the back plate on the case.
Whatever you do, do it slowly and carefully.
When the engine is clean and free to move, quickly flip the prop in each direction clockwise/counterclock wise expelling the excess oil from the crankcase. You can use the correct Cox tool to remove the prop drive washer and plastic intake in desired. Always nice to do. If you can, remove the cylinder and rear plate, remove the piston and crank and carefully clean both.
Evapo-rust gel is an option but it will remove any anodizing and will lighten the finish (bluing) on the cylinder.
If all else fails, you might try a hair drier, a heat gun even on a low setting can really get away from you. These Medallions etc. are after-all designed to stand some heat. But I would be careful. The above has always worked for me and I have never had to resort to heat. But on Babe Bee's and the like heat is definately your friend.
Others will check in with additional methods.
Fred's engine enjoying a little love with Spike the dog laying well clear. Good luck.
Hi friend, thank you very much for the advice. My plan is basically to disassemble everything into parts, clean well and maybe paint the parts that are possible and return the medallion. I will keep it in my room on the work desk on a stand and I have a simple 0.49 cox one that I will use to fly cables that a friend gave me that was once built in my country
Tomcox1977- New Member
- Posts : 3
Join date : 2022-08-16
Age : 24
Location : Israel
Fledgling
![]() Coxfledgling Sat Aug 20, 2022 2:47 am
Coxfledgling Sat Aug 20, 2022 2:47 am
Hi Tom,
All of the above but...don't be tempted to unscrew the cylinder using the Cox wrench s Todd the exhaust ports, use a strap wrench or pliers with a leather protective strip
The leather grips the cylinder whilst the pliers grip the leather .
Warming the alloy c/case to release its grip to the cylinder slightly can help
I would first remove the cylinder head and refit nipped up then remove cylinder ...
I have a small camping stove and saucepan to heat car engine oil to apply heat, but all plastic parts need to be removed first
Im in UK and use petrol for cleaning which works for me but again plastic parts are first removed.
Mecoa will not send stuff to UK so I have to be really careful when working on these engines
Someone will confirm if there is a lub channel in the main bearing for the crank
Which may well be blocked
Take your trip and enjoy ...
Coxfledgling- Gold Member

- Posts : 375
Join date : 2021-01-10
Location : Near Caernarfon, Snowdonia, Wales, UK
Re: My cox 0.49 medallion
![]() balogh Sat Aug 20, 2022 3:26 am
balogh Sat Aug 20, 2022 3:26 am
I guess this is a later production thick wall cylinder with the flats on the top fin, so the wrench can be used on the top fin, not on the exhaust ports...nevertheless the warming of the crankcase as Bob and Coxfledgling advised is a good tip to loosen the threads..
I have not found lube channel in the front end of the crankcase of rotary valve engines, most likely because unlike reedies, the rotary valve opening provides a continuous contact of the crankcase nose internal with fresh fuel and thus, oil.
I have not found lube channel in the front end of the crankcase of rotary valve engines, most likely because unlike reedies, the rotary valve opening provides a continuous contact of the crankcase nose internal with fresh fuel and thus, oil.
balogh- Top Poster
-
Posts : 4803
Join date : 2011-11-06
Age : 65
Location : Budapest Hungary
Re: My cox 0.49 medallion
![]() rsv1cox Sat Aug 20, 2022 7:21 am
rsv1cox Sat Aug 20, 2022 7:21 am
balogh wrote:I guess this is a later production thick wall cylinder with the flats on the top fin, so the wrench can be used on the top fin, not on the exhaust ports...nevertheless the warming of the crankcase as Bob and Coxfledgling advised is a good tip to loosen the threads..
I have not found lube channel in the front end of the crankcase of rotary valve engines, most likely because unlike reedies, the rotary valve opening provides a continuous contact of the crankcase nose internal with fresh fuel and thus, oil.
Balogh has sharp eyes. It does look like your engine has the flats cut into the top fin necessary to safely remove the cylinder. This is the Cox tool that you should have to do the job. The horse-shoe cutout is designed to do that. The hooked cutout at the top of the tool is used to remove the front plate next to the plastic intake.

I'm not so against using the fork at the left side of the tool to remove the cylinder, but I buffer it, ensure that the cylinder is well heated and that the fork is fully inserted into the exhaust ports before doing so, most cylinders do not have the top flat cut. But notice the top wrenches fork is quite shallow, I never use that, to easy to not fully engage with the exhaust ports.
But before doing anything, remove the needle which could be bent in the "removing parts" process.
If your eager to clean your engine and do not want to go to the expense of buying the Berryman's cleaner you can clean it with a tooth brush and alcohol, or better yet a light machine oil. Marvel Mystery oil works well, Remoil better. You can also use glow fuel, or Hoppees #9.
rsv1cox- Top Poster
-
Posts : 10851
Join date : 2014-08-18
Location : West Virginia
» Medallion 049 & Medallion 049; what is the difference?
» Cox Texaco Production Blog
» Medallion .15
» cox medallion. 15
» Medallion .09 R/C
» Cox Texaco Production Blog
» Medallion .15
» cox medallion. 15
» Medallion .09 R/C
Page 1 of 1
Permissions in this forum:
You cannot reply to topics in this forum