

 Rules
Rules
Log in
Search
Latest topics
» Stealth SB-Xby Admin Today at 8:28 pm
» ST .35 STUNT / VOODOO / ZERO POINT ZERO NITRO
by TD ABUSER Today at 7:45 pm
» SUPERTIGER .15 PROJECT
by TD ABUSER Today at 7:42 pm
» For sale -- Cox Custom Carburetors for Tee Dee engines
by sosam117 Today at 5:23 pm
» WHERE ARE YOU BUYING YOUR FUEL AND GLOW PLUGS...?
by TD ABUSER Today at 4:35 pm
» Waiting for Engines from Ken Enya
by sosam117 Today at 4:33 pm
» Unusual Cox 049 cylinder - Need help identifying
by anm2 Today at 4:12 pm
» Jim Walker Bonanza etc.
by rsv1cox Today at 2:57 pm
» What's the Best Reed for Cox Reed Valve Engines.
by roddie Today at 1:37 pm
» Fuel choice
by 1975 control line guy Yesterday at 4:01 pm
» "Fall S.M.A.L.L." Video 3.
by GallopingGhostler Yesterday at 2:37 pm
» Gifted Fox
by Ken Cook Yesterday at 11:12 am
Cox Engine of The Month
August-2024
balogh's

"Cox TD09 R/C Beast of Burden featuring Kamtechnik head and DIY metallic fuel nipple"

PAST WINNERS
balogh's
"Cox TD09 R/C Beast of Burden featuring Kamtechnik head and DIY metallic fuel nipple"
PAST WINNERS
CEF Traveling Engine


Win This Engine!

Live on Patrol


I did it! I really did it!
Page 2 of 2
Page 2 of 2 •  1, 2
1, 2
Re: I did it! I really did it!
![]() Ken Cook Sat May 06, 2023 3:43 am
Ken Cook Sat May 06, 2023 3:43 am
What I see in your picture is what typically happens when silk is applied or no plasticizer in dope. I've had several planes like that and it usually dials in a irreversible warp into the wing.

Ken Cook- Top Poster

- Posts : 5573
Join date : 2012-03-27
Location : pennsylvania
Re: I did it! I really did it!
![]() 944_Jim Sat May 06, 2023 9:46 am
944_Jim Sat May 06, 2023 9:46 am
That's some genius thinking there!
It appears as if you had just the right size scrap for a test, and lined it up just right. I'm curious how you index your wood so the cutter "knows" the cut zone.
Does your cutter have a discreet platen with fixed width x length? Or does it pull the material through front to back and eject out the rear like an old inkjet in "pass straight out the back" mode?
Thanks much,
"lost in the woods"_944
_________________
Never enough time to build them all...always enough time to smash them all!
944_Jim- Diamond Member


Posts : 2014
Join date : 2017-02-08
Age : 59
Location : NE MS
Re: I did it! I really did it!
![]() GallopingGhostler Sat May 06, 2023 11:24 am
GallopingGhostler Sat May 06, 2023 11:24 am
Just my opinion, but regarding the excessive shrinkage distortion on Mark's plane wing, I'd probably just straighten the parts as best as I could, then overlay the parts distorted (ribs and tips) with stiff 1/32nd sheet balsa or 1/64th basswood, to straighten and strengthen them. Only replace the worst parts.
It would add minimal weight, then with a modern synthetic covering like Litespan, recover it. This would spare a lot of serious dismantling and get it back into flying condition.
Again, just my opinion.


It would add minimal weight, then with a modern synthetic covering like Litespan, recover it. This would spare a lot of serious dismantling and get it back into flying condition.
Again, just my opinion.

GallopingGhostler- Top Poster
-
Posts : 5513
Join date : 2013-07-13
Age : 70
Location : Clovis NM or NFL KC Chiefs
Re: I did it! I really did it!
![]() batjac Sun May 07, 2023 12:33 am
batjac Sun May 07, 2023 12:33 am
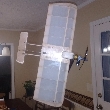
The leading edge is not warped, just the trailing edge, so it's not going to be a problem. I'll just straighten the t.e. and install new 1/16" ribs and 3/32" wingtips. I believe the ribs are glued with Ambroid, and not a great job at that, so it's going to be easy to remove the glue and just pull out the ribs which are none too secure. I was going to omit the flaps, but who knows. Should be pretty straightforward. Since it's already really ugly I'll not spend too much time getting it ready. I'll cut the terrible cloth hinges and replace them with thread hinges using Spectra line, and then cover with some yellow leftover Monokote.
The Sloppy Mark
The Sloppy Mark

batjac- Diamond Member
-
Posts : 2360
Join date : 2013-05-22
Age : 61
Location : Broken Arrow, OK, USA
Re: I did it! I really did it!
![]() NEW222 Sun May 07, 2023 9:20 pm
NEW222 Sun May 07, 2023 9:20 pm
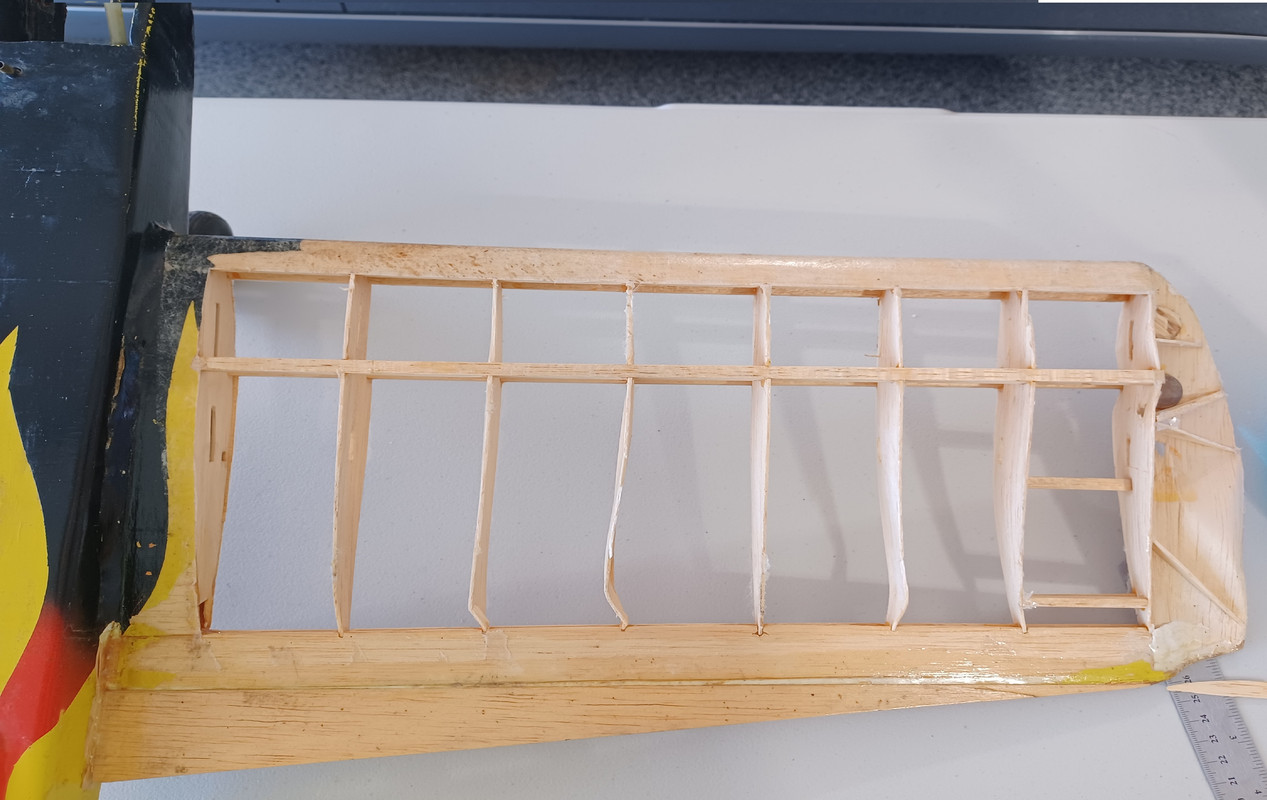
batjac wrote:Okay, I had a little time to get back to this so I stripped off the wing covering. Hoo Boy! Worse than I thought.
I downloaded the Super Combat Streak plans from Outerzone. I measured the dimensions on the ribs in the wing so I could adjust the plans for the ribs so they fit in the existing wing. Whaddayaknow! The ribs as shown on the .pdf fit perfectly! So, I drew up the rib in Inkscape and cut a test rib out on my Cricut cutter.
I’ll try it out tomorrow, and if it fits I’ll cut out the other 13 ribs I need.
The Cautious Mark
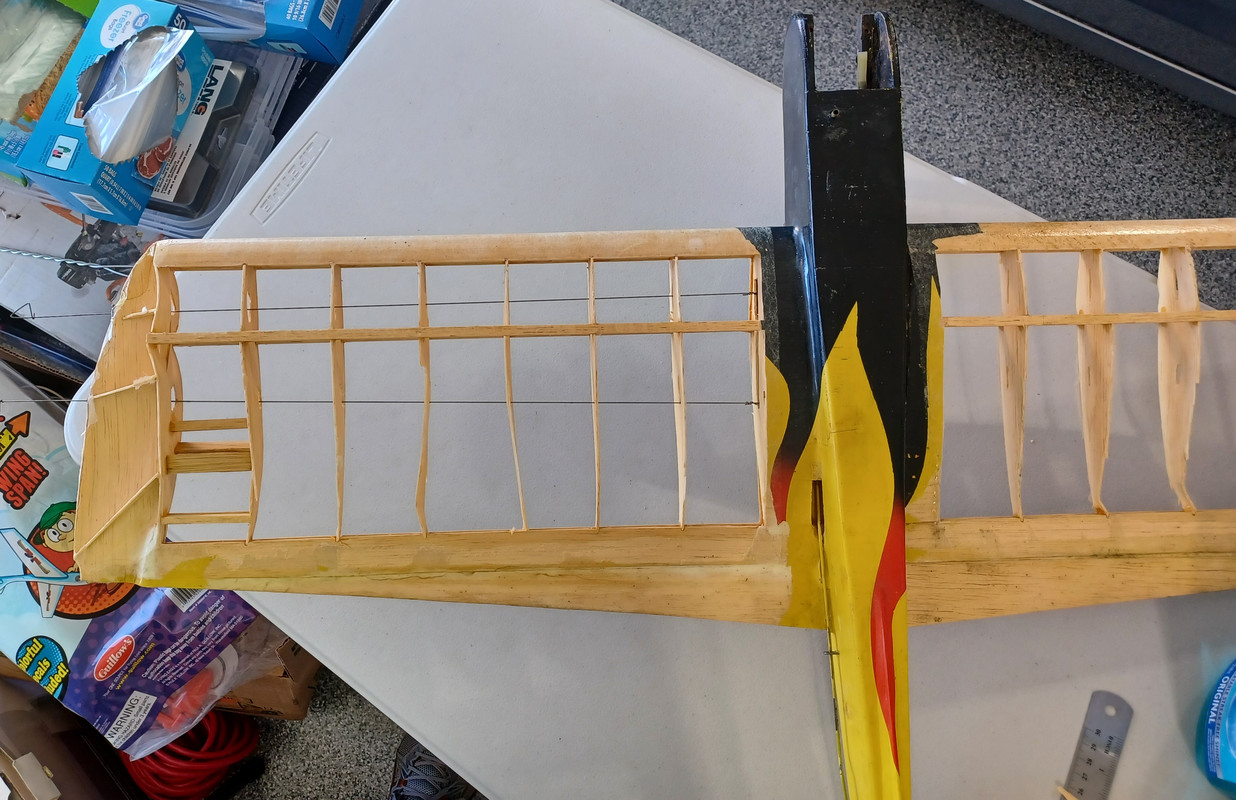

It kinda looks like the ribs followed the same contours of the 'flame' job on the fuselage.....
Sorry, it is not funny it is damaged, but just thought the look was very similar.

NEW222- Top Poster
- Posts : 3895
Join date : 2011-08-13
Age : 45
Location : oakbank, mb
Re: I did it! I really did it!
![]() GallopingGhostler Sun May 07, 2023 10:21 pm
GallopingGhostler Sun May 07, 2023 10:21 pm
My problem is not half butt builds, I do them well. It is when I'm a half-b*** pilot.getback on Jan 12, 2023 wrote:I seen a kit for this plane is $150 Either way I agree with Ken you can't learn on a half butt plane , I can say i think most the planes i fly/flown have been this issue .And getting over it is a Building experience till you succeed at what your tring to get out of the hobby .Just do it and have fun !!


Actually, it is not worse. I've seen worse. Looks like to me that extra soft balsa was used for the sheet surfaces (ribs, tip, tip ribs, etc.)batjac wrote:Okay, I had a little time to get back to this so I stripped off the wing covering. Hoo Boy! Worse than I thought.
The warped ribs could even be fixed with say, 1/16 x 3/16 stiff balsa to straighten along the centerline of the rib on one side. Use a covering sealing iron and a clean sponge with plain water, apply to warped rib with sealing iron to heat and swell / dry the wood fibers back to normal. Then glue the flat balsa stick to keep rib straight. Clear dope or glue (carpenters, Duco, Sigment, etc.), to stiffen up surface of the rib. With a little time and effort working back and forth, existing can be restored without disassembly, maybe except for the very worst parts. But I don't see that type of worseness. (Awaiting the Grammarians
The Combat Flite Streak reminds me a little of my half-A Dumas Tom Tom II that I built in high school for a Golden Bee. Fuselage and wing resembles yours.
GallopingGhostler- Top Poster
-
Posts : 5513
Join date : 2013-07-13
Age : 70
Location : Clovis NM or NFL KC Chiefs
Re: I did it! I really did it!
![]() batjac Mon Jun 10, 2024 7:03 pm
batjac Mon Jun 10, 2024 7:03 pm
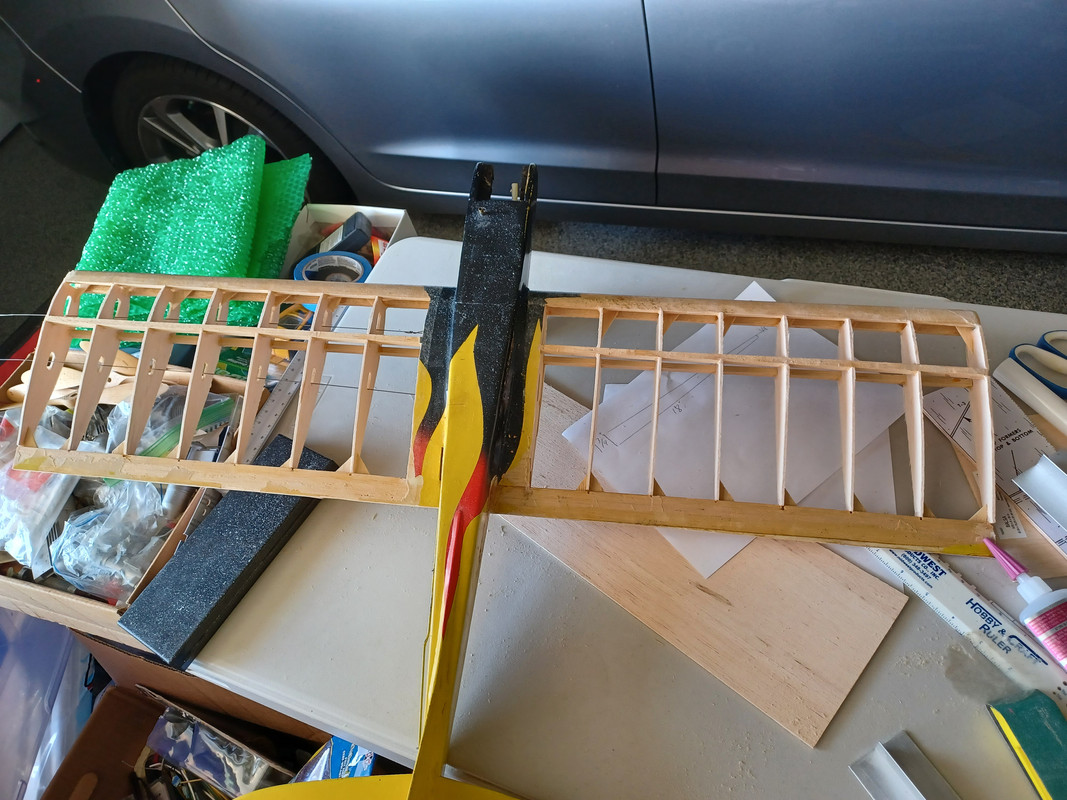
Well, I finally got tired of walking by this in the corner of the garage every time I walked out, so I cleared a little room on my garage work table and got back to this. I went ahead and cut out a set of wing ribs. The ribs are 1/16”, but all the 1/16” sheet balsa at the nearest HobbyLobby is horrible warped. So I’m going with 3/16”. It’ll be stronger, with not a lot of weight gain. After all, this thing is a pig already. What’s a few more grams?
Funny, I made that test rib on the Cricut machine, but it didn't fit. So I printed out the wing rib full size per the plan .pdf, figuring I made some mistake when I did the Cricut .svg file. But when I cut the plan and pasted it to a piece of cardstock to check it against the ribs on the wing, the plan ribs are too large. Another example of how plans and kits do not match. So I cut the length down and then sanded the ribs to shape after gluing in place.
As intimated in previous posts, I’m putting limited resources into this wreck I salvaged from the trash. So don’t expect this to look pretty when I’m done.
The 4/10 Mark
batjac- Diamond Member
-
Posts : 2360
Join date : 2013-05-22
Age : 61
Location : Broken Arrow, OK, USA
Re: I did it! I really did it!
![]() Ken Cook Mon Jun 10, 2024 7:45 pm
Ken Cook Mon Jun 10, 2024 7:45 pm
The Combat Streak is a excellent flying plane. In fact it's probably one of the best designs from that era. In addition to good flying ability, the upright engine and tank directly behind the engine offers superb runs. I would be very cautious of using that tank Mark without taking it out of the plane and cleaning the inside. That might prove a bit difficult to remove but it would be well worth the trouble in doing so. Unfortunately, the largest tank you can fit into the Streak is 3 oz. I'm currently building two right now and I had to modify the wing to accommodate 4 oz. tanks without sacrificing the strength of the wing.
Ken Cook- Top Poster
- Posts : 5573
Join date : 2012-03-27
Location : pennsylvania
Re: I did it! I really did it!
![]() getback Tue Jun 11, 2024 6:07 am
getback Tue Jun 11, 2024 6:07 am
Good decision to use the 3/16 for ribs , man i hate sanding them after in place always worry about breaking one . Yeah I would remove that tank cut the hatch top side inspect clean and new fuel hoses , bee worth it not to have engine problems..

getback- Top Poster
-
Posts : 10326
Join date : 2013-01-18
Age : 67
Location : julian , NC
Re: I did it! I really did it!
![]() rsv1cox Tue Jun 11, 2024 8:14 am
rsv1cox Tue Jun 11, 2024 8:14 am
As intimated in previous posts, I’m putting limited resources into this wreck I salvaged from the trash. So don’t expect this to look pretty when I’m done.
The 4/10 Mark
Ah Mark your just messing with yourself trying to believe that you will not have an investment. How do I know. Been there.
From one model airplane roundy-round nut to another.
The 4/10 Mark
Ah Mark your just messing with yourself trying to believe that you will not have an investment. How do I know. Been there.
From one model airplane roundy-round nut to another.

rsv1cox- Top Poster
-
Posts : 10928
Join date : 2014-08-18
Location : West Virginia
Re: I did it! I really did it!
![]() batjac Tue Jun 11, 2024 9:33 am
batjac Tue Jun 11, 2024 9:33 am
getback wrote:Yeah I would remove that tank cut the hatch top side inspect clean and new fuel hoses , bee worth it not to have engine problems..
I was planning to flush out the tank, but I guess I could cut it out and inspect/replace it. I'm gonna Monokote the wings, but I'm not sure what I'm gonna spray the fuselage with to fuel-proof it. Man! I miss LustreKote.
The Nostalgic Mark
batjac- Diamond Member
-
Posts : 2360
Join date : 2013-05-22
Age : 61
Location : Broken Arrow, OK, USA
Page 2 of 2 • 1, 2
Page 2 of 2
Permissions in this forum:
You cannot reply to topics in this forum