Log in
Search
Latest topics
» Simple Glidersby getback Today at 7:13 am
» Cox PT-19 Wing
by getback Today at 6:24 am
» Foam hand kids glider converted to 0.049 CL
by getback Today at 6:23 am
» Roddie-Rigger.. a 2005 original design
by getback Today at 6:17 am
» Golden Bee basic running problem
by roddie Yesterday at 10:51 pm
» Weird search for a single comic from an old Mad Magazine
by Kim Yesterday at 1:44 pm
» Scientific "Zipper" Build...Zipper Flys!.
by getback Yesterday at 7:27 am
» Cox .049 Tee Dee engines back in stock (limited availablility)
by GallopingGhostler Yesterday at 1:05 am
» Very off-topic.........Time passes and not always for the best......
by rsv1cox Thu Jul 25, 2024 2:47 pm
» Jim Walker Bonanza etc.
by rsv1cox Wed Jul 24, 2024 6:30 pm
» Throttles for Cox Tee Dee .049 / .020 / .010 engines --- videos
by sosam117 Wed Jul 24, 2024 8:54 am
» Introducing our Cox .049 TD Engines
by Admin Tue Jul 23, 2024 2:00 am
Cox Engine of The Month
July-2024
robot797's
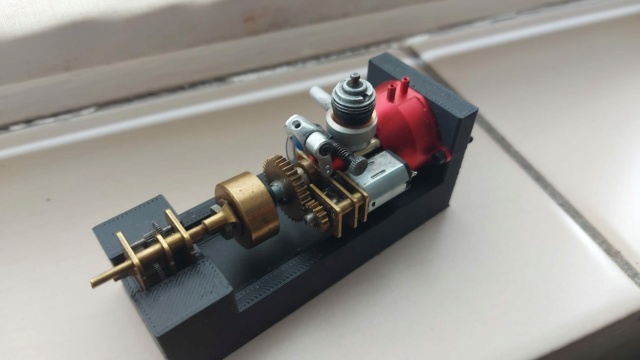
"ULTIMITE COX 010: it has a clutch, E starter, throttle, exhaust, aluminum tank, aluminum venturi, gearbox with forward and reverse, and now its on a custom drawn and printed stand"

PAST WINNERS
robot797's

"ULTIMITE COX 010: it has a clutch, E starter, throttle, exhaust, aluminum tank, aluminum venturi, gearbox with forward and reverse, and now its on a custom drawn and printed stand"

PAST WINNERS
Bolink Digger, the off-road Jerobee
Page 1 of 2
Page 1 of 2 • 1, 2 
 Bolink Digger, the off-road Jerobee
Recently, I found a Bolink Digger, 1st generation, with radio gear and transmitter on ebay. I bought it for 41 EUR including shipping. The digger uses a Jerobee chassis and rear axle components with a VW Beetle body. The model dates from 1980 and has an electro motor
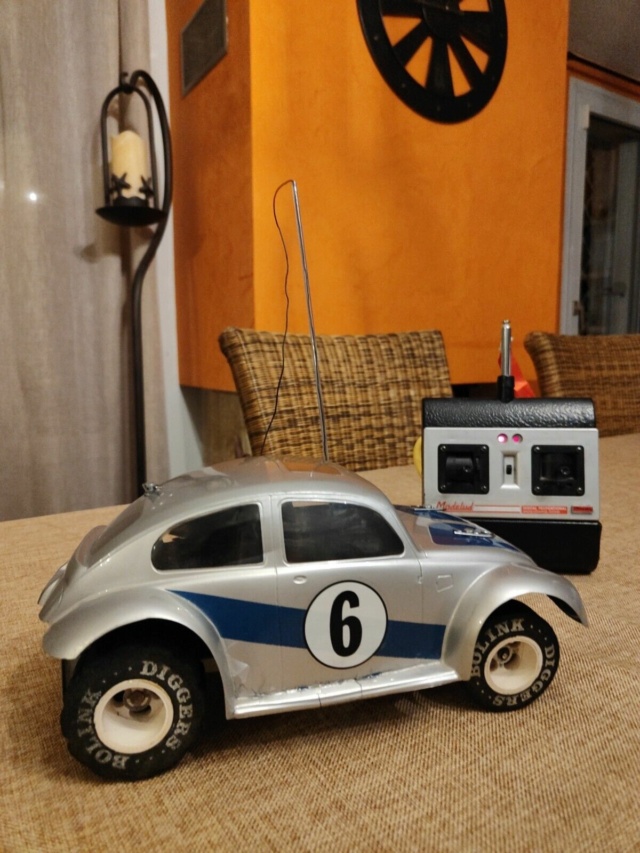


The above pictures were made by the seller. The car arrived well packed and without damages. After removing the body, the modifications carried out by Bolink to turn this into an off-road vehicle with increased grond clearance become visible:
- the front chassis part is cut off.
- longer king pins are used combined with Associated springs and steering blocks.
- 2 aluminium body posts up front and an extension at the rear.
- the standard Jerobee rear axle is mounted lower in the chassis.
- a Bolink shaker plate is used.


The gear ratio is 9:58 which gives 1:6,4. This is lower than a Cox powered Jerobee (1;5,6) or an electric powered Jerobee (1:3,4). The foam wheels don't have flat spots and they hav minimal wear. To be continued.


The above pictures were made by the seller. The car arrived well packed and without damages. After removing the body, the modifications carried out by Bolink to turn this into an off-road vehicle with increased grond clearance become visible:
- the front chassis part is cut off.
- longer king pins are used combined with Associated springs and steering blocks.
- 2 aluminium body posts up front and an extension at the rear.
- the standard Jerobee rear axle is mounted lower in the chassis.
- a Bolink shaker plate is used.


The gear ratio is 9:58 which gives 1:6,4. This is lower than a Cox powered Jerobee (1;5,6) or an electric powered Jerobee (1:3,4). The foam wheels don't have flat spots and they hav minimal wear. To be continued.

OVERLORD- Diamond Member

- Posts : 1799
Join date : 2013-03-19
Age : 58
Location : Normandy, France
 Re: Bolink Digger, the off-road Jerobee
Hi Lieven! Happy Holidays to you! I like that beetle body! Thanks for educating us on the Jerobee/Jomac/Bolink offerings. They don't show-up in your typical "Cox" searches unless the ad specifically mentions Cox; therefor... many Cox hobbyists may not know of their products.
I'd like to see a conversion to nitro... but that's just me...
I'd like to see a conversion to nitro... but that's just me...
 Re: Bolink Digger, the off-road Jerobee
I first thought of changing to nitro but as the rear axle is moved and the motor is slightly off centre, one cannot know what gears to use. Also the low gearing of 9:58 is chosen to give more power when driving away in rough ground or grass and top speed is less important. The cox engine has a pinion of 10T. When the spur gear is equal or smaller than 58T then the initial ratio for off road is gone. A DC electromotor has the highest torque when standing still and is here better for off-road . That's why, when a car battery is discharged and you try to turn over the engine, the startermotor blocks and can burn out due to the high current.
I did some further dismantling, I removed the batteries which showed bubbles on the outside, the shaker plate and cables and the speed regulator with servo. There is also a female electric connector to charge the batteries. There is something wrong with the position of the front wheels. They have severe toe-out which need correcting and both king pins are bent.


I did some further dismantling, I removed the batteries which showed bubbles on the outside, the shaker plate and cables and the speed regulator with servo. There is also a female electric connector to charge the batteries. There is something wrong with the position of the front wheels. They have severe toe-out which need correcting and both king pins are bent.


OVERLORD- Diamond Member

- Posts : 1799
Join date : 2013-03-19
Age : 58
Location : Normandy, France
 Re: Bolink Digger, the off-road Jerobee
I just know that you are enjoying sorting this thing out. Half the fun.
Those Sanyo batterys bring back memories.
Those Sanyo batterys bring back memories.

rsv1cox- Top Poster


Posts : 10851
Join date : 2014-08-18
Location : West Virginia
 Re: Bolink Digger, the off-road Jerobee
The batteries are the smaller sub-C batteries. These Sanyo batteries were the business in the early 80's. I had 4 C types.
I took the front axle apart. The wheels and steering blocks came off easily. I removed the bent king pins with a pair of pliers. I need to find some new ones. Maybe I could bend them back but I think they will become brittle and break. There is a little crack in the right king pin housing. The servo was glued wtth double sided tape onto a piece of balsa. The brass tubes of the shaker plate bolts are a bit oxydized. I cleaned the shaker plate with soap to remove the glue of the sticky tape that held the batteries
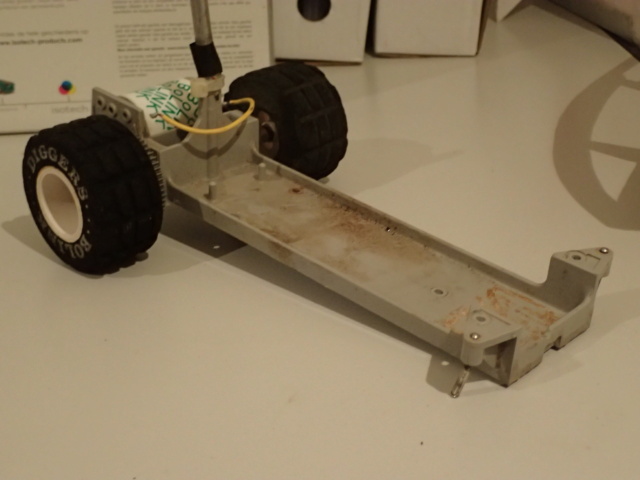


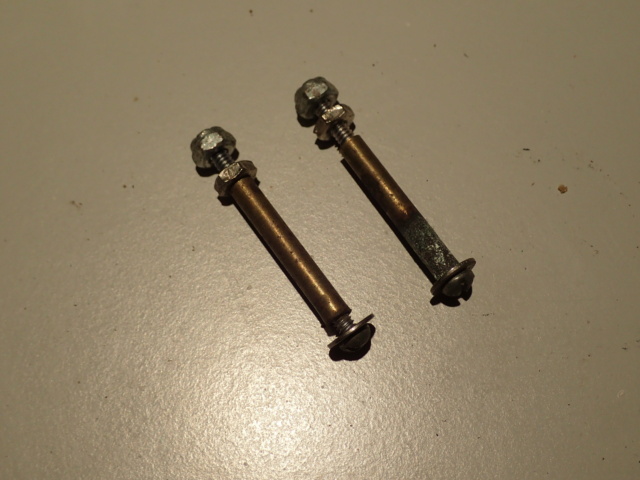

I took the front axle apart. The wheels and steering blocks came off easily. I removed the bent king pins with a pair of pliers. I need to find some new ones. Maybe I could bend them back but I think they will become brittle and break. There is a little crack in the right king pin housing. The servo was glued wtth double sided tape onto a piece of balsa. The brass tubes of the shaker plate bolts are a bit oxydized. I cleaned the shaker plate with soap to remove the glue of the sticky tape that held the batteries


OVERLORD- Diamond Member

- Posts : 1799
Join date : 2013-03-19
Age : 58
Location : Normandy, France
 Re: Bolink Digger, the off-road Jerobee
Good to see you getting back on this jewel , looks like thins are coming together for you , have you got the steering Kunkle for it ? Should bee fun to run in the rough ground . 


getback- Top Poster


Posts : 10280
Join date : 2013-01-18
Age : 66
Location : julian , NC
 Re: Bolink Digger, the off-road Jerobee
I have spare steering blocks and spare stub axles but haven't got spares for the bent king pins. They seem to be a week part. They are rather long and only fixed with the upper part. I don't know how they managed to bend all this. The body has no front damage at all. Maybe the car was driven without body hitting a wall, who knows.
Another irregularity is that the car has negative caster, i. e. the steering axis is behind the point where the tyre touches the road. In this way the front wheels are pushed by the car and not pulled as they are on a shopping trolley. This eliminates the self centering property.
Another irregularity is that the car has negative caster, i. e. the steering axis is behind the point where the tyre touches the road. In this way the front wheels are pushed by the car and not pulled as they are on a shopping trolley. This eliminates the self centering property.

OVERLORD- Diamond Member

- Posts : 1799
Join date : 2013-03-19
Age : 58
Location : Normandy, France
 Re: Bolink Digger, the off-road Jerobee
Good that you got some the parts , that is strange with all the bent stuff when the car is not made to go fast . 


getback- Top Poster


Posts : 10280
Join date : 2013-01-18
Age : 66
Location : julian , NC
 Re: Bolink Digger, the off-road Jerobee
The parts I got spares for are not damaged. I got them years ago with a parts lot I believe, but in the future, who knows...
I removed rear axle and motor and cleaned the chassis, all 4 wheels and the bearings with soap and a soft brush. The rear axle was cleaned with some Scotch Brite. The rear body post was broken at some point and refixed with putty. This ended up not straight and when putting the aluminium extension on, it's even worse. I think of filing one side of the plastic top away and then glueing the extension on with epoxy.


I removed rear axle and motor and cleaned the chassis, all 4 wheels and the bearings with soap and a soft brush. The rear axle was cleaned with some Scotch Brite. The rear body post was broken at some point and refixed with putty. This ended up not straight and when putting the aluminium extension on, it's even worse. I think of filing one side of the plastic top away and then glueing the extension on with epoxy.


OVERLORD- Diamond Member

- Posts : 1799
Join date : 2013-03-19
Age : 58
Location : Normandy, France
 Re: Bolink Digger, the off-road Jerobee
I assembled the back end and the shaker plate. I found that there was some play in way of the right plastic axle bearing. I have spare bearings but after having a closer look, I found that the play was between the bearing and the mounting hole in the chassis. Because this is the bearing that has to catch the torque of the motor I have to fill up that clearance. I think of using coke can foil or a piece of sea chart to wind around the bearing.

The rear body post was glued straight and yesterday, I received a new 3000 mAh 7,2V battery. The 6 sub C cells form 1 bar and not 2x3 cells as before. The new battery will be attached transversally onto the shaker plate.


The rear body post was glued straight and yesterday, I received a new 3000 mAh 7,2V battery. The 6 sub C cells form 1 bar and not 2x3 cells as before. The new battery will be attached transversally onto the shaker plate.


OVERLORD- Diamond Member

- Posts : 1799
Join date : 2013-03-19
Age : 58
Location : Normandy, France

rsv1cox- Top Poster


Posts : 10851
Join date : 2014-08-18
Location : West Virginia

OVERLORD- Diamond Member

- Posts : 1799
Join date : 2013-03-19
Age : 58
Location : Normandy, France
 Re: Bolink Digger, the off-road Jerobee
Looking Good Lieven Isn't this the engine driven one instead of electric ? 


getback- Top Poster


Posts : 10280
Join date : 2013-01-18
Age : 66
Location : julian , NC
 Re: Bolink Digger, the off-road Jerobee
Nice rebuild of a classic RC car…. I like the old wire wound speed control…. Reminds me of something similar on a Tamaya Grasshopper I bought for my son…. It was a three position switch also operated by a servo…. It had a big ceramic resistor to absorb the current for the two lower speeds… Long before electronic speed control but worked just fine…

rdw777- Diamond Member


Posts : 1470
Join date : 2021-03-11
Location : West Texas
 Re: Bolink Digger, the off-road Jerobee
The Bolink Diggers was never equipped with an engine, also the more buggy like cars of the 90's were all electric.
The electric speed controllers are as old as electric rc cars. In the december '75 issue of RCM, a Jerobee converted to electric was considered a novelty and this car had a commercial ESC.
https://rclibrary.co.uk/files_titles/2074/RCM_1975_12_December_reordered.pdf
Maybe they were expensive at the time. When I started playing with electric cars and boats in the early 80's, I also had the resistor type speed regulators and had never heard of ESC.

OVERLORD- Diamond Member

- Posts : 1799
Join date : 2013-03-19
Age : 58
Location : Normandy, France
 Re: Bolink Digger, the off-road Jerobee
I did some more work on the chassis:
REAR AXLE
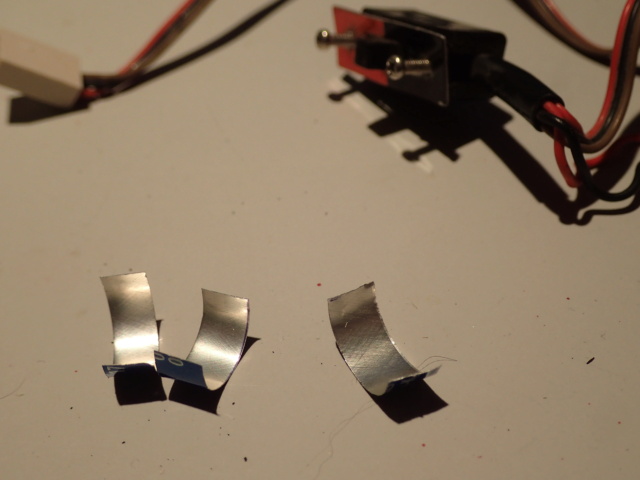
I cut some thin strips of 6mm x 20mm to fit around the right rear axle bearing. One was enough to take up the play.
STEERING BLOCKS
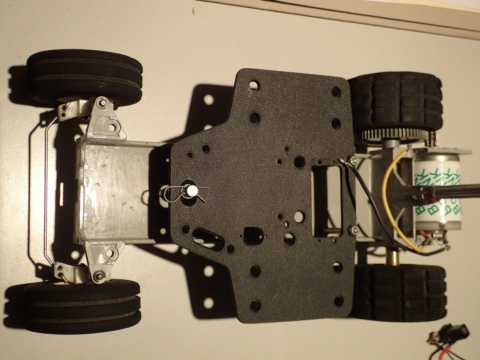
I turned around both steering blocks and track rod assembly. According to the prototype pictures, the track rod should be hanging onto the steering blocks and not be above it. The track rod was straightened and this solved the toe out. 1 steering block has a crack in the hole for the drag link but I trie to glue that with superglue. I have spare associated steering blocks but they only have 1 hole in the steering arm.


KING PINS
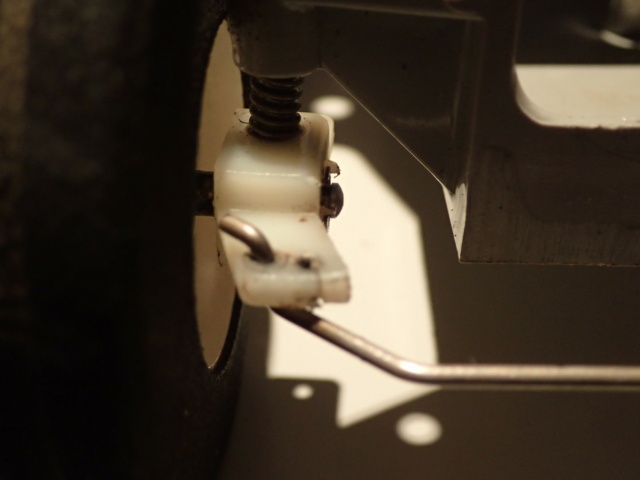
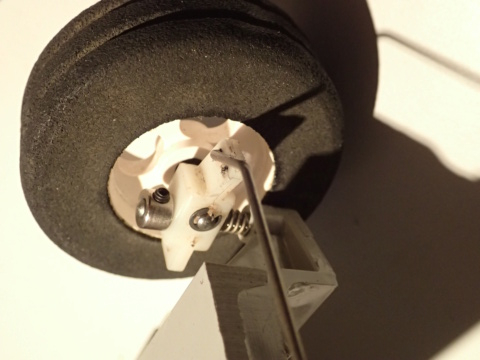
The bent king pins have a length of 30mm. I found some Bolink stub axles of 34mm that I'm using as king pins. Instead of using an e-clip at the bottom end, I used Great Planes 1/8" wheel retainers.

I received spare parts last week for 17 EUR including postage which included a gear puller for the motor pinions, 2 pairs of the longer king pins and the proper steering linkage according to the Diggers parts list.

REAR AXLE
I cut some thin strips of 6mm x 20mm to fit around the right rear axle bearing. One was enough to take up the play.

STEERING BLOCKS
I turned around both steering blocks and track rod assembly. According to the prototype pictures, the track rod should be hanging onto the steering blocks and not be above it. The track rod was straightened and this solved the toe out. 1 steering block has a crack in the hole for the drag link but I trie to glue that with superglue. I have spare associated steering blocks but they only have 1 hole in the steering arm.


KING PINS
The bent king pins have a length of 30mm. I found some Bolink stub axles of 34mm that I'm using as king pins. Instead of using an e-clip at the bottom end, I used Great Planes 1/8" wheel retainers.


I received spare parts last week for 17 EUR including postage which included a gear puller for the motor pinions, 2 pairs of the longer king pins and the proper steering linkage according to the Diggers parts list.


OVERLORD- Diamond Member

- Posts : 1799
Join date : 2013-03-19
Age : 58
Location : Normandy, France
 Re: Bolink Digger, the off-road Jerobee
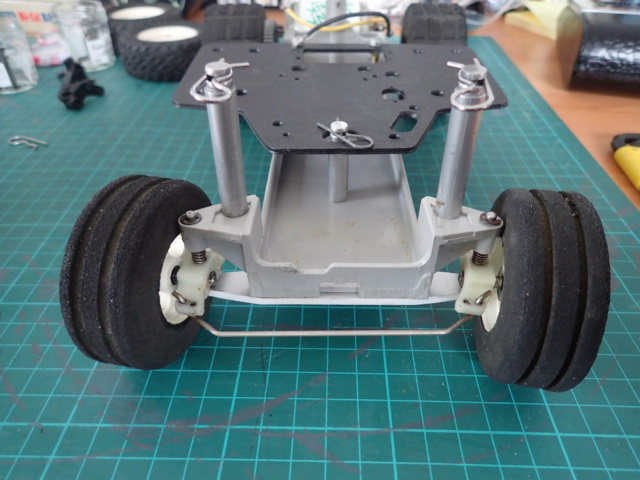
In order to reinforce the king pins and to avoid that they will get bent again in the future, I made a T shaped piece of 3mm hard plastic. This piece will bolt onto the bottom of the chassis and is drilled with two 3,2mm holes at each end that slide over the lower part of the king pins. That makes them more secure. The 1/8" wheel retainers are not needed anymore and I replaced them by the standard e-clips. This piece of plastic will be fixed on the chassis with the bolts used to clamp the steering servo. I also installed both front body posts.




OVERLORD- Diamond Member

- Posts : 1799
Join date : 2013-03-19
Age : 58
Location : Normandy, France

rsv1cox- Top Poster


Posts : 10851
Join date : 2014-08-18
Location : West Virginia
 Re: Bolink Digger, the off-road Jerobee
rsv1cox wrote:
Perhaps the Manufacturer should have added a plate like that.
Maybe he should have done. But then again, I think the prototype was submitted to all kinds of trials and this set up was approved. Maybe these king pins bent only due to serious abuse, who knows. But it is strange to the automotive eye to see a king pin only fixed at the top end.
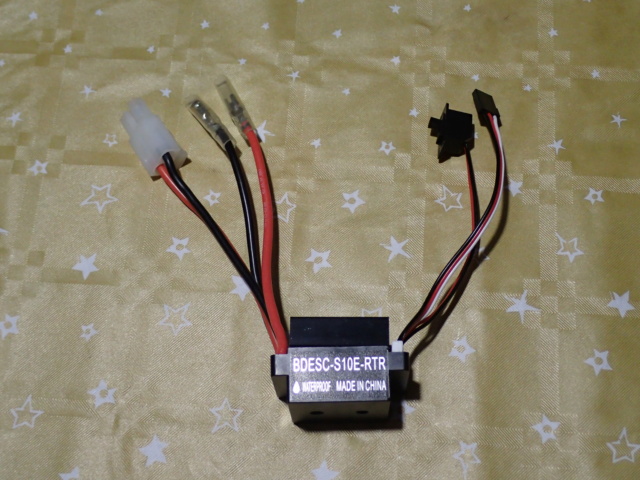
Today, I received an ESC from PRC. this cost me 11 EUR brought at my doorstep.


OVERLORD- Diamond Member

- Posts : 1799
Join date : 2013-03-19
Age : 58
Location : Normandy, France
 Re: Bolink Digger, the off-road Jerobee
OVERLORD wrote:Maybe these king pins bent only due to serious abuse, who knows. But it is strange to the automotive eye to see a king pin only fixed at the top end.
Hi Lieven, The Bug chassis/frt. suspension is looking sweet now!
just a random race-vid below.. maybe give you some ideas on building a track.
This class of RC car-racing is quite popular in my locale.. and has been for decades.
Here's an actual "how-to" vid on making a nice little backyard track.
 Re: Bolink Digger, the off-road Jerobee
Very courageous guy. For the moment, at my place, the lawn will do.

OVERLORD- Diamond Member

- Posts : 1799
Join date : 2013-03-19
Age : 58
Location : Normandy, France
 Re: Bolink Digger, the off-road Jerobee
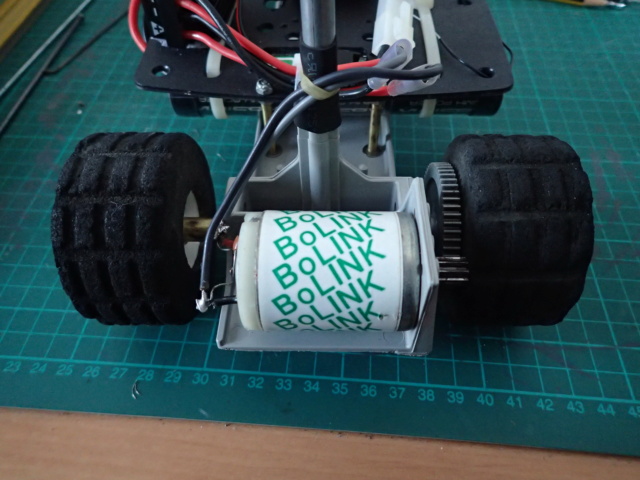
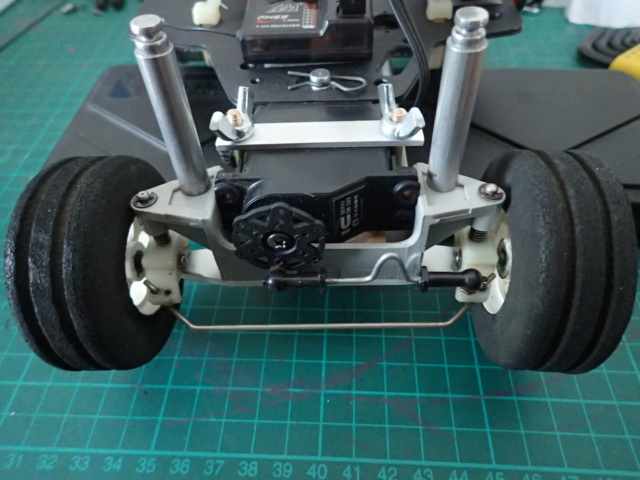
The chassis is as good as ready. To hold the steering servo and the "sub-chassis" plate, I made 2 threaded studs from 4mm brass stock. The servo was then clamped on with a piece of aluminium and wing nuts. The battery fitted nicely between the shaker plate and the chassis. ESC and receiver were fixed with stick-on velcro. I replaced one cable that was soldered to the motor because the one that was on there was too small in section.




OVERLORD- Diamond Member

- Posts : 1799
Join date : 2013-03-19
Age : 58
Location : Normandy, France
 Re: Bolink Digger, the off-road Jerobee
oh man that looks Good ,everything came together pretty easily for you considering pretty much scratch build , You got a body picked out or did I miss that ? 


getback- Top Poster


Posts : 10280
Join date : 2013-01-18
Age : 66
Location : julian , NC
 Re: Bolink Digger, the off-road Jerobee
Eric, it's a VW beetle body that goes on the chassis. That is next on the list for repair. It's in good overall shape but the running boards need to be repaired. There are some cracks and it's all held together with electrical tape. Also, in some areas, the silver paint. Is missing, creating see-through holes. I will touch up with Humbrol paint from inside the body.

OVERLORD- Diamond Member

- Posts : 1799
Join date : 2013-03-19
Age : 58
Location : Normandy, France
 Re: Bolink Digger, the off-road Jerobee
If I had looked the VW was in the first frame  I hope you can get it fixed up It will look good !

getback- Top Poster


Posts : 10280
Join date : 2013-01-18
Age : 66
Location : julian , NC
Page 1 of 2 • 1, 2 
 Similar topics
» Bolink Clutch
» I wish this road really took me there
» Cox Stuka and Antique Road Show
» On the road, got my mags...
» Up Early and On the Road on the 4th !!!!!!
» I wish this road really took me there
» Cox Stuka and Antique Road Show
» On the road, got my mags...
» Up Early and On the Road on the 4th !!!!!!
Page 1 of 2
Permissions in this forum:
You cannot reply to topics in this forum

 Rules
Rules


