

 Rules
Rules
by roddie Yesterday at 10:51 pm
» Simple Gliders
by rdw777 Yesterday at 6:25 pm
» Foam hand kids glider converted to 0.049 CL
by rdw777 Yesterday at 6:11 pm
» Weird search for a single comic from an old Mad Magazine
by Kim Yesterday at 1:44 pm
» Scientific "Zipper" Build...Zipper Flys!.
by getback Yesterday at 7:27 am
» Cox .049 Tee Dee engines back in stock (limited availablility)
by GallopingGhostler Yesterday at 1:05 am
» Very off-topic.........Time passes and not always for the best......
by rsv1cox Thu Jul 25, 2024 2:47 pm
» Roddie-Rigger.. a 2005 original design
by roddie Wed Jul 24, 2024 11:48 pm
» Jim Walker Bonanza etc.
by rsv1cox Wed Jul 24, 2024 6:30 pm
» Throttles for Cox Tee Dee .049 / .020 / .010 engines --- videos
by sosam117 Wed Jul 24, 2024 8:54 am
» Introducing our Cox .049 TD Engines
by Admin Tue Jul 23, 2024 2:00 am
» Project Cox .049 r/c & Citabrian Champion
by getback Mon Jul 22, 2024 4:14 pm
robot797's
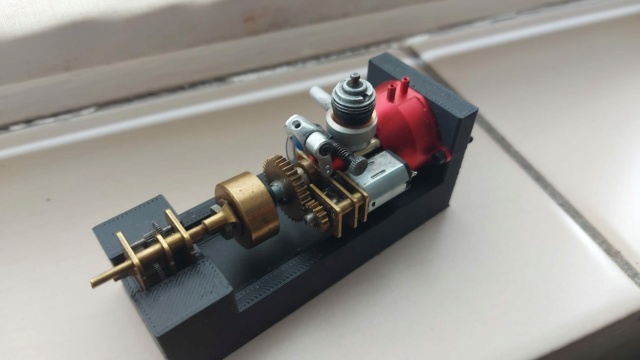
"ULTIMITE COX 010: it has a clutch, E starter, throttle, exhaust, aluminum tank, aluminum venturi, gearbox with forward and reverse, and now its on a custom drawn and printed stand"

PAST WINNERS


Goldberg Li'l Jumpin Bean build thread (Finished!)
Page 2 of 3 •  1, 2, 3
 ![]()
Re: Goldberg Li'l Jumpin Bean build thread (Finished!)
![]() Ivanhoe Wed Sep 12, 2012 3:22 am
Ivanhoe Wed Sep 12, 2012 3:22 am
The original kit plan shows the CG as about 1" back from the L/E, I have (scratch)built two models from this plan, and the CG came out in the right place, as built, on both. I can't for the life of me see how it could come out really nose heavy, TAIL heavy I could understand with any kit, but with such a short nose it's very odd.
Wilf

Ivanhoe- Diamond Member

- Posts : 1752
Join date : 2011-09-30
Location : Northern Ireland
Re: Goldberg Li'l Jumpin Bean build thread (Finished!)
![]() Ken Cook Wed Sep 12, 2012 5:31 am
Ken Cook Wed Sep 12, 2012 5:31 am

Ken Cook- Top Poster

- Posts : 5542
Join date : 2012-03-27
Location : pennsylvania
Re: Goldberg Li'l Jumpin Bean build thread (Finished!)
![]() Cribbs74 Wed Sep 12, 2012 8:29 am
Cribbs74 Wed Sep 12, 2012 8:29 am
It appears that the leadout guides are cocked in the picture, but they are actually in line with what is on the plans. Mine did come with the Sig Bellcrank so we shall see if it's twitchy. As to the tip weight it is not lead and is actually a steel block so it would be hard to trim down. I will probably buy some lead or just use some pennies. I will keep an eye out for the lead tape.
Wilf,
These plans I am using are just a photocopy of the originals so I am not sure why there is no CG mark on them.
Ron

Cribbs74- Moderator


Posts : 11904
Join date : 2011-10-24
Age : 50
Location : Tuttle, OK
Re: Goldberg Li'l Jumpin Bean build thread (Finished!)
![]() PV Pilot Wed Sep 12, 2012 10:36 am
PV Pilot Wed Sep 12, 2012 10:36 am
Funny how pictures can throw that view.

PV Pilot- High Tech Balsa Basher
- Posts : 1854
Join date : 2011-08-11
Age : 57
Location : The ragged end of the Universe.
Re: Goldberg Li'l Jumpin Bean build thread (Finished!)
![]() RknRusty Wed Sep 12, 2012 10:57 am
RknRusty Wed Sep 12, 2012 10:57 am
_________________
...and never Ever think about how good you are at something...
while you're doing it!
My Hot Rock & Blues Playlist

RknRusty- Rest In Peace

- Posts : 10869
Join date : 2011-08-10
Age : 68
Location : South Carolina, USA
Re: Goldberg Li'l Jumpin Bean build thread (Finished!)
![]() Cribbs74 Wed Sep 12, 2012 11:02 am
Cribbs74 Wed Sep 12, 2012 11:02 am
PV Pilot wrote:I was thinking the leadout tubes were crooked also and there would be sever rib rubbing right there. As far as the plans were concerned in that area, I swayed away from the plans to make sure there were straight pulls on those leads to the bellcrank with equal distance between rib cutouts for the travel of the bellcrank and swing of the leads. Found out the hard way years ago to make sure the crimps and tag ends of the leads were covered with shrink tube or cut back so they would not snag.
Funny how pictures can throw that view.
I am going to sink those into the tip LE tonight I think. I will verify they are straight before I glue down. Right now I am not snagging on anything and each leadout has a nice smooth pull.
Cribbs74- Moderator
-
Posts : 11904
Join date : 2011-10-24
Age : 50
Location : Tuttle, OK
Re: Goldberg Li'l Jumpin Bean build thread (Finished!)
![]() RknRusty Wed Sep 12, 2012 11:03 am
RknRusty Wed Sep 12, 2012 11:03 am

RE: my previous post about balance. I used 1-1/4" lightweight foam tires. That helps reduce weight in front of the CG. And they roll on grass better.
Last edited by RknRusty on Wed Sep 12, 2012 11:06 am; edited 1 time in total
_________________
...and never Ever think about how good you are at something...
while you're doing it!
My Hot Rock & Blues Playlist
RknRusty- Rest In Peace
- Posts : 10869
Join date : 2011-08-10
Age : 68
Location : South Carolina, USA
Re: Goldberg Li'l Jumpin Bean build thread (Finished!)
![]() Cribbs74 Wed Sep 12, 2012 11:04 am
Cribbs74 Wed Sep 12, 2012 11:04 am
RknRusty wrote:My Bean came with 14g of wingtip weight. I e-mailed Brodak and they told me to cut it in half. I did and 7g works right. The primer, paint and shrink covering will change the balance a good bit. I tend to lay it on thick, primer, paint and clear gloss Lustrekote. That alone will probably swing the balance to the rear. I'll look at my plans this afternoon and find the recommended CG for you. Have you put your metal tail skid on yet?
Ok I will attempt to cut it in half then. No, I have not put the skid on yet. I did lay it on the tail and it still wanted to flip itself upside down. I will check CG when I am done covering and painting
Cribbs74- Moderator
-
Posts : 11904
Join date : 2011-10-24
Age : 50
Location : Tuttle, OK
Re: Goldberg Li'l Jumpin Bean build thread (Finished!)
![]() SuperDave Wed Sep 12, 2012 11:15 am
SuperDave Wed Sep 12, 2012 11:15 am
Just as a side-note, I found the wing ribs on the Brodak BR rather flimsy so I reinforced mine with 1/16" square basswood (from my Spit project). The Brodak BR is intended to be built on a Brodak wing jig ergo the excessive wing rib holes. (Curious that the Brodak wing rib jig is not available and I believe that is just another example of Brodak being "proprietorial".)

SuperDave- Rest In Peace
- Posts : 3552
Join date : 2011-08-13
Location : Washington (state)
Re: Goldberg Li'l Jumpin Bean build thread (Finished!)
![]() Cribbs74 Wed Sep 12, 2012 11:10 pm
Cribbs74 Wed Sep 12, 2012 11:10 pm

This is third model in a row I've done that. So....... The top covering is coming off tomorrow. Anyway color scheme is cream and sky blue.

https://i.imgur.com/1O4sk.jpg
Cribbs74- Moderator
-
Posts : 11904
Join date : 2011-10-24
Age : 50
Location : Tuttle, OK
Re: Goldberg Li'l Jumpin Bean build thread (Finished!)
![]() RknRusty Thu Sep 13, 2012 6:50 am
RknRusty Thu Sep 13, 2012 6:50 am
Looks nice. No need to remove any covering. Just make a surgical slit to open a flap of covering on the underside of the wingtip and put some 5 minute epoxy on the weight and drop it in place. On the bottom so it's not as visible and the epoxy will never let go. Cover it with a round-edged patch. If you've never patched Ultracote before, you'll be amazed at how invisible it is. I have patches on some wings that I have a hard time finding. You really can't see it.cribbs74 wrote:I finished covering and painting the Bean tonight. It came out OK couple little wrinkles, but overall OK. However, guess what? This blithering idiot forgot to add tip weight!
This is third model in a row I've done that. So....... The top covering is coming off tomorrow. Anyway color scheme is cream and sky blue.
_________________
...and never Ever think about how good you are at something...
while you're doing it!
My Hot Rock & Blues Playlist
RknRusty- Rest In Peace
- Posts : 10869
Join date : 2011-08-10
Age : 68
Location : South Carolina, USA
Re: Goldberg Li'l Jumpin Bean build thread (Finished!)
![]() fit90 Thu Sep 13, 2012 7:33 am
fit90 Thu Sep 13, 2012 7:33 am
fit90- Diamond Member
- Posts : 1337
Join date : 2011-08-11
Location : Naples, Florida
Re: Goldberg Li'l Jumpin Bean build thread (Finished!)
![]() andrew Thu Sep 13, 2012 7:36 am
andrew Thu Sep 13, 2012 7:36 am
RknRusty wrote:Just make a surgical slit to open a flap of covering on the underside of the wingtip and put some 5 minute epoxy on the weight and drop it in place. On the bottom so it's not as visible and the epoxy will never let go.
Rusty's procedure will work just fine.
Before you add a permanent weight, why don't you tape a coin to the wingtip first. You can then adjust the weight to your satisfaction before epoxying it in.

andrew- Diamond Member
- Posts : 1814
Join date : 2011-08-11
Age : 76
Location : Western Kentucky -

Re: Goldberg Li'l Jumpin Bean build thread (Finished!)
![]() John Goddard Thu Sep 13, 2012 7:52 am
John Goddard Thu Sep 13, 2012 7:52 am
Next time you're getting a new tyre fitted or even just your old ones balanced
ask the Rubber Monkey if you can have a handful or wheelweights which are
self adhesive these days and v handy for our purposes.

John Goddard- Diamond Member
- Posts : 2447
Join date : 2011-11-24
Age : 59
Location : Leyton North East London
Re: Goldberg Li'l Jumpin Bean build thread (Finished!)
![]() fit90 Thu Sep 13, 2012 7:56 am
fit90 Thu Sep 13, 2012 7:56 am
fit90- Diamond Member
- Posts : 1337
Join date : 2011-08-11
Location : Naples, Florida
Re: Goldberg Li'l Jumpin Bean build thread (Finished!)
![]() Cribbs74 Thu Sep 13, 2012 8:19 am
Cribbs74 Thu Sep 13, 2012 8:19 am
Cribbs74- Moderator
-
Posts : 11904
Join date : 2011-10-24
Age : 50
Location : Tuttle, OK
Re: Goldberg Li'l Jumpin Bean build thread (Finished!)
![]() Godsey3.0 Thu Sep 13, 2012 8:25 am
Godsey3.0 Thu Sep 13, 2012 8:25 am
Rolla
Godsey3.0- Platinum Member

- Posts : 970
Join date : 2011-09-21
Age : 28
Location : Metamora, Indiana
Re: Goldberg Li'l Jumpin Bean build thread (Finished!)
![]() SuperDave Thu Sep 13, 2012 8:48 am
SuperDave Thu Sep 13, 2012 8:48 am

SuperDave- Rest In Peace
- Posts : 3552
Join date : 2011-08-13
Location : Washington (state)
Re: Goldberg Li'l Jumpin Bean build thread (Finished!)
![]() Ivanhoe Thu Sep 13, 2012 8:56 am
Ivanhoe Thu Sep 13, 2012 8:56 am
SuperDave wrote:Isn't the Rubber Monkey related to the Grease Monkey?
Yeah, and the Elastic Ape is another relative
Ivanhoe- Diamond Member
- Posts : 1752
Join date : 2011-09-30
Location : Northern Ireland
Re: Goldberg Li'l Jumpin Bean build thread (Finished!)
![]() John Goddard Thu Sep 13, 2012 9:02 am
John Goddard Thu Sep 13, 2012 9:02 am
The missing link
John Goddard- Diamond Member
- Posts : 2447
Join date : 2011-11-24
Age : 59
Location : Leyton North East London
Re: Goldberg Li'l Jumpin Bean build thread (Finished!)
![]() SuperDave Thu Sep 13, 2012 9:31 am
SuperDave Thu Sep 13, 2012 9:31 am
There are lots of "missing links". They're called politians.
They feed on $$$$$$$$$$$$$$$.
Last edited by SuperDave on Thu Sep 13, 2012 9:39 am; edited 1 time in total
SuperDave- Rest In Peace
- Posts : 3552
Join date : 2011-08-13
Location : Washington (state)
Re: Goldberg Li'l Jumpin Bean build thread (Finished!)
![]() PV Pilot Thu Sep 13, 2012 9:36 am
PV Pilot Thu Sep 13, 2012 9:36 am
John Goddard wrote:Johnnies tip time
Next time you're getting a new tyre fitted or even just your old ones balanced
ask the Rubber Monkey if you can have a handful or wheelweights which are
self adhesive these days and v handy for our purposes.

Johnny's tip-o-the day is a good one, and one I use also. I don't use the tape on the stick on weight for self adhesion. A blob of epoxy on the untaped side to be assured it doesn't come off.
Looking good Ron.
Don't get to crazy now, it will fly with a few wrinkles on the leading edge. You start stripping the covering off and it can weaken glue joints and pull balsa wood. Proceed carefully if you do that.
PV Pilot- High Tech Balsa Basher
- Posts : 1854
Join date : 2011-08-11
Age : 57
Location : The ragged end of the Universe.
Re: Goldberg Li'l Jumpin Bean build thread (Finished!)
![]() Cribbs74 Fri Sep 14, 2012 10:04 pm
Cribbs74 Fri Sep 14, 2012 10:04 pm
So, I still need to fuel proof it as I always use Testors paint as I can brush it on. No spray painting in the Embassy Suites!

I usually shoot a coat of Clear Monokote over these things when done. It works well. I love how the Bean looks, real sleek, I hope it flies as good!
Click on the links if you can't see the pics.

https://i.imgur.com/2caU0.jpg

https://i.imgur.com/Mb03d.jpg

https://i.imgur.com/4yjJH.jpg

https://i.imgur.com/3rych.jpg
Cribbs74- Moderator
-
Posts : 11904
Join date : 2011-10-24
Age : 50
Location : Tuttle, OK
re: noseheavy
![]() happydad Fri Sep 14, 2012 11:24 pm
happydad Fri Sep 14, 2012 11:24 pm


happydad- Rest In Peace
- Posts : 1592
Join date : 2012-05-28
Age : 78
Location : Escondido, CA
Re: Goldberg Li'l Jumpin Bean build thread (Finished!)
![]() Cribbs74 Fri Sep 14, 2012 11:38 pm
Cribbs74 Fri Sep 14, 2012 11:38 pm
happydad wrote:Ron: did you ever figure out why the plane was nose heavy ? or was it less nose heavy when finished and covered ?happydad
Less nose heavy, but still nose heavy.......... As much as I don't want to add weight I am going to have to if I want this thing to stunt well.
Ron
Cribbs74- Moderator
-
Posts : 11904
Join date : 2011-10-24
Age : 50
Location : Tuttle, OK
Page 2 of 3 • 1, 2, 3 ![]()
» Li'l Jumpin Bean
» Li'l Jumpin Bean
» Tha' Bandit builds a bean thread
» Li'l Jumpin Bean on a wedge