

 Rules
Rules
Log in
Search
Latest topics
» Golden Bee basic running problemby roddie Yesterday at 10:51 pm
» Simple Gliders
by rdw777 Yesterday at 6:25 pm
» Foam hand kids glider converted to 0.049 CL
by rdw777 Yesterday at 6:11 pm
» Weird search for a single comic from an old Mad Magazine
by Kim Yesterday at 1:44 pm
» Scientific "Zipper" Build...Zipper Flys!.
by getback Yesterday at 7:27 am
» Cox .049 Tee Dee engines back in stock (limited availablility)
by GallopingGhostler Yesterday at 1:05 am
» Very off-topic.........Time passes and not always for the best......
by rsv1cox Thu Jul 25, 2024 2:47 pm
» Roddie-Rigger.. a 2005 original design
by roddie Wed Jul 24, 2024 11:48 pm
» Jim Walker Bonanza etc.
by rsv1cox Wed Jul 24, 2024 6:30 pm
» Throttles for Cox Tee Dee .049 / .020 / .010 engines --- videos
by sosam117 Wed Jul 24, 2024 8:54 am
» Introducing our Cox .049 TD Engines
by Admin Tue Jul 23, 2024 2:00 am
» Project Cox .049 r/c & Citabrian Champion
by getback Mon Jul 22, 2024 4:14 pm
Cox Engine of The Month
July-2024
robot797's
"ULTIMITE COX 010: it has a clutch, E starter, throttle, exhaust, aluminum tank, aluminum venturi, gearbox with forward and reverse, and now its on a custom drawn and printed stand"

PAST WINNERS
robot797's
"ULTIMITE COX 010: it has a clutch, E starter, throttle, exhaust, aluminum tank, aluminum venturi, gearbox with forward and reverse, and now its on a custom drawn and printed stand"
PAST WINNERS
CEF Traveling Engine


Win This Engine!

Live on Patrol


"Barbie's stunter"
Page 1 of 1

"Barbie's stunter"
![]() roddie Sat Sep 07, 2013 3:45 pm
roddie Sat Sep 07, 2013 3:45 pm
I built this in 1992 for a "Prod." engine and "Perfect" wedge-tank. It's my own design and my 1st using "flaps"... It turns beautifully! Some of Barbie's hair has fallen out over the years; but then... so has mine.


roddie- Top Poster

-
Posts : 8459
Join date : 2013-07-17
Age : 64
Location : N. Smithfield, Rhode Island -

Re: "Barbie's stunter"
![]() SuperDave Sat Sep 07, 2013 4:56 pm
SuperDave Sat Sep 07, 2013 4:56 pm
"Bald is beautiful!"  Or so I've been told by my bald friends.
"Barbie" should have known better than using castor oil for shampoo!
SD
Or so I've been told by my bald friends."Barbie" should have known better than using castor oil for shampoo!
SD

SuperDave- Rest In Peace

- Posts : 3552
Join date : 2011-08-13
Location : Washington (state)
Re: "Barbie's stunter"
![]() roddie Thu Jul 06, 2017 12:16 pm
roddie Thu Jul 06, 2017 12:16 pm
Getting this old girl ready to fly. She'd been stripped of hdwe. for years since a paint touch-up. I put all the parts in a bag.. which I took out last night.
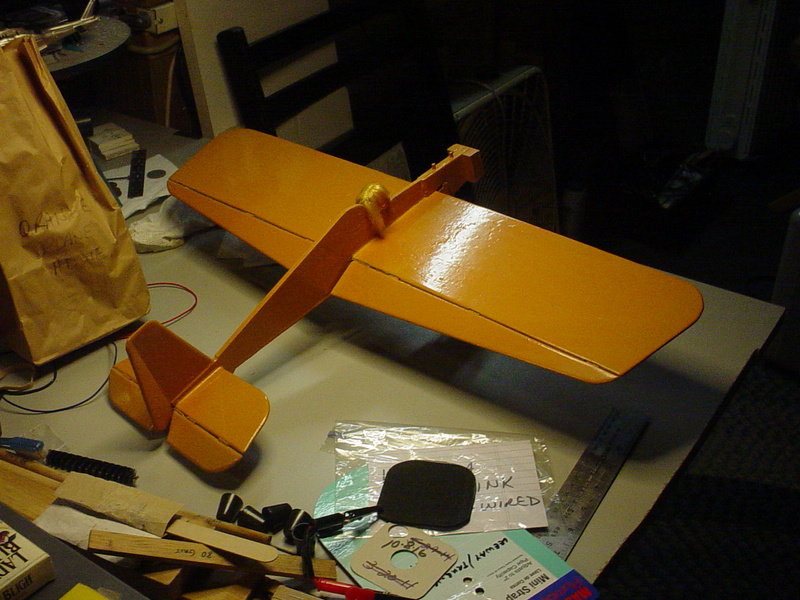
IIRC.. that's rattle-can Pactra "Formula-U" International-Orange. It's one of a very few models I built using Dubro pinned-hinges. Slotting 1/8" sheet-balsa is tedious.
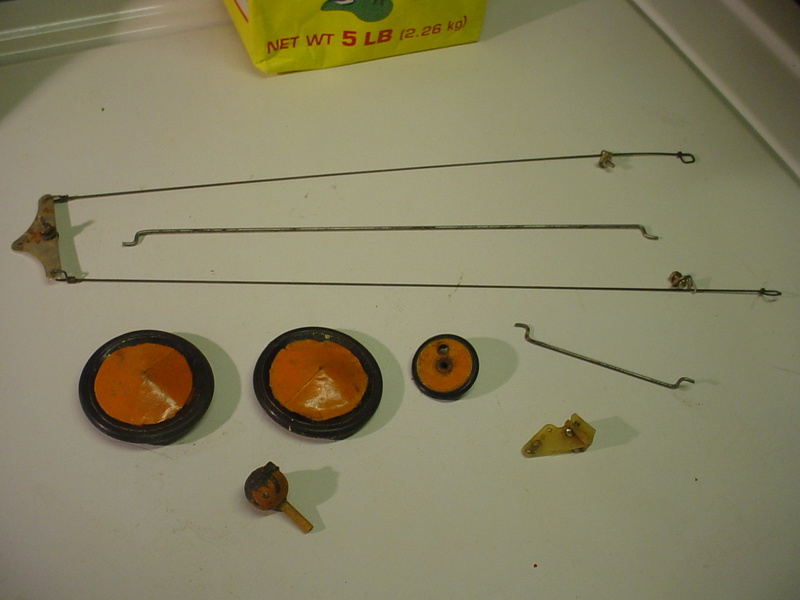
There are no clevis's in the control-linkage.. so I'm going to have to set the flaps and elev. to neutral and install the flap-horn to get an idea of what the differential was set to.


I don't think this is correct. The bell-crank pushrod should be in the top-hole of the flap-horn and the elevator pushrod in the hole below it, to give less deflection to the flaps. This is a PIA with Z-bends rather than clevis's in the linkage. I must have had a lot of patience 25 years ago when I built this airplane..
roddie- Top Poster
-
Posts : 8459
Join date : 2013-07-17
Age : 64
Location : N. Smithfield, Rhode Island -
Re: "Barbie's stunter"
![]() Ken Cook Thu Jul 06, 2017 3:25 pm
Ken Cook Thu Jul 06, 2017 3:25 pm
Limit your throw to the flap by moving the small pushrod closer to the bellcrank pivot point. It appears it's in the outer hole which makes the throw too fast. If needed, drill a additional hole as close as you can to the center, Your flap horn to elevator horn assuming your horns are the same size should be in the same holes.This is all relative to your handle spacing so if more throw is needed, move the pushrod closes to the center of hinge lines on both.

Ken Cook- Top Poster
- Posts : 5542
Join date : 2012-03-27
Location : pennsylvania
Re: "Barbie's stunter"
![]() NEW222 Thu Jul 06, 2017 5:16 pm
NEW222 Thu Jul 06, 2017 5:16 pm
Looking good there. I have to comment on your way of keeping the surfaces level for hooking up your controls. I had not thought of using a paper clip for that. I use the same technique except with 1/4" square spruce rubber banded at the ends. The idea is very quick, simple, and effective. Now off to the store to look for a paper clip so I can have two different 'jigs'.

NEW222- Top Poster
- Posts : 3895
Join date : 2011-08-13
Age : 45
Location : oakbank, mb
Re: "Barbie's stunter"
![]() roddie Thu Jul 06, 2017 8:06 pm
roddie Thu Jul 06, 2017 8:06 pm
Ken Cook wrote: Limit your throw to the flap by moving the small pushrod closer to the bellcrank pivot point. It appears it's in the outer hole which makes the throw too fast. If needed, drill a additional hole as close as you can to the center, Your flap horn to elevator horn assuming your horns are the same size should be in the same holes.This is all relative to your handle spacing so if more throw is needed, move the pushrod closes to the center of hinge lines on both.
Well...... I missed this post Ken.. I'd been working all day on the airplane outside. It was a BEAUTIFUL afternoon! I consider it RTF.. but I could still apply your suggestions.
At this point.. "it is what it is".. because I somewhat sealed the deal by applying a drop of CA to the bellcrank-nut to help keep it from loosening.

That pretty-much locks the two Z-bent pushrods in their positions. I wouldn't build it that way again.. but it flew well back in the day. I don't have the materials to redo the linkage with clevis's if I wanted to.
I spent a lot of time today on this model today.. because it was basically stripped.. and I really want to get it in the air again. Lots of fun memories with this one.

The following is photo-heavy.. and details the work that I did today. It was actually fun for me.. because I enjoy the fitting-up of parts.. and the challenges involved. My other airplanes won't need nearly as much work to be flight-ready.
I didn't have as much "down-deflection" as "up" in the controls. The elevator pushrod was contacting the flaps' trailing-edge.. even though I'd previously provided a relief-cut in the flap. I filed a notch that gives more down-throw. I need to seal the wood there before I run the engine on the model.


Wheels.......... you don't need them to fly, but I have a wheel fetish..


I made some custom plastic flat-washers to exactly fit the 1/16" music-wire axles.. and used (my favorite..) "Goldberg-style" spring-retainers.
The tail-wheel has a hole to accept a pin from my launching-stooge. (all my C/L airplanes are stooge-launched)

and the main-gear wheels..


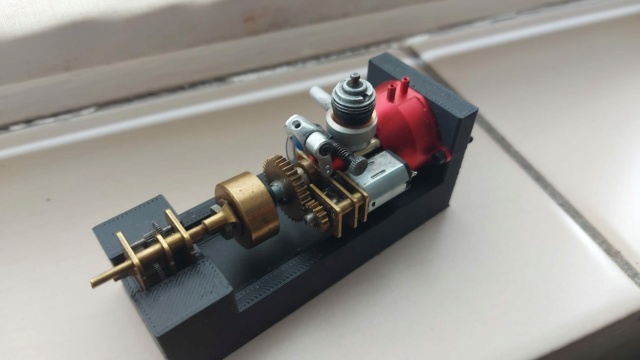
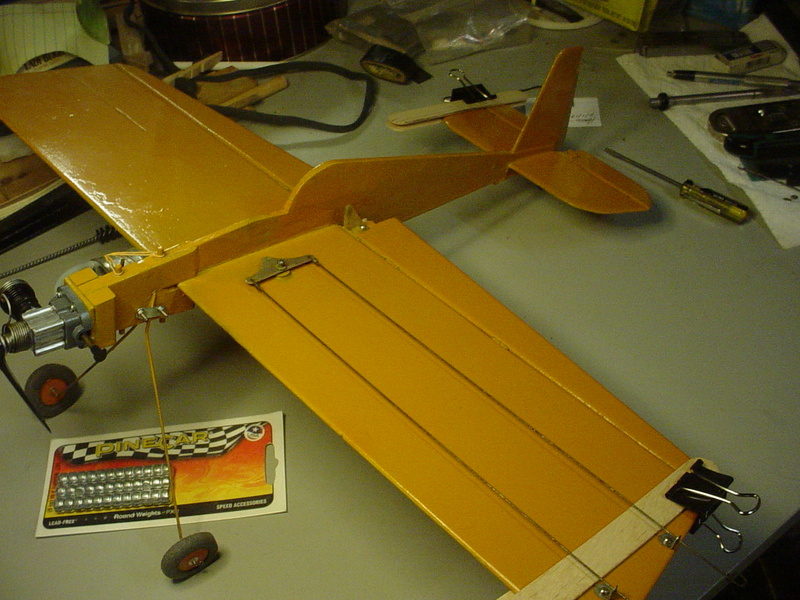
Mounting the engine and fuel tank was a lot easier. This is all I'll have to do to most of the other airplanes in my ARF fleet.


I'm using silicone fuel-line with a .075" ID. compared to Dubro's small-size .042" ID line that I used to use with my .049 engines (suction-feed) This tank is a Perfect-brand #18 (3/8oz.) The engine has a #2 (single-bypass) cylinder, #325 (standard) glow-head with a Cox black 5"d x 4"p prop. It ran strong on the bench yesterday on Sig Champion 25% nitro fuel. I'm running a small piece of padding under the fuel-tank that's made of spongy-rubber shelf-liner. I feel it helps to cushion the tank against vibration that can cause air-bubbles/foaming. I think that the rubber-band retention-mounts help also.

Dry-weight is 8.0oz.

roddie- Top Poster
-
Posts : 8459
Join date : 2013-07-17
Age : 64
Location : N. Smithfield, Rhode Island -
Re: "Barbie's stunter"
![]() KariFS Fri Jul 07, 2017 2:35 am
KariFS Fri Jul 07, 2017 2:35 am
Looking good Roddie! I like the attention to detail 
What does the number on the fuel tank mean?
Edit: it is a good idea to use popsicle sticks (or are those from the doctor's office?) between the binder clips and the balsa surfaces. I used big binder clips to keep things in place while making stitch hinges and they left marks on the surface.
What does the number on the fuel tank mean?
Edit: it is a good idea to use popsicle sticks (or are those from the doctor's office?) between the binder clips and the balsa surfaces. I used big binder clips to keep things in place while making stitch hinges and they left marks on the surface.
KariFS- Diamond Member

- Posts : 2019
Join date : 2014-10-10
Age : 52
Re: "Barbie's stunter"
![]() MauricioB Fri Jul 07, 2017 7:20 am
MauricioB Fri Jul 07, 2017 7:20 am
Barbie's stunter already asks for clue !!! I'm waiting for a flight video soon! ... it would be nice to have a video with the engine running already placed on the model! Come on, Roddie, I'm keeping an eye on the progress!

MauricioB- Top Poster
- Posts : 3649
Join date : 2016-02-16
Age : 53
Location : ARG
Re: "Barbie's stunter"
![]() roddie Fri Jul 07, 2017 7:25 am
roddie Fri Jul 07, 2017 7:25 am
KariFS wrote:Looking good Roddie! I like the attention to detail
What does the number on the fuel tank mean?
Edit: it is a good idea to use popsicle sticks (or are those from the doctor's office?) between the binder clips and the balsa surfaces. I used big binder clips to keep things in place while making stitch hinges and they left marks on the surface.
Thanks Kari!!
The #18 represents the model number of this Perfect-brand fuel tank.

It's mostly a reference for me. If I know the tank number.. I can calculate the capacity in cc's from the ounces printed on the box. In this case the tank is 1/3oz. which = 9.8cc's. I used an industrial-grade "Sharpie" pen. I could have etched the number.. but the ink is supposed to be resistant to chemicals.


The sticks are similar to tongue-depressors and are called "super craft sticks".

They're useful for all sorts of things.. along with round wooden toothpicks.
Pilot "Barbie" has lost more of her hair..

Maybe I can fashion a helmet for her from the bottom of a small plastic bottle..
roddie- Top Poster
-
Posts : 8459
Join date : 2013-07-17
Age : 64
Location : N. Smithfield, Rhode Island -
Re: "Barbie's stunter"
![]() getback Fri Jul 07, 2017 7:56 am
getback Fri Jul 07, 2017 7:56 am
Looks Good !! When the big day when Barbie takes to the air? 


getback- Top Poster


Posts : 10276
Join date : 2013-01-18
Age : 66
Location : julian , NC
Re: "Barbie's stunter"
![]() roddie Fri Jul 07, 2017 8:58 am
roddie Fri Jul 07, 2017 8:58 am
getback wrote:Looks Good !! When the big day when Barbie takes to the air?
It's supposed to rain all day today.. (heavy at times forecasted) so I'll install some more engines/fuel-tanks to my fleet and get them ready. I'd like to have at least two.. or maybe three models RTF for when I go out. They'll be ones I've flown before.. except for the P-51's.
roddie- Top Poster
-
Posts : 8459
Join date : 2013-07-17
Age : 64
Location : N. Smithfield, Rhode Island -
Re: "Barbie's stunter"
![]() roddie Fri Jul 07, 2017 9:56 am
roddie Fri Jul 07, 2017 9:56 am
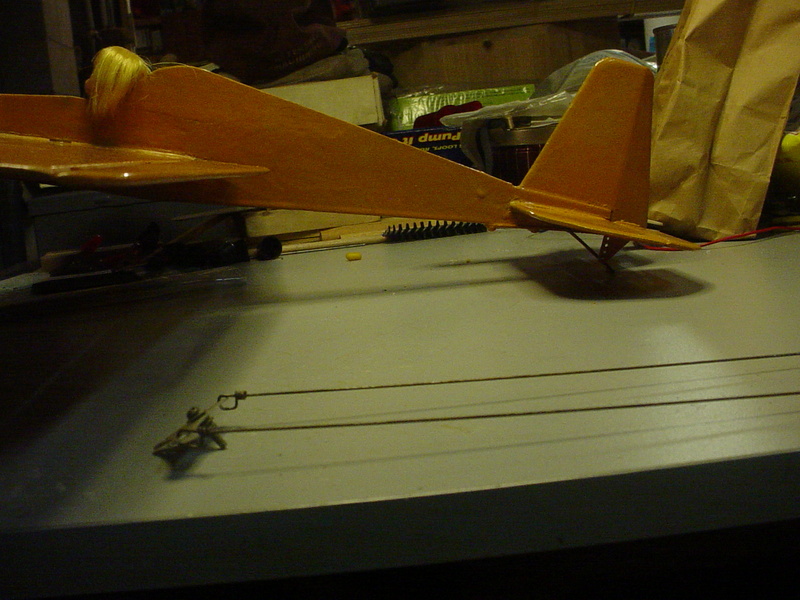
Balance-point.. dry

I hope this will be ok. It's 2" back from the wing's L/E.. which incidentally is exactly where my bellcrank screw is. It's a SWAG really.. because this isn't built from a kit or plan to tell me where the C of G should be. I can always put a pair of heavier wheels on it. The ones on it now, weigh next to nothing.
The avg. chord of the wing is 6".. including the flaps.. and 4.5" from the L/E back to the hinge-line. The wingspan is 23.5" and approx. 138 sq. in. area.
roddie- Top Poster
-
Posts : 8459
Join date : 2013-07-17
Age : 64
Location : N. Smithfield, Rhode Island -
Re: "Barbie's stunter"
![]() RknRusty Sat Jul 08, 2017 2:59 am
RknRusty Sat Jul 08, 2017 2:59 am
Roddie, a rule of thumb for a test fliying a control line plane is for the C/G to be about 20% - 25% of the mean average chord(MAC) behind the LE. Including the flaps, yours is about right, but no further aft.
_________________
Don't Panic!
...and never Ever think about how good you are at something...
while you're doing it!
My Hot Rock & Blues Playlist
...and never Ever think about how good you are at something...
while you're doing it!
My Hot Rock & Blues Playlist

RknRusty- Rest In Peace
- Posts : 10869
Join date : 2011-08-10
Age : 68
Location : South Carolina, USA
Re: "Barbie's stunter"
![]() roddie Sat Jul 08, 2017 11:38 am
roddie Sat Jul 08, 2017 11:38 am
RknRusty wrote:Roddie, a rule of thumb for a test fliying a control line plane is for the C/G to be about 20% - 25% of the mean average chord(MAC) behind the LE. Including the flaps, yours is about right, but no further aft.
Thanks Rusty. This airplane has a rebuilt-nose since it last flew. I originally built it without plywood nose-doublers.. and crashed it; breaking the nose off just behind the firewall. (I'd forgotten about that..
bottom view..

top view..

You can see the balsa butt-joint, just forward of the rear dowel in both photos. The old nose had a firewall for a tanked-engine. I used to run a Cox Golden bee, which I did my first-ever loops and inverted-flight with. I hope it flies as well with the new nose and engine/tank set-up. I used to fly it in a rather confined-area. I'm tempted to re-maiden it with the same line-length as I used back then, which was 25 feet.. to see how strong it pulls, doing only roundy-rounds. If it pulls strong, I may increase that by 5 feet. At 8oz. it's a heavy airplane for a stock reed-valve .049.. but it will be fun to fly it again!
roddie- Top Poster
-
Posts : 8459
Join date : 2013-07-17
Age : 64
Location : N. Smithfield, Rhode Island -
Re: "Barbie's stunter"
![]() roddie Sat Jul 15, 2017 3:46 pm
roddie Sat Jul 15, 2017 3:46 pm
I was working on the model today.. dissatisfied with the control-linkages' flap/elev. ratio. I repositioned the secondary pushrod to a hole on the elevator-horn closer to the hinge-line. This provided the more elevator-deflection than flap-deflection that I was looking for. There was some binding in the Z-bends of the old pushrod.. so I tried to tweak the bends closer to 90 degrees.. and heard a "crack"...
 .... I think I'll make the replacement with "L-bends".. and use the spring-type retainers like I did on my Rare Bear..
 .... I think I'll make the replacement with "L-bends".. and use the spring-type retainers like I did on my Rare Bear..
roddie- Top Poster
-
Posts : 8459
Join date : 2013-07-17
Age : 64
Location : N. Smithfield, Rhode Island -
Re: "Barbie's stunter"
![]() roddie Sat Jul 15, 2017 7:29 pm
roddie Sat Jul 15, 2017 7:29 pm
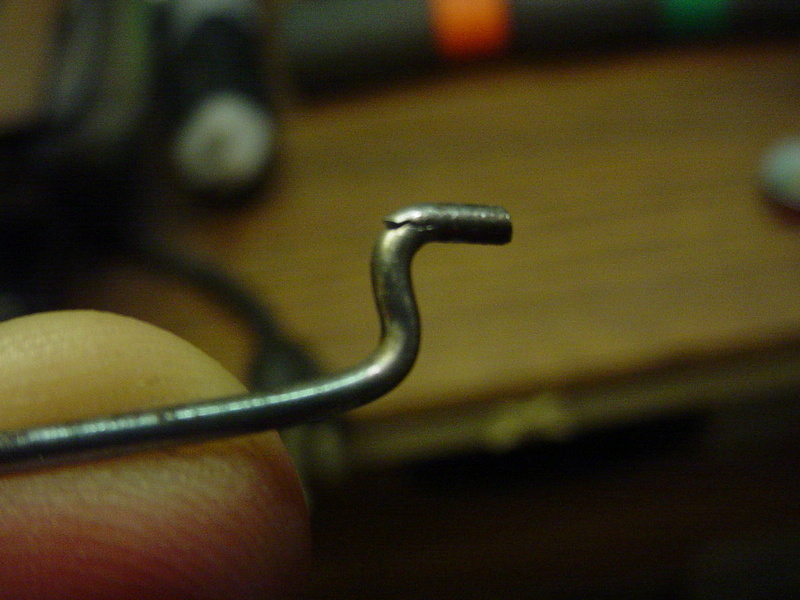
Macro-photography really shows this old girl's age..  It took me a couple of hours.. but I feel a LOT better about the entire control system. I made a new secondary pushrod from .062" music-wire using the "L-bends" this time.
I had to set the flaps and elevator to neutral again.. and measured between the flap-horn hole and the elevator-horn hole to get the length of my pushrod.
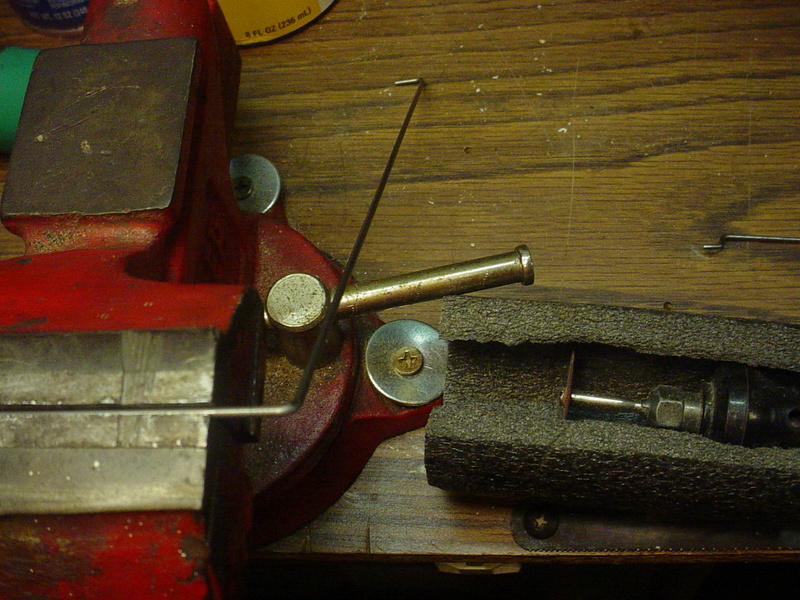
Used my "Harry's Z-bender" to form the "L-bends".. and my trusty old B & D rotary-tool with cut-off wheel to trim-off the 2nd bend. Note the cut-off wheel and flex-shaft of the rotary tool have a "keeper" made from a piece of foam pipe-insulation. This helps to keep the fragile non-reinforced cut-off wheels from getting broken while it sits on my workbench. It's kind of a "dedicated" tool that's always set up for cutting-off hardened-wire.. or shortening screws.
I was quite happy when the new pushrod slipped right-into both holes!
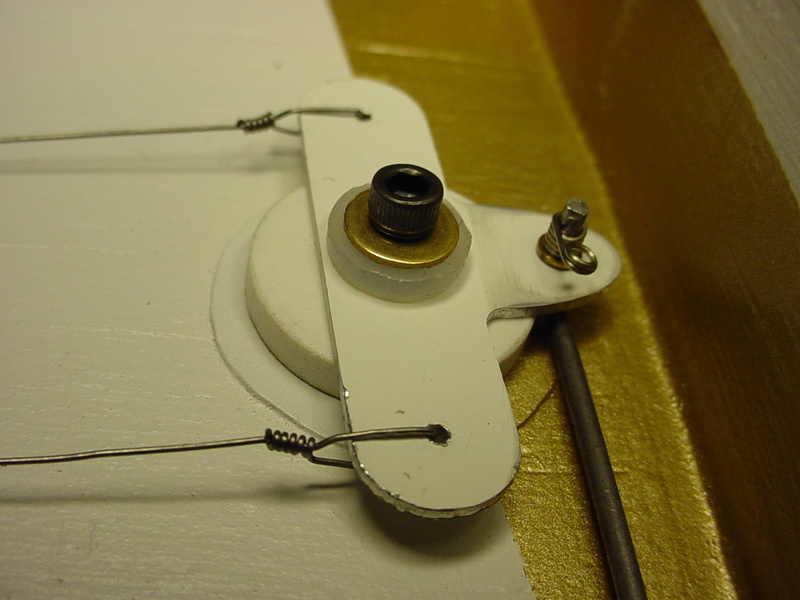
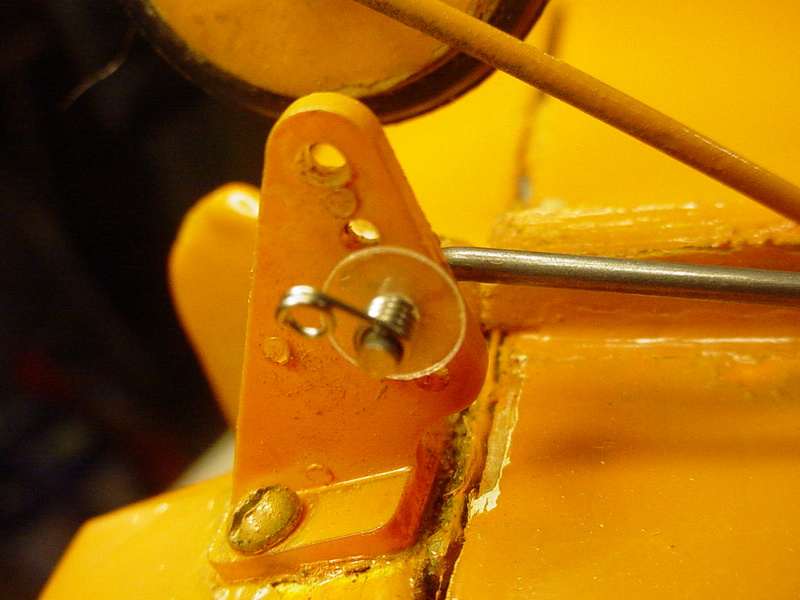
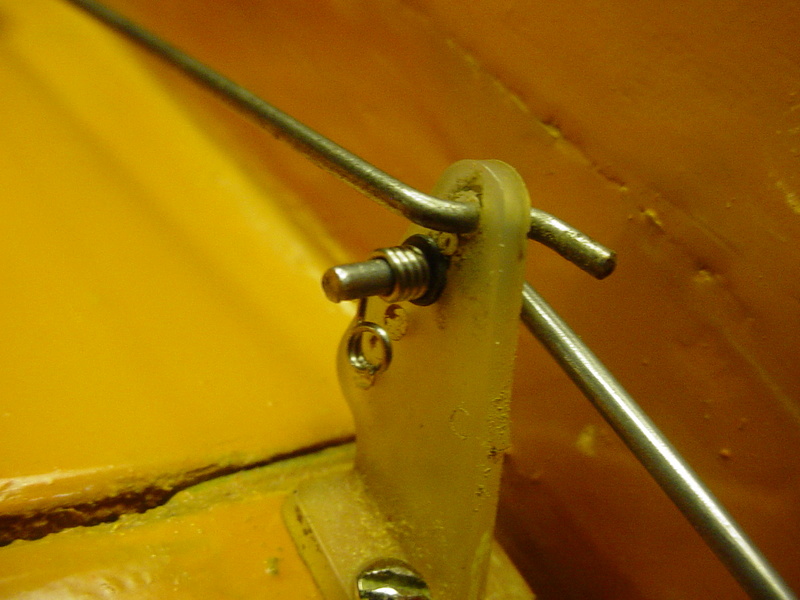
Working with tweezers and a lighted-magnifier... I assembled the linkage using a custom-made plastic washer on the elevator-horn.. and a smaller precision "Hob-Bits" metal washer (1/16" ID and 1/8" OD) on the flap-horn.. so as not to interfere with the primary pushrod in the hole just above. I used spring-style wheel-retainers on both horns to secure the new pushrod.

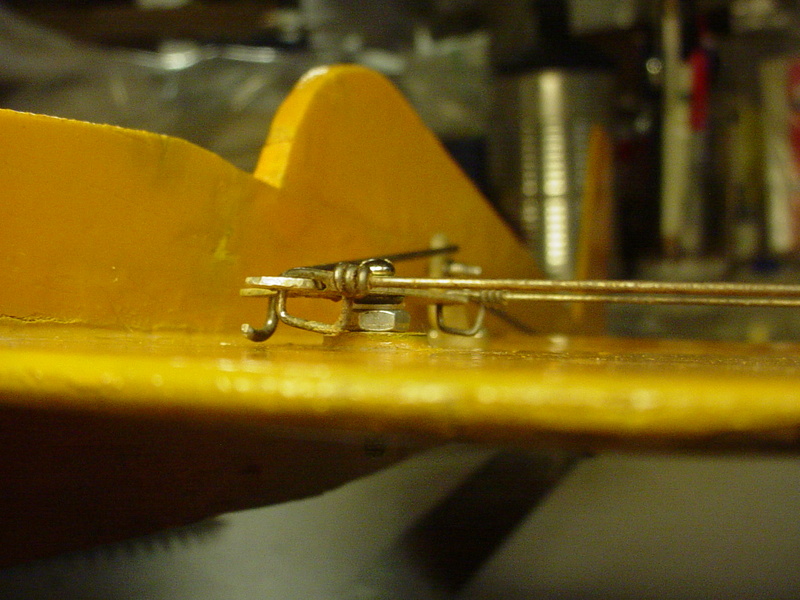
Another thing that was bothering me was the way that the old-school (overkill .032" dia.) solid-wire lead-outs were contacting the wing-surface/paint at the bell-crank.. so I bushed the bell-crank higher which took care of that. (not that this is a thing of beauty.. but why allow paint to be worn-away if it can be prevented?)
Finally.. the end-result that I was really looking for; achieving a 40/60 deflection-ratio between the flaps and elevator.

The controls work effortlessly.. which really makes me appreciate the Dubro small pinned-hinges that I painstakingly installed 25+ years ago. Slotting 1/8" sheet- balsa is tedious. I'd like to try a "sewn/stitched-hinge" on a future-build for this reason. Most of my other airplanes have Sig "Easy-Hinges" (CA-type) installed.. but I usually cut them to a pretty-small size (3/16" x 1/2" "tab") for my 1/2A models.. so that they're not too stiff. I usually install one in the close-proximity to a control-horn. The others are quite spread-out in their spacing.
Thanks for reading my account of a Saturday afternoon/evening spent tinkering on one of my old model-airplanes. It was actually quite enjoyable for me.
I had to set the flaps and elevator to neutral again.. and measured between the flap-horn hole and the elevator-horn hole to get the length of my pushrod.

Used my "Harry's Z-bender" to form the "L-bends".. and my trusty old B & D rotary-tool with cut-off wheel to trim-off the 2nd bend. Note the cut-off wheel and flex-shaft of the rotary tool have a "keeper" made from a piece of foam pipe-insulation. This helps to keep the fragile non-reinforced cut-off wheels from getting broken while it sits on my workbench. It's kind of a "dedicated" tool that's always set up for cutting-off hardened-wire.. or shortening screws.

I was quite happy when the new pushrod slipped right-into both holes!
Working with tweezers and a lighted-magnifier... I assembled the linkage using a custom-made plastic washer on the elevator-horn.. and a smaller precision "Hob-Bits" metal washer (1/16" ID and 1/8" OD) on the flap-horn.. so as not to interfere with the primary pushrod in the hole just above. I used spring-style wheel-retainers on both horns to secure the new pushrod.


Another thing that was bothering me was the way that the old-school (overkill .032" dia.) solid-wire lead-outs were contacting the wing-surface/paint at the bell-crank.. so I bushed the bell-crank higher which took care of that. (not that this is a thing of beauty..

Finally.. the end-result that I was really looking for; achieving a 40/60 deflection-ratio between the flaps and elevator.

The controls work effortlessly.. which really makes me appreciate the Dubro small pinned-hinges that I painstakingly installed 25+ years ago. Slotting 1/8" sheet- balsa is tedious.
Thanks for reading my account of a Saturday afternoon/evening spent tinkering on one of my old model-airplanes. It was actually quite enjoyable for me.
roddie- Top Poster
-
Posts : 8459
Join date : 2013-07-17
Age : 64
Location : N. Smithfield, Rhode Island -
» New Project
» not a stunter
» Looking for a wingtip for a Cox ME-109 Stunter
» Sig Mustang Stunter
» 1/2A Charger C/L stunter
» not a stunter
» Looking for a wingtip for a Cox ME-109 Stunter
» Sig Mustang Stunter
» 1/2A Charger C/L stunter
Page 1 of 1
Permissions in this forum:
You cannot reply to topics in this forum