

 Rules
Rules
by getback Today at 2:32 pm
» Roddie's flat-bottomed boat..
by OVERLORD Today at 2:20 pm
» PT-19 Mayhem at Buder Park...a Decade Ago!!!!
by Kim Today at 7:41 am
» Project Cox .049 r/c & Citabrian Champion
by getback Today at 6:46 am
» Three -- sold out (making two more) Cox .010 Carburetors with wrench
by balogh Today at 12:34 am
» Joe Wagners Sioux
by GallopingGhostler Yesterday at 9:03 pm
» Happy Anzac Day!
by GallopingGhostler Yesterday at 4:16 pm
» Jim Walkers FireBee - This is going to be fun
by rsv1cox Yesterday at 12:27 pm
» Revivng Some Childhood Classics
by getback Yesterday at 7:31 am
» Fox .35 Modifications
by Ken Cook Yesterday at 3:16 am
» Introducing our Cox .049 TD Engines
by getback Fri Apr 26, 2024 6:20 am
» Cox powered jet-pump for model Sprint Boat
by roddie Thu Apr 25, 2024 10:25 pm


The Refried Bean Build-It flies
Page 1 of 6 • 1, 2, 3, 4, 5, 6 ![]()

The Refried Bean Build-It flies
![]() RknRusty Sun Oct 07, 2012 5:28 pm
RknRusty Sun Oct 07, 2012 5:28 pm
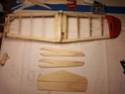
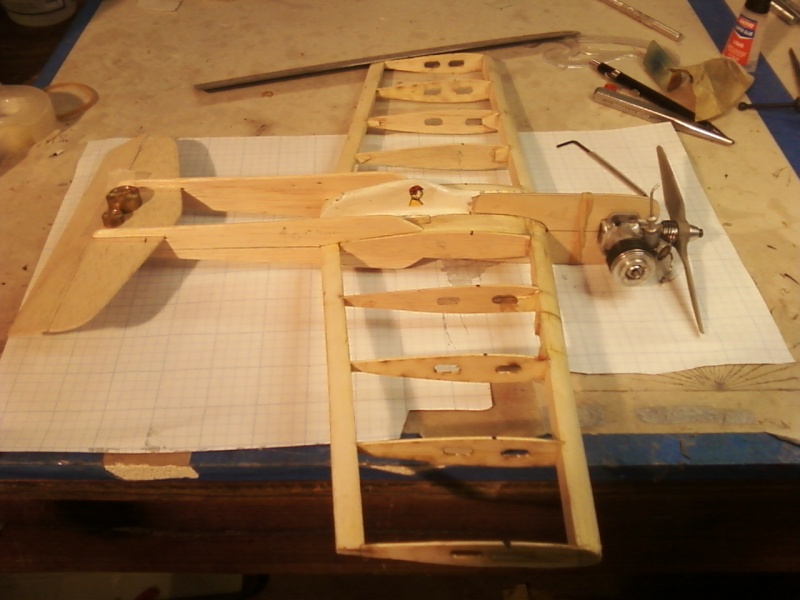
It's my old Li'l Jumpin Bean which has been to hell and back while I was learning to do stunts. The fuse is more glue than wood, the nose has been repaired way too many times and to add insult to injury, the bellcrank platform came crashing through the ribs in the middle of a loop one day. I've decided to make twin tail booms from 1/8" balsa(the fuse was 1/4"), and mount the stab/elevator on it. The length from the prop to the stab LE will be the same as the bean, and the booms should weigh about what the fuse did. While making the stab/elev, I came up with a question. First the pics, then the question.
Here are the tail parts laid out:
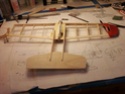
Here it is, press fit together before I cut the elevator off of the stab:
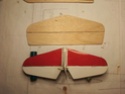
Here is the stab/elevator compared to the original one from the Bean:
The stab/elev are set at the same height above the centerline as the Bean was designed. I'm accurate with the centerline, so far it all fits together and lines up nicely. As I said, the nose to tail length is the same as the Bean plans.
Now here's my question: Notice I made the elevator with more area than the original Bean. It seemed like a good idea, but is there any mysterious modeling reason why I shouldn't do this?
I still have to replace some ribs and rebuild the nose, but I think it should fly just fine unless the oversized elevator needs changing. Ore maybe I should use just a stabilator like the Satan. I'll take advice on that. Does this look like a good flyer? Thanks.
Rusty
_________________
...and never Ever think about how good you are at something...
while you're doing it!
My Hot Rock & Blues Playlist

RknRusty- Rest In Peace

- Posts : 10869
Join date : 2011-08-10
Age : 68
Location : South Carolina, USA
Re: The Refried Bean Build-It flies
![]() Ken Cook Sun Oct 07, 2012 6:12 pm
Ken Cook Sun Oct 07, 2012 6:12 pm
I saw a guy at Brodak's this year flying a Carl Goldberg Cosmic Wind wing in which he put tail booms on it just like your doing. This plane was a bit rough looking. It flew so darn well it was impressive. It really surprised me how well it flew and it just had a terrific turn rate. This project may just really surprise you. I feel you have a good wing design. You certainly could try several engine options. If you wanted to try a internal bladder compartment, you could use a rocket tube possibly. The one problem I was faced with a wing as such is keeping the pushrod from bowing. This isn't an easy task as you don't have a fuse to attach a fairlead to. Ken

Ken Cook- Top Poster

- Posts : 5455
Join date : 2012-03-27
Location : pennsylvania
Re: The Refried Bean Build-It flies
![]() RknRusty Sun Oct 07, 2012 6:38 pm
RknRusty Sun Oct 07, 2012 6:38 pm
I will press ahead and see how she goes. I want to get this done pretty soon. I need to put that fine thread NV on the engine and learn how to needle it. It can't be too much different than a Tee Dee.
_________________
...and never Ever think about how good you are at something...
while you're doing it!
My Hot Rock & Blues Playlist
RknRusty- Rest In Peace
- Posts : 10869
Join date : 2011-08-10
Age : 68
Location : South Carolina, USA
Re: The Refried Bean Build-It flies
![]() RknRusty Tue Oct 09, 2012 8:32 pm
RknRusty Tue Oct 09, 2012 8:32 pm
My next step is to make new wingtips. They are the fragile ones from the Brodak kit and one was already repaired. I busted it again while removing the covering. so I may make a ply/balsa sandwich like Cribbs did. I'm not too worried about a little added weight as the Norvel will be more than enough power to blow the canopy off of my Baby Flite Streak... which I consider fast. Fast for me anyway.
The nose is going to be the biggest challenge. I sawed the old one off flush with the LE. I wish I hadn't, but I was getting a little wild when this idea struck me. I'll figure something out, and this will be an opportunity to get the engine closer to the LE which is best for the crazed aerobatics I seem to love.
Okay, back out to the shop. See y'all in the funny papers.
_________________
...and never Ever think about how good you are at something...
while you're doing it!
My Hot Rock & Blues Playlist
RknRusty- Rest In Peace
- Posts : 10869
Join date : 2011-08-10
Age : 68
Location : South Carolina, USA
Re: The Refried Bean Build-It flies
![]() RknRusty Tue Oct 09, 2012 11:50 pm
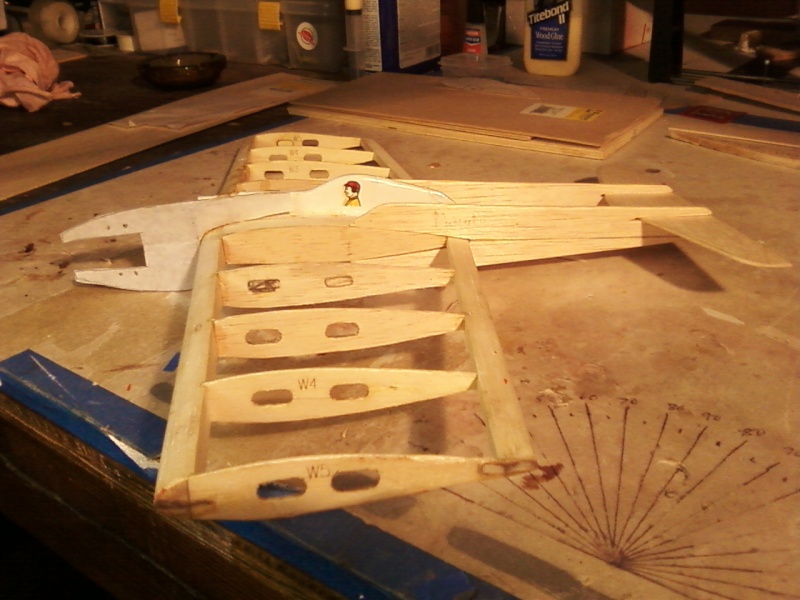
RknRusty Tue Oct 09, 2012 11:50 pm
What do you guys think?
Click the pic for a full image.
If you look closely, you can see the cut off end of the fuse in front of the LE.
_________________
...and never Ever think about how good you are at something...
while you're doing it!
My Hot Rock & Blues Playlist
RknRusty- Rest In Peace
- Posts : 10869
Join date : 2011-08-10
Age : 68
Location : South Carolina, USA
Re: The Refried Bean Build-It flies
![]() Cribbs74 Wed Oct 10, 2012 8:48 am
Cribbs74 Wed Oct 10, 2012 8:48 am
Ron

Cribbs74- Moderator


Posts : 11895
Join date : 2011-10-24
Age : 50
Location : Tuttle, OK
Re: The Refried Bean Build-It flies
![]() RknRusty Wed Oct 10, 2012 7:04 pm
RknRusty Wed Oct 10, 2012 7:04 pm
I started removing the thickness left over from the old mount and the old repairs. Man, that's a job, lots of epoxy I had mixed with sawdust and old plywood braces. I wish the Dremel turned both ways, I looked like a sawdust snowman when I finished. I'll detail it later tonight and maybe go ahead and cut out the doublers. I still don't know how I'm going to strengthen the extension that replaces the missing fuse nose. I thought of drilling 2 holes to add bamboo dowels that connect the two pieces and just use balsa between the doublers. I don't know how the heck I'll get the holes and sticks to line up though. I'm not much of a woodworker when it comes to perfectly mating two adjoining pieces. Maybe horizontal slots all the way through from side to side and basswood would be easier. I also have a strip of 1/16"x2/8" carbon fiber. Would that be stronger than basswood? Ply gussets bracing it to the LE are another(or additional) option.
_________________
...and never Ever think about how good you are at something...
while you're doing it!
My Hot Rock & Blues Playlist
RknRusty- Rest In Peace
- Posts : 10869
Join date : 2011-08-10
Age : 68
Location : South Carolina, USA
Re: The Refried Bean Build-It flies
![]() RknRusty Thu Oct 11, 2012 9:12 pm
RknRusty Thu Oct 11, 2012 9:12 pm
I got the doublers cut out of 1/16" ply. That was a pain too because I don't have good woodworking tools. I traced it out, CA glued two sheets together and roughed out the airfoil shape and the rectangular engine notch with my drill press and a 3/8" forstner bit. Then put it in the vice and used a rasp to get closer. Then holding it in my hand, filing, sanding, test fitting, sanding, and sanding to get the shape right... all the while trying to keep my centerline in the center. So far the inboard doubler fits okay. Tomorrow, the outboard doubler. And then the balsa meat for the sandwich. I'm still wondering the best way to securely connect it to the sawed off nose of the existing fuse. If I don't blow a shoulder, it'll be downhill from there.
_________________
...and never Ever think about how good you are at something...
while you're doing it!
My Hot Rock & Blues Playlist
RknRusty- Rest In Peace
- Posts : 10869
Join date : 2011-08-10
Age : 68
Location : South Carolina, USA
Re: The Refried Bean Build-It flies
![]() RknRusty Sun Oct 14, 2012 8:52 pm
RknRusty Sun Oct 14, 2012 8:52 pm
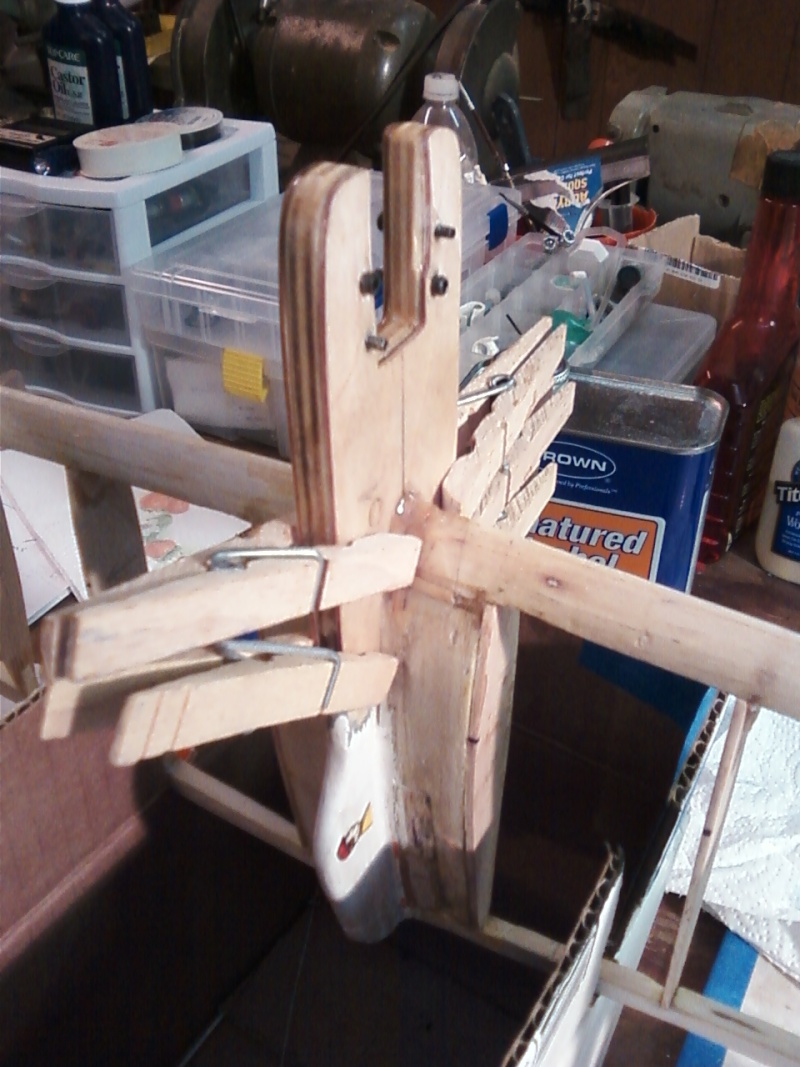
I test fit it all together with the engine on it to see how the balance looks so far.
EDIT: Correction; I had the CG marked wrong. It balances easily with only a couple of grams on the tail. Paint will probably help that.
Last edited by RknRusty on Tue Oct 16, 2012 6:31 pm; edited 2 times in total
_________________
...and never Ever think about how good you are at something...
while you're doing it!
My Hot Rock & Blues Playlist
RknRusty- Rest In Peace
- Posts : 10869
Join date : 2011-08-10
Age : 68
Location : South Carolina, USA
Re: The Refried Bean Build-It flies
![]() RknRusty Tue Oct 16, 2012 6:23 pm
RknRusty Tue Oct 16, 2012 6:23 pm
I have the center nose extension of the fuselage cut out of 1/4" birch plywood and it is the same shape as the two 1/16" ply side doublers shown in the picture in a post above, except it doesn't wrap over the wing root like the doublers do. It just butts up flush against the old cut off fuselage, which is cut off at the LE. I'm going to epoxy the doublers and the nose extension together so it's one piece when I glue it onto the plane. Since it's not actually part of the fuse, I'm going to add some lateral support with triangular gussets that will brace the new nose against the LE on each wing.
Now my questions; should I add some sort of connection between the nose and the fuse? Like when woodworkers join wood, they cut slots and glue tabs(biscuits?) into the slots of each piece to make a stronger joint. I have a strip of carbon fiber I could use to make those little biscuits, but does epoxy stick to CF as well as 1/16" ply? Which is lighter/stronger? Would it even be worth the work(and in my case, the risk) of trying to add a couple of joiners? Or will my gussets be enough support. I hope I don't crash in a high speed nose-in. I haven't in a very long time, but... well, just askin'. I'd appreciate any opinions,
Rusty
_________________
...and never Ever think about how good you are at something...
while you're doing it!
My Hot Rock & Blues Playlist
RknRusty- Rest In Peace
- Posts : 10869
Join date : 2011-08-10
Age : 68
Location : South Carolina, USA
Re: The Refried Bean Build-It flies
![]() Cribbs74 Tue Oct 16, 2012 8:05 pm
Cribbs74 Tue Oct 16, 2012 8:05 pm
It looks pretty good Rusty!
Ron
Cribbs74- Moderator
-
Posts : 11895
Join date : 2011-10-24
Age : 50
Location : Tuttle, OK
Re: The Refried Bean Build-It flies
![]() RknRusty Tue Oct 16, 2012 9:53 pm
RknRusty Tue Oct 16, 2012 9:53 pm
cribbs74 wrote:I would think that should be enough support even without the gussets much less the joiners. Ply doublers usually add enough strength on their own. If it were me I would leave it as is. The gussets aren't a bad idea though.
It looks pretty good Rusty!
Ron
Well my thoughts were that the fuse originally extended into, and filled the space between the doublers(or would have if I had originally made it as a beam mount), plus two square hardwood dowels extending under where the engine mounts. That is stronger than a patchwork stub of a fuse extension just glued onto the end of the sawed off fuse, even with the doublers. But epoxy grips pretty good, so you're probably right.
I also used ply instead of balsa for the extension. Not for strength but because I didn't have hardwood dowels to support the tight engine screws. That's going to make it nose heavy, but hopefully not too much. I should have taken a picture of the extension before I glued the doublers to it. The glue is setting now. Tomorrow I'll glue the new nose to the plane.
_________________
...and never Ever think about how good you are at something...
while you're doing it!
My Hot Rock & Blues Playlist
RknRusty- Rest In Peace
- Posts : 10869
Join date : 2011-08-10
Age : 68
Location : South Carolina, USA
Re: The Refried Bean Build-It flies
![]() PV Pilot Wed Oct 17, 2012 11:15 am
PV Pilot Wed Oct 17, 2012 11:15 am
http://www.blackhawkmodels.com/ps.html

PV Pilot- High Tech Balsa Basher

- Posts : 1854
Join date : 2011-08-11
Age : 57
Location : The ragged end of the Universe.
Re: The Refried Bean Build-It flies
![]() RknRusty Wed Oct 17, 2012 11:58 am
RknRusty Wed Oct 17, 2012 11:58 am
That would be interesting. I was trying to think of something creative, and I was wondering how much the regular wingtips affect its aerobatic ability, as they add a little bit to the total wing area. The tips will be the last thing I do. Soon I hope.PV Pilot wrote:For your wingtips Rusty, you could do a form of a spill plate on the ends,,kinda like the Mini Stunt Rocket. Simple and easy, it would seem.
http://www.blackhawkmodels.com/ps.html
After I glue the nose on tonight I need to figure out where to mount the bellcrank. In the first rib bay, I guess, but it will take some extra reinforcing. It's going to be one odd Bean, that's for sure.
_________________
...and never Ever think about how good you are at something...
while you're doing it!
My Hot Rock & Blues Playlist
RknRusty- Rest In Peace
- Posts : 10869
Join date : 2011-08-10
Age : 68
Location : South Carolina, USA
Re: The Refried Bean Build-It flies
![]() RknRusty Wed Oct 17, 2012 10:32 pm
RknRusty Wed Oct 17, 2012 10:32 pm
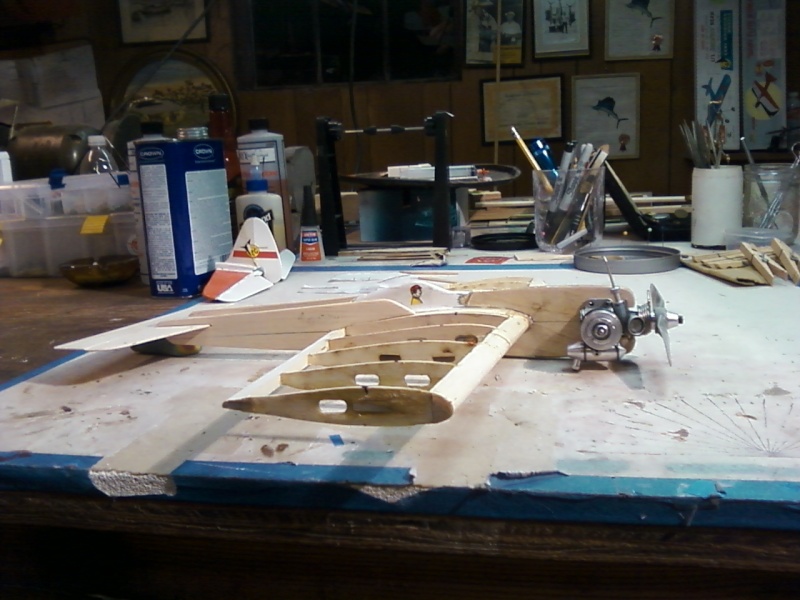
The hardest part is done. I put the .061 on it and re-checked the balance with the new nose and it's pretty nose heavy. Hoping the paint and Monokote will help level it off some. 10g on top of the stab balances it now in its skeletal form. I don't know how to calculate wing loading, but I might look into that. If it's too heavy I might need to add an inch of flap to the TE. But all that can wait until it's almost finished.
The new nose getting glued on.
You can see where I had to notch it for the Norvel starter spring.
Posing for a profile shot. That's a lot of engine.
I could reduce some nose weight by sanding some of the height off of the nose. It's a bit fat.
_________________
...and never Ever think about how good you are at something...
while you're doing it!
My Hot Rock & Blues Playlist
RknRusty- Rest In Peace
- Posts : 10869
Join date : 2011-08-10
Age : 68
Location : South Carolina, USA
Re: The Refried Bean Build-It flies
![]() Cribbs74 Thu Oct 18, 2012 7:46 am
Cribbs74 Thu Oct 18, 2012 7:46 am
I wouldn't worry about wing loading too much as that Norvel will make up for what's lacking.

Cribbs74- Moderator
-
Posts : 11895
Join date : 2011-10-24
Age : 50
Location : Tuttle, OK
Re: The Refried Bean Build-It flies
![]() RknRusty Thu Oct 18, 2012 8:53 am
RknRusty Thu Oct 18, 2012 8:53 am
Yeah, It'll just brute force it through the sky.cribbs74 wrote:You know that nose is a little big, but it actually looks really good. It has a real hot rod appearance to it. All my nose heavy builds lessened some once covered, but they were still nose heavy when complete.
I wouldn't worry about wing loading too much as that Norvel will make up for what's lacking.
But if the wing is overloaded it won't do loops no matter how much power you have. No worries though, I looked up the math and roughly calculated it using more weight than it will probably have and came out with about 11oz/sq. foot. If what I read is right, then approaching 20oz/sq. foot is becoming a kludge.
It does sort of have that old timey hotrod look with the fat nose. I should get some inline 12 cylinder headers to put on the inboard side of the nose... and pipe the exhaust through them...Not. Maybe some flames or shark teeth. Now there's a decal idea.
_________________
...and never Ever think about how good you are at something...
while you're doing it!
My Hot Rock & Blues Playlist
RknRusty- Rest In Peace
- Posts : 10869
Join date : 2011-08-10
Age : 68
Location : South Carolina, USA
Re: The Refried Bean Build-It flies
![]() RknRusty Thu Oct 18, 2012 11:17 pm
RknRusty Thu Oct 18, 2012 11:17 pm
I spent more time getting the old paint off, and there's still more stripping to do. I got the bellcrank platform mounted in the first wing bay and braced to withstand hard flying and being repeatedly pulled out of the stooge. I used really hard balsa to make the new #1 and #2 ribs that hold it. Since I have a strip of 1" pre-cut flap balsa I'm going to add a small tapered flap on each wing. It will also act as a gusset for the tail booms.
It's coming along quickly now and all of my measurements are actually fitting together like they should. That's a real accomplishment for me. Lots of details left. Sanding and filling and sanding some more, elevator hinges, control rod, landing gear... the devil is in the details. I like the guys at RCG that always say you can bang this kind of project out in a couple of hours.
I fiddled with the Big Mig today. Now I see how the lock nut on the fine thread NV works, that's pretty handy. I'll probably find the needle setting on the test bench before I put it on the plane for good.
_________________
...and never Ever think about how good you are at something...
while you're doing it!
My Hot Rock & Blues Playlist
RknRusty- Rest In Peace
- Posts : 10869
Join date : 2011-08-10
Age : 68
Location : South Carolina, USA
Re: The Refried Bean Build-It flies
![]() PV Pilot Fri Oct 19, 2012 10:33 am
PV Pilot Fri Oct 19, 2012 10:33 am
PV Pilot- High Tech Balsa Basher
- Posts : 1854
Join date : 2011-08-11
Age : 57
Location : The ragged end of the Universe.
Re: The Refried Bean Build-It flies
![]() RknRusty Fri Oct 19, 2012 10:42 am
RknRusty Fri Oct 19, 2012 10:42 am
It's a lot more streamlined now. I shaved a bunch of wood off of the top and bottom of the nose. It's still nose heavy, but I think after painting and covering it will only need a few grams on the tail. So far it's a third of an ounce heavier than the Bean in its original form. I hope the addition of the faux flaps will help it float a little better.PV Pilot wrote:Looks to be a bit nose heavy and draggy with that big head. Drop like a stone off power I would bet. On the motor tho', it should fling it across the sky.
_________________
...and never Ever think about how good you are at something...
while you're doing it!
My Hot Rock & Blues Playlist
RknRusty- Rest In Peace
- Posts : 10869
Join date : 2011-08-10
Age : 68
Location : South Carolina, USA
Elevator hinge material
![]() RknRusty Tue Oct 23, 2012 10:59 pm
RknRusty Tue Oct 23, 2012 10:59 pm
I know we've had discussions about sewing but I don't want to do that on this one. I wanted something pretty invisible. I read about using two strips of Monokote heated and stuck together in an over and under fashion so I tried that. After meticulously cutting the strips I stuck the first two together and tested it. All the people on other forums raving about that are full of bull-oney, they must have some wimpy little planes. It didn't stand up to my tenderness test at all. So scrap that idea. I want some of the light fiberglass tape like Goldberg used to put in all of his kits, but I can't find it anywhere. Plenty of medium, I even have a roll, but no fine.
Anyone know where to get it. Or recommend another cloth that will hold up... forever, like the glass?
Thanks,
Rusty
Last edited by RknRusty on Wed Oct 24, 2012 10:42 pm; edited 1 time in total
_________________
...and never Ever think about how good you are at something...
while you're doing it!
My Hot Rock & Blues Playlist
RknRusty- Rest In Peace
- Posts : 10869
Join date : 2011-08-10
Age : 68
Location : South Carolina, USA
re: monokote hinges
![]() happydad Wed Oct 24, 2012 12:08 am
happydad Wed Oct 24, 2012 12:08 am
RknRusty wrote:It's time to put the hinges on my Refried Bean and I was thinking about various options. I haven't been getting most of my building questions answered in the build thread so I figured I'd start another topic.
I know we've had discussions about sewing but I don't want to do that on this one. I wanted something pretty invisible. I read about using two strips of Monokote heated and stuck together in an over and under fashion so I tried that. After meticulously cutting the strips I stuck the first two together and tested it. All the people on other forums raving about that are full of bull-oney, they must have some wimpy little planes. It didn't stand up to my tenderness test at all. So scrap that idea. I want some of the light fiberglass tape like Goldberg used to put in all of his kits, but I can't find it anywhere. Plenty of medium, I even have a roll, but no fine.
Anyone know where to get it. Or recommend another cloth that will hold up... forever, like the glass?
Thanks,
Rusty
 Rusty: I have used monokote hinges for more than 30 years and the only failures were when a airplane crashed due to other reasons, failed radio, operator error, etc. i used strips of monokote about 3/8inch to 1/2inch wide and from 1/2inch to 1inch long depending on the application and size of rudder/elevator/ailerons being moved. I typically ovelapped the reversed piece 1/8inch to 1/4inch depending again on the size of the rudder/elevator/aileron. I spaced the hinges 1/8inch to 1/4inch apart over 90% of the rudder/elevator/aileron. I have used the monokote hinges on sailplanes up to 96inch winspan and powered planes mostly in the smaller .049 range. Electric planes up to 50inch winspan.
 I have seen people use fiber imbedded packing tape for hinges, but i find it too stiff. I have used 3M clear tape on both sides of a rudder/elevator/aileron on smaller planes, but only after carefully pressing it into the hinged area and checking for free movement.
p.s. and the 3M clear tape is still clear and flexible on my plane plans after 30+ years.
again my 2 cents.
happydad 


happydad- Rest In Peace
- Posts : 1592
Join date : 2012-05-28
Age : 78
Location : Escondido, CA
Re: The Refried Bean Build-It flies
![]() John Goddard Wed Oct 24, 2012 2:50 am
John Goddard Wed Oct 24, 2012 2:50 am
Flight have all come with fibre type hinges Rusty.
I tend to drill and pin them with cocktail sticks to 'make sure'
They can't pull out.
The instructions always say just wick them in with cyano.
If memory serves my old EF 58in Extra with a YS63 up front
Had them as well. Bearing in mind these models have a huge
(90 degrees plus) surface deflection and do see an awful lot of
High stress action on their surfaces.
I think I've only ever had a couple need replacing both in my
Foamy Yak and both times after one of my unscheduled arrivals.
Most model shops sell them cut to size and ready to slot in.

John Goddard- Diamond Member
- Posts : 2447
Join date : 2011-11-24
Age : 59
Location : Leyton North East London
Re: The Refried Bean Build-It flies
![]() Ken Cook Wed Oct 24, 2012 4:36 am
Ken Cook Wed Oct 24, 2012 4:36 am
The next best hinge of choice is the dental floss hinge sewn onto the elevator and stab. This works, it really is quite free and readily available in most homes. The downside is that the waxed version is mostly used which I don't recommend. You sew figure eights in the over under pattern from stab to elevator. I like to cut back 3/16" and glue bass wood to the front and rear of the elevator stab for this due to it not allowing the wood to tear out. I drill holes for this prior. Stitches though can be sewn through balsa with no holes other than the one the needle makes. Ken
Ken Cook- Top Poster
- Posts : 5455
Join date : 2012-03-27
Location : pennsylvania
Re: The Refried Bean Build-It flies
![]() John Goddard Wed Oct 24, 2012 8:28 am
John Goddard Wed Oct 24, 2012 8:28 am
The above are pre cut, don't fray and will take even
a ten thumbed idiot like me 5 mins to hinge a surface.
John Goddard- Diamond Member
- Posts : 2447
Join date : 2011-11-24
Age : 59
Location : Leyton North East London
Page 1 of 6 • 1, 2, 3, 4, 5, 6 ![]()
» Baby Flite Streak build thread
» Goldberg Li'l Jumpin Bean build thread (Finished!)
» Guillows Cessna 150 build circa 1970 (Build Log)
» La Stick Scratch Build for Cox Pee Wee .020