

 Rules
Rules
by rdw777 Today at 12:33 pm
» Roddie-Rigger.. a 2005 original design
by rsv1cox Today at 12:17 pm
» O&R 23 & Brown Jr
by lla Today at 11:15 am
» need info on this
by lla Today at 10:30 am
» Post your Older books
by GallopingGhostler Today at 10:26 am
» Speed plane - Crispy but not too crispy
by GallopingGhostler Today at 10:23 am
» Project Cox .049 r/c & Citabrian Champion
by rdw777 Today at 9:00 am
» Fox .35 Modifications
by rdw777 Today at 8:51 am
» Jim Walkers FireBee - This is going to be fun
by rdw777 Today at 8:30 am
» Three (only one left) Cox .020 silencers for sale.
by GallopingGhostler Today at 5:12 am
» *Cox Engine of The Month* Submit your pictures! -May 2024-
by Admin Today at 2:38 am
» S1 Ringmaster
by Onelife Yesterday at 8:40 am


1960 Scientific P-40 Profile kit
Page 3 of 4 •  1, 2, 3, 4
 ![]()
Re: 1960 Scientific P-40 Profile kit
![]() getback Mon Sep 17, 2018 9:05 am
getback Mon Sep 17, 2018 9:05 am

getback- Top Poster


Posts : 10127
Join date : 2013-01-18
Age : 66
Location : julian , NC
Re: 1960 Scientific P-40 Profile kit
![]() Levent Suberk Mon Sep 17, 2018 9:46 am
Levent Suberk Mon Sep 17, 2018 9:46 am
You can print decals on A4 clear sheet with laser printer.

Levent Suberk- Diamond Member

- Posts : 2204
Join date : 2017-12-24
Location : Türkiye
Re: 1960 Scientific P-40 Profile kit
![]() rsv1cox Mon Sep 17, 2018 1:47 pm
rsv1cox Mon Sep 17, 2018 1:47 pm
Pictures, videos, mea culpas, crashes, rebuilds, reads like a who done it. Been there for all of those.
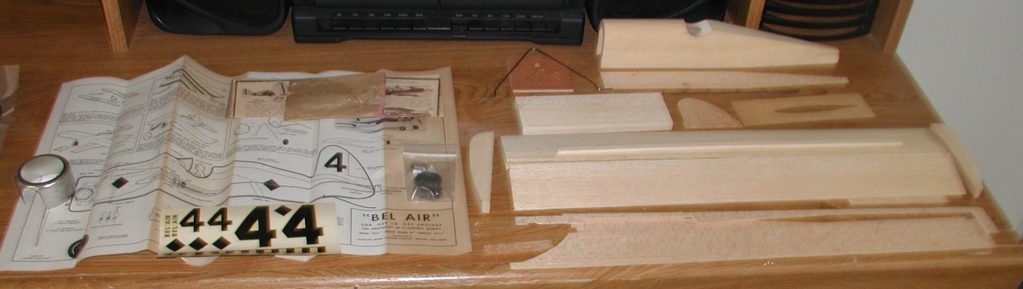
I'm not familiar with Scientific kits, looks like they are/were Sterling kit knock-offs although I do not know which pre-dates which. Then Ron sent me this Scientific Bel-Air kit. Pretty impressive when compared with Sterling. Perhaps better quality combined with different construction techniques. But then I have just this one Scientific kit to judge against the many Sterling kits that I have built.


rsv1cox- Top Poster
-
Posts : 10580
Join date : 2014-08-18
Location : West Virginia
Re: 1960 Scientific P-40 Profile kit
![]() ticomareado Mon Sep 17, 2018 2:16 pm
ticomareado Mon Sep 17, 2018 2:16 pm

ticomareado- Account Under Review
- Posts : 1089
Join date : 2013-10-03
Location : NC
Re: 1960 Scientific P-40 Profile kit
![]() 944_Jim Mon Sep 17, 2018 5:40 pm
944_Jim Mon Sep 17, 2018 5:40 pm
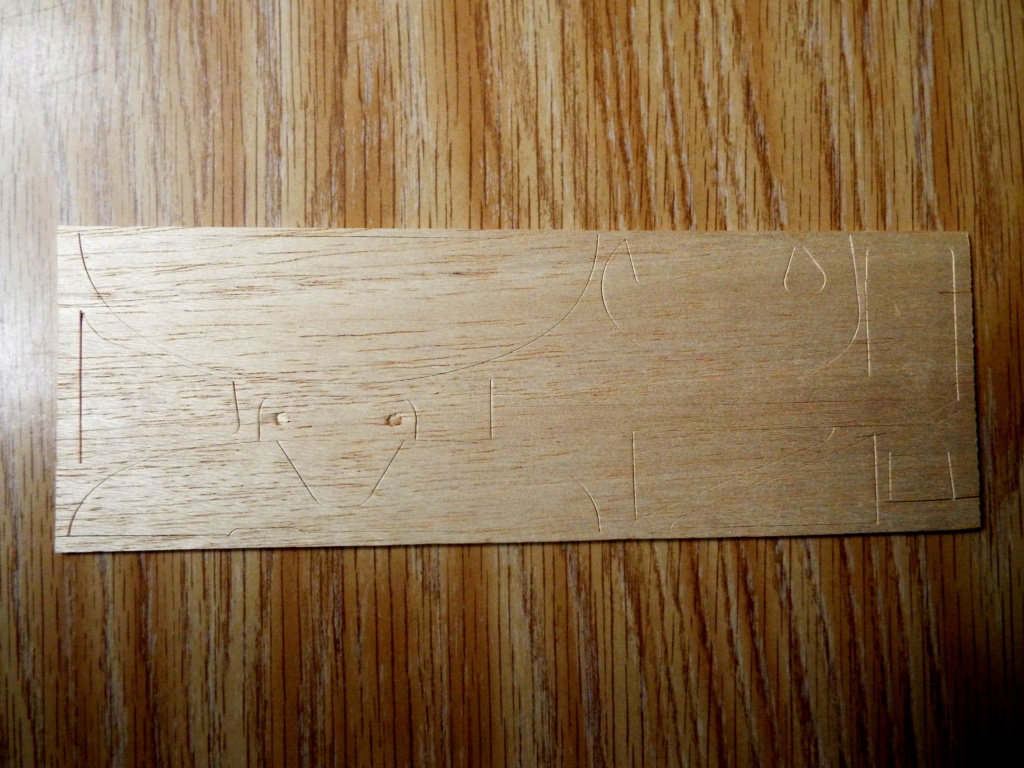
The plan scan shows a validated full-size wing pattern to build over. I used the tile feature to print the plan scan, then compared it to the original. If I'm off by anything, the parts are a ball-point pen tip bigger than the parts...but I also scanned the woods if you want them. Oh, and I scanned the decals too!
I don't think I can post PDFs here directly...does Admin want them for the "members' only" section?
944_Jim- Diamond Member
-
Posts : 1954
Join date : 2017-02-08
Age : 59
Location : NE MS
Re: 1960 Scientific P-40 Profile kit
![]() GallopingGhostler Mon Sep 17, 2018 7:27 pm
GallopingGhostler Mon Sep 17, 2018 7:27 pm

Regarding which is better, I think Goldberg 1/2-A's were a little better, but overall, they seemed about equal whether Top Flite, Sterling, Scientific, Dumas, etc. I say this when comparing the same type construction. Basically, they were attempting to outsell each other with the lowest per unit retail cost. They all came with varying densities of wood, although the Scientifics overall seemed to do a slightly better job. There, they used heavier wood that tended to be sturdy.
Wood quality of the early Sterling profile Beginner Series IMO was comparable to Scientific. Anyway, for sport flying and a teen boy, overall they still made for decent building models. If one wanted to roll their own for better quality, that was also an option, too.

GallopingGhostler- Top Poster
-
Posts : 5320
Join date : 2013-07-13
Age : 70
Location : Clovis NM or NFL KC Chiefs
Re: 1960 Scientific P-40 Profile kit
![]() 944_Jim Mon Sep 17, 2018 9:56 pm
944_Jim Mon Sep 17, 2018 9:56 pm
rsv1cox wrote:Lovin this thread.
Pictures, videos, mea culpas, crashes, rebuilds, reads like a who done it. Been there for all of those.
Thanks, Bob! I wish we could all fly in one place together. If this is the only way I can share my hobby with like-minded people, then this is how/why I do it. The members of this forum are really quite supportive of each other.
rsv1cox wrote: I'm not familiar with Scientific kits, looks like they are/were Sterling kit knock-offs although I do not know which pre-dates which. Then Ron sent me this Scientific Bel-Air kit. Pretty impressive when compared with Sterling. Perhaps better quality combined with different construction techniques. But then I have just this one Scientific kit to judge against the many Sterling kits that I have built.
Please look for my kids' FW-190 and Typhoon kits here. They are Scientific reproductions by Dave Cowell out west (DPCModels). I think I shared those builds here. I know both are at RCG, one in CL, and the other in 1/2A. They are good representations of a boy's next kit from the logs. They feature 18" built-up, flat-bottomed wings with profile fuselages and plastic cowls. I suspect the next step up would be the Super Mustang and this P-40. Again, a profile fuselage, plastic cowl, but a 24" symmetrical wing for stunting...they are bigger than the beginner logs, profiles, box slab fuselages.
I'm "early-mid 50s." Growing up in Boston and seeing Guillows kits in the hobby shop, I drooled over them the most. Sterling kits seemed as daunting, and unbuildable as the Guillows kits, both having built-up everything! Guillows was only a 40 minute drive from where I grew up, so they are my "Hero Kit makers" (gotta love the home team). My first "real kit" was the CG Stuntman 23, and then a Lil Satan, followed by an unflown Combat Kitten. After those, I took on the challenge of the Guillows B-25, with Medallions no less!
I can't recall Scientific kits, and was introduced to them only within the last few years through the efforts of DPCModels (via Brenda Lombas). However, none of this would mean anything to me if it were not for LM Cox and the plastic planes that volunteered engines for my brief pass through balsa kits...that is, until I got a driver's license!
Now that I've knocked the shine off of the P-40, it's gonna get flown hard! Grab the popcorn, or the dust pan, and hang around for a little longer!
944_Jim- Diamond Member
-
Posts : 1954
Join date : 2017-02-08
Age : 59
Location : NE MS
Re: 1960 Scientific P-40 Profile kit
![]() 944_Jim Mon Sep 24, 2018 10:02 am
944_Jim Mon Sep 24, 2018 10:02 am
A little clear dope, tissue, and some color. I may be able to fly this weekend!
Last edited by 944_Jim on Mon Sep 24, 2018 11:29 am; edited 1 time in total (Reason for editing : (sic))
944_Jim- Diamond Member
-
Posts : 1954
Join date : 2017-02-08
Age : 59
Location : NE MS

Kim- Top Poster
-
Posts : 8532
Join date : 2011-09-06
Location : South East Missouri
Re: 1960 Scientific P-40 Profile kit
![]() fredvon4 Mon Sep 24, 2018 2:31 pm
fredvon4 Mon Sep 24, 2018 2:31 pm
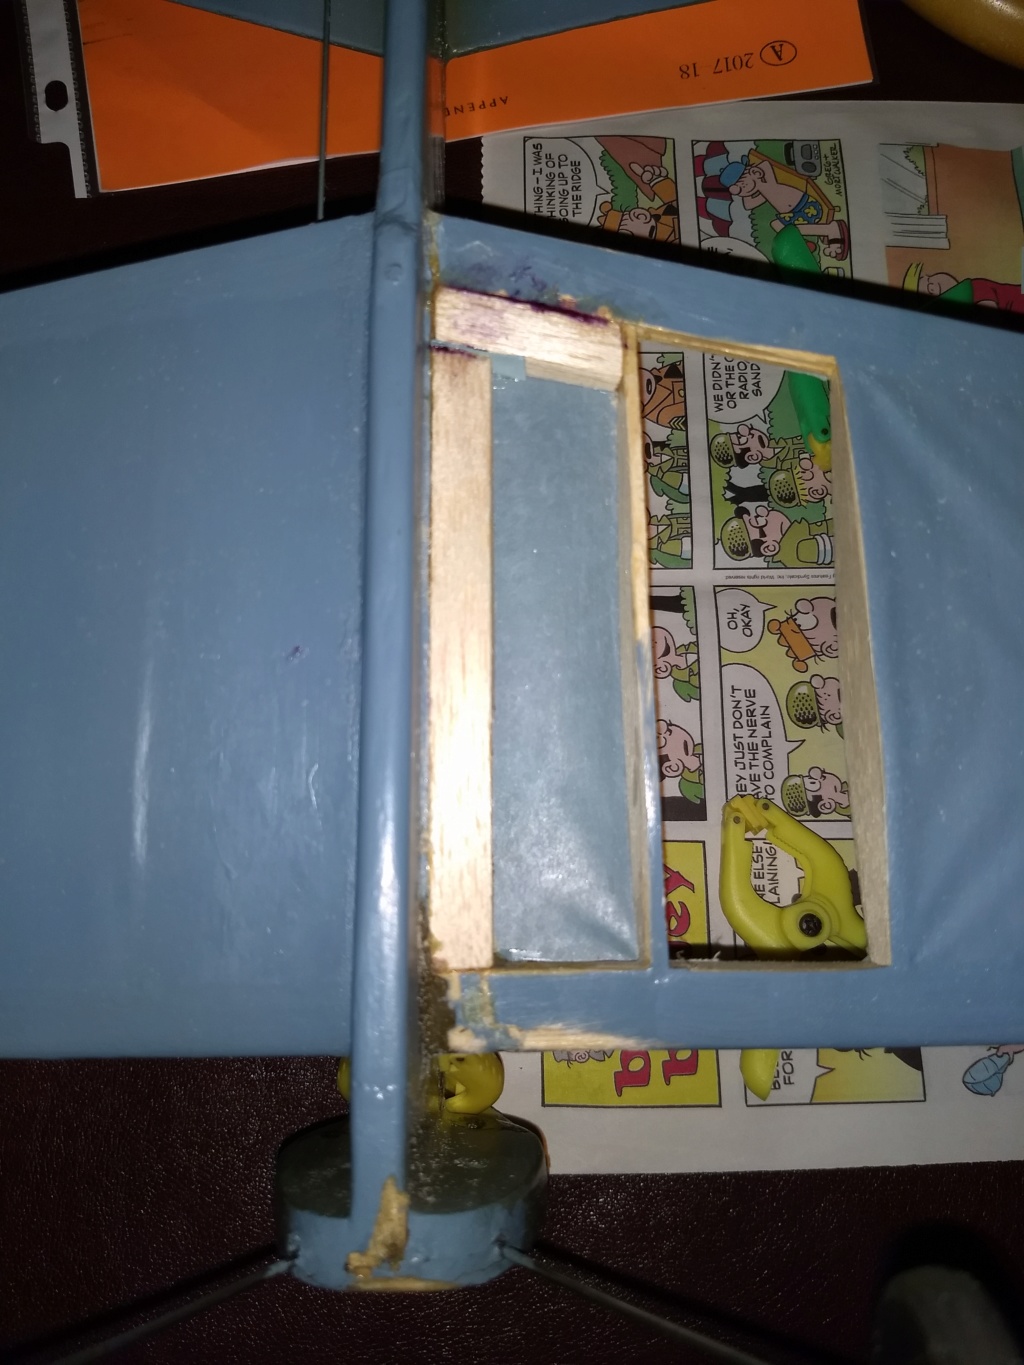
All local papers suck
Have not seen Beetle(sp?) Bailey in two decades...forgot how much I enjoyed the cartoons
Now need to research mail order news print that have full syndicated cartoon sections

fredvon4- Top Poster
-
Posts : 4002
Join date : 2011-08-26
Age : 68
Location : Lampasas Texas
Re: 1960 Scientific P-40 Profile kit
![]() Ken Cook Mon Sep 24, 2018 3:12 pm
Ken Cook Mon Sep 24, 2018 3:12 pm

Ken Cook- Top Poster
- Posts : 5461
Join date : 2012-03-27
Location : pennsylvania
Re: 1960 Scientific P-40 Profile kit
![]() 944_Jim Mon Sep 24, 2018 8:22 pm
944_Jim Mon Sep 24, 2018 8:22 pm
Ken Cook wrote: Jim, if you ever get into that situation again, take a piece of 1/16" balsa about 1/2" wide strip...is quite light.
Thanks Ken,
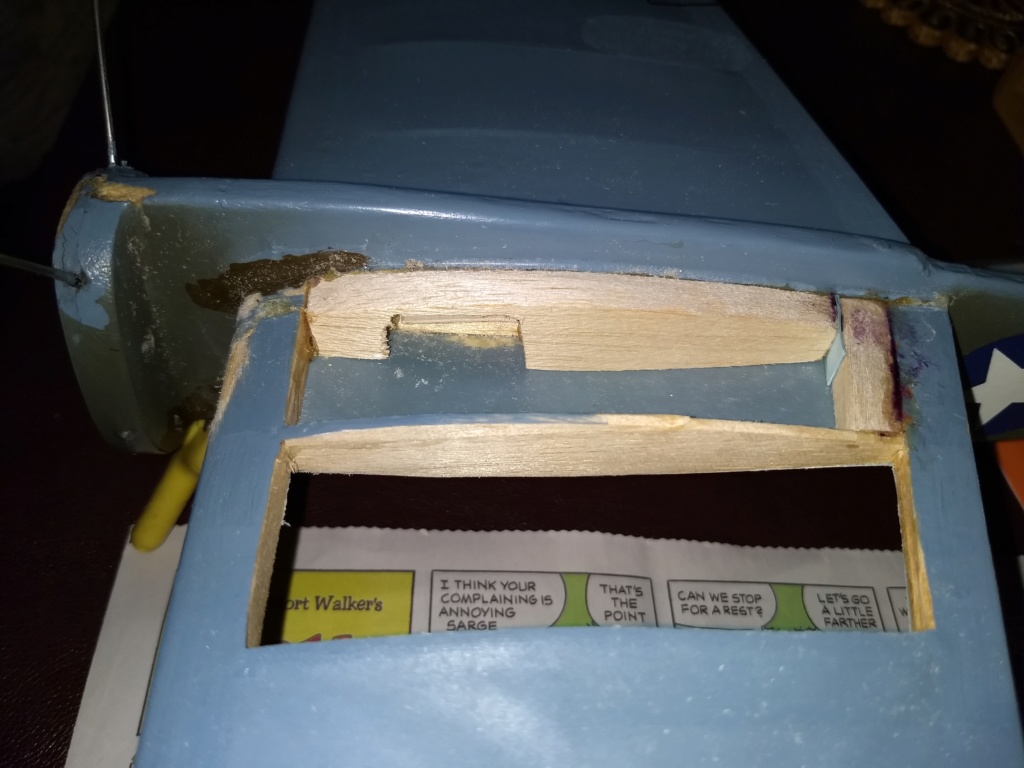
I'm hoping the ugly trailing edge scab will add to the split the trailing edge took, and add as an additional anchor point. My mistake was how I originally handled the joint in the trailing edge's middle. It was a pie slice wedge edge-glued to two square cut edges. Next time there will be a pretty good gusset if not a scarf joint.
Your suggestion is a lot cleaner!
944_Jim- Diamond Member
-
Posts : 1954
Join date : 2017-02-08
Age : 59
Location : NE MS
Pheonix rises!
![]() 944_Jim Mon Sep 24, 2018 10:16 pm
944_Jim Mon Sep 24, 2018 10:16 pm
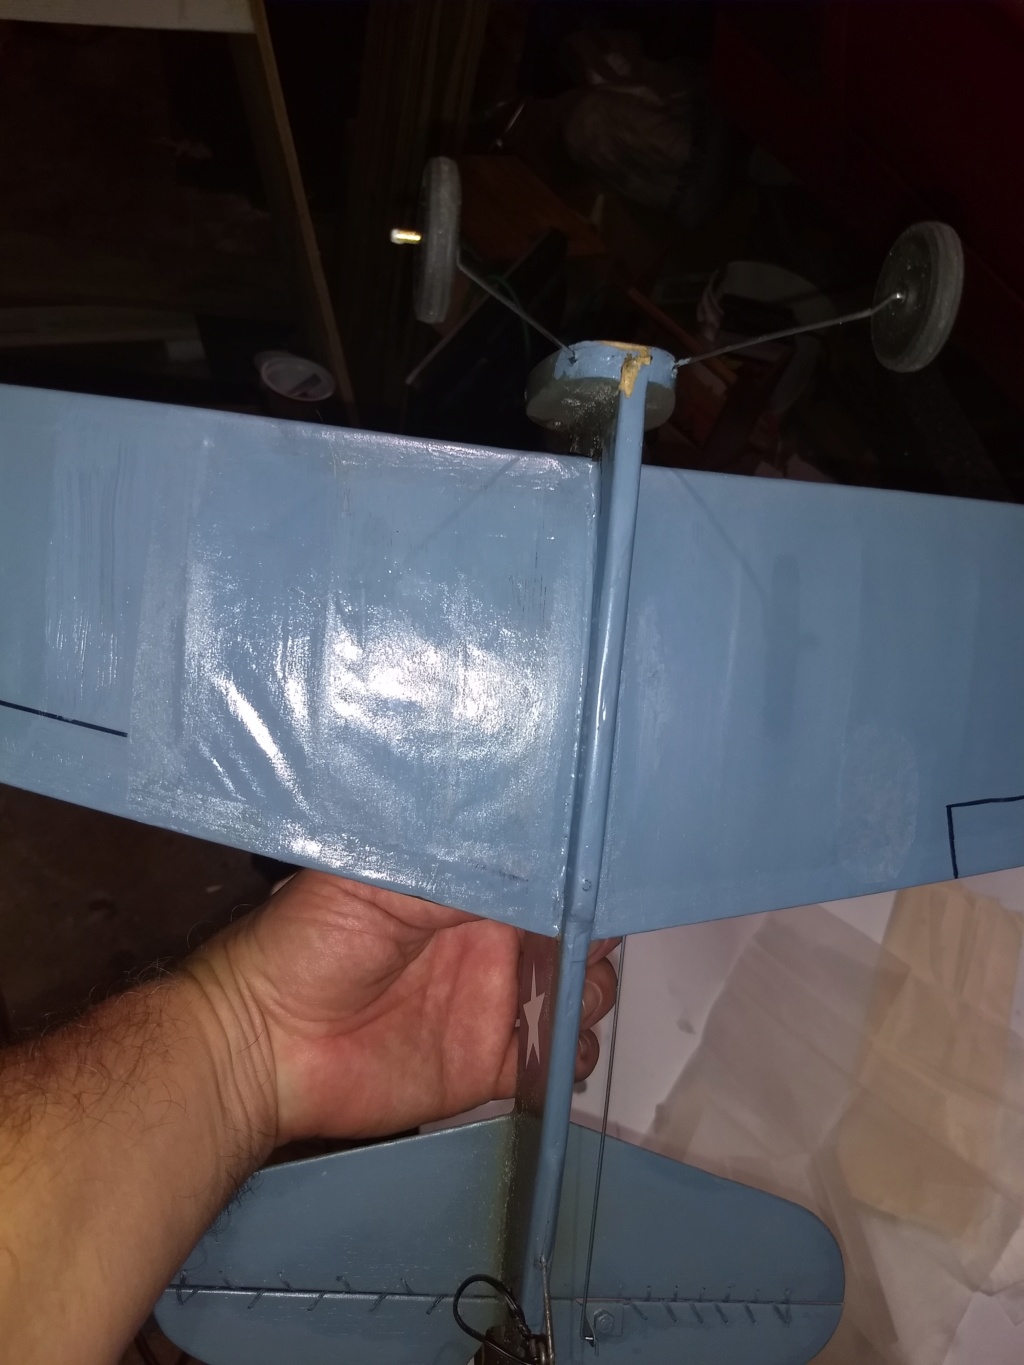
Ok...not my best patch job. But then I plan on flying it like I stole it.
I applied the tissue dry (bad move, too lazy to find the spray bottle).
I tore the tissue looking for the grain (should have done the magic marker bleed lines/pattern test).
I used paper that I "may have used" (since I don't know what I used...I guess I need to track/mark left-overs).
And only the blue bottom paint was left over. The OD was custom blended during the original build.
For all the goodies I lined up for the rebuild, I think I'll scratch a pretty-boy to hang them on.
But I get to fly this weekend if the weather permits!

944_Jim- Diamond Member
-
Posts : 1954
Join date : 2017-02-08
Age : 59
Location : NE MS
Kim- Top Poster
-
Posts : 8532
Join date : 2011-09-06
Location : South East Missouri
Re: 1960 Scientific P-40 Profile kit
![]() 944_Jim Tue Oct 02, 2018 1:16 pm
944_Jim Tue Oct 02, 2018 1:16 pm

944_Jim- Diamond Member
-
Posts : 1954
Join date : 2017-02-08
Age : 59
Location : NE MS
Re: 1960 Scientific P-40 Profile kit
![]() Ken Cook Tue Oct 02, 2018 9:03 pm
Ken Cook Tue Oct 02, 2018 9:03 pm
Rather than apply the silkspan and then shrink it, wet the silkspan first by running the pieces under the faucet. This insures that the fibers are adequately soaked and promotes even drying. Take one piece at a time and lay them on your shirt to absorb excess water. This not only fully wets the piece, it allows you to lay it on the framework and essentially pull out all the wrinkles. The covering will stay in place if wet. You can brush either thinner or dope onto it at this point and it will not be affected by the water. The dope will still go through and melt into the base. Brush off of your work and not into it as this prevents puddles from forming on the underside when the brush contacts the surface. I smooth out leading edges and trailing edges with a finger to force it into the wood.
Clear dope will turn white where the water is. This will go away on the next building coats. A wing done in this fashion will be drum tight when dry. When you apply the next coats, it will cause the covering to sag in between ribs but it will shrink right back up. The important thing to do is to do underside and then top at the same time. If the plane is placed on it's gear during the drying process, make certain that you flip it over a few minutes later as the top will dry first and the bottom doesn't have a fair chance to gas off and the solvents are trapped under the wing. I also drill small holes in the end of the wing tip to allow solvents inside to escape. This prevents ballooning of the covering and assists in preventing dope induced warping due to fast drying of one side vs the other.
One thing I do prior to putting the dope bottle away is to ALWAYS give the ribs and edges another coat. Reason being is these are the edges that are going to burn through during sanding first. This is another reason to radius the ribs as this prevents you from sanding too hard and cutting through the silkspan . If you find yourself having a difficult time with the wingtip area, the main portion of the wing can be covered all the way to the wingtip rib and then you can apply a smaller piece for the wingtip making the overlap directly or slightly off of the wingtip rib, you only need a 1/4" overlap.
After the attachment coat, the first coat is much more successful if you plan your brushing. This means the first coat is brushed in the same direction of the ribs. Reason is that the brush will push puddles of dope against the rib side as you approach it if you brush perpendicular to it. The second coat, you can brush from root to tip if desired. Just sealing the initial base coat first is important as you don't need to the dope to puddle through the covering on the inside gluing the covering down to the framework in one spot. Applying additional coats of dope does shrink it to a degree making the overall appearance look acceptable, but you are adding more dope which means the more dope in one spot, the more shrinkage your going to achieve which can twist unwanted surfaces.
Don't puddle or apply butyrate dope heavily near the fuse, any dope that goes from a horizontal surface to a vertical is going to cause a huge blister. Just brush evenly and clean along the fuse. Nitrate doesn't seem to have this problem. If the blister doesn't form immediately, it will in the future. and it's not a easy fix as it needs to be cut out.
Ken Cook- Top Poster
- Posts : 5461
Join date : 2012-03-27
Location : pennsylvania
Re: 1960 Scientific P-40 Profile kit
![]() Marleysky Wed Oct 03, 2018 12:13 pm
Marleysky Wed Oct 03, 2018 12:13 pm

Marleysky- Top Poster
-
Posts : 3618
Join date : 2014-09-28
Age : 71
Location : Grand Rapids, MI
Re: 1960 Scientific P-40 Profile kit
![]() 944_Jim Thu Nov 22, 2018 6:34 pm
944_Jim Thu Nov 22, 2018 6:34 pm
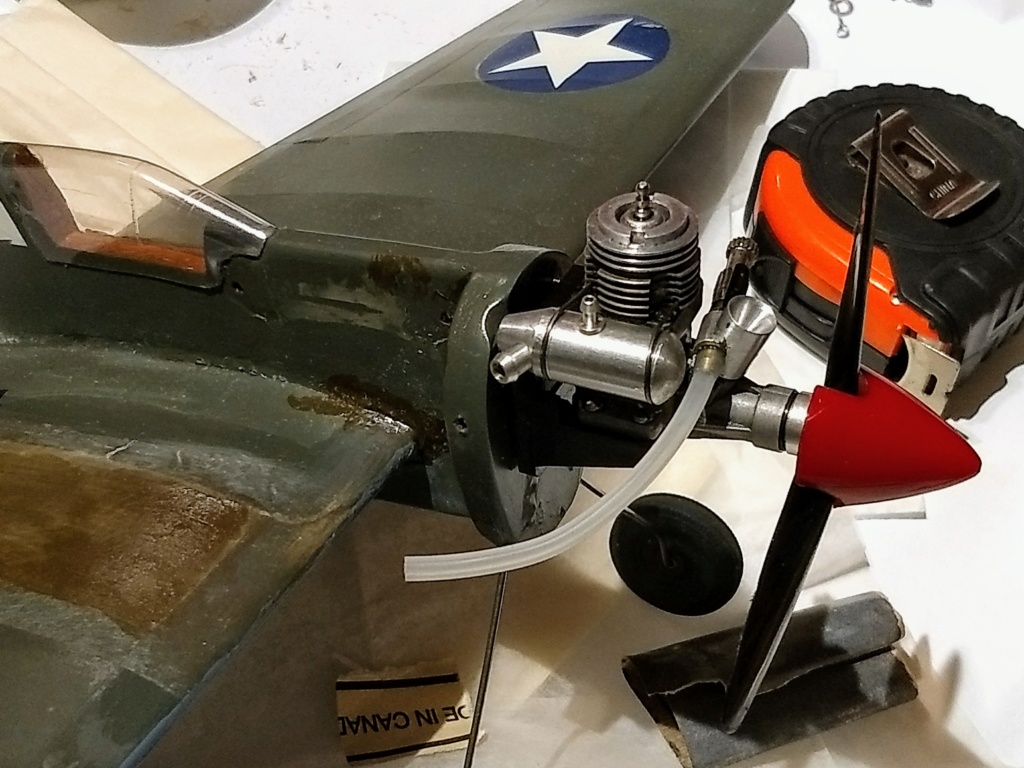
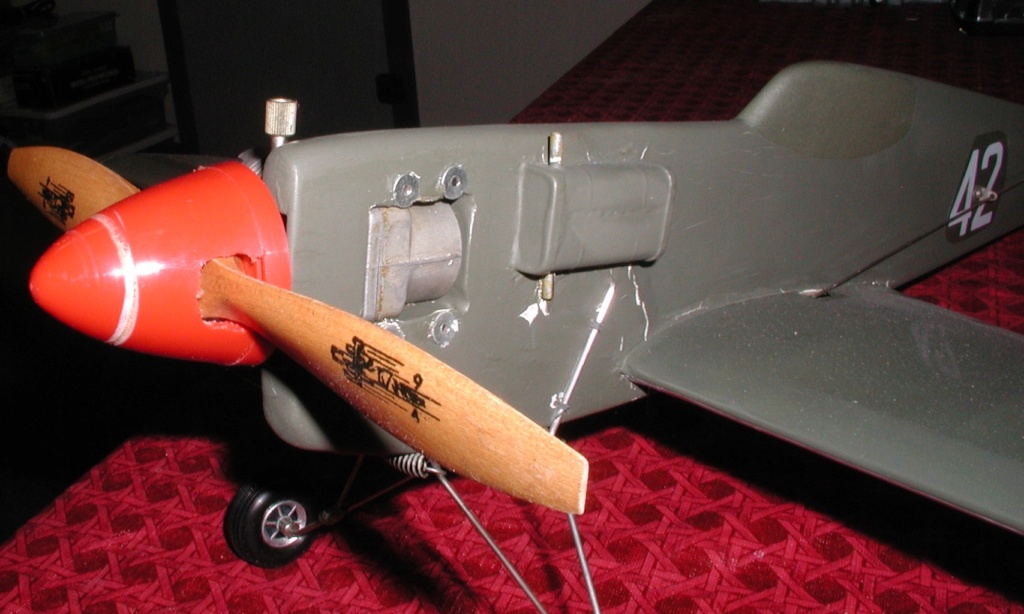
Changes to the power train:
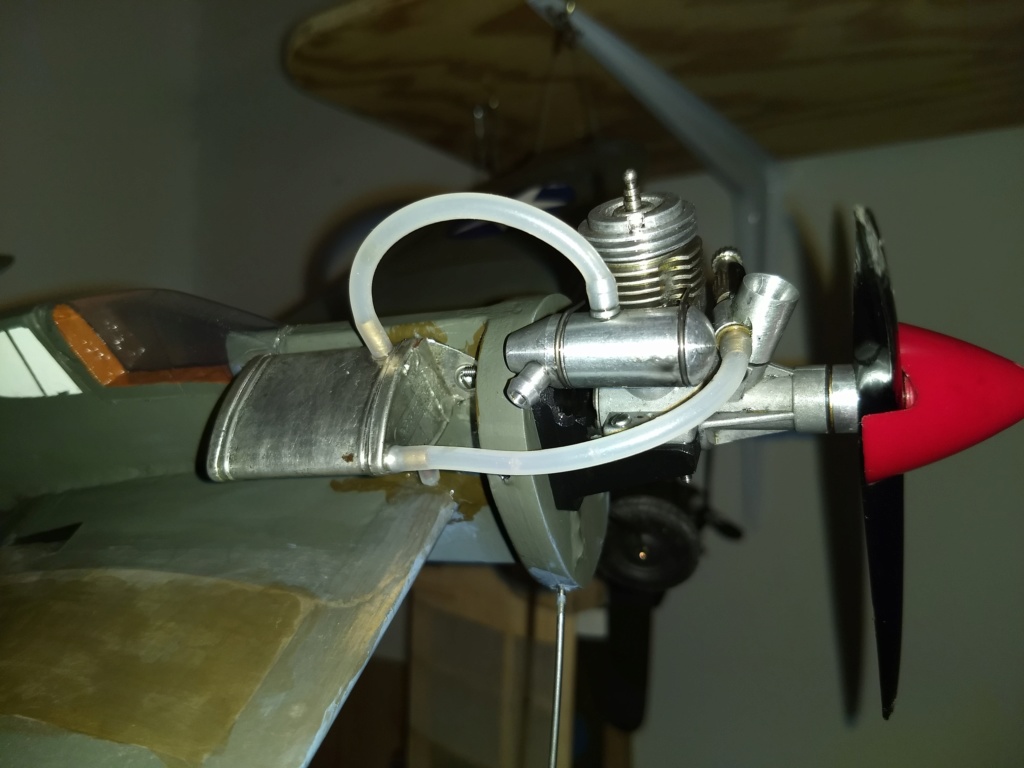
Norvel muffler. It puts the exhaust outlet back, and has a top mounted muffler tap.
K&B three blade 5x3 prop with a Cox spinner and barrel. The barrel was drilled and tapped for the AP 4mmx0.7 prop shaft.
Once again I had the lines mixed up. This time the long line and the short line mixed up. Neutral was 30' off the deck.
I landed the plane and swapped the lines...much better, back at about shoulder high.
The extra prop blade, and a muffler that seemed to choke the engine down a bit caused a few neat side effects. The engine seemed to turn slower, but pulled much better going up hill. It also seemed to be turning slightly slower laps, for a longer overall flight. So I guess my fuel consumption has dropped a bit...good, cheaper flights! I still need to could t laps to confirm this.
I popped off three quick flights back-to-back. I think it's time to print a maneuver card so I can practice a pattern in my head.
Next change is to remove muffler pressure. Let's see how the weather turns out this weekend.
944_Jim- Diamond Member
-
Posts : 1954
Join date : 2017-02-08
Age : 59
Location : NE MS
Re: 1960 Scientific P-40 Profile kit
![]() 944_Jim Mon Jan 28, 2019 7:14 am
944_Jim Mon Jan 28, 2019 7:14 am
I set up just to the right of upwind, oh, about 1:00. The launch run can go about 3/8 of a circle before flying into the edgeof the grass, just below 9:00.
By taking one step forward with the wind to my back, I actually be flying level with my center, but over a drop-off of about 10 feet. The plane is on 40 foot lines.
First launch, one of the line connectors hung funny. I drive into the grass. No damage.
Second launch, the plane leaves the ground, and levels out. After a couple of laps, I start moving to the edge of the hill. Three solid, level laps later, the plane's downwind third lap is really moving quite well over ground that is almost 15 feet below horizon. Two quick wing-overs later, I decide to try a loop. From a middle high position, I dive down the hill, and put it in a climb. About 45 degrees up, I take it inverted. It goes to the top and starts to fall in on me...I back pedal and give it full up! After gaining line-pull, the elevator catches up with the lines, and the plane is rotating due to full-up.
Now the plane is just at "shoulder height" in front of me, but still 15 feet above the bottom if the hill. While the fuselage "seems to slowly rotate," the plane is still losing too much altitude! By the time the wings appear to be making lift, it was roughly 7 feet below me. The plane had enough speed to begin climbing up the hill. I didnt clear the earth by much, even at the top of the hill... this would be be waist high at 4:00 off the wind. Two more turns to clear out the engine, on the down-wind side again, I try one more loop. This time, the plane goes up, rolls over the top of the loop, and the plane pancakes into the ground...15 feet below me.
I don't get it. It turns hard going from horizontal to vertical for a wing over. It keeps out in the lines for a wing over. Coming out of the wing-over, it really mushes (just doesn't turn sharply) before collecting itself up and recovering.
Loops just don't work. I'm glad the wind was blowing the direction it was because without the hill, there is no way this plane will loop! I even added 1/2 ounce of solder to the tail skid to bring CG farther back. The plane dies great level, climbs, and wing overs...but anything coming down (like out of a wing-over) the plane just "mushes" through the turn.
What gives?
All in all, one tank for an incomplete flight, and I pumped a 1/3 of the tank out at the end if it.
Last edited by 944_Jim on Mon Jan 28, 2019 1:47 pm; edited 1 time in total (Reason for editing : Spelling Syntax)
944_Jim- Diamond Member
-
Posts : 1954
Join date : 2017-02-08
Age : 59
Location : NE MS
Re: 1960 Scientific P-40 Profile kit
![]() Ken Cook Mon Jan 28, 2019 3:52 pm
Ken Cook Mon Jan 28, 2019 3:52 pm
Ken Cook- Top Poster
- Posts : 5461
Join date : 2012-03-27
Location : pennsylvania
Re: 1960 Scientific P-40 Profile kit
![]() 944_Jim Mon Jan 28, 2019 8:23 pm
944_Jim Mon Jan 28, 2019 8:23 pm
I can weigh it after dinner tonight. It could be "porky." I do need to check the CG.
I opened up my handle spacing an extra 1/4" between the line points on the handle. Now the plane is sensitive, almost a bit twitchy, but controllable. I'd hate to think I need more distance between the lines at the handle.
I have equal up/down deflection. It might be worth looking into just how much, but it IS enough that the plane turns well going up. So I figure it should be enough to turn "down" from upside down, or left from straight down. In fact, the plane does turn, but it is like a car in ice...sure the body turns, but it ain't much changing direction of travel!
No discernable slop in the controls. I guess I could check to make sure the control rod isn't flexing, but I doubt it. I think the rod is under compression when pulling back/up. Easy enough to stabilize.
It fell down/in on me from the top of the circle..I was able to recover by backpedalling 4-6 steps (really fast!).
There is about 1/4-3/8 oz of lead in the outboard tip.
I need to figure out how to record the pilot's view (from the handle).
944_Jim- Diamond Member
-
Posts : 1954
Join date : 2017-02-08
Age : 59
Location : NE MS
Re: 1960 Scientific P-40 Profile kit
![]() Cribbs74 Tue Jan 29, 2019 1:58 pm
Cribbs74 Tue Jan 29, 2019 1:58 pm
It could be several things. Is your wing perfectly straight? Are the elevator halves moving together? Did you build any rudder or engine offset into it?
Sometimes the wind up above isn’t doing the same thing as below. It sounds like your flying site is uneven so who knows what the wind is doing coming off the hill. Any trees around?

Cribbs74- Moderator
-
Posts : 11895
Join date : 2011-10-24
Age : 50
Location : Tuttle, OK
Re: 1960 Scientific P-40 Profile kit
![]() 944_Jim Sat Mar 23, 2019 7:58 pm
944_Jim Sat Mar 23, 2019 7:58 pm
I got in a few more flights earlier this week, and then slung it around some more today. I love the way it pulls on the lines while flying level. I'm disappointed by how it flies coming out of a loop. It still needs to be weighed, just to see if weight is the issue (I bet it is). I am taking my time flying it more and more aggressively! Wing-overs are starting to take on more of a loose S shape as I climb up, just to see how well the plane responds borderline upside-down before topping out in the wing-over. Inverted climbs are just around the corner.
I do have a Black Widow to throw on it after a rebuild, just for a vis-a- vis comparison. I seem to remember weighing both my Golden Bee and the AP only to find negligible differences in weight (I think the tankless AP was lighter). So unless black anodizing weighs less than gold, I doubt the lower performance engine will mean much to the airframe.
However, I need to thank two people for their assistance getting it looking like it does now.
Scotty68 provided the three blade spinner several months ago. Scotty and I met over on RCG when I discovered he had a Norvel .061 he wanted a carb for. I had a Norvel I wanted a venturi for. The answer was simple...we swapped straight up. So I had no issues picking up the spinner from him. This worked better than the Reese's peanut butter ads!
The other big thanks goes to Smooth Bill. Mr. Bill basically saw my request for a Norvel muffler. Looking back on this thread, you can see the AP .061, complete with the OEM muffler. I tried running the muffler backwards in order to minimize the pressure line length. However, that put the stinger/tail rotating from vibration into the Jan Haluzko venturi. Hanging the muffler in the normal position caused the pressure line to swing all around before plugging into the fill line on the tank. I had posted here, RCG, and Stunt Hanger. Bill and I tossed a couple of PMs back in late August/early September last year (2018). No price was set, yet along came a box. I was tickled pink to open it to find a Norvel muffler. The Norvel muffler places the pressure tap topside, and back. Optimally positioning it to feed the tank with a short line.
So, Scotty and Mr. Bill, I apologize for my tardiness. Thanks much to both of you! Your additions are HUGE visual improvements to the model!
944_Jim- Diamond Member
-
Posts : 1954
Join date : 2017-02-08
Age : 59
Location : NE MS
Re: 1960 Scientific P-40 Profile kit
![]() rsv1cox Sun Mar 24, 2019 7:48 am
rsv1cox Sun Mar 24, 2019 7:48 am
Why not this?

All I see are benefits with no down-side. Or am I missing something. Worked for me on many profiles for years.
Bob
rsv1cox- Top Poster
-
Posts : 10580
Join date : 2014-08-18
Location : West Virginia
Re: 1960 Scientific P-40 Profile kit
![]() GPW Sat Apr 06, 2019 7:38 am
GPW Sat Apr 06, 2019 7:38 am


GPW- Silver Member

- Posts : 85
Join date : 2019-02-19
Location : New Orleans
Page 3 of 4 • 1, 2, 3, 4 ![]()
» 1960's Cox Olympic .15.
» Ronnie's engines
» 1960 Frog 349 BB RC
» Cox Engine Tests/reviews ONLY