

 Rules
Rules
Log in
Search
Latest topics
» Dodge Viper - What a waste but brilliant marketingby roddie Today at 6:46 pm
» COX .020 POWERED SPEEDSTER
by TD ABUSER Today at 6:32 pm
» **VOTE-ON-THE-NEXT-COX-ENGINE-OF-THE-MONTH** (November 2024)
by roddie Today at 6:13 pm
» Brushless motors?
by rsv1cox Today at 4:53 pm
» Free Flight Radio Assist
by rdw777 Today at 4:28 pm
» Cox 020 PeeWee rebuild questions
by balogh Today at 4:15 pm
» L4 Grasshopper
by latole Today at 3:43 pm
» PAW 80 and possible use
by fit90 Today at 8:36 am
» Music-wire bending tools (DIY video)
by 1975 control line guy Today at 8:32 am
» Ultrasonic Cleaners??
by sosam117 Yesterday at 11:26 am
» My CA or CyA (super glue) allergy
by rsv1cox Yesterday at 9:52 am
» My Pseudo killerbee.
by rsv1cox Yesterday at 7:04 am


CEF Traveling Engine


Win This Engine!

Live on Patrol


Babe Bee Restoration
Page 2 of 2
Page 2 of 2 •  1, 2
1, 2
Update : Done
![]() NEW222 Sun Apr 08, 2018 10:03 pm
NEW222 Sun Apr 08, 2018 10:03 pm
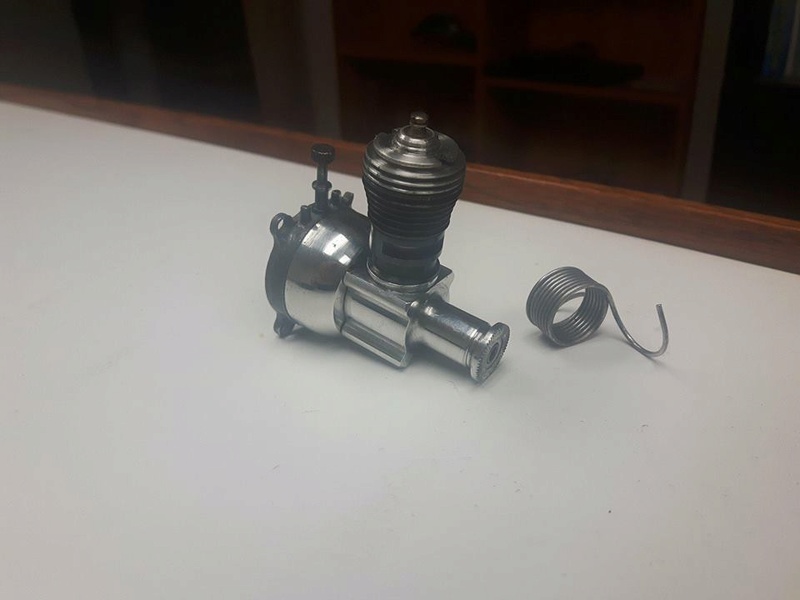
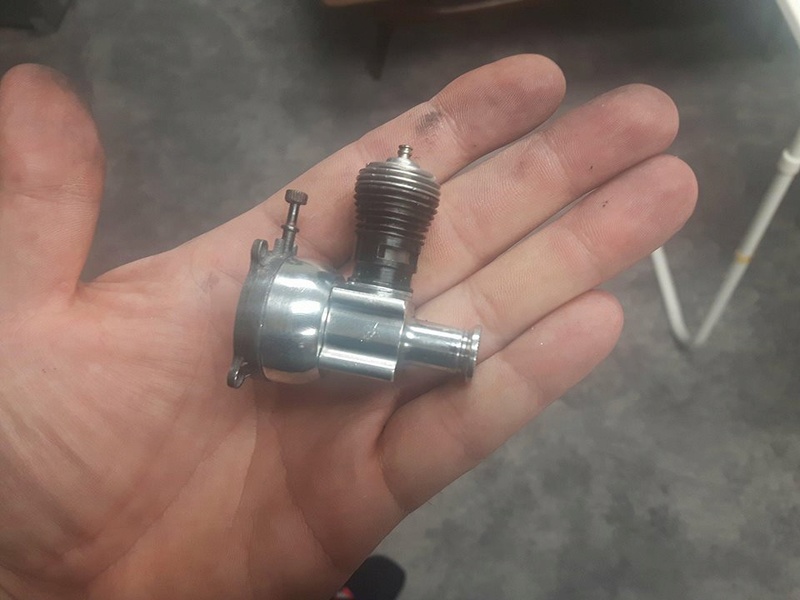
Ok. So, as of now, it is oficially finished. The one main thing I did not have was any sandpaper finer than 800, so that is where I left off before polishing. I did temporarily install the 'bad' backplate till my new one arrives. This was mainly so I did not have it apart for some time and start losing parts. I did give it a quick polish anyways. When I replace it, I will then make a JB Weld ear on it. Heck, maybe even later tonight I may take it back apart and add the JB Weld. It did turn out better than I expected, but nowhere near the ones that were my inspiration. But, I will take some more time on the next one. This was a great and fun learning experience I must say and very glad I did it. I even sanded and polished the thrust washer. These little parts get HOT when polishing with a rotary tool! I also learned that next time I will be investing in some rubber gloves as my hands turned grey from both polishing and sanding. So, wait no more, here it is. Thanks for watching and reading.


NEW222- Top Poster

- Posts : 3896
Join date : 2011-08-13
Age : 46
Location : oakbank, mb
Re: Babe Bee Restoration
![]() Marleysky Mon Apr 09, 2018 8:51 am
Marleysky Mon Apr 09, 2018 8:51 am
Taa-Daa!
you’ve done it! Looks good too. Feels good to resurrect one of these little buggers, don’ t it?
Marleysky- Top Poster

Posts : 3618
Join date : 2014-09-28
Age : 71
Location : Grand Rapids, MI
Re: Babe Bee Restoration
![]() rsv1cox Mon Apr 09, 2018 12:38 pm
rsv1cox Mon Apr 09, 2018 12:38 pm
Looks great!! Hard work is it's own reward.
Are you going to leave to starter off? I'm not in favor of them. Detract from the over all look of the engine and..they don't work near as well as the Wen-Macs. Looks added on rather than engineered in.
Bob
Are you going to leave to starter off? I'm not in favor of them. Detract from the over all look of the engine and..they don't work near as well as the Wen-Macs. Looks added on rather than engineered in.
Bob

rsv1cox- Top Poster
-

Posts : 11207
Join date : 2014-08-18
Location : West Virginia
Re: Babe Bee Restoration
![]() NEW222 Mon Apr 09, 2018 1:06 pm
NEW222 Mon Apr 09, 2018 1:06 pm
Yes, it does feel good and it is rewarding to resurrect one of these little buggers!
Leave the starter off? Well, it is back on right now so I don't misplace it, but I would it rather not be on there. I will probably run it the first time or two to see it run, and then remove it and try without it. It is true that it does indeed take away from the appearance of the work put into the engine, I agree.
Thanks for the compliments.
NEW222- Top Poster
- Posts : 3896
Join date : 2011-08-13
Age : 46
Location : oakbank, mb
Page 2 of 2 • 1, 2
» box restoration
» Bob V’s Next car restoration
» Engine Restoration
» Restoration of my Citroen 2CV
» Sig Skyray Restoration
» Bob V’s Next car restoration
» Engine Restoration
» Restoration of my Citroen 2CV
» Sig Skyray Restoration
Page 2 of 2
Permissions in this forum:
You cannot reply to topics in this forum