

 Rules
Rules
Log in
Search
Latest topics
» Golden Bee basic running problemby roddie Today at 10:51 pm
» Simple Gliders
by rdw777 Today at 6:25 pm
» Foam hand kids glider converted to 0.049 CL
by rdw777 Today at 6:11 pm
» Weird search for a single comic from an old Mad Magazine
by Kim Today at 1:44 pm
» Scientific "Zipper" Build...Zipper Flys!.
by getback Today at 7:27 am
» Cox .049 Tee Dee engines back in stock (limited availablility)
by GallopingGhostler Today at 1:05 am
» Very off-topic.........Time passes and not always for the best......
by rsv1cox Yesterday at 2:47 pm
» Roddie-Rigger.. a 2005 original design
by roddie Wed Jul 24, 2024 11:48 pm
» Jim Walker Bonanza etc.
by rsv1cox Wed Jul 24, 2024 6:30 pm
» Throttles for Cox Tee Dee .049 / .020 / .010 engines --- videos
by sosam117 Wed Jul 24, 2024 8:54 am
» Introducing our Cox .049 TD Engines
by Admin Tue Jul 23, 2024 2:00 am
» Project Cox .049 r/c & Citabrian Champion
by getback Mon Jul 22, 2024 4:14 pm
Cox Engine of The Month
July-2024
robot797's
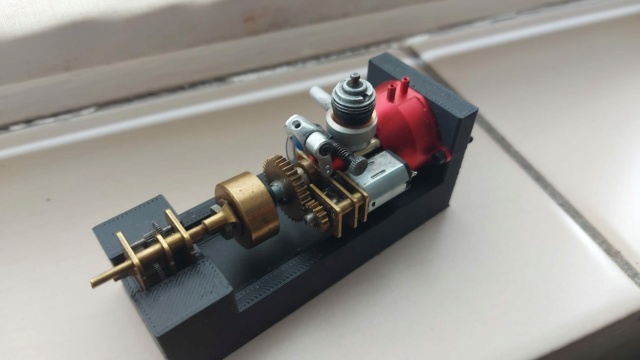
"ULTIMITE COX 010: it has a clutch, E starter, throttle, exhaust, aluminum tank, aluminum venturi, gearbox with forward and reverse, and now its on a custom drawn and printed stand"

PAST WINNERS
robot797's
"ULTIMITE COX 010: it has a clutch, E starter, throttle, exhaust, aluminum tank, aluminum venturi, gearbox with forward and reverse, and now its on a custom drawn and printed stand"
PAST WINNERS
CEF Traveling Engine


Win This Engine!

Live on Patrol


My Southridge CNC Hyper Viper build
Page 2 of 2
Page 2 of 2 •  1, 2
1, 2
Re: My Southridge CNC Hyper Viper build
![]() getback Fri Mar 29, 2019 10:20 am
getback Fri Mar 29, 2019 10:20 am
Thats a good looking spray gun / got mine from Hobby Lobby its the jar type use it with a regulator on my 160 gal. tank commp . I wish i had got the Hopper type but was afraid i would spill paint everywhere , Rusty's got me thinking about the 2" chop could bee a few uses that take the fun out of building . I Love Air Brushing though and you will too it will get the job done and some, quickly . 

getback- Top Poster


Posts : 10276
Join date : 2013-01-18
Age : 66
Location : julian , NC
Re: My Southridge CNC Hyper Viper build
![]() RknRusty Fri Mar 29, 2019 11:46 am
RknRusty Fri Mar 29, 2019 11:46 am
Iwata is a good brand. I wanted a gravity feed gun with a cup like that, but the only thing they had was a siphon type.
_________________
Don't Panic!
...and never Ever think about how good you are at something...
while you're doing it!
My Hot Rock & Blues Playlist
...and never Ever think about how good you are at something...
while you're doing it!
My Hot Rock & Blues Playlist

RknRusty- Rest In Peace

- Posts : 10869
Join date : 2011-08-10
Age : 68
Location : South Carolina, USA
Re: My Southridge CNC Hyper Viper build
![]() NEW222 Fri Mar 29, 2019 4:12 pm
NEW222 Fri Mar 29, 2019 4:12 pm
Looks really good there Rusty. I like you want to try airbrushing. I have one here myself that I had wanted to use again after not using it for many years. Maybe one day this year. I have my Lil Jumpin Bean I could use it on...

NEW222- Top Poster
- Posts : 3895
Join date : 2011-08-13
Age : 45
Location : oakbank, mb
Re: My Southridge CNC Hyper Viper build
![]() RknRusty Sun Jun 02, 2019 9:42 pm
RknRusty Sun Jun 02, 2019 9:42 pm
The Viper has been sitting and waiting for my most recent gimp attack to clear up. I had taped and CA tacked it together for Hangouts calendar pictures, and that created the illusion that it was a splash of paint and a swatch of silk shy of flying. But that was far from the truth. It still needed shape sanding, plus silk-spanning(with doctor paper) the fuselage, stab, and wing. It also needs aluminum engine bearers and fuelproofing the power plant compartment.
Earlier this week I put the new glass(old shower door) on my table, and raised and leveled it with 1-1/4" angle aluminum. Let the building begin!
The sanding snowballed, as I'm a meticulous nut. I rounded a lot of the squarish corners off and finally smoothed it with 320 grit paper. I'll just have to quit sanding and call it done sometime soon, or I'll never finish. I also installed an exhaust pipe that I opened up with a drill and several files. I was happy that I was able to make a pretty wide passage for the exhaust, which will be piped out the side of the cowl.
Here is the Tee Dee with its exhaust pipe

I started cutting 1/8" bearers. If they are too thick, I also have some 1/16" and 1/32" aluminum.

Once I mount the engine and see how it al fits up, I'll silkspan the airframe and wing and paint it all before assembling.Some oy you guys could have thius plane flying in 5 days, but any of you that remembers my building habits knows, it'll still be a while. But it should look good and fly just fine when I finally finish.
Rusty
Earlier this week I put the new glass(old shower door) on my table, and raised and leveled it with 1-1/4" angle aluminum. Let the building begin!
The sanding snowballed, as I'm a meticulous nut. I rounded a lot of the squarish corners off and finally smoothed it with 320 grit paper. I'll just have to quit sanding and call it done sometime soon, or I'll never finish. I also installed an exhaust pipe that I opened up with a drill and several files. I was happy that I was able to make a pretty wide passage for the exhaust, which will be piped out the side of the cowl.
Here is the Tee Dee with its exhaust pipe
I started cutting 1/8" bearers. If they are too thick, I also have some 1/16" and 1/32" aluminum.
Once I mount the engine and see how it al fits up, I'll silkspan the airframe and wing and paint it all before assembling.Some oy you guys could have thius plane flying in 5 days, but any of you that remembers my building habits knows, it'll still be a while. But it should look good and fly just fine when I finally finish.
Rusty
RknRusty- Rest In Peace
- Posts : 10869
Join date : 2011-08-10
Age : 68
Location : South Carolina, USA
Re: My Southridge CNC Hyper Viper build
![]() Ken Cook Sun Jun 02, 2019 9:50 pm
Ken Cook Sun Jun 02, 2019 9:50 pm
Rusty, I tried the same thing with that muffler. I found it robbed a lot of power and caused the engine to sag in the maneuvers. I assume the exhaust cutouts don't clear the cowling? Davis diesel offered a silicone tube that you stretched around the cylinder head, this allowed both exhaust cutouts to breathe freely. The muffler you show while the one side is opened up, the opposing side has a very small pin hole. I truly believe this is where the issues start.

Ken Cook- Top Poster
- Posts : 5542
Join date : 2012-03-27
Location : pennsylvania
Re: My Southridge CNC Hyper Viper build
![]() RknRusty Sun Jun 02, 2019 11:52 pm
RknRusty Sun Jun 02, 2019 11:52 pm
If I mount that engine on top of the 1/8" aluminum bearers, the exhaust ports may very well have adequate clearance.Another alternative is to bend a piece of 1/32" aluminum as a wall to block the exhaust behind the engine and let it blow through cutouts on both sides. I can even make it blow through my headers that Howard Rush made for me. How cool would that be!
I was afraid of having the exact problems you describe with the engine run too, so I'm not committed to using that smokestack.
I saw that pinhole and thought I must've made it by accident with the drill bit or needle file. I figured if I use that thing, I'd plug the pinhole with JB Weld.Thanks for the tips. I'll bring it to the show tomorrow night for S&T and we can explore options then.
Rusty
_________________
Don't Panic!
...and never Ever think about how good you are at something...
while you're doing it!
My Hot Rock & Blues Playlist
...and never Ever think about how good you are at something...
while you're doing it!
My Hot Rock & Blues Playlist
RknRusty- Rest In Peace
- Posts : 10869
Join date : 2011-08-10
Age : 68
Location : South Carolina, USA
Page 2 of 2 • 1, 2
» Southridge CNC Hyper Viper
» Hybrid-Profile Flite Streak/Cox Hyper Viper scratch build
» Hyper Viper #3
» Cox me-109 stunt measures - for a friend - he wants to build one again !
» Cox Hyper Viper *** And Chipmunk, now
» Hybrid-Profile Flite Streak/Cox Hyper Viper scratch build
» Hyper Viper #3
» Cox me-109 stunt measures - for a friend - he wants to build one again !
» Cox Hyper Viper *** And Chipmunk, now
Page 2 of 2
Permissions in this forum:
You cannot reply to topics in this forum