Log in
Search
Latest topics
» **VOTE-ON-THE-NEXT-COX-ENGINE-OF-THE-MONTH** (November 2024)by MauricioB Today at 8:37 pm
» Cox 020 PeeWee rebuild questions
by roddie Today at 8:21 pm
» Dodge Viper - What a waste but brilliant marketing
by roddie Today at 6:46 pm
» COX .020 POWERED SPEEDSTER
by TD ABUSER Today at 6:32 pm
» Brushless motors?
by rsv1cox Today at 4:53 pm
» Free Flight Radio Assist
by rdw777 Today at 4:28 pm
» L4 Grasshopper
by latole Today at 3:43 pm
» PAW 80 and possible use
by fit90 Today at 8:36 am
» Music-wire bending tools (DIY video)
by 1975 control line guy Today at 8:32 am
» Ultrasonic Cleaners??
by sosam117 Yesterday at 11:26 am
» My CA or CyA (super glue) allergy
by rsv1cox Yesterday at 9:52 am
» My Pseudo killerbee.
by rsv1cox Yesterday at 7:04 am
All-Star Biplane for .020
Page 1 of 1
 All-Star Biplane for .020
I am starting a build of a Ace All-Star Biplane. I shrunk the plans on my laser printer 78% then 78% again. It looks like the main wing will be about 22 to 24inches. I will be using 1/16in. balsa where necessary, but using 1/32 in. balsa where possible to save weight. I will be making notes as I go along.
My first picture will be of my wing building area and a rib template half made that was inspired by Ron Cribbs.
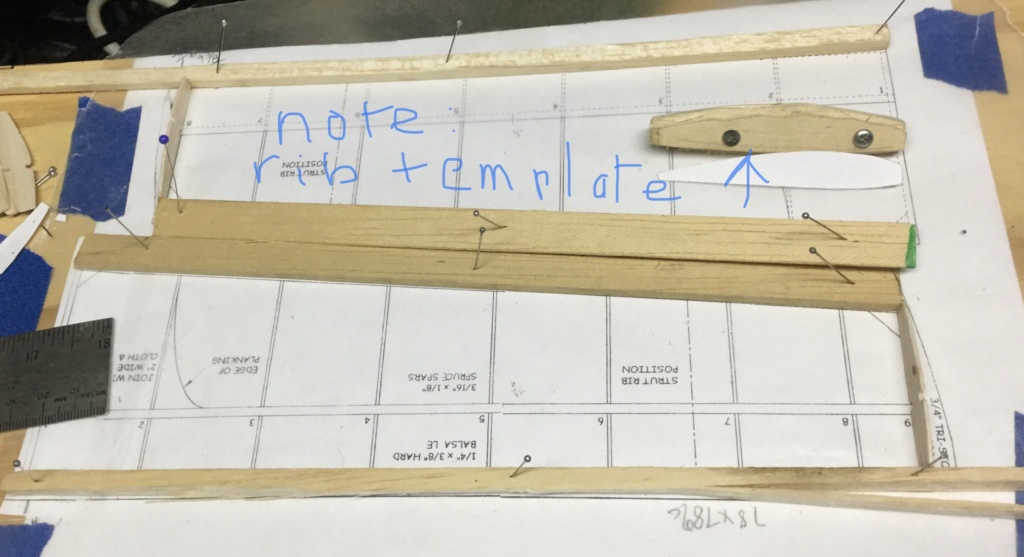
wing building platform and 1/2built rib template inspired by Ron Cribbs. Top is 1/2bottom wing, bottom is 1/2top wing
edited at 8:44p.m. PST to add photo, 9:02p.m. PST to correct errors. I didn't notice picture was upside down. too many distractions at home. sorry.
Happydad


 may the 4th be with you.
My first picture will be of my wing building area and a rib template half made that was inspired by Ron Cribbs.

wing building platform and 1/2built rib template inspired by Ron Cribbs. Top is 1/2bottom wing, bottom is 1/2top wing
edited at 8:44p.m. PST to add photo, 9:02p.m. PST to correct errors. I didn't notice picture was upside down. too many distractions at home. sorry.
Happydad


 may the 4th be with you.
Last edited by happydad on Sat Jul 04, 2020 11:09 pm; edited 2 times in total (Reason for editing : to add photo fix errors)
happydad- Rest In Peace

- Posts : 1592
Join date : 2012-05-28
Age : 79
Location : Escondido, CA
 Re: All-Star Biplane for .020
Hello! I see that you have had your project !! ... Congratulations !! ... according to your question about MP I was inclined to make it 440mm and 420mm respectively for Cox .020, but I see you have opted for a larger size! .... I'm glad you're on your way, follow their progress and I wish you the best of luck in this beautiful project!

MauricioB- Top Poster

- Posts : 3700
Join date : 2016-02-16
Age : 53
Location : ARG
 small update to All Star Biplane Change on the BRM
happydad wrote:I am starting a build of a Ace All-Star Biplane. I shrunk the plans on my laser printer 78% then 78% again. It looks like the main wing will be about 22 to 24inches. I will be using 1/16in. balsa where necessary, but using 1/32 in. balsa where possible to save weight. I will be making notes as I go along.
My first picture will be of my wing building area and a rib template half made that was inspired by Ron Cribbs.
wing building platform and 1/2built rib template inspired by Ron Cribbs. Top is 1/2bottom wing, bottom is 1/2top wing
Happydad


may the 4th be with you.
7-8-2020 Some update to the All Star Biplane Build. It has been a busy week, but I have built most of the rib templates. Ribs 6 and 7 involve the wings struts between upper and lower wings and I haven't decided exactly how I am going to attach the 2 wings.
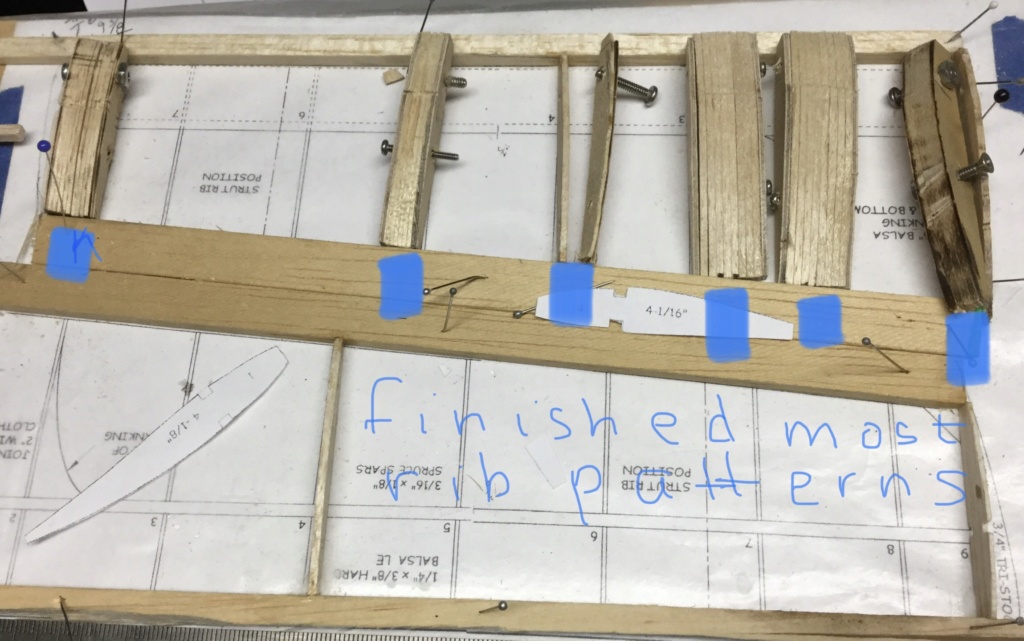
Most of the rib templates complete.
P.S. If anyone is interested in this Baby Ring Master with ribbed wing.
Free to good home. you pay for shipping. setup for Babe Bee
>>>>> edited 8-40-20 at 1:07p.m. PST. UPDATE on the BRM.
Promised to a newer FORUM member.

Needs trim around wing-fuselage joint. Green and Yellow were my college colors. 21 inch wing. PM me for more pictures.
Sorry promised to someone, too late. >>>>edit complete
happydad


Last edited by happydad on Sun Aug 30, 2020 3:10 pm; edited 1 time in total (Reason for editing : To add comment)

happydad- Rest In Peace

- Posts : 1592
Join date : 2012-05-28
Age : 79
Location : Escondido, CA
 more wing progress
7-10-2020. more progress on the wing. i'm having a lot of trouble with the $ store super glue. It used to dry very fast, but now takes forever to set.

still need to decide how to install ribs that attach to cabanes to fuselage. top wing ribs 6 and 7 not flat on bottom. bottom wing ribs 6 and 7 not contoured on top. also need to install upper and lower spars.
i've been toying with the exhaust port twin slits and taking out the bar. fun. see porting posts.
happydad


happydad- Rest In Peace

- Posts : 1592
Join date : 2012-05-28
Age : 79
Location : Escondido, CA
 a little progress FIGURED IT OUT, DUH.
7-12-2020. some progress on the BiPlane. I still need help with the UPPER Wing Cradle.
7-14-2020 UPDATE:SEE PHOTO BELOW
Does anyone have an All Star BiPlane or know what the highlighted area on photo means ?
I have assembled my version of the forward hatch which holds the assembly with supports the Upper Wing assembly, (Cabanes), but the drawing shows a 1/16 flexible wire attached to the cabanas and wound with string.
My question is: Do both inside Cabanes have the soft wire and what supports the wing? why not use a piece of 1/32inch thick, on my .020 version, plywood attached between the cabanas? Mark showed a picture of the all star biplane he has, but I can't tell how the wing is attached.


see note. on top is my version of the forward hatch
that's all for now. happydad


>>>>update here:
Dummy me, I figured it out while answering a post. The drawing above shows a 1/2 section of the top view of the fuselage and the top wing, but doesn't say so. I am adding the original drawing with a correction showing my interpretation of the top wing to cabanas connections. NOW it is obvious. I was re-reading the suggestions to outerzone and RCG, which showed pictures hard to visualize, when I thought what if that shadow is that 1/16 wire they are talking about, but not here with the picture?? see for yourself.
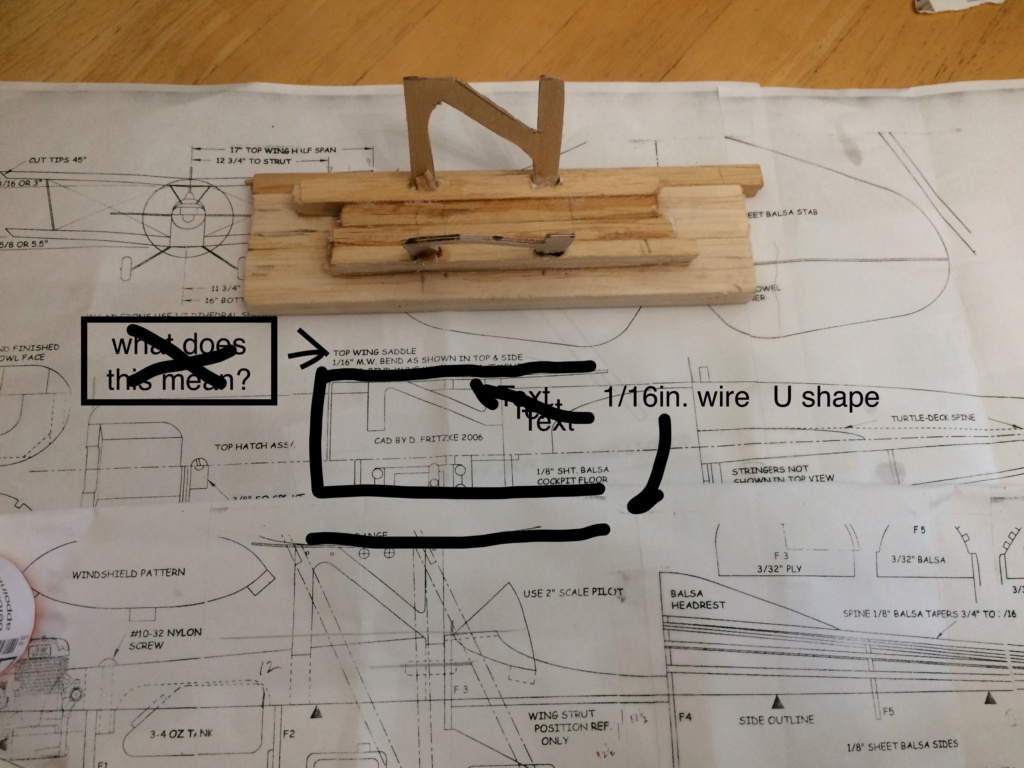
photo of top view of fuselage showing front hatch. see my partially completed hatch on very top.
By ove I think I've FINALLY got it. happydad


7-14-2020 UPDATE:SEE PHOTO BELOW
Does anyone have an All Star BiPlane or know what the highlighted area on photo means ?
I have assembled my version of the forward hatch which holds the assembly with supports the Upper Wing assembly, (Cabanes), but the drawing shows a 1/16 flexible wire attached to the cabanas and wound with string.
My question is: Do both inside Cabanes have the soft wire and what supports the wing? why not use a piece of 1/32inch thick, on my .020 version, plywood attached between the cabanas? Mark showed a picture of the all star biplane he has, but I can't tell how the wing is attached.


see note. on top is my version of the forward hatch
that's all for now. happydad


>>>>update here:
Dummy me, I figured it out while answering a post. The drawing above shows a 1/2 section of the top view of the fuselage and the top wing, but doesn't say so. I am adding the original drawing with a correction showing my interpretation of the top wing to cabanas connections. NOW it is obvious. I was re-reading the suggestions to outerzone and RCG, which showed pictures hard to visualize, when I thought what if that shadow is that 1/16 wire they are talking about, but not here with the picture?? see for yourself.

photo of top view of fuselage showing front hatch. see my partially completed hatch on very top.
By ove I think I've FINALLY got it. happydad


Last edited by happydad on Tue Jul 14, 2020 9:06 pm; edited 1 time in total (Reason for editing : solved the problem, added new pic)

happydad- Rest In Peace

- Posts : 1592
Join date : 2012-05-28
Age : 79
Location : Escondido, CA
 Re: All-Star Biplane for .020
Hey Happydad ; here is a download you could look at and a read too , https://outerzone.co.uk/plan_details.asp?ID=7916 Also a desscustion on RCU https://www.rcuniverse.com/forum/1-2-1-8-airplanes-70/509115-ace-allstar-bipe.html MauricioB built a Pitts with the same isues you could ck out his built here .. https://www.coxengineforum.com/t13983p150-flight-pitts-skelton-aerobatic-model-page-7#184458 Thats all the help i can give 

getback- Top Poster


Posts : 10415
Join date : 2013-01-18
Age : 67
Location : julian , NC
 Some great ideas
getback wrote:Hey Happydad ; here is a download you could look at and a read too , https://outerzone.co.uk/plan_details.asp?ID=7916 Also a desscustion on RCU https://www.rcuniverse.com/forum/1-2-1-8-airplanes-70/509115-ace-allstar-bipe.html MauricioB built a Pitts with the same isues you could ck out his built here .. https://www.coxengineforum.com/t13983p150-flight-pitts-skelton-aerobatic-model-page-7#184458 Thats all the help i can give
Thanks for the links. I like Mauricio’s idea of holding the wing, but I want to be able the remove the wing for portability.
Still have to read the RCU article.

Happydad


happydad- Rest In Peace

- Posts : 1592
Join date : 2012-05-28
Age : 79
Location : Escondido, CA
 Re: All-Star Biplane for .020
Hi happydad, It's nice to see that you're building a model! It's also a treat for me; that it's a bipe! Multi-winged aircraft are just classic IMHO.
I have the Ace kit. I bought it from Tower Hobbies back in the 1990's. I knew I'd want to build it someday.
Looking very much forward to seeing your scaled-down version!

I have the Ace kit. I bought it from Tower Hobbies back in the 1990's. I knew I'd want to build it someday.
Looking very much forward to seeing your scaled-down version!

 What wingspan is yours? Smaller drawings another way
roddie wrote:Hi happydad, It's nice to see that you're building a model! It's also a treat for me; that it's a bipe! Multi-winged aircraft are just classic IMHO.
I have the Ace kit. I bought it from Tower Hobbies back in the 1990's. I knew I'd want to build it someday.
Looking very much forward to seeing your scaled-down version!
Thanks roddie: I am still having trouble finding time to work on it.
What size is yours, 34inch or 72inch. I retraced my steps and found out I started with the 34inch wingspan version from outerzone. I was trying to explain to iceberg how to download the tiled pages, so it can be printed on 8 1/2 x 11 paper and taped together, and suddenly realized the numbers didn’t work because I was starting with the 72inch version.
Outerzone offers a full sized 72inch wingspan drawing that fits on 8 1/2 x 11 paper, kinda hard to read, but it’s all there. And also offer the 34inch wingspan in tiled version where a full sized sheet for the 34inch wingspan is printed on 8 1/2 x 11 sheets and taped together.
Or as I did reduced each 8 1/2 x 11 page by a percentage, in my case 78%, because my laser printer only reduced in steps, 94%, 86%, 78%, and and something in the 60% range. So I took the two pages that made up the wing and measured the wingspan after the pages had been reduced by each percentage, for instance 78% = 13inch x2 = 26inch wingspan. I tried other combos and wrote down the wingspan for each. Then I took each percentage and reduced that page by each of the choices, 94, 86, 78, and wrote down those numbers. Reducing by 78% then 78% again can out close to the 22inch wingspan I wanted ideally, but after talking to forum members, especially Mauricio, I decided to reduce again by 94% more and ended up with about 20inch wingspan for the upper wing, and 19inch for the lower wing.
>>>>>>>>Edit 7-16-2020 7p.m.PST
Hijack my own build instructions
I was awake all night Tuesday night. Wednesday was the last day of helping seniors with taxes and some5hing else was bothering me. I was explaining to iceberg in a PM and sort of above how to make the 34inch wingspan drawing for a smaller wingspan. My copier-laser printer has fixed copy reduction setting as explained, but what if I could reduce the original print of the .pdf file where 100% was 34inch wingspan. So 20inch wingspan, my goal, was 20 / 34 = .58 or 58%, don’t have my calculator, just pretend, LOL. So why not print the original.pdf file at 58%. Bingo, so I tried it. I printed the 3 pages that had the wing(s) on them. Surprise #1 the picture did not fill the entire page.
 , DUH. 58% of 100% is not a full page. Surprise #2, after cutting and pasting the 3 pieces together and measuring 1/2 chord, if was 10inches. 2 x 10 = 20inches. DUH. Why print 28 pages, reduce by 78% 28 pages, then reduce those 28 pages by 78% the those 28 pages by 94%. Lot of wasted paper. I actually only printed the 2 wing pages then when I was close the 3 wing pages, 1 part of the wing was only about 1inch. Lot of wasted time. I was trying to save iceberg a lot of time and paper as he is isolated in Canada for a short time and wanted to get started NOW.
 O.k. Hijack over. <<<<<<<<< thanks for listening
So hurry up with your build so I can see how to put together the front hatch and the cabana which support the upper wing. The drawing shows a 1/16 piece of soft wire, as shown in posts above, attached to the cabanes, but I can’t see the wire in the other view(s).
It just hit me that maybe what I am supposed to see in the top view of the fuselage with wing cutout above is 1/2 of a U on it’s right side, the each of the legs is attached the the
cabanes with string.

WOW. That simple? I wonder why they didn’t show it that way, or say “1/2 section of wing area showing connection of wire to cabanes”, DUH!
That’s all for now. Hope to see your build soon. How many cox .049’s do you think it will to take for liftoff?


Happydad


Last edited by happydad on Thu Jul 16, 2020 9:18 pm; edited 1 time in total (Reason for editing : To may smaller drawings another way)

happydad- Rest In Peace

- Posts : 1592
Join date : 2012-05-28
Age : 79
Location : Escondido, CA

GUS THE I.A.- Gold Member

- Posts : 359
Join date : 2012-08-15
Location : Wichita, Kansas
 What about the top wing saddle?
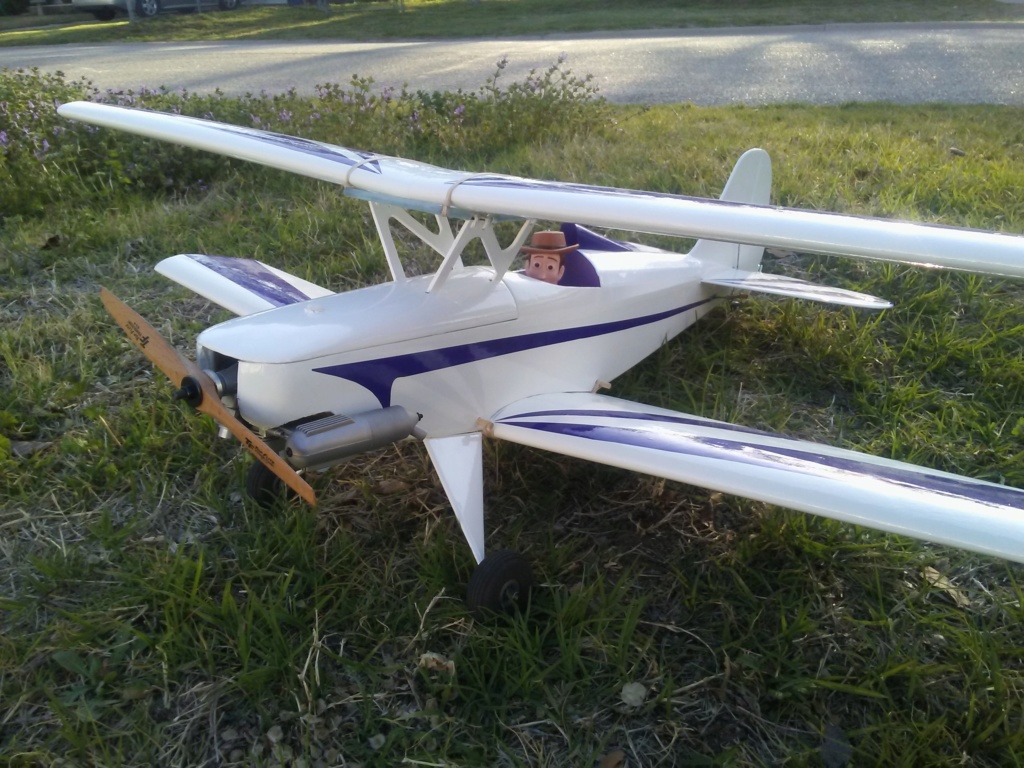
Wow, beautiful plane.
Can you send a pic of the top wing saddle? Is it 1/16 wire wound with whatever they called the string, or is it reinforced. In fact with a O.S. .15 for an engine did you double or reinforce the inside cabanes? And why no struts on the outside of the wings joining them. Wing flutter? I would hate to see my top wing go flying off if I did a loop or axial roll.
Great picture and nice colors. I will have to go with more cloud contrast colors as my sight is not to good these days.
Thanks again for the feedback, even if the engine is an O.S. LOL couldn’t you at least used a Cox Tee Dee .15. Again, LOL, but this is the COXENGINEFORUM

Happydad


happydad- Rest In Peace

- Posts : 1592
Join date : 2012-05-28
Age : 79
Location : Escondido, CA
 Re: All-Star Biplane for .020
that is a Fine looking Plane right there , Gus do you fly it or have you ?

getback- Top Poster


Posts : 10415
Join date : 2013-01-18
Age : 67
Location : julian , NC
 Re: All-Star Biplane for .020
Yes, I have flown it, and it does a great job of ripping up the sky! I was really quite surprised by its ability to perform decent rolls, as it has NO AILERONS- just rudder, elevator and throttle.
I will try to get a picture and description of the structure you are curious about.
Thanks for the compliments of the biplane. It is covered with white Ultracote and translucent purple Monokote.
I will try to get a picture and description of the structure you are curious about.
Thanks for the compliments of the biplane. It is covered with white Ultracote and translucent purple Monokote.

GUS THE I.A.- Gold Member

- Posts : 359
Join date : 2012-08-15
Location : Wichita, Kansas
 Re: All-Star Biplane for .020
happydad wrote:roddie wrote:Hi happydad, It's nice to see that you're building a model! It's also a treat for me; that it's a bipe! Multi-winged aircraft are just classic IMHO.
I have the Ace kit. I bought it from Tower Hobbies back in the 1990's. I knew I'd want to build it someday.
Looking very much forward to seeing your scaled-down version!
Thanks roddie: I am still having trouble finding time to work on it.
What size is yours, 34inch or 72inch?
My kit is the smaller version (as Doug's-Gus's is)
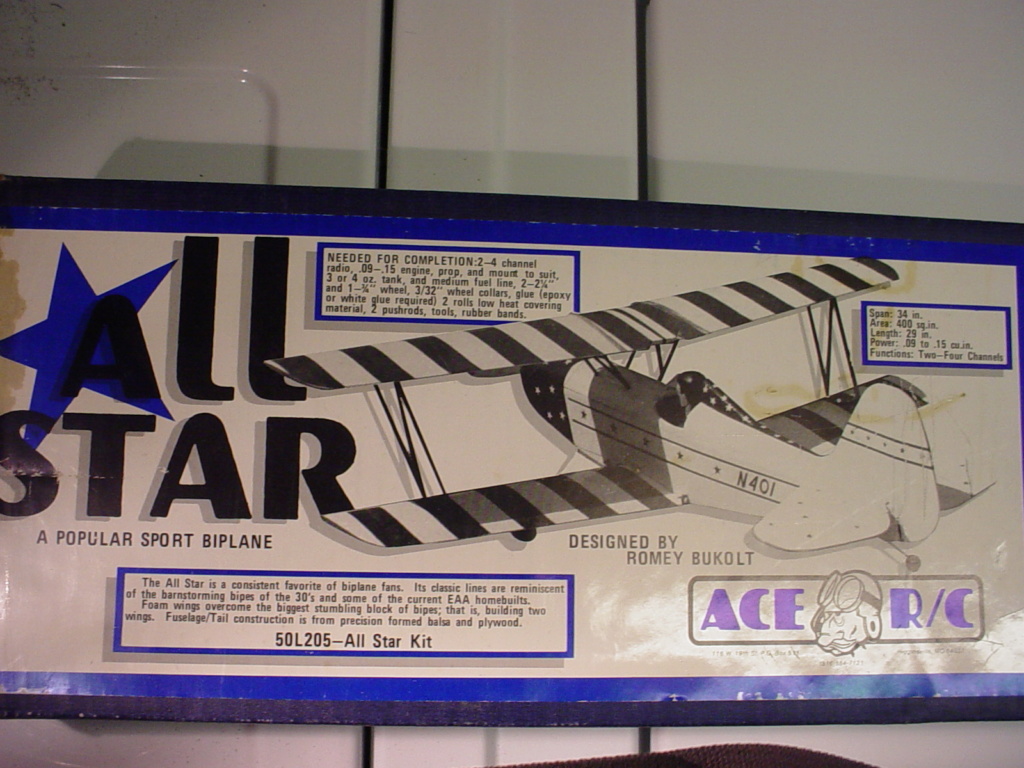
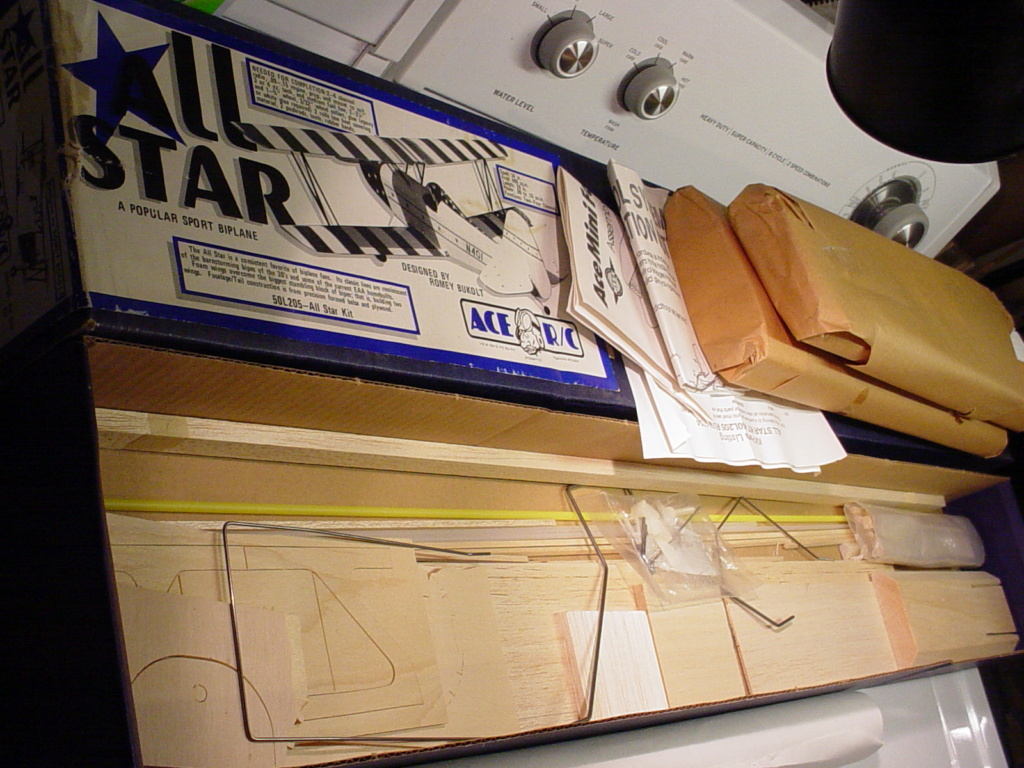
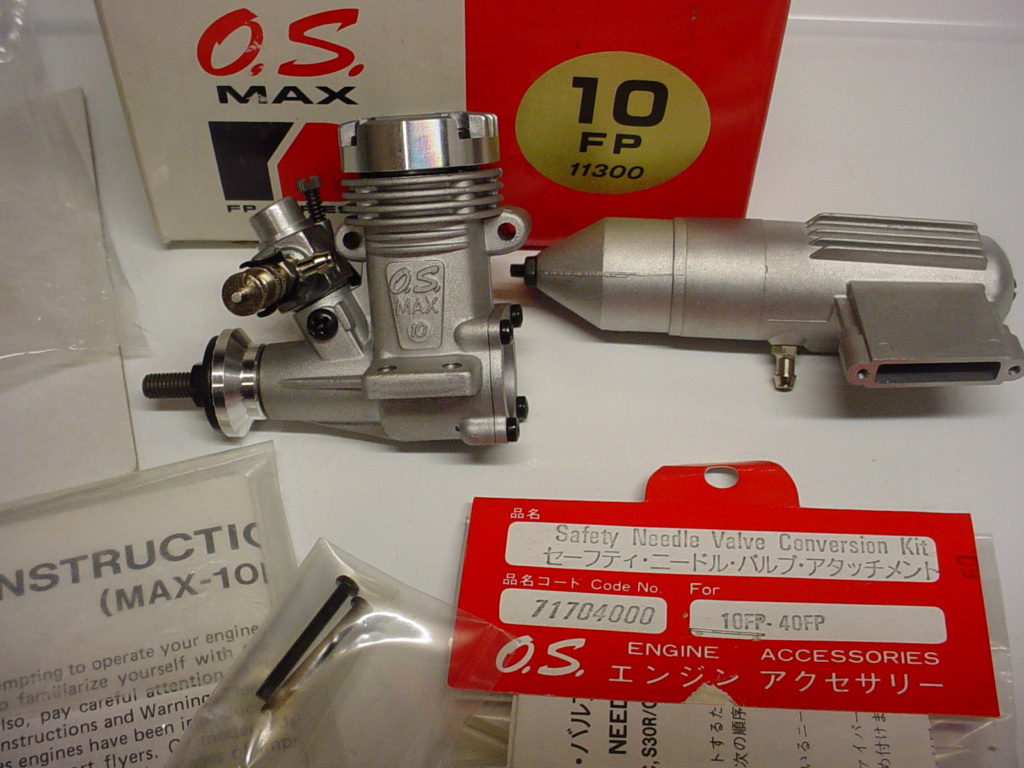
I bought an OS Max .10FP/RC in the same order from Tower sometime back in the mid 1990's. The kit is complete (unbuilt) and the engine is still NIB.. including a remote needle-valve mount that OS was offering at the time.
Here's an interesting story about a 34" Ace All-Star Biplane. One of the more animated RC pilots belonging to an RC flying-club local to me had one that he was bored with. So.. he modified the nose to fit a .40 (2-stoke) and re-balanced the air-frame. I was there at the field for the maiden. He was a skilled pilot.. and wrung the little bipe out, until finally... the top wing folded when pulling out of a loop.. following a Lomcevak maneuver.
I haven't much experience with scaling/tile-printing. I'm always fascinated when the topic comes up though. I'm hoping to build more models from plans when and if I reach retirement age. I've been stockpiling wood.. in anticipation of that.
I like the whole idea of scaling down model aircraft. The CEF 1/2-A C/L Profi-Scale Speed Contests were a lot of fun for me. The designing and building were extremely satisfying.. along with seeing what other fellow CEF'ers were coming up with for models.
Sending some positive energy your way!

 More progress 7-25-2020
7-26-2020 - Progress finally. I have busy with home related things. Wifes BIG birthday is this coming Tuesday.
020 All Star BiPlane progress has been really slow, too many broken things at home to count. But finally some progress on making more parts. I cutout and shaped both sides of the fuselage and an extra for a pattern. I cutout and shaped the stabilizer and elevator halves and an extra for a pattern and setup a flat board for building the fuselage.
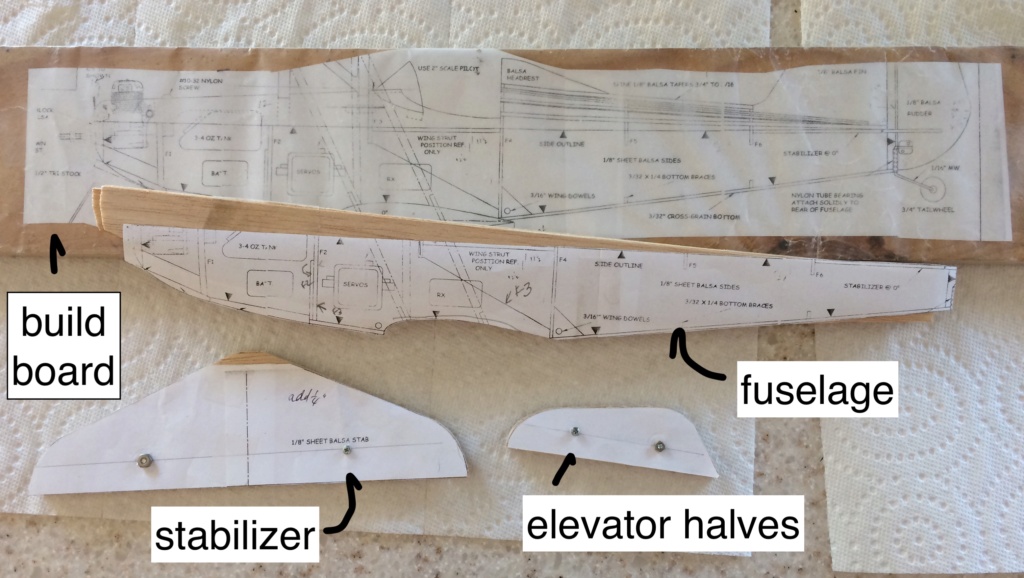
Progress: build board, stabilizer, elevator halves, fuselage
now if I can just get the house and back yard ready for Tuesday. happy happydad


020 All Star BiPlane progress has been really slow, too many broken things at home to count. But finally some progress on making more parts. I cutout and shaped both sides of the fuselage and an extra for a pattern. I cutout and shaped the stabilizer and elevator halves and an extra for a pattern and setup a flat board for building the fuselage.

Progress: build board, stabilizer, elevator halves, fuselage
now if I can just get the house and back yard ready for Tuesday. happy happydad


happydad- Rest In Peace

- Posts : 1592
Join date : 2012-05-28
Age : 79
Location : Escondido, CA
 More progress on the .020 BiPlane
Life has been busy here trying to do 20 things at a time. But I have made more progress on the All Star BiPlane for Cox .020.
Trying to clean the garage for my metal working lathe was sidelined for a while when the wife wanted a closet in a spare bedroom cleared for pillows. Pillows?? Nuff said or I will be in BIG trouble.
When I got down to the last box I found something very unusual and way out of place. The box was for Motorola model 720 cellphone parts, about 10 to 15 years old. There in an old pill bottle among screws, nuts and others misc. parts was: a Cox .051 piston, no cylinder, just the piston. WHAT? Cellphone parts, not Cox engine parts. It was dirty, but compression in .051 cylinders was good, so traded it for some parts I wanted to try. Sorry.
Still have a lot of stuff to filter in the garage before I see a space for a lathe, but I have made lots of progress. In fact today I made another discovery. A little backstory. When I was in Thailand I worked on semi-precious stones during the day. I worked night shift and the days were WAY HOT, so I worked in the air-conditioned gemshop. Either for free, or for $1.00 per hour, can’t remember, it was over 50 years ago. So anyway I worked with local stones from Thailand like the Black Sapphire. They were local, cheap and easy to work on. It took a long time to choose a good stone, shape it, the polish the stone with diamond dust. That 1 part could take up to 20 hours, 2 to 3 weeks off time. But I made several black Sapphire stones and sold them, after having them mounted in gold settings. I brought a few black stones home with me.
But I was surprised today when I found what looks like either a red Sapphire or a red Ruby. Most likely a Sapphire because of the way it looks. I will post a pic tomorrow. Wife took it to bed with her. After 50 years she wants me to go out, where ?, and cut, shape and polish the stone instantaneously so she can have it set in a ring. I made some opals in Thailand and gave her a ring after we got married. She broke the stone, they are soft, we bought a replacement stone and had it set, then the ring was stolen.
Oh well.
Busy week, busy month. I will post pics of the bit of progress on the All Star BiPlane for Cox .020 soon, maybe tomorrow. Back to the garage in this heat.
Happydad


Trying to clean the garage for my metal working lathe was sidelined for a while when the wife wanted a closet in a spare bedroom cleared for pillows. Pillows?? Nuff said or I will be in BIG trouble.
When I got down to the last box I found something very unusual and way out of place. The box was for Motorola model 720 cellphone parts, about 10 to 15 years old. There in an old pill bottle among screws, nuts and others misc. parts was: a Cox .051 piston, no cylinder, just the piston. WHAT? Cellphone parts, not Cox engine parts. It was dirty, but compression in .051 cylinders was good, so traded it for some parts I wanted to try. Sorry.
Still have a lot of stuff to filter in the garage before I see a space for a lathe, but I have made lots of progress. In fact today I made another discovery. A little backstory. When I was in Thailand I worked on semi-precious stones during the day. I worked night shift and the days were WAY HOT, so I worked in the air-conditioned gemshop. Either for free, or for $1.00 per hour, can’t remember, it was over 50 years ago. So anyway I worked with local stones from Thailand like the Black Sapphire. They were local, cheap and easy to work on. It took a long time to choose a good stone, shape it, the polish the stone with diamond dust. That 1 part could take up to 20 hours, 2 to 3 weeks off time. But I made several black Sapphire stones and sold them, after having them mounted in gold settings. I brought a few black stones home with me.
But I was surprised today when I found what looks like either a red Sapphire or a red Ruby. Most likely a Sapphire because of the way it looks. I will post a pic tomorrow. Wife took it to bed with her. After 50 years she wants me to go out, where ?, and cut, shape and polish the stone instantaneously so she can have it set in a ring. I made some opals in Thailand and gave her a ring after we got married. She broke the stone, they are soft, we bought a replacement stone and had it set, then the ring was stolen.
Oh well.
Busy week, busy month. I will post pics of the bit of progress on the All Star BiPlane for Cox .020 soon, maybe tomorrow. Back to the garage in this heat.

Happydad


happydad- Rest In Peace

- Posts : 1592
Join date : 2012-05-28
Age : 79
Location : Escondido, CA
 Real Progress on the .020 All Star BiPlane
Well, some real progress on the BiPLane today. I set up to make the second half of the wing set and made a build board for the fuselage, FINALLY.

starting the second half of the wing set, top wing shown. see the Left half of the top wing on the left.
Still missing the strut ribs to join the 2 wings.

build board for the fuselage.
happydad.


starting the second half of the wing set, top wing shown. see the Left half of the top wing on the left.
Still missing the strut ribs to join the 2 wings.

build board for the fuselage.
happydad.


happydad- Rest In Peace

- Posts : 1592
Join date : 2012-05-28
Age : 79
Location : Escondido, CA
 Re: All-Star Biplane for .020
friend, I keep an eye on your progress !! ... I want to see that model airplane standing up with its engine screaming !!! 

MauricioB- Top Poster

- Posts : 3700
Join date : 2016-02-16
Age : 53
Location : ARG
 Re: All-Star Biplane for .020
Looking Good Happy . 

getback- Top Poster


Posts : 10415
Join date : 2013-01-18
Age : 67
Location : julian , NC
 Re: .020 All Star BiPlane Progress
It has been a while since I have posted progress, but I cannot post pictures because my MacBook is still in pieces.
So I will give a short review of what progress has been done.
I have made the fuselage doublers, and patterns, and installed on both halves of the fuselage. I have made all of the fuselage formers, and patterns, and began installing them from the tail.
I an ready to true up the 2 fuselage pieces to make sure they are the same and start putting the bottom and top planking, cross pieces, on to make a real fuselage.
Until I get the stupid MacBook fixed I cannot post pictures.
Until then
Happydad.


happydad- Rest In Peace

- Posts : 1592
Join date : 2012-05-28
Age : 79
Location : Escondido, CA
 Similar topics
» Here's a Biplane!
» Well, well, my first Biplane for Cox! VIDEOS!!
» ***The World's Smallest Traveling Engine*** SIGN UP!
» Cox Twin .049 Biplane
» New Biplane and other Hobbies...
» Well, well, my first Biplane for Cox! VIDEOS!!
» ***The World's Smallest Traveling Engine*** SIGN UP!
» Cox Twin .049 Biplane
» New Biplane and other Hobbies...
Page 1 of 1
Permissions in this forum:
You cannot reply to topics in this forum

 Rules
Rules


