Log in
Search
Latest topics
» Golden Bee basic running problemby roddie Today at 10:51 pm
» Simple Gliders
by rdw777 Today at 6:25 pm
» Foam hand kids glider converted to 0.049 CL
by rdw777 Today at 6:11 pm
» Weird search for a single comic from an old Mad Magazine
by Kim Today at 1:44 pm
» Scientific "Zipper" Build...Zipper Flys!.
by getback Today at 7:27 am
» Cox .049 Tee Dee engines back in stock (limited availablility)
by GallopingGhostler Today at 1:05 am
» Very off-topic.........Time passes and not always for the best......
by rsv1cox Yesterday at 2:47 pm
» Roddie-Rigger.. a 2005 original design
by roddie Wed Jul 24, 2024 11:48 pm
» Jim Walker Bonanza etc.
by rsv1cox Wed Jul 24, 2024 6:30 pm
» Throttles for Cox Tee Dee .049 / .020 / .010 engines --- videos
by sosam117 Wed Jul 24, 2024 8:54 am
» Introducing our Cox .049 TD Engines
by Admin Tue Jul 23, 2024 2:00 am
» Project Cox .049 r/c & Citabrian Champion
by getback Mon Jul 22, 2024 4:14 pm
Cox Engine of The Month
July-2024
robot797's
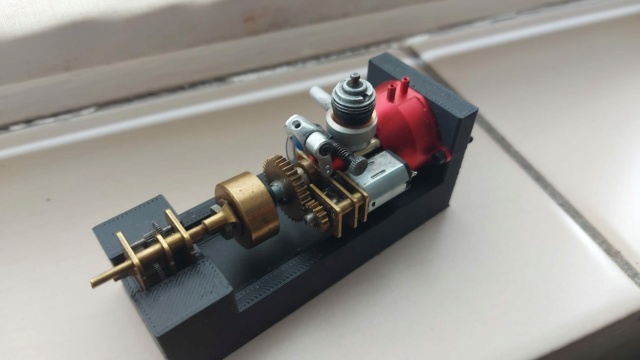
"ULTIMITE COX 010: it has a clutch, E starter, throttle, exhaust, aluminum tank, aluminum venturi, gearbox with forward and reverse, and now its on a custom drawn and printed stand"

PAST WINNERS
robot797's

"ULTIMITE COX 010: it has a clutch, E starter, throttle, exhaust, aluminum tank, aluminum venturi, gearbox with forward and reverse, and now its on a custom drawn and printed stand"

PAST WINNERS
Spee-Dee 010, a new build project
Page 1 of 3
Page 1 of 3 • 1, 2, 3 
 Spee-Dee 010, a new build project
I have collected too many COX TeeDee010 engines to afford only to have them sit on the shelf. In fact I currently only have one of them in service on the Sharkface.
Inspired by the concept shown some years ago by Brad aka 1/2A Nut :
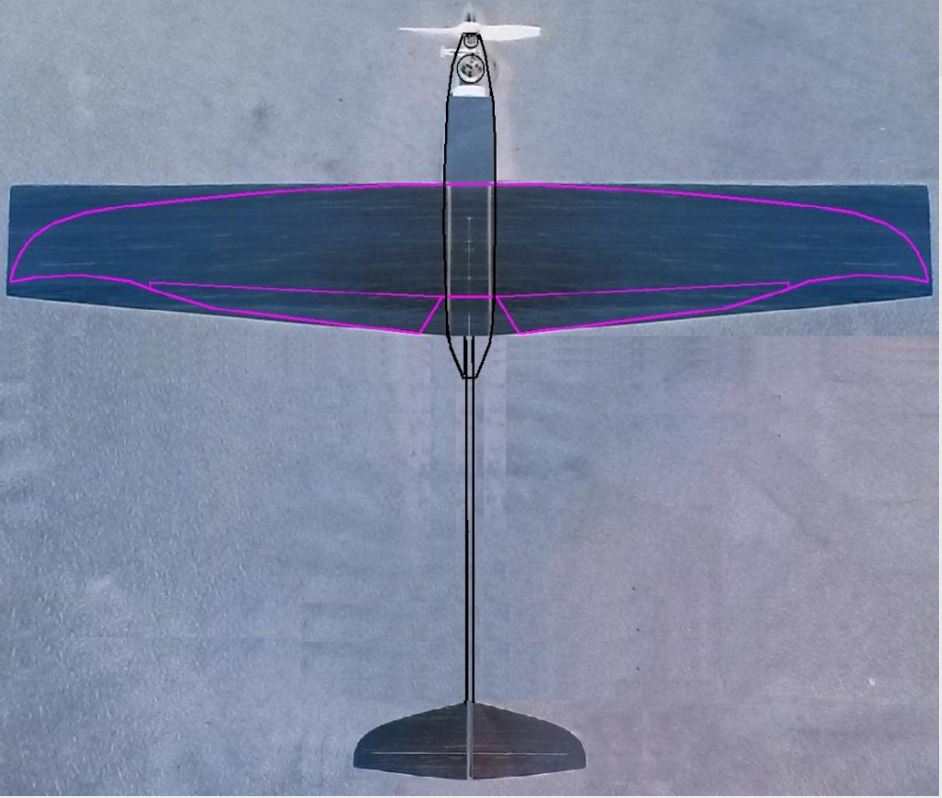
I started to build a 010 size speed plane under the name of Spee-Dee in hopes, that it will live up to its name:
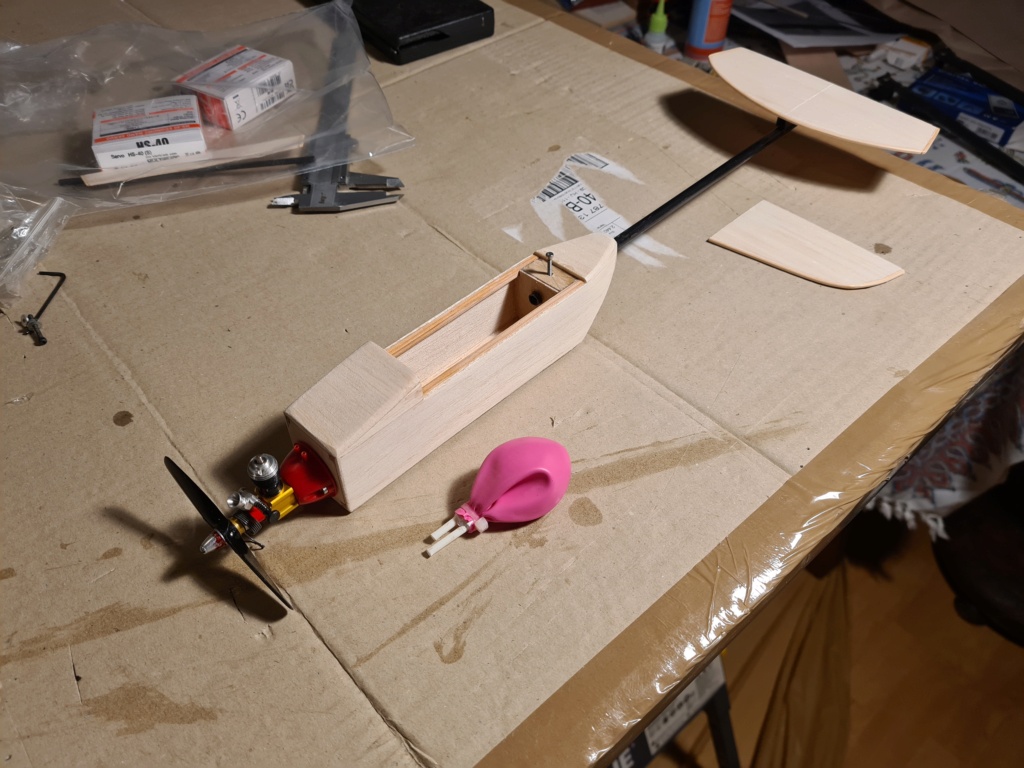
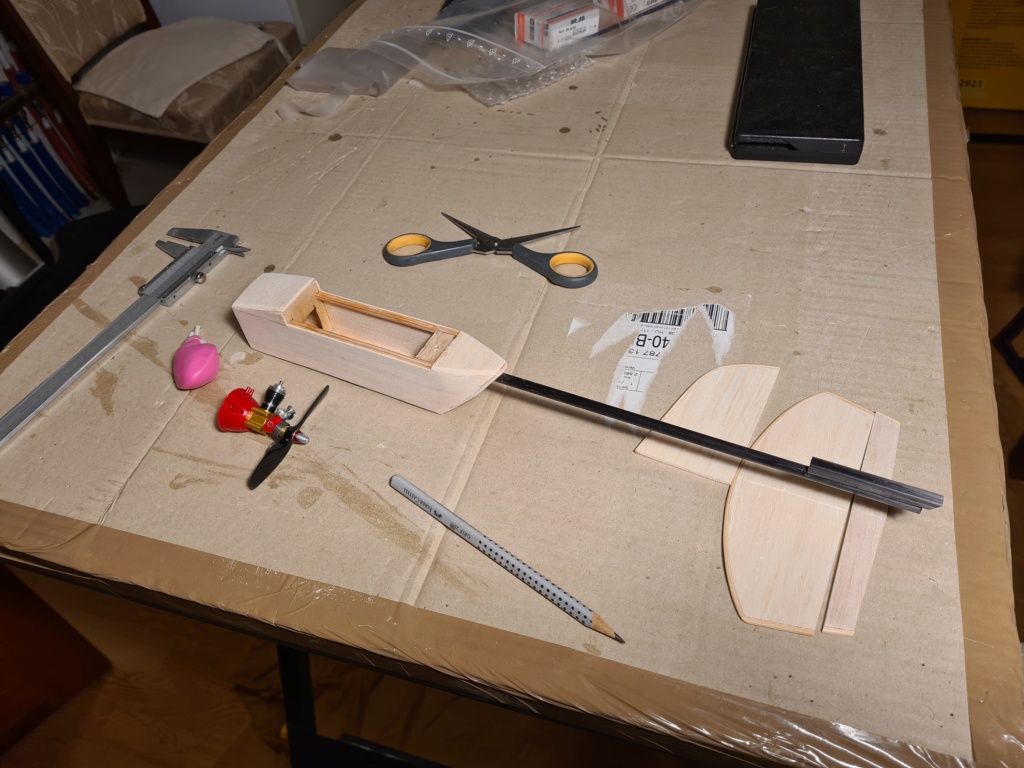
The plane will have a half fuselage and a carbon pipe boom connecting it to the tail feathers. The wingspan is planned at 18" and I will have to cut and sand/"sculpture" the wing contour from a wing profile balsa board:
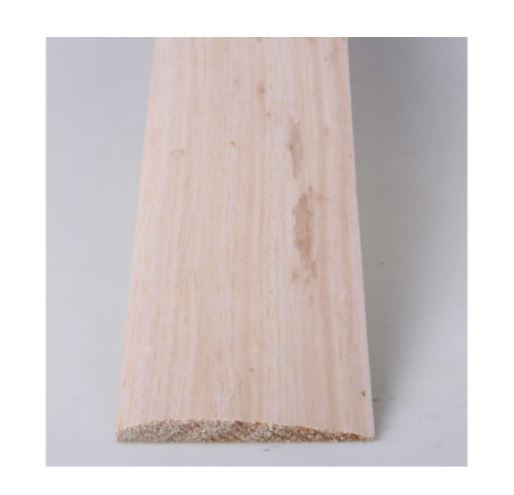
I am building it based on the rough dimensions and surface ratios of Brad's concept, with only a small hand-made sketch. I trust it will be airworthy, anyway.
With 2 servos (aileron and elevator) of 5 grams each, a 150mAh NiMh battery of 15 grams and a Furaba receiver of 9 grams I figure the all-up weight will be less than 125 grams that the current idiotic drone laws set as a limit below which one can fly RC planes without any bureaucracy.
More will come after I have turned my back to the Xmas tree.
Merry Christmas to all of you.

Inspired by the concept shown some years ago by Brad aka 1/2A Nut :

I started to build a 010 size speed plane under the name of Spee-Dee in hopes, that it will live up to its name:


The plane will have a half fuselage and a carbon pipe boom connecting it to the tail feathers. The wingspan is planned at 18" and I will have to cut and sand/"sculpture" the wing contour from a wing profile balsa board:

I am building it based on the rough dimensions and surface ratios of Brad's concept, with only a small hand-made sketch. I trust it will be airworthy, anyway.
With 2 servos (aileron and elevator) of 5 grams each, a 150mAh NiMh battery of 15 grams and a Furaba receiver of 9 grams I figure the all-up weight will be less than 125 grams that the current idiotic drone laws set as a limit below which one can fly RC planes without any bureaucracy.
More will come after I have turned my back to the Xmas tree.
Merry Christmas to all of you.


balogh- Top Poster


Posts : 4803
Join date : 2011-11-06
Age : 65
Location : Budapest Hungary
 Re: Spee-Dee 010, a new build project
Very nice Andras, Will be watching with interest!!!…Yes, Brad’s planes are truly inspirational…. He’s done a lot of R & D with nitro speed….I think your onboard RC equipment will be great… Merry Christmas to you as well 

rdw777- Diamond Member


Posts : 1470
Join date : 2021-03-11
Location : West Texas

layback209- Gold Member

- Posts : 282
Join date : 2017-10-13
Age : 38
Location : Okotoks
 Re: Spee-Dee 010, a new build project
Robert, Layback, thank you fir your compliments! I am still waiting for the transparent Oracover, the Futaba receiver, and the battery to be delivered only in early January. So I will have the time to work on the wing, but weather permitting, I plan to maiden it in early January.

balogh- Top Poster


Posts : 4803
Join date : 2011-11-06
Age : 65
Location : Budapest Hungary
 Re: Spee-Dee 010, a new build project
Great to see a different approach! Looks great so far! 
I hope I can get my hands on a 010 TeeDee one day.
Is the balloon a tank?
Merry Christmas!

I hope I can get my hands on a 010 TeeDee one day.
Is the balloon a tank?
Merry Christmas!

Tobaiies- Silver Member

- Posts : 80
Join date : 2020-10-30
Age : 22
 Re: Spee-Dee 010, a new build project
Hello Tobailes, thank you.
Yes, all my RC planes of the COX engine size range run on non-pressurized balloon tanks that I make from party balloons. Needs only 2 lines, does not use a heavy clunk for aerobatics, does not allow fuel to foam, cheap, simple etc..
I will start working on the wing tomorrow.
Merry Christmas!
Yes, all my RC planes of the COX engine size range run on non-pressurized balloon tanks that I make from party balloons. Needs only 2 lines, does not use a heavy clunk for aerobatics, does not allow fuel to foam, cheap, simple etc..
I will start working on the wing tomorrow.
Merry Christmas!

balogh- Top Poster


Posts : 4803
Join date : 2011-11-06
Age : 65
Location : Budapest Hungary

1/2A Nut- Top Poster

- Posts : 3464
Join date : 2013-10-20
Age : 60
Location : Brad in Texas
 Re: Spee-Dee 010, a new build project
Thanks Brad,
The fuselage is 30mm wide inside between the sidewalls and the 010 tank backplate diameter is 25mm, so there was not too much fuselage width to spare, given the dimensions of the blind nuts in the firewall, the battery, servo and receiver and switch, that are available for this project.
Also, the internal tank lead outs needed space on the firewall. In order to help the suction of the 010, unlike in larger project with sidewall fuel line lead out, I resorted here to the firewall leadout to minimize fuel line length.
The firewall and the entire fuselage front will get a fuel proofer polyurethane spray before the heat shrink transparent white Oracover is added.
Anyway, I am not targeting any speed record,and just want to have a quick fun sports plane

balogh- Top Poster


Posts : 4803
Join date : 2011-11-06
Age : 65
Location : Budapest Hungary
 Re: Spee-Dee 010, a new build project
Hello András, first of all Merry Christmas! 
I like your project, these little machines are really fascinating. I'll keep an eye on the progress...maybe I can also apply your Cox .010 r/c Micro Flite to it and experiment!!
Well buddy, good luck!

I like your project, these little machines are really fascinating. I'll keep an eye on the progress...maybe I can also apply your Cox .010 r/c Micro Flite to it and experiment!!

Well buddy, good luck!

MauricioB- Top Poster

- Posts : 3649
Join date : 2016-02-16
Age : 53
Location : ARG
 Re: Spee-Dee 010, a new build project
Thank you Mauricio. If the plane proves to be a good one, I will add a 3rd servo and the Micro Flight PET to throttle the 010..
Merry Christmas my friend !
Merry Christmas my friend !


balogh- Top Poster


Posts : 4803
Join date : 2011-11-06
Age : 65
Location : Budapest Hungary
 Re: Spee-Dee 010, a new build project
I finally sculptured this tapered contour into the wing profile balsa board. Added some wash-out to the wing bottom at the tips, and a thin carbon rod to strengthen the leading edge for landing on a hard terrain with tall grass and weed, my typical outlaw flying field. I know it adds some unwanted vortices behind the leading edge and reduce the lift a bit, but this compromise for leading edge strength is worth it.
Next is cutting the ailerons from the wing trailing section. I am planning fishing lines for hinges because of the tiny cross sections of wing and aileron involved.

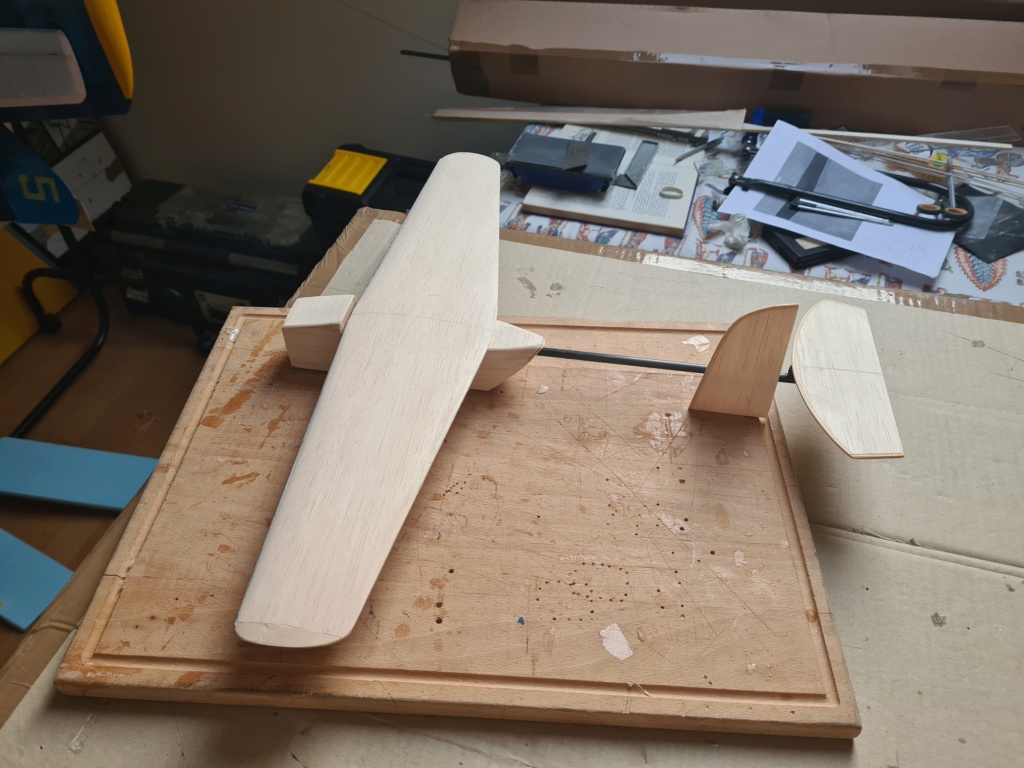
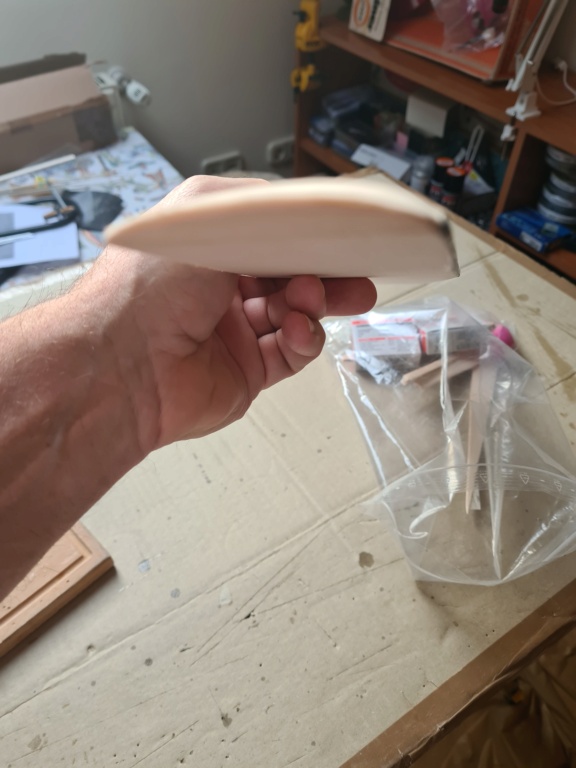
Next is cutting the ailerons from the wing trailing section. I am planning fishing lines for hinges because of the tiny cross sections of wing and aileron involved.


balogh- Top Poster


Posts : 4803
Join date : 2011-11-06
Age : 65
Location : Budapest Hungary
 Re: Spee-Dee 010, a new build project
Looking very nice Andras, Thanks for sharing this build  ….
….
You may already have the hinge part of the project lined out but here are a few more details how they were installed on PB if it is helpful…
The stationary part of the hinge is drilled first then used as a guide to drill the movable part…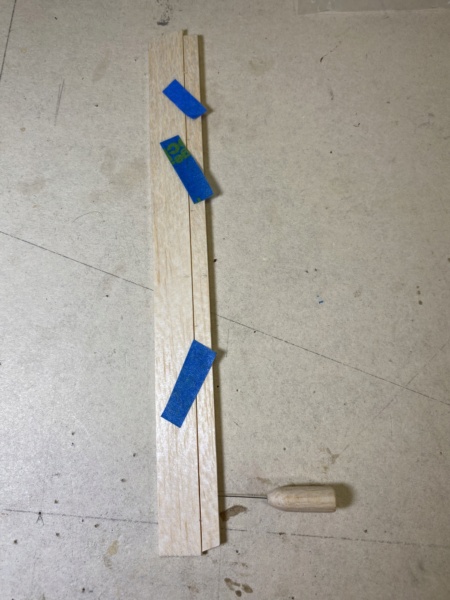
The line in the movable part is inserted and glued in two places, Where it enters and at its end… The end can be found by holding it up to a strong light and then a pin hole for the CA to enter (which can be covered with light weight filler)
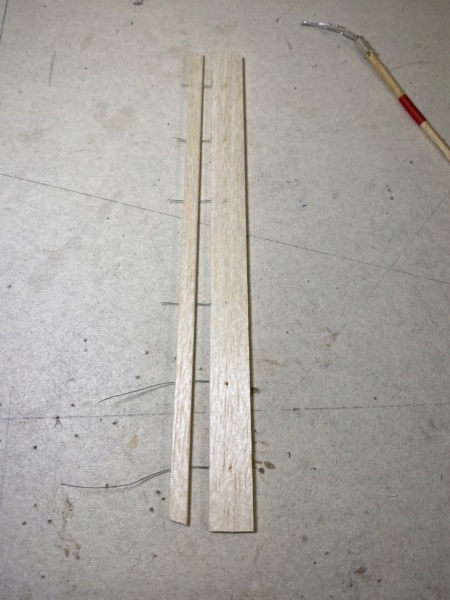
A couple of pins in the work board can be used to put a little tension on the line while you touch it with a drop of glue…. I started with the innermost lines and worked outward to try and keep the parts feeling the same tension

Cut the excess line off and leave just a little tail and glue them down… You can kind of press them into the wood so they don’t interfere with the final glue joint on the wing
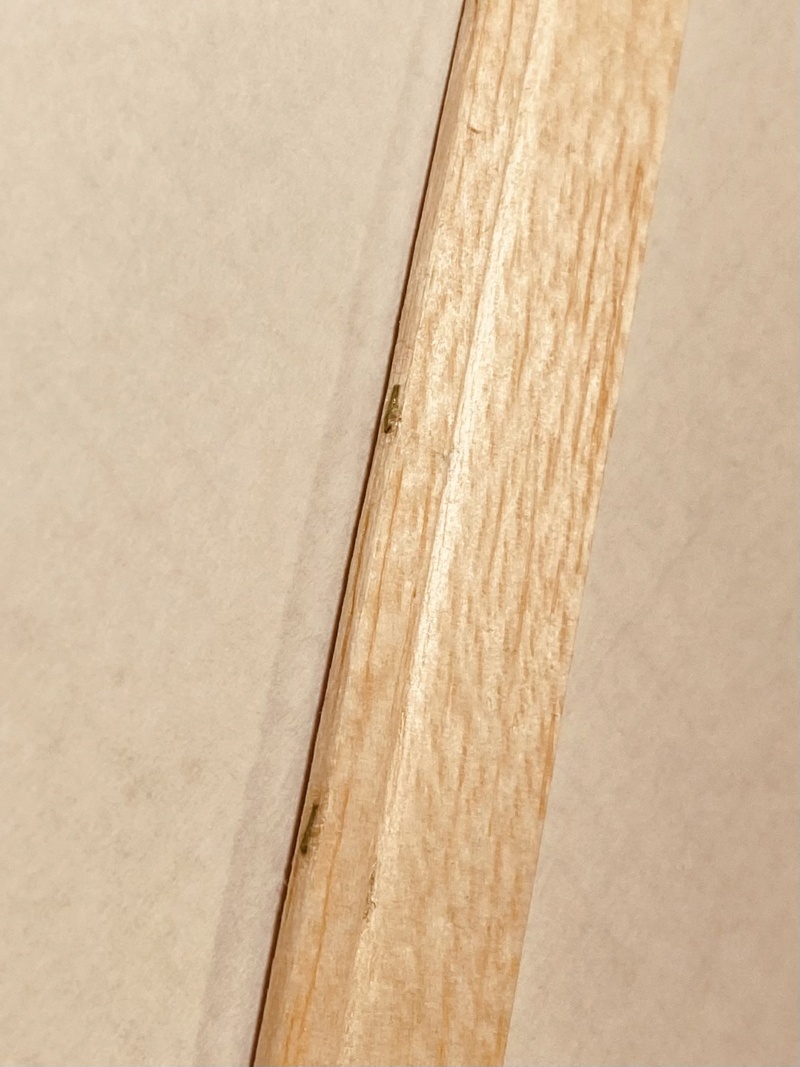
Be sure and clean the line good with alcohol….If you use the little pin-applicator tool it will clog after a while with CA but can be scraped clean with a knife blade….One of the neat things about this hinge is that after it is installed, You can finish shaping by sanding to match the profile of your wing perfectly…
I think it is secure but be sure to prove it to yourself before flight
You may already have the hinge part of the project lined out but here are a few more details how they were installed on PB if it is helpful…
The stationary part of the hinge is drilled first then used as a guide to drill the movable part…

The line in the movable part is inserted and glued in two places, Where it enters and at its end… The end can be found by holding it up to a strong light and then a pin hole for the CA to enter (which can be covered with light weight filler)

A couple of pins in the work board can be used to put a little tension on the line while you touch it with a drop of glue…. I started with the innermost lines and worked outward to try and keep the parts feeling the same tension

Cut the excess line off and leave just a little tail and glue them down… You can kind of press them into the wood so they don’t interfere with the final glue joint on the wing

Be sure and clean the line good with alcohol….If you use the little pin-applicator tool it will clog after a while with CA but can be scraped clean with a knife blade….One of the neat things about this hinge is that after it is installed, You can finish shaping by sanding to match the profile of your wing perfectly…
I think it is secure but be sure to prove it to yourself before flight

rdw777- Diamond Member


Posts : 1470
Join date : 2021-03-11
Location : West Texas
 Re: Spee-Dee 010, a new build project
Thanks a lot, Robert,
I would assume the other end of the fishing line needs to be glued in in one if the extreme positions of the control surface.. If glued in in the neutral position, it may be tensioned when the control throw is at its extreme?
I would assume the other end of the fishing line needs to be glued in in one if the extreme positions of the control surface.. If glued in in the neutral position, it may be tensioned when the control throw is at its extreme?

balogh- Top Poster


Posts : 4803
Join date : 2011-11-06
Age : 65
Location : Budapest Hungary
 Re: Spee-Dee 010, a new build project
Andras, I set the line tension with the two pieces flat on the board then made sure it would deflect the desired amount…. I experimented first with a few scrap pieces to get the feel of how much tension to put on the line…It doesn’t take much….Rounding the edges of the mating wood pieces gives a good bit of wiggle room for deflection as well

rdw777- Diamond Member


Posts : 1470
Join date : 2021-03-11
Location : West Texas
 Re: Spee-Dee 010, a new build project
Before the surgical removal of ailerons from the wing, I finalized the wing fixture mechanism by adding a 2mm diameter carbon locating pin in the front center, and a locking screw at the rear center. To strengthen the rear fixing area, a thin plywood sheet was embedded in level with the wing top at the trailing edge center , on which the washer of the locking screw will sit, without pressing a mark or cutting into the balsa.
A M2 size blind nut is submerged from underneath in the bridge between the 2 rear formers, that also anchor the tail boom. A quick calculation and consideration proved the above mechanism is overall lighter than 2 dowels and rubber bands would weigh, keeps the wing firm in place, and does not add drag like the dowel+rubber rings would do)
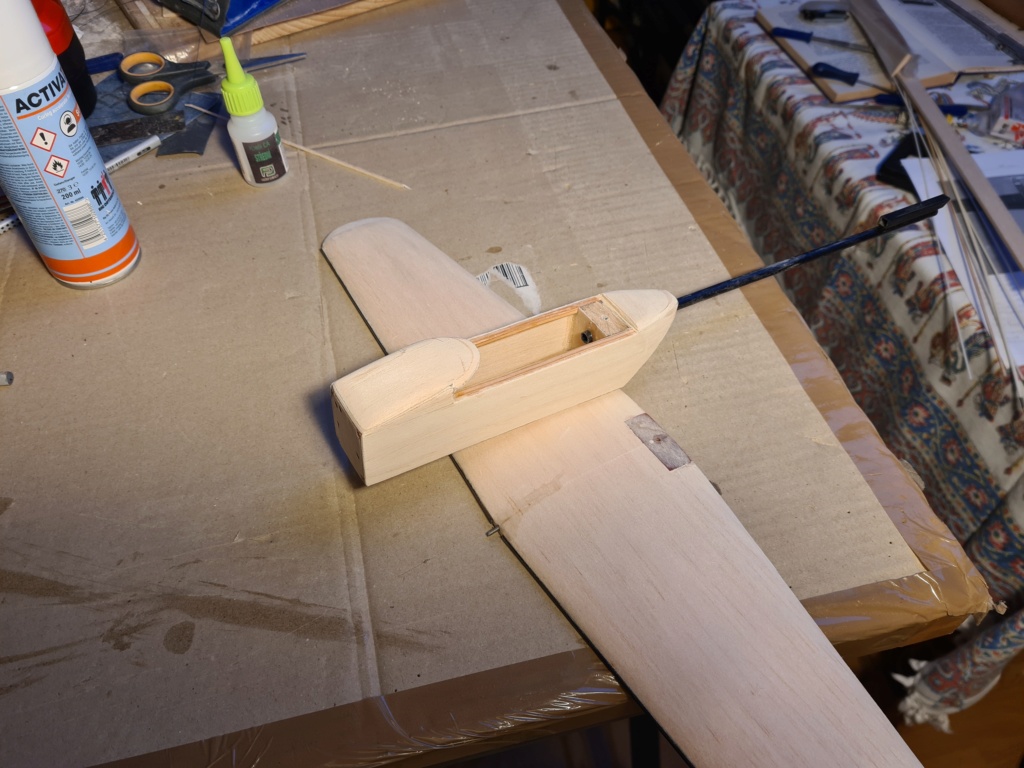
I have also improvised by sanding a light balsa fairing behind the tank compartment in order to streamline the fuse-to-wing intersection for better aerodynamics.
I am still wondering if the vertical stab, when seated on the horizontal feather, is not too tall...the swirling air behind the prop, hitting the large vertical surface, may result in left yaw of the plane? (As said, I do not have any plans or blueprint for this plane, just put things with dimensions together as per my gut feeling, keeping weights down as best as I can...
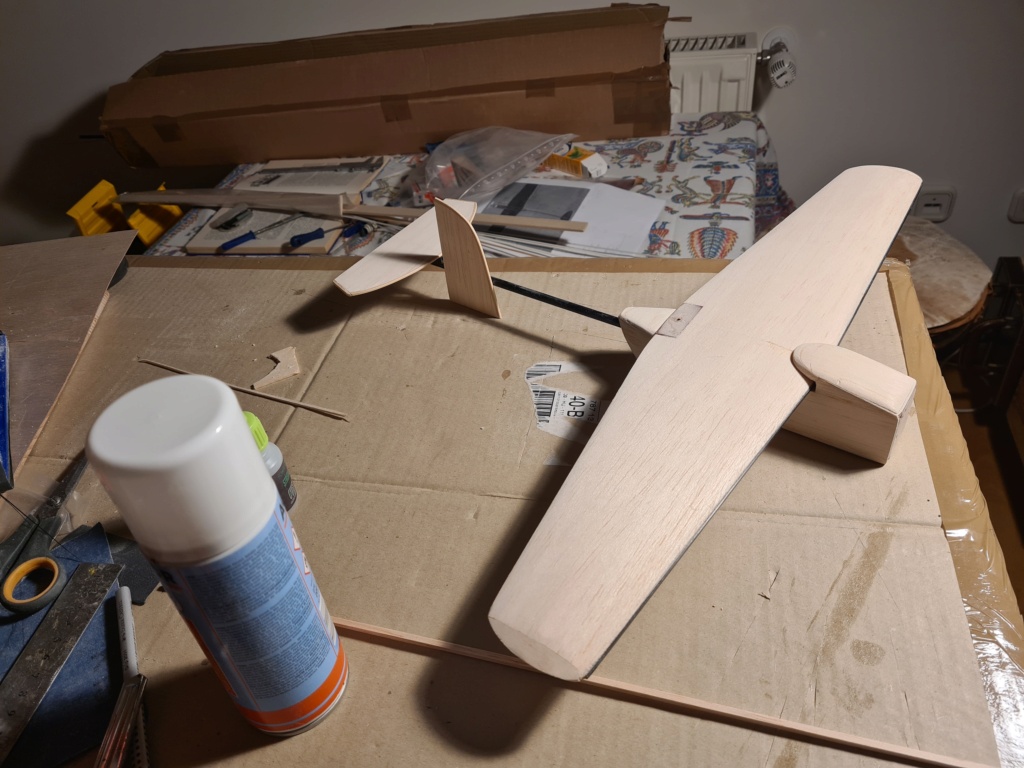
I am collecting the mental strength to start working on the ailerons, a typical trouble maker in my builds...plus the aileron servo cut and sunk into the wing top, exposing the pushrods too...I was hesitating whether to hide the servo and pushrods in the fuse, but that would have complicated the placement of the aileron gears together with battery and receiver as well as the elevator servo in a crowded compartment. So I compromised by choosing on the external aileron servo, that impacts the plane's visual integrity, adds drag, and allows seepage of castor , or ambient moisture into the servo body along its output shaft, to the occasional detriment of this component. (I may add later a fake pilot's screen in front of the servo body in order to deflect castor laden exhaust gases from the servo.) But, this aileron arrangement will surely not interfere with other gears and cabling sitting in the plane's belly. I also saw others like Brad placing the aileron servo outside in 010 size planes, most likely because of the lack of space in the fuselage.
In the meantime I am still waiting for the postman to deliver the Oracover transparent film that I favor because of its very light weight, and transparency, leaving the balsa grains visible after the coverage...plus the low-weight battery from the UK, and a new Futaba receiver- all my receivers are built in planes that I would not like to cannibalize. I wish I had a few more hobbyshops around, but those that survived do not stock the components a miniature RC plane is built from, so I need to hunt the components piece-by-piece from the net or ebay...takes time and patience, I hope the so far unproven flying characteristics of this lil plane will be worth the effort, expenses and patience spent..
I do not expect this plane to do the maiden flight before the New Year's Eve...
A M2 size blind nut is submerged from underneath in the bridge between the 2 rear formers, that also anchor the tail boom. A quick calculation and consideration proved the above mechanism is overall lighter than 2 dowels and rubber bands would weigh, keeps the wing firm in place, and does not add drag like the dowel+rubber rings would do)

I have also improvised by sanding a light balsa fairing behind the tank compartment in order to streamline the fuse-to-wing intersection for better aerodynamics.
I am still wondering if the vertical stab, when seated on the horizontal feather, is not too tall...the swirling air behind the prop, hitting the large vertical surface, may result in left yaw of the plane? (As said, I do not have any plans or blueprint for this plane, just put things with dimensions together as per my gut feeling, keeping weights down as best as I can...

I am collecting the mental strength to start working on the ailerons, a typical trouble maker in my builds...plus the aileron servo cut and sunk into the wing top, exposing the pushrods too...I was hesitating whether to hide the servo and pushrods in the fuse, but that would have complicated the placement of the aileron gears together with battery and receiver as well as the elevator servo in a crowded compartment. So I compromised by choosing on the external aileron servo, that impacts the plane's visual integrity, adds drag, and allows seepage of castor , or ambient moisture into the servo body along its output shaft, to the occasional detriment of this component. (I may add later a fake pilot's screen in front of the servo body in order to deflect castor laden exhaust gases from the servo.) But, this aileron arrangement will surely not interfere with other gears and cabling sitting in the plane's belly. I also saw others like Brad placing the aileron servo outside in 010 size planes, most likely because of the lack of space in the fuselage.
In the meantime I am still waiting for the postman to deliver the Oracover transparent film that I favor because of its very light weight, and transparency, leaving the balsa grains visible after the coverage...plus the low-weight battery from the UK, and a new Futaba receiver- all my receivers are built in planes that I would not like to cannibalize. I wish I had a few more hobbyshops around, but those that survived do not stock the components a miniature RC plane is built from, so I need to hunt the components piece-by-piece from the net or ebay...takes time and patience, I hope the so far unproven flying characteristics of this lil plane will be worth the effort, expenses and patience spent..
I do not expect this plane to do the maiden flight before the New Year's Eve...
Last edited by balogh on Mon Dec 26, 2022 3:38 pm; edited 1 time in total

balogh- Top Poster


Posts : 4803
Join date : 2011-11-06
Age : 65
Location : Budapest Hungary
 Re: Spee-Dee 010, a new build project
Looking great Andras, I like the wing hold down…. And the idea of the windscreen to help with streamlining…. Would look cool too!!
When you remove the sections for the ailerons and fit the new:… If it doesn’t fit exactly like you like you can always make a aileron/hinge set with scrap balsa then contour to your wing…
I think your vertical fin is OK…. When I have a question on something like that I’ll usually refer to a well known designer and copy relative to what I’m working on…. Too much fin on free flight can cause spiral instability at low speeds but for hi speed RC probably helps it “lock in” better…. Example: Fred Reece’s Pocket Rocket … Tall fin….
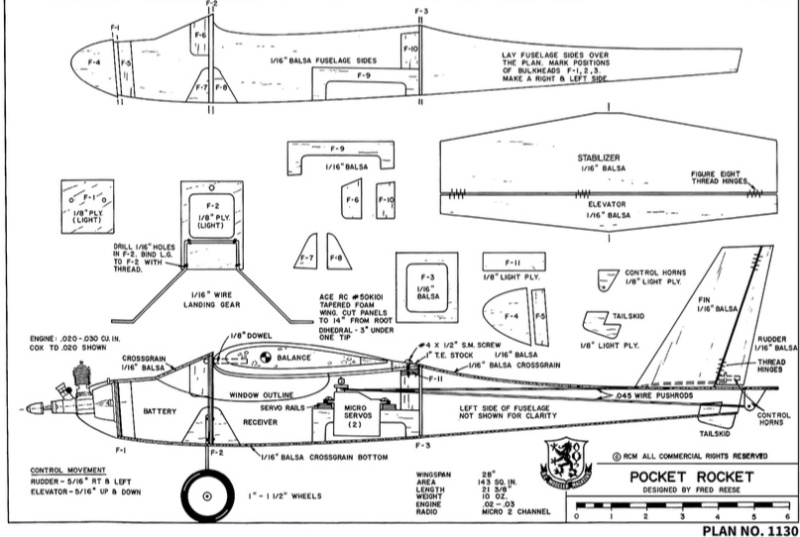
I’m not going to fly before New Year either LOL!!..,But having fun with the building and fiddling with the .010
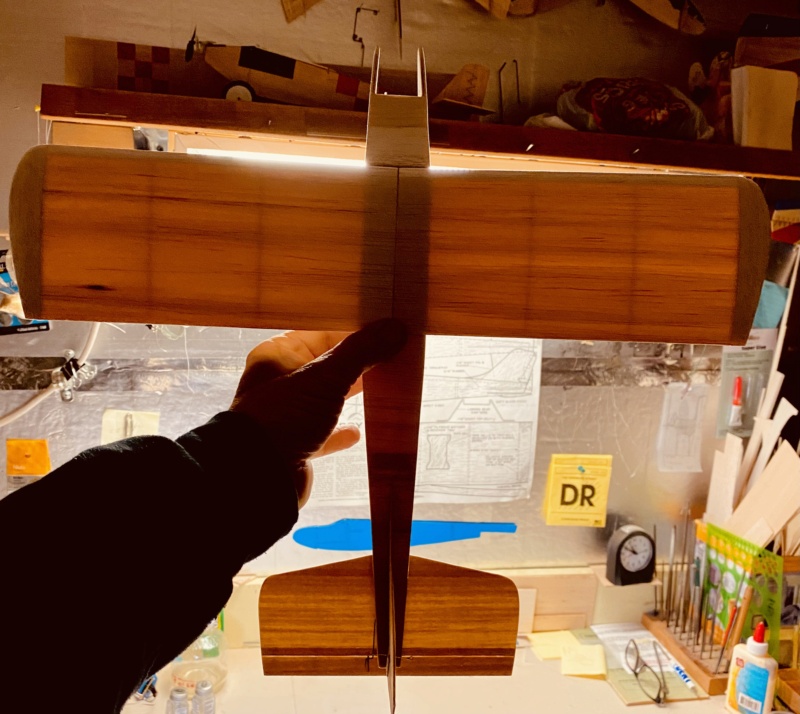
When you remove the sections for the ailerons and fit the new:… If it doesn’t fit exactly like you like you can always make a aileron/hinge set with scrap balsa then contour to your wing…
I think your vertical fin is OK…. When I have a question on something like that I’ll usually refer to a well known designer and copy relative to what I’m working on…. Too much fin on free flight can cause spiral instability at low speeds but for hi speed RC probably helps it “lock in” better…. Example: Fred Reece’s Pocket Rocket … Tall fin….

I’m not going to fly before New Year either LOL!!..,But having fun with the building and fiddling with the .010


rdw777- Diamond Member


Posts : 1470
Join date : 2021-03-11
Location : West Texas
 Re: Spee-Dee 010, a new build project
Thanks Robert, your transparent, X-ray-like presentation of your lovely plane emphasizes how natural the materials we play with are..
Thanks for the advice on the vertical fin..I will search some educated literature, like modeling handbooks on the basic design and area ratios.
Well, if I mess up the ailerons then I have a problem replacing them, because they are part of the airfoil, not just a flat board..
In addition, I am hesitating if I should cut them out from the wing parallel with the tapered trailing edge, cutting through grains, but having the axis of rotation perpendicular to the inverted V orientation of the pushrods, that will make the surfaces easier to be thrown by the pushrods, or, cut them parallel with the wing span, in which case I will not cut through the longitudinal balsa grains, but the angle between the axis of aileron rotation and servo pushbar will not be perpendicular, so the servo horn will turn in a plane not parallel with the pushrod, causing some jamming at the extreme position?

balogh- Top Poster


Posts : 4803
Join date : 2011-11-06
Age : 65
Location : Budapest Hungary
 Re: Spee-Dee 010, a new build project
If it were mine I would use the slight forward sweep shown on Brad’s drawing… I think the benefit of having the pushrods aligned better outweighs the slight cross grain cut on the balsa…Plus it shapes the aileron a certain way he probably intended..,,, Mounting the servo far forward (as practical) would help lessen any angular differences as well

rdw777- Diamond Member


Posts : 1470
Join date : 2021-03-11
Location : West Texas
 Re: Spee-Dee 010, a new build project
Finally have cut out the ailerons from the wing trailing edges, and sunk the aileron servo pit in the wing center. Embedded plywood reinforcements in level with the wing top and sanded them smooth for the servo screws. Will apply polyurethane spray near the fuselage front, and leading edges of the wing and tail feathers, places I most frequently notice castor seepage no matter the cover film.
Also slightly reduced the vertical stab area by cutting its bottom slanted, thus sweeping it back too..
Waiting for the Oracover, the battery and receiver to be delivered.
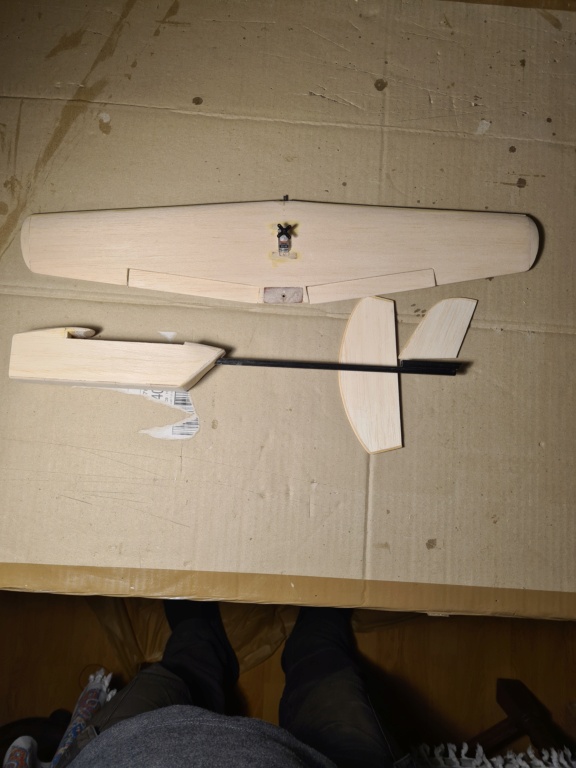
Chances are the all up weight will be below 120 grams I.e. 4.2 oz.
Also slightly reduced the vertical stab area by cutting its bottom slanted, thus sweeping it back too..
Waiting for the Oracover, the battery and receiver to be delivered.

Chances are the all up weight will be below 120 grams I.e. 4.2 oz.

balogh- Top Poster


Posts : 4803
Join date : 2011-11-06
Age : 65
Location : Budapest Hungary
 Re: Spee-Dee 010, a new build project
Neat design Andras….. Should really scoot at that light weight!!…. How will you bond the tail parts to the boom?

rdw777- Diamond Member


Posts : 1470
Join date : 2021-03-11
Location : West Texas
 Re: Spee-Dee 010, a new build project
Thanks, Robert,
I glued a 6mm hollow square carbon rod equal in length with the horizontal stab, to the top of the 6mm diameter hollow round carbon boom at its tail end. Both being 6mm, it was easy just to lay them next to each other on a flat surface and shed a few drops of light CA to fix/align them accurately. I may add even square 3mm balsa square rods as gusset, under the horizontal stab, along the 2 sides of the carbon square, but I assume a 6mm flat surface will provide more than sufficient platform for the tail feathers to rest on.
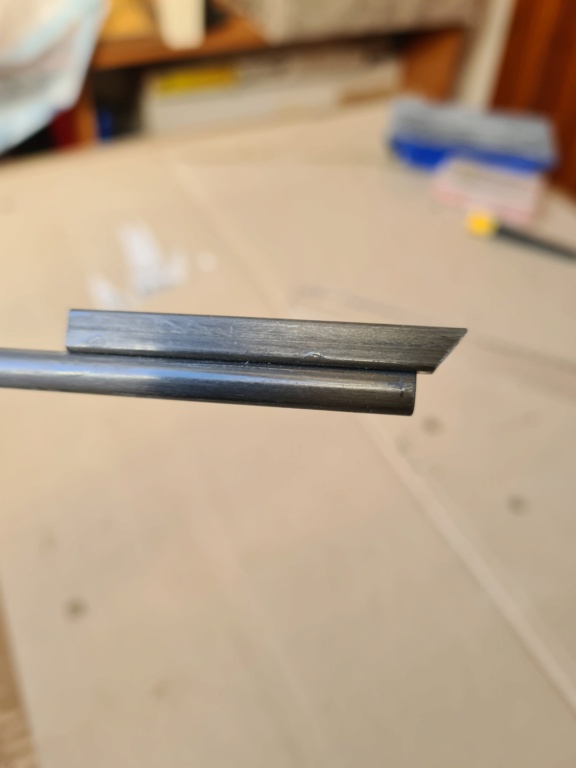
The round and hollow carbon boom will also house the elevator pushrod. I chamfered the tip of the square rod to allow the elevator servo horn to pull full throw in a down command...not that I give full down commands, unless flying inverted....which is then full up command...
The horizontal stab will sit on the top face of the square carbon rod, whose top plane was the reference for aligning it with the wing saddle so as the horizontal stab and the wing bottom are level, and parallel. (My phone camera lens may distort it like fish-eye, but they are actually parallel!...and focused more on the Super Sport Trainer than on the Spee-Dee butt )
)

In the meantime I tested the fishing line hinge technique you detailed above, and found it very quick and safe..I will actually use a sewing needle to pull the line across the elevator board before I glue the line behind the elevator, as you suggested. I find it important to mark the line entries facing each other on the stab and elevator, before the elevator leading edge is sanded round, because finding the middle plane of the flat and raw leading edge is easier before than after the rounding..
Thanks for the good tip, again.
I glued a 6mm hollow square carbon rod equal in length with the horizontal stab, to the top of the 6mm diameter hollow round carbon boom at its tail end. Both being 6mm, it was easy just to lay them next to each other on a flat surface and shed a few drops of light CA to fix/align them accurately. I may add even square 3mm balsa square rods as gusset, under the horizontal stab, along the 2 sides of the carbon square, but I assume a 6mm flat surface will provide more than sufficient platform for the tail feathers to rest on.

The round and hollow carbon boom will also house the elevator pushrod. I chamfered the tip of the square rod to allow the elevator servo horn to pull full throw in a down command...not that I give full down commands, unless flying inverted....which is then full up command...
The horizontal stab will sit on the top face of the square carbon rod, whose top plane was the reference for aligning it with the wing saddle so as the horizontal stab and the wing bottom are level, and parallel. (My phone camera lens may distort it like fish-eye, but they are actually parallel!...and focused more on the Super Sport Trainer than on the Spee-Dee butt

In the meantime I tested the fishing line hinge technique you detailed above, and found it very quick and safe..I will actually use a sewing needle to pull the line across the elevator board before I glue the line behind the elevator, as you suggested. I find it important to mark the line entries facing each other on the stab and elevator, before the elevator leading edge is sanded round, because finding the middle plane of the flat and raw leading edge is easier before than after the rounding..
Thanks for the good tip, again.

balogh- Top Poster


Posts : 4803
Join date : 2011-11-06
Age : 65
Location : Budapest Hungary
 Re: Spee-Dee 010, a new build project
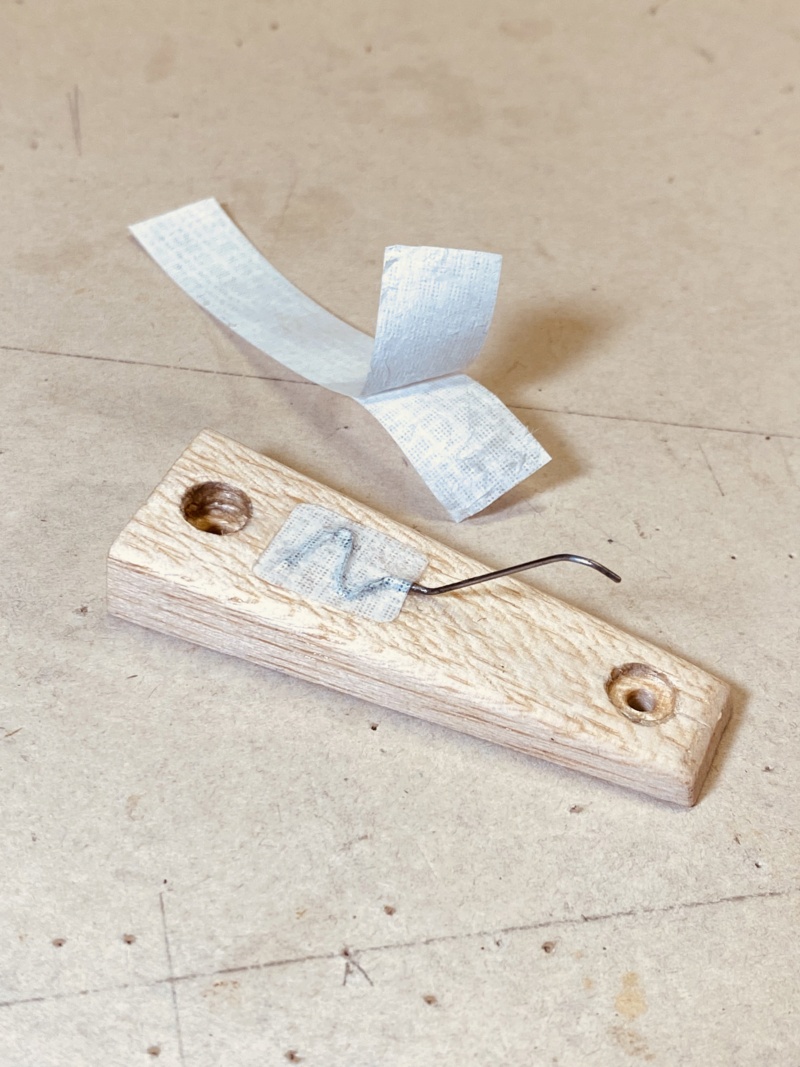
Thanks for the explanation Andras…. I have worked with CF rod a little but not too much…Having the round and square sections the same thickness certainly is a good way to keep things straight…The stabilizer/wing alignment looks good…. It’s amazing how the eye can get those lines to parallel….Love the Super Sport in the back  The gussets you mentioned would add a little extra security…. Sometimes I’ll add a patch to make sure parts are bonded well… I use building wrap material that is available in hardware stores here…. Usually brand name Tyvec ….Sometimes found on certain mailing envelopes as well…. It’s two ply so I peel it apart and use one layer…. Very light and strong… Only thing I’ve found that will glue it is solvent based cements or CA but once applied, parts are really locked together…Clean with alcohol first…. I used a piece on PB’s tail skid…
Glad the hinge is working out for you… You’ll come up with all the tweaks needed that will make it your own ….
….
Robert
 The gussets you mentioned would add a little extra security…. Sometimes I’ll add a patch to make sure parts are bonded well… I use building wrap material that is available in hardware stores here…. Usually brand name Tyvec ….Sometimes found on certain mailing envelopes as well…. It’s two ply so I peel it apart and use one layer…. Very light and strong… Only thing I’ve found that will glue it is solvent based cements or CA but once applied, parts are really locked together…Clean with alcohol first…. I used a piece on PB’s tail skid…
Glad the hinge is working out for you… You’ll come up with all the tweaks needed that will make it your own
Robert

rdw777- Diamond Member


Posts : 1470
Join date : 2021-03-11
Location : West Texas
 Re: Spee-Dee 010, a new build project
I just discovered this thread Andras. Very nice effort. There is something about nicely sculptured and finely sanded balsa that has eye appeal for me. Speed plane? As if the little rockets that you fly are not fast enough. 
Robert, what is the "drill" that you use to install those fishing line hinges? You must have addressed it before but I missed it. Such thin line would require a pin sized drill or penetrating device. Seems like keeping the hole true in wood would be a problem then passing the line through? Maybe a big hole filled with CA? I would like to try them.
Robert, what is the "drill" that you use to install those fishing line hinges? You must have addressed it before but I missed it. Such thin line would require a pin sized drill or penetrating device. Seems like keeping the hole true in wood would be a problem then passing the line through? Maybe a big hole filled with CA? I would like to try them.

rsv1cox- Top Poster


Posts : 10851
Join date : 2014-08-18
Location : West Virginia
 Re: Spee-Dee 010, a new build project
Thank you, Bob..I just wanted to try my humble experience and build a 010 size plane nearly blindfolded, except for Brad's concept drawing.
More importantly, I am learning little bits and pieces of modeling details that I ignored when building larger planes. This is my first wing that I sculptured with an exacto knife and 2 sand papers of different grit sizes, and nothing more. The curves and surfaces worked out surprisingly nice and smooth, indeed. (Tapering a profile board of originally parallel sides requires a lot of adjustment by sanding the airfoil while building the gradual taper contour)
It gives me some confidence for my present and next build projects.
It is yet to be seen if my "wet finger" dimensions and ratios will combine into a really flyable little plane..
I also like Robert's fishing line idea. As far as I am concerned, I managed to pull the line through thin balsa boards like a thread, with the help of a sewing needle. Thin lines are sufficiently strong for the purpose of a hinge, and are easy to tuck in the eye if the sewing needle too.

balogh- Top Poster


Posts : 4803
Join date : 2011-11-06
Age : 65
Location : Budapest Hungary
 Re: Spee-Dee 010, a new build project
Hi Bob, Glad to see you posting after those weather events  …. The “drill” is a .010” metal guitar string set in a small balsa dowel…. I sharpened the tip a bit by rotating it against a Dremel cut off wheel to help it track better…..The line measures .005, CA seems to fill the gap OK….Yes, the drill can wander a bit but with a little practice can be held reasonably straight…. As Andras mentioned above it’s best to drill both mating parts while the edges are still flat, Then round them after…. You may have to re-find the holes and clean them with the drill after rounding…..The last inch or so of the line can become the “needle “ by hardening with CA if you go that route… I’m sure a regular thin needle can be the drill and the pull tool too as Andras has demonstrated….. Easy to practice with some scrap balsa….. Let us know how it works out

 …. The “drill” is a .010” metal guitar string set in a small balsa dowel…. I sharpened the tip a bit by rotating it against a Dremel cut off wheel to help it track better…..The line measures .005, CA seems to fill the gap OK….Yes, the drill can wander a bit but with a little practice can be held reasonably straight…. As Andras mentioned above it’s best to drill both mating parts while the edges are still flat, Then round them after…. You may have to re-find the holes and clean them with the drill after rounding…..The last inch or so of the line can become the “needle “ by hardening with CA if you go that route… I’m sure a regular thin needle can be the drill and the pull tool too as Andras has demonstrated….. Easy to practice with some scrap balsa….. Let us know how it works out

rdw777- Diamond Member


Posts : 1470
Join date : 2021-03-11
Location : West Texas
Page 1 of 3 • 1, 2, 3 
 Similar topics
» Pluto Build Project
» Lil' Spee-Dee flight video
» Tigercat RC pylon racer build project
» Dick Russ' 1/2A Streaker, my build project
» New Project
» Lil' Spee-Dee flight video
» Tigercat RC pylon racer build project
» Dick Russ' 1/2A Streaker, my build project
» New Project
Page 1 of 3
Permissions in this forum:
You cannot reply to topics in this forum

 Rules
Rules


