Log in
Search
Latest topics
» Foam hand kids glider converted to 0.049 CLby roddie Today at 4:33 am
» Cox PT-19 Wing
by latole Today at 4:28 am
» Roddie-Rigger.. a 2005 original design
by roddie Today at 2:54 am
» Golden Bee basic running problem
by roddie Yesterday at 10:51 pm
» Simple Gliders
by rdw777 Yesterday at 6:25 pm
» Weird search for a single comic from an old Mad Magazine
by Kim Yesterday at 1:44 pm
» Scientific "Zipper" Build...Zipper Flys!.
by getback Yesterday at 7:27 am
» Cox .049 Tee Dee engines back in stock (limited availablility)
by GallopingGhostler Yesterday at 1:05 am
» Very off-topic.........Time passes and not always for the best......
by rsv1cox Thu Jul 25, 2024 2:47 pm
» Jim Walker Bonanza etc.
by rsv1cox Wed Jul 24, 2024 6:30 pm
» Throttles for Cox Tee Dee .049 / .020 / .010 engines --- videos
by sosam117 Wed Jul 24, 2024 8:54 am
» Introducing our Cox .049 TD Engines
by Admin Tue Jul 23, 2024 2:00 am
Cox Engine of The Month
July-2024
robot797's
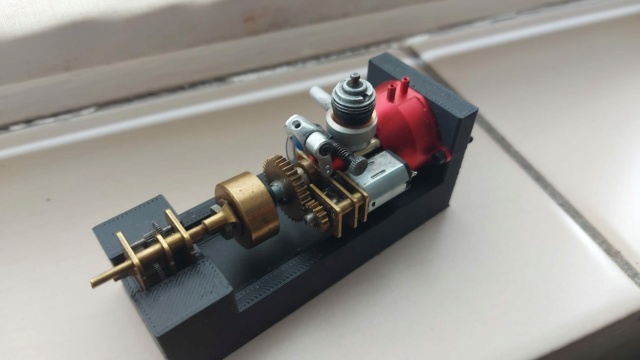
"ULTIMITE COX 010: it has a clutch, E starter, throttle, exhaust, aluminum tank, aluminum venturi, gearbox with forward and reverse, and now its on a custom drawn and printed stand"

PAST WINNERS
robot797's

"ULTIMITE COX 010: it has a clutch, E starter, throttle, exhaust, aluminum tank, aluminum venturi, gearbox with forward and reverse, and now its on a custom drawn and printed stand"

PAST WINNERS
Cox TD Run In / Break In Stick
Page 1 of 2
Page 1 of 2 • 1, 2 
 Cox TD Run In / Break In Stick
I needed to run in - break in 4 Cox 049 TDs just recently and cobbled this stick together rather than being stuck with a static test rig.
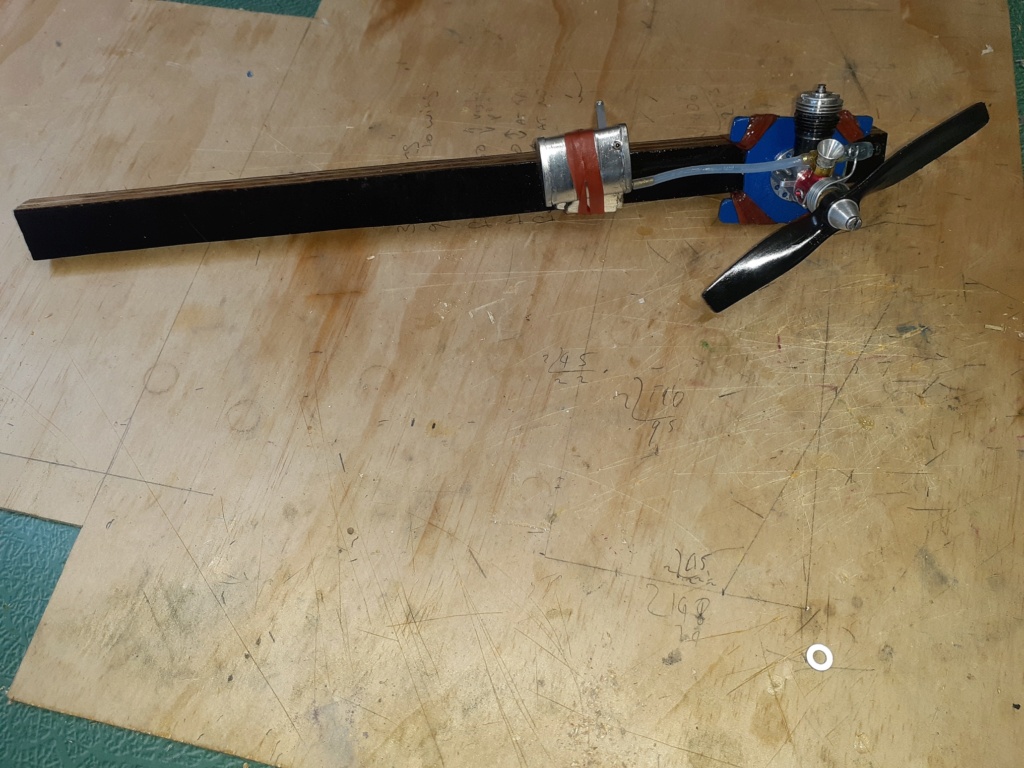
It has many advantages for me, in that I can take it wherever I want to take it so as that people dont complain about noise. Its very easy to put an engine on and off. Doesnt need a big bench or vice, and the main advantage of the stick is that when the engine is running I can very easily richen and lean the fuel to the engine by angling the stick to change the height of the tank in relation to the venturi / spray bar, as TDs are quite sensitive to this it seems, so it works very well for me.
Yes, I have seen the video of the dudes that Free Flight a stick like this
And for the observant you might notice the level of math I need to do a written calaculation for as I cant do it in my head
GaryB
'Yabby'

It has many advantages for me, in that I can take it wherever I want to take it so as that people dont complain about noise. Its very easy to put an engine on and off. Doesnt need a big bench or vice, and the main advantage of the stick is that when the engine is running I can very easily richen and lean the fuel to the engine by angling the stick to change the height of the tank in relation to the venturi / spray bar, as TDs are quite sensitive to this it seems, so it works very well for me.
Yes, I have seen the video of the dudes that Free Flight a stick like this

And for the observant you might notice the level of math I need to do a written calaculation for as I cant do it in my head

GaryB
'Yabby'

Yabby- Platinum Member


Posts : 711
Join date : 2021-06-08
Location : Yorke Peninsula South Australia
 Re: Cox TD Run In / Break In Stick
Very handy solution, Yabby..did you experience any vibration, or, the rubber band fixture held them firmly to the stick?

balogh- Top Poster


Posts : 4803
Join date : 2011-11-06
Age : 65
Location : Budapest Hungary
 Re: Cox TD Run In / Break In Stick
Hi Andras @balogh The rubber bands are solid. I used 4 rubber bands on the diagnal. They are very solid postal rubber bands about 7mm wide and quite strong so the engine is very solidly mounted on the stick. The tank vibrates a bit sometimes, but I just put my finger on it and it stops it vibrating. When it does vibrate though, it very clearly shows how it leans the fuel off. I could use another rubber band a bit tighter on the tank but a finger on it stops it vibrating, if it does.
GaryB
'Yabby'
GaryB
'Yabby'

Yabby- Platinum Member


Posts : 711
Join date : 2021-06-08
Location : Yorke Peninsula South Australia
 Re: Cox TD Run In / Break In Stick
Yes, I assume vibration leads to foaming of fuel so the engine may draw some air bubbles too.. A rubber balloon tank would prevent that, but mounting it to the stick would be difficult. Did you tach the engines? Any notable rpm difference between them? I saw you used a 6x3 COX prop? The screenless ventury on the photo talks about a pre 1972 item, the associated crankcase may also be an old stock, without the No 2 punched into the left mounting beam?
How is the Kamtechnik radial backplate mount working out? I also have one but have not used it...the prop torque is working on tightening the backplate threads, so no risk of the engine untightening it during operation..
The aftermarket starter spring on my engines allows maybe 1 full turn clockwise rotation before it butts out. What is your experience, is that enough for a quick engine start? Maybe I will also try and use it instead if an electric starter..
.

balogh- Top Poster


Posts : 4803
Join date : 2011-11-06
Age : 65
Location : Budapest Hungary
 Re: Cox TD Run In / Break In Stick
Hi Andras, yes this has shown me conclusively that vibration of the tank produces air bubbles in the fuel line, which has been good to see with my own eyes in a situation where I can put my finger on the tank and stop the vibration and see the instant difference. The prop is a Cox 5 x 3 that is the only size I run on them and find they work very well. I didnt tach it as I only have the Phone RPM app and I dont worry about that too much anyway. I had bought the crankcase as a complete CK from ExModelEngines and later Ive added a cylinder. Ive actually used a slitted cylinder as I had one and find there is little difference between slitted and SPI (there is a difference but its not an issue for me) (not looking for people to beat me up again  ).
).
I can hear revs and peak and the slightest waver in revs and stroke very very well. It is something I am fortunately good at as you do not survive racing Piston Ported 2 stroke GP Yamaha TZs unless you are very good at hearing engines and picking that one missed stroke before they seize. They seize pistons and cranks and seize instantly solidly usually when you back them off to brake. Seizing the back wheel solid at 150 mph sorts out those that can pick engine sounds and those that cant in time to pull the clutch They also seize when changing up a gear which is even worse when cranked over hard in very high speed sweeper corners.
The Kamtechnik backplates are excellent. I really like them. I also normally use a kamtechnik head once the engine is run in fully. I do mod the backplates though. Cox or Kamtechnik such that I have .30 of a mm clearance between the big end / crank pin and the backplate with the prop plate pushed fully back. I redo the prop plates for minimal clearance also. I have found this helps stop them bending crank pins when I stick an engine into the ground at absolute full revs and speed. ( Which I try not to make a habbit of but thats just me. Lol ) I know people will say that doing this increase the CK volume and supposedly reduces performance. If you run higher oil you will increase CK compression anyway. Im not racing these engines or competing, so I build them to work for me, doing what I need them to do for me.
I find the springs dont quite have the life I would like, but they are fine on a very good condition TD 049, that is started the correct way and they work very well. But they get loose tension after time and ive had some end up in the prop. So Im going to eventually change over to using a Half A starter as that is a better long term solution. I only use about 3/4 of a turn on the spring and sort of flick it when I start the engine. I find that a TD 049 in really good condition does start easy, even with fingers, but once that optimal condition goes, starting gets harder and needs a spring or half A starter. I really like the TD 049 a lot, but find they can at times be frustrating. I also find they start easier with a lower compression head, but the performance of the higher compression Kamtechnik head is better than the standard head. everything with a TD 049 is just needing to be that bit more correct all the time for them to work at their best and when they do they are awesome!!!! Thats why I use them and work at learning more about setting them up by trying things for myself.
Garyb
'Yabby'
 ).
). I can hear revs and peak and the slightest waver in revs and stroke very very well. It is something I am fortunately good at as you do not survive racing Piston Ported 2 stroke GP Yamaha TZs unless you are very good at hearing engines and picking that one missed stroke before they seize. They seize pistons and cranks and seize instantly solidly usually when you back them off to brake. Seizing the back wheel solid at 150 mph sorts out those that can pick engine sounds and those that cant in time to pull the clutch
 They also seize when changing up a gear which is even worse when cranked over hard in very high speed sweeper corners.
The Kamtechnik backplates are excellent. I really like them. I also normally use a kamtechnik head once the engine is run in fully. I do mod the backplates though. Cox or Kamtechnik such that I have .30 of a mm clearance between the big end / crank pin and the backplate with the prop plate pushed fully back. I redo the prop plates for minimal clearance also. I have found this helps stop them bending crank pins when I stick an engine into the ground at absolute full revs and speed. ( Which I try not to make a habbit of but thats just me. Lol ) I know people will say that doing this increase the CK volume and supposedly reduces performance. If you run higher oil you will increase CK compression anyway. Im not racing these engines or competing, so I build them to work for me, doing what I need them to do for me.
I find the springs dont quite have the life I would like, but they are fine on a very good condition TD 049, that is started the correct way and they work very well. But they get loose tension after time and ive had some end up in the prop. So Im going to eventually change over to using a Half A starter as that is a better long term solution. I only use about 3/4 of a turn on the spring and sort of flick it when I start the engine. I find that a TD 049 in really good condition does start easy, even with fingers, but once that optimal condition goes, starting gets harder and needs a spring or half A starter. I really like the TD 049 a lot, but find they can at times be frustrating. I also find they start easier with a lower compression head, but the performance of the higher compression Kamtechnik head is better than the standard head. everything with a TD 049 is just needing to be that bit more correct all the time for them to work at their best and when they do they are awesome!!!! Thats why I use them and work at learning more about setting them up by trying things for myself.
Garyb
'Yabby'

Yabby- Platinum Member


Posts : 711
Join date : 2021-06-08
Location : Yorke Peninsula South Australia
 Re: Cox TD Run In / Break In Stick
How do you modify the prop drive plate, Yabby, to prevent the pin from scratching the backplate? Do you push it further up the splined end of the crankshaft? Or add an extra thrust washer? Or, you remove some thin layer from the backplate instead?

balogh- Top Poster


Posts : 4803
Join date : 2011-11-06
Age : 65
Location : Budapest Hungary
 Re: Cox TD Run In / Break In Stick
I do all three. Pull it up further, extra washer and take some off of the engine backplate. I take the prop plate off and put two washers on and then pull the prop plate up well. You cannot pull it all the way anyhow as part of the CK bearing surface I think it is protrudes ever so slightly, so you cant over do it (and nor do you want to. it needs a bit of free play) . Then I get the backplate on a file and slowly do figure 8s on the file with the backplate and put it back in and measure with feeler gauge till im happy. If I had a lathe I would do it that way and take off .4 mm (I dont know how thick the wall of the backplate is as I dont have suitable measuring equipment). I have a vernier but it wont fit in the back plate to measure properly. anyway, feeler gausge is all thats needed to measure the clearance with the proop plate pushed back really hard. it starts off standard approx .12 mm which is roughly 10 though of an inch. The clearance standard is exactly the same for Kamtechnik radial mount and the Cox CK end cap/screw/plate thingo. So I understand they are both as intended and correct. Its just I like that bit more clearance because I cant keep my engines out of the ground and they are expensive and getting harder to replace.
GaryB
'Yabby'
GaryB
'Yabby'

Yabby- Platinum Member


Posts : 711
Join date : 2021-06-08
Location : Yorke Peninsula South Australia
 Re: Cox TD Run In / Break In Stick
You should try some foam between the tank and stick , on the CK pin clearence >> https://www.pegasusautoracing.com/productselection.asp?Product=3325 would work i guess 


getback- Top Poster


Posts : 10276
Join date : 2013-01-18
Age : 66
Location : julian , NC
 Re: Cox TD Run In / Break In Stick
Hi Eric, thanks  The plastic measuring stuff I have used before and a friend not on the forum but is a mechanic who flies models also suggested the same stuff. It is very good, but in this case a feeler gauge does the job quite nicely to measure between the end of the crank pin and the backplate as Im trying to widen the gap and not too woried about being exact. .3 mm is a gap ive chosen as being that I dont think anything can move or flex that far for the pin to hit the backplate.
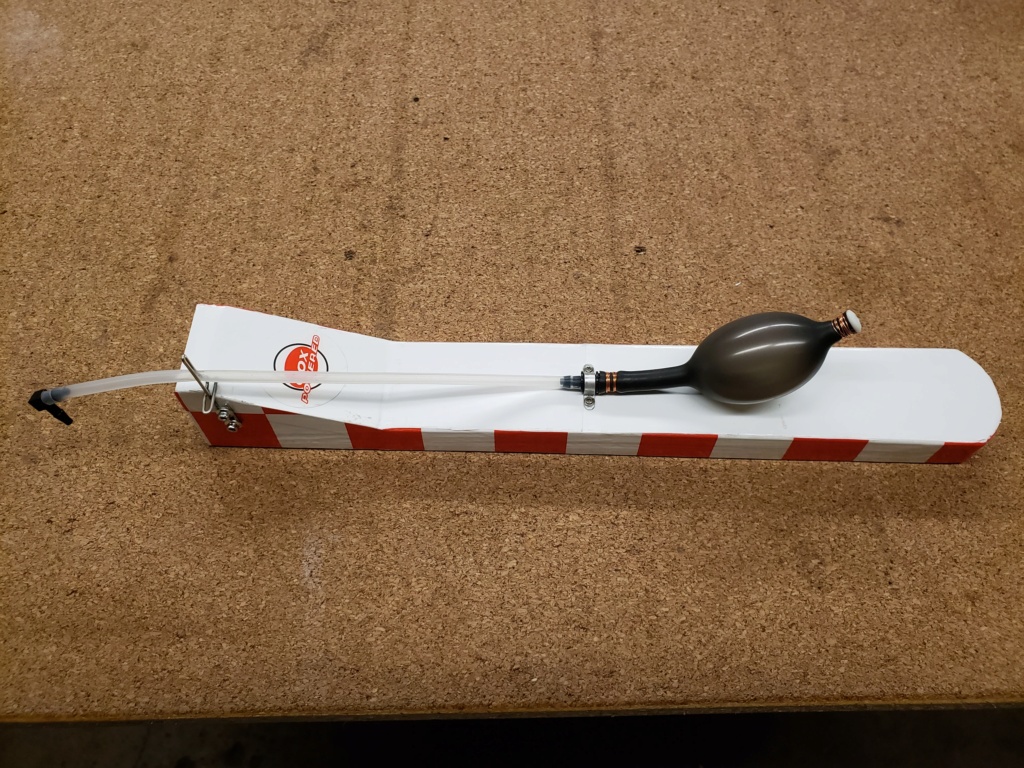
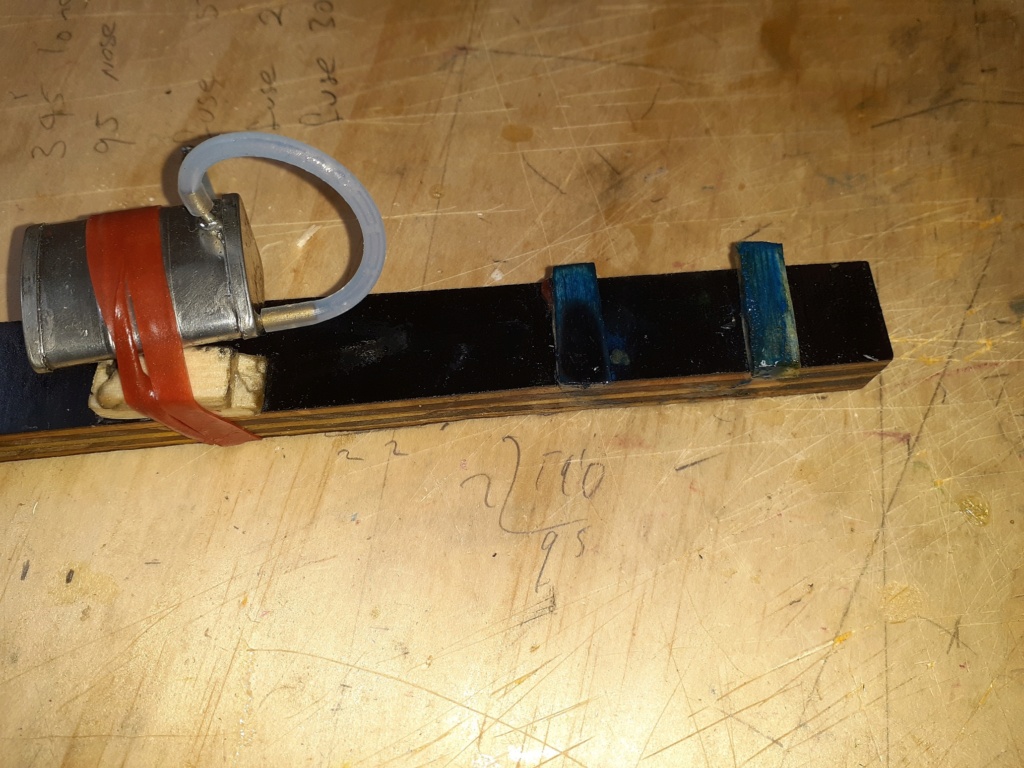
You are right with the tank. the picture below shows the stick without the engine and you can see Ive just used some bits of balsa glued to the stick that the engine mount presses up against via the rubber bands. I could do similar with the tank. But generally it doesnt vibrate when I sit it properly against the bit of balsa at the bottom of the tank and do the rubber bands up properly. It works quite well actually. Certainly does exactly what I wanted and isnt complicated.


GaryB
'Yabby'
 The plastic measuring stuff I have used before and a friend not on the forum but is a mechanic who flies models also suggested the same stuff. It is very good, but in this case a feeler gauge does the job quite nicely to measure between the end of the crank pin and the backplate as Im trying to widen the gap and not too woried about being exact. .3 mm is a gap ive chosen as being that I dont think anything can move or flex that far for the pin to hit the backplate.
You are right with the tank. the picture below shows the stick without the engine and you can see Ive just used some bits of balsa glued to the stick that the engine mount presses up against via the rubber bands. I could do similar with the tank. But generally it doesnt vibrate when I sit it properly against the bit of balsa at the bottom of the tank and do the rubber bands up properly. It works quite well actually. Certainly does exactly what I wanted and isnt complicated.


GaryB
'Yabby'

Yabby- Platinum Member


Posts : 711
Join date : 2021-06-08
Location : Yorke Peninsula South Australia
 Re: Cox TD Run In / Break In Stick
Picking up on Andras and Erics vibration comments. I used the same approach several years ago only with a Wen Mac engine and got so much vibration I abandoned the idea. Posted about it here. Glad that you are having better results.

rsv1cox- Top Poster


Posts : 10851
Join date : 2014-08-18
Location : West Virginia
 Re: Cox TD Run In / Break In Stick
 Check out all the vibrations with my stick mounted reedy.
 The stick lays across the end of a wooden plank with rubber bands looped under
the plank to both ends of the stick. The nylon fuel tank has no cushioning up against
the stick with a unsupported pipe at the stinger.


1/2A Nut- Top Poster

- Posts : 3464
Join date : 2013-10-20
Age : 60
Location : Brad in Texas
 Re: Cox TD Run In / Break In Stick
rsv1cox wrote:Picking up on Andras and Erics vibration comments. I used the same approach several years ago only with a Wen Mac engine and got so much vibration I abandoned the idea. Posted about it here. Glad that you are having better results.
Hi, Im not really having vibration problems at all. Andras asked if I was, and Im not having a problem other than about two runs where the tank had a broken rubber band and only one holding it on, so it wanted to rattle everywhere and try and head for the prop. So a finger on the tank stopped that. If I had vibration problems the stick would be useless. The main purpose is to run in engines and I like It as I can alter the height of the tank in respect to the NV/Ventui whilst it is running to richen and lean the run.
Works really well for me.
GaryB
'Yabby'

Yabby- Platinum Member


Posts : 711
Join date : 2021-06-08
Location : Yorke Peninsula South Australia
 Re: Cox TD Run In / Break In Stick
Hi Yabby,
Decades ago I was running my .049 Cox engines.
Mounted to a 4ft 2X2 clamped to a sawhorse.
Could not find a clean small tank, so tried a bladder that I had read about.
Thumb from a latex glove. Cardboard 'tube' to hold the bladder. ~2in of fuel line between the backplate reedy and bladder.
Fired it up and dialed it in. %15 nitro.
I unclamped the stick, started waving it around.
(think wielding a broad sword ! )
)
No matter what position the engine was in, it ran steady.
Including 'high-Gs' that any plane could not do.
Other than my Black Widows, I don't bother with hard tanks anymore.
Not trying to sell anything,
Just saying what works for me...
Take care,
Have fun,
Dave
Decades ago I was running my .049 Cox engines.
Mounted to a 4ft 2X2 clamped to a sawhorse.
Could not find a clean small tank, so tried a bladder that I had read about.
Thumb from a latex glove. Cardboard 'tube' to hold the bladder. ~2in of fuel line between the backplate reedy and bladder.
Fired it up and dialed it in. %15 nitro.
I unclamped the stick, started waving it around.
(think wielding a broad sword !
No matter what position the engine was in, it ran steady.
Including 'high-Gs' that any plane could not do.
Other than my Black Widows, I don't bother with hard tanks anymore.
Not trying to sell anything,
Just saying what works for me...
Take care,
Have fun,
Dave

HalfaDave- Platinum Member

- Posts : 608
Join date : 2022-12-06
Location : Oakville, Ontario
 Re: Cox TD Run In / Break In Stick
Yabby wrote:rsv1cox wrote:Picking up on Andras and Erics vibration comments. I used the same approach several years ago only with a Wen Mac engine and got so much vibration I abandoned the idea. Posted about it here. Glad that you are having better results.
Hi, Im not really having vibration problems at all. Andras asked if I was, and Im not having a problem other than about two runs where the tank had a broken rubber band and only one holding it on, so it wanted to rattle everywhere and try and head for the prop. So a finger on the tank stopped that. If I had vibration problems the stick would be useless. The main purpose is to run in engines and I like It as I can alter the height of the tank in respect to the NV/Ventui whilst it is running to richen and lean the run.
Works really well for me.

GaryB
'Yabby'
Good to hear Yabby.
I had mine mounted on a 1X2 about 10 inches long and mounted it tightly in a vice. When I started it radial mounted it vibrated so bad I had to shut it down. One of those combo beam/radial mount things. Remounted it beam and it was fine.

rsv1cox- Top Poster


Posts : 10851
Join date : 2014-08-18
Location : West Virginia
 Re: Cox TD Run In / Break In Stick
rsv1cox wrote:Yabby wrote:rsv1cox wrote:Picking up on Andras and Erics vibration comments. I used the same approach several years ago only with a Wen Mac engine and got so much vibration I abandoned the idea. Posted about it here. Glad that you are having better results.
Hi, Im not really having vibration problems at all. Andras asked if I was, and Im not having a problem other than about two runs where the tank had a broken rubber band and only one holding it on, so it wanted to rattle everywhere and try and head for the prop. So a finger on the tank stopped that. If I had vibration problems the stick would be useless. The main purpose is to run in engines and I like It as I can alter the height of the tank in respect to the NV/Ventui whilst it is running to richen and lean the run.
Works really well for me.

GaryB
'Yabby'
Good to hear Yabby.
I had mine mounted on a 1X2 about 10 inches long and mounted it tightly in a vice. When I started it radial mounted it vibrated so bad I had to shut it down. One of those combo beam/radial mount things. Remounted it beam and it was fine.
Hey Bob, I think the difference with the stick I used is the radial mount is to a piece of ply and the piece of ply presses up against two blocks of balsa glued to the stick. Rubber bands pull the engine mount back very very tight, but the system is able to absorb vibration due to the balsa and rubber bands mounting the engine. like car engine mounts with the rubber blocks in them. Might be wrong but I think that is where the vibration is soaked up.
GaryB
'Yabby'

Yabby- Platinum Member


Posts : 711
Join date : 2021-06-08
Location : Yorke Peninsula South Australia
 Re: Cox TD Run In / Break In Stick
Hi Dave @HalfaDave , I am yet to get into the bladders. Im sure I will eventually, at least try them. The ability to richen and lean the run by changing the tank position relative to the engine for running an engine in is very useful to me, so in this case a hard tank suits better for me. But in general, yes, bladdder is probably the way to go, other than having to assemble and muck with them every time I go flying. I think thats what puts me off. The hard tanks work fine for me in flight and they are always just there. Nothing to be done. I try to cut down on things I need to do to launch and fly a CL plane. Thats one appeal of RC. No lines to look after. 
GaryB
'Yabby'
GaryB
'Yabby'

Yabby- Platinum Member


Posts : 711
Join date : 2021-06-08
Location : Yorke Peninsula South Australia
 Re: Cox TD Run In / Break In Stick
Yabby wrote:I do all three. Pull it up further, extra washer and take some off of the engine backplate. I take the prop plate off and put two washers on and then pull the prop plate up well. You cannot pull it all the way anyhow as part of the CK bearing surface I think it is protrudes ever so slightly, so you cant over do it (and nor do you want to. it needs a bit of free play) . Then I get the backplate on a file and slowly do figure 8s on the file with the backplate and put it back in and measure with feeler gauge till im happy. If I had a lathe I would do it that way and take off .4 mm (I dont know how thick the wall of the backplate is as I dont have suitable measuring equipment). I have a vernier but it wont fit in the back plate to measure properly. anyway, feeler gausge is all thats needed to measure the clearance with the proop plate pushed back really hard. it starts off standard approx .12 mm which is roughly 10 though of an inch. The clearance standard is exactly the same for Kamtechnik radial mount and the Cox CK end cap/screw/plate thingo. So I understand they are both as intended and correct. Its just I like that bit more clearance because I cant keep my engines out of the ground and they are expensive and getting harder to replace.
GaryB
'Yabby'
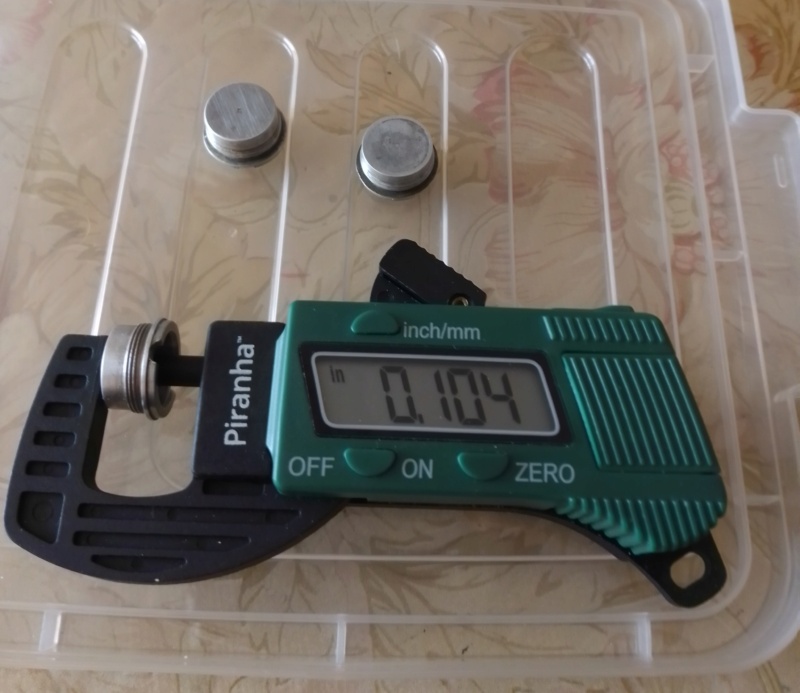
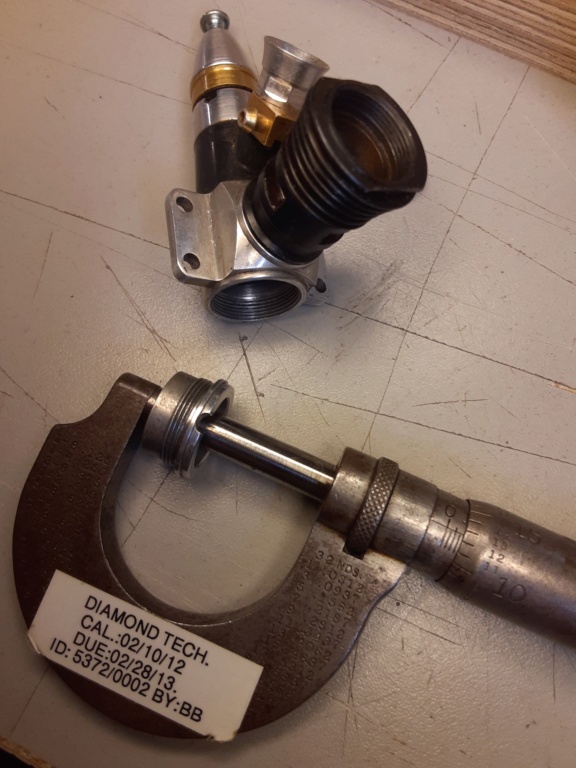
Hi Gary, I got curious about the backplate "web" thickness and decided to check X2 of my engines; a Tee Dee .049 and a Tee Dee .051 using my 0-1" micrometer to find that there was quite a difference between the two. Neither one showed any wear marks on their inside faces. Both had a tiny raised "nub" in the center from machining, which I removed with a couple strokes of 600 grit paper in order to get an accurate reading.
This .049 measures .0875"
This .051 measures .1075"
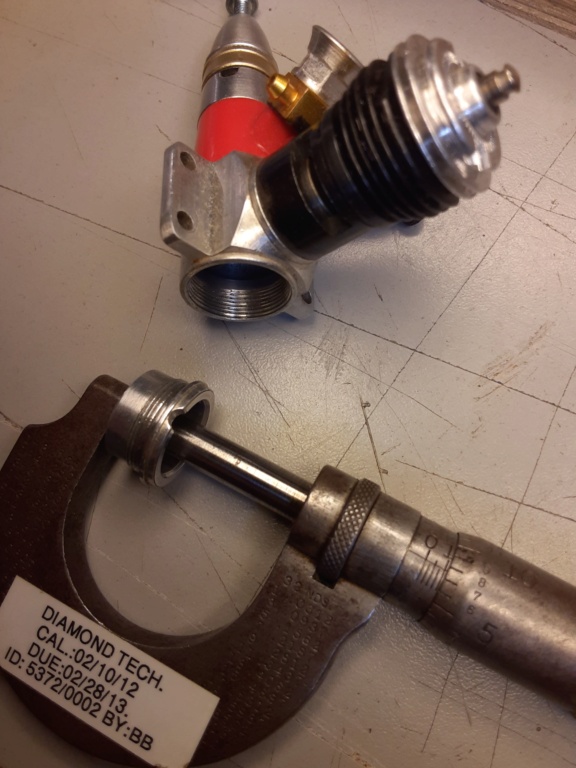
I would have thought they'd be MUCH closer than .02" That's a difference of .51mm

 Re: Cox TD Run In / Break In Stick
Roddie I think the thickness of the backplate is indifferent, but it is the distance between the backplate inner face and the bottom face of the outside flange that seals when fully screwed in, what matters. This distance determines the internal depth of the crankcase in which the shaft may have some axial play without the pin touching the backplate.

balogh- Top Poster


Posts : 4803
Join date : 2011-11-06
Age : 65
Location : Budapest Hungary
 Re: Cox TD Run In / Break In Stick
Hi Andras @balogh and Roddie @roddie I think you are both right, but maybe answering slightly different questions of which both I did ask or comment on. Diagram below may help.
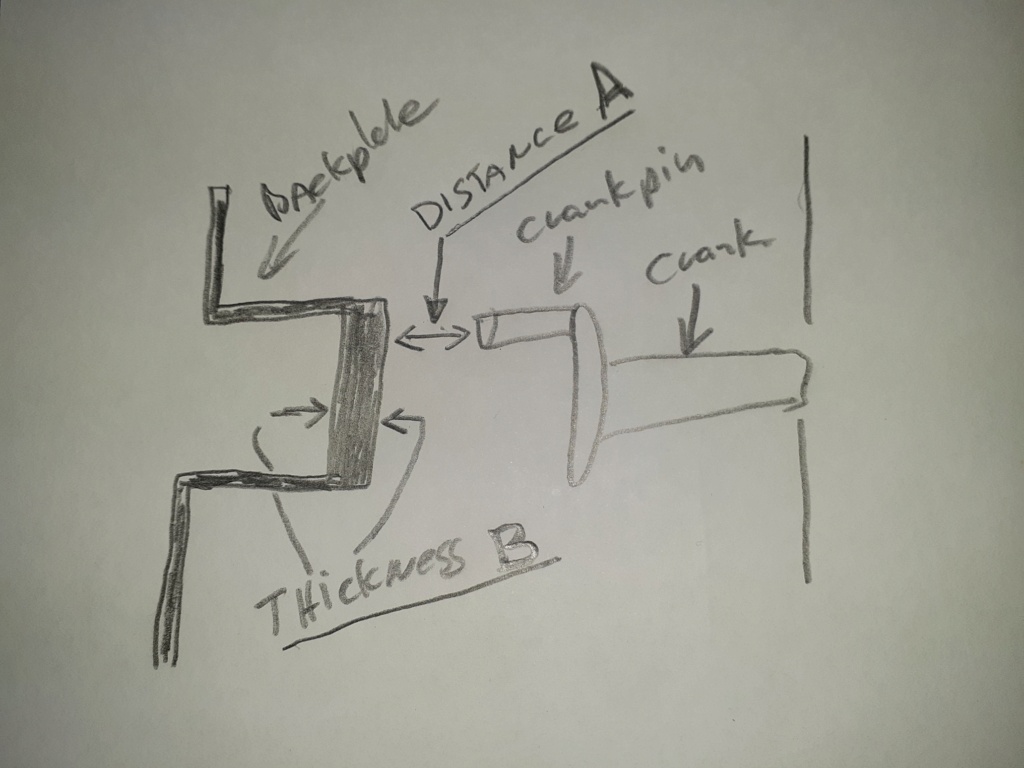
As shown in the image, my primary concern is the Distance A, as that is the distance I need to increase to help prevent the crank pin striking the back plate and bending the crank or crank pin when the engine is in a very hard crash straight into the ground at high revs. To increase Distance A, I reduced Thickness B on the face that is towards the crank pin, and I questioned as to how thick the backplate was where thickness B is, as to how much might I be able to remove from the face towards the crank pin. I dont have a tool that can measure thickness B front to back and that is what Roddie was answering. Using feeler gauges before I start I know the gap between the pin and the backplate and i know how ever much I increase the gap by, is the amount I am taking off of the plate. I had wondered in general how much I had to play with. Hence Roddies post I believe.
As it turns out I have quite a lot to play with as I am removing approx .3 of a mm from the back plate and I think that is quite safe. I also believe it is likely enough to save the pin from striking the backplate. I have measured the gap with the crank pushed back as hard as I can.
I have had bent three (3) cranks over time and each engine backfired and misfired when trying to start it after the crash that bent the crank or pin which is what led me to believe the pin was bent. Each engine had a significant dent in the backplate from the crank striking the plate. Each engine ran perfectly when the crank was replaced with a new crank, so it wasnt a bent conrod or the problem would not have gone away by replacing the crankshaft.
There is no noticeable difference in engine performance after doing this. I have crashed an engine very hard with the changed backplate and the pin didnt bend, but it did still just scuff the backplate. Hence if I had a lathe I would take .5mm off the face of the backplate. I have looked at shimming the backplate out that distrance but dont have any shimms that fit, so removing some thickness from the backplate works best for me at the moment.
Maybe I was just unlucky with the three (3) that bent, but now I prefer to help my luck by modding the backplate, as unfortunately I will crash more times in the future as will my Lad, and we use TD 049 engines predominantly as they perform so solidly and strongly and allow flying on much longer lines which makes it easier to do stunts/manauveres with the extra sky you get.
GaryB
'Yabby'

Yabby- Platinum Member


Posts : 711
Join date : 2021-06-08
Location : Yorke Peninsula South Australia
 Re: Cox TD Run In / Break In Stick
Nice with a balloon setup 
GaryB
'Yabby'

GaryB
'Yabby'

Yabby- Platinum Member


Posts : 711
Join date : 2021-06-08
Location : Yorke Peninsula South Australia

Levent Suberk- Diamond Member

- Posts : 2228
Join date : 2017-12-24
Location : Türkiye

Levent Suberk- Diamond Member

- Posts : 2228
Join date : 2017-12-24
Location : Türkiye
 Re: Cox TD Run In / Break In Stick
Thanks heaps for the extra data Levent 
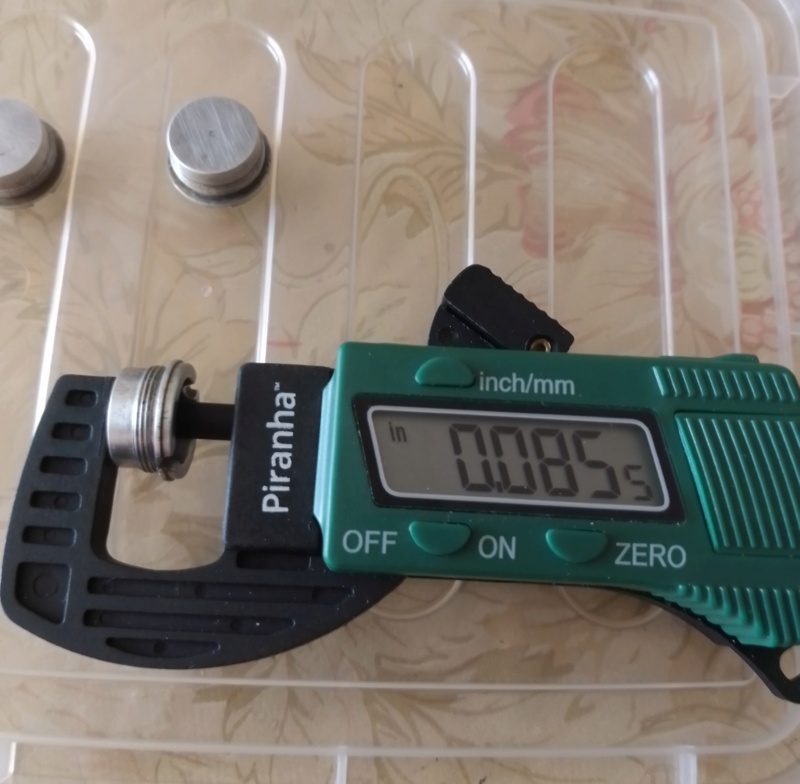
 It starting to look like .08 is around the minimum thickness and .1 around the max. I think I will buy myself a micrometer or vernier - electronic one. there have been other times when it would have been handy to be able to measure things. A vernier and or micrometer are really a basic required tool if going to do mods to things myself.
Thank you for taking the measurements and posting them its a big help.
GaryB
'Yabby'
Thank you for taking the measurements and posting them its a big help.

GaryB
'Yabby'
Last edited by Yabby on Fri Feb 10, 2023 6:13 am; edited 1 time in total (Reason for editing : correct spelling of name)

Yabby- Platinum Member


Posts : 711
Join date : 2021-06-08
Location : Yorke Peninsula South Australia
 Re: Cox TD Run In / Break In Stick
roddie wrote:
Hi Gary, I got curious about the backplate "web" thickness and decided to check X2 of my engines; a Tee Dee .049 and a Tee Dee .051 using my 0-1" micrometer to find that there was quite a difference between the two. Neither one showed any wear marks on their inside faces. Both had a tiny raised "nub" in the center from machining, which I removed with a couple strokes of 600 grit paper in order to get an accurate reading.
This .049 measures .0875"
This .051 measures .1075"
I would have thought they'd be MUCH closer than .02" That's a difference of .51mm
Yes, I agree Roddie
 , thats more difference than I would have expected in an engine that is supposed to have tight specs. Levent @Levent Suberk measured some plates and found similar differences. I wonder if the really early TDs have the same variation in machining tolerance. Andras @balogh often says he believes the machining tolerances on the older TDs are tighter. Mind you I must say none of this has caused a power/performance problem for me with the TDs I own which are mostly made/assembled by myself from parts. They all run really hard and serve me very well in my modelling and CL flying! I am really hopeful Bernie is able to get new ones being produced. I own plenty, but some of the parts would be very helpful to me and I would like to see the TD continue as a truly available engine. They are unique! And Half A is the thing I really enjoy above all other CL sizes.
GaryB
'Yabby'

Yabby- Platinum Member


Posts : 711
Join date : 2021-06-08
Location : Yorke Peninsula South Australia
Page 1 of 2 • 1, 2 
 Similar topics
» .049 break in
» TeeDee .049 Break In Procedures
» 4-2-4 break in small stuff?
» First Run/Break-In of my P.A.W. Diesel .06 RC !
» Cox Conquest
» TeeDee .049 Break In Procedures
» 4-2-4 break in small stuff?
» First Run/Break-In of my P.A.W. Diesel .06 RC !
» Cox Conquest
Page 1 of 2
Permissions in this forum:
You cannot reply to topics in this forum

 Rules
Rules


