Log in
Search
Latest topics
» Foam hand kids glider converted to 0.049 CLby roddie Today at 4:33 am
» Cox PT-19 Wing
by latole Today at 4:28 am
» Roddie-Rigger.. a 2005 original design
by roddie Today at 2:54 am
» Golden Bee basic running problem
by roddie Yesterday at 10:51 pm
» Simple Gliders
by rdw777 Yesterday at 6:25 pm
» Weird search for a single comic from an old Mad Magazine
by Kim Yesterday at 1:44 pm
» Scientific "Zipper" Build...Zipper Flys!.
by getback Yesterday at 7:27 am
» Cox .049 Tee Dee engines back in stock (limited availablility)
by GallopingGhostler Yesterday at 1:05 am
» Very off-topic.........Time passes and not always for the best......
by rsv1cox Thu Jul 25, 2024 2:47 pm
» Jim Walker Bonanza etc.
by rsv1cox Wed Jul 24, 2024 6:30 pm
» Throttles for Cox Tee Dee .049 / .020 / .010 engines --- videos
by sosam117 Wed Jul 24, 2024 8:54 am
» Introducing our Cox .049 TD Engines
by Admin Tue Jul 23, 2024 2:00 am
Cox Engine of The Month
July-2024
robot797's
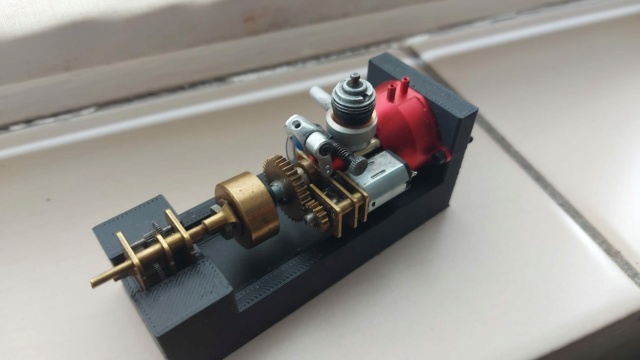
"ULTIMITE COX 010: it has a clutch, E starter, throttle, exhaust, aluminum tank, aluminum venturi, gearbox with forward and reverse, and now its on a custom drawn and printed stand"

PAST WINNERS
robot797's

"ULTIMITE COX 010: it has a clutch, E starter, throttle, exhaust, aluminum tank, aluminum venturi, gearbox with forward and reverse, and now its on a custom drawn and printed stand"

PAST WINNERS
3D Printing
Page 1 of 4
Page 1 of 4 • 1, 2, 3, 4 
 3D Printing
I have been looking at 3D printers for some time and they always seemed to be very expensive. Especially "shop bought" or pre assembled jobs.
Why? There are quite a few custom parts that can be made - servo holders, bell cranks, engine mounts ............(more ideas welcome).
Some only use PLA - this seems to be a delicate plastic while quite a few can handle ABS (higher temperature to melt, heated bed required).
After many seconds of research there appeared to be a few problems selecting a printer - apart from cost!
A lot of the pre contructed printers have parts that are not easily available making repairs and maintenance a trifle expensive and modifications (different sized printing head) not possible.
So I perused the various forums (none a patch on this one - creep, crawl!) and realised that you can easily build your own for a fraction of the cost.
Chicken and egg - the self build machines use brackets made by 3D printing. These can be found though - there are many entrepenurial 3D enthusiasts around.
The frames are simple threaded rods and the sliding parts mounted on smooth aluminium rods.
Stepper motors, wiring, control boards are all easily found from a multitude of sources on the interweb and fleabay.
There are many, many build manuals on the interweb - they have material checklistss and are very detailed.
http://garyhodgson.com/reprap/prusa-mendel-visual-instructions/
However, there are many different variations of mounting brackets.
Afeter a few more seconds thinking about it - I decided to build the Prusa Mendel Iteration 2.
Why? It looks easy and is better than Iteration 1. There is an Iteration 3 but it doesn't have the "skeletal" look of the previous versions.
Also, I watched a derogatory U tube video with some chap criticising it and I decided that I didn't like him.
https://www.youtube.com/watch?v=IQuUqd9ldUU
This "printer" is not perfect but as an introduction and buildable for well under £200 ($300) - I made another of my milli second impulse decisions and decided to source parts and give it a whirl. There are also numerous hints, tips and improvements on U tube and enthusiasts web sites.
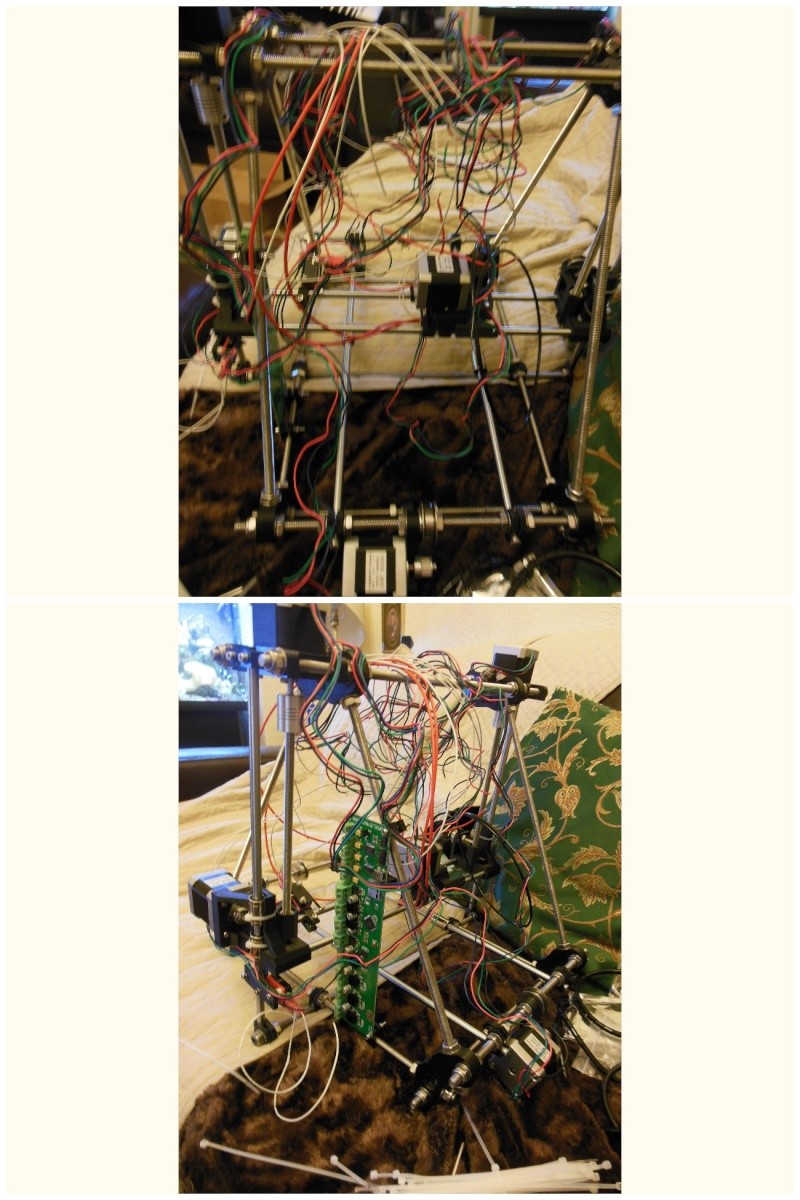
All my parts arrived and I started building yesterday. The mechanical and framework is 90% complete and I now am ready to embark on the electrickery.

If anyone is interested - I will update the post. It is likely to be slow though (I have spent 4 hours on it so far) as I have just had both eyes operated on. Day after returning from Chicago - holes laser drilled!!!!!!
Why? There are quite a few custom parts that can be made - servo holders, bell cranks, engine mounts ............(more ideas welcome).
Some only use PLA - this seems to be a delicate plastic while quite a few can handle ABS (higher temperature to melt, heated bed required).
After many seconds of research there appeared to be a few problems selecting a printer - apart from cost!
A lot of the pre contructed printers have parts that are not easily available making repairs and maintenance a trifle expensive and modifications (different sized printing head) not possible.
So I perused the various forums (none a patch on this one - creep, crawl!) and realised that you can easily build your own for a fraction of the cost.
Chicken and egg - the self build machines use brackets made by 3D printing. These can be found though - there are many entrepenurial 3D enthusiasts around.
The frames are simple threaded rods and the sliding parts mounted on smooth aluminium rods.
Stepper motors, wiring, control boards are all easily found from a multitude of sources on the interweb and fleabay.
There are many, many build manuals on the interweb - they have material checklistss and are very detailed.
http://garyhodgson.com/reprap/prusa-mendel-visual-instructions/
However, there are many different variations of mounting brackets.
Afeter a few more seconds thinking about it - I decided to build the Prusa Mendel Iteration 2.
Why? It looks easy and is better than Iteration 1. There is an Iteration 3 but it doesn't have the "skeletal" look of the previous versions.
Also, I watched a derogatory U tube video with some chap criticising it and I decided that I didn't like him.
https://www.youtube.com/watch?v=IQuUqd9ldUU
This "printer" is not perfect but as an introduction and buildable for well under £200 ($300) - I made another of my milli second impulse decisions and decided to source parts and give it a whirl. There are also numerous hints, tips and improvements on U tube and enthusiasts web sites.
All my parts arrived and I started building yesterday. The mechanical and framework is 90% complete and I now am ready to embark on the electrickery.

If anyone is interested - I will update the post. It is likely to be slow though (I have spent 4 hours on it so far) as I have just had both eyes operated on. Day after returning from Chicago - holes laser drilled!!!!!!

ian1954- Diamond Member

- Posts : 2688
Join date : 2011-11-16
Age : 69
Location : England
 Re: 3D Printing
I too looked long and hard at the 3D printers that are made of rods and printed parts.
I decided on a sturdier design. Although the cost was greater I feel the added rigidity of the frame will yield better prints.
http://store.makerstoolworks.com/printer-kits/mendelmax-2-0-standard-kit/
There will be lots of tweaking to get things right and I am still printing upgrades and tweaking after 3 months.

Jason_WI- Top Poster


Posts : 3123
Join date : 2011-10-09
Age : 49
Location : Neenah, WI
 Re: 3D Printing
That looks like a very tidy printer. Do you know what controller board it uses and what software are you running?

ian1954- Diamond Member

- Posts : 2688
Join date : 2011-11-16
Age : 69
Location : England

ian1954- Diamond Member

- Posts : 2688
Join date : 2011-11-16
Age : 69
Location : England
 Re: 3D Printing
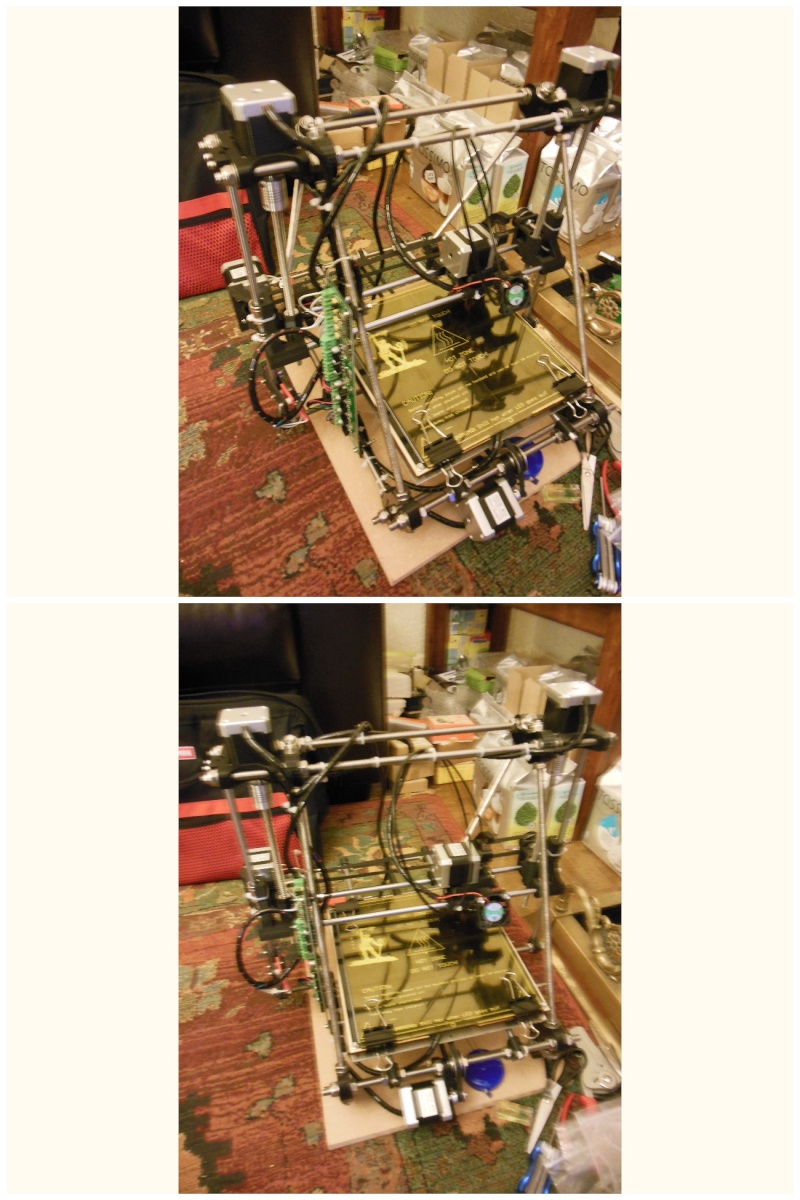
A little tidier!


ian1954- Diamond Member

- Posts : 2688
Join date : 2011-11-16
Age : 69
Location : England
 Re: 3D Printing
It has a rambo controller board in it along with a GLCD kit in it. I use Ponterface and Slic3r for the software. With the GLCD kit I can run the printer standalone with the SD card interface in it.
Looks to be coming along nicely. The wiring is one of the most difficult things to keep tidy and still be able to work on the machine.
Looks to be coming along nicely. The wiring is one of the most difficult things to keep tidy and still be able to work on the machine.

Jason_WI- Top Poster


Posts : 3123
Join date : 2011-10-09
Age : 49
Location : Neenah, WI
 Re: 3D Printing
I have finished the build now. The controller board is a Melzi.
I have downloaded Pronterface and Repetier (along with the driver software) and once I have fine tuned the printer, I will try both.
The Rambo board is more feature packed than the Melzi but, if this follows my CNC builds, I will be chopping and changing.
Thanks for the info Jason
I have downloaded Pronterface and Repetier (along with the driver software) and once I have fine tuned the printer, I will try both.
The Rambo board is more feature packed than the Melzi but, if this follows my CNC builds, I will be chopping and changing.
Thanks for the info Jason

ian1954- Diamond Member

- Posts : 2688
Join date : 2011-11-16
Age : 69
Location : England
 Re: 3D Printing
I jumped straight in - after the build was completed, it took a long time to set this up ready to print. It still needs a lot of fine tuning and adjustments both to the hardware and the firmware but ............ one step at a time.

Not the best finish in the world - but a start

After cleaning up
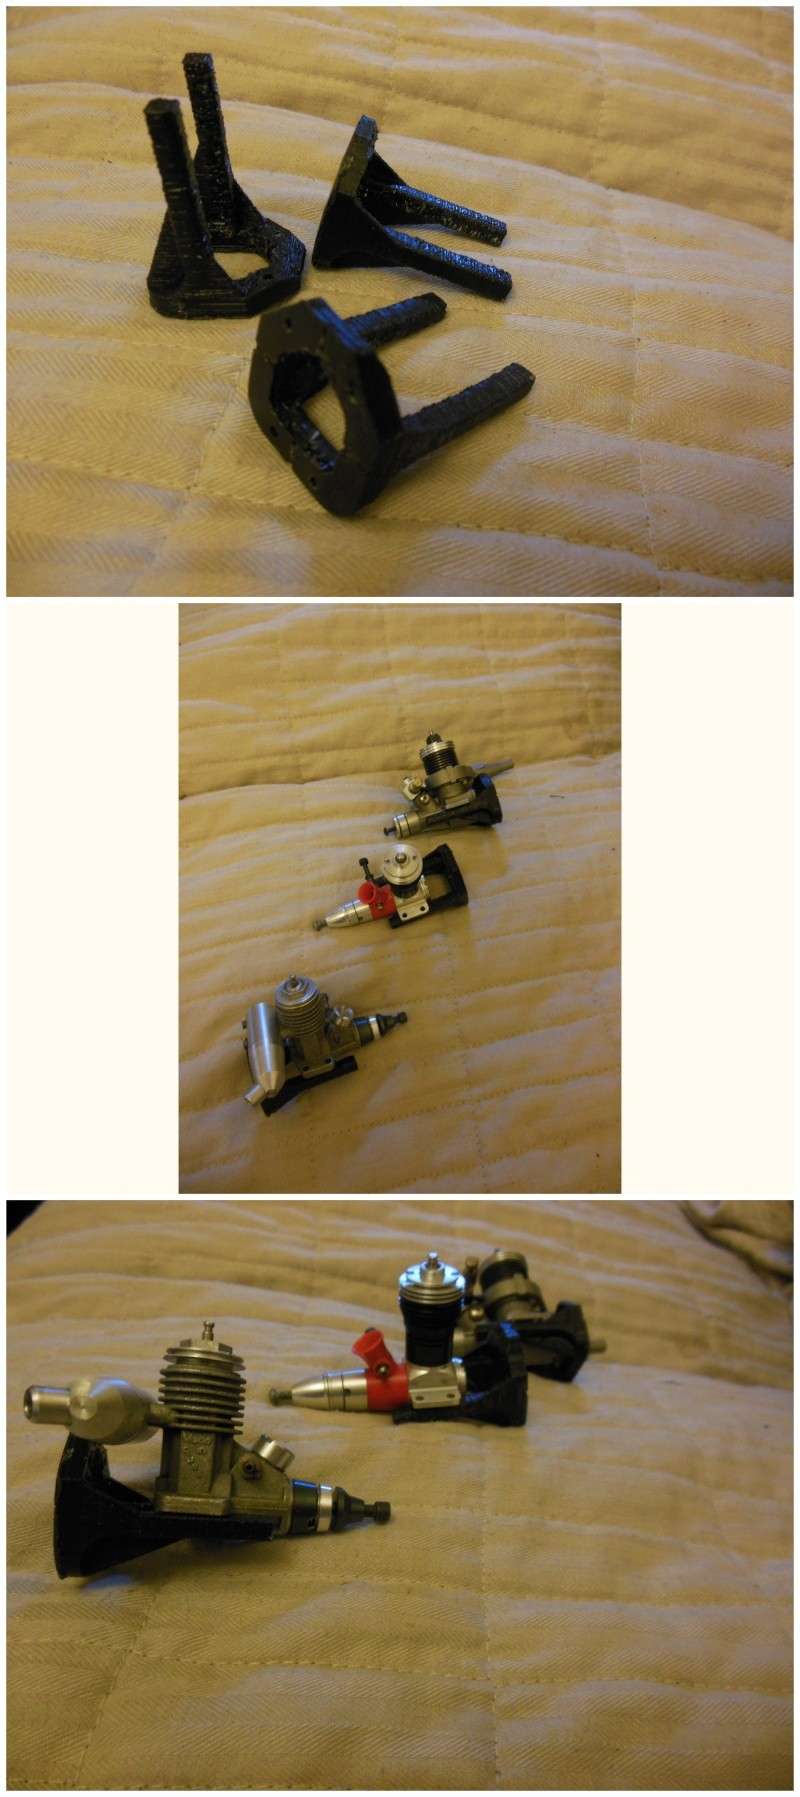

Not the best finish in the world - but a start

After cleaning up


ian1954- Diamond Member

- Posts : 2688
Join date : 2011-11-16
Age : 69
Location : England
 Re: 3D Printing
What material are you using?
It might be stronger to do the layering in the other direction...some testing might be in order.
Phil
It might be stronger to do the layering in the other direction...some testing might be in order.
Phil

pkrankow- Top Poster

- Posts : 3025
Join date : 2012-10-02
Location : Ohio
 Re: 3D Printing
It is ABS plastic. The mounts are also very strong - I cannot snap them. Don't be fooled by the "ridges" they aren't like the grain in wood. The plastic is all melted together.pkrankow wrote:What material are you using?
It might be stronger to do the layering in the other direction...some testing might be in order.
Phil
The ridges are a product of using too large a diameter melt (0.5mm) on a small area with sharp turns and too thick a layering.
There are a lot of adjustments to do. It is like piping icing decoration on a cake. It is not possible the form a sharp corner easily. The smaller the print the harder it is.
I sawed through one of the bearers and it was solid. I couldn't cut it with a knife.
They would all look better if produced with a smaller nozzle and a thinner layer.
I have made a few as test pieces and am going to machine them. Some "smooth" them out using acetone.
It would also be difficult to build the bearers any other way. The plastic is molten when being laid - if not supported the arms would end up as a pile of goo on the table.
You also need quite a large area for the part to remain "stck" to the table and not move.
Ian

ian1954- Diamond Member

- Posts : 2688
Join date : 2011-11-16
Age : 69
Location : England
 Re: 3D Printing
Looking good. ABS is the most difficult to learn with. I had issues with my ABS filament as it had water in it. ABS will absorb water out of the air. I had to bake mine in the oven for 8 hours on the lowest oven setting to bake the moisture out of it. I was getting steam pockets and plastic bubbles.
What temperature where you running at? I run ABS at 230 to 235C. The hot plate I have set to 100C. PLA at 180C with the plate at 80C. I print on Kapton but there is ABS glue that can be used to prig right on the glass. I haven't tried that yet.
PLA is a lot easier to work with but it's not rated for outdoor stuff.

Jason_WI- Top Poster


Posts : 3123
Join date : 2011-10-09
Age : 49
Location : Neenah, WI
 Re: 3D Printing
I have the bed set at 110c and the first layers at 235c, the rest at 230c. No fan for the first few layers.Jason_WI wrote:Looking good. ABS is the most difficult to learn with. I had issues with my ABS filament as it had water in it. ABS will absorb water out of the air. I had to bake mine in the oven for 8 hours on the lowest oven setting to bake the moisture out of it. I was getting steam pockets and plastic bubbles.
What temperature where you running at? I run ABS at 230 to 235C. The hot plate I have set to 100C. PLA at 180C with the plate at 80C. I print on Kapton but there is ABS glue that can be used to prig right on the glass. I haven't tried that yet.
PLA is a lot easier to work with but it's not rated for outdoor stuff.
Kapton tape and I was advised to use ABS slurry - ABS dissolve in acetone. I am currently dissolving ABS scrap in acetone to make this.
However, "hairspray" was also recommended and so when the SWTSMB isn't looking I "borrow" the aerosol for a quick squirt. It works a treat and she hasn't noticed the smell yet! Just thinks melting ABS smells nice.
I use the hairspray on Kapton tape and will do the same with the slurry.

ian1954- Diamond Member

- Posts : 2688
Join date : 2011-11-16
Age : 69
Location : England
 Re: 3D Printing
Where did you find the .stl files for the engine mounts?

Jason_WI- Top Poster


Posts : 3123
Join date : 2011-10-09
Age : 49
Location : Neenah, WI
 Re: 3D Printing
Printing some of Ian's creations.

A new crankcase that has mounting lugs.


A new crankcase that has mounting lugs.


Jason_WI- Top Poster


Posts : 3123
Join date : 2011-10-09
Age : 49
Location : Neenah, WI
 Re: 3D Printing
The engine mounts that Jason produced are much crisper than mine. I need to spend more time on my printer setup and practice.
The crankcase is a mighty fine effort - the ones I produced (I didn't post any pictures) looked saggy. Still, I was pleased for first efforts.
Jason's are very neat.
I will be working on a few more designs - but for now, here is the Cox hybrid progress. It is a cross between an Enya and a Keil crankcase modded for Cox components.

For "prototyping" the 3D printer is a marvel. A physical 3D object like the crankcase Jason produced makes visualisation of a build much easier than a diagram or picture. They can even be used to produce moulds for castings.
Thank you Jason for posting your prints. It is a spur for me to improve mine.
The crankcase is a mighty fine effort - the ones I produced (I didn't post any pictures) looked saggy. Still, I was pleased for first efforts.
Jason's are very neat.
I will be working on a few more designs - but for now, here is the Cox hybrid progress. It is a cross between an Enya and a Keil crankcase modded for Cox components.

For "prototyping" the 3D printer is a marvel. A physical 3D object like the crankcase Jason produced makes visualisation of a build much easier than a diagram or picture. They can even be used to produce moulds for castings.
Thank you Jason for posting your prints. It is a spur for me to improve mine.

ian1954- Diamond Member

- Posts : 2688
Join date : 2011-11-16
Age : 69
Location : England
 Re: 3D Printing
great job Ian , out of my league for sure ! are you and Jason I think it was going to hook su up with some plastic engines that are quieter . LOL 
 nice job Eric

 nice job Eric
getback- Top Poster


Posts : 10276
Join date : 2013-01-18
Age : 66
Location : julian , NC
 Re: 3D Printing
I designed another part/piece of equipment to print - I am not saying what it is until it is finished!
On the printer
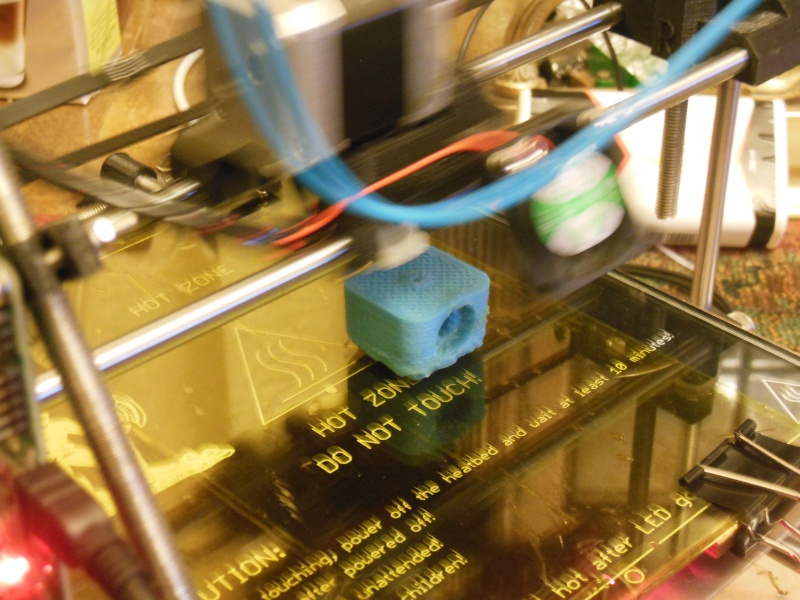
Printing finished


Now for a bit more work!
..............to be continued...........
On the printer

Printing finished


Now for a bit more work!
..............to be continued...........

ian1954- Diamond Member

- Posts : 2688
Join date : 2011-11-16
Age : 69
Location : England
 Re: 3D Printing
Prints are looking alot better. Is this PLA or ABS?

Jason_WI- Top Poster


Posts : 3123
Join date : 2011-10-09
Age : 49
Location : Neenah, WI
 Re: 3D Printing
This is ABS. I am going to have to print it again though.Jason_WI wrote:Prints are looking alot better. Is this PLA or ABS?
I decided that I wanted to smooth it. Read about using acetone --- dipped it ......... not a good result!
will post pictures tonight.

ian1954- Diamond Member

- Posts : 2688
Join date : 2011-11-16
Age : 69
Location : England
 Re: 3D Printing
How not to smooth an ABS print - I dipped the part in acetone. I was really pleased it went smooth and shiny --- then as it dried the newly formed skin bubbled and blistered!
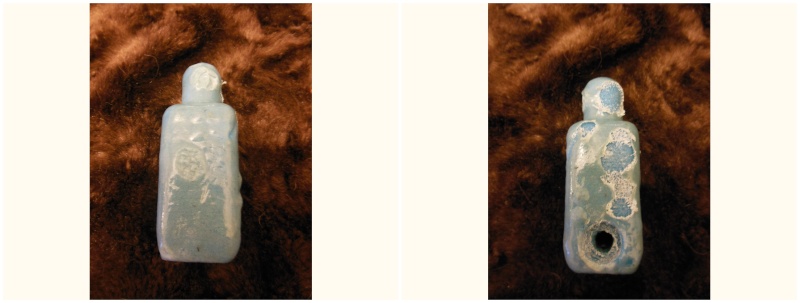
Anyway, I took the opportunity for a slight redesign - smaller with less curved edges and I am ready to continue

Any ideas what it is going to be? It is something to do with model aeroplanes!

Anyway, I took the opportunity for a slight redesign - smaller with less curved edges and I am ready to continue

Any ideas what it is going to be? It is something to do with model aeroplanes!

ian1954- Diamond Member

- Posts : 2688
Join date : 2011-11-16
Age : 69
Location : England
 Re: 3D Printing
It progresses! - more clues

The dog isn't very interested either!

The dog isn't very interested either!

ian1954- Diamond Member

- Posts : 2688
Join date : 2011-11-16
Age : 69
Location : England
 Re: 3D Printing
Dang! I thought it was an arrow shaft linkage connector in the 12/5 post. No Idea now though.
_________________
Don't Panic!
...and never Ever think about how good you are at something...
while you're doing it!
My Hot Rock & Blues Playlist
...and never Ever think about how good you are at something...
while you're doing it!
My Hot Rock & Blues Playlist

RknRusty- Rest In Peace

- Posts : 10869
Join date : 2011-08-10
Age : 68
Location : South Carolina, USA
 Re: 3D Printing
Assembled


ian1954- Diamond Member

- Posts : 2688
Join date : 2011-11-16
Age : 69
Location : England
 Re: 3D Printing
Drive for a car?
Phil
Phil

pkrankow- Top Poster

- Posts : 3025
Join date : 2012-10-02
Location : Ohio
Page 1 of 4 • 1, 2, 3, 4 
 Similar topics
» PT-19 3D printing
» Printing out .pdf plans to scale
» 3D printing nonstop
» Printing on Tissue
» Printing in tile program
» Printing out .pdf plans to scale
» 3D printing nonstop
» Printing on Tissue
» Printing in tile program
Page 1 of 4
Permissions in this forum:
You cannot reply to topics in this forum

 Rules
Rules


