

 Rules
Rules
by roddie Today at 4:33 am
» Cox PT-19 Wing
by latole Today at 4:28 am
» Roddie-Rigger.. a 2005 original design
by roddie Today at 2:54 am
» Golden Bee basic running problem
by roddie Yesterday at 10:51 pm
» Simple Gliders
by rdw777 Yesterday at 6:25 pm
» Weird search for a single comic from an old Mad Magazine
by Kim Yesterday at 1:44 pm
» Scientific "Zipper" Build...Zipper Flys!.
by getback Yesterday at 7:27 am
» Cox .049 Tee Dee engines back in stock (limited availablility)
by GallopingGhostler Yesterday at 1:05 am
» Very off-topic.........Time passes and not always for the best......
by rsv1cox Thu Jul 25, 2024 2:47 pm
» Jim Walker Bonanza etc.
by rsv1cox Wed Jul 24, 2024 6:30 pm
» Throttles for Cox Tee Dee .049 / .020 / .010 engines --- videos
by sosam117 Wed Jul 24, 2024 8:54 am
» Introducing our Cox .049 TD Engines
by Admin Tue Jul 23, 2024 2:00 am
robot797's
"ULTIMITE COX 010: it has a clutch, E starter, throttle, exhaust, aluminum tank, aluminum venturi, gearbox with forward and reverse, and now its on a custom drawn and printed stand"

PAST WINNERS


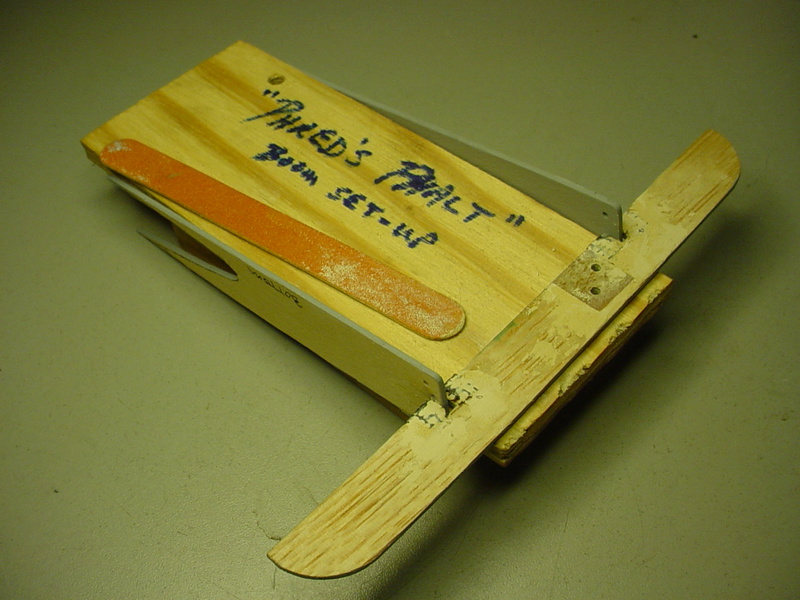
"Phred's Phault"
Page 6 of 7 •  1, 2, 3, 4, 5, 6, 7
 ![]()
Re: "Phred's Phault"
![]() roddie Thu Jun 02, 2016 6:43 am
roddie Thu Jun 02, 2016 6:43 am
KariFS wrote:roddie wrote:I'd really like to be the first guy that I've seen here; since "I've" been a CEF member.. to utilize a postage-stamp backplate in a scratch-built model!
Don't worry, there's a good chance that you will...
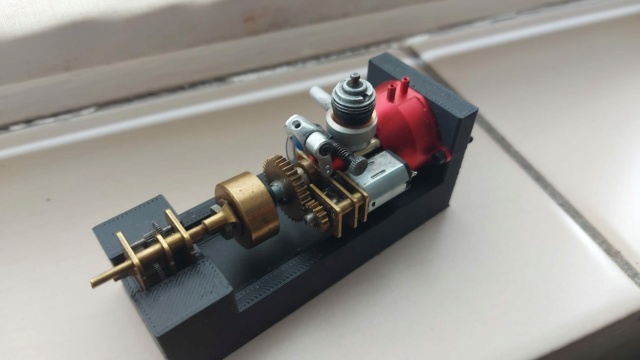
I've been considering my own version of Dale Kirn's "290 Special" for a few months, it is on "the list" but knowing me, it'll take a few months more even though I do have an engine already cleaned up for it
EDIT: here's a link to the plan:
http://www.outerzone.co.uk/plan_details.asp?ID=6104
Hi Kari, I had previously gathered info on the 290 Special. Some of this info derived from a MAN June 1967 issue, highlights the engine in particular.
Here's some MAN page-scans from that issue, provided by our CEF member GWillieFox. (I wish I had the entire article)
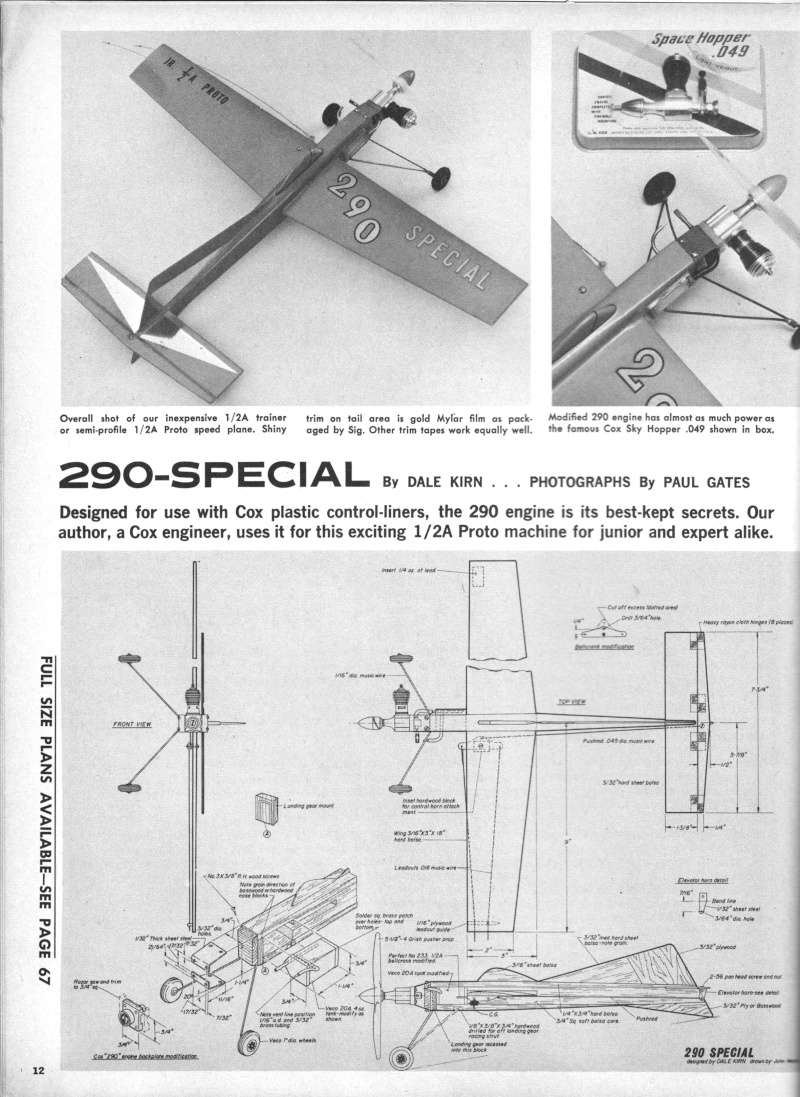
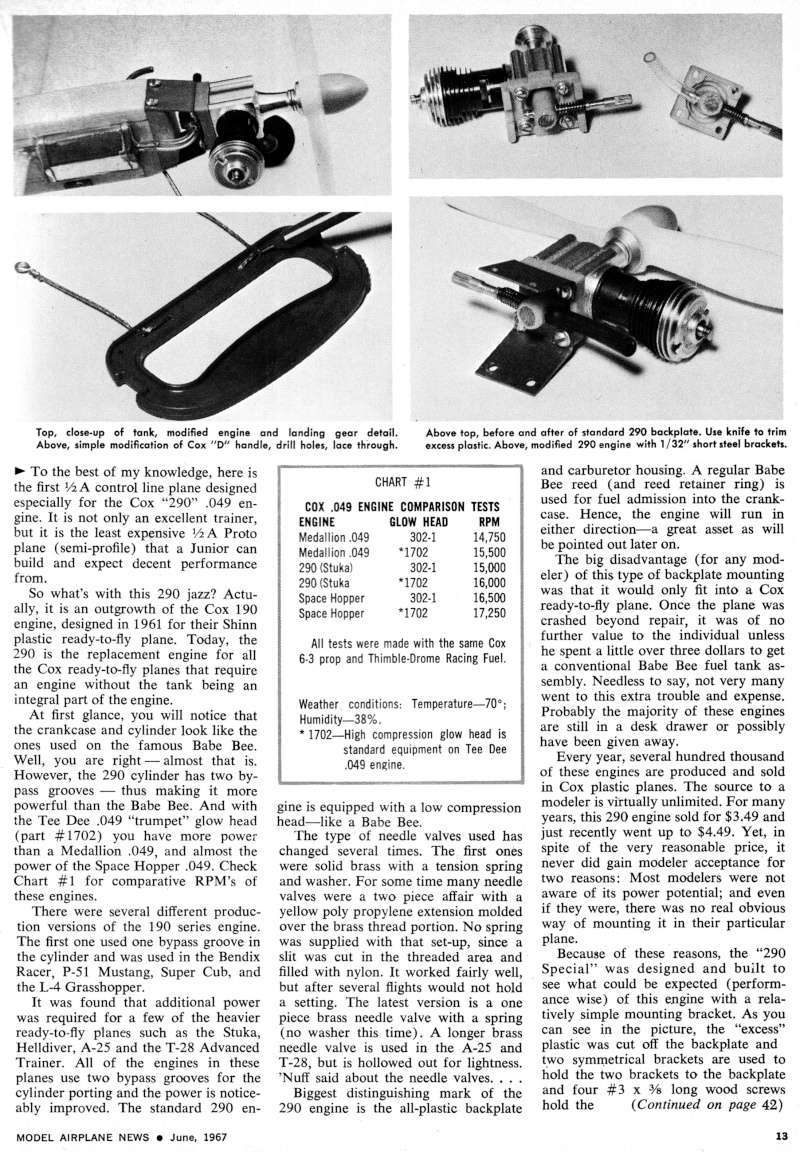
So.. citing the above; if you're assembling a "repro" 290 engine from parts.. the backplate is just one part of the equation. You'd also need a dual-ported cylinder. This was really Cox's first high-performance reed-valve engine.. designed as a replacement engine for their "heavier" RTF plastic airplanes. In "stock" form, it had more power than a Babe Bee.. and if fitted with a high-compression glow-head, would turn 16K rpm on a 6 x 3 prop with Cox Racing Fuel.
It's handicap.. as most of us know; was it's lack of a practical mount for installing in a balsa-wood airframe. Dale Kirn's model shows trimming of the engine's back-plate. That's one way to do it.. (for streamlining) but not necessary for mounting in general.
I hope "you" find the time to build yours.. and I'd be very interested in the progress.

roddie- Top Poster

-
Posts : 8461
Join date : 2013-07-17
Age : 64
Location : N. Smithfield, Rhode Island -

Re: "Phred's Phault"
![]() KariFS Fri Jun 03, 2016 1:56 am
KariFS Fri Jun 03, 2016 1:56 am
I think I will do the streamlining too as one of the backplates is a bit chewed up from the edges. I am also thinking about making the mounting plates out of aluminum and the shape will probably be "curved" or with a larger-radius bend instead of the sharp bend shown in the plan.
KariFS- Diamond Member

- Posts : 2019
Join date : 2014-10-10
Age : 52
Re: "Phred's Phault"
![]() roddie Fri Jun 03, 2016 9:31 pm
roddie Fri Jun 03, 2016 9:31 pm
So many were thrown away.. or their back-plates cannibalized for their fine-thread needles. Granted.. the Goldberg retrofit mounts are hard to find.. but custom mounts are not that hard to make. After all.. that's how most old hotrods were built. You know.. custom engine-mounts and Moon-tanks!
roddie- Top Poster
-
Posts : 8461
Join date : 2013-07-17
Age : 64
Location : N. Smithfield, Rhode Island -
Re: "Phred's Phault"
![]() KariFS Sat Jun 04, 2016 11:06 am
KariFS Sat Jun 04, 2016 11:06 am

I often take the side of the "underdog" and also have a soft spot for the poor old postage stamp engines
KariFS- Diamond Member
- Posts : 2019
Join date : 2014-10-10
Age : 52
Dremel repair
![]() roddie Sat Jul 02, 2016 7:14 pm
roddie Sat Jul 02, 2016 7:14 pm
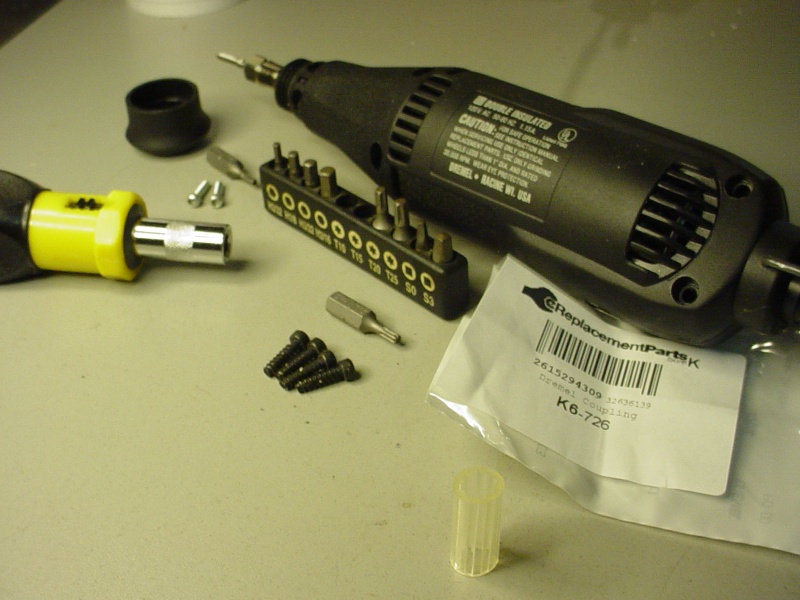
 This couldn't have been easier to do. Tools required were Torx T-10 and T15 drivers.
 Remove (unscrew by hand) the plastic spindle-collar/ring and pull-off the tool's wire hanger hoop.. then remove the 6 case screws. (two T-10's on the spindle-end and four T-15's for the main body)
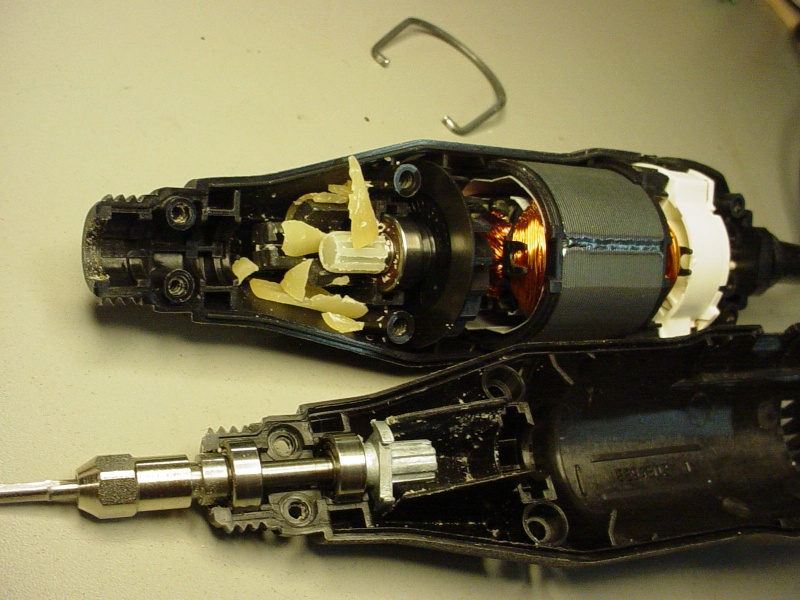
Here's what the old coupling looked like.. disintegrated.
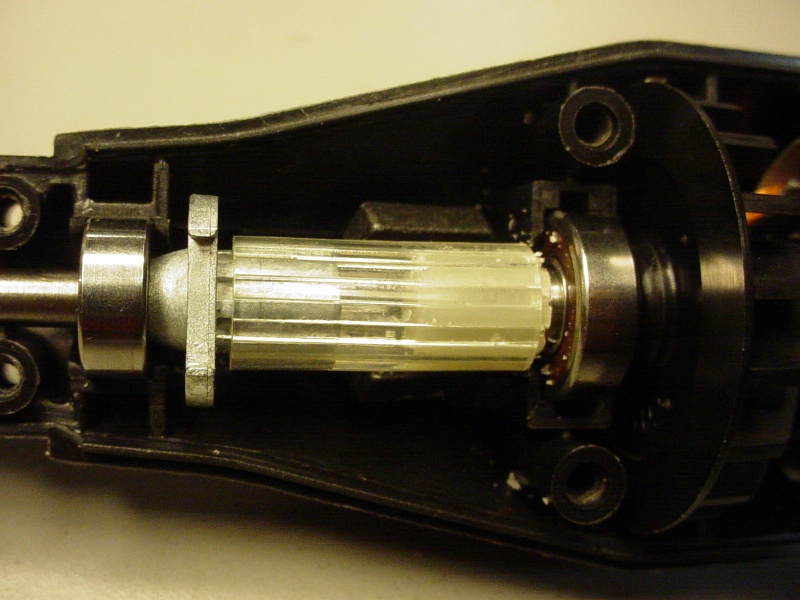
New coupling slips onto motor/spindle shafts effortlessly. Reassemble/Done!
roddie- Top Poster
-
Posts : 8461
Join date : 2013-07-17
Age : 64
Location : N. Smithfield, Rhode Island -
Re: "Phred's Phault"
![]() Marleysky Sat Jul 02, 2016 8:01 pm
Marleysky Sat Jul 02, 2016 8:01 pm


Marleysky- Top Poster

Posts : 3618
Join date : 2014-09-28
Age : 71
Location : Grand Rapids, MI
Re: "Phred's Phault"
![]() roddie Sat Jul 09, 2016 3:51 pm
roddie Sat Jul 09, 2016 3:51 pm
Marleysky wrote:Congrats on a well done repair! Thanks for the pictures and dialog. I know one of mine will die just as I'm half way thru a project. That's why I have a back up and now I know how to fix it when I does break....of old age!!
Thanks much! I'd been straight-out with music-gigs for the last few weekends.. and just no energy during the week after work to get anything done. I've cleared a little workspace in the shop.. which does help to motivate when I get the urge. It was time to try out the newly repaired tool today. The depth setting in the router attachment was unchanged.. and I had not loosened the spindle-nut with router-bit installed.. so I just grabbed the wing and finished the slot for the lead-outs.
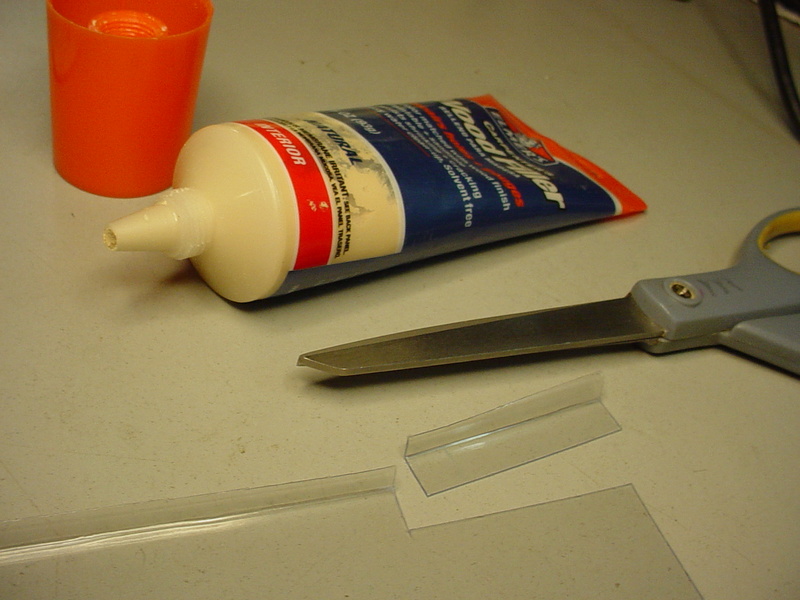
The tail-booms/elevator assy. had gotten some filler applied last week to the underside of the elevator where the horn-mount-plate is located and the fiberglass-screen hinges lay. I've been using Elmer's wood-filler (comes in a squeeze-tube) and seems to sand easily using an emery-board. To apply the filler, I chose to make a spreader-tool from some heavy clear packaging material. For stiffness; I cut-out a piece along a radius-edge, which worked well for the small/narrow area I had to work in.

More filling/sanding needs to be done.. but I hate that crap..
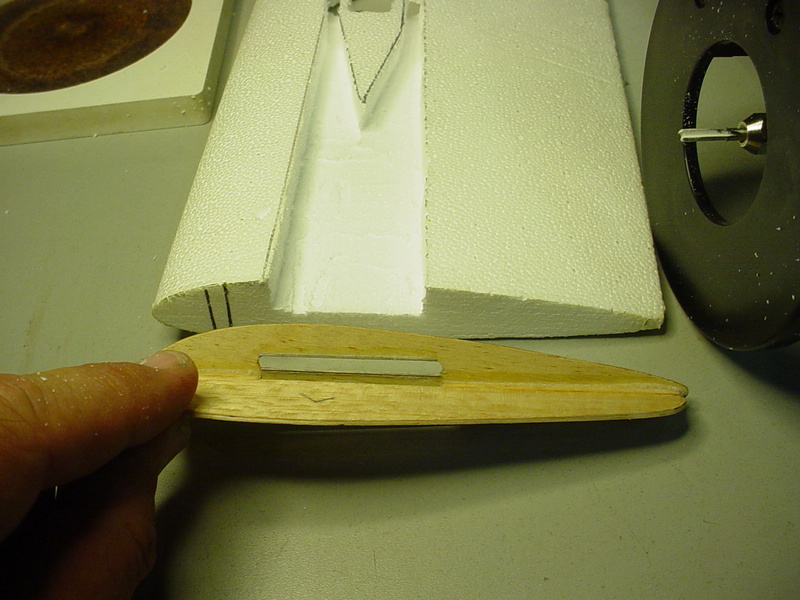
Here is the planned balloon fuel-cell again.. it's the only part of the model that will have a significant impact on it's aerodynamics. It naturally needs to have a mounting-provision that will not cause it to shift rearward when scrubbing the ground on landing.

I may attach a strip of "sacrificial" material (tape) to the bottom of the capsule to prevent abrasion.. but it depends on the capsule's method of attachment to the belly.
 If I use hook-and-loop strips.. I can attach the belly-strip permanently by sewing-it into a thin 1/64" ply-plate as part of the belly-mount, and epoxying it securely. This will alleviate the worry of an adhesive failure "there". If the capsule-strips' adhesive degrades.. I can merely clean it and apply a new piece. A pin/block behind the capsule should prevent any rearward shifting when the model lands.. (hopefully on its belly..)
Thanks for staying tuned..
roddie- Top Poster
-
Posts : 8461
Join date : 2013-07-17
Age : 64
Location : N. Smithfield, Rhode Island -
Re: "Phred's Phault"
![]() getback Sun Jul 10, 2016 7:58 am
getback Sun Jul 10, 2016 7:58 am
I need some plane building therapy about now with all this heat and the garden wants to wilt or something from the every day rain storms . 

getback- Top Poster
-

Posts : 10276
Join date : 2013-01-18
Age : 66
Location : julian , NC
Re: "Phred's Phault"
![]() fredvon4 Sun Jul 10, 2016 9:36 am
fredvon4 Sun Jul 10, 2016 9:36 am
I would shape the recess with a soldering iron carefully melting the recess..... try it on a scrap piece of foam and you can see it is pretty easy to form the foam a bit better than using knives or sand paper

fredvon4- Top Poster
-
Posts : 4004
Join date : 2011-08-26
Age : 69
Location : Lampasas Texas
Re: "Phred's Phault"
![]() roddie Sun Jul 10, 2016 1:36 pm
roddie Sun Jul 10, 2016 1:36 pm
getback wrote:Good to see you got the dremel going and back at the airplane ,, sounds like you got it figured out for the tube tank with the strip of ply. You might want to try a drop of water with that filler it makes it go on a lot smoother with less sanding to do , to much and will wipe right off though
Yea.. the Dremel runs nice and smooth now.. I can hear the difference. Thanks for the tip on thinning the wood-filler. I really over-complicated this model.
roddie- Top Poster
-
Posts : 8461
Join date : 2013-07-17
Age : 64
Location : N. Smithfield, Rhode Island -
Re: "Phred's Phault"
![]() roddie Mon Jul 11, 2016 5:50 am
roddie Mon Jul 11, 2016 5:50 am
fredvon4 wrote:If there is a clear area on the underside of the wing, I would probably draw out the fuel tube shape, and carefully recess it half diameter into the wing held by goop or a good layer of double sided tape then accept the bottom hump UNDER the covering with a opening in the rear to replace balloon if needed
I would shape the recess with a soldering iron carefully melting the recess..... try it on a scrap piece of foam and you can see it is pretty easy to form the foam a bit better than using knives or sand paper
Phred, I wanted to keep the balloon-capsule centered because I have a suction-feed. The feed-line would need to be longer.. and turn inward to the back-plate. It might not be as critical where I have a reed-valve induction.. but I might be fighting g-forces more if I offset the capsule, than with a short straight-shot on center. As planned; the feed-line only needs to be about an inch long.
roddie- Top Poster
-
Posts : 8461
Join date : 2013-07-17
Age : 64
Location : N. Smithfield, Rhode Island -
Re: "Phred's Phault"
![]() roddie Tue Jul 26, 2016 4:41 pm
roddie Tue Jul 26, 2016 4:41 pm
Looks a little scary here.. (bottom side)
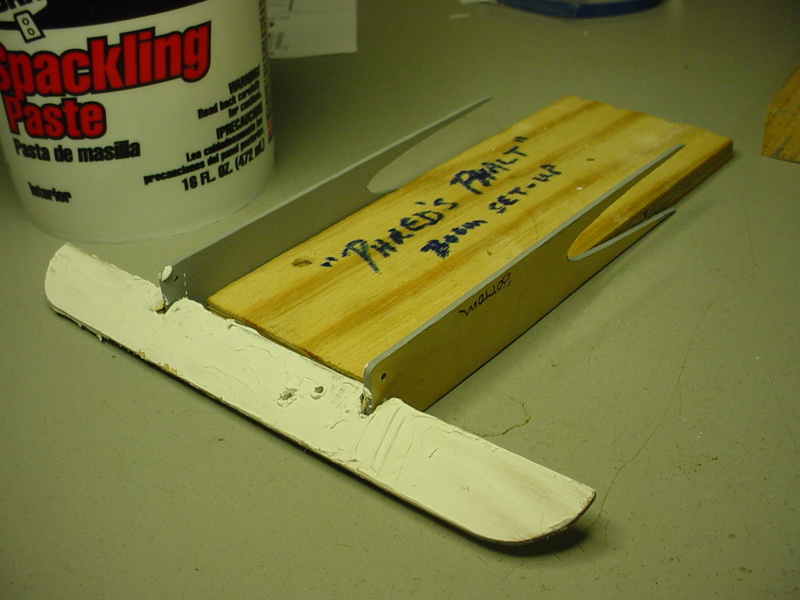
(top side, which had previously been primed grey.. along with only one side of the booms)
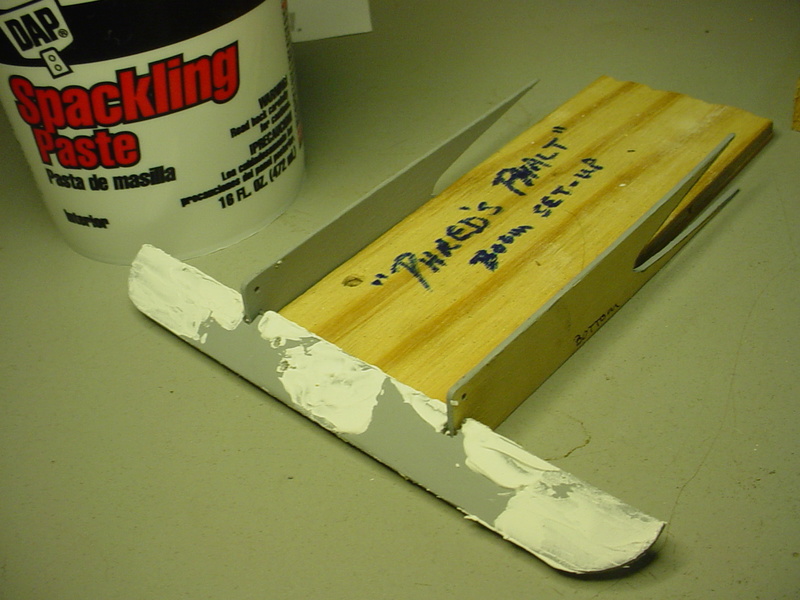
I allowed the spackle to dry for a couple of days.. then being very careful and patient, I used an 8"L. 1/4" x 3/4" stick with 240 grit paper wrapped around it, to feather-sand smooth. The sandpaper is 3M 413Q TRI-M-ITE. It cut through the DAP-brand spackle with ease.. even though I used very light strokes with the sanding-stick. The size of the stick helped prevent me from being too heavy-handed with it. Supporting-well with my free-hand's fingers underneath the stab helped to keep the work-piece steady.
(bottom side sanded)
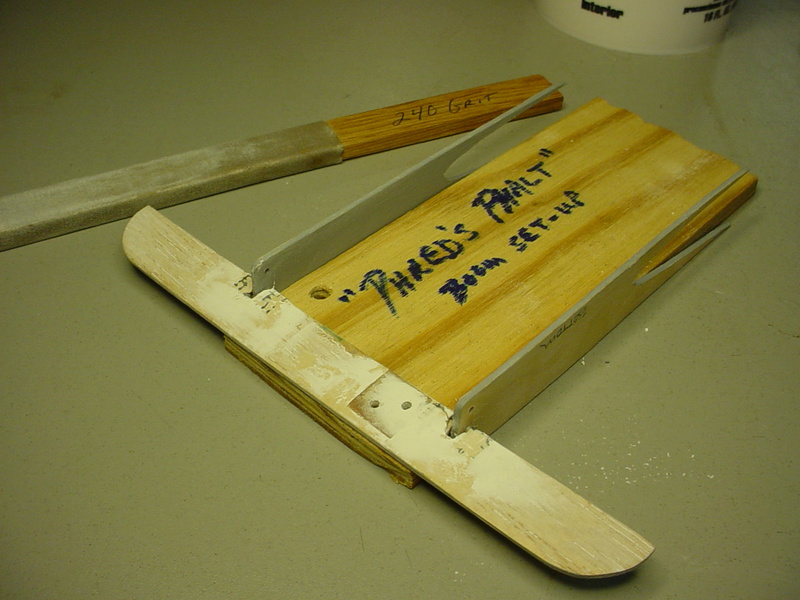
(top side sanded)


Sorry that there's not more to report.. but I figured that some of you might see the value in making a satisfactory sanding tool for a particular purpose. You simply can't have enough sanding tools (sticks, blocks, dowels etc..) faced with altering-grit paper. I'll generally make 3 of every size/shape that I want.. and face them with fine, med. and coarse grades. Once made.. they last a long time.. and are always ready to tackle a specific sanding job with much better results.. than grabbing any old random block off the shelf.
Remember my sandpaper-remnant 3-ring binder?
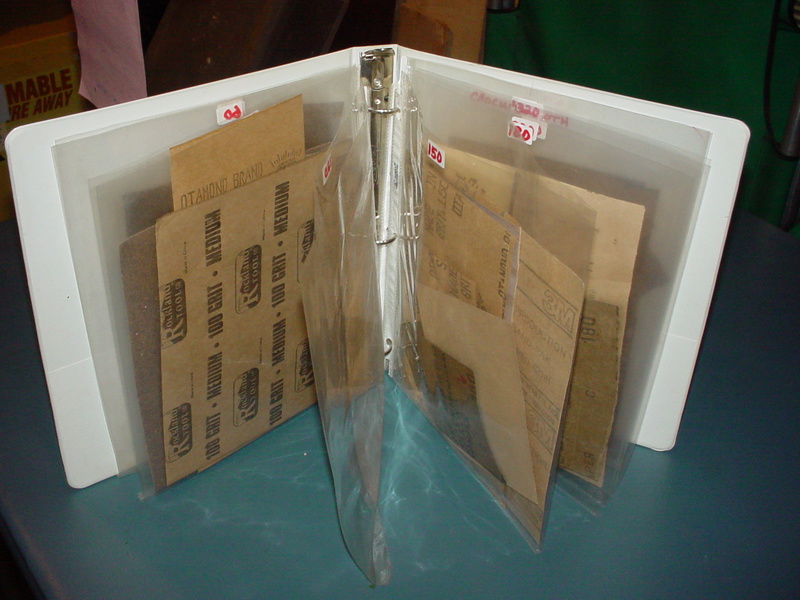
I use it for when I cut a piece from a full sheet. Full-sheets I organize in envelopes graded by fine, med. and coarse.

Make-up a sanding-tool box some night when you have nothing to do.. you'll be glad you did.
roddie- Top Poster
-
Posts : 8461
Join date : 2013-07-17
Age : 64
Location : N. Smithfield, Rhode Island -
Re: "Phred's Phault"
![]() roddie Mon Mar 27, 2017 9:38 pm
roddie Mon Mar 27, 2017 9:38 pm

Above.. is a photo of what I bought.. which is what I wanted. Slow-cure epoxy (it's considerably cheaper than the fast-set stuff.. as well as stronger) I need to join two foam wing-halves.. and I want to have some time to get the alignment correct before the glue sets. I have a center frame-structure that will be glued to one wing-panel first. The second wing-panel alignment will be critical, because there will be a pair of tail-booms extending back from each panel.. that will support the stabilator.
I don't really like working with epoxy.. I never really know how much to mix; for the job I need to do. I always over-estimate.. and hate wasting material. OTOH.. I love the strength that it provides. I'm "stuck" with it for this build though. There isn't much else that will glue foam together, that I have experience with. I don't want to experiment with polyurethane adhesives at this stage.
I'll feel better when I get the wing-halves joined and the tail-booms straight. This airplane has been in pieces in a bag.. for quite a while. I'm going to put it together.


roddie- Top Poster
-
Posts : 8461
Join date : 2013-07-17
Age : 64
Location : N. Smithfield, Rhode Island -
Re: "Phred's Phault"
![]() Marleysky Mon Mar 27, 2017 10:13 pm
Marleysky Mon Mar 27, 2017 10:13 pm
It's nice to know I'm not alone in having a workshop full of good intentions and partially started/half finished planes! I'm not sure if it's short attention span, or onset memory loss. ( more than likely it's job/family priorities getting pushed in front of hobby time) yeah, well my other excuse is I don't want to rush thru the build, I want to enjoy the experience.
Congratulation on getting one step closer to completion!!
IMPORTANT PS: just re read your post.....please make sure the epoxy is "foam safe"
I've seen some build logs where the builder was inserting a CF rod and the glue ate (melted) the foam wing. Test a small patch on a unused foam piece.
Last edited by Marleysky on Mon Mar 27, 2017 10:18 pm; edited 1 time in total (Reason for editing : Caution on foam)
Marleysky- Top Poster
-
Posts : 3618
Join date : 2014-09-28
Age : 71
Location : Grand Rapids, MI
Re: "Phred's Phault"
![]() fredvon4 Tue Mar 28, 2017 9:00 am
fredvon4 Tue Mar 28, 2017 9:00 am
That epoxy you show is 5 min set stuff and much too fast
I use 30 to 90 min epoxy for anything I need time to get fit and alignments correct
fredvon4- Top Poster
-
Posts : 4004
Join date : 2011-08-26
Age : 69
Location : Lampasas Texas
Re: "Phred's Phault"
![]() rsv1cox Tue Mar 28, 2017 9:41 am
rsv1cox Tue Mar 28, 2017 9:41 am
fredvon4 wrote:Sure hope this note is in time to prevent some frustration
That epoxy you show is 5 min set stuff and much too fast
I use 30 to 90 min epoxy for anything I need time to get fit and alignments correct
I made that connection too Fred, but I figured that roddie was experienced enough to know the difference.
Time and temperture, I have learned to gauge both when working with the five minute stuff which is responsible for 90% of my repairs. I have used 30 minute in the past, but I'm an impatient person and get antsy waiting. For me, the 5 minute epoxy is slow cure. I do have some 1 minute epoxy but after Eric's caution regarding it's use I have not used it. Preparation is the key.
Also X2 on that "foam safe". There is a foam safe CA but regular CA will eat foam right now.
Bob

rsv1cox- Top Poster
-
Posts : 10851
Join date : 2014-08-18
Location : West Virginia
Re: "Phred's Phault"
![]() KariFS Tue Mar 28, 2017 10:58 am
KariFS Tue Mar 28, 2017 10:58 am
I am currently in the middle of a styrofoam wing build, I used carpenter's glue (pva I think) for leading and trailing edges and also for gluing the top and bottom halves together. It sticks quite well to both styro and balsa. Still use epoxy for critical parts such as bellcrank mount and wingtips. The left tip obviously has the adjustable lead-out guide and the right one will carry the wingtip weight.
The reason for using the carpenter's glue instead of epoxy is that my wife can't stand the smell of epoxy
I barely notice the scent but she regognizes it even if it has been a while. Well, she puts up with (among other things) me building planes on the dining table and sanding them in the bathroom, so until my shop is ready, white glue it will be... If I absolutely need to use epoxy, I can borrow my son's shop, but I can't sand there as the dust will ruin his paintjobs. All this gives me extra motivation to clean up&declutter the garage
KariFS- Diamond Member
- Posts : 2019
Join date : 2014-10-10
Age : 52
Re: "Phred's Phault"
![]() roddie Tue Mar 28, 2017 4:43 pm
roddie Tue Mar 28, 2017 4:43 pm
Luckily I haven't done anything yet. I thought that most epoxies were foam-safe. I'll be sure to test first with scrap pieces.
Thanks as always for the comments and advice.
roddie- Top Poster
-
Posts : 8461
Join date : 2013-07-17
Age : 64
Location : N. Smithfield, Rhode Island -
Re: "Phred's Phault"
![]() Marleysky Wed Mar 29, 2017 8:14 am
Marleysky Wed Mar 29, 2017 8:14 am
On items like paint, glue or caulk the "production" date may be of importance to the end user, it ( shelf life) may not be printed on the can or tube but you can assume 12 to 18 months on products properly stored in a "cool dry place"
Here is a short list of stuff I've bought on sale for "future use" and the end result when I did use/open it years later:
Two part Epoxy glue: purchased 1980+/- ...........Still in use 2017. Not much left.
HobbyPox part A and Part B and
JB weld purchased late 80's early 90's .................still in use 2017.
Still have one unopened pkg as a back-up
Any type of CA glue thin,medium,thick have hardened in the package (1-2years)
Aerosol spray paint. These usually lose the propellant over a few months once used the first time. ( I then open the can and pour the contents into tight sealing glass jars)
White painters caulk/ Black roofing sealer/ liquid nails/ concrete patch/RTV sealer, in a tube anything in a caulk gun tube..........I bought a bunch of each of these when "HandyAndy" went out of business. When used fresh worked great, after 5-10 years in storage they all turned into a tube of dried hard product, or dried flexible product in the case of thr RTV sealer! I assume the products cured in place because the tubes are not airtight.
So, I do believe the epoxy glues do last a much longer time in storage. You don't have a "fresh batch" until you mix part A with part B or resin with hardener.
Yup, another two parter Bondo and hardner and fiberglass resin and hardener are still in usable liquid state until mixed....ahh, love that Bondo smell, just about as good a nitro!
,
Marleysky- Top Poster
-
Posts : 3618
Join date : 2014-09-28
Age : 71
Location : Grand Rapids, MI
Re: "Phred's Phault"
![]() roddie Wed Mar 29, 2017 7:56 pm
roddie Wed Mar 29, 2017 7:56 pm
I kinda' figured that the 2-part glues were fairly stable, pretty much indefinitely. "Elmer's" use to sell epoxy (slow and fast-cure) in small .25oz. tubes. I've had two packages of both types for over 25 years. I've never used the "fast-cure".. but the slow-cure has been used several times.. and as recent as 2 years ago. I only mix-up a button's-worth at a time.I like to assemble my 1/2A radial firewalls with it. That's really the only place I use it. Makes for a good strong nose. I usually laminate a couple ply-plates together.. with hardwood cheek-blocks behind. This assembly keys-into/onto a profile-fuse with either 1/32" or 1/64" ply doublers installed. The doublers are generally glued-on with thick CA-glue.
Here's a photo of my Rare Bear's firewall being glued-up with epoxy and clamps. The cheek-blocks are 3/8" sq. cherry-wood.

I've always overbuilt the noses of my little airplanes. It's the area that will inevitably be smacked-hard at some point. I always figured that any extra weight there; would be more of a benefit.. than a penalty. Sometimes the nose of a model is fairly "short".. especially with a scale-like design. An external fuel tank (which I often use) is located rearward; closer to the center of gravity. I like having the fuel-tank there actually. The main landing-gear can be a weight-adjustment-point.. by both; angular-adjustment and the weight of the wheels used, but wheel-"weight" is better to alter.. than gear-angle. You don't want to locate a "too-far rearward" main-gear on a tail-dragger. If so; you may experience "nose-overs" when R.O.G.-launching.. as well as "nose-overs" when landing. There's a "balance" that needs to be achieved.. for the environment in which the model will be flown.
I personally like to have landing-gear on my models. This poses some issues. I've flown 1/2A models exclusively.. and I have all kinds of wheels. I've made my own wheels to deal with the rigors of rough runways.. and grass. To me; it's fun to be able to have a model airplane "roll-out into flight" and "land on it's wheels".. without nosing-over.
roddie- Top Poster
-
Posts : 8461
Join date : 2013-07-17
Age : 64
Location : N. Smithfield, Rhode Island -
Re: "Phred's Phault"
![]() roddie Sat Apr 08, 2017 4:10 pm
roddie Sat Apr 08, 2017 4:10 pm
K...
so I bought a Loctite "syringe" (.85oz. combined..) of "extra time" (60 min./translucent yellow) for $4+change at my local "Lowes" home-center. (my 1st stop..)

K... so.. there's a "Leeway" (agricultural/True-Value) outlet on my drive home. They're "pricey".. but they're one of those hdwe. stores where you can still find the cool stuff that the "big-box" stores don't bother with. (it's where I found the "Ruby Fluid" paste-flux for hard-soldering my fuel-tanks together..) I walk in.. and within 15 seconds; a young man asks what I'm looking for. "Epoxy" I exclaimed.. He directs me to the "glue-aisle".. where I found some "slow-cure" Devcon epoxy in .5oz. tubes (1oz. combined..) again.. for about $4+change.. This was progress.. and I'll explain why. My experience with epoxies isn't what one would call "expansive"..


Aren't photos great? It sucks reading.. without any "eye-candy"..
Some of the epoxies that I've bought over the years have included some good tools for the mixing of components. I thought it'd be worthwhile to post a photo.

"Rusty" mentions using "graph-paper" to gage/mix resin/hardener. The above photo shows a re-useable graduated "palette" for measuring.. and also a "comb-type" spreader.. which I think is a terrific mixing tool. A plastic "fork-utensil" would also work well. The more "complete" that you can mix 2-part glues.. the stronger their bond will be. That's why I'd rather use the slow-set variety.
Oh yea...


I may end-up using the Titebond if it doesn't react unfavorably with the foam. The reason being; my wife (Lynne) gets SEVERE migraine-headaches that are triggered by even "slight" solvent-type odors. I have to be real careful with that. She takes the prescription-med Imitrex (Sumatriptan-Succinate..) to relieve her migraines. "Excedrine" can work.. if she catches the onset early. It's the caffeine/Acetaminophen mix in the Excedrine that can be effective against the start of a migraine.
So... "Phred's Phault" needs to be finished with that in mind. The good news is.. the weather's getting warmer and I can glue-up some parts outside if I have to. I want to use the epoxy mainly on the center-structure for strength.

I made some balsa filler-blocks to cap the plywood T-spar for the channel that I cut in the wing-cores. These will come-up "flush" to the top-surface of the foam-cores.

"Phred's Phault" will be finished for this season.
roddie- Top Poster
-
Posts : 8461
Join date : 2013-07-17
Age : 64
Location : N. Smithfield, Rhode Island -
It really is Phred's fault..
![]() roddie Tue Aug 07, 2018 8:45 pm
roddie Tue Aug 07, 2018 8:45 pm
Some construction-hurdles had stalled me on this self-designed model.. but I've never forgotten about its original "scope". To re-cap; it's been designed as a 50% scale-model of the Riley Wooten/Carl Goldberg kit G13-295 "VOODOO" for combat/stunt.
Here are the major assemblies.. laid-out. I just need to "get-back" to it..

roddie- Top Poster
-
Posts : 8461
Join date : 2013-07-17
Age : 64
Location : N. Smithfield, Rhode Island -
Re: "Phred's Phault"
![]() rsv1cox Wed Aug 08, 2018 10:40 am
rsv1cox Wed Aug 08, 2018 10:40 am
Ian participated in this thread too. Perhaps he will see it and chime in also.
rsv1cox- Top Poster
-
Posts : 10851
Join date : 2014-08-18
Location : West Virginia
Re: "Phred's Phault"
![]() fredvon4 Wed Aug 08, 2018 12:10 pm
fredvon4 Wed Aug 08, 2018 12:10 pm
After your note, I went way back to page one and took my time reading and remembering
fredvon4- Top Poster
-
Posts : 4004
Join date : 2011-08-26
Age : 69
Location : Lampasas Texas
Re: "Phred's Phault"
![]() Mark Boesen Wed Aug 08, 2018 4:00 pm
Mark Boesen Wed Aug 08, 2018 4:00 pm
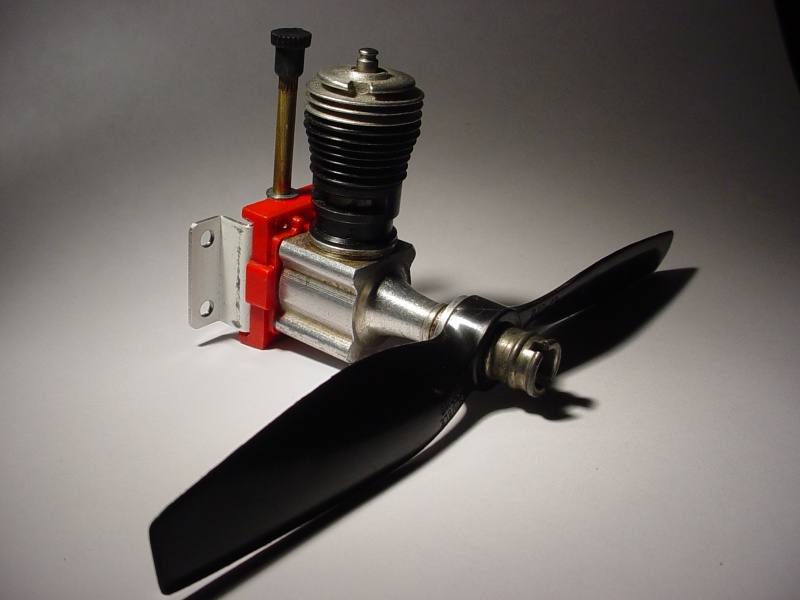
KariFS wrote:Nice picture! Here's one of mine:
I often take the side of the "underdog" and also have a soft spot for the poor old postage stamp enginesAlthough I did steal the thin wall dual-bypass cylinder from the one in the picture for my otherwise perfect "Silver Bee"


wanted to mention that this was off a Helldiver or A-25, the yellow needle was only made for a year or so.

Mark Boesen- Top Poster
- Posts : 3978
Join date : 2011-09-01
Age : 66
Location : Rockford, Il -
Page 6 of 7 • 1, 2, 3, 4, 5, 6, 7 ![]()