

 Rules
Rules
Log in
Search
Latest topics
» Foam hand kids glider converted to 0.049 CLby roddie Today at 4:33 am
» Cox PT-19 Wing
by latole Today at 4:28 am
» Roddie-Rigger.. a 2005 original design
by roddie Today at 2:54 am
» Golden Bee basic running problem
by roddie Yesterday at 10:51 pm
» Simple Gliders
by rdw777 Yesterday at 6:25 pm
» Weird search for a single comic from an old Mad Magazine
by Kim Yesterday at 1:44 pm
» Scientific "Zipper" Build...Zipper Flys!.
by getback Yesterday at 7:27 am
» Cox .049 Tee Dee engines back in stock (limited availablility)
by GallopingGhostler Yesterday at 1:05 am
» Very off-topic.........Time passes and not always for the best......
by rsv1cox Thu Jul 25, 2024 2:47 pm
» Jim Walker Bonanza etc.
by rsv1cox Wed Jul 24, 2024 6:30 pm
» Throttles for Cox Tee Dee .049 / .020 / .010 engines --- videos
by sosam117 Wed Jul 24, 2024 8:54 am
» Introducing our Cox .049 TD Engines
by Admin Tue Jul 23, 2024 2:00 am
Cox Engine of The Month
July-2024
robot797's
"ULTIMITE COX 010: it has a clutch, E starter, throttle, exhaust, aluminum tank, aluminum venturi, gearbox with forward and reverse, and now its on a custom drawn and printed stand"

PAST WINNERS
robot797's
"ULTIMITE COX 010: it has a clutch, E starter, throttle, exhaust, aluminum tank, aluminum venturi, gearbox with forward and reverse, and now its on a custom drawn and printed stand"
PAST WINNERS
CEF Traveling Engine


Win This Engine!

Live on Patrol


Avoiding my chores.
Page 1 of 1

Avoiding my chores.
![]() batjac Sat Oct 31, 2015 4:10 am
batjac Sat Oct 31, 2015 4:10 am
As my vacation is over, I looked around my desk and started cleaning. Well, pushing things around from place to place really. But, one thing I’ve been pushing around for months is the test fixture I made for THIS thread on my pipe bomb engines. As I’ve finished that test, I have no further use for a Testors test stand. Get it? Testors Test stand? Ahhh-ha-ha-ha.
But, it seemed a shame to toss out a perfectly usable item, so I got “distracted” from my cleaning to do something with this. I needed something quick and dirty for this, so I cast about in my mind for something to do with it. Since it is for Testors pipe bomb engines, I thought of Riley Wooten’s L’il Bomb. That plane is pretty simple, so I decided to cut down the test fixture and graft it into the plane and call it….
Wait for it….
A L’il Pipe Bomb!!!
As usual, I started building before I thought to start taking pictures. Here’s the plane with the basic frame. I took a 1/8x3x36’ stick of balsa and cut it into two 18” pieces. I butt-joined the two pieces to make a 6x18” slab. I cut a couple of 1” end cross pieces from a scrap 1/8” balsa. Then cut the wing to shape and cut out two pieces for the elevator to attach to. All glued together:

Then I made a cutout for the section of engine mount made from the test fixture. No, I didn’t cut the angle for in-thrust. This is the bottom of the plane. The angle is not as extreme as the crappy camera makes it look.

I then cut and glued on the fins.


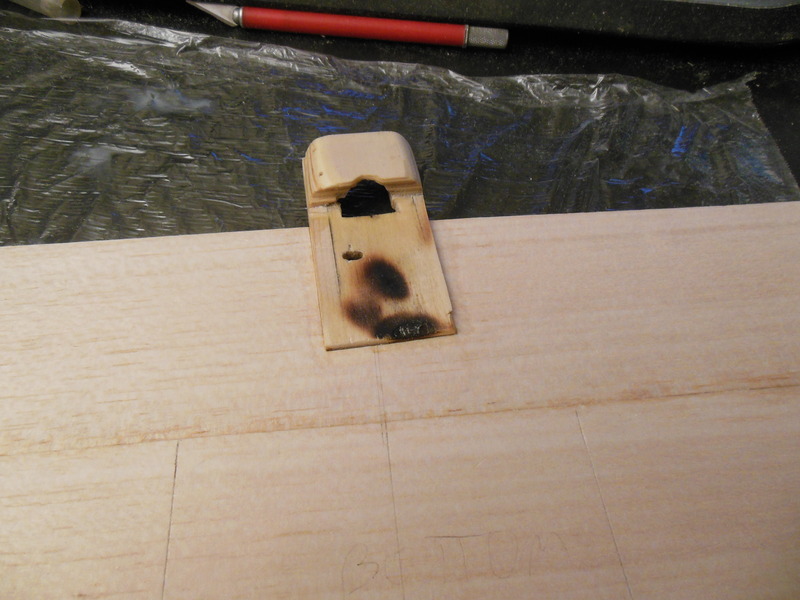
Afterwards, I glued in the engine mount. The burnt patches were from about 22 years ago when I used the ply as a fixture to solder up the cabanes on an ACE 4-120 Bipe kit.


Taping the elevator in place to mark up the pushrod, and the pushrod cut to length.


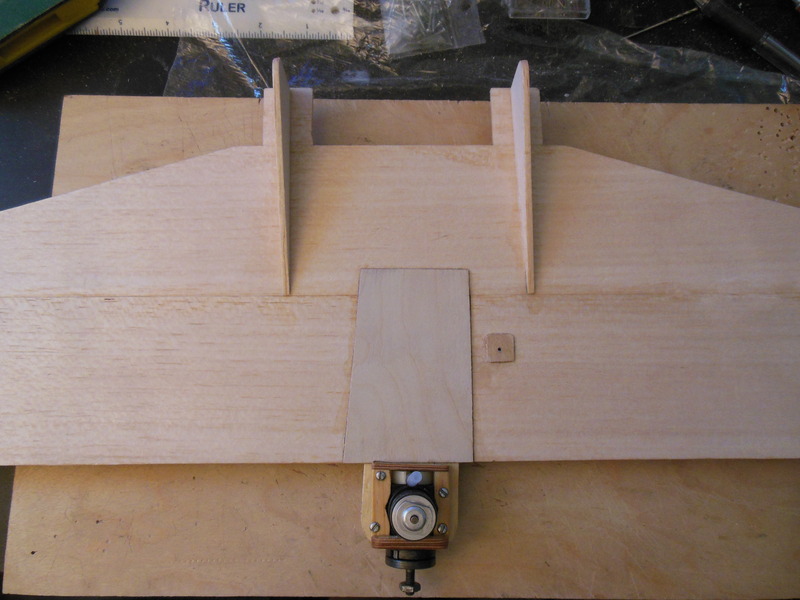
Next I glued in ply doublers for the bellcrank mount and a 1/32” doubler to cover the engine mount and secure it to the wing.

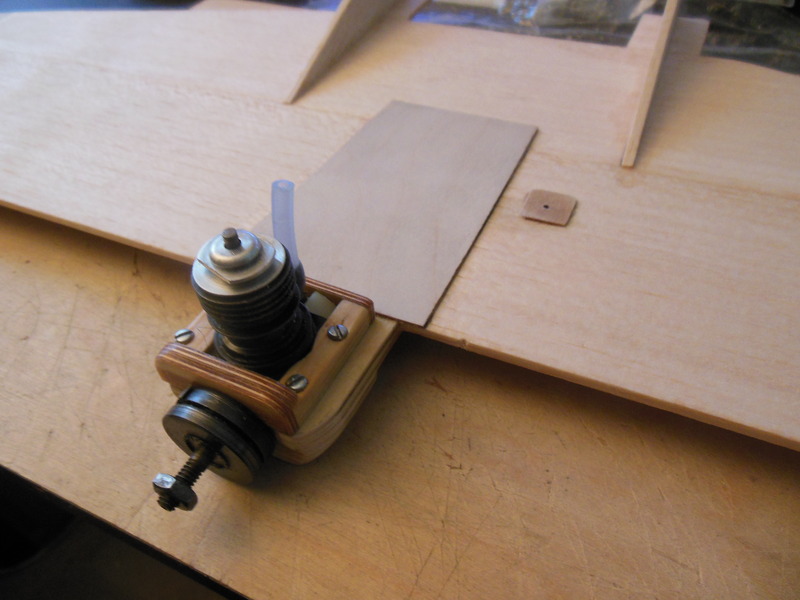
Test fitting the engine. I decided to use the engine clamp that I used for my Pipe Bomb Special, as I was a little lazy tonight. I might make up a better clamp that matches the bottom of the mount, but the plane currently balances about 3/8" behind the leading edge of the plane, so I don’t want to add more weight to the front. We’ll see how it balances after I paint it.

I made up and glued in the leadout guide, but then looking at it I decided I had glued it in too far back, especially since I’m putting out-thrust in the engine. So, I made a poor man’s adjustable leadout guide and glued another guide ahead of the first one. Now I have four holes spaced ½” apart that I can adjust the guide in.

And here it is assembled to check final layout and rough balance before I take it apart for painting. This is two evenings’ work. Not fancy, but it looks functional. I’ll wait until after I paint it to decide the exact placement of the fuel tank.


Now to put aside the L’il Pipe Bomb until we have a non-rainy/non-humid day so I can paint it.
The Soggy Mark
But, it seemed a shame to toss out a perfectly usable item, so I got “distracted” from my cleaning to do something with this. I needed something quick and dirty for this, so I cast about in my mind for something to do with it. Since it is for Testors pipe bomb engines, I thought of Riley Wooten’s L’il Bomb. That plane is pretty simple, so I decided to cut down the test fixture and graft it into the plane and call it….
Wait for it….
A L’il Pipe Bomb!!!
As usual, I started building before I thought to start taking pictures. Here’s the plane with the basic frame. I took a 1/8x3x36’ stick of balsa and cut it into two 18” pieces. I butt-joined the two pieces to make a 6x18” slab. I cut a couple of 1” end cross pieces from a scrap 1/8” balsa. Then cut the wing to shape and cut out two pieces for the elevator to attach to. All glued together:
Then I made a cutout for the section of engine mount made from the test fixture. No, I didn’t cut the angle for in-thrust. This is the bottom of the plane. The angle is not as extreme as the crappy camera makes it look.
I then cut and glued on the fins.
Afterwards, I glued in the engine mount. The burnt patches were from about 22 years ago when I used the ply as a fixture to solder up the cabanes on an ACE 4-120 Bipe kit.
Taping the elevator in place to mark up the pushrod, and the pushrod cut to length.
Next I glued in ply doublers for the bellcrank mount and a 1/32” doubler to cover the engine mount and secure it to the wing.
Test fitting the engine. I decided to use the engine clamp that I used for my Pipe Bomb Special, as I was a little lazy tonight. I might make up a better clamp that matches the bottom of the mount, but the plane currently balances about 3/8" behind the leading edge of the plane, so I don’t want to add more weight to the front. We’ll see how it balances after I paint it.
I made up and glued in the leadout guide, but then looking at it I decided I had glued it in too far back, especially since I’m putting out-thrust in the engine. So, I made a poor man’s adjustable leadout guide and glued another guide ahead of the first one. Now I have four holes spaced ½” apart that I can adjust the guide in.
And here it is assembled to check final layout and rough balance before I take it apart for painting. This is two evenings’ work. Not fancy, but it looks functional. I’ll wait until after I paint it to decide the exact placement of the fuel tank.
Now to put aside the L’il Pipe Bomb until we have a non-rainy/non-humid day so I can paint it.
The Soggy Mark
batjac- Diamond Member


Posts : 2356
Join date : 2013-05-22
Age : 61
Location : Broken Arrow, OK, USA
Re: Avoiding my chores.
![]() larrys4227 Sat Oct 31, 2015 4:32 am
larrys4227 Sat Oct 31, 2015 4:32 am
Nicely done! And I like how you built the motor mount. Looks great!

larrys4227- Gold Member

- Posts : 338
Join date : 2015-07-23
Location : Lakeland, FL
Re: Avoiding my chores.
![]() rsv1cox Sat Oct 31, 2015 6:24 am
rsv1cox Sat Oct 31, 2015 6:24 am
Yes, looks great. I may have to copy-cat it this winter and make use of one of my unusable "pipe-bombs."
Bob
Bob

rsv1cox- Top Poster

-
Posts : 10851
Join date : 2014-08-18
Location : West Virginia
Re: Avoiding my chores.
![]() RknRusty Sat Oct 31, 2015 9:05 am
RknRusty Sat Oct 31, 2015 9:05 am
That's Da Bomb!
Mark, your ingenuity is inspiring. Well thought out and executed. I like the skids on the belly.
I hate to suggest anything, because you probably already processed it. But, maybe a scuff plate or additional skid under the nacelle?
Rusty
Mark, your ingenuity is inspiring. Well thought out and executed. I like the skids on the belly.
I hate to suggest anything, because you probably already processed it. But, maybe a scuff plate or additional skid under the nacelle?
Rusty
_________________
Don't Panic!
...and never Ever think about how good you are at something...
while you're doing it!
My Hot Rock & Blues Playlist
...and never Ever think about how good you are at something...
while you're doing it!
My Hot Rock & Blues Playlist

RknRusty- Rest In Peace

- Posts : 10869
Join date : 2011-08-10
Age : 68
Location : South Carolina, USA
Re: Avoiding my chores.
![]() getback Sat Oct 31, 2015 9:36 am
getback Sat Oct 31, 2015 9:36 am
Looks Good Mark , just wondering is there going to be enough air for the engine to breath there in the nice mount you have made ? I didn't see a hole in the bottom of the mount plate for an interance . Eric 

getback- Top Poster
-
Posts : 10276
Join date : 2013-01-18
Age : 66
Location : julian , NC
Re: Avoiding my chores.
![]() roddie Sat Oct 31, 2015 11:31 am
roddie Sat Oct 31, 2015 11:31 am
"Wicked" as usual Mark! Will the Testors' needle handle a bladder? It would look trick having a bladder mounted on stand-offs atop that ply plate behind the engine. I think "Foremost" used to make a small size fuel-fittings set that contained a 90 degree elbow for a low straight-shot from the backplate to a bladder or balloon tank capsule.
You get Kudos for again.. resurrecting the pipe-bomb retro fit. I needed a 3/4" (19mm) hole-saw (which I bought a while ago..) for boring through the side of 3/4" PVC pipe for the engine-cylinder to fit through. I shelved the project shortly after I bought the tool.. but I should tinker with that mount some more. Your back-end trimming idea.. allows the whole lower-end to fit inside the pipe with some strategic slotting.

I'm hoping to redesign my mount so that the cylinder is installed after the crankcase snaps into the pipe from the front. The pipe acts as a c-clamp when slit all the way down one side.
The pipe forms a nice streamlined profile that's barely visible behind the wind-up starter.

A short piece of 3/4" hardwood dowel "halved" lengthwise and glued top/bottom to the leading-edge of a sheet-wing would form a good foundation for the rear-slotted pipe to fit over. The ID of my PVC pipe is actually .800".. so halving the dowel will provide for the proper snug fit. Secure the pipe to the dowel-piece with a wood screw.
You get Kudos for again.. resurrecting the pipe-bomb retro fit. I needed a 3/4" (19mm) hole-saw (which I bought a while ago..) for boring through the side of 3/4" PVC pipe for the engine-cylinder to fit through. I shelved the project shortly after I bought the tool.. but I should tinker with that mount some more. Your back-end trimming idea..
allows the whole lower-end to fit inside the pipe with some strategic slotting. I'm hoping to redesign my mount so that the cylinder is installed after the crankcase snaps into the pipe from the front. The pipe acts as a c-clamp when slit all the way down one side.
The pipe forms a nice streamlined profile that's barely visible behind the wind-up starter.
A short piece of 3/4" hardwood dowel "halved" lengthwise and glued top/bottom to the leading-edge of a sheet-wing would form a good foundation for the rear-slotted pipe to fit over. The ID of my PVC pipe is actually .800".. so halving the dowel will provide for the proper snug fit. Secure the pipe to the dowel-piece with a wood screw.

roddie- Top Poster
-
Posts : 8461
Join date : 2013-07-17
Age : 64
Location : N. Smithfield, Rhode Island -

Re: Avoiding my chores.
![]() batjac Sat Oct 31, 2015 6:14 pm
batjac Sat Oct 31, 2015 6:14 pm
getback wrote:Looks Good Mark , just wondering is there going to be enough air for the engine to breath there in the nice mount you have made ? I didn't see a hole in the bottom of the mount plate for an interance . Eric
Eric, There's plenty of room for air to get in. The air inlet is in the center of the plastic back piece just like a product engine. Lots of free space around it in the mount I have. But, looking at the pictures, I'll have to do some trimming to make the wood behind the inlet parallel with he plastic piece. Not that it'd make any difference, but looking at it in the picture, the way its angled just bothers me. I didn't bother with making anything straight or neat when I slapped the test fixture together, as it was temporary and I figured I'd just toss it when I was done. Foolish me.

The Crooked Mark
batjac- Diamond Member
-
Posts : 2356
Join date : 2013-05-22
Age : 61
Location : Broken Arrow, OK, USA
Re: Avoiding my chores.
![]() batjac Sat Oct 31, 2015 6:20 pm
batjac Sat Oct 31, 2015 6:20 pm
roddie wrote:"Wicked" as usual Mark! Will the Testors' needle handle a bladder? It would look trick having a bladder mounted on stand-offs atop that ply plate behind the engine. I think "Foremost" used to make a small size fuel-fittings set that contained a 90 degree elbow for a low straight-shot from the backplate to a bladder or balloon tank capsule.
Roddie, no luck on the bladder. The needle is finicky just on atmospheric. It's just too coarse for a bladder. Although a balloon would probably work. But I'm just going to go with a wedge tank, as I've a couple in my goodie box. I have a few of the 90° elbows in my other goodie box, and I might use one. I don't know yet.
The Rough Mark
batjac- Diamond Member
-
Posts : 2356
Join date : 2013-05-22
Age : 61
Location : Broken Arrow, OK, USA
Re: Avoiding my chores.
![]() batjac Sat Oct 31, 2015 6:26 pm
batjac Sat Oct 31, 2015 6:26 pm
RknRusty wrote:That's Da Bomb!
Mark, your ingenuity is inspiring. Well thought out and executed. I like the skids on the belly.
I hate to suggest anything, because you probably already processed it. But, maybe a scuff plate or additional skid under the nacelle?
Rusty
Suggest away Rusty. If it's a good suggestion, I'll just use it and claim credit for it, "forgetting" that someone else suggested it first...

Just kidding. I'll take any suggestions I can get. I was thinking of just using a small wire bow under the bottom of the mount to protect the fuel line going into the fuel nipple. But I need to see how the tank mounts first.
The Borrower Mark
batjac- Diamond Member
-
Posts : 2356
Join date : 2013-05-22
Age : 61
Location : Broken Arrow, OK, USA
Re: Avoiding my chores.
![]() batjac Sat Oct 31, 2015 6:35 pm
batjac Sat Oct 31, 2015 6:35 pm
larrys4227 wrote:Nicely done! And I like how you built the motor mount. Looks great!
Larry,
I kind of like that design myself. Initially, I thought to make a mount by stacking light ply strips cut out and beveled for the bottom of the engine until the engine was enclosed as a quick and easy way for a temporary fixture. But after getting done, I thought that it might just be a good way to make a permanent one, doing a little more careful job of it and coating the entire thing with epoxy. I still may do another one like that to try on other planes if I acquire any more pipe bomb engines.
The Planning Mark
edit: Now that I think about it, it'd be a good way to mount a TD engine in a streamlined nose for a 1/2A speed plane or racer, so long as the first ply layer was 5-ply....
The Big Plans Mark
batjac- Diamond Member
-
Posts : 2356
Join date : 2013-05-22
Age : 61
Location : Broken Arrow, OK, USA
Re: Avoiding my chores.
![]() RknRusty Sat Oct 31, 2015 7:17 pm
RknRusty Sat Oct 31, 2015 7:17 pm
Hey Mark, I wonder if you'd be willing to try Minwax polyurethane instead of epoxy. Since I first used it on the Osprey, I've painted it onto a lot of stuff, the entire Ukey nose being the best example, and I've found it to be incredibly bulletproof to anything our hobby might spill on it or soak it in. It's lighter and it sands nicer, easy to fuelproof screw-holes with a toothpick, and hardly slow down to wait for it. Wipe it on with a t-shirt rag and a pint lasts a long time. I'm a recent convert at the fuelproofaholic meetings.batjac wrote:...it might just be a good way to make a permanent one, doing a little more careful job of it and coating the entire thing with epoxy....
The Big Plans Mark
And it makes your fingernails beautiful for weeks. I've been meaning to post a thread asking others' opinions on that... urethane, not fingernails.
Rusty
_________________
Don't Panic!
...and never Ever think about how good you are at something...
while you're doing it!
My Hot Rock & Blues Playlist
...and never Ever think about how good you are at something...
while you're doing it!
My Hot Rock & Blues Playlist
RknRusty- Rest In Peace
- Posts : 10869
Join date : 2011-08-10
Age : 68
Location : South Carolina, USA
Re: Avoiding my chores.
![]() getback Sun Nov 01, 2015 6:08 am
getback Sun Nov 01, 2015 6:08 am
Finger nails  I know what your saying about that , and it is some darn good stuff I have yet to put it on an airplane but , since you are living proof of the resilience of it to fuel and other ill stuff of the fun I want to give it a go . Good deal Mark just wondering the way it was closed in around the bottom half of the engine in the pic . Eric
I know what your saying about that , and it is some darn good stuff I have yet to put it on an airplane but , since you are living proof of the resilience of it to fuel and other ill stuff of the fun I want to give it a go . Good deal Mark just wondering the way it was closed in around the bottom half of the engine in the pic . Eric
getback- Top Poster
-
Posts : 10276
Join date : 2013-01-18
Age : 66
Location : julian , NC
Re: Avoiding my chores.
![]() roddie Sun Nov 01, 2015 12:28 pm
roddie Sun Nov 01, 2015 12:28 pm
batjac wrote:roddie wrote:"Wicked" as usual Mark! Will the Testors' needle handle a bladder? It would look trick having a bladder mounted on stand-offs atop that ply plate behind the engine. I think "Foremost" used to make a small size fuel-fittings set that contained a 90 degree elbow for a low straight-shot from the backplate to a bladder or balloon tank capsule.
Roddie, no luck on the bladder. The needle is finicky just on atmospheric. It's just too coarse for a bladder. Although a balloon would probably work. But I'm just going to go with a wedge tank, as I've a couple in my goodie box. I have a few of the 90° elbows in my other goodie box, and I might use one. I don't know yet.
The Rough Mark
Yes, I was afraid of that (coarse-thread needle..) I still want to experiment with putting a restrictor in the fuel line for that issue. The concept was used (and works) on crankcase-pressure systems. Would need to use a fuel filter upstream of it though. I bought a couple bags (Tower Hobbies) of K & S assorted size alloy tubing/rod cut-offs. Wicked handy to have.. cost only a couple bucks.

Here's an example of a restricted-flow using a couple pieces. It could be restricted further by crimping the smaller tube, which would also hold it in place inside the larger one.

I think this would work.. although I have not tried it yet.
You have more of these Testors engines right? Why not try making an experimental balsa mount for one of them. Laminations w/thin CA glue would harden it.. then try Rusty's suggestion of Minwax Poly to seal it. It would be super light.. and fairly strong.. wouldn't it?
roddie- Top Poster
-
Posts : 8461
Join date : 2013-07-17
Age : 64
Location : N. Smithfield, Rhode Island -
Page 1 of 1
Permissions in this forum:
You cannot reply to topics in this forum