

 Rules
Rules
by GallopingGhostler Today at 8:26 am
» Internet buy
by bsadonkill Today at 8:19 am
» Jim Walker Firebaby
by getback Today at 7:42 am
» Sherline lathe wont run
by getback Today at 7:15 am
» Hawk had breakfast and then took a bath
by GallopingGhostler Today at 6:43 am
» Roddie's water-cooling bottle for bench-running
by roddie Yesterday at 7:38 pm
» Feed Station Zebra.. Spring 2022
by roddie Yesterday at 5:59 pm
» **VOTE-ON-THE-NEXT-COX-ENGINE-OF-THE-MONTH** (May 2024)
by GallopingGhostler Yesterday at 11:12 am
» Jim Walkers FireBee - This is going to be fun
by rsv1cox Yesterday at 7:43 am
» Baja Bug / Dune Buggy Recoil Starter
by vambrosini Mon May 13, 2024 8:57 pm
» Wanted: Pull Starter reapir kit for a Cox Dune Buggy.
by vambrosini Mon May 13, 2024 8:55 pm
» cox dune buggy/ baja bug
by vambrosini Mon May 13, 2024 8:49 pm


Guillow's P40 Warhawk build, photos of the finished model
Page 3 of 5 •  1, 2, 3, 4, 5
 ![]()
Re: Guillow's P40 Warhawk build, photos of the finished model
![]() OVERLORD Fri Jun 20, 2014 1:56 pm
OVERLORD Fri Jun 20, 2014 1:56 pm
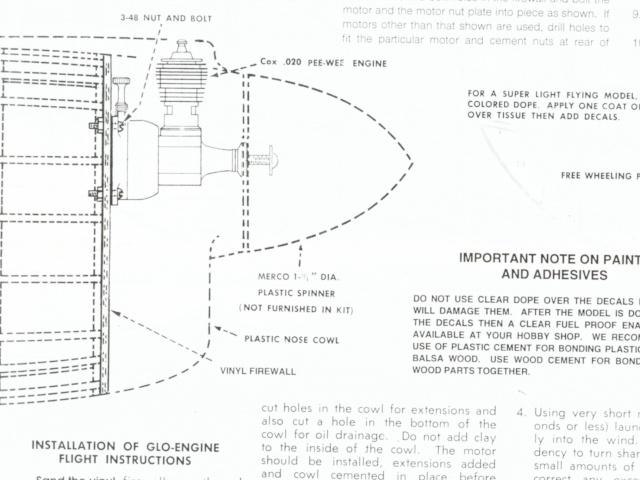
It shows the engine and spinner but doesn't say anything about the prop.
Today, I let the Pee Wee run with the Cox 4.5x2 prop. During the first run, it went backwards but that didn't bother me much. Then happened this: the prop flew off and the engine continued running without the prop. That gave a rather screaming noise
 . I stopped it by pinching the drive washer with my fingers using a rag. Of course, the prop bolt is lost forever in the lawn. After putting the prop back on again with a RED PLASTIC SPINNER !!! this time, I think I found out what happened. While running backwards, drops of castor oïl fly into the propeller andwhen that happened, I heard a distinctive knock in the engine sound . Maybe the prop bolt wasn't done up enough at the same time.
I put a silicon tubing on the needle but the regime was still not constant. Moving the needle with my fingers still made a difference. A video is uploading.
Would a 049 still be all right? It weights twice as much as a Pee Wee.
Lieven

OVERLORD- Diamond Member

- Posts : 1791
Join date : 2013-03-19
Age : 57
Location : Normandy, France
Re: Guillow's P40 Warhawk build, photos of the finished model
![]() OVERLORD Fri Jun 20, 2014 2:53 pm
OVERLORD Fri Jun 20, 2014 2:53 pm
OVERLORD- Diamond Member
- Posts : 1791
Join date : 2013-03-19
Age : 57
Location : Normandy, France
Re: Guillow's P40 Warhawk build, photos of the finished model
![]() Cribbs74 Fri Jun 20, 2014 8:48 pm
Cribbs74 Fri Jun 20, 2014 8:48 pm
It's possible to make the .020 work. They are notorious air leakers so you probably need to pressurize the tank and see what happens.
That being said, it would take a bit of work to get an .049 to fit neatly under the cowl. Plus it would take some beefing up of the nose. If it were me I would do it, but it would be up to you. The horseshoe backplate .049 would be your lightest option.
Since you have so much invested in the Pee Wee maybe it's best to stick with it for now.
Ron

Cribbs74- Moderator


Posts : 11897
Join date : 2011-10-24
Age : 50
Location : Tuttle, OK
Re: Guillow's P40 Warhawk build, photos of the finished model
![]() Ken Cook Sat Jun 21, 2014 7:01 am
Ken Cook Sat Jun 21, 2014 7:01 am
Have you had this engine completely apart? The reason I ask, I've seen similar runs where the beginning starts out similar to your run and ends the same. Inside the case and on the shaft itself the castor develops a thick goo that when heated up starts to act somewhat like a brake and clamps down on the crank. A quick polishing of the crank and cleaning of the journal in the case can clear this up. I like to take the easy path first, I would certainly try one shim and see if any improvement is made. I'm looking forward to the video with it on the plane circling skywards. So lets get this engine going as I'm patiently waiting. Ken

Ken Cook- Top Poster

- Posts : 5484
Join date : 2012-03-27
Location : pennsylvania
Re: Guillow's P40 Warhawk build, photos of the finished model
![]() roddie Sat Jun 21, 2014 10:50 am
roddie Sat Jun 21, 2014 10:50 am
Like Ron said; you could have an air-leak somewhere too. May as well eliminate any variables that you can.. and Ken's question about the fuel pick-up tube should definitely be addressed.
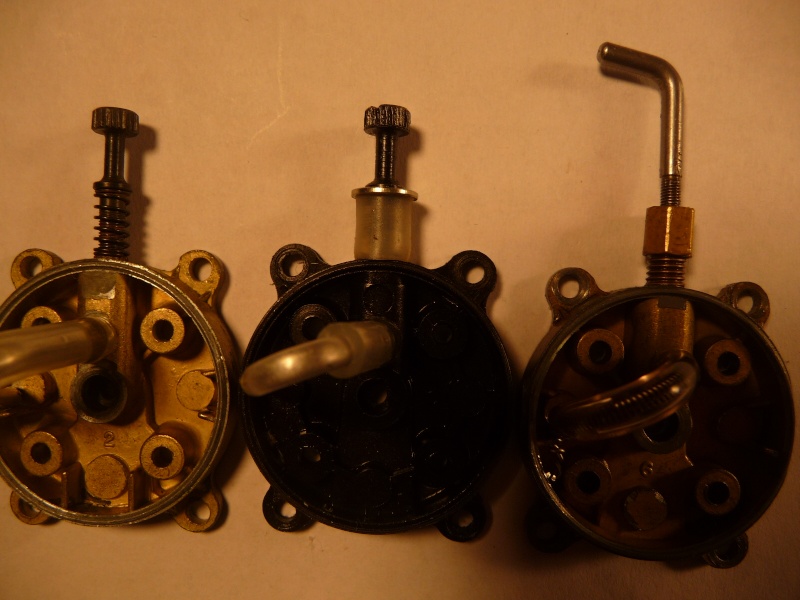
Paul G. sent me a photo of some of his Cox Bee back-plate mods. Notice the one in the middle; particularly the way the "needle" is set up (not the feed-tube..) Notice that he uses a small steel "washer" above the fuel-line seal.. and that the seal needs to be an optimal length to be effective for the needle's range during operation. Too short; and you will have a gap exposing an air-leak.. and too long; the tubing will squash/distort.. and cause the same condition. These are .049 back-plates.. but the same modification could be made for your Pee Wee's needle. I see that you're using a seal.. but I can't see clearly from the vid; whether you're using a washer? The seal-tubing should also be cut perfectly "square" to seal properly.

roddie- Top Poster
- Posts : 8316
Join date : 2013-07-17
Age : 64
Location : N. Smithfield, Rhode Island -

Re: Guillow's P40 Warhawk build, photos of the finished model
![]() OVERLORD Mon Jun 23, 2014 1:45 pm
OVERLORD Mon Jun 23, 2014 1:45 pm
The fuel tube as in the control line position. There is not much space to redirect the fuel line next to the intake tube and then pointing to the bottom. After your last helpful tips, I fixed a washer above the silicon tube on the needle and removed the spring in the fuel line trying to fix in more vertically. After assembling the lot, I tried to start the engine but that became very difficult. Suddenly I noticed that the tank seriously leaked fuel. It wasn't from the tank- backplate joint but from one of the 4 crankcase bolts. I tried to rescrew the one I thought was leaking, but suddenly that went too easy: The bolt hole part of the backplate broke off
Now, before starting this kit, I got everything I thought was usefull for a Pee Wee to stay without problems, heads, gasket sets, spare bolts, reeds, spanner... but what I haven't got is a backplate!!!
Lieven
OVERLORD- Diamond Member
- Posts : 1791
Join date : 2013-03-19
Age : 57
Location : Normandy, France
Re: Guillow's P40 Warhawk build, photos of the finished model
![]() GallopingGhostler Wed Jul 09, 2014 12:00 am
GallopingGhostler Wed Jul 09, 2014 12:00 am
Back in the early '70s, I flew a 27" (686mm) span Top Flite R/C Schoolboy on rudder only pulse proportional and after that a 20" (508mm) Top Flite R/C Roaring 20. I found that the Cox 4.5x2 prop only gave the plane with Cox Pee Wee about 1.5 minutes flight. A Top Flite 5.25x3 nylon prop mounted on it, gained a minute more in fflight and flight was at the same speed. Pee Wee has enough torque to spin a 5" prop. This is of course was on 15% to 25% nitro fuel.Ken Cook wrote:Lieven, one thing I might add is that the 5" prop is a bittoo much for the little Pee Wee. Combine that with that huge spinner and your really lugging it. The backplate of the spinner is as tall as the cylinder sticking up. This could really be blocking needed cooling air thus causing the engine to start overheating and sagging. For a bit the engine ran rich, then leaned up but it definitely wasn't liking it in the end. Try the prop again without the spinner and make a determination. Higher nitro will help. I'm curious myself. Ken
I'd say the the large spinner is the culprit and possibly the plastic prop too. I think the Top Flites were lighter back then. I think simply removing the spinner (except for static display) and going to a wood 5x3 prop, but I find that no one makes that small a wood prop nowadays. I'd try a Cox International 5x3 nylon prop. That I believe is lighter than the Masters or APC prop.

GallopingGhostler- Top Poster
-
Posts : 5341
Join date : 2013-07-13
Age : 70
Location : Clovis NM or NFL KC Chiefs
Re: Guillow's P40 Warhawk build, photos of the finished model
![]() Kim Wed Jul 09, 2014 5:55 am
Kim Wed Jul 09, 2014 5:55 am
If you have a really tough time finding a new backplate, let me know and I'll send one your way !
Spare Parts Kim

Kim- Top Poster
-
Posts : 8536
Join date : 2011-09-06
Location : South East Missouri
Re: Guillow's P40 Warhawk build, photos of the finished model
![]() GallopingGhostler Wed Jul 09, 2014 2:21 pm
GallopingGhostler Wed Jul 09, 2014 2:21 pm
Cox 020 Pee Wee Model Engine Test
Peter Chinn tried a Tornado 5x3 prop and obtained 10,900 rpm on 25% nitro. He adds a statement that there is no use in trying props that diminish rpm less than 11,000. Looking at the engine power graph, engine torgue falls off at values less than 11,000. The 10,900 on a Tornado is right at the threshold. IIRC, the Top Flite prop I used has less blade area than the Tornado given its overall shape.
There is an earlier report in December 1958 Model Aircraft, which has a slightly different power graph, seen at sceptreflight.net:
MA Engine Test Cox "Pee Wee"
11,000 rpm is close to maximum torque. Between 1958 and 1976, no doubt Cox made gradual and subtle improvements to the engine's design. I obtained my engine in Fall 1972, whether it was closer to the 1958 model or 1976 one, it had the smaller tapered crankcase plain bearing shaft housing like the 1958 one.
Regardless, the Pee Wee is a little jewel, and loves high nitro fuel. (Until refomulated, don't use the Hobbico Cox Power Fuel. Even though it has 25% nitro, it has 18% oil with only a smigeon of Castor. Bernie at Cox International has recommended at least 20% oil of which half is Castor.)
I'd suggest experimentation, make sure not to run the Pee Wee overly lean but let it scream, leave off the heavy and cumbersome nose cone; and see what best results are obtained through various small props.
GallopingGhostler- Top Poster
-
Posts : 5341
Join date : 2013-07-13
Age : 70
Location : Clovis NM or NFL KC Chiefs
Re: Guillow's P40 Warhawk build, photos of the finished model
![]() GallopingGhostler Wed Jul 09, 2014 2:38 pm
GallopingGhostler Wed Jul 09, 2014 2:38 pm
Looks like you are in luck, Lieven, Kim has offered you a back plate. Leak you had may have been related to a cracked bolt hole flange, which finally separated on you. Also, if there was leakage out the rear venturi hole, it could have been due to a missing rubber washer gasket. It looks similar to a tiny O-ring, except it is flat.OVERLORD wrote:Before starting for the first time, I took the tank apart. There were no remnants of fuel or oïl in there. Also the crankcase was clean. The fuel tube as in the control line position. There is not much space to redirect the fuel line next to the intake tube and then pointing to the bottom. After your last helpful tips, I fixed a washer above the silicon tube on the needle and removed the spring in the fuel line trying to fix in more vertically. After assembling the lot, I tried to start the engine but that became very difficult. Suddenly I noticed that the tank seriously leaked fuel. It wasn't from the tank- backplate joint but from one of the 4 crankcase bolts. I tried to rescrew the one I thought was leaking, but suddenly that went too easy: The bolt hole part of the backplate broke off
Now, before starting this kit, I got everything I thought was usefull for a Pee Wee to stay without problems, heads, gasket sets, spare bolts, reeds, spanner... but what I haven't got is a backplate!!! Lieven
The vinyl fuel pickup tube nipple on the back plate is very fragile. I have already broken one. If your tube is hardened due to age, you may have to apply a little heat to it (hot water) to soften it. You can use very small silicon tubing, reuse the tubing spring and reroute to the bottom of the tank.
Cox International has an overhaul kit for US$ 3.95 (€ 2.96) that includes a new pickup tube:
http://coxengines.ca/cox-.020-pee-wee-overhaul-kit.html
GallopingGhostler- Top Poster
-
Posts : 5341
Join date : 2013-07-13
Age : 70
Location : Clovis NM or NFL KC Chiefs
Re: Guillow's P40 Warhawk build, photos of the finished model
![]() RknRusty Wed Jul 09, 2014 2:41 pm
RknRusty Wed Jul 09, 2014 2:41 pm
Thanks for re-iterating that, George. Warnings against that fuel are scattered about here at CEF, but it can't be stated enough. The Cox Super Power Fuel from Tower or Coxmodels.com can and will ruin a Cox engine in one short session. A couple of our members have proved it.GallopingGhostler wrote:...Regardless, the Pee Wee is a little jewel, and loves high nitro fuel. (Until reformulated, don't use the Hobbico Cox Power Fuel. Even though it has 25% nitro, it has 18% oil with only a smidgen of Castor. Bernie at Cox International has recommended at least 20% oil of which half is Castor.)...
Rusty
_________________
...and never Ever think about how good you are at something...
while you're doing it!
My Hot Rock & Blues Playlist

RknRusty- Rest In Peace

- Posts : 10869
Join date : 2011-08-10
Age : 68
Location : South Carolina, USA
Re: Guillow's P40 Warhawk build, photos of the finished model
![]() GallopingGhostler Wed Jul 09, 2014 2:51 pm
GallopingGhostler Wed Jul 09, 2014 2:51 pm
Many a modeler ruined model aeroplane engines using that fuel.
GallopingGhostler- Top Poster
-
Posts : 5341
Join date : 2013-07-13
Age : 70
Location : Clovis NM or NFL KC Chiefs
Re: Guillow's P40 Warhawk build, photos of the finished model
![]() OVERLORD Thu Jul 10, 2014 11:29 am
OVERLORD Thu Jul 10, 2014 11:29 am
The pick up tube is still in the control line position. It doesn't bother me much. As long as the engine stops instantly when runnung out of fuel, that should be OK. What I experienced until now was that during the last 10 seconds of running time, the engine ran very irregularly, which would not give a nice flight.
As what cooling is concerned, there will be an air flow through the lower openings in the cowl that rises past the cylinder and head back out again.
Hopefully, this all will give some positive results.
Lieven
OVERLORD- Diamond Member
- Posts : 1791
Join date : 2013-03-19
Age : 57
Location : Normandy, France
Re: Guillow's P40 Warhawk build, photos of the finished model
![]() GallopingGhostler Thu Jul 10, 2014 4:51 pm
GallopingGhostler Thu Jul 10, 2014 4:51 pm
Your replacing the tank venturi O-ring should improve needle response and prevent flooding. Your erratic running may have been attributed to fuel consumption going below the venturi location, starting to suck air.
Regarding needing at least 50% of the 20% oil being Castor, engine will run hot. I gather that Leroy Cox scaled the engine down from the .049, but I don't think there was science on cooling, mostly empirical (experimental). This is particularly true when using slightly larger props. The Castor will help to protect the piston ball and socket joint and piston cylinder fit. Once pickup tubing is relocated or replaced to opening at bottom of tank, expect about 1 to 1.5 minutes run time. I was getting 2.5 minutes with 5.25x3 and 5x3 Top Flite nylon props. (Although wood was superior did not use it, as they didn't stand up too well with hard landings.) Some drill a hole through the tank and use an external tank for longer run time. I did that on my Ace R/C Littlest Stick. I don't know if you want to do that to your engine.
GallopingGhostler- Top Poster
-
Posts : 5341
Join date : 2013-07-13
Age : 70
Location : Clovis NM or NFL KC Chiefs
Re: Guillow's P40 Warhawk build, photos of the finished model
![]() roddie Thu Jul 10, 2014 5:52 pm
roddie Thu Jul 10, 2014 5:52 pm
I actually don't see that big spinner being much of a concern for this application.. It's merely a "flywheel".. and it's rotational-mass difference compared to running a smaller/lighter one.. (or no spinner at all) is really insignificant when you compare these factors to increasing propeller pitch, which "will" load the engine. If your engine were "throttled".. you might notice a dwell in throttle-response.. until reaching a steady engine speed; both throttling up or down. Consider the physics behind the "Hit and Miss" engine design, which uses a sizeable flywheel to spin the crankshaft between ignition power strokes.
roddie- Top Poster
- Posts : 8316
Join date : 2013-07-17
Age : 64
Location : N. Smithfield, Rhode Island -
Re: Guillow's P40 Warhawk build, photos of the finished model
![]() GallopingGhostler Thu Jul 10, 2014 6:06 pm
GallopingGhostler Thu Jul 10, 2014 6:06 pm
GallopingGhostler- Top Poster
-
Posts : 5341
Join date : 2013-07-13
Age : 70
Location : Clovis NM or NFL KC Chiefs
Re: Guillow's P40 Warhawk build, photos of the finished model
![]() OVERLORD Sun Jul 27, 2014 2:08 am
OVERLORD Sun Jul 27, 2014 2:08 am
I considered repairing the broken bit of the backplate but it wont be easy for 2 reasons: These backplates are made of zamac, or mazac as they say in the UK, which is not a very good material to work with and once repaired, there is a lot of force acting onto that part by the crankcase bolt. I doubt that a repair would resist to all that.
Thanks to Kim, who sent me a backlate and many more spares for a proper Pee Wee overhaul, the engine is back running again. During the first tests, the engine ran with constant speed which was a big improvement due to the now non-leaking fuel tank and the replaced rubber o ring on the fuel feed. I also fixed a longer pick up tube that goes right to the bottom of the tank. The rpm was not very high though and the spinner vibrated a lot:
I found out that the vibrations of the spinner were caused by the plasting spinner base plate that flexes combined with the weight of the cone attached to it. Also, with a full tank, the engine stopped by itself half way through. Then, I could start it again and kept running till the end.
For a second test, I replaced the needle spring by a piece of silicon tubing and I removed the spinner cone. That was much better: higher rpm and no vibrations:
Now I have to find a way of determine the exact fuel quantity for a certain amount of running time. The tank should be 2 or 3 cc? With 1.5cc of fuel, the engine ran about 30 seconds but I have to do further testing for that.
I fixed the rudder to the fuse by means of a brass plate thet can be bent if needed. The plate was bolted to the fuse so it can be removed.

I'm happy that this engine is repaired and runs great. THANK YOU KIM!!!
Lieven
OVERLORD- Diamond Member
- Posts : 1791
Join date : 2013-03-19
Age : 57
Location : Normandy, France
Re: Guillow's P40 Warhawk build, photos of the finished model
![]() roddie Sun Jul 27, 2014 9:04 am
roddie Sun Jul 27, 2014 9:04 am
Is it necessary to use a prop-screw that long? Also; that brass tubing spacer for the screw; is it the only thing bearing on the spinner-plate? Try cutting the screw shorter.. and use a steel washer to bear on the spinner-plate and try running the engine again with the cone.
EDIT: I just noticed that there's also a bushing that appears to be bearing on the spinner-plate. Is that part of the spinner assembly.. or something you devised in order to utilize the length of the prop-screw(s) that you had on hand? Is it a hub-reduction adapter that came with the spinner? If so; maybe retaining it with the shorter screw/steel washer would stabilize it better
I didn't "see" any vibration in the first test vid.. and if you only did the two tests.. you may find now; that the spinner runs smoother with a shortened prop-screw w/washer.. and at a higher RPM due to harmonic differences.

roddie- Top Poster
- Posts : 8316
Join date : 2013-07-17
Age : 64
Location : N. Smithfield, Rhode Island -
Re: Guillow's P40 Warhawk build, photos of the finished model
![]() getback Sun Jul 27, 2014 11:58 am
getback Sun Jul 27, 2014 11:58 am


getback- Top Poster
-
Posts : 10158
Join date : 2013-01-18
Age : 66
Location : julian , NC
Re: Guillow's P40 Warhawk build, photos of the finished model
![]() OVERLORD Sun Jul 27, 2014 1:51 pm
OVERLORD Sun Jul 27, 2014 1:51 pm
There is no other spacer or bushing on that spinner plate. Just the bolt and the small brass tube. I distilled a picture out of the video showing the spinner vibration. That is only caused by the bending of the spinner plate when the cone is attached. Maybe I should look out for a Kavan spinner. These are screwed on with the cone onto the prop and they have no back plate at all.

Lieven
OVERLORD- Diamond Member
- Posts : 1791
Join date : 2013-03-19
Age : 57
Location : Normandy, France
Re: Guillow's P40 Warhawk build, photos of the finished model
![]() GallopingGhostler Mon Jul 28, 2014 2:17 pm
GallopingGhostler Mon Jul 28, 2014 2:17 pm
GallopingGhostler- Top Poster
-
Posts : 5341
Join date : 2013-07-13
Age : 70
Location : Clovis NM or NFL KC Chiefs
Re: Guillow's P40 Warhawk build, photos of the finished model
![]() OVERLORD Mon Jul 28, 2014 3:42 pm
OVERLORD Mon Jul 28, 2014 3:42 pm
http://www.weymuller.fr/catalogue/cones/cones_nylon/cones_kavan_bipale.html
Lieven
OVERLORD- Diamond Member
- Posts : 1791
Join date : 2013-03-19
Age : 57
Location : Normandy, France
Re: Guillow's P40 Warhawk build, photos of the finished model
![]() 1/2A Nut Sun Aug 03, 2014 2:37 am
1/2A Nut Sun Aug 03, 2014 2:37 am
1/2A Nut- Top Poster
- Posts : 3441
Join date : 2013-10-20
Age : 60
Location : Brad in Texas
Re: Guillow's P40 Warhawk build, photos of the finished model
![]() GallopingGhostler Sun Aug 03, 2014 8:39 am
GallopingGhostler Sun Aug 03, 2014 8:39 am
The Cox Pee Wee is a torquey little bugger. I flew them in the early 1970's in single channel RC planes. I gaine an additional minute of flight time on a Top Flite 5.25x3 nylon prop with no change in flight speed. Haven't tried a modern 5x2, but I don't see why it shouldn't work. Still have my Ace RC Littlest Stick from the late 1970's with Cox Pee Wee. Still need to install modern RC micro gear, convert to 2 channel. Then I'll be able to test the more recent props.1/2A Nut wrote:That spinner dia. is so big it leaves less working prop for flying the plane. I wonder if a 5x2 would do some good.
GallopingGhostler- Top Poster
-
Posts : 5341
Join date : 2013-07-13
Age : 70
Location : Clovis NM or NFL KC Chiefs
Re: Guillow's P40 Warhawk build, photos of the finished model
![]() OVERLORD Fri Aug 22, 2014 12:52 pm
OVERLORD Fri Aug 22, 2014 12:52 pm
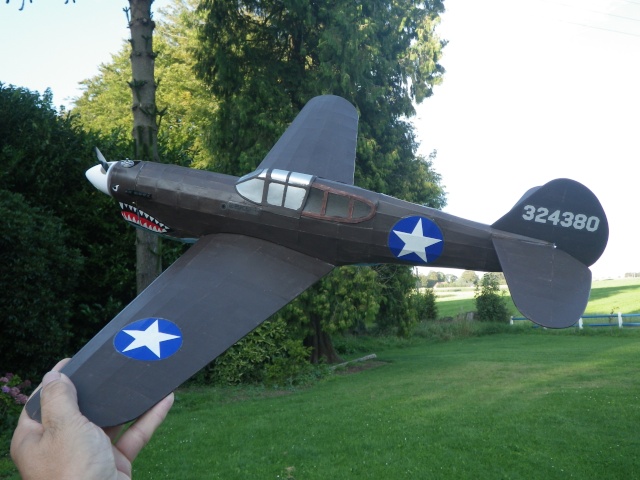
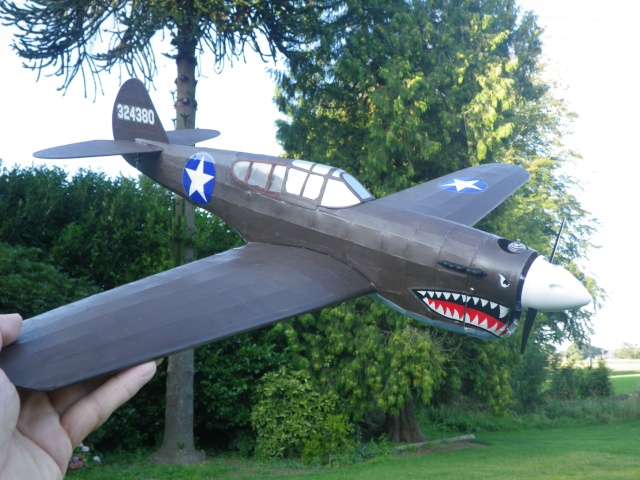
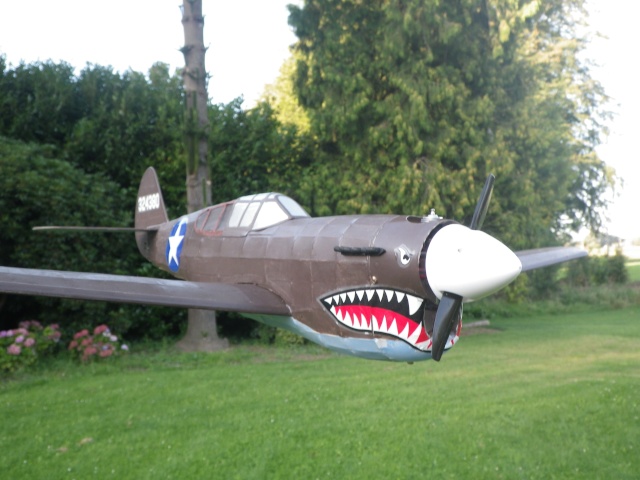
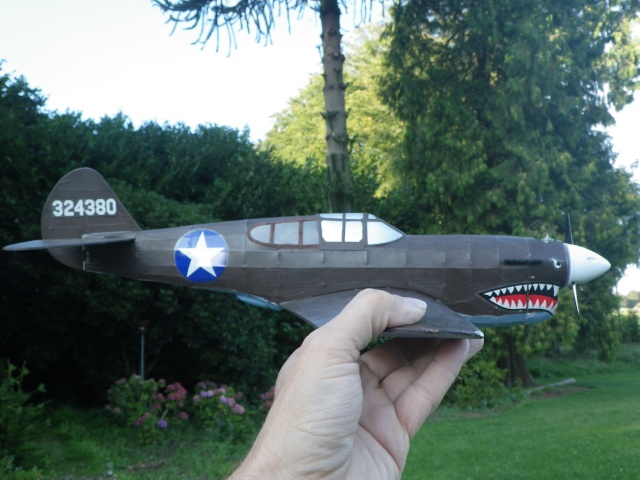
Things that still need doing:
- add a fuel filling tube
- make a drain hole on the cowl
- reinforce the spinner's back plate to prevent wobbling. A reinforcement device, custom built by Roddie is on its way.
- fit a 5x2 prop and experimenting
- balancing
- flying
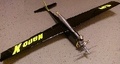
Does it look mean?
Lieven
OVERLORD- Diamond Member
- Posts : 1791
Join date : 2013-03-19
Age : 57
Location : Normandy, France
Page 3 of 5 • 1, 2, 3, 4, 5 ![]()
» Guillows Cessna 150 build circa 1970 (Build Log)
» Another Li'l Satan build (Finished)
» Guillows Spitfire park flyer FINISHED!!!!!!!!!!!!
» Guillows Cessna build advice needed