Log in
Search
Latest topics
» Roddie's flat-bottomed boat..by OVERLORD Today at 10:11 am
» Tired of it all…
by Ken Cook Today at 8:04 am
» PT-19 Mayhem at Buder Park...a Decade Ago!!!!
by Kim Today at 7:41 am
» Project Cox .049 r/c & Citabrian Champion
by getback Today at 6:46 am
» Three -- sold out (making two more) Cox .010 Carburetors with wrench
by balogh Today at 12:34 am
» Joe Wagners Sioux
by GallopingGhostler Yesterday at 9:03 pm
» Happy Anzac Day!
by GallopingGhostler Yesterday at 4:16 pm
» Jim Walkers FireBee - This is going to be fun
by rsv1cox Yesterday at 12:27 pm
» Revivng Some Childhood Classics
by getback Yesterday at 7:31 am
» Fox .35 Modifications
by Ken Cook Yesterday at 3:16 am
» Introducing our Cox .049 TD Engines
by getback Fri Apr 26, 2024 6:20 am
» Cox powered jet-pump for model Sprint Boat
by roddie Thu Apr 25, 2024 10:25 pm
Cox Engine of The Month
Stuntman 23 Redux
Page 1 of 1
 Stuntman 23 Redux
Well, since it has been a long while since I flew control line, and about as long since I sliced any balsa, I decided to go back to what worked well for me before. Scratch building a Stuntman 23 from the sketches on Outerzone. I "traced" the pieces into a CAD file and scaled them to yield a 23" wingspan. I had thought the actual span was 23-1/2", but 23 seems to work okay.
I forgot how large the tailplane is compared to the wing. The plans on Outerzone did not include the horizontal stabilizer, so mine is conjectural, tempered by images I found on the web. I also forgot how "spongy" balsa can be compared to say, maple or ash, and having a metal straightedge and sharp Xacto blades are essential.
Anyway, here is a photo and a link to several others on my Photobucket page.
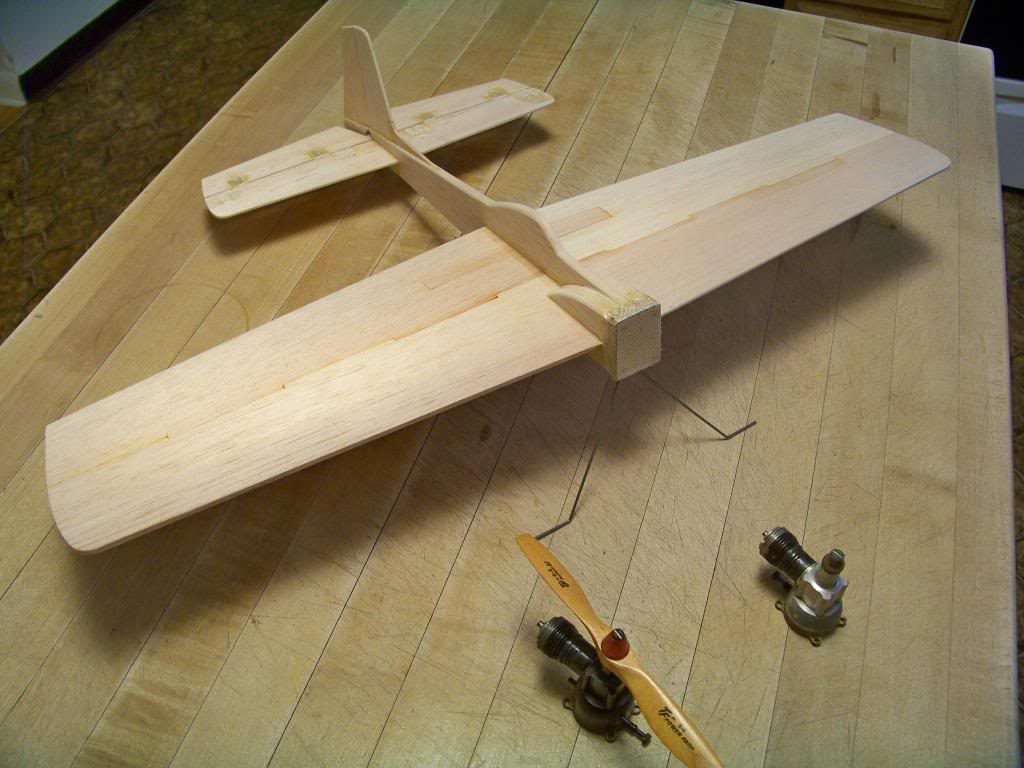
http://https://s165.photobucket.com/user/JKCavitt/library/Stuntman%2023?sort=3&page=1
I used fiberglass cloth from a Bondo automotive repair kit - came with resin - for the firewall reinforcement and the elevator hinges. I used Ambroid (glad they still make this - my favorite) to glue this together including the fiberglass cloth. A tip for anyone using this fiberglass cloth, it unravels quite easily. I found spraying the cloth with clear lacquer (you can also use dope) stiffens and sort of binds the fibers, preventing unraveling (or unweaving). The acetone in the Ambroid glue will soften the dry lacquer (or dope) enough to lay down and stipple it into the tacky glue. Another tip is to clean up any stray fibers pronto. Otherwise they will follow you around the house bringing unwanted attention and utter scorn from the resident housekeeper.
IIRC the last time I went to fly the Stuntman, the engine came off taking the firewall with it. I found the block behind the firewall was saturated with glow fuel. This time I made the firewall from two 1/8" aircraft ply pieces sandwiched together. Hopefully I'll get a few more flights this way.
I also deviated from the original Stuntman, making a single piece elevator, reinforcing the center and horn location with 1/16" ply.
I hope to have this puppy ready for spring flying with my nephews.
The engines are a Babe Bee and a Black Widow, last flown on a Stuntman 23 around '83. I was using Cox sport fuel then, and a Top Flite 6x3 and 6x4 power prop. Not sure what fuel to use now, since Cox isn't making fuel anymore; engines either I gather. Anyway I was thinking Sig makes a 25% nitro fuel that is probably close to the old Cox formula.
Ciao, and Merry Christmas and best wishes to all here for an Excellent 2014.
I forgot how large the tailplane is compared to the wing. The plans on Outerzone did not include the horizontal stabilizer, so mine is conjectural, tempered by images I found on the web. I also forgot how "spongy" balsa can be compared to say, maple or ash, and having a metal straightedge and sharp Xacto blades are essential.
Anyway, here is a photo and a link to several others on my Photobucket page.

http://https://s165.photobucket.com/user/JKCavitt/library/Stuntman%2023?sort=3&page=1
I used fiberglass cloth from a Bondo automotive repair kit - came with resin - for the firewall reinforcement and the elevator hinges. I used Ambroid (glad they still make this - my favorite) to glue this together including the fiberglass cloth. A tip for anyone using this fiberglass cloth, it unravels quite easily. I found spraying the cloth with clear lacquer (you can also use dope) stiffens and sort of binds the fibers, preventing unraveling (or unweaving). The acetone in the Ambroid glue will soften the dry lacquer (or dope) enough to lay down and stipple it into the tacky glue. Another tip is to clean up any stray fibers pronto. Otherwise they will follow you around the house bringing unwanted attention and utter scorn from the resident housekeeper.
IIRC the last time I went to fly the Stuntman, the engine came off taking the firewall with it. I found the block behind the firewall was saturated with glow fuel. This time I made the firewall from two 1/8" aircraft ply pieces sandwiched together. Hopefully I'll get a few more flights this way.
I also deviated from the original Stuntman, making a single piece elevator, reinforcing the center and horn location with 1/16" ply.
I hope to have this puppy ready for spring flying with my nephews.
The engines are a Babe Bee and a Black Widow, last flown on a Stuntman 23 around '83. I was using Cox sport fuel then, and a Top Flite 6x3 and 6x4 power prop. Not sure what fuel to use now, since Cox isn't making fuel anymore; engines either I gather. Anyway I was thinking Sig makes a 25% nitro fuel that is probably close to the old Cox formula.
Ciao, and Merry Christmas and best wishes to all here for an Excellent 2014.

statorvane- Moderate Poster

- Posts : 22
Join date : 2013-11-10
Location : Upstate New York
 Re: Stuntman 23 Redux
Good job!
SIG 25% is what most of us use, or we mix castor into current offerings. I use 30% powermaster heli fuel and add castor to bump the content to 20%
SIG 25% is what most of us use, or we mix castor into current offerings. I use 30% powermaster heli fuel and add castor to bump the content to 20%

Cribbs74- Moderator


Posts : 11895
Join date : 2011-10-24
Age : 50
Location : Tuttle, OK

getback- Top Poster


Posts : 10119
Join date : 2013-01-18
Age : 66
Location : julian , NC
 Re: Stuntman 23 Redux
The Stuntman looks great! Nice job.. I also like using Ambroid. BTW... NICE Guitars/amps in your other photobucket galleries. I'm a musician myself. (keys)
Roddie
Roddie
 Re: Stuntman 23 Redux
Thank you all for the kind words and encouragement. And thanks Cribbs74 for the confirmation on the Sig Champion 25% nitro fuel.
Lots of neat work here. I'll keep you posted as the model progresses. Thinking this might scale well into a flapped stunter, built-up wing, 1.5 size increase for a .20, or doubling the size with say a .35 or so.
BTW, forgot to ask. Anybody ever built their own control handles? I've got lots of scrap maple, mahogany, and ash taking up space. Some ply as well.
Thank you all again.

statorvane- Moderate Poster

- Posts : 22
Join date : 2013-11-10
Location : Upstate New York
 Re: Stuntman 23 Redux
statorvane wrote:
BTW, forgot to ask. Anybody ever built their own control handles? I've got lots of scrap maple, mahogany, and ash taking up space. Some ply as well.
I copied a few pics from the 1/2A section of Stunthanger a couple of days ago, as I need to make a handle for a project I have in mind.
This is about as basic as it gets:


And one I don't think I'll copy, but you might like:

And one that is a design I'll try at least once to see how it feels. You can see how he winds the line about a post and then holds it in place with a rubber band. Neat. The line spacing would be perfect for a .020 model, and maybe for a .049 model:


The Poorly Handled Mark
batjac- Diamond Member


Posts : 2336
Join date : 2013-05-22
Age : 61
Location : Broken Arrow, OK, USA

batjac- Diamond Member


Posts : 2336
Join date : 2013-05-22
Age : 61
Location : Broken Arrow, OK, USA
 Re: Stuntman 23 Redux
Thank you all kindly. Many different ways to skin a cat.  I kind of like the orange stick/handle.
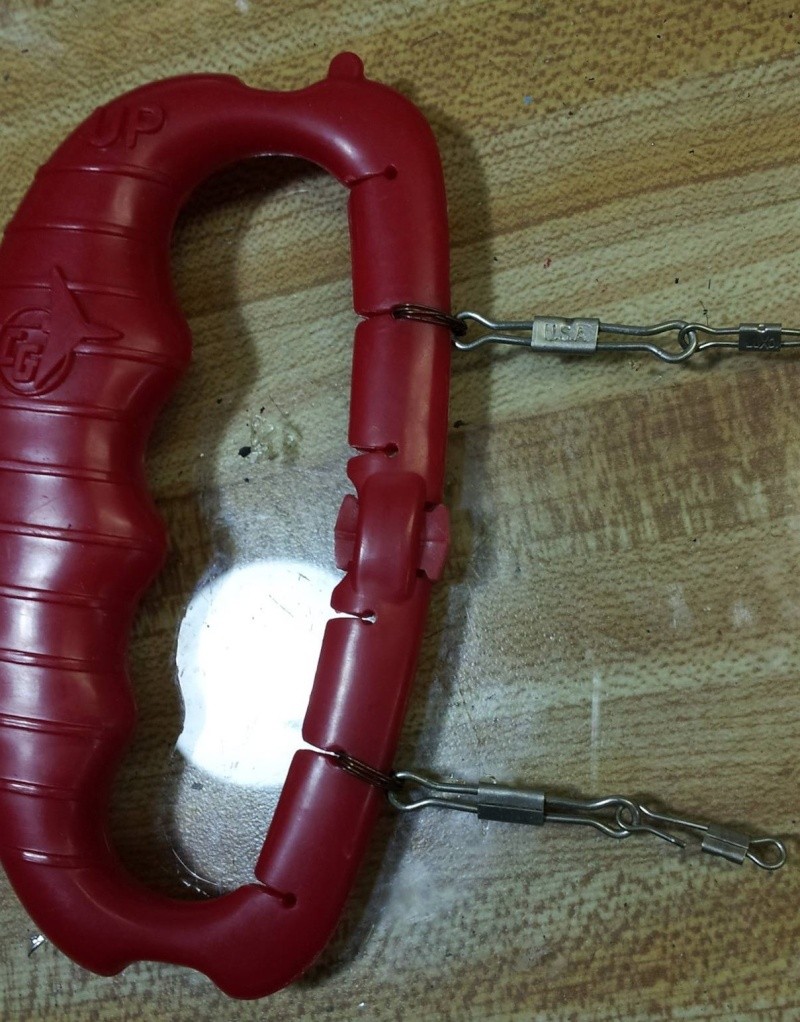
I did a web search for "Control Line Handle". I think it looks like this one: http://www.ebay.com/itm/Control-Line-Handle-Adjustable-Throw-C-L-Combat-3-0-/150823255222
batjac wrote:I can't see the the handle very well, but it gives the impression that the control line holes are movable.
I did a web search for "Control Line Handle". I think it looks like this one: http://www.ebay.com/itm/Control-Line-Handle-Adjustable-Throw-C-L-Combat-3-0-/150823255222

statorvane- Moderate Poster

- Posts : 22
Join date : 2013-11-10
Location : Upstate New York
 Re: Stuntman 23 Redux
I have one of those. He makes them with several different leader spacings. It's a good strong handle, and pretty comfortable in my hand.statorvane wrote:Thank you all kindly. Many different ways to skin a cat.I kind of like the orange stick/handle.
batjac wrote:I can't see the the handle very well, but it gives the impression that the control line holes are movable.
I did a web search for "Control Line Handle". I think it looks like this one: http://www.ebay.com/itm/Control-Line-Handle-Adjustable-Throw-C-L-Combat-3-0-/150823255222
_________________
Don't Panic!
...and never Ever think about how good you are at something...
while you're doing it!
My Hot Rock & Blues Playlist
...and never Ever think about how good you are at something...
while you're doing it!
My Hot Rock & Blues Playlist

RknRusty- Rest In Peace

- Posts : 10869
Join date : 2011-08-10
Age : 68
Location : South Carolina, USA
 Re: Stuntman 23 Redux
I have one of those, it's a Larry Renger desighn and I love it.
http://www.rsmdistribution.com/index-2.htm
Kind of a funky link, go to the "handles and lines" section.
Jim

JPvelo- Diamond Member

- Posts : 1972
Join date : 2011-12-02
Age : 56
Location : Colorado
 Re: Stuntman 23 Redux
Thanks for the control handle ideas. I need to optimize one for minimal throw when I train my nephews, and for my remedial training! I like the orange one. I found several more ideas on another website, similar to the orange one.
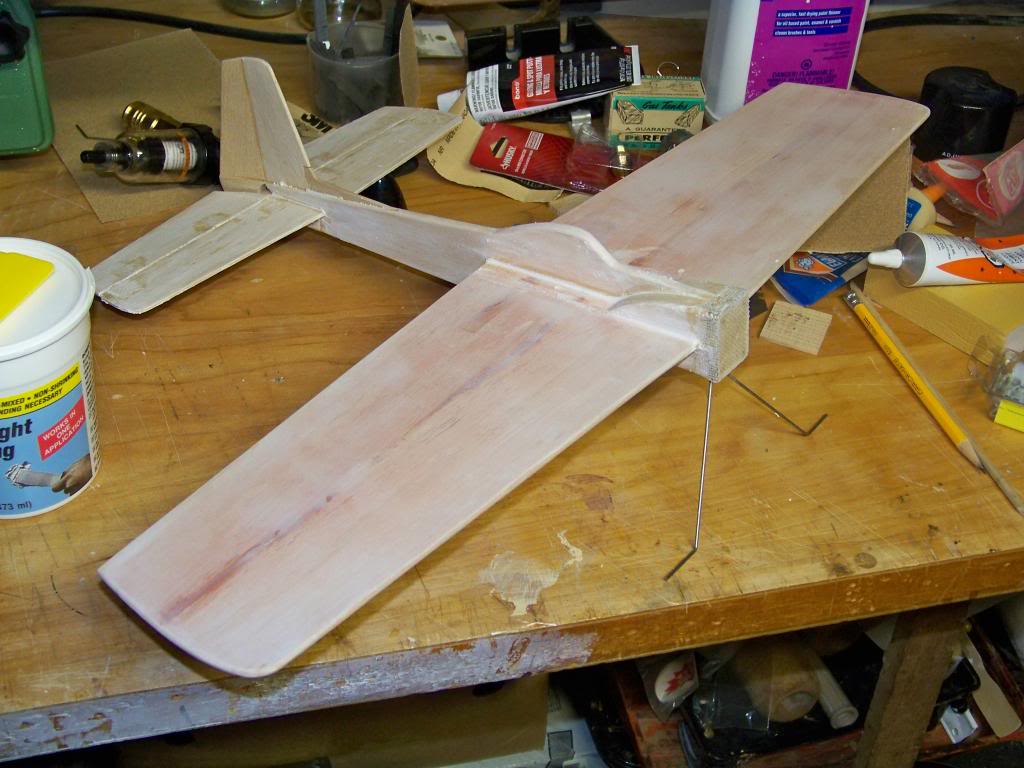
I picked up on Rockin' Rusty's spackle method of preparing the wood. I am simply rubbing it in with my fingers - surprising how much can disappear into the wood; the open pores of the balsa readily accept it. I applied it to the wing first. You can see the wing start to warp after applying it to one side. Flipping the plane over and applying it to the opposite side removes the warp. I let it dry overnight and sand in the morning. Having a ShopVac nearby is handy as this stuff is much like sanding sanding sealer - the spackle sanding residue goes all over the joint.
In the attached photo, the wings have been spackled and sanded w/220 grit paper using a hard, flat sanding block, while the rest of the model has just had some spackle applied. There are some traces of Bondo spotting putty I had tried earlier. Very heavy, but I sanded most of it off anyway. I was really just trying to find a method of sealing the balsa pores. In my previous modeling experience I could get a really smooth finish, but over a year or so, the dope would continue to sink into the pores, revealing the grain again. I am hoping the spackle will act as a grain filler and keep this from happening.
There are several other shots as well. Feel free to browse the album on photobucket: Stuntman 23
BTW, the brand of spackle I am using is Bondex lightweight spackle. Should be able to find this at a home improvement store. Rusty is right - this stuff is featherweight. I believe DAP also markets a similar product.
Hope this helps someone, and thanks Rusty!
I picked up on Rockin' Rusty's spackle method of preparing the wood. I am simply rubbing it in with my fingers - surprising how much can disappear into the wood; the open pores of the balsa readily accept it. I applied it to the wing first. You can see the wing start to warp after applying it to one side. Flipping the plane over and applying it to the opposite side removes the warp. I let it dry overnight and sand in the morning. Having a ShopVac nearby is handy as this stuff is much like sanding sanding sealer - the spackle sanding residue goes all over the joint.
In the attached photo, the wings have been spackled and sanded w/220 grit paper using a hard, flat sanding block, while the rest of the model has just had some spackle applied. There are some traces of Bondo spotting putty I had tried earlier. Very heavy, but I sanded most of it off anyway. I was really just trying to find a method of sealing the balsa pores. In my previous modeling experience I could get a really smooth finish, but over a year or so, the dope would continue to sink into the pores, revealing the grain again. I am hoping the spackle will act as a grain filler and keep this from happening.

There are several other shots as well. Feel free to browse the album on photobucket: Stuntman 23
BTW, the brand of spackle I am using is Bondex lightweight spackle. Should be able to find this at a home improvement store. Rusty is right - this stuff is featherweight. I believe DAP also markets a similar product.
Hope this helps someone, and thanks Rusty!

statorvane- Moderate Poster

- Posts : 22
Join date : 2013-11-10
Location : Upstate New York
 Re: Stuntman 23 Redux
Wow, thanks for the credit, StatorV.
Man, you're making me miss my old Stuntman! I traced it out so I can copy it. Mayne I'll bash one together this Summer. Maybe two and make one a chopper like I had to do when it got too worn out to fix the fuse. I loved the way it flew with the stab an inch or so behind the wing. I can measure it if you ever want to do that.
Rusty
_________________
Don't Panic!
...and never Ever think about how good you are at something...
while you're doing it!
My Hot Rock & Blues Playlist
...and never Ever think about how good you are at something...
while you're doing it!
My Hot Rock & Blues Playlist

RknRusty- Rest In Peace

- Posts : 10869
Join date : 2011-08-10
Age : 68
Location : South Carolina, USA
 Stuntman 23 my first plane
I built my Stuntman when I was 11. Looking at the kit now, I figure all of those wing sections were used just to keep the kit box smaller. If I were to make one today, I'd just use a single, but larger balsa sheet for the wing.
Mine was powered with the infamous Fox 0.099. If you ever get to see one of these in person, you could see the problem that would arise trying to mount it to the Stuntman's firewall. The Fox had a tank in the back of the crankcase casting that was sealed by a cork gasket and cover plate. The same bolts were supposed to be glued behind the firewall (Ambroid of course) and hold the whole shebang together. Well, good luck with that! There was no chance of Ambroid holding the nuts from turning when I tried to assemble the engine to this Mickey mouse setup.
Fortunately, my dad came to the rescue with a sheet metal bracket that screwed into the cheek blocks that reinforced the firewall. That worked out really well. I used an 0.020 music wire for the pushrod. Bad idea. It flexed like crazy and as a result, my plane never flew for more than a half lap or so.
So my Stuntman was definitely NOT a success, but it was my first airplane. The Fox did serious training duty later on a PDQ trainer that I built to replace the battered Stuntman.
Those Goldberg kits still hold a special spot in my heart for days gone by.

706jim- Gold Member

- Posts : 459
Join date : 2013-11-29
 Re: Stuntman 23 Redux
Jim, I was thinking about that too. It could be to help prevent warping, but that's only my guess. It could probably be built with a few less small pieces in the tail section. Or at least simpler methods of reinforcement back there. The rear fuselage is the weakest point. I need a good trainer, and a Stuntman chopper would be perfect for that. Built that way, it flies well, is indestructible, and looks cool too. A 4' tissue paper streamer helps make it more manageable for beginners too.706jim wrote:...Looking at the kit now, I figure all of those wing sections were used just to keep the kit box smaller. If I were to make one today, I'd just use a single, but larger balsa sheet for the wing.
Rusty
_________________
Don't Panic!
...and never Ever think about how good you are at something...
while you're doing it!
My Hot Rock & Blues Playlist
...and never Ever think about how good you are at something...
while you're doing it!
My Hot Rock & Blues Playlist

RknRusty- Rest In Peace

- Posts : 10869
Join date : 2011-08-10
Age : 68
Location : South Carolina, USA
 Re: Stuntman 23 Redux
706jim wrote:Looking at the kit now, I figure all of those wing sections were used just to keep the kit box smaller.
I agree. I had trouble as a kid building a non-warped wing. The second time I built it, same thing. This time, I selected the balsa myself, nice straight Midwest balsa, and the only "warp" is at the joint line between sections. I straightened it out with the leadout guide. I made an identical one for the outboard wing to keep a flat section there too.
706jim wrote:Those Goldberg kits still hold a special spot in my heart for days gone by.
Abso-freakin-lutely. I really miss the Comet kits also. K-Mart used to carry them.

statorvane- Moderate Poster

- Posts : 22
Join date : 2013-11-10
Location : Upstate New York
 Re: Stuntman 23 Redux
Remember the 18" Swordsman? This one's fuse snapped right behind the wing... and it's had the most bogus of other repairs made. My Dad built both of these planes many years ago. He built me a handsome Swordsman probably 45 years ago... It had silk-spanned wings, finished in dk. green Aero-gloss.. and a black fuse. Power was a Cox .049 Babe Bee.
This Stuntman is probably at least 35 years old... I guess I save it because I can always use it as a pattern to build another one.. (justification sickness) and maybe "flapped" like SV mentioned... or a hotrod shortened tail moment like Rusty's...!!
Roddie
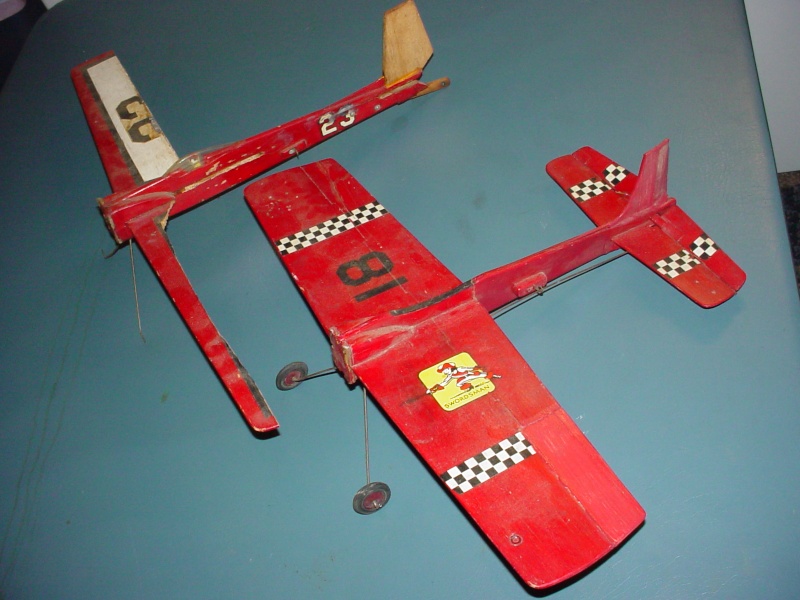
This Stuntman is probably at least 35 years old... I guess I save it because I can always use it as a pattern to build another one.. (justification sickness) and maybe "flapped" like SV mentioned... or a hotrod shortened tail moment like Rusty's...!!
Roddie

 Similar topics
» any suggestions for a big slow plane1/2a or bigger
» Fun with Generic, Non-Threatening Title
» Stuntman 23
» stuntman 23 weight
» Building some Stuntman 23s
» Fun with Generic, Non-Threatening Title
» Stuntman 23
» stuntman 23 weight
» Building some Stuntman 23s
Page 1 of 1
Permissions in this forum:
You cannot reply to topics in this forum

 Rules
Rules


 Glad to see there is more than 2 / 23 flyers here, plane is looking good there. got a old stuntman I've been working with myself was going to fly today but the mediation with its new tank set up had other plans I just couldn't take the chance on crashing [again]


