Log in
Search
Latest topics
» Cox 020 PeeWee rebuild questions by rdw777 Today at 2:15 pm
» COX .020 POWERED SPEEDSTER
by TD ABUSER Today at 2:09 pm
» My N-1R build log
by roddie Today at 12:29 pm
» Ultrasonic Cleaners??
by OVERLORD Today at 9:08 am
» *Cox Engine of The Month* Submit your pictures! -November 2024-
by roddie Today at 6:08 am
» Took an engine out last week
by OVERLORD Today at 4:31 am
» **VOTE-ON-THE-NEXT-COX-ENGINE-OF-THE-MONTH** (November 2024)
by Admin Today at 1:27 am
» K&B Sea Fury outboard engine, casting and box repair
by ffkiwi Yesterday at 7:45 pm
» Cox NaBOO - Just in time for Halloween
by rsv1cox Yesterday at 6:38 pm
» Drones, pretty nifty...........
by rdw777 Yesterday at 4:00 pm
» TEE DEE Having issues
by davidll1984 Yesterday at 7:01 am
» Throttle control for Cox .010 "Viking" engine.
by davidll1984 Yesterday at 6:18 am
Cox powered jet-pump for model Sprint Boat
Page 4 of 4
Page 4 of 4 • 1, 2, 3, 4
Re: Cox powered jet-pump for model Sprint Boat
robot797 wrote:OH so close I cant wait for the results
Almost there Peter!!
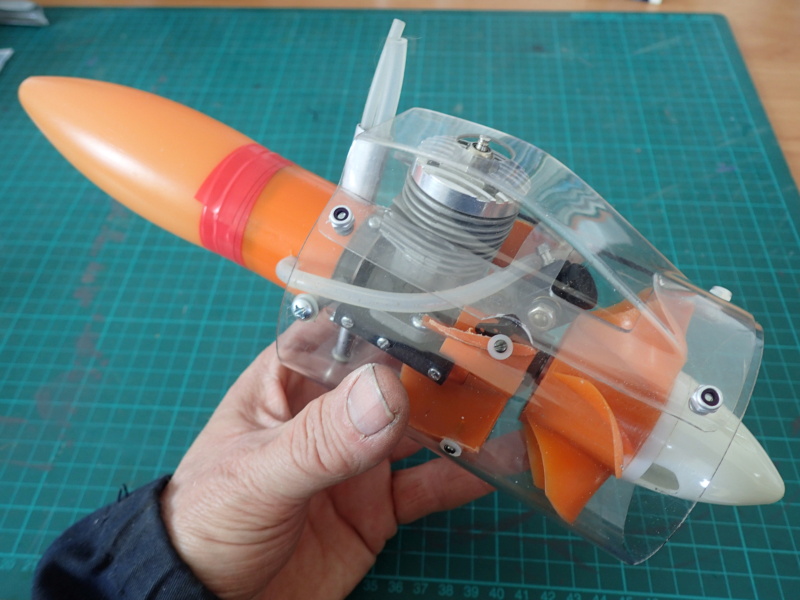
I noticed a potential problem with my engine-mount that I needed to fix before attempting to "tension" the flywheel with the starter-belt. I had only one "pair" of screws through the sides of the fixture to secure the bulkhead/engine-mount. This would allow the mount to pivot like a hinge when subjected to the belt's tension. Left alone; this stresses the coupling and could actually damage the little pump.
So... I put a second pair of screws in below the first pair.. which beefs-up the mount considerably.
Getting these things worked-out through the use of a fixture; will help when it comes time to design/build a hull for the drive.
Re: Cox powered jet-pump for model Sprint Boat
looking good!!!
robot797- Platinum Member
- Posts : 787
Join date : 2013-07-28
Age : 34
Re: Cox powered jet-pump for model Sprint Boat
robot797 wrote:looking good!!!
Thank Peter! Assuming that this will work.. and in anticipation of that... I'm going to make a "spray-baffle". I think I just made a new word. Basically just an angled plate to box-off one end of the tub.. about 6 inches on the spray-side.. and about 2 inches off the floor. Maybe just a "flap" mounted just above the pump nozzle made from thin clear plastic? Easy enough to do.. and might help keep me and the surrounding support equipment dry. Wishful thinking....
Last edited by roddie on Thu Apr 25, 2024 2:00 pm; edited 2 times in total (Reason for editing : "spray".. not splash..)
robot797- Platinum Member
- Posts : 787
Join date : 2013-07-28
Age : 34
Re: Cox powered jet-pump for model Sprint Boat
I've been waiting to run some of this Sig fuel.. unopened since 2018... (really glad I got it when I did...) The castor is for "doctoring" small fuel batches of 10-22 Powermaster fuel, for old vintage glow plain-bearing/steel-fin "stoves".. of which I have a few of.. and I love them.
The Sig "Champion" blends are for my Cox engines.. exclusively.
drive-coupling alignment issues
I recently reworked my marine flywheel/O-ring set-up for more positive "grip".. and less slip for two prospective marine engines.. as well as the flywheel on my electric starter.
In the process; I noticed excessive run-out in the drive couplings on my jet-pump-to-engine connection that absolutely needed to be addressed.. or else the vibration would wreak havoc in the drive-bushings in no time.
Talk about a PITA.. (um.. fiasco..) I'm using X2 couplings which is not ideal.... but it's the way I did it. The pump has a 3mm dia. input-shaft.. so I sourced a 3mm to 3.17mm (1/8" dia.) adaptive coupling. I had to source a 2nd coupling so as to clear the pump-housing around the input-shaft.. and also the bulkhead that the housing's flange mounts to. A 3.17mm to 3.17mm (1/8" to 1/8") coupling. The Cox .049/.051 engines accept a #5 (5-40) machine-screw which must be utilized in the set-up. I used a 1" length 5-40 cap-screw with the head cut off to achieve this.. and filed a flat for the coupling's grub-screw to bite-into. Then I made a stub-shaft from 1/8" music-wire to connect the two couplings.
The adaptive "pump-coupling" utilizes real small grub-screws which require a 1.5mm hex-key. A lesser quality hex key strips in short order. I sourced a good quality hex-key to deal with this issue. Well.. it turns out that those little grub-screws aren't of the highest quality either.. The couplings came in a package of 8.. so I replaced the pump-coupling having fresh screws and my better quality hex-key. OK... then the stub-shaft connects the engine-coupling. The engine coupling has bigger/better grub-screws and seems to be spinning "true" from the pump-side. The connection to the engine was where the run-out was happening. I needed to face the coupling up "flush" with the 5-40 hex-nut on the flywheel to alleviate the run-out. (are you getting all this?)
I'll be building a single-coupling surface-drive for my rigger project.. and will drill/tap the coupling 5-40 on the engine-side to avoid this issue. Unfortunately I have to run two couplings with this jet-pump drive.
1st vid of the jet-pump's test-tub.
Don't expect much from this vid. The engine ran.. but the pump didn't pump......
I wrote a synopsis that can be read in the YouTube view.. but it basically notes that the engines' fill/vent nipples for its' 5cc integral tank were occluded/blocked by tubing that I had installed over the "needle"... to prevent air-leaks. I wasn't prepared to easily refuel the tank.. and my syringes' fuel-line wall was too thick for the task.
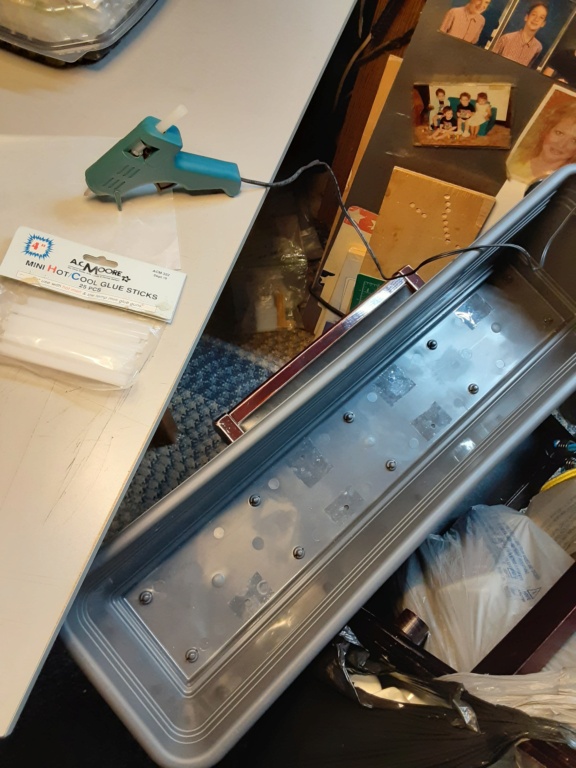
It's a good mod to make... but you can see by the below photos.. what the issue is. A hypodermic type of needle/nozzle for injecting fuel into one of the nipples would be key.
That's just a formality.. I was warned about the use of my test-tub; not giving accurate flow-feedback. I agree now. Despite the fixture's decline-angle for submerging the pump; the pump was not completely submerged. I'm assuming that complete submersion must happen in order to prime the pump. I may need to vertically lower the pump into a bucket of water to note how much the engine labors.
Re: Cox powered jet-pump for model Sprint Boat
good firsth test
but there is WAY to little water
jet drives need to be fully submerged or else they have a hard time
but there is WAY to little water
jet drives need to be fully submerged or else they have a hard time
robot797- Platinum Member
- Posts : 787
Join date : 2013-07-28
Age : 34
Re: Cox powered jet-pump for model Sprint Boat
robot797 wrote:good firsth test
but there is WAY to little water
jet drives need to be fully submerged or else they have a hard time
Hi Peter, Yea... I'm actually pleased with the way my belt-start system is working. I'll be applying it in the Roddie-Rigger... which incidentally is further-along as an actual model.. than the jet-drive boat. I'm trying to decide how to proceed. We're into June now.. and I want to put a boat in the water.. and have it run.
Re: Cox powered jet-pump for model Sprint Boat
I say do what you think is right
but if I had to pick it would be the jet
robot797- Platinum Member
- Posts : 787
Join date : 2013-07-28
Age : 34
Re: Cox powered jet-pump for model Sprint Boat
Since establishing some assembly methods with my out-rigger.. (thread) I'm going to get back to working on this.. on the side. I'm running out of Summer.. but on a positive note; the pond algae goes away when the cooler weather comes.
Page 4 of 4 • 1, 2, 3, 4
Similar topics
» WL917 mini RC Sprint Boat
» Cox powered boat litle shrimp hidroplane
» Cox 049 powered race boat
» scale model boat-dock with slips...
» .049 cox powered rc boat Convert to nitro
» Cox powered boat litle shrimp hidroplane
» Cox 049 powered race boat
» scale model boat-dock with slips...
» .049 cox powered rc boat Convert to nitro
Page 4 of 4
Permissions in this forum:
You cannot reply to topics in this forum