

 Rules
Rules
by Ken Cook Today at 8:04 am
» PT-19 Mayhem at Buder Park...a Decade Ago!!!!
by Kim Today at 7:41 am
» Project Cox .049 r/c & Citabrian Champion
by getback Today at 6:46 am
» Roddie's flat-bottomed boat..
by getback Today at 6:17 am
» Three -- sold out (making two more) Cox .010 Carburetors with wrench
by balogh Today at 12:34 am
» Joe Wagners Sioux
by GallopingGhostler Yesterday at 9:03 pm
» Happy Anzac Day!
by GallopingGhostler Yesterday at 4:16 pm
» Jim Walkers FireBee - This is going to be fun
by rsv1cox Yesterday at 12:27 pm
» Revivng Some Childhood Classics
by getback Yesterday at 7:31 am
» Fox .35 Modifications
by Ken Cook Yesterday at 3:16 am
» Introducing our Cox .049 TD Engines
by getback Fri Apr 26, 2024 6:20 am
» Cox powered jet-pump for model Sprint Boat
by roddie Thu Apr 25, 2024 10:25 pm


Frog Aerobat
Page 1 of 2 • 1, 2 ![]()

 Frog Aerobat
![]() ian1954 Mon Jun 02, 2014 4:01 pm
ian1954 Mon Jun 02, 2014 4:01 pm
I made templates from the fuselage sides to assist and finally
Not perfect but one of my best attempts.

ian1954- Diamond Member

- Posts : 2688
Join date : 2011-11-16
Age : 69
Location : England
Re: Frog Aerobat
![]() ian1954 Mon Jun 02, 2014 4:07 pm
ian1954 Mon Jun 02, 2014 4:07 pm
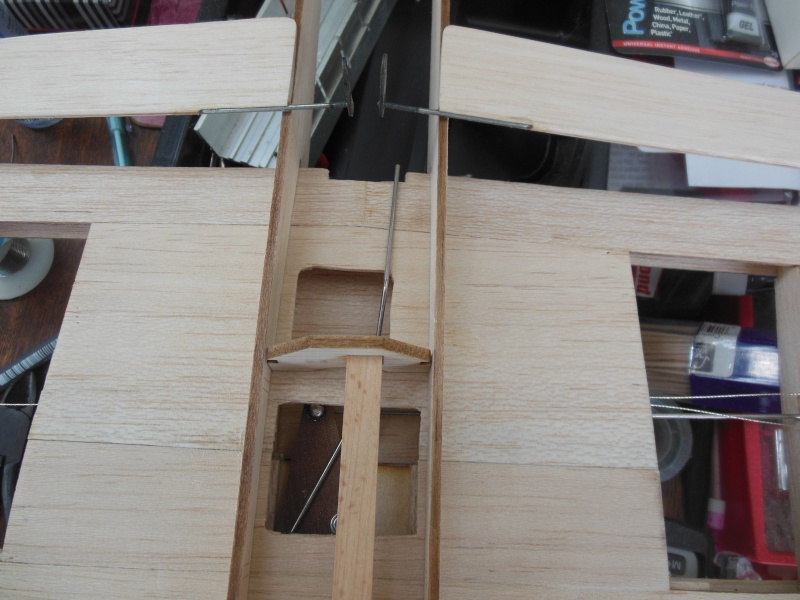
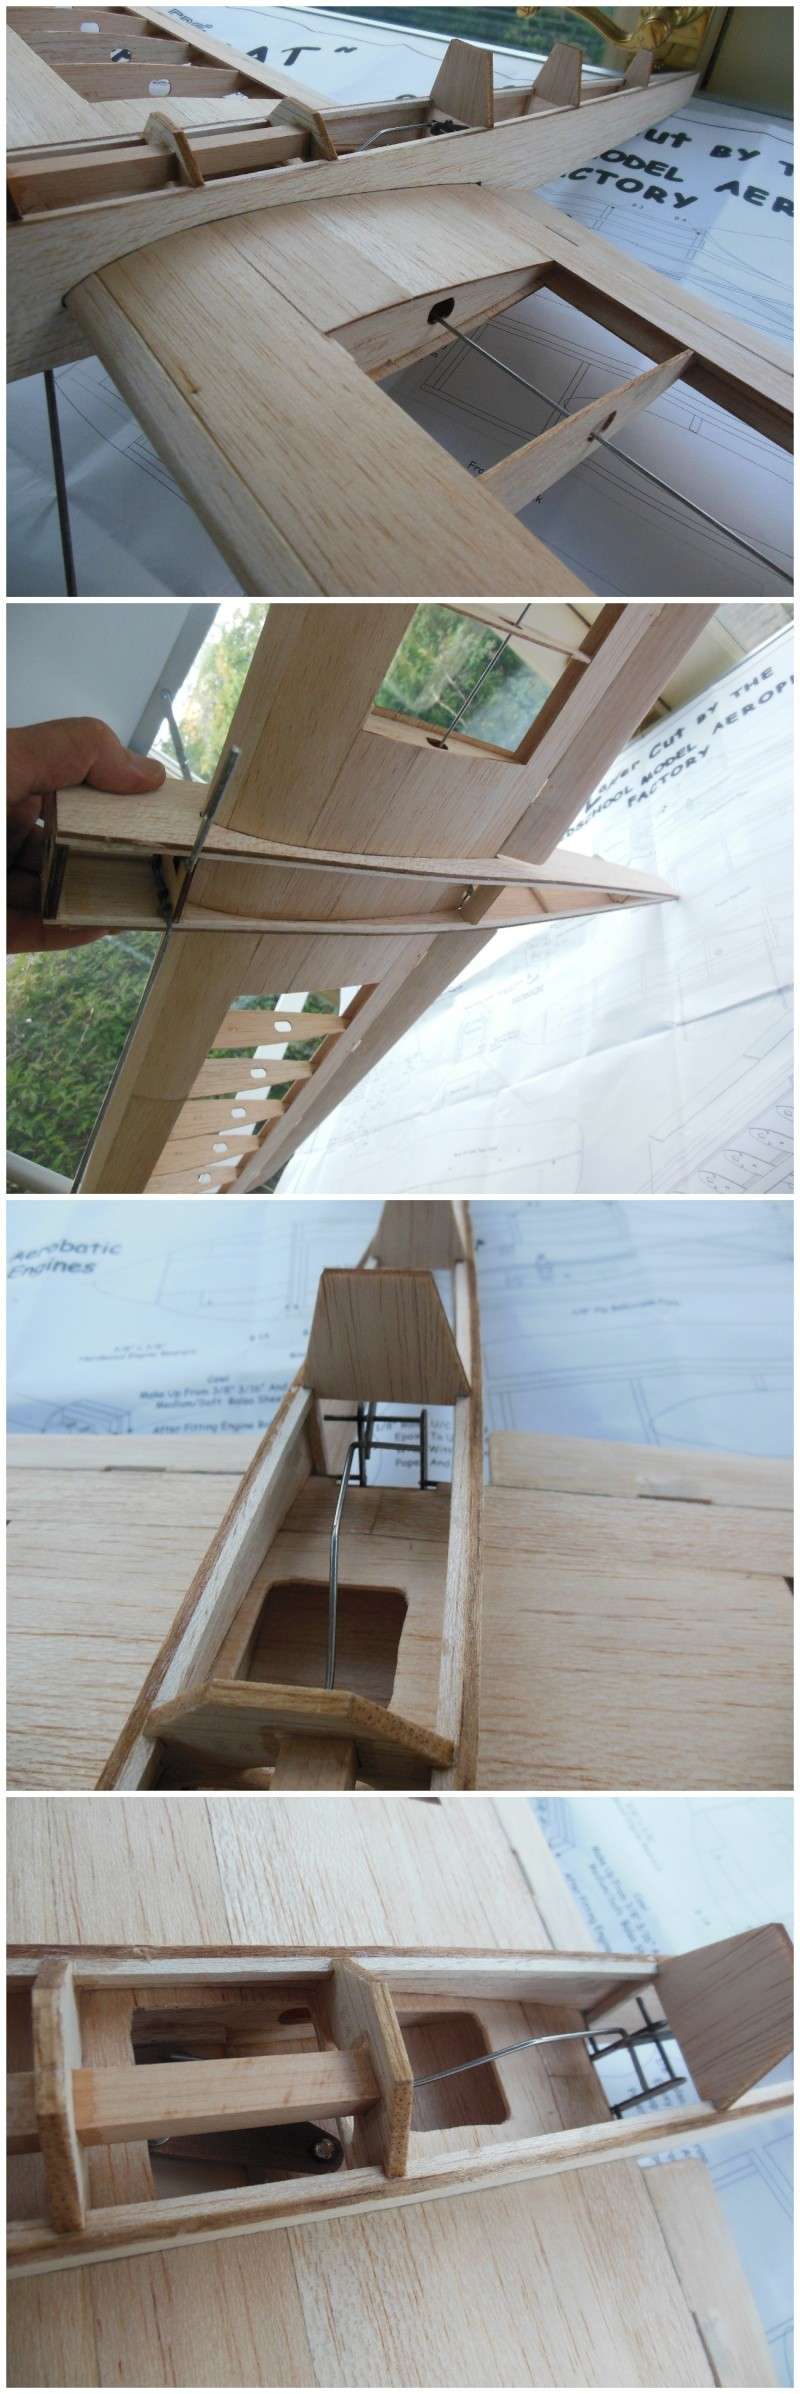
Also the flaps, I prepared but .........
Then I moved to the fuselage and realised that if I built it - the wings would not slide in. The pushrod would be in the way and the control horns for the flaps.
ian1954- Diamond Member
- Posts : 2688
Join date : 2011-11-16
Age : 69
Location : England
Re: Frog Aerobat
![]() ian1954 Mon Jun 02, 2014 4:14 pm
ian1954 Mon Jun 02, 2014 4:14 pm
Then attach the hinges.
Anyway, this picture is for Roddie. Not neat but I timed this tank construction. 6 mins 46 secs from marking out to finishing. Only two blisters!

ian1954- Diamond Member
- Posts : 2688
Join date : 2011-11-16
Age : 69
Location : England
Re: Frog Aerobat
![]() RknRusty Mon Jun 02, 2014 5:49 pm
RknRusty Mon Jun 02, 2014 5:49 pm
Rusty
_________________
...and never Ever think about how good you are at something...
while you're doing it!
My Hot Rock & Blues Playlist

RknRusty- Rest In Peace

- Posts : 10869
Join date : 2011-08-10
Age : 68
Location : South Carolina, USA
Re: Frog Aerobat
![]() Ken Cook Mon Jun 02, 2014 6:07 pm
Ken Cook Mon Jun 02, 2014 6:07 pm

Ken Cook- Top Poster

- Posts : 5455
Join date : 2012-03-27
Location : pennsylvania
Re: Frog Aerobat
![]() ian1954 Tue Jun 03, 2014 3:02 am
ian1954 Tue Jun 03, 2014 3:02 am
Ken Cook wrote: Ian, a very common solution to the fuse installation is to cut out the belly of the fuse. There's no need to have it slide from the tip to the center sheeting. You could install the pushrod and flap assembly and then hook the fuse onto the wing so to speak. Glue the belly section back on just back up the joint using some 1/64" ply. I go as far to glass the joints prior to painting or covering. Ken
Thanks Ken. I saw this in the Windy videos and wondered why he'd done it. After seeing your post I went back and reviewed.
At first I thought he had made them detachable - which I thought was a good idea for transporting larger models. Do it in RC all the time! The videos can be a little confusing - they are not in an easily followed order and so I got a bit mixed up at times.
It is food for thought. On this model it would definitely have to be bottom entry as you suggest. Top entry would allow for a detachable wing but, in this instance, the engine bearer would be in the way.
We lives and learns!
ian1954- Diamond Member
- Posts : 2688
Join date : 2011-11-16
Age : 69
Location : England
Re: Frog Aerobat
![]() ian1954 Sat Jun 14, 2014 2:05 pm
ian1954 Sat Jun 14, 2014 2:05 pm
On a profile fuselage, you can adjust the position within reason but it is always best to recreate the engine and tank position and test before committing to burying the tank in the fuselage.
Recreate everything. Side mounted engine, tank position, length of fuel line ........ then knock something together that you can waggle about.
See if anything starves the engine, see how long the engine runs for.
Set the engine up as close as you can before mounting in the plane. It is a lot easier to fiddle using an open jig instead of a cowled engine.

ian1954- Diamond Member
- Posts : 2688
Join date : 2011-11-16
Age : 69
Location : England
Re: Frog Aerobat
![]() Cribbs74 Sat Jun 14, 2014 9:07 pm
Cribbs74 Sat Jun 14, 2014 9:07 pm
Nice setup and great build.
I see one flaw in your plan. Even though you have everything setup before installation, you may find it's a whole different ball game once you fly the plane.
If at all possible make a hatch to make the tank accessible. The only way to test for tank height or tank faults is to fly the plane.
At first when just flying level it may run fine, but once inverted or doing eights or overhead stuff you may find the tank position to be incorrect or that the tank itself has issues.
I have only had one tank that worked right out of the box and that was the one Ken Cook went through for me. All others have needed attention from time to time. A hatch is the only way to go.
You could even have a hatch underneath the fuse so it looks cleaner.
Ron

Cribbs74- Moderator


Posts : 11895
Join date : 2011-10-24
Age : 50
Location : Tuttle, OK
Re: Frog Aerobat
![]() roddie Sun Jun 15, 2014 7:56 am
roddie Sun Jun 15, 2014 7:56 am
ian1954 wrote:
Anyway, this picture is for Roddie. Not neat but I timed this tank construction. 6 mins 46 secs from marking out to finishing. Only two blisters!
Holy crap!!! Were you listening to Barbara Streisand's "Minute Waltz" or something?
This is polyurethane filter media made for "window" type air conditioners.
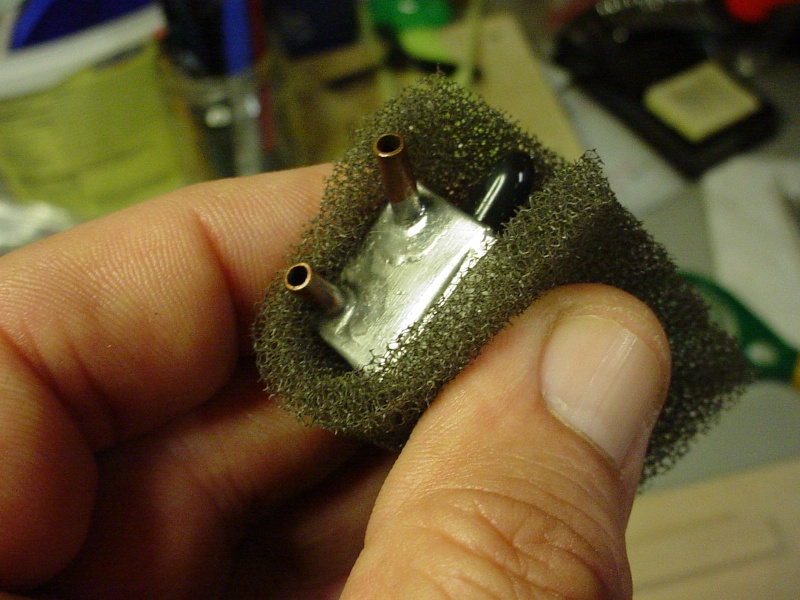
... and this is a newer type of "shelf-liner" that's sold in rolls.

I don't know how fuel-proof the shelf-liner is... but the filter media is polyurethane and I've used it without any problems with breaking down. Hopefully your tank wont leak.. but don't forget to fuel-proof that entire tank-bay before you seal it up; including the inside of the hatch panel.. (it's easy to forget that piece, where it's not on the model yet..)

roddie- Top Poster
- Posts : 8271
Join date : 2013-07-17
Age : 64
Location : N. Smithfield, Rhode Island -

Re: Frog Aerobat
![]() ian1954 Sun Jun 15, 2014 8:22 am
ian1954 Sun Jun 15, 2014 8:22 am
I remove the board from the workmate with the engine running - with a diesel I don't even bother using the workmate - and really put it through the motions.
I use tanks all the time for testing and running engines. (Just running engines can be boring and so testing tanks as well makes it more interesting!)
The tank you see in the rig is as per the plan supplied with the kit. It was supplied as a sheet of "coated" steel. I had not come across this material before - it had a matt grey finish - but it was easy and true to bend and the solder flowed beautifully.
Unfortunately, there is no provision for a hatch in this fuselage - the tank sits tight between the engine bearer top and bottom - it would also not be possible to alter the height even if there was tank access.
The only thing that I can't test easily is the "centrifugal effect" - the whole essence behind the wedge shape. For this, I keep everything "level" and when the engine coughs I do a spin with up and down motions to see if it comes back to life.
I make many tanks and, more recently, have been exploring "uniflo" rather than just taking it for granted. The tank in the KK Radian is uniflo (that is another story - caused me alot of frustration because of my stupidity (or was it a memory issue?)).
I build tanks for a couple of vintage combat flyers (they, like me, are vintage as well as the models) in the north of England but these, although simple tanks, are difficult to build. They send me a cross section of the wing and I make the tank to fit inside and match the profile of the wing. The wedge is at the back of the tank but rounded. The filler and the overflow pipe are at the peak of the profile and the feed pipe bottom front exit to the far rear corner. I don't understand how this works when they are battling overhead as the tank fails my tests! Pointing my test rig downwards results in an engine cut. I modifed one for a baffle and it only gained a few seconds.
What I have found is that commercial tanks are not always good quality. I have to say that I have not had one that leaks but have taken several apart and found - filler and overflow pipes that do not penetrate far enough, feed pipes that stop short, feed pipes that are blocked - up against the tank back, cut narrowing inlet, solder restricting uptake.............. I do have some vintage brass tanks that are superb!
I have just seen Roddies post. I will be using soft rubber strip. Not wrapped around the tank but strips between the bearers and the tank and thin strips at the sides fron and rear.
I will be fuel proofing with epoxy during the build - still haven't worked out the assenbbly order yet! Mulling over Ken's suggestion of cutting open the belly of the fuselage.
ian1954- Diamond Member
- Posts : 2688
Join date : 2011-11-16
Age : 69
Location : England
Re: Frog Aerobat
![]() Ken Cook Sun Jun 15, 2014 8:37 am
Ken Cook Sun Jun 15, 2014 8:37 am
Ken Cook- Top Poster
- Posts : 5455
Join date : 2012-03-27
Location : pennsylvania
Re: Frog Aerobat
![]() ian1954 Sun Jun 15, 2014 10:23 am
ian1954 Sun Jun 15, 2014 10:23 am
The Flex tanks look a good idea. Adjusting shape with a heat gun!
http://www.sullivanproducts.com/FuelTanksMainContent.htm
There is a store in the UK that sells them
http://www.hobbystores.co.uk/default.asp?WPG=HOB_HomePage1&PageNumber=1&s=c:0,c:080,c:080-100,b:Sullivan
ian1954- Diamond Member
- Posts : 2688
Join date : 2011-11-16
Age : 69
Location : England
Re: Frog Aerobat
![]() ian1954 Sun Jul 06, 2014 1:25 pm
ian1954 Sun Jul 06, 2014 1:25 pm
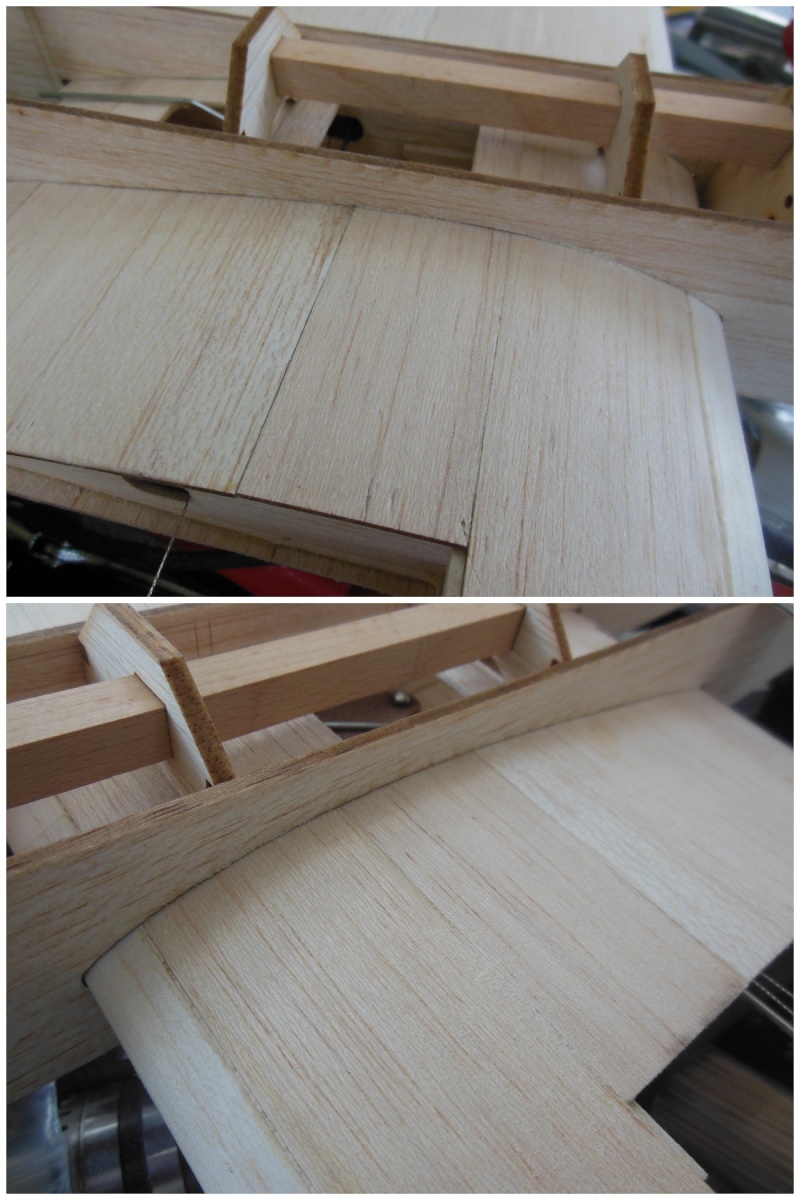
I decided that seeing as I hadn't used "hinge" hinges before I would try them on this. However, I tried them on the "Rocking Donkey" and found cutting the recess with a knife tedious and prone to error. There were three hinges on that, The Aerobat needs eight for the ailerons!
After watching yet another "Windy" video I saw him make and use a little sanding tool for fitting hinges.
I quickly made one and eight recesses were completed very neatly in just a few minutes.

ian1954- Diamond Member
- Posts : 2688
Join date : 2011-11-16
Age : 69
Location : England
Re: Frog Aerobat
![]() RknRusty Sun Jul 06, 2014 2:15 pm
RknRusty Sun Jul 06, 2014 2:15 pm
Rusty
_________________
...and never Ever think about how good you are at something...
while you're doing it!
My Hot Rock & Blues Playlist
RknRusty- Rest In Peace
- Posts : 10869
Join date : 2011-08-10
Age : 68
Location : South Carolina, USA
Re: Frog Aerobat
![]() ian1954 Sun Jul 06, 2014 2:30 pm
ian1954 Sun Jul 06, 2014 2:30 pm
It was all cut and CA 'd together in a couple of minutes.
ian1954- Diamond Member
- Posts : 2688
Join date : 2011-11-16
Age : 69
Location : England
Re: Frog Aerobat
![]() Cribbs74 Sun Jul 06, 2014 2:35 pm
Cribbs74 Sun Jul 06, 2014 2:35 pm
Good stuff Ian
Cribbs74- Moderator
-
Posts : 11895
Join date : 2011-10-24
Age : 50
Location : Tuttle, OK
Re: Frog Aerobat
![]() GallopingGhostler Tue Jul 08, 2014 9:59 am
GallopingGhostler Tue Jul 08, 2014 9:59 am

GallopingGhostler- Top Poster
-
Posts : 5302
Join date : 2013-07-13
Age : 70
Location : Clovis NM or NFL KC Chiefs

ian1954- Diamond Member
- Posts : 2688
Join date : 2011-11-16
Age : 69
Location : England
Cribbs74- Moderator
-
Posts : 11895
Join date : 2011-10-24
Age : 50
Location : Tuttle, OK
Re: Frog Aerobat
![]() ian1954 Sat Jul 19, 2014 4:33 am
ian1954 Sat Jul 19, 2014 4:33 am

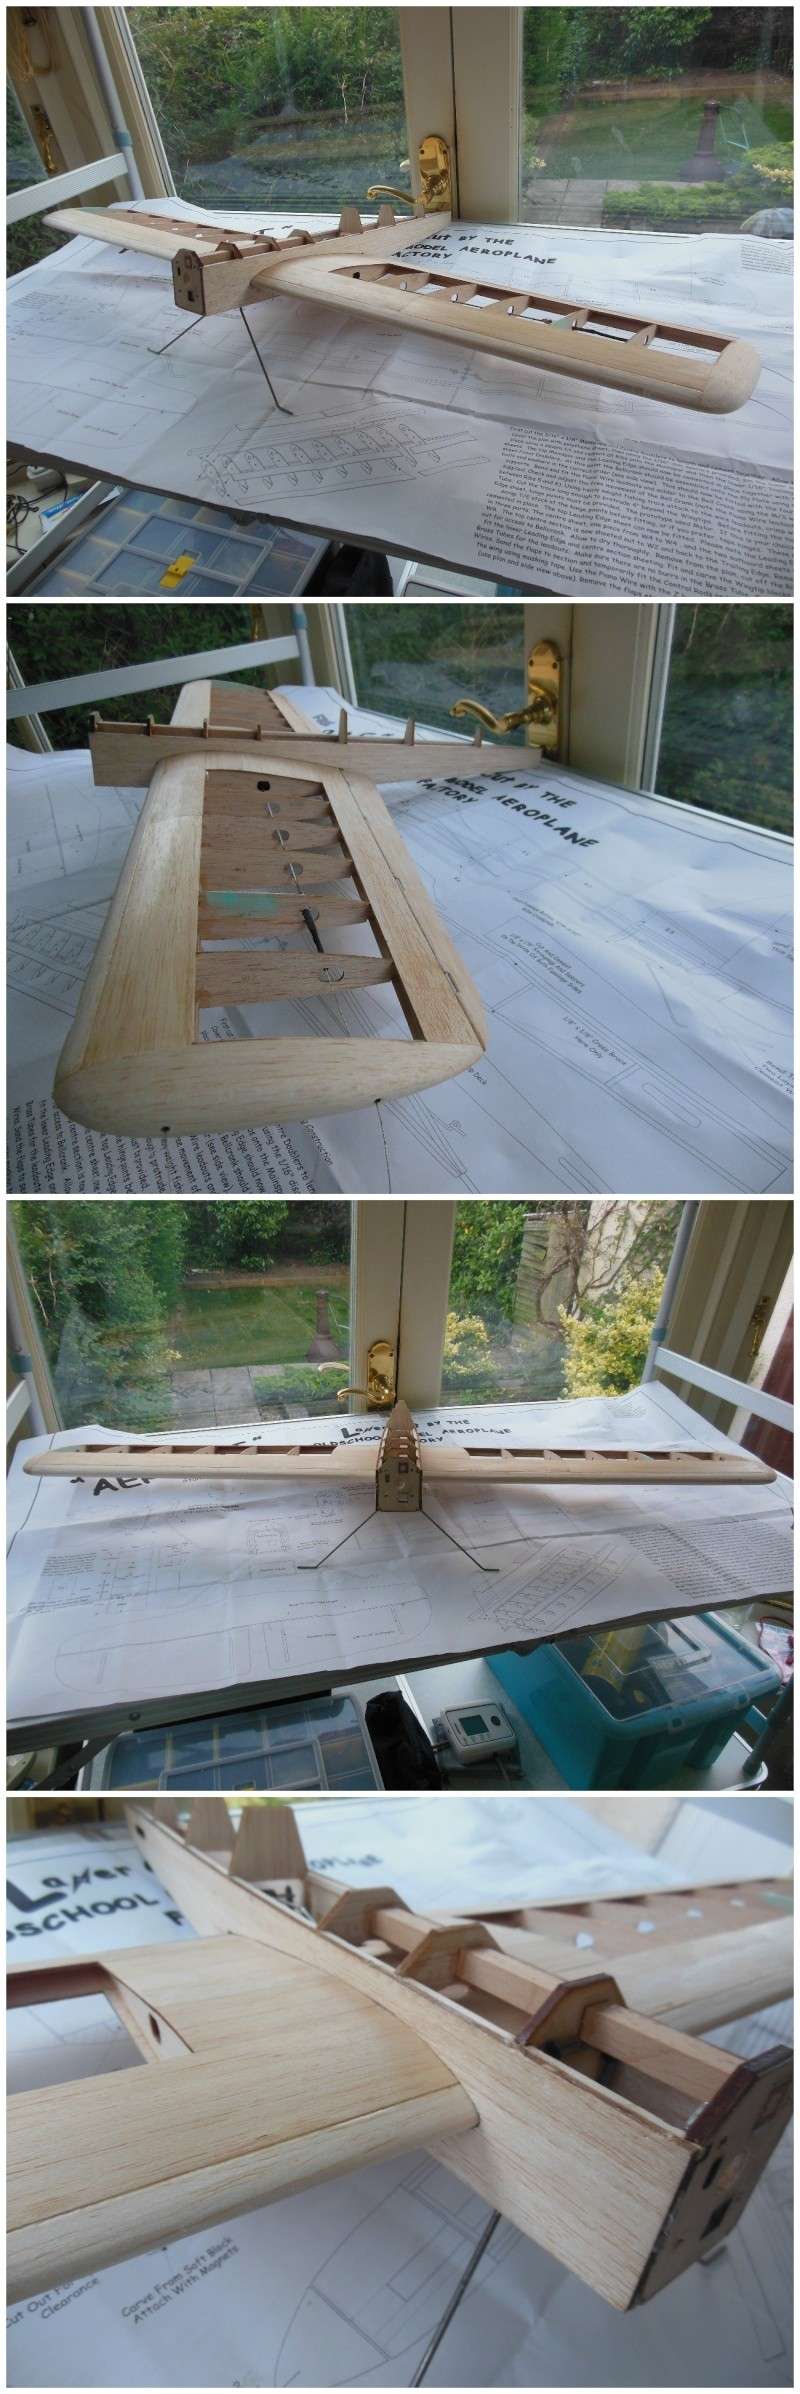
I don't like snading. I am clumsy and seem to create more dings and gouges during the process!
ian1954- Diamond Member
- Posts : 2688
Join date : 2011-11-16
Age : 69
Location : England
Re: Frog Aerobat
![]() RknRusty Sat Jul 19, 2014 5:20 am
RknRusty Sat Jul 19, 2014 5:20 am
ian1954 wrote:Ready for a bit of sanding.
I don't like sanding. I am clumsy and seem to create more dings and gouges during the process!
I can agree with you there. At first I get that inflated feeling of control over the wood, the quiet voices of angels singing approval(or at least Jimi Hendrix), shaping its beauty to my own desi... crack...ah crap, busted a rib. Better put it on the table to... whap damn banged it against the mag lamp, and on and on. I finally got my LE shaped last night and dry fit it into the fuse. I better give those ribs a once-over and patch the nicks and chips. Ten times worse if using contest balsa.
Rusty
_________________
...and never Ever think about how good you are at something...
while you're doing it!
My Hot Rock & Blues Playlist
RknRusty- Rest In Peace
- Posts : 10869
Join date : 2011-08-10
Age : 68
Location : South Carolina, USA
Re: Frog Aerobat
![]() getback Sat Jul 19, 2014 7:12 am
getback Sat Jul 19, 2014 7:12 am

getback- Top Poster
-
Posts : 10119
Join date : 2013-01-18
Age : 66
Location : julian , NC
Re: Frog Aerobat
![]() roddie Sat Jul 19, 2014 10:06 am
roddie Sat Jul 19, 2014 10:06 am
RknRusty wrote:ian1954 wrote:Ready for a bit of sanding.
I don't like sanding. I am clumsy and seem to create more dings and gouges during the process!
I can agree with you there. At first I get that inflated feeling of control over the wood, the quiet voices of angels singing approval(or at least Jimi Hendrix), shaping its beauty to my own desi... crack...ah crap, busted a rib. Better put it on the table to... whap damn banged it against the mag lamp, and on and on. I finally got my LE shaped last night and dry fit it into the fuse. I better give those ribs a once-over and patch the nicks and chips. Ten times worse if using contest balsa.
Rusty
It REALLY pays to have sanding-tools handy before starting a modeling project. Making your own is time-consuming.. but well-worth it when you realize the time spent on sanding.. and "how well" the sanding job turned out. One of the easiest ways to attach sandpaper to a block or form, is to use double-sided tape. Make sure the tape-strips don't overlap though. For wood, I usually make 3 identically shaped forms (dowels of the same diameter, sticks of the same size, angle-stock etc.) and face them with coarse, medium and fine papers. PVC pipe couplers in different sizes make great radius-sanding tools, where a wooden dowel size would be too big and heavy. Emery-cloth, which comes in rolls is cheap.. and great for attaching to a long length of aluminum angle or extrusion for shaping leading-edges. Two such tools can be mounted "face to face" and clamped at a "V"-angle of your choice, for making very quick and accurate long tapers. This makes short work of making your own flap and trailing-edge stock. I think that Windy U. mentioned in one of his build videos; buying a sanding belt and cutting it at it's seam.. and adhering it to a piece of 1/2" safety-glass... another excellent tool to have handy.. and will last for a lifetime of balsa sanding.
roddie- Top Poster
- Posts : 8271
Join date : 2013-07-17
Age : 64
Location : N. Smithfield, Rhode Island -
Re: Frog Aerobat
![]() Cribbs74 Sat Jul 19, 2014 10:34 am
Cribbs74 Sat Jul 19, 2014 10:34 am
I like the wing tips, hollowed block tips look the best.
Cribbs74- Moderator
-
Posts : 11895
Join date : 2011-10-24
Age : 50
Location : Tuttle, OK
Re: Frog Aerobat
![]() ian1954 Sat Jul 19, 2014 1:32 pm
ian1954 Sat Jul 19, 2014 1:32 pm
I use all sorts of sanding tools but still manage to grip too tight, bash the model on something or other while handling it, apply too much pressure, get carried away sanding .......... It now has two dings in the leading edge of the wing that need filling!
I will probably be powering it with an OS "15" motor. Still to be decided - alot depends on balance as I approach completion.
ian1954- Diamond Member
- Posts : 2688
Join date : 2011-11-16
Age : 69
Location : England
Page 1 of 2 • 1, 2 ![]()
» For Sale-Cox E-Z Flyer Aerobat 150 Control Line RTF
» Frog 349 BB CL
» Frog 80 0.79cc
» Frog 100 Mk I 1947