

 Rules
Rules
Log in
Search
Latest topics
» Joe Wagners Siouxby GallopingGhostler Today at 9:03 pm
» Roddie's flat-bottomed boat..
by rsv1cox Today at 6:26 pm
» Happy Anzac Day!
by GallopingGhostler Today at 4:16 pm
» Three -- sold out (making two more) Cox .010 Carburetors with wrench
by MauricioB Today at 3:43 pm
» Jim Walkers FireBee - This is going to be fun
by rsv1cox Today at 12:27 pm
» Project Cox .049 r/c & Citabrian Champion
by rdw777 Today at 8:14 am
» Revivng Some Childhood Classics
by getback Today at 7:31 am
» Fox .35 Modifications
by Ken Cook Today at 3:16 am
» Introducing our Cox .049 TD Engines
by getback Yesterday at 6:20 am
» Cox powered jet-pump for model Sprint Boat
by roddie Thu Apr 25, 2024 10:25 pm
» Micro Draco Gets to Fly on a Beautiful Morning.
by rdw777 Thu Apr 25, 2024 8:15 pm
» Jim Walker Firebaby
by rdw777 Thu Apr 25, 2024 8:06 pm
Cox Engine of The Month


CEF Traveling Engine


Win This Engine!

Live on Patrol


Frog Aerobat
Page 2 of 2
Page 2 of 2 •  1, 2
1, 2
 Re: Frog Aerobat
![]() Cribbs74 Sat Jul 19, 2014 7:33 pm
Cribbs74 Sat Jul 19, 2014 7:33 pm
Well, done is done. Nothing ever turns out as good as we hope. There is always something we don't like.
Maybe that's just me.
Maybe that's just me.

Cribbs74- Moderator


Posts : 11895
Join date : 2011-10-24
Age : 50
Location : Tuttle, OK
Re: Frog Aerobat
![]() RknRusty Sat Jul 19, 2014 10:46 pm
RknRusty Sat Jul 19, 2014 10:46 pm
No matter, that's what filler is for. Even Windy dents his too, I find no matter how frustrating a model build id, it always turns out well enough to make me proud. Yours will too. Besides after you fly it once, the anal preoccupation with beauty and perfection fades instantly. I'm looking forward to your fine finished project.
Rusty
Rusty
_________________
Don't Panic!
...and never Ever think about how good you are at something...
while you're doing it!
My Hot Rock & Blues Playlist
...and never Ever think about how good you are at something...
while you're doing it!
My Hot Rock & Blues Playlist

RknRusty- Rest In Peace

- Posts : 10869
Join date : 2011-08-10
Age : 68
Location : South Carolina, USA
Re: Frog Aerobat
![]() roddie Sat Jul 19, 2014 11:30 pm
roddie Sat Jul 19, 2014 11:30 pm
Ian, I am curious about the flap linkage/joiner. That horn looks different than the simple "U-brace riding in a bearing" design that I'm used to seeing. Does your trailing edge have a slight taper? I've seen "lucky boxes" (I think Rusty designed them for his Yak) but I was wondering if yours had a horn assembly that deals with the difference in angles, from inside the fuse?

roddie- Top Poster

- Posts : 8270
Join date : 2013-07-17
Age : 64
Location : N. Smithfield, Rhode Island -

Re: Frog Aerobat
![]() Cribbs74 Sat Jul 19, 2014 11:41 pm
Cribbs74 Sat Jul 19, 2014 11:41 pm
Roddie,
I had to look twice and I am not seeing a difference in angles. The wing looks to be a constant chord. The flaps do taper though, just not along the wing seam.
Am I missing something?
I had to look twice and I am not seeing a difference in angles. The wing looks to be a constant chord. The flaps do taper though, just not along the wing seam.
Am I missing something?
Cribbs74- Moderator
-
Posts : 11895
Join date : 2011-10-24
Age : 50
Location : Tuttle, OK
Re: Frog Aerobat
![]() RknRusty Sun Jul 20, 2014 12:11 am
RknRusty Sun Jul 20, 2014 12:11 am
Rod, that's a straight hinge line. The flap TE taper might give the illusion that the wing TE is not straight but it is.
BTW, I'm thrilled at how my first attempt at Lucky Boxes work, and they really do. My method was primitive looking compared with the neat installation they can do on thicker wood, but they are strong. I was tickled that Bob Z was complimentary of my CF control system. I'm a big sucker for compliments.
Rusty
P.S. Call me on the phone sometime, I'd love to chat with you.(or I guess that phone thing can work both ways, eh)
Rusty
_________________
Don't Panic!
...and never Ever think about how good you are at something...
while you're doing it!
My Hot Rock & Blues Playlist
...and never Ever think about how good you are at something...
while you're doing it!
My Hot Rock & Blues Playlist
RknRusty- Rest In Peace
- Posts : 10869
Join date : 2011-08-10
Age : 68
Location : South Carolina, USA
Re: Frog Aerobat
![]() ian1954 Sun Jul 20, 2014 8:43 am
ian1954 Sun Jul 20, 2014 8:43 am
Photographs can be deceiving but the wings are tapered as well as the flaps.
I saw the lucky box concept on the Windy video for the Spitfire he was bulding. A brilliant idea but more suited to a larger model with thicker flaps. Again a balance between the thickness of the piano wire and the thicknes of the flaps is required.
It is a brilliant way to get even up and down movement of the flaps.
The Aerobat is simpler. The flaps have independant horns - connected by a rod with a central double ended horn. One end to the bellcrank and the other to the elevator.
As the double ended horn is moved, the rod through the middle of it pushes or pulls the flap horns simultaneously.
The rod allows the flap horns to slide inwards and outwards as they are being rotated compensating for the taper.
This also brings about my first mistake with this build. I should not have attached the wing horns to the flaps. It has led me to installing the hinges before covering. Not a good idea.

ian1954- Diamond Member

- Posts : 2688
Join date : 2011-11-16
Age : 69
Location : England
Re: Frog Aerobat
![]() roddie Sun Jul 20, 2014 10:58 am
roddie Sun Jul 20, 2014 10:58 am
ian1954 wrote:Photographs can be deceiving but the wings are tapered as well as the flaps.
I saw the lucky box concept on the Windy video for the Spitfire he was bulding. A brilliant idea but more suited to a larger model with thicker flaps. Again a balance between the thickness of the piano wire and the thicknes of the flaps is required.
It is a brilliant way to get even up and down movement of the flaps.
Yes.. the photos are deceiving.. but I knew there had to be a reason for that more complex horn assembly.
So.. I had an idea for building lucky-box pockets into "thin" flaps for smaller models.. but I'm not sure of the geometry involved. If the pockets only require "side to side" and depth clearance for the rod to slide in, which I'm thinking is the case; then why not design your flap in 3 pieces? If you have a 1/8" trailing-edge.. build your flaps from 3/32" sheet and cut your slot/pocket width/depth out first.. then skin the top and bottom (full-span) with 1/64" plywood. This would allow for the use of fairly small music wire, and provide a rigid surface top/bottom (with no bulges) for the wire to bear-on. Dressing the ends of the wire smooth is probably a good idea too.. to help prevent wear. You could also soak the skin in the pocket area with thin CA, which would harden it.
Does the slot also require some vertical clearance as well? I'm thinking "no"... because of the possibility of flutter. Even if a slight vertical gap is required, you'd have 3/32" (.093") of vertical gap to play with. On a small model, you could get away with using wire as small as .047" dia. to drive flaps. If the geometry in fact; only requires a pocket with side to side clearance.. you could make the flaps even thinner.. possibly using a 1/16" balsa core. Building "skinned" flaps might also provide for easier hinging of them as well.
roddie- Top Poster
- Posts : 8270
Join date : 2013-07-17
Age : 64
Location : N. Smithfield, Rhode Island -
Re: Frog Aerobat
![]() ian1954 Sun Aug 03, 2014 4:24 pm
ian1954 Sun Aug 03, 2014 4:24 pm
I build most models and plough on regardless. This one has been "stop and start" and the subject of many changes of mind.
Firstly the motor. Originally, it was destined for IC - I built the tank for it and tested the set up.
Then I changed my mind and went for an 0S 15.
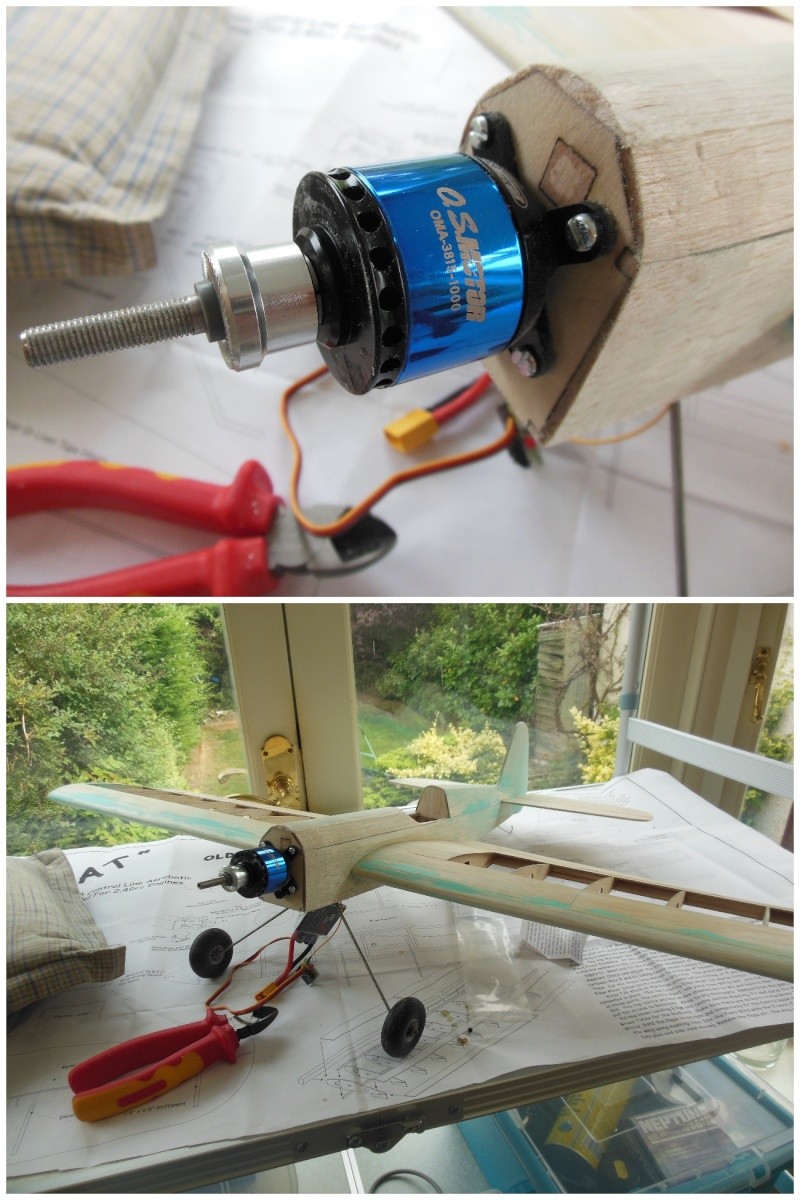
Then I stalled on the front end. I wanted it to be removable and so finally decided to make a glassed cowl.
So first of all, I built a "mould" - quite rough but ..........
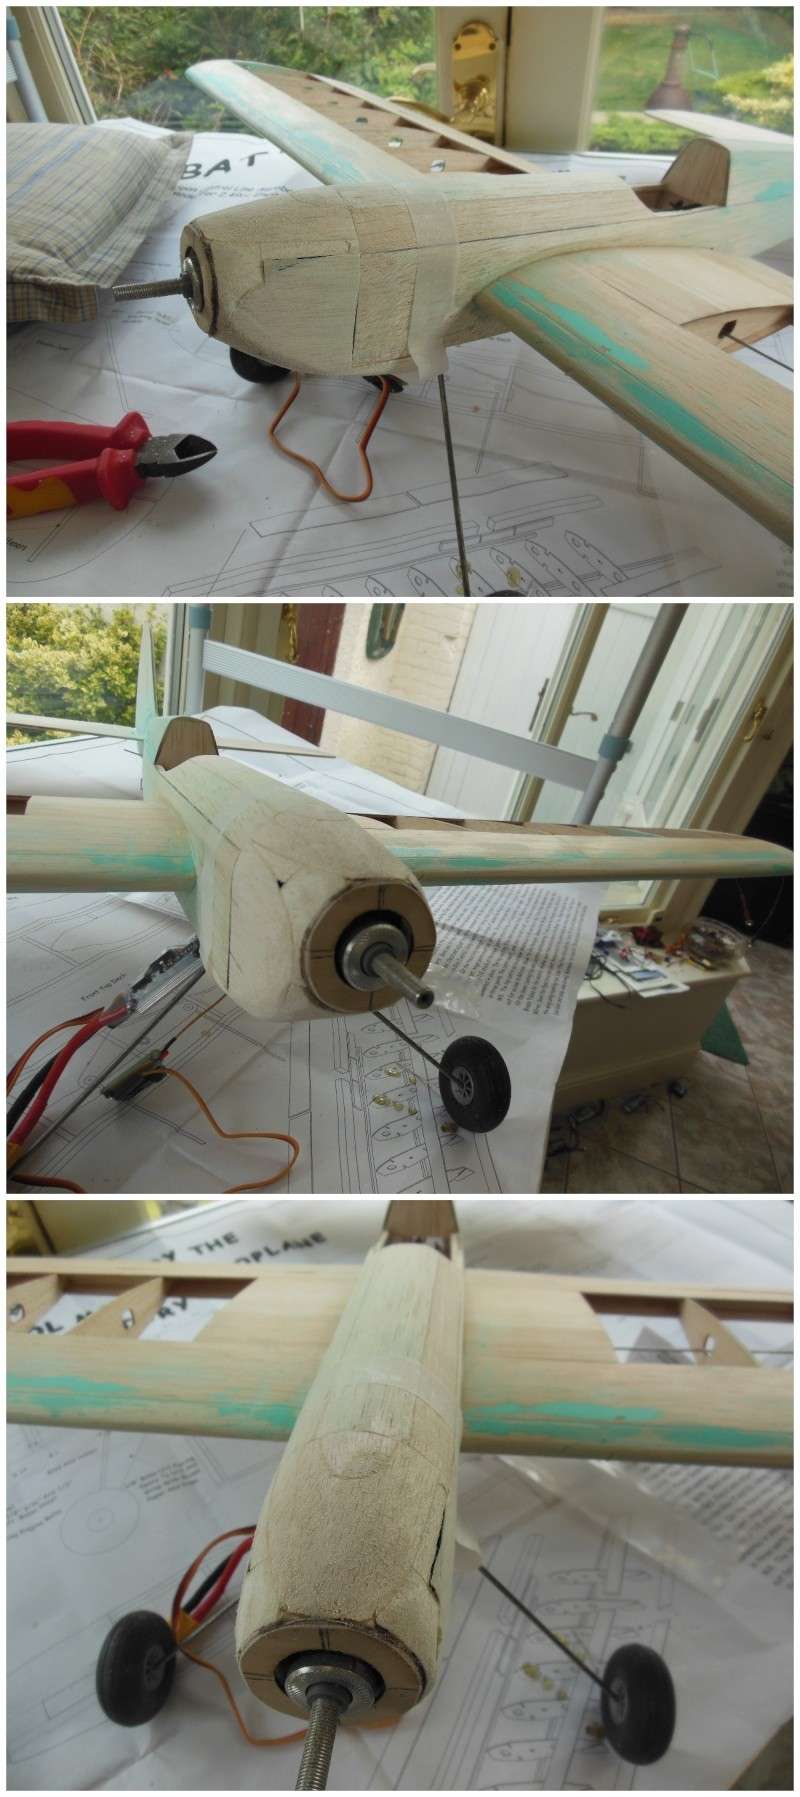
Then I removed the balsa "mould" and covered it with Cling Film (the stuff food is wrapped in) (I thought about waxes, release agents........ but not for long!) and started covering with lightweight glass cloth and a water based resin "Eze Kote".
After many layers, one day between each one (lost count) - much sanding - sticky fingers and a general mess ...
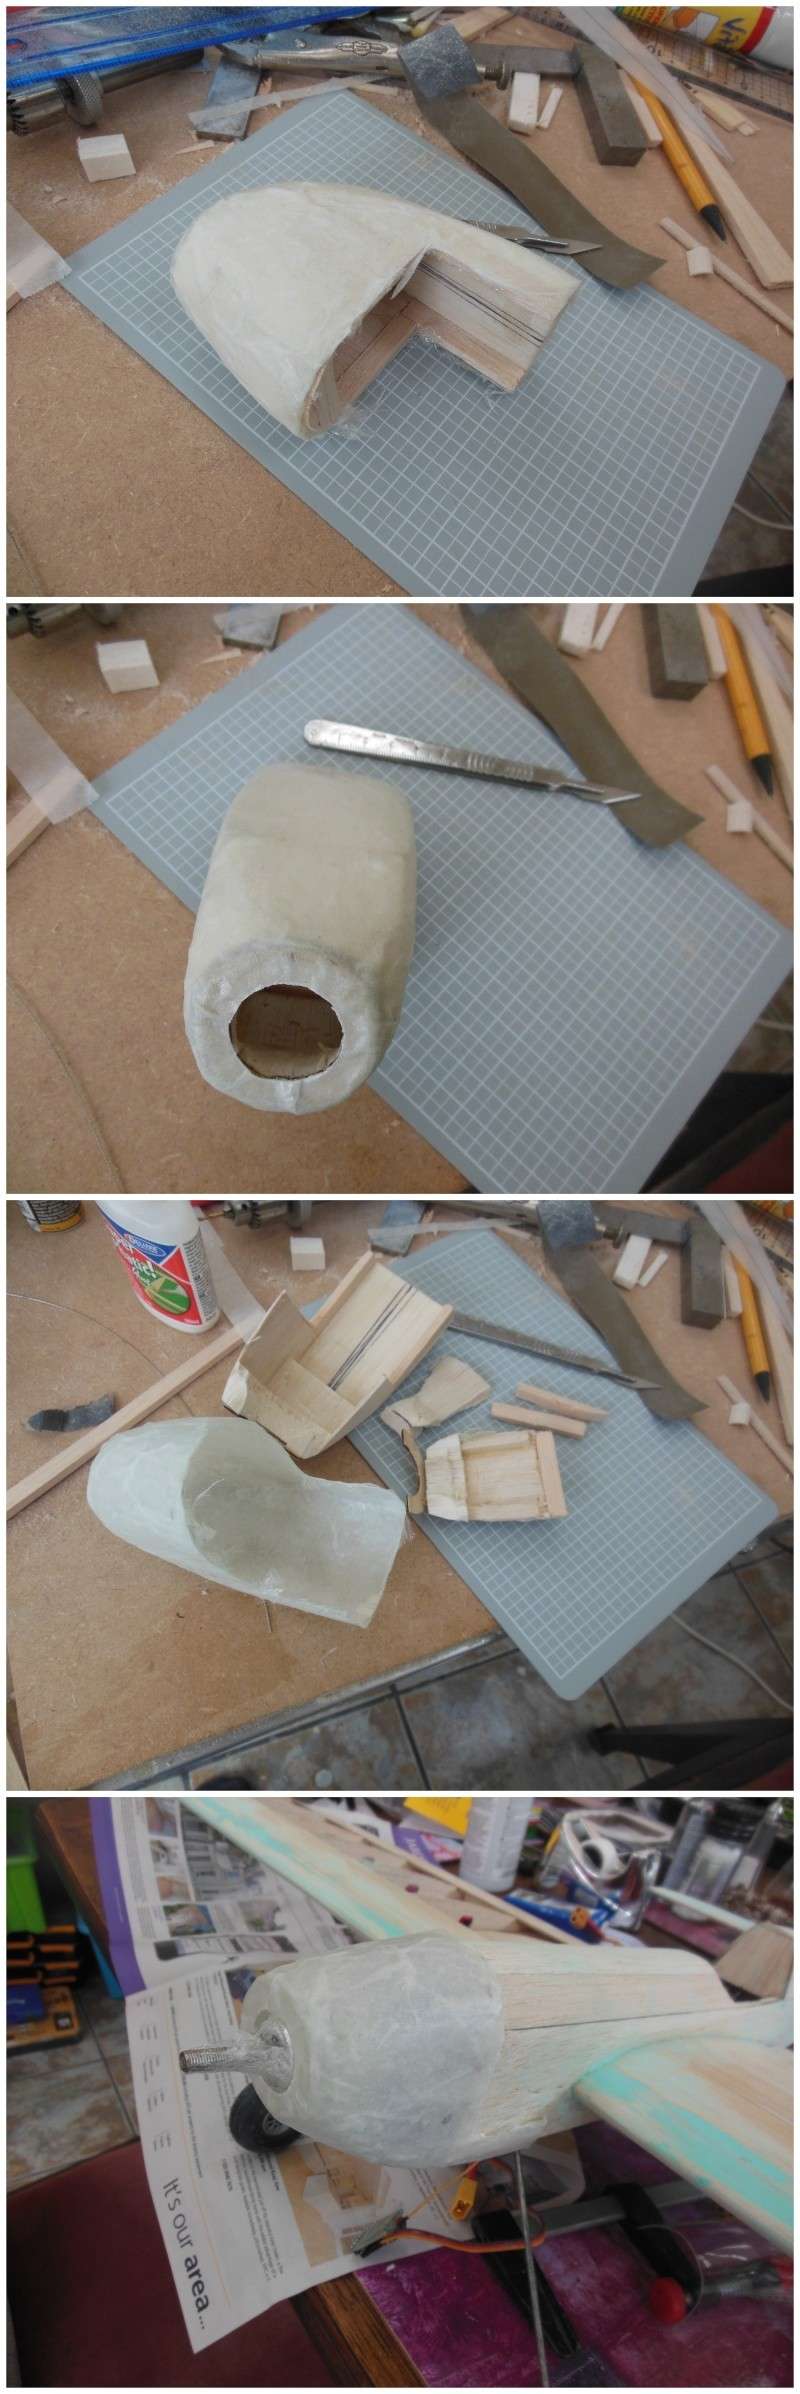
That was then followed by filling, sanding, more filling, more sanding and more resin.
Then I was able to test the motor/timer/battery combination.
This video is boring but it was a record for me to check the timer. It was set for 5 minutes, 9,000 revs with a 25 sec start up delay. But at 4 mins 20secs the failsafe took over.
With this motor, a 2000mah 3S battery and a 10x7 prop - I will have to drop the time to 4 minutes.
There are some advantages to electrickery - I wouldn't fancy testing a glo or diesel set up in an unfinished model!
Firstly the motor. Originally, it was destined for IC - I built the tank for it and tested the set up.
Then I changed my mind and went for an 0S 15.
Then I stalled on the front end. I wanted it to be removable and so finally decided to make a glassed cowl.
So first of all, I built a "mould" - quite rough but ..........
Then I removed the balsa "mould" and covered it with Cling Film (the stuff food is wrapped in) (I thought about waxes, release agents........ but not for long!) and started covering with lightweight glass cloth and a water based resin "Eze Kote".
After many layers, one day between each one (lost count) - much sanding - sticky fingers and a general mess ...
That was then followed by filling, sanding, more filling, more sanding and more resin.
Then I was able to test the motor/timer/battery combination.
This video is boring but it was a record for me to check the timer. It was set for 5 minutes, 9,000 revs with a 25 sec start up delay. But at 4 mins 20secs the failsafe took over.
With this motor, a 2000mah 3S battery and a 10x7 prop - I will have to drop the time to 4 minutes.
There are some advantages to electrickery - I wouldn't fancy testing a glo or diesel set up in an unfinished model!
ian1954- Diamond Member
- Posts : 2688
Join date : 2011-11-16
Age : 69
Location : England
Re: Frog Aerobat
![]() sdjjadk Sun Aug 03, 2014 6:11 pm
sdjjadk Sun Aug 03, 2014 6:11 pm
Awesome build so far Ian. I can't wait to see it finished and in the air. 
Shawn
Shawn

sdjjadk- Platinum Member

- Posts : 640
Join date : 2012-04-07
Location : Southern Maryland
Re: Frog Aerobat
![]() Cribbs74 Sun Aug 03, 2014 11:07 pm
Cribbs74 Sun Aug 03, 2014 11:07 pm
It's looking good Ian!
It pains me to admit this, but in this case the electric makes sense. If you can keep the weight down then it should work well.
Acccck! I can't believe I said that!
It pains me to admit this, but in this case the electric makes sense. If you can keep the weight down then it should work well.
Acccck! I can't believe I said that!
Cribbs74- Moderator
-
Posts : 11895
Join date : 2011-10-24
Age : 50
Location : Tuttle, OK
Re: Frog Aerobat
![]() getback Mon Aug 04, 2014 6:53 am
getback Mon Aug 04, 2014 6:53 am
Time for some colors , looking good Ian , The fiberglass job Is a nice add to the model.... Apears to have plenty of power I could see the boy come out of you when you started to move it from side to side like it was flying ... Cool,  Eric
Eric

getback- Top Poster
-
Posts : 10116
Join date : 2013-01-18
Age : 66
Location : julian , NC
Re: Frog Aerobat
![]() ian1954 Mon Aug 25, 2014 4:06 pm
ian1954 Mon Aug 25, 2014 4:06 pm
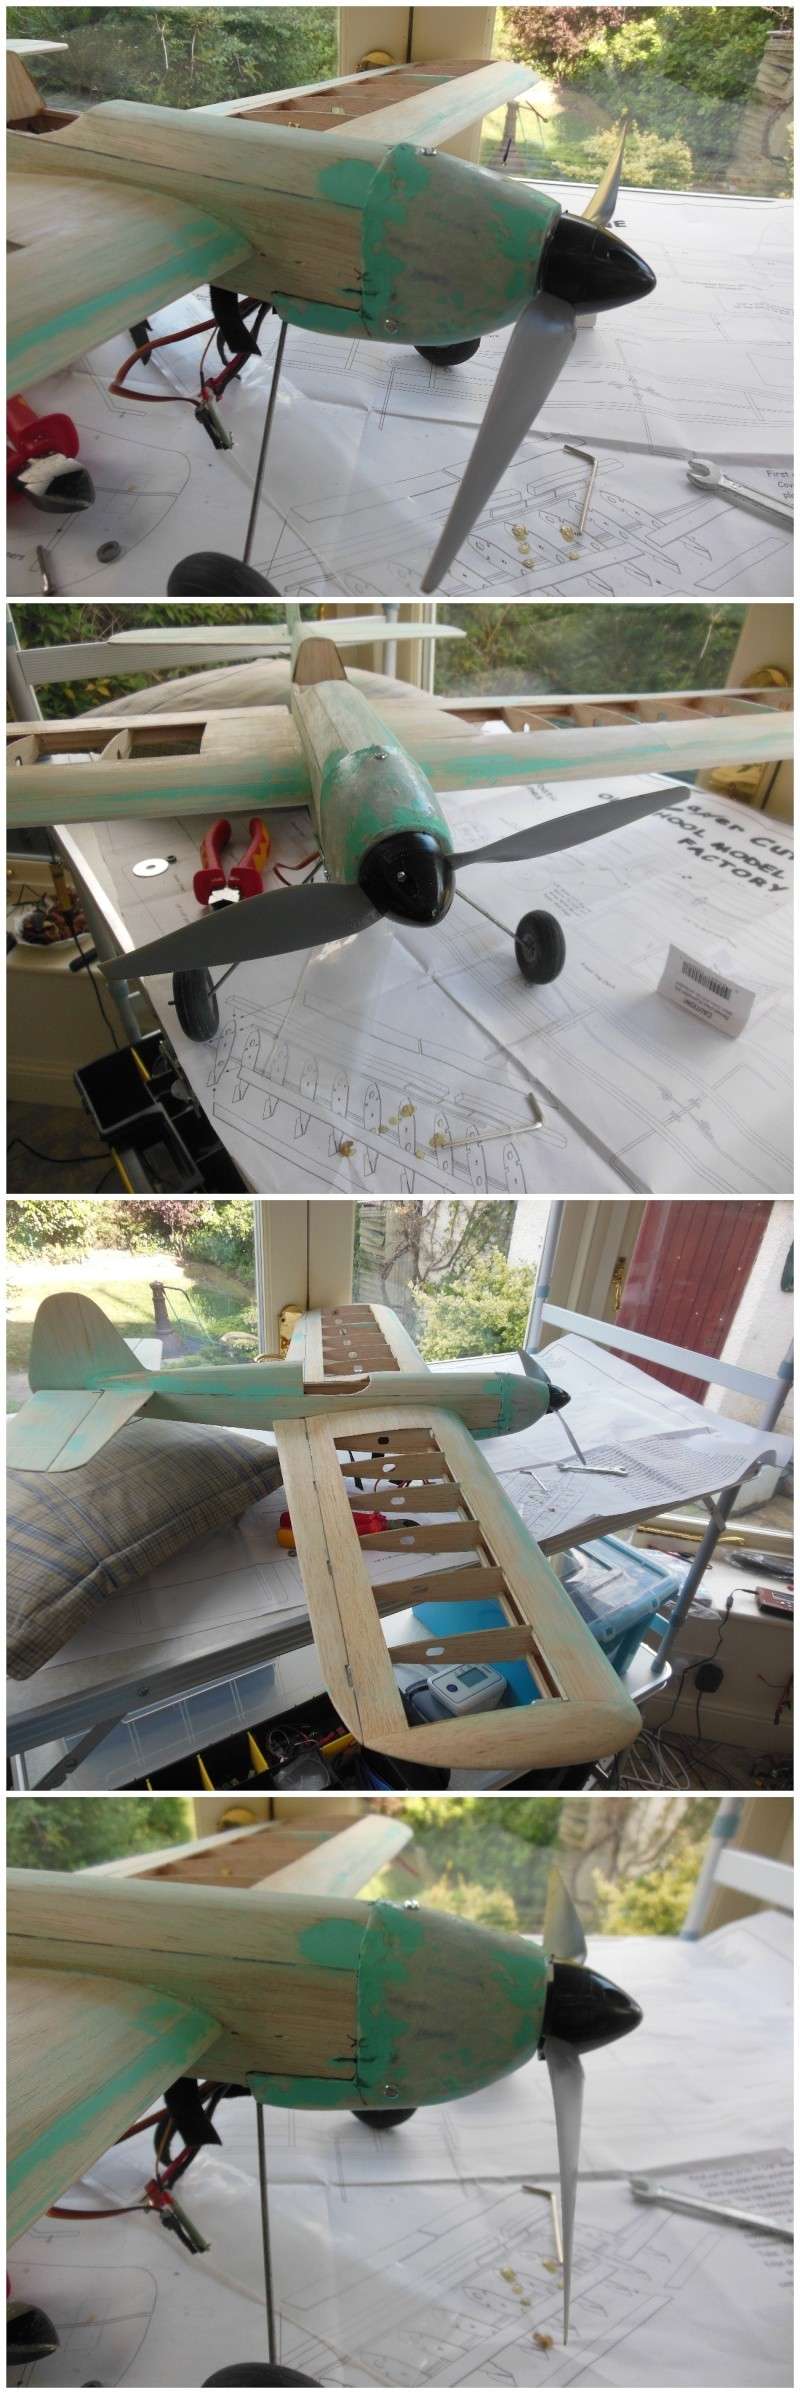
The more I looked at the Aerobat, the more I didn't like the fit of the cowling. It stood proud and wasn't as sturdy a fit as I would like.
I applied some more balsa ......
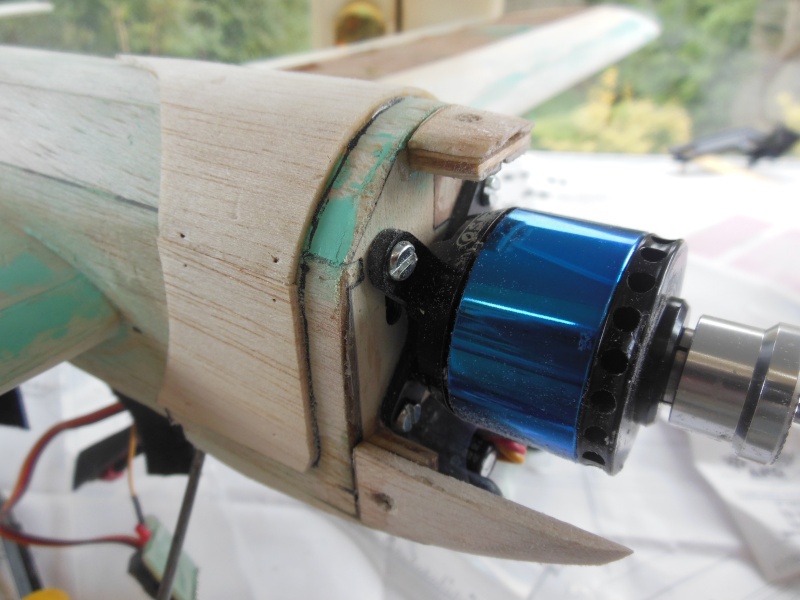
and reworked the cowling mounts
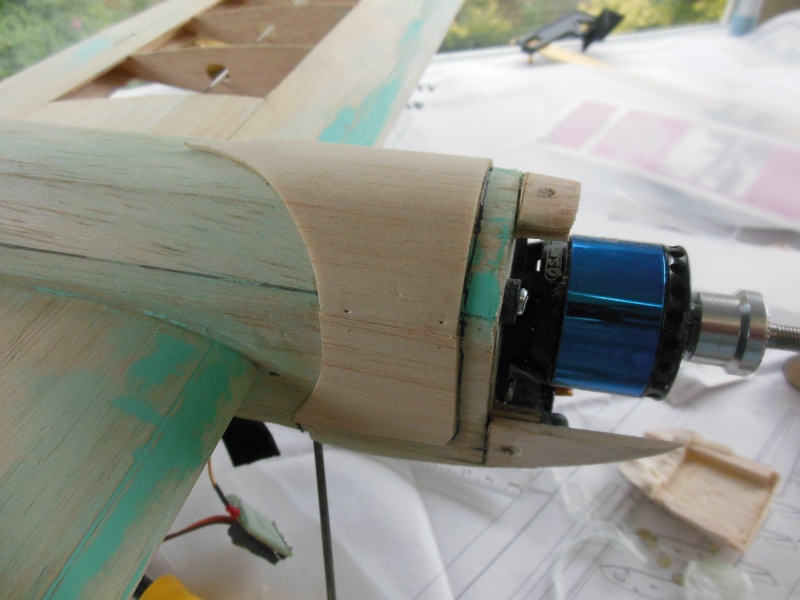
Then I decided that while the cowling was off I would ventilate it.
and so ........ enter one wooden spoon
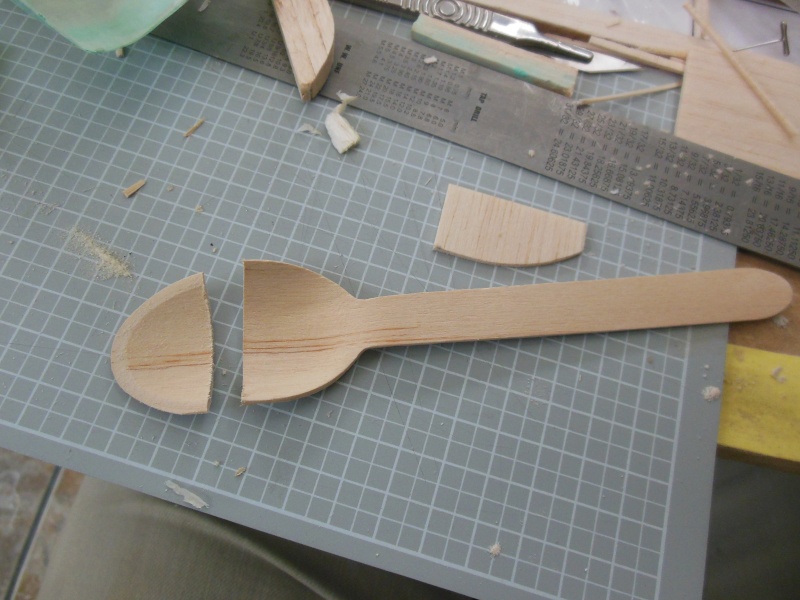
apply to the cowling over a spoon shaped hole
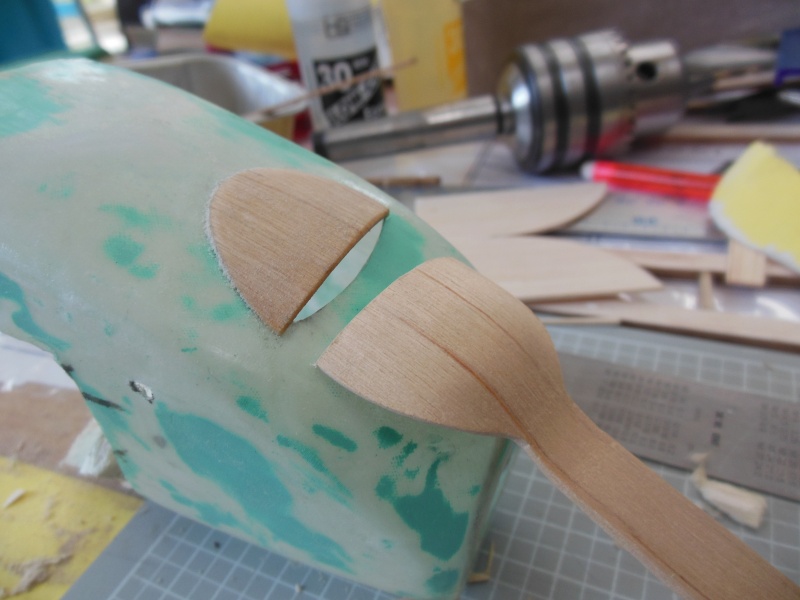
Refit the cowl and do a bit of sanding .....
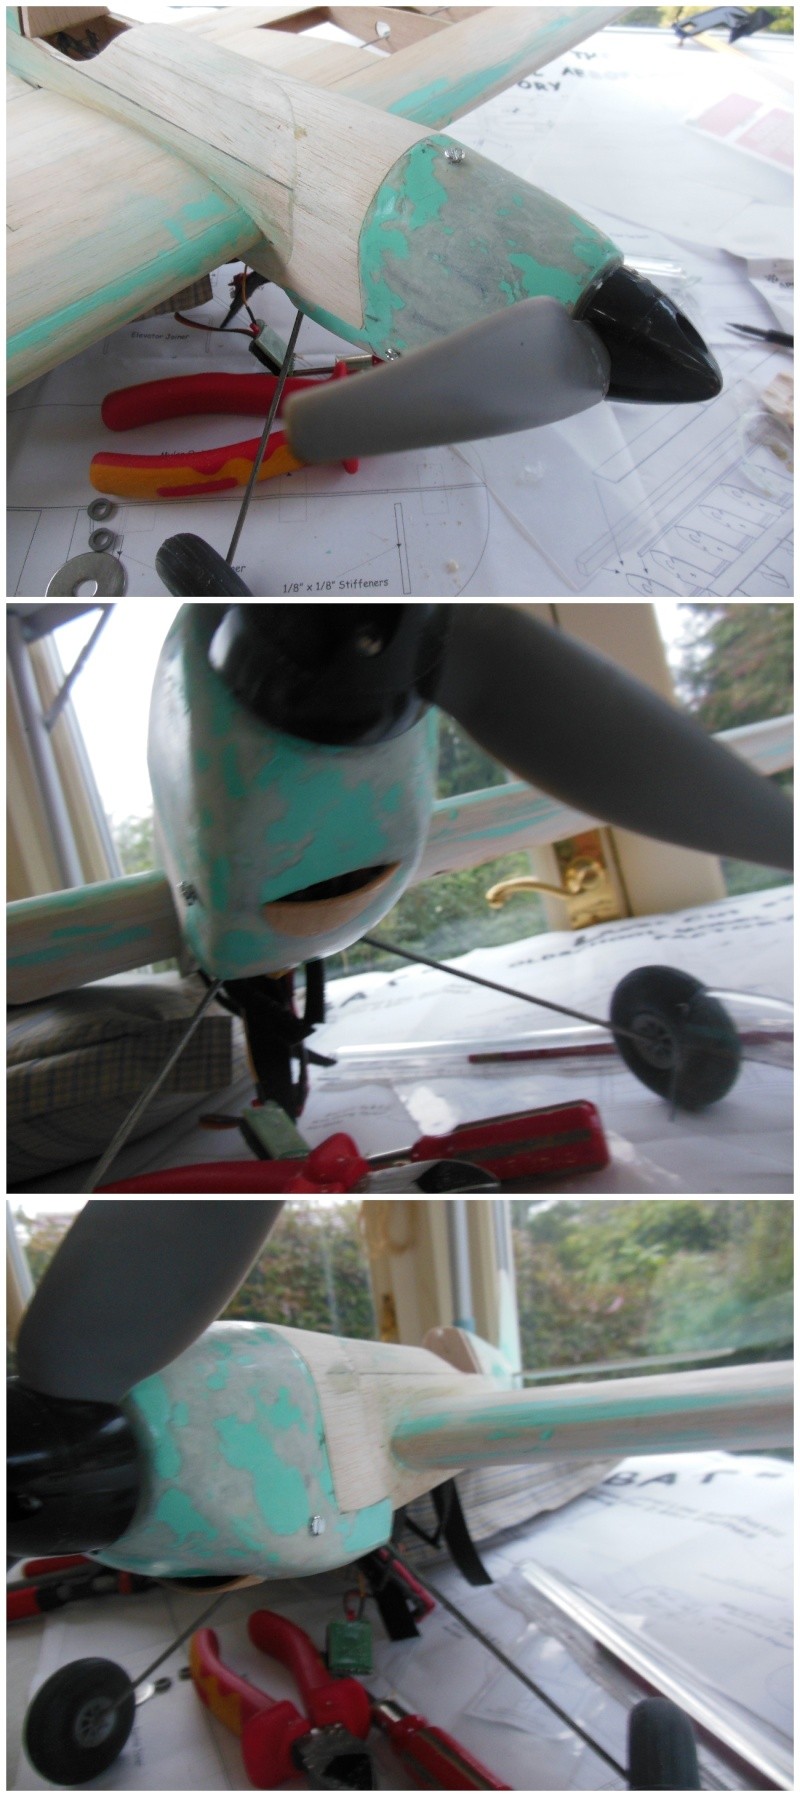
Now to leave it a while while I mull over the cockpit canopy which I have cut too small!
I applied some more balsa ......
and reworked the cowling mounts
Then I decided that while the cowling was off I would ventilate it.
and so ........ enter one wooden spoon
apply to the cowling over a spoon shaped hole
Refit the cowl and do a bit of sanding .....
Now to leave it a while while I mull over the cockpit canopy which I have cut too small!
ian1954- Diamond Member
- Posts : 2688
Join date : 2011-11-16
Age : 69
Location : England
Re: Frog Aerobat
![]() Cribbs74 Mon Aug 25, 2014 4:15 pm
Cribbs74 Mon Aug 25, 2014 4:15 pm
Looking good! I really like the wooden spoon intake. What a good idea!
Cribbs74- Moderator
-
Posts : 11895
Join date : 2011-10-24
Age : 50
Location : Tuttle, OK
Page 2 of 2 • 1, 2
» Cessna 150 Aerobat
» For Sale-Cox E-Z Flyer Aerobat 150 Control Line RTF
» Frog 349 BB CL
» Frog 80 0.79cc
» Frog 100 Mk I 1947
» For Sale-Cox E-Z Flyer Aerobat 150 Control Line RTF
» Frog 349 BB CL
» Frog 80 0.79cc
» Frog 100 Mk I 1947
Page 2 of 2
Permissions in this forum:
You cannot reply to topics in this forum