

 Rules
Rules
by rdw777 Today at 6:25 pm
» Foam hand kids glider converted to 0.049 CL
by rdw777 Today at 6:11 pm
» Weird search for a single comic from an old Mad Magazine
by Kim Today at 1:44 pm
» Scientific "Zipper" Build...Zipper Flys!.
by getback Today at 7:27 am
» Cox .049 Tee Dee engines back in stock (limited availablility)
by GallopingGhostler Today at 1:05 am
» Very off-topic.........Time passes and not always for the best......
by rsv1cox Yesterday at 2:47 pm
» Golden Bee basic running problem
by 944_Jim Yesterday at 12:44 pm
» Roddie-Rigger.. a 2005 original design
by roddie Wed Jul 24, 2024 11:48 pm
» Jim Walker Bonanza etc.
by rsv1cox Wed Jul 24, 2024 6:30 pm
» Throttles for Cox Tee Dee .049 / .020 / .010 engines --- videos
by sosam117 Wed Jul 24, 2024 8:54 am
» Introducing our Cox .049 TD Engines
by Admin Tue Jul 23, 2024 2:00 am
» Project Cox .049 r/c & Citabrian Champion
by getback Mon Jul 22, 2024 4:14 pm
robot797's
"ULTIMITE COX 010: it has a clutch, E starter, throttle, exhaust, aluminum tank, aluminum venturi, gearbox with forward and reverse, and now its on a custom drawn and printed stand"

PAST WINNERS


Wedge Tank build
Page 1 of 2 • 1, 2 ![]()

Wedge Tank build
![]() ian1954 Sun Feb 28, 2016 7:02 am
ian1954 Sun Feb 28, 2016 7:02 am
I have alluded to this before but wedge tanks are not easy to source in the UK, uniflo tanks are even harder and I have only found these at Den's Models. He does classic tanks, custom builds
http://www.densmodelsupplies.co.uk/index.php?c=bespoke_classic_fuel_tanks
and imports Brodak tanks.
http://www.densmodelsupplies.co.uk/index.php?c=fuel_tanks__fuel_tube
They are quite expensive though (I am not criticising these prices as with our VAT, import duty ....... and for the custom builds - the time taken (these are hand built) .... they seem reasonable.
However, if you are a tight old git with short arms and very deep pockets (first out of the taxi last to the bar!) and you want a size that is not available then .........
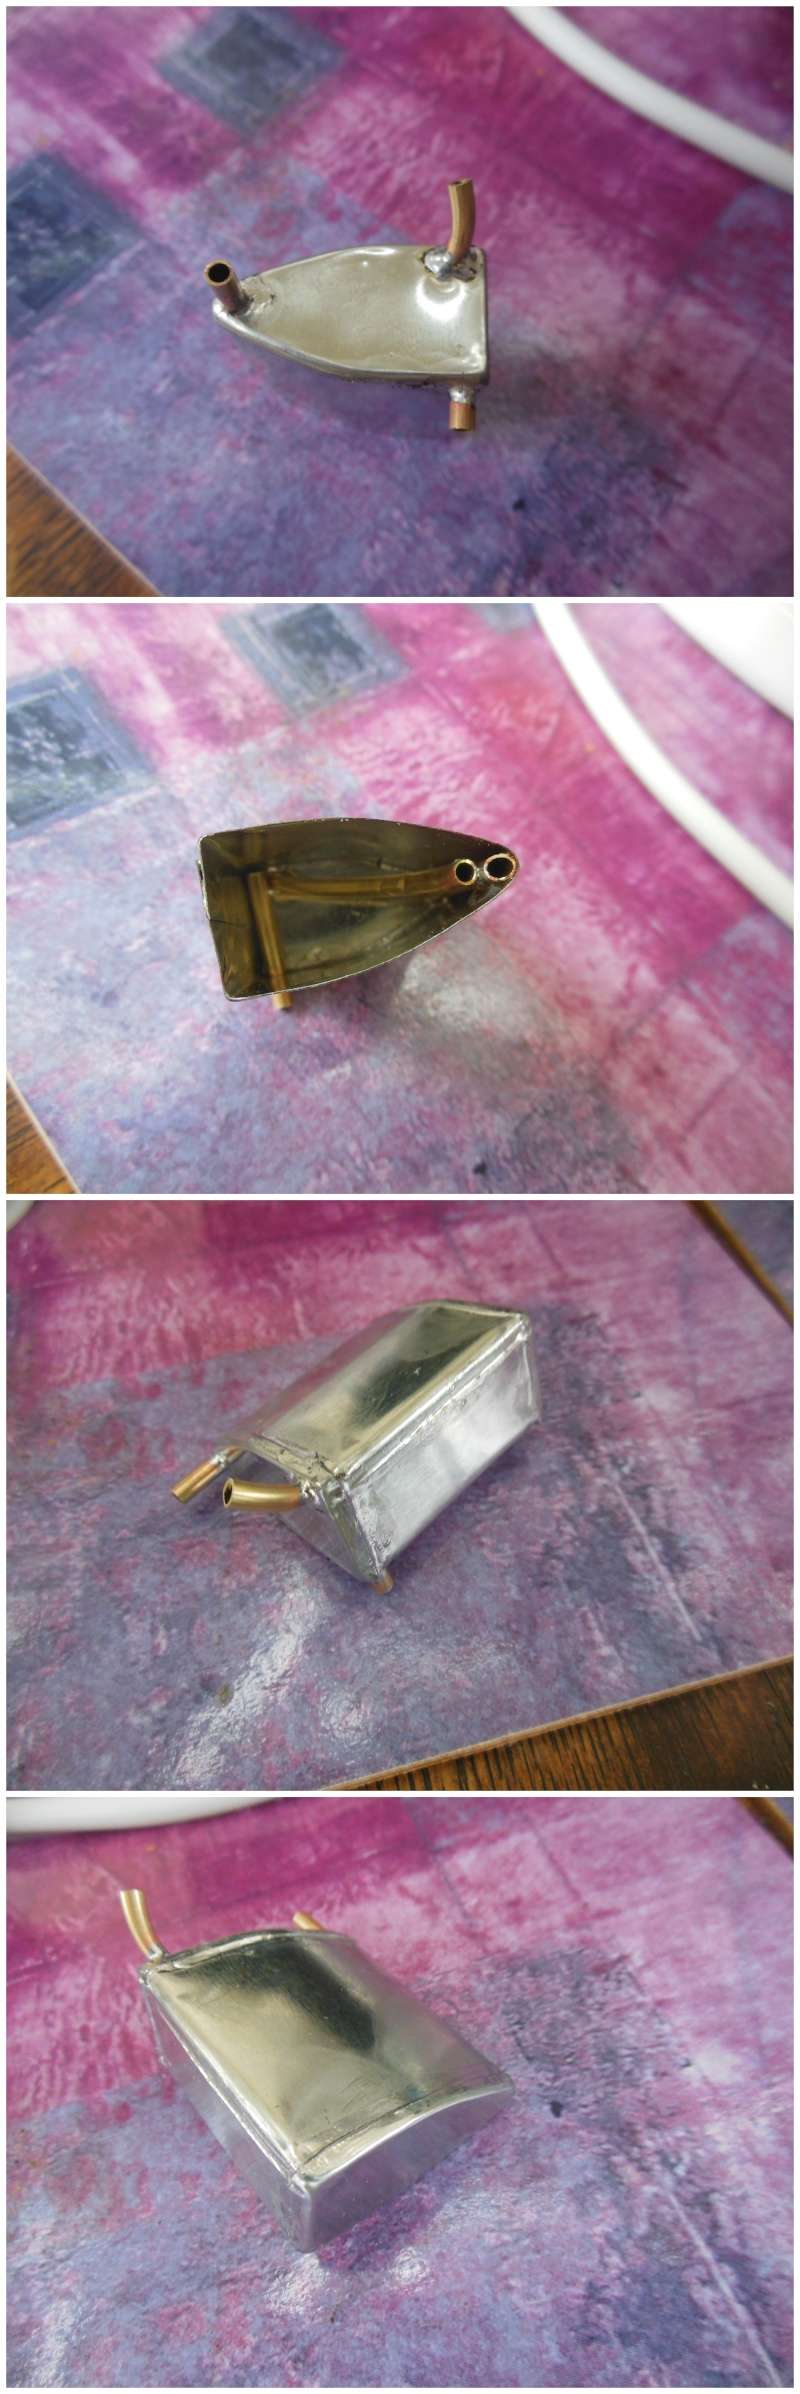
Buy some tinned sheet.
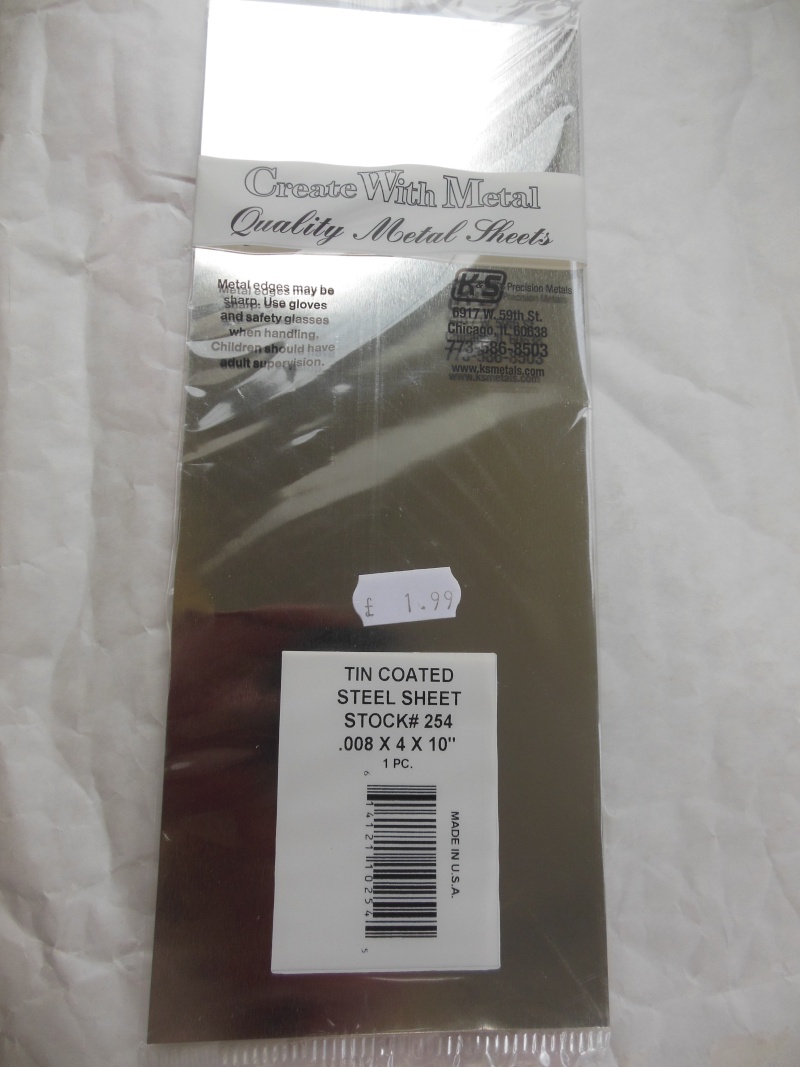
This sheet is .008", I also have .013. As you can see it cost £1.99 (well under $2) and ther is enough in one sheet to make three of this sized tank. Add £1 for tubing per tank, 31p for solder (I just made that up to make my sums easy!) and we are talking £1.10p per tank. (Well under a dollar)
And NO- i don't want to know how many cents this sheet is in the USA - I do know that that is where it is made!
Now we come to the expensive bit. I use Geomagic Design (formerly Alibre) to draw up the tank shape and then I 3D print it.
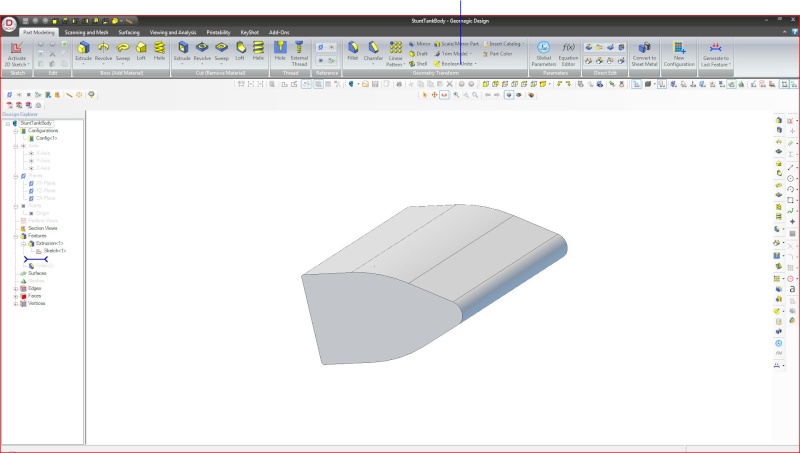
Once I am happy with the size and shape (limited space on the Gazelle) about two minutes later (Geomagic Design is very flexible) - I have end caps with an allowance for two thicknesses of metal.
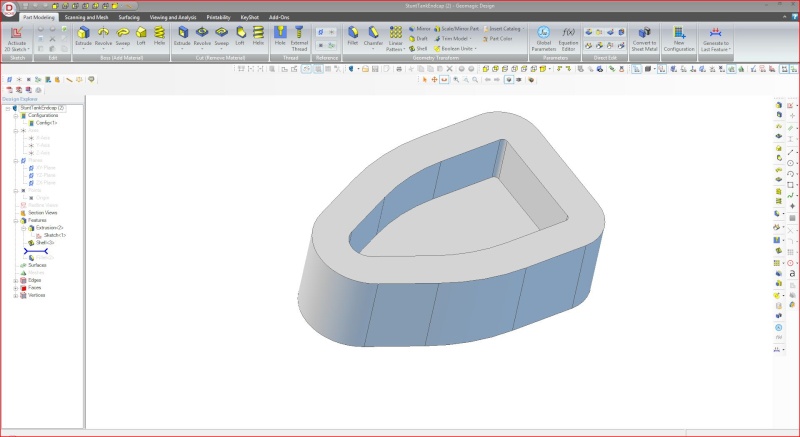
Print two of these and ready for action.
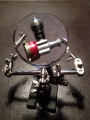
Here we have the parts pressing out the end caps.
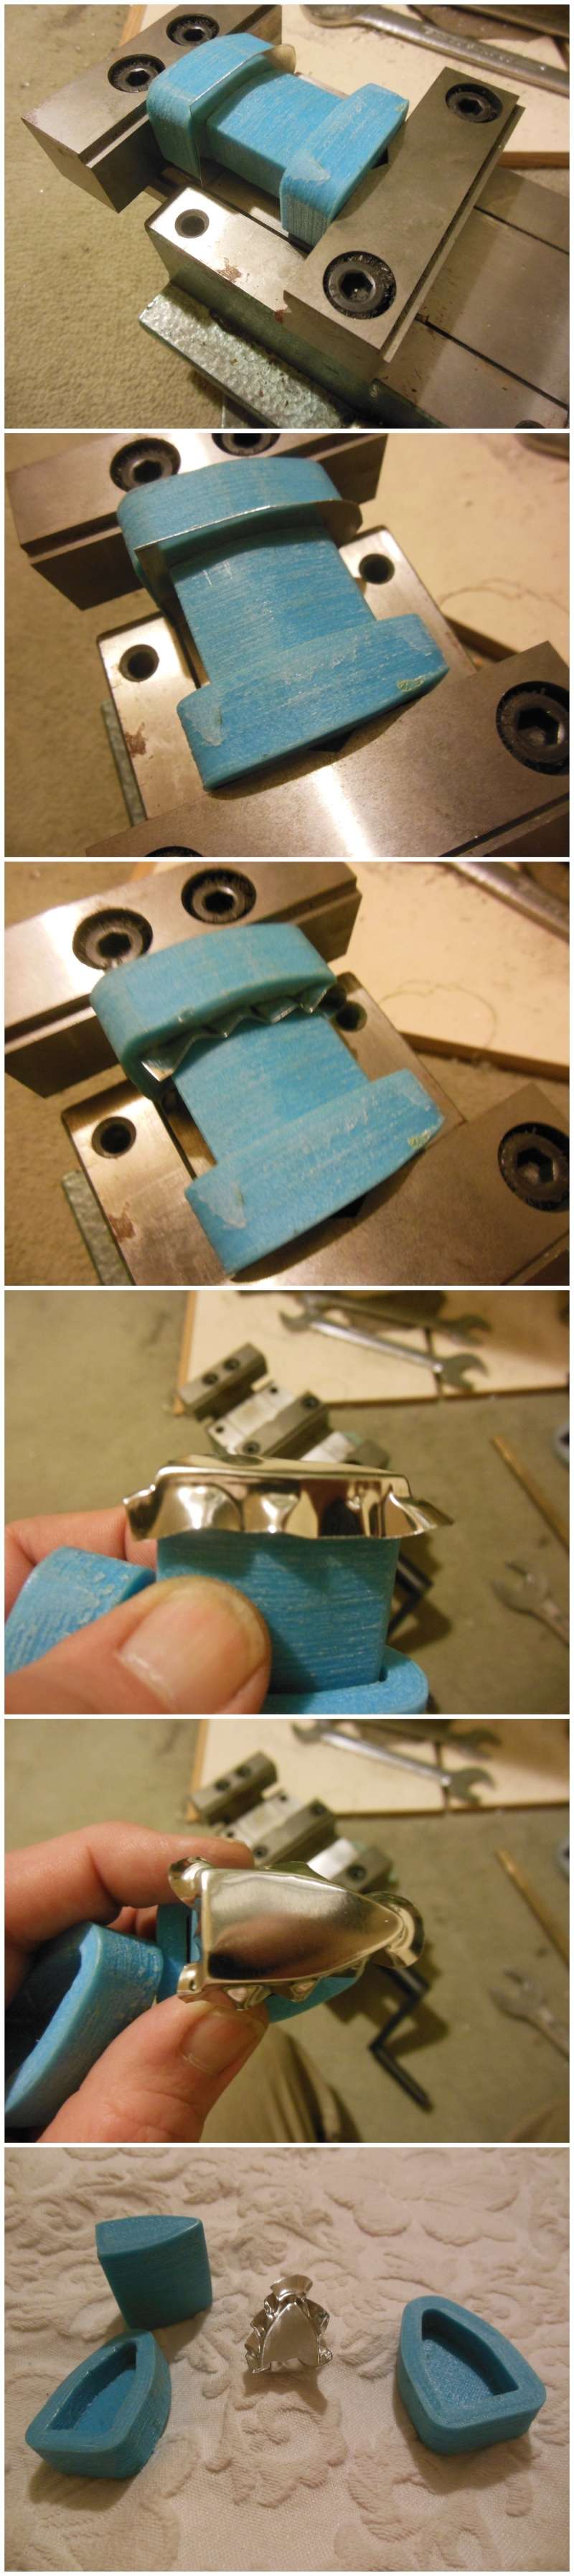
Now the body bending and the trial fit before trimming
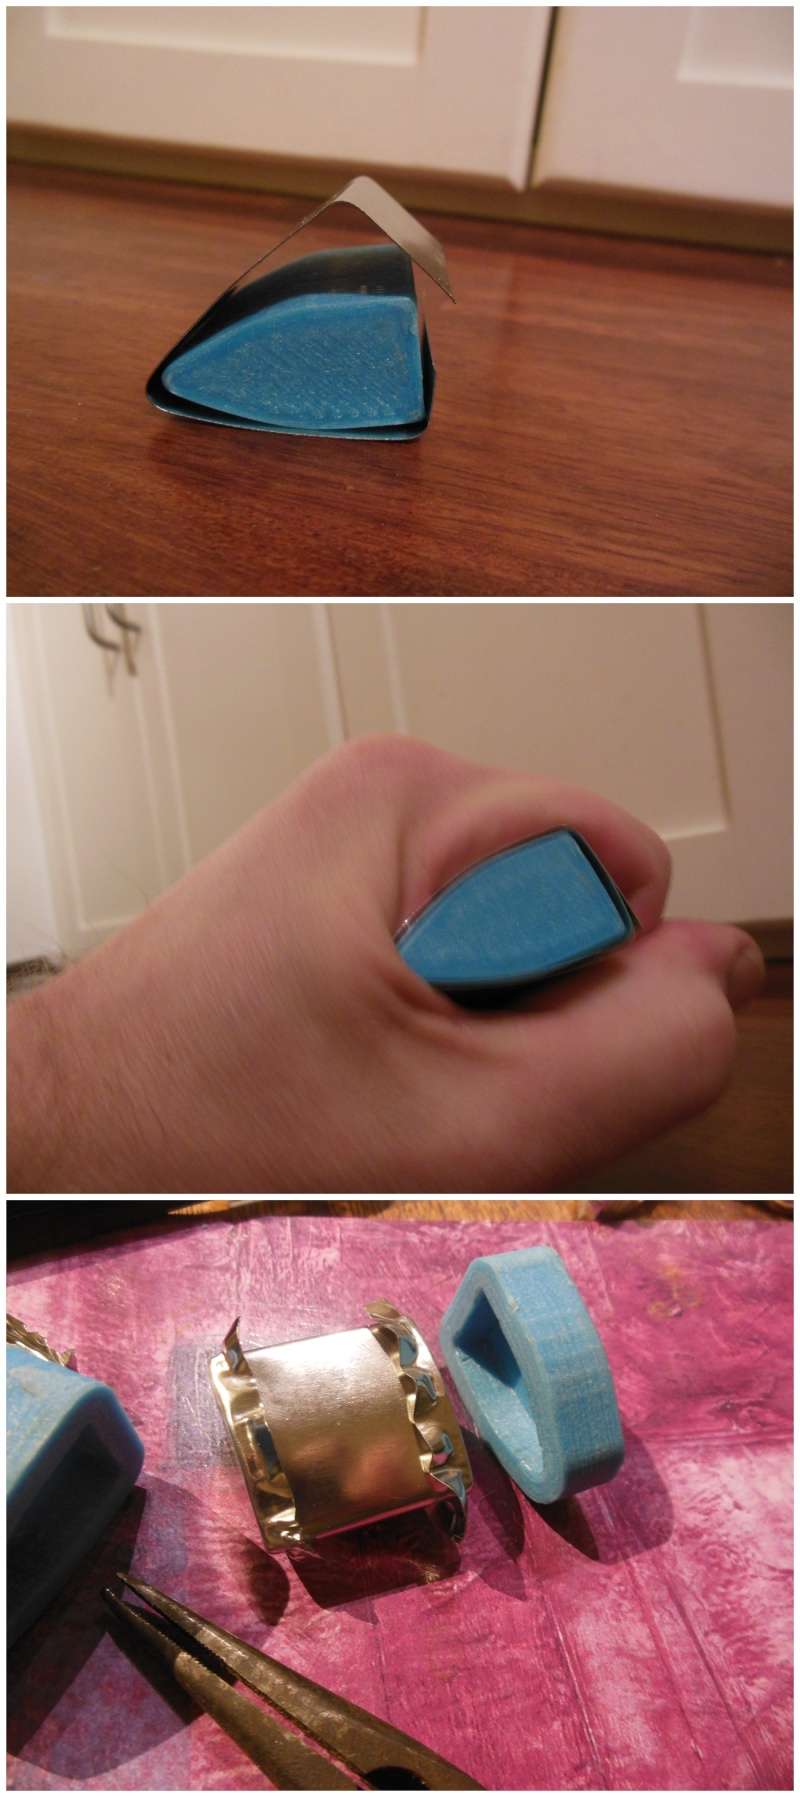
Then solder together
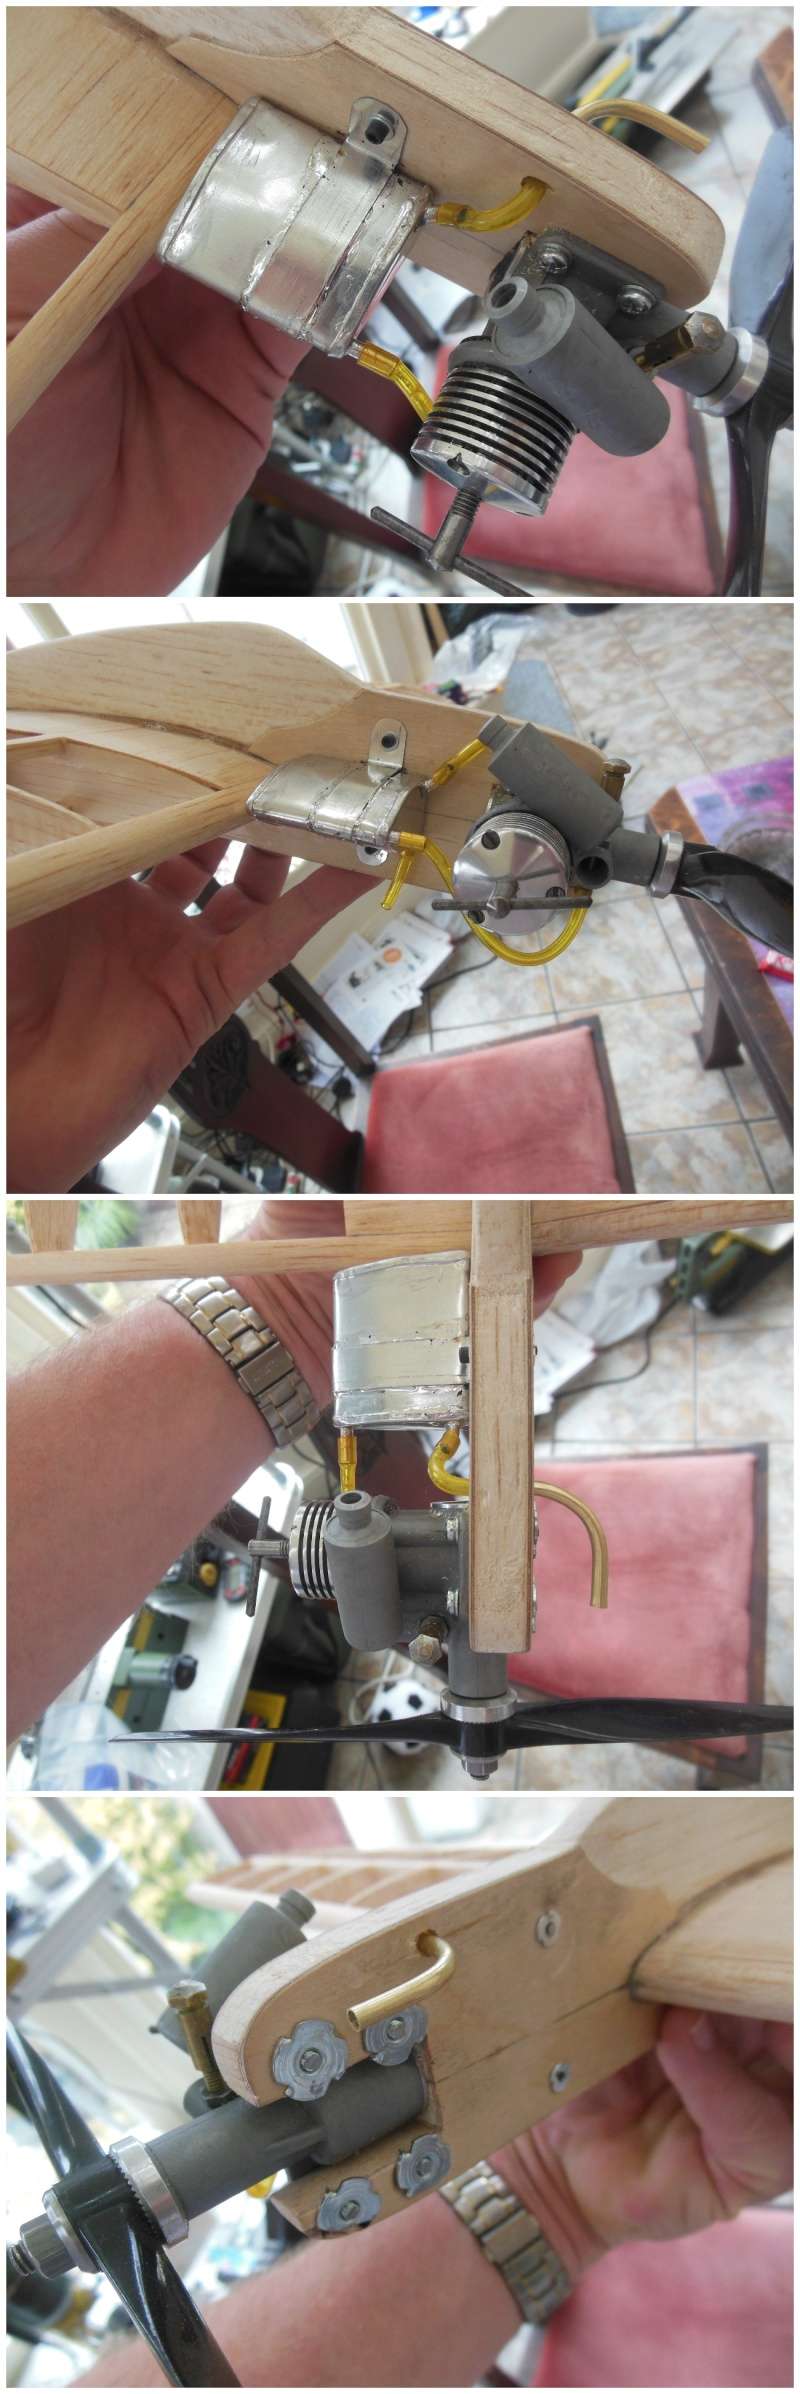
Stick it on the plane - I have moved the silencer so the tank can be seen.

ian1954- Diamond Member

- Posts : 2688
Join date : 2011-11-16
Age : 69
Location : England
Re: Wedge Tank build
![]() JPvelo Sun Feb 28, 2016 7:11 am
JPvelo Sun Feb 28, 2016 7:11 am
I am left in awe by your ingenuity and fabrication skills. Beautiful work as always.
Jim

JPvelo- Diamond Member
- Posts : 1972
Join date : 2011-12-02
Age : 56
Location : Colorado
Re: Wedge Tank build
![]() pkrankow Sun Feb 28, 2016 7:36 am
pkrankow Sun Feb 28, 2016 7:36 am
I have used fender washers in end grain wood for making circles for a pop-pop motor, but the results were not nearly as good.
Phil

pkrankow- Top Poster

- Posts : 3025
Join date : 2012-10-02
Location : Ohio
Re: Wedge Tank build
![]() getback Sun Feb 28, 2016 9:36 am
getback Sun Feb 28, 2016 9:36 am


getback- Top Poster


Posts : 10276
Join date : 2013-01-18
Age : 66
Location : julian , NC
Re: Wedge Tank build
![]() batjac Sun Feb 28, 2016 11:47 am
batjac Sun Feb 28, 2016 11:47 am
Awesome Job, Ian! The pictures make it look so easy. I want to make up a couple of tanks myself, but just have not gotten around to carving a hardwood block the size I want. A 3D printer would be great. I did not know the material used in small 3D printers would be hard enough to hold up to squeezing the end caps. And the price I paid here for those same tin sheets was about the same price a you paid, so you're not getting soaked on the price over there.
The Impressed Mark

batjac- Diamond Member
-
Posts : 2356
Join date : 2013-05-22
Age : 61
Location : Broken Arrow, OK, USA
Re: Wedge Tank build
![]() akjgardner Sun Feb 28, 2016 11:52 am
akjgardner Sun Feb 28, 2016 11:52 am

akjgardner- Diamond Member
-
Posts : 1527
Join date : 2014-12-28
Age : 64
Location : Greensberg Indiana
Re: Wedge Tank build
![]() roddie Sun Feb 28, 2016 12:48 pm
roddie Sun Feb 28, 2016 12:48 pm
I hope it works well on the model.. and glad that there's no reports of you burning yourself!

roddie- Top Poster
-
Posts : 8458
Join date : 2013-07-17
Age : 64
Location : N. Smithfield, Rhode Island -

Re: Wedge Tank build
![]() ian1954 Sun Feb 28, 2016 2:07 pm
ian1954 Sun Feb 28, 2016 2:07 pm
I cut the wavy bits off using little tin snips - ended up with a slightly raggy edge that I smoothed of on a disc sander.
The print media is cheap - pence and the moulds can be reused. The printer is a home made RepRap Prusa I2 variant.
3D printers have fallen in price due to their popularity and the latest Prusa can be obtained as a kit.
https://www.prusaprinterkits.com/product/prusa-i3-3d-printer-black/?gclid=Cj0KEQiA0sq2BRDRt6Scrqj71vQBEiQAg5bj0x1MFkKuwnGpL8_G5cCHpXjEwGIZJehP_5yQ2E6gE9IaAn348P8HAQ
Not cheap but not expensive when you can print control horns, bell cranks, engine mounts, tank moulds and prototype many things.
Software to run it is free - Slic3R and Repetier - but good CAD software is not cheap!
I have no idea how much Geomagic design is - I was an Alibre home/hobby user and I think I paid $99 for a perpetual license for a "personal" edition. I was upgraded to the full Geomagic design for a few dollars more as part of a promotion but the original full version of Alibre was $1,000 plus!
So I tread carefully when showing something like this - although there are freeware CAD packages - they are not good and don't have the features of the professional packages. I tried all sorts before I gave up and bought Alibre. It is software that isn't cheap.
I do have a few CAD/Cam packages but they are specialist for machining. Cut2D, Cut3D, VCarve Pro, Punch ViaCAD, Dolphin Partmaster, DevFus Cam ..... They are suit different pruposes and I have kept my eye open for good introductory offers.
I 3D print before I commit to metal machining - so 3D printing saves me time and expense.
My Alibre/Geomagic versions is now the "Expert" version. It has a sheet metal function that wasn't included with my original personal edition.
I can't get my head around it though but when I do (if I do!), i will be able to uses my CNC router to cut sheet metal complete with tabs and then just fold and solder it.
I have given up commenting on my modelling wounds unless they have bordered on serious. I am careless and I burned myself twice on the 3D printer clearing away dross and catching myself on the nozzle. Not to mention a burned lip (I used my teeth to pull solder off the reel and caught the hot end on my lip) plus the two cuts (one on my forefinger and one on the palm of my hand) from freshly cut metal.
I almost forgot - my middle finger nail now has a very thin portion where I caught it on my disc sander and nearly went through it!
My eyes are dim, I cannot see
even though I have my specs on me
I cannot judge distance
in a mere instance
bit I am a poet
and you should know it
ian1954- Diamond Member
- Posts : 2688
Join date : 2011-11-16
Age : 69
Location : England
Re: Wedge Tank build
![]() PeterJGregory Sun Feb 28, 2016 4:43 pm
PeterJGregory Sun Feb 28, 2016 4:43 pm
Did you use an electrical iron to solder or did you use a torch?

PeterJGregory- Gold Member

- Posts : 144
Join date : 2014-07-28
Age : 61
Location : Hudson Valley, New York
Re: Wedge Tank build
![]() ian1954 Sun Feb 28, 2016 4:57 pm
ian1954 Sun Feb 28, 2016 4:57 pm
PeterJGregory wrote:Thanks for the excellent share. Functional art. The CAD software cost/learning curve is unfortunate. I once was a wiz on circuit design software and know the investment in getting commercial-grade skilled.
Did you use an electrical iron to solder or did you use a torch?
I used a 60 watt electric soldering iron but only because I couldn't find my little torch. I found it easier to get a nice neat joint but took a lot longer.
ian1954- Diamond Member
- Posts : 2688
Join date : 2011-11-16
Age : 69
Location : England
Re: Wedge Tank build
![]() roddie Sun Feb 28, 2016 5:44 pm
roddie Sun Feb 28, 2016 5:44 pm
I have some more questions..
roddie- Top Poster
-
Posts : 8458
Join date : 2013-07-17
Age : 64
Location : N. Smithfield, Rhode Island -
Re: Wedge Tank build
![]() cox24711 Sun Feb 28, 2016 11:20 pm
cox24711 Sun Feb 28, 2016 11:20 pm
i tried to make mine and it came out now where near as good!

cox24711- Platinum Member

- Posts : 722
Join date : 2014-01-18
Age : 21
Location : Noosa Queensland Australia
Re: Wedge Tank build
![]() ian1954 Mon Feb 29, 2016 7:35 am
ian1954 Mon Feb 29, 2016 7:35 am
roddie wrote::
I have some more questions..Wire-size/type of solder, type of flux? What size (inside diameter) are your tubes? Do you know the tank's capacity yet? You said you had 1.5" square of fuse to work with for the tank's footprint. Did you do any area-figuring on how deep to make the end-caps/body? That was a PIA to figure-out, even on my rectangular tanks.. for conversion to cc's, but it was something I wanted to know for the Speed competition.
I used resin (rosin) cored solder - 60/40 tin lead - an a wipe of resin flux - Fluxite.

The Fluxite works with leaded and unleaded solders. The solder wire was 0.7mm diameter, narrower than I would normally use but it produced a much neater finish. Fluxite cleans off easily with soap and water, if you over cook it - denatured alcohol or windex.
I made the tank to fit the plane without any measuring - the end caps are almost flush with the tank body excepting the curvature of the fold. The tank also has a curvatures - I wouldn't have the patience to do the maths for that.
The pipes are 1/8th" external diameter - 0.014" wall thickness.
ian1954- Diamond Member
- Posts : 2688
Join date : 2011-11-16
Age : 69
Location : England
Re: Wedge Tank build
![]() ian1954 Mon Feb 29, 2016 7:51 am
ian1954 Mon Feb 29, 2016 7:51 am
cox24711 wrote:Wow master Yoda i never knew that you were good at making tanks !
i tried to make mine and it came out now where near as good!
Never give up trying, it doesn't have to be pretty to work and my first attempts at your age were none too good.
In the 1960s lots of things were sold in little tin cans so all we really had to do was to fit and solder pipe work.
There were various shapes and sizes and so we started making fuel tanks the easy way just by soldering the lid on!

Our favourite was the oval Colmans mustard tin.
Practise bending and soldering scraps of metal before starting a full tank and you will soon see how easy it is.
ian1954- Diamond Member
- Posts : 2688
Join date : 2011-11-16
Age : 69
Location : England
Re: Wedge Tank build
![]() rsv1cox Mon Feb 29, 2016 8:15 am
rsv1cox Mon Feb 29, 2016 8:15 am
I used a similar sized off the shelf Perfect tank for my Aircrate but before I installed it I filled it with water, dried the exterior well, stopped off the vents and applied a small amount of pressure from my air compressor as a leak test.
How do you pressure test yours?
Bob

rsv1cox- Top Poster
-
Posts : 10851
Join date : 2014-08-18
Location : West Virginia
Re: Wedge Tank build
![]() ian1954 Mon Feb 29, 2016 8:40 am
ian1954 Mon Feb 29, 2016 8:40 am
rsv1cox wrote:Yes, another great job Ian. Well beyond my skills.
I used a similar sized off the shelf Perfect tank for my Aircrate but before I installed it I filled it with water, dried the exterior well, stopped off the vents and applied a small amount of pressure from my air compressor as a leak test.
How do you pressure test yours?
Bob
I stop off the vents and submerge the tank in water. Then I apply the air through the fuel tube from my compressor and look for air bubbles.
My pal does the same as me but skips the water and uses a gas leak spray and watches for bubbles.

ian1954- Diamond Member
- Posts : 2688
Join date : 2011-11-16
Age : 69
Location : England
Re: Wedge Tank build
![]() PeterJGregory Tue Mar 01, 2016 6:19 pm
PeterJGregory Tue Mar 01, 2016 6:19 pm
PeterJGregory- Gold Member
- Posts : 144
Join date : 2014-07-28
Age : 61
Location : Hudson Valley, New York
Re: Wedge Tank build
![]() roddie Tue Mar 01, 2016 7:54 pm
roddie Tue Mar 01, 2016 7:54 pm
PeterJGregory wrote:Artfully done. I like the tooling, wish I had access to some nice machines. Nonetheless, I want to give it a try with less elaborate machine access. Thanks for the excellent share.
Peter, I built my first tank(s) recently and had good experience. I didn't have any special tooling. Tools I found handy other than the iron, LEADED rosin-core solder and paste-flux were; sharp scissors, a small nylon-faced hammer, a bench-vise, an awl, a razor-saw, some hardwood scraps and good lighting.
Like Ian mentioned to young Greg; practice a little first. When I built my rectangular tanks.. essentially a box, I made a paper pattern to lay-out the parts. A hardwood plug for forming the body helps when it comes time for forming the end-caps too. Wood forms/wedges help to keep the heat of soldering concentrated on the area where you're working. Metal clamps or holding fixtures will sink/draw heat away.. and prevent the solder from flowing and sealing the joints... so you should "pad" them with thin wood/scrap balsa. I used a standard 25-30w pencil-type iron for joining .008" tin-sheet (bought locally at a home-center-HDWE dept.) with 1/8" round copper tubing (auto-supply store-gages), cut to length with a razor saw. I used .022" dia. leaded rosin-core solder. I have not heard a good thing yet about lead-free solder for this type of work. Try to find/use leaded-solder in a .022"-.032" size if you can. A small pencil-type iron should have no problem. I used Fourney's "Ruby Fluid".. a paste-flux, which worked well for me. Piercing the tube-locations through with an awl, and into a backing-block/plug, supports the panel and forms a concave pocket for a strong solder-joint. Wood wedge(s) cut to fit, help hold tubes in place inside the tank when soldering; inside and out. Time spent with snug-fitting joints will pay-off in ease of soldering, less chance of leaks.. (and easier to fix if there are any..) as well as appearance.
Give it a try! I enjoyed it so much, that I built 5 little tanks in 3 different sizes. Little tanks of the size/type that I wanted, weren't available.. so I had to make them.
roddie- Top Poster
-
Posts : 8458
Join date : 2013-07-17
Age : 64
Location : N. Smithfield, Rhode Island -
Re: Wedge Tank build
![]() PeterJGregory Tue Mar 01, 2016 7:56 pm
PeterJGregory Tue Mar 01, 2016 7:56 pm
PeterJGregory- Gold Member
- Posts : 144
Join date : 2014-07-28
Age : 61
Location : Hudson Valley, New York
Re: Wedge Tank build
![]() pkrankow Tue Mar 01, 2016 9:05 pm
pkrankow Tue Mar 01, 2016 9:05 pm
Similar treatment can be done with steel bar stock to form end caps. Create a hole in a piece that is carefully measured. Fasten to another piece to make a bottom to the cavity. Take a third piece and make a plug that fits the hole very closely, allowing stock clearance, then fasten to a piece to make a cap on the plug. Press one end cap at a time.
Either way is work, and has been done by many other people, particularly the wooden plug. There is also some low-temperature plastics that can be used
https://www.adafruit.com/products/2504
Phil
pkrankow- Top Poster
- Posts : 3025
Join date : 2012-10-02
Location : Ohio
Re: Wedge Tank build
![]() KariFS Wed Mar 02, 2016 2:35 am
KariFS Wed Mar 02, 2016 2:35 am
I would use birch for the plug, plane it to shape and then trace the shape on a piece of plywood and cut the piece out to create the cavity side. With my skills it would probably not be as accurate as Ian's 3D prints but they would probably work. Birch and oak are the easiest-to-get hardwoods around here.
3D CAD doesn't have to be expensive, there are some free softwares that are adequate for this kind of parts. I have used Google Sketchup for workshop layout work, it is (or at least was at the time) free to use for non-commercial purposes. Sketchup is supposed to have a function that converts the model into a file that 3D printers understand. There are also services where you can email your files and have them printed. Probably this would be easier than making wooden tools, especially as I myself don't have tools for this kind of precision carpentry.
KariFS- Diamond Member
- Posts : 2019
Join date : 2014-10-10
Age : 52
Re: Wedge Tank build
![]() ian1954 Wed Mar 02, 2016 5:34 am
ian1954 Wed Mar 02, 2016 5:34 am
If I pushed the end cap to the bottom of the cavity when initially forming it was difficult to get out because of all the crinkled metal. It would have been easier to push it through.
After it had been trimmed though, it was ideal for pressing the end caps on the tank body.
Also have the base to the cavity stopped the sides from spreading.
Food for thought!
ian1954- Diamond Member
- Posts : 2688
Join date : 2011-11-16
Age : 69
Location : England
Re: Wedge Tank build
![]() KariFS Wed Mar 02, 2016 5:59 am
KariFS Wed Mar 02, 2016 5:59 am
Where did you get the copper tube? My sources only have brass and aluminium, neither is ideal for this kind of work.
KariFS- Diamond Member
- Posts : 2019
Join date : 2014-10-10
Age : 52
Re: Wedge Tank build
![]() pkrankow Wed Mar 02, 2016 6:37 am
pkrankow Wed Mar 02, 2016 6:37 am
KariFS wrote:Forgot to say, that's a good looking tank!
Where did you get the copper tube? My sources only have brass and aluminium, neither is ideal for this kind of work.
Try oil pressure gauge tubing at the auto parts store.
Phil
pkrankow- Top Poster
- Posts : 3025
Join date : 2012-10-02
Location : Ohio
Re: Wedge Tank build
![]() ian1954 Wed Mar 02, 2016 8:09 am
ian1954 Wed Mar 02, 2016 8:09 am
There have been many debates over the use of copper tubing for the fuel tanks, mostly around corrosion. I have taken some old tanks apart and seen the verdigris and gungy green deposits inside the tank around the pipes. I do know those who swear by using copper as they find it easier to bend. All the tanks I have seen with the problem have been unused for many years.
Brass can be difficult to bend in its hardened form. You can buy soft brass tubing
http://pegasusmodels.co.uk/prodcat.asp?type=submenu&maingp=Building+Materials+And+Coverings&id=Metals&offset=165#pt
but I use the normal hard brass tubing but, for the parts I need to bend, I anneal it. Just heat to a dull red colour and let it cool slowly. Just remember - both copper and soft brass will work harden if bent and re bent. They both need annealing at some point.
ian1954- Diamond Member
- Posts : 2688
Join date : 2011-11-16
Age : 69
Location : England
Page 1 of 2 • 1, 2 ![]()
» vent in my wedge tank
» I neeed a 1.5 ounce/44.4cc wedge tank
» Li'l Jumpin Bean on a wedge
» Guillows Cessna 150 build circa 1970 (Build Log)