

 Rules
Rules
Log in
Search
Latest topics
» Jim Walker Firebaby by rsv1cox Today at 7:59 pm
» Speed plane - Crispy but not too crispy
by rsv1cox Today at 7:19 pm
» need info on this
by lla Today at 5:19 pm
» Post your Older books
by GallopingGhostler Today at 2:49 pm
» Roddie-Rigger.. a 2005 original design
by rsv1cox Today at 12:17 pm
» O&R 23 & Brown Jr
by lla Today at 11:15 am
» Project Cox .049 r/c & Citabrian Champion
by rdw777 Today at 9:00 am
» Fox .35 Modifications
by rdw777 Today at 8:51 am
» Jim Walkers FireBee - This is going to be fun
by rdw777 Today at 8:30 am
» "SOLD OUT" Cox .020 silencers -- currently
by GallopingGhostler Today at 5:12 am
» *Cox Engine of The Month* Submit your pictures! -May 2024-
by Admin Today at 2:38 am
» S1 Ringmaster
by Onelife Yesterday at 8:40 am
Cox Engine of The Month


CEF Traveling Engine


Win This Engine!

Live on Patrol


Hoppers and Bugs
Page 1 of 1

Hoppers and Bugs
![]() cstatman Sat Nov 18, 2023 1:54 pm
cstatman Sat Nov 18, 2023 1:54 pm
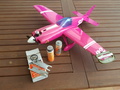
one of my pushers, I mean "friends" decided I needed a few less dollars in my pocket, and a few more projects on my bench
Came just the way I like em, covered in dried castor, mismatched screws, wrapped in newspapers from decades ago
cleaning up, ordered parts from Bernie
Hope to have em running soon.

Came just the way I like em, covered in dried castor, mismatched screws, wrapped in newspapers from decades ago
cleaning up, ordered parts from Bernie
Hope to have em running soon.

cstatman- Platinum Member


Posts : 536
Join date : 2021-02-17
Age : 59
Location : San Jose, CA
Re: Hoppers and Bugs
![]() Ken Cook Sun Nov 19, 2023 6:28 am
Ken Cook Sun Nov 19, 2023 6:28 am
In and around 1982, I had a Space Hopper which was in a speed pan given to me. I have the pan still but I couldn't find the engine. I searched and searched for it for years. Last night, I opened this small gold tin can I knew I had, inside was the Space Hopper. I was pleasantly surprised. Locked solid ready for a tear down. Removing the rear screen cap over the intake is a bit of a challenge because the newer wrenches don't fit it. The small jet holes in the venturi stack are even smaller than the holes on a TD venturi. Sourcing a extremely small piece of copper wire was a bit of a chore last night but I managed. Unfortunately, mine has now what looks to be fuel and oil staining on the case and spinner. I was going to run it last evening but sundown seemed to take place in minutes.

Ken Cook- Top Poster

- Posts : 5463
Join date : 2012-03-27
Location : pennsylvania
Re: Hoppers and Bugs
![]() getback Sun Nov 19, 2023 6:50 am
getback Sun Nov 19, 2023 6:50 am
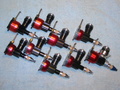
Cool Deal Charles , looks like you got all the parts for 4 engines ! Enjoy the new to you engine and less beer money  That's pretty cool that you would find the engine just as Charles is upping his game Ken . The only Hopper i got is like New ,never ran so it will stay that way $$ Till I can get another that's a runner
  or
or 
That's pretty cool that you would find the engine just as Charles is upping his game Ken . The only Hopper i got is like New ,never ran so it will stay that way $$ Till I can get another that's a runner or 
getback- Top Poster
-
Posts : 10127
Join date : 2013-01-18
Age : 66
Location : julian , NC
Re: Hoppers and Bugs
![]() roddie Sun Nov 19, 2023 2:56 pm
roddie Sun Nov 19, 2023 2:56 pm
Ken Cook wrote: In and around 1982, I had a Space Hopper which was in a speed pan given to me. I have the pan still but I couldn't find the engine. I searched and searched for it for years. Last night, I opened this small gold tin can I knew I had, inside was the Space Hopper. I was pleasantly surprised. Locked solid ready for a tear down. Removing the rear screen cap over the intake is a bit of a challenge because the newer wrenches don't fit it. The small jet holes in the venturi stack are even smaller than the holes on a TD venturi. Sourcing a extremely small piece of copper wire was a bit of a chore last night but I managed. Unfortunately, mine has now what looks to be fuel and oil staining on the case and spinner. I was going to run it last evening but sundown seemed to take place in minutes.
How COOL
I know very little about about either of these two engines. The only Cox engines that were in my family, were sourced by my dad in the early 70's. "Bee" engines.. is all I owned for Cox engines.. until eight or nine years ago.
The above photos that show the parts-breakdowns are useful knowledge for me. Thank you for sharing Charles.
Last edited by roddie on Mon Nov 20, 2023 6:38 pm; edited 1 time in total (Reason for editing : removed a redundancy)

roddie- Top Poster
- Posts : 8283
Join date : 2013-07-17
Age : 64
Location : N. Smithfield, Rhode Island -

Re: Hoppers and Bugs
![]() rsv1cox Sun Nov 19, 2023 4:51 pm
rsv1cox Sun Nov 19, 2023 4:51 pm
Strange things going on in those pictures Charles. Looking forward to seeing what you come up with.
Bob
Bob

rsv1cox- Top Poster
-
Posts : 10584
Join date : 2014-08-18
Location : West Virginia
Re: Hoppers and Bugs
![]() GallopingGhostler Sun Nov 19, 2023 5:01 pm
GallopingGhostler Sun Nov 19, 2023 5:01 pm
Nice rescue operation in progress, Charles. 
Looking forward to seeing your final results, restoration to life again and any run reports.
Looking forward to seeing your final results, restoration to life again and any run reports.

GallopingGhostler- Top Poster
-
Posts : 5321
Join date : 2013-07-13
Age : 70
Location : Clovis NM or NFL KC Chiefs
Re: Hoppers and Bugs
![]() cstatman Sun Nov 19, 2023 6:22 pm
cstatman Sun Nov 19, 2023 6:22 pm
gaskets and tiny bolts ordered. almost everything else is cleaned up
i need to figure out 2 prop-drive plates
Cleaning the venturi jets? the leeeetel beeety holes?
I grab a pliers, and YANK! a single strand of brass from one of my wire brushes,
then I use magnifying glasses, and use te brass wire to gently poke through and clean up the holes, with copious amounts of Ballistol to keep it all clean and lubricated
when mostly clean, I used compressed air to blow out the needle seat area, as well as pressurize it all and make sure air is flowing through everywhere it should
for these, I did not want super polished shiney, so I went with hours of gentle hand brushing with brass wire brush, ballistol, and rags. its looking better and better. Now waiting for gaskets from Bernie, and maybe some other bits and pieces
Drive plate is the only missing bits for 2 of the engines. and ONE of them is gonna have a "modern" cylinder/piston/head. but three of them have the originals
cstatman- Platinum Member
-
Posts : 536
Join date : 2021-02-17
Age : 59
Location : San Jose, CA
Re: Hoppers and Bugs
![]() roddie Mon Nov 20, 2023 7:04 pm
roddie Mon Nov 20, 2023 7:04 pm
cstatman wrote:gaskets and tiny bolts ordered. almost everything else is cleaned up
i need to figure out 2 prop-drive plates
Drive plate is the only missing bits for 2 of the engines. and ONE of them is gonna have a "modern" cylinder/piston/head. but three of them have the originals
My friend has a small lathe... a Unimat and another small/popular/milling machine in his basement/cellar workshop in his home. You may consider placing an ad in/on your local "community-board".. asking about machining services for a small (sub 1") one-off part.. made from Aluminum. There are people that would want to help you with this. You have drive-plate examples? If so; you could easily have them made to the exact proportions.. through an inspection by the machinist.
There might be someone in the next town.. down the road.. or even next-door.. who could and would make your prop-driver plates. They may even have some round aluminum bar-stock for the job. People helping people... It does still happen.
roddie- Top Poster
- Posts : 8283
Join date : 2013-07-17
Age : 64
Location : N. Smithfield, Rhode Island -
Re: Hoppers and Bugs
![]() cstatman Tue Nov 21, 2023 11:38 am
cstatman Tue Nov 21, 2023 11:38 am
i have a TAG micro-lathe
and also have dear friends who are machinists.
these driveplates are tiny and intricate. I could make the shape, but it would be rough
the three slots that key it to the driveshaft (like a vintage O&R) are the difficult part to cut with precision
time = money
this plate, like .010 crankshafts, calls for "precision machining". most shops don't do tiny bits, and any precision shop is only interested in production quantities. The quote I got for .010 crankshafts was a minimal run of 500, and $27/unit.
thus? if i can find 2 of them? much cheaper than trying to make them.
want to love the idea of 'people-helping-people"
just like the bride to be asking a wedding photographer for cheap rates cause they will get "exposure"?
its difficult to ask my machinist friends to work for free.
cstatman- Platinum Member
-
Posts : 536
Join date : 2021-02-17
Age : 59
Location : San Jose, CA
Re: Hoppers and Bugs
![]() cstatman Tue Nov 28, 2023 7:28 pm
cstatman Tue Nov 28, 2023 7:28 pm

cstatman- Platinum Member
-
Posts : 536
Join date : 2021-02-17
Age : 59
Location : San Jose, CA
Re: Hoppers and Bugs
![]() balogh Wed Nov 29, 2023 1:22 am
balogh Wed Nov 29, 2023 1:22 am
Gents even if the driveplate is made on a lathe, how do you add the serrated contact surface for torque transmission to the prop?
balogh- Top Poster
-
Posts : 4748
Join date : 2011-11-06
Age : 65
Location : Budapest Hungary
Re: Hoppers and Bugs
![]() sosam117 Wed Nov 29, 2023 6:04 am
sosam117 Wed Nov 29, 2023 6:04 am
balogh wrote:Gents even if the driveplate is made on a lathe, how do you add the serrated contact surface for torque transmission to the prop?
You can do like what I do to the electric motors I have when I use one of those shaft adapters to install a prop on it.
Those shaft adapters (when you purchase the cheap ones from China) don't have the knurling but have a smooth face.
I cut from 360 grit sandpaper a small disk to fit on the prop driver.
One side facing the prop and the 2nd one facing the aluminum prop driver.
The sandpaper gives enough friction to tighten up the prop to the motor/engine with no problems.
sosam117
Mike
sosam117- Diamond Member

- Posts : 1291
Join date : 2016-03-23
Location : Suburb of Chicago, Illinois
rsv1cox- Top Poster
-
Posts : 10584
Join date : 2014-08-18
Location : West Virginia
Re: Hoppers and Bugs
![]() cstatman Wed Nov 29, 2023 12:44 pm
cstatman Wed Nov 29, 2023 12:44 pm
imma try to get one or two on a test stand and running as soon as I can.
i am not gonna spend time and lathe work trying to build driveplates. either I find some, or they are display motors.
i am not gonna spend time and lathe work trying to build driveplates. either I find some, or they are display motors.
cstatman- Platinum Member
-
Posts : 536
Join date : 2021-02-17
Age : 59
Location : San Jose, CA
Re: Hoppers and Bugs
![]() cstatman Thu Nov 30, 2023 12:51 pm
cstatman Thu Nov 30, 2023 12:51 pm
i need to dial the needle, and tighten my stand, it was bouncing a bit, but running
https://www.youtube.com/shorts/gT8OTn6ju9w?si=KItEgczlFF7boIqA
maybe go on a nostalgia class FF bird...
https://www.youtube.com/shorts/gT8OTn6ju9w?si=KItEgczlFF7boIqA
maybe go on a nostalgia class FF bird...
cstatman- Platinum Member
-
Posts : 536
Join date : 2021-02-17
Age : 59
Location : San Jose, CA
Re: Hoppers and Bugs
![]() GallopingGhostler Thu Nov 30, 2023 1:25 pm
GallopingGhostler Thu Nov 30, 2023 1:25 pm
cstatman wrote:i need to dial the needle, and tighten my stand, it was bouncing a bit, but running
maybe go on a nostalgia class FF bird...
That Thermal Hopper showed potential.
Would be a good add to any vintage C/L, F/F, or R/C. (Shoot, nearly every plan we show planes of now is over 40 years old or vintage  )
)
GallopingGhostler- Top Poster
-
Posts : 5321
Join date : 2013-07-13
Age : 70
Location : Clovis NM or NFL KC Chiefs
Re: Hoppers and Bugs
![]() ffkiwi Thu Nov 30, 2023 4:54 pm
ffkiwi Thu Nov 30, 2023 4:54 pm
balogh wrote:Gents even if the driveplate is made on a lathe, how do you add the serrated contact surface for torque transmission to the prop?
Easy-you do that with a knurling tool-which is simply a small piece of hardened steel anywhere from 5/8" to about 1" diameter, pivoted on an axle which forms part of the tool shank-so the knurl can freely rotate. Cut on the periphery of the knurl is a series of closely spaced V-shaped 'teeth' (think of a gear about 3/16"-1/4" thick with very fine teeth.....and you basically have a knurl)-these teeth can be parallel to the rotating axis or at about 45 degrees
In practice the prop driver blank in held in the lather chuck, rotating, and the knurling tool mounted in the normal toolpost and advanced axially into the spinning face of the prop driver, which leaves a radial knurl pattern with the radial grooves matching the teeth on the knurl. This is a metal DISPLACEMENT process not a cutting process, so it is usual to do it in several stages, brushing away any chips as they form to keep the face clean.
The same process can be used to produce the splines on the crankshaft-though this time you would bring the knurl in from the side, at 90 degrees to the spinning shaft. Sometimes-in the case of very small parts, you might want to use a knurl to make a thinner copy of itself so you can get the thinner one in to the job-in which case yo would knurl a cylindrical piece of soft steel bar, bore the pivot hole, part it off and then harden it. This approach often has to be used where a prop driver has a centre boss on it, which projects forward of the knurled driving surface-if you're trying to replicate one of these you run into clearance problems with the normal knurling tool.
Finally-there are single and double knurling tools-the double ones are like a two tine fork-with pivoting tines each holding a knurling wheel-which on these tools are usually of the angled type-but with opposite directions-and the two wheels straddle the rotating work and are brought in contact with it from above and below by tightening a screw. the two knurls then each imprint their respective pattern on the workpiece-and since the 'teeth' are opposite handed-the result is the nice diamond pattern knurl you find on all sorts of tools and pieces of equipment-for either decorative or improved grip purposes.....in our case, frequently seen on needle valve knobs. I have both types of knurling tool-but mainly use the diamond pattern two wheel one...funnily enough for making grips for the rear peg on rubber models more often than engine parts.
Ooh-before I forget-another clever feature of face knurling-if the tool is exactly on centre of the lathe axis you get a true radial knurl-if it is set above or below centre-you get the attractive spiral knurl seem on many of the better quality Japanese and Italian model engines.
ChrisM

ffkiwi- Gold Member

- Posts : 361
Join date : 2018-07-10
Location : Wellington, NZ
Re: Hoppers and Bugs
![]() balogh Thu Nov 30, 2023 5:03 pm
balogh Thu Nov 30, 2023 5:03 pm
Thanks for the explanation so this is rather an extrusion than a cutting/milling process..in lack of the knurling tool one may just want to extrude or cut a few parallel grooves into the face, that would also help transmit the engine torque onto the prop..it is true though the radial knurles would keep the prop fixed even if it jumped a notch, but the parallel grooves, once skipped, would not hold the prop anymore before the prop slips 180 degrees..
balogh- Top Poster
-
Posts : 4748
Join date : 2011-11-06
Age : 65
Location : Budapest Hungary
Re: Hoppers and Bugs
![]() ffkiwi Thu Nov 30, 2023 5:24 pm
ffkiwi Thu Nov 30, 2023 5:24 pm
balogh wrote:Thanks for the explanation so this is rather an extrusion than a cutting/milling process..in lack of the knurling tool one may just want to extrude or cut a few parallel grooves into the face, that would also help transmit the engine torque onto the prop..it is true though the radial knurles would keep the prop fixed even if it jumped a notch, but the parallel grooves, once skipped, would not hold the prop anymore before the prop slips 180 degrees..
No I wouldn't call it an extrusion process-extrusion implicitly means stock is forced through a die and the product has the external profile of the inner shape of the die. Knurling is a displacement process-softer material (you can't knurl something that is harder than your knurl is..!) is pushed out of the way of the teeth of the knurl-leaving behind a mirror shape of the tooth. The process is more akin to 'flaring' a piece of piping so that another piece of the same size can fit inside the expanded area-there knurling pushes part of the softer material of the prop driver out to either side of the tooth in contact with the surface-and since the work is rotating you end up with a series of peaks and hollows formed....with a bit of mess (because of the radial speed) at the outer side of the prop driver-which is usually cleaned up by taking a bevel cut on the extreme outer edge of the prop driver after the knurling is over-just to make it look a bit tidier. Other tricks include machining the blank to have an annular band on the front face-slightly raised above the overall surface-and just this band get knurled, not the entire face-which usually results in a better appearance....the German Taifun engines used this approach in most of their range
I think there are multiple ways of achieving the result-and knurling is a technique that has been around much longer than model engines, and usually for providing a gripping surface on metal items-so from an production engineering viewpoint it would be a logical way of doing things.,,, but you could also achieve a gripping surface by simply keeping the lathe stationary, and using say a threading tool-which has a V-shaped cutting profile-and winding this across the face of the prop driver blank-by rotating the lathe by hand a small amount, and repeating the process, you could generate a set of radial grooves on the driver face-and if you had a dividing head involved, you could move the work a repeatable angular distance for each groove [but dividing heads are fairly expensive accessories]
You could also-as seen on some-mainly Czech motors-machine a series of parallel grooves across the face-this COULD be done by using a vertical mill-but is most likely done using a 'ganged' tool-in the same way cylinder fins are cut-in a non CNC setup. My very first prop driver-made almost 35 years ago-long before I had a lathe of my own-was for a British Mills 1.3 diesel-and done by the manual 'winding a sharp lathe tool across the prop driver face' technique. It wasn't pretty to look at-but it did the job....
ChrisM
Actually the hardest job with prop drivers is not the drive face it is getting the tapered hole at the back to exactly match the taper on the crankshaft-or-if a tapered collet is used-getting the collet male taper and the prop driver female taper to match....male tapers are easy-you just set over the compound slide....female tapers....not quite so easy-for a start-you have trouble getting a tool in there-most are too big, and if you happen to have a suitable sized miniature one-they are so thin in the shank that they flex whilst cutting-so again your taper doesn't match. The only safe way is to make a tapered D-bit reamer....and then you have to be able to grind accurately....
ffkiwi- Gold Member
- Posts : 361
Join date : 2018-07-10
Location : Wellington, NZ
Re: Hoppers and Bugs
![]() cstatman Fri Dec 01, 2023 12:38 pm
cstatman Fri Dec 01, 2023 12:38 pm
its that female taper. 100% keeping me from wasting my time trying to make this. I will never get it properly built
cstatman- Platinum Member
-
Posts : 536
Join date : 2021-02-17
Age : 59
Location : San Jose, CA
» Pre Production Space Hoppers
» Correct head for Space Hoppers
» *Cox Engine of The Month* Submit your pictures! -January 2015-
» For sale on EBay 2 space hoppers
» *Cox Engine of The Month* Submit your pictures! -November 2016-
» Correct head for Space Hoppers
» *Cox Engine of The Month* Submit your pictures! -January 2015-
» For sale on EBay 2 space hoppers
» *Cox Engine of The Month* Submit your pictures! -November 2016-
Page 1 of 1
Permissions in this forum:
You cannot reply to topics in this forum