

 Rules
Rules
by Admin Today at 5:50 pm
» Fox .35 Modifications
by Onelife Today at 4:34 pm
» Project Cox .049 r/c & Citabrian Champion
by MauricioB Today at 4:08 pm
» Jim Walkers FireBee - This is going to be fun
by rsv1cox Today at 3:56 pm
» Revivng Some Childhood Classics
by rsv1cox Today at 7:17 am
» Introducing our Cox .049 TD Engines
by getback Today at 6:20 am
» Roddie's flat-bottomed boat..
by Levent Suberk Today at 12:23 am
» Cox powered jet-pump for model Sprint Boat
by roddie Yesterday at 10:25 pm
» Micro Draco Gets to Fly on a Beautiful Morning.
by rdw777 Yesterday at 8:15 pm
» Jim Walker Firebaby
by rdw777 Yesterday at 8:06 pm
» Hydro-bat by Vic Smeed: engine probs
by GallopingGhostler Yesterday at 5:12 pm
» Roddie-Rigger.. a 2005 original design
by roddie Yesterday at 3:39 pm


Happy Cox Day Today
Page 1 of 2 • 1, 2 ![]()

 Happy Cox Day Today
![]() NEW222 Sat Jan 31, 2015 1:22 pm
NEW222 Sat Jan 31, 2015 1:22 pm
[img]
 [/img]
[img]
 [/img]
NEW222- Top Poster

- Posts : 3892
Join date : 2011-08-13
Age : 45
Location : oakbank, mb
Re: Happy Cox Day Today
![]() roddie Sat Jan 31, 2015 2:03 pm
roddie Sat Jan 31, 2015 2:03 pm
Try to locate a standard "Cox" glowhead and it's proper Copper gasket. This will ensure a proper sealing of the top-end.. as well as proper compression.. assuming your piston/cylinder fit is good. I have not had good luck with the conversion heads for standard 1/4-32 threaded plugs. Did you thread the Cox head that you drilled out with a 1/4"-32 tap? If it was a different size.. that would surely cause trouble.
EDIT: one more thing... I see that there is a needle-valve extension. I would eliminate that. It looks like a nail.. and will vibrate causing your needle setting to drift while running. It could also break your needle off in the back-plate if something knocks into it.


roddie- Top Poster
- Posts : 8268
Join date : 2013-07-17
Age : 64
Location : N. Smithfield, Rhode Island -

Re: Happy Cox Day Today
![]() NEW222 Sat Jan 31, 2015 2:38 pm
NEW222 Sat Jan 31, 2015 2:38 pm
NEW222- Top Poster
- Posts : 3892
Join date : 2011-08-13
Age : 45
Location : oakbank, mb


KariFS- Diamond Member

- Posts : 2002
Join date : 2014-10-10
Age : 52
Re: Happy Cox Day Today
![]() Ken Cook Sat Jan 31, 2015 4:06 pm
Ken Cook Sat Jan 31, 2015 4:06 pm

Ken Cook- Top Poster
- Posts : 5449
Join date : 2012-03-27
Location : pennsylvania
Re: Happy Cox Day Today
![]() roddie Sat Jan 31, 2015 4:10 pm
roddie Sat Jan 31, 2015 4:10 pm
NEW222 wrote:Thank you for your help. For the glow head, I have 1 spare one here, it is just that I wanted to try a conversion. I did buy and use the correct glow plug tap from my LHS on the head. I will definitely try the sandpaper thing when I disassemble it this week. And as for the needle, I will then remove the top piece. It was already installed when I got the motor and never thought of any adverse effects on the rest of the needle, so I will heed your advice and remove. Thank you. I also just got back inside again and wow, the garage smells nice. I am not sure what the other half will say when she gets home, but who cares, I had fun. It has actually been an honest 2 -3 years since I had run anything nitro.I now remember what I was missing.
That's great! Everybody needs to have fun once in a while. I think that burnt glow-fuel may be an aphrodisiac! I like to experiment too.. so I can understand your trying a head conversion. A few members here have tried these with standard plugs.. and while they "do" work; they just don't perform as well. I think it has to do mostly with the "shape" of the combustion chamber at the top; around where the coil element is.
Your needle.. I would remove from the back-plate and slip an inch or so of fuel line over the threads so you can grip it with your fingers and use a dremel cut-off wheel to remove the extension. (wear safety glasses)
A "Sig-Skyray" would make a nice little control-line model for that engine!
Shown here, with a Cox Golden Bee engine that has a slightly larger 8cc tank which is vented for stunt flying. It has a 23-3/4" wingspan.

roddie- Top Poster
- Posts : 8268
Join date : 2013-07-17
Age : 64
Location : N. Smithfield, Rhode Island -
Re: Happy Cox Day Today
![]() NEW222 Sat Jan 31, 2015 4:21 pm
NEW222 Sat Jan 31, 2015 4:21 pm
 Anyways, thanks all again for the comments. After disassembly, I will also put a couple of threads of q-tip on the screws.
NEW222- Top Poster
- Posts : 3892
Join date : 2011-08-13
Age : 45
Location : oakbank, mb
Re: Happy Cox Day Today
![]() rsv1cox Sat Jan 31, 2015 4:52 pm
rsv1cox Sat Jan 31, 2015 4:52 pm
Great suggestions too by roddie etc. Your probably familar with the proper tightening sequence of those fuel tank screws, like roddie says cris/cross. I like to leave all four loose, snug them down then slowily tightening them a bit at a time per old cris. How tight is tight, we all know when.
Welcome back to the hobby. My absence was a bit longer, in the order of about 35 years.....But fair warning, one engine leads to two, one airplane leads to several. But you already know that. I never bought a plastic model before I signed on here, now I have lost track.

rsv1cox- Top Poster


Posts : 10552
Join date : 2014-08-18
Location : West Virginia
Re: Happy Cox Day Today
![]() roddie Sat Jan 31, 2015 7:22 pm
roddie Sat Jan 31, 2015 7:22 pm
NEW222 wrote:I have installed a piece of fuel tubing to the needle valve prior to trying it as it had nothing on, needle or tubing before. As for the removal, it does appear to be soldered on, so I will try the simple removal first.
I should have been more explicit about cutting off the needle extension. Yes.. the short piece of fuel tubing that you installed is great for helping to seal air-leaks.. so you'll want to keep that on there.
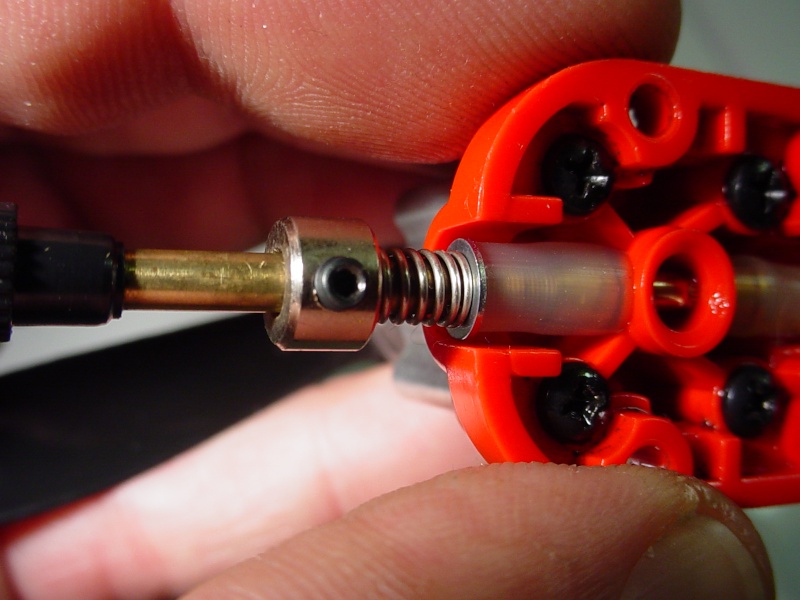
When you remove the needle to remove the extension.. whether you use a dremel's cut-off wheel, a soldering iron or a torch (you mentioned that it is soldered on.. right?) the needle will get HOT. Slipping a larger diameter piece of fuel-line; covering the needle's threads (from the pointed end) will keep your fingers from getting burned while your holding it. I would remove the short (sealing-piece) first.. then put it back on after the needle cools down. It's also helpful to find a small flat-washer just larger than the OD of the threads on the needle, and install it first.. for it to bear on the sealing-tubing.
This is a different back-plate/needle.. but you can see how the steel flat-washer that I installed, bears on the piece of silicone sealing-tubing.
roddie- Top Poster
- Posts : 8268
Join date : 2013-07-17
Age : 64
Location : N. Smithfield, Rhode Island -
Re: Happy Cox Day Today
![]() RknRusty Sat Jan 31, 2015 7:44 pm
RknRusty Sat Jan 31, 2015 7:44 pm

One more thing about the leaks. Sometimes the holes in the crankcase will not be threaded deeply enough so the screw will feel like it's tight, but not actually compressing the tank to the crankcase. You can shorten the screw, but I prefer to use a 2-56 bottoming tap to add threads deeper into the hole. They're always bored deep enough, but sometimes not tapped all the way.
Rusty
_________________
...and never Ever think about how good you are at something...
while you're doing it!
My Hot Rock & Blues Playlist

RknRusty- Rest In Peace

- Posts : 10869
Join date : 2011-08-10
Age : 68
Location : South Carolina, USA
Re: Happy Cox Day Today
![]() dinsdale Sun Feb 01, 2015 12:47 am
dinsdale Sun Feb 01, 2015 12:47 am
Glad to hear you have it going. A really good very fine grinding paste is good ol' toothpaste. I often use it on a piece of plate glass I inherited from my Dad. Does a fine job of lapping metal to metal.NEW222 wrote:No to very little compression. I looked and the copper head gasket was missing. So I made one. Out of the side of a pop can. Had a bit of compression, but not enough. So I made and installed 2 more. Now it had a bit of compression.
However, I'm surely at a loss as to how you increased your compression by adding head gaskets. Exactly the opposite is what you should have observed. I suspect that you had other leaks causing the lack of compression. I'd try a little meticulous cleaning, checking and assembly and then go back to 1 gasket and see what happens. If it doesn't work better with 1 than with 3 head gaskets then methinks you have other problems.

dinsdale- Account Deactivated by Owner
- Posts : 317
Join date : 2012-02-22
Re: Happy Cox Day Today
![]() rsv1cox Sun Feb 01, 2015 7:04 am
rsv1cox Sun Feb 01, 2015 7:04 am
dinsdale wrote:Glad to hear you have it going. A really good very fine grinding paste is good ol' toothpaste. I often use it on a piece of plate glass I inherited from my Dad. Does a fine job of lapping metal to metal.NEW222 wrote:No to very little compression. I looked and the copper head gasket was missing. So I made one. Out of the side of a pop can. Had a bit of compression, but not enough. So I made and installed 2 more. Now it had a bit of compression.
However, I'm surely at a loss as to how you increased your compression by adding head gaskets. Exactly the opposite is what you should have observed. I suspect that you had other leaks causing the lack of compression. I'd try a little meticulous cleaning, checking and assembly and then go back to 1 gasket and see what happens. If it doesn't work better with 1 than with 3 head gaskets then methinks you have other problems.
My thought exactly. I believe that his "pop can gasket" just wasn't sealing properly until he added more gaining a proper seal as he went.
rsv1cox- Top Poster
-
Posts : 10552
Join date : 2014-08-18
Location : West Virginia
Re: Happy Cox Day Today
![]() rsv1cox Sun Feb 01, 2015 7:10 am
rsv1cox Sun Feb 01, 2015 7:10 am
Bob
rsv1cox- Top Poster
-
Posts : 10552
Join date : 2014-08-18
Location : West Virginia
Re: Happy Cox Day Today
![]() balogh Sun Feb 01, 2015 10:15 am
balogh Sun Feb 01, 2015 10:15 am
Pretty cold though, I could squeeze out some 23,5k from my veteran 051 with the smaller 4,54x4 prop, while the 4,82x4 (supposed to be 5x4, this is Bernies brand new stuff) turned 20,5k.

I used 20% nitro..I guess with 25% and a bit warmer ambient my 051 could have revved the 4,54x4 beyond 24k too. I wonder what props you guys finally used on the Tach race for the TeeDee049 class?

balogh- Top Poster
-
Posts : 4745
Join date : 2011-11-06
Age : 65
Location : Budapest Hungary
Re: Happy Cox Day Today
![]() roddie Sun Feb 01, 2015 11:55 am
roddie Sun Feb 01, 2015 11:55 am
rsv1cox wrote:That's some complicated needle roddie. So you have a collet, a spring, and a flat washer all on top of tubing. I gather the spring compresses over a range of rpm's as you adjust for best performance?
Bob

I "do" tend to over-complicate things..
Below is a better example for the OP.. (photo courtesy of Paul Gibeault) of various "Bee"-style back-plates incorporating different needle configurations.
Note the "center" example uses a stock-type needle with no spring at all.. but has the silicone tube-seal with a steel flat-washer above it. No doubt that Paul cut his tubing to a length that would work within the needle's operating range for his engine.. and still seal; with enough tension from the tubing to "act" as a spring.. and hold the needle-setting from wandering while running his engine.

roddie- Top Poster
- Posts : 8268
Join date : 2013-07-17
Age : 64
Location : N. Smithfield, Rhode Island -
NEW222- Top Poster
- Posts : 3892
Join date : 2011-08-13
Age : 45
Location : oakbank, mb
Re: Happy Cox Day Today
![]() NEW222 Sun Feb 01, 2015 8:16 pm
NEW222 Sun Feb 01, 2015 8:16 pm
NEW222- Top Poster
- Posts : 3892
Join date : 2011-08-13
Age : 45
Location : oakbank, mb
Re: Happy Cox Day Today
![]() roddie Sun Feb 01, 2015 9:55 pm
roddie Sun Feb 01, 2015 9:55 pm
A fuel having 100% synthetic oil and zero castor can ruin the Cox engine in as little as one tankful.
roddie- Top Poster
- Posts : 8268
Join date : 2013-07-17
Age : 64
Location : N. Smithfield, Rhode Island -
Re: Happy Cox Day Today
![]() NEW222 Mon Feb 02, 2015 6:16 pm
NEW222 Mon Feb 02, 2015 6:16 pm
CHAMPION "25"
25% Nitromethane
20% Lubricating Oils
(1/2 Castor, 1/2 Klotz)
For high performance 2-stroke engines. The next step up from CHAMPION "15", this high performance fuel provides more horsepower for specialized contest use. Also excellent for use in very small .010-.049 glow engines, which require a hotter fuel to start and run properly.
Thank you.
NEW222- Top Poster
- Posts : 3892
Join date : 2011-08-13
Age : 45
Location : oakbank, mb
Update
![]() NEW222 Mon Feb 02, 2015 6:24 pm
NEW222 Mon Feb 02, 2015 6:24 pm
Ok, despite it being cold here again, and getting colder, I tried it out once again. Well, it ran and started rather good still, but I still had a fuel leak at the tank and crankcase area again. This was even after the sanding on glass. So, I am again at a loss. I am thinking of disassembling again and using a sealant, or making a gasket out of something a bit thicker that might have a bit of compression, like a playing card? There was no noticeable leak at the glow plug today. I even sanded that copper washer too. And after fuelling it up and quickly starting it, I had timed it at approximately 1 minute 10 seconds run time. Anyways, I am not sure of a proper run time of a Baby Bee engine, but I was actually hoping for 2 minutes.
NEW222- Top Poster
- Posts : 3892
Join date : 2011-08-13
Age : 45
Location : oakbank, mb
Re: Happy Cox Day Today
![]() NEW222 Thu Feb 05, 2015 7:16 pm
NEW222 Thu Feb 05, 2015 7:16 pm
NEW222- Top Poster
- Posts : 3892
Join date : 2011-08-13
Age : 45
Location : oakbank, mb
Re: Happy Cox Day Today
![]() getback Fri Feb 06, 2015 8:46 am
getback Fri Feb 06, 2015 8:46 am
 Bee sure to clean and put the spring in the hose if you replace the hose . Eric

getback- Top Poster
-
Posts : 10114
Join date : 2013-01-18
Age : 66
Location : julian , NC
Re: Happy Cox Day Today
![]() roddie Fri Feb 06, 2015 12:45 pm
roddie Fri Feb 06, 2015 12:45 pm
A fraction of a turn with the needle may have caused your varying times on the test stand. Naturally; if you have a slightly leaner setting, you'll have a longer run than a rich setting.
The Sig Champion "25" is a great fuel. If you plan on flying, get yourself a few more props in the 5" to 6" diameter range.. and pitches between 2 and 4 inches. Depending on the airplane model you choose, you will see differences in performance.. even with different brand props having the same size. Look for balsawood models having a profile fuselage and a wingspan between 18-24" specifying a "radial" engine mounting. I mentioned the Sig Skyray.. but the Goldberg "Swordsman" (18") and the "Stuntman" (23") are good flying little models too.. and easy to build. You would need to source "plans" for the Goldberg models though.. as they are no longer produced.
Kudos on making a new gasket!
roddie- Top Poster
- Posts : 8268
Join date : 2013-07-17
Age : 64
Location : N. Smithfield, Rhode Island -
Re: Happy Cox Day Today
![]() NEW222 Fri Feb 06, 2015 5:28 pm
NEW222 Fri Feb 06, 2015 5:28 pm
I am a bit shocked too at the recommended run times suggested, as I think I was only getting approximately 2 1/2 minutes on my Black Widow (bought new in 1999 or 2000) and has never been apart! So I thought the 2 minutes I was getting were good. Thanks again for the help and advice.
NEW222- Top Poster
- Posts : 3892
Join date : 2011-08-13
Age : 45
Location : oakbank, mb
Re: Happy Cox Day Today
![]() getback Sat Feb 07, 2015 8:09 am
getback Sat Feb 07, 2015 8:09 am
 Getback
getback- Top Poster
-
Posts : 10114
Join date : 2013-01-18
Age : 66
Location : julian , NC
Page 1 of 2 • 1, 2 ![]()
» happy birthday happy dad
» ACE GLH II MODS?SUGESTIONS
» My day today
» Cox Venom Piston Rod Reset Question