

 Rules
Rules
Log in
Search
Latest topics
» Fox .35 Modifications by Onelife Today at 6:47 pm
» Happy Anzac Day!
by 706jim Today at 6:44 pm
» Project Cox .049 r/c & Citabrian Champion
by MauricioB Today at 4:08 pm
» Jim Walkers FireBee - This is going to be fun
by rsv1cox Today at 3:56 pm
» Revivng Some Childhood Classics
by rsv1cox Today at 7:17 am
» Introducing our Cox .049 TD Engines
by getback Today at 6:20 am
» Roddie's flat-bottomed boat..
by Levent Suberk Today at 12:23 am
» Cox powered jet-pump for model Sprint Boat
by roddie Yesterday at 10:25 pm
» Micro Draco Gets to Fly on a Beautiful Morning.
by rdw777 Yesterday at 8:15 pm
» Jim Walker Firebaby
by rdw777 Yesterday at 8:06 pm
» Hydro-bat by Vic Smeed: engine probs
by GallopingGhostler Yesterday at 5:12 pm
» Roddie-Rigger.. a 2005 original design
by roddie Yesterday at 3:39 pm
Cox Engine of The Month


CEF Traveling Engine


Win This Engine!

Live on Patrol


Veco .35/.35C
Page 1 of 1

Veco .35/.35C
![]() roddie Fri Nov 04, 2016 2:16 pm
roddie Fri Nov 04, 2016 2:16 pm
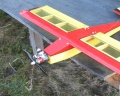
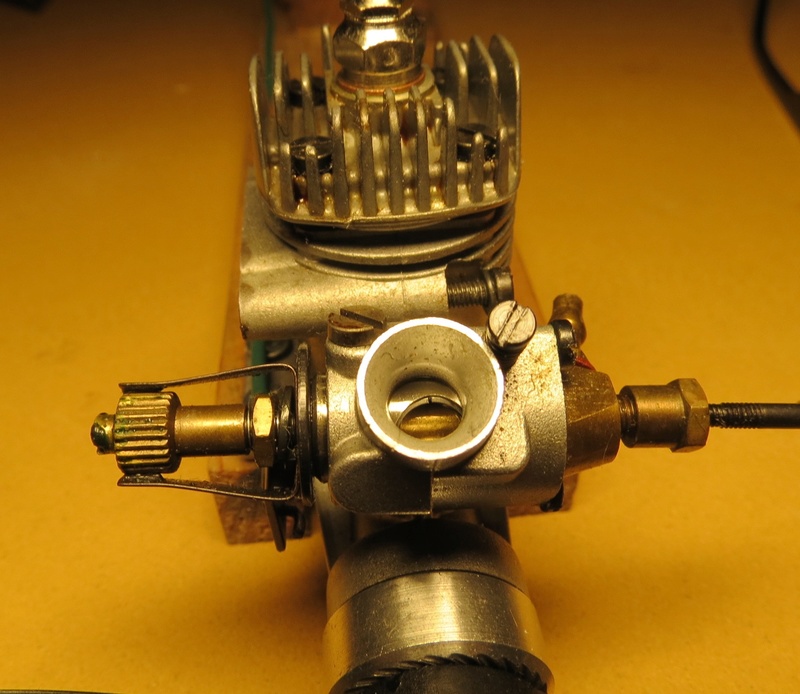
This was my Dad's engine. My Uncle (a 1960's/70's combat flier.. and my Dad's brother in-law)) said it was a "C" model.. but I have my doubts about that. He said it was the set-up to have on a Veco "Renegade".. and that he's always wanted one. My Uncle ran a ST .35 on his. This engine has always resided in my Dad's Veco "Warrior". I've had it for years.. and decided to dis-mount it from the model and keep it stored with my other engines. I'd like to clean it.. but I'm not sure how yet. I'm leaning toward buying one of those little crock-pots for an ethylene-glycol soak. The screw-heads are all in good shape (my dad wasn't one to take things apart..) so I don't foresee any trouble with removing them. I'd like to replace them with higher-grade cap-screws though. I'm guessing that they're 3-48 or 4-40 size screws.

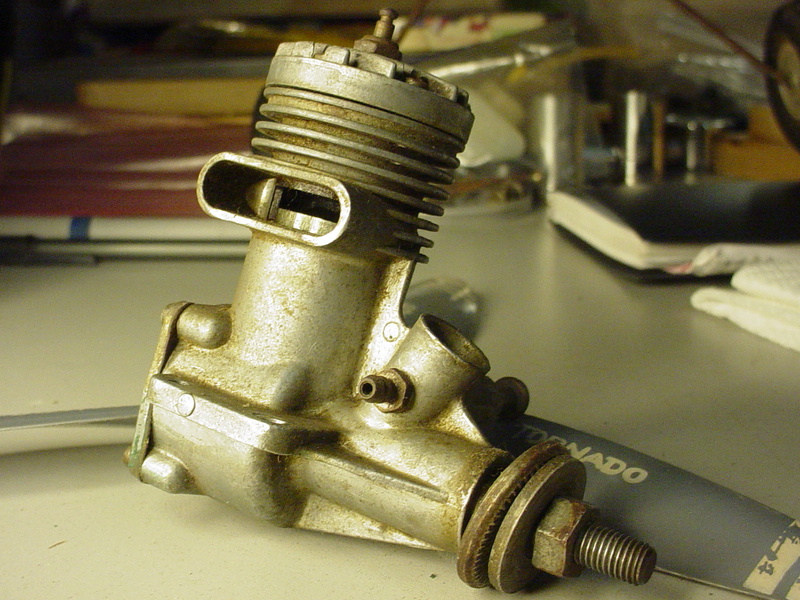
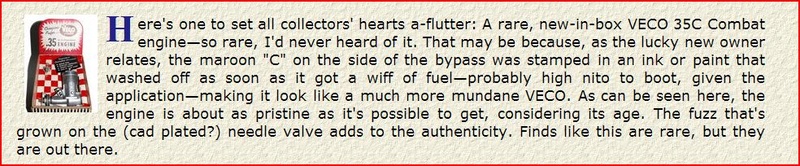
I can't find much info on a .35C.. other than this web-photo below.

My engine doesn't have that red "C" marking on the case.. or a polished-head. There is also a venturi-insert shown, that I don't have. The case-pressure tap on mine could have been added by someone else. I don't know if my dad bought the engine new. I only know this engine to have been run on two models; a Renegade and the Warrior. The former of which I do not remember.. and is long-gone.
I can't find much info on a .35C.. other than this web-photo below.
My engine doesn't have that red "C" marking on the case.. or a polished-head. There is also a venturi-insert shown, that I don't have. The case-pressure tap on mine could have been added by someone else. I don't know if my dad bought the engine new. I only know this engine to have been run on two models; a Renegade and the Warrior. The former of which I do not remember.. and is long-gone.

roddie- Top Poster

- Posts : 8268
Join date : 2013-07-17
Age : 64
Location : N. Smithfield, Rhode Island -

Re: Veco .35/.35C
![]() ian1954 Fri Nov 04, 2016 2:44 pm
ian1954 Fri Nov 04, 2016 2:44 pm
Not sure about this one but there may have been two series of them. There are two engine reviews of what look like different engines - size and weight.

It also looks as if the "Red C" came off easily.
http://sceptreflight.net/Model%20Engine%20Tests/Veco%2035C.html
http://sceptreflight.net/Model%20Engine%20Tests/Veco%2035C%20(2).html
http://sceptreflight.net/Model%20Engine%20Tests/Veco%2035C%20(3).html
It also looks as if the "Red C" came off easily.
http://sceptreflight.net/Model%20Engine%20Tests/Veco%2035C.html
http://sceptreflight.net/Model%20Engine%20Tests/Veco%2035C%20(2).html
http://sceptreflight.net/Model%20Engine%20Tests/Veco%2035C%20(3).html

ian1954- Diamond Member

- Posts : 2688
Join date : 2011-11-16
Age : 69
Location : England
Re: Veco .35/.35C
![]() fredvon4 Fri Nov 04, 2016 3:09 pm
fredvon4 Fri Nov 04, 2016 3:09 pm
The Typical $9.99 walMart crock pot is a good deal along with true Antifreeze
If you use the correct tool there is no real need to change to socket head screws...unless they were previously buggered
Main reason I say this is..I got deep into trying to find the correct thread and LENGTH screws for several older engines
lots of wasted time and money and grief with total length
Don't get me wrong I did change many over to socket heads. I just feel the time and expense may not always be necessary for the usual reasons many guys do the change (upgrade???)
If the original screws are good.. get and properly use the right tool and they are good for the life of the engine

fredvon4- Top Poster

Posts : 4001
Join date : 2011-08-26
Age : 68
Location : Lampasas Texas
Re: Veco .35/.35C
![]() roddie Fri Nov 04, 2016 5:13 pm
roddie Fri Nov 04, 2016 5:13 pm
ian1954 wrote:Not sure about this one but there may have been two series of them. There are two engine reviews of what look like different engines - size and weight.
It also looks as if the "Red C" came off easily.
http://sceptreflight.net/Model%20Engine%20Tests/Veco%2035C.html
http://sceptreflight.net/Model%20Engine%20Tests/Veco%2035C%20(2).html
http://sceptreflight.net/Model%20Engine%20Tests/Veco%2035C%20(3).html
Thank you for the links Ian! They're in my data-archives now. I removed the needle and wiped the taper clean. I'd like to blast some solvent through the spray-bar.. but maybe should wait until after a soak?

For now, it's a light oiling.. and into a zipper-bag in wait for the crock-pot.
Last edited by roddie on Sat Nov 05, 2016 8:13 am; edited 1 time in total (Reason for editing : grammar/sp)
roddie- Top Poster
- Posts : 8268
Join date : 2013-07-17
Age : 64
Location : N. Smithfield, Rhode Island -
Veco .35
![]() Mike1484 Fri Nov 04, 2016 9:14 pm
Mike1484 Fri Nov 04, 2016 9:14 pm
I think the back plate on your motor is turned 90 degrees . Look at the Combat .35 picture .
Mike 1484
Mike 1484
Mike1484- Gold Member

- Posts : 296
Join date : 2011-10-28
Age : 75
Location : Northern Ohio
Re: Veco .35/.35C
![]() Ken Cook Fri Nov 04, 2016 11:05 pm
Ken Cook Fri Nov 04, 2016 11:05 pm
The only thing needed to do is put a pin through the spray bar and flush with alcohol or fuel. From what I see there may have been a venturi insert to choke down the throat area of the venturi. Personally, I would eliminate the use of crank pressure because it's a pain in the rear. if the engine will run on suction without pressure it makes the entire experience better. Generally, the pressure nipple opening is far too large making needling far too finicky not to mention the flooding of the engine during cranking. You have to administer the same concept as starting a engine on bladder using pinchers. The pressure line needs to be pinched off , prime the engine, when running on prime open the pinchers and hope your needle setting is close. 9 out of 10 times it's not and the engine floods out and quits and the entire process has to be started all over again. Any air leaks in the systems compromises it's effectiveness and it becomes a act of frustration. That needle was typical for K&B referred to as the universal and it's threads are fairly coarse.
As for the engine, prior to running, remove the plug, flush out the venturi upside down and fill the case with a little fuel or alcohol. Turn the engine upside down and pour out the plug. Nothing fancy to do. Feed it at least 22% oil more on the castor side and all will be well. One of our club members uses one in a Brodak Firecat for nostalgia purposes. I can say it makes good power for it's time frame. It doesn't like to hot start until cool .
As for the engine, prior to running, remove the plug, flush out the venturi upside down and fill the case with a little fuel or alcohol. Turn the engine upside down and pour out the plug. Nothing fancy to do. Feed it at least 22% oil more on the castor side and all will be well. One of our club members uses one in a Brodak Firecat for nostalgia purposes. I can say it makes good power for it's time frame. It doesn't like to hot start until cool .

Ken Cook- Top Poster
- Posts : 5449
Join date : 2012-03-27
Location : pennsylvania
Re: Veco .35/.35C
![]() Surfer_kris Sat Nov 05, 2016 4:40 am
Surfer_kris Sat Nov 05, 2016 4:40 am
Mike1484 wrote: I think the back plate on your motor is turned 90 degrees . Look at the Combat .35 picture .
Yes, there is a relief for the piston and transfer channel on the inside, this is also evident in the casting on the outside of the backplate. Looks to be 90° off at the moment...
Surfer_kris- Diamond Member
- Posts : 1905
Join date : 2010-11-20
Location : Sweden
Re: Veco .35/.35C
![]() roddie Sat Nov 05, 2016 9:01 am
roddie Sat Nov 05, 2016 9:01 am
Surfer_kris wrote:Mike1484 wrote: I think the back plate on your motor is turned 90 degrees . Look at the Combat .35 picture .
Yes, there is a relief for the piston and transfer channel on the inside, this is also evident in the casting on the outside of the backplate. Looks to be 90° off at the moment...
Geez.. good point. Now I'm really curious.
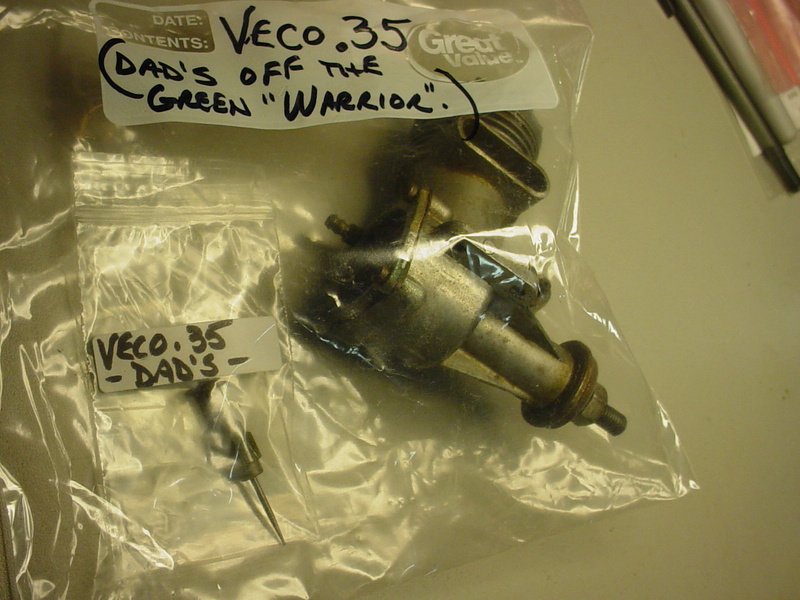
 Here's a pic of the backside from straight-on. Had to use a flash to eliminate shadows.
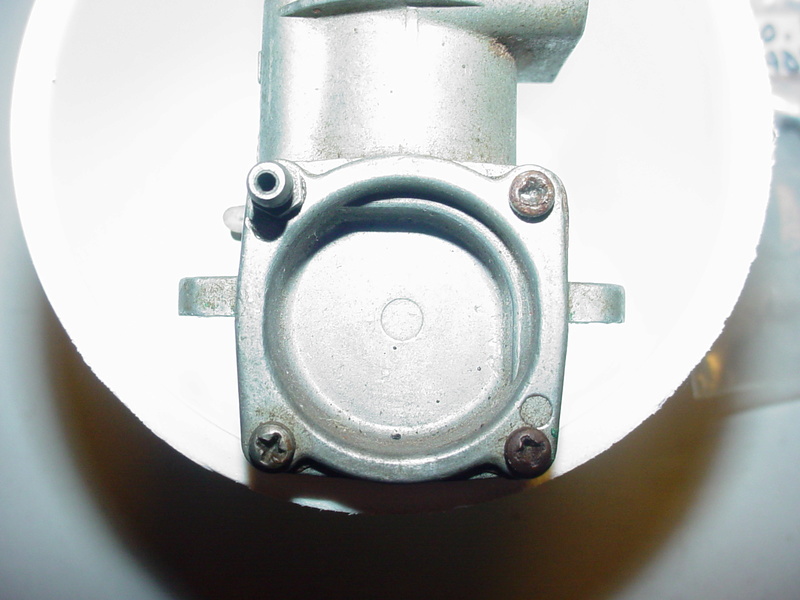
There is that buggered-screw.. so someone probably took it off at some point.
roddie- Top Poster
- Posts : 8268
Join date : 2013-07-17
Age : 64
Location : N. Smithfield, Rhode Island -
Re: Veco .35/.35C
![]() gcb Sat Nov 05, 2016 10:16 am
gcb Sat Nov 05, 2016 10:16 am
It was not uncommon back in those days to remove the venturi insert and drill from the screw hole to the crankcase and add a pressure tap. Removing the venturi insert would leave insufficient suction to draw fuel from the tank...especially during maneuvers. Before bladders came into wide use, folks would use pressure taps to push the fuel up to the engine. I have a couple of late fifties Super Tigres (.15 and .35) that have built-in pressure taps on the bottom of the crankshaft housings.
I would suggest for better/easier handling that you find/make a venturi insert of the proper size, replace the pressure tap with a normal screw, and run it on suction.
If your engine is relatively clean inside, which you can see when you turn the backplate 90 degrees CCW, I would skip the crock pot and consider cleaning the outside with fuel or alcohol and a toothbrush and just flush the inside as Ken suggested. If you do this, add some oil to displace any alcohol or nitro so it won't rust.
Oh, be careful when removing the backplate and try to preserve the gasket.
You might want to make the first couple of runs very rich to remove any junk that did not flush out.
I have an old Veco .35 but it is not the combat version. Good luck with yours.
George

gcb- Platinum Member

- Posts : 908
Join date : 2011-08-11
Location : Port Ewen, NY
Re: Veco .35/.35C
![]() Surfer_kris Sat Nov 05, 2016 12:05 pm
Surfer_kris Sat Nov 05, 2016 12:05 pm
Thanks for the better picture. The pressure tap and the "buggered" screw certainly show that these thing have been off at some point in the past....
Judging from the outside only I would say that the backplate should be rotated by 90° counter-clockwise.
There is no need for that type of casting on the exhaust side and the top. Instead it should be on the transfer side and at the top.
Judging from the outside only I would say that the backplate should be rotated by 90° counter-clockwise.
There is no need for that type of casting on the exhaust side and the top. Instead it should be on the transfer side and at the top.
Surfer_kris- Diamond Member
- Posts : 1905
Join date : 2010-11-20
Location : Sweden
Re: Veco .35/.35C
![]() roddie Sat Nov 05, 2016 12:47 pm
roddie Sat Nov 05, 2016 12:47 pm
Thanks guys, (and thanks again Kris) for all the helpful observations/tips. I still lack the proper fuel to run any of my old irons.. but when I'm ready; Powermaster blends are within an hours' driving distance.. or so I was recently informed by the NEST guys.
The backplate being out of position 90 degrees puzzles me. When Mike first noticed that, I immediately started looking at it and questioning why. I dispelled one stupid theory.. by doing a test. I thought it possible that the backplate be turned purposely to block-off the pressure and run conventionally. Blowing through a short piece of fuel line connected to the pressure-nipple revealed it to be open. (might have been a nice feature at the time..)
I've never made a venturi-insert.. but I could give it a shot. I had bought a couple bags of K & S alloy tubing "cut-offs" a while back.. and there's a good assortment of AL pieces to trial-fit for a possible candidate.
The venturi-throat measures .364" at the bottom.. tapering out to .420" at the top. Just checking; I don't have any tubing that's a close fit for total insertion. That would be 23/64" OD (.359") if I could find some.
Here's what a stub-piece of thick-wall .375" AL tubing looks like, sitting on the top. It's ID coincidentally is .364".

I could reduce that down.. but does the reduction require a straight-shot down past the spray-bar to operate effectively? There is no spray-hole visible with the NVA's current position.
Bevelling that stub-tube to seat atop the stack wouldn't be hard for me to accomplish.. but would it be too turbulent of an airflow transition above the spray-bar?
Regarding R & R of the backplate; if the gasket tears.. I'm confident that I can make another one. I have a sheet of gasket material, circle templates and a 1/8" hole-punch to make the case-screw holes and incidentally, makes perfect fitting Cox tanked-Bee venturi-gaskets too.
The backplate being out of position 90 degrees puzzles me. When Mike first noticed that, I immediately started looking at it and questioning why. I dispelled one stupid theory.. by doing a test. I thought it possible that the backplate be turned purposely to block-off the pressure and run conventionally. Blowing through a short piece of fuel line connected to the pressure-nipple revealed it to be open. (might have been a nice feature at the time..)
I've never made a venturi-insert.. but I could give it a shot. I had bought a couple bags of K & S alloy tubing "cut-offs" a while back.. and there's a good assortment of AL pieces to trial-fit for a possible candidate.
The venturi-throat measures .364" at the bottom.. tapering out to .420" at the top.
Just checking; I don't have any tubing that's a close fit for total insertion. That would be 23/64" OD (.359") if I could find some. Here's what a stub-piece of thick-wall .375" AL tubing looks like, sitting on the top. It's ID coincidentally is .364".
I could reduce that down.. but does the reduction require a straight-shot down past the spray-bar to operate effectively? There is no spray-hole visible with the NVA's current position.
Bevelling that stub-tube to seat atop the stack wouldn't be hard for me to accomplish.. but would it be too turbulent of an airflow transition above the spray-bar?
Regarding R & R of the backplate; if the gasket tears.. I'm confident that I can make another one. I have a sheet of gasket material, circle templates and a 1/8" hole-punch to make the case-screw holes and incidentally, makes perfect fitting Cox tanked-Bee venturi-gaskets too.
roddie- Top Poster
- Posts : 8268
Join date : 2013-07-17
Age : 64
Location : N. Smithfield, Rhode Island -
Re: Veco .35/.35C
![]() Ken Cook Sun Nov 06, 2016 5:33 am
Ken Cook Sun Nov 06, 2016 5:33 am
A venturi doesn't need to be tapered. You will hear mixed results of that. You don't even need a venturi to run a engine. You just need to choke it down enough to draw fuel. You could even stuff a piece of fuel tubing in there or even a piece of wood right next to the spraybar, I do it all the time if the venturi is too large.Ron had sent me an engine some time ago and this is what I needed to do at the field to get good fuel draw. Keep the venturi hole around .265 with that spraybar and go from there. That's the size of the LA .25. It will run just fine with that size and if need be you can open it up a bit.
Ken Cook- Top Poster
- Posts : 5449
Join date : 2012-03-27
Location : pennsylvania
Re: Veco .35/.35C
![]() Surfer_kris Sun Nov 06, 2016 6:16 am
Surfer_kris Sun Nov 06, 2016 6:16 am
A slotted tube will work fine in RC carbs in order to improve fuel draw, that's was even supplied as an option by some manufactures. Here is an example from Super Tigre (X.11);
Surfer_kris- Diamond Member
- Posts : 1905
Join date : 2010-11-20
Location : Sweden
Re: Veco .35/.35C
![]() Ken Cook Sun Nov 06, 2016 10:25 am
Ken Cook Sun Nov 06, 2016 10:25 am
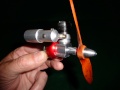
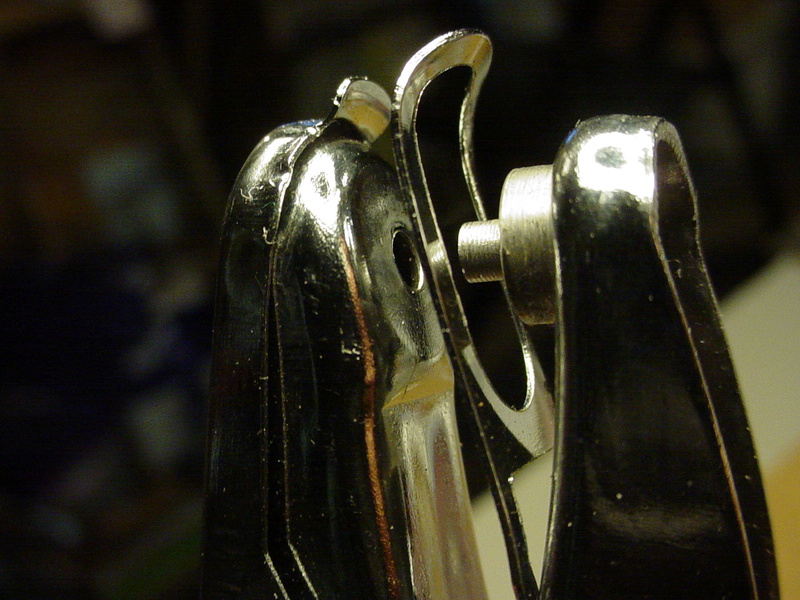
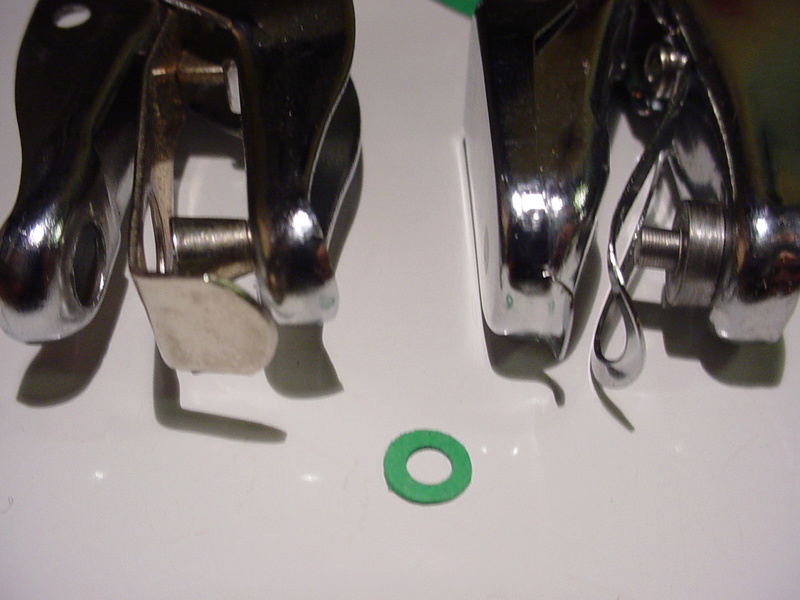
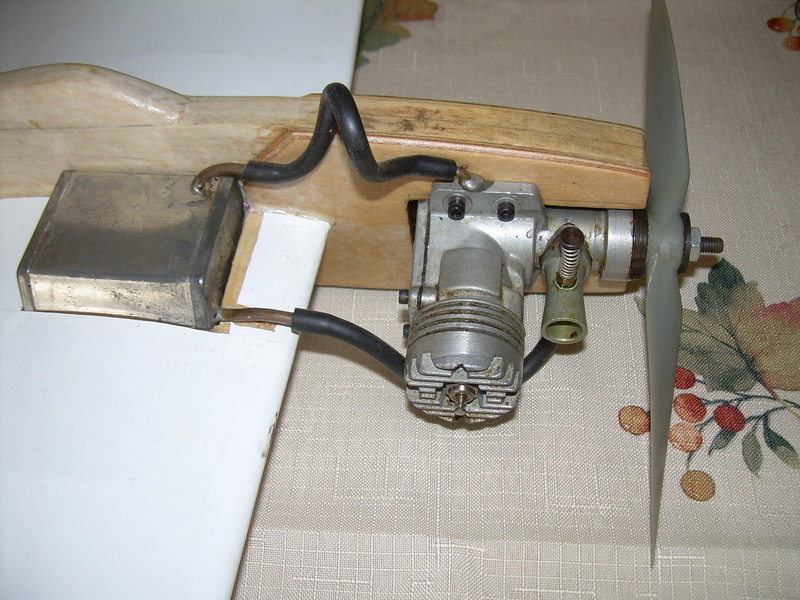
My flying friend Dennis provided me with this terrific example of using crank pressure. Here's a Fox .15 BB . The pressure nipple is drilled through the engine lug into the case where a piece of tubing was pressed into the case. I really love these little engines. This particular plane was designed rather poorly in terms of tank location. This tank was placed in the wing due to no real estate on the nose. Venturi has been opened up on this version. It really screams though. The loop in the pressure line helps prevent siphoning. Just another example of pressure on our little engines.
Ken Cook- Top Poster
- Posts : 5449
Join date : 2012-03-27
Location : pennsylvania
Re: Veco .35/.35C
![]() Twin Stack Mon Oct 16, 2017 10:32 pm
Twin Stack Mon Oct 16, 2017 10:32 pm
An old thread I know, but - the VECO 35 shown at the top is definitely a 35C or Combat. It can be positively ID'd by looking at the 2nd photo showing inside the exhaust stack. The Combat version has a huge exhaust port cut in the liner as shown, the bottom edge being flush with the inside bottom edge of the stack. The VECO 35 Stunt has a smaller port, the lower edge being set well up from the bottom of the stack.

Twin Stack- Moderate Poster

- Posts : 10
Join date : 2017-10-16
Re: Veco .35/.35C
![]() roddie Tue Oct 17, 2017 8:52 am
roddie Tue Oct 17, 2017 8:52 am
Twin Stack wrote:An old thread I know, but - the VECO 35 shown at the top is definitely a 35C or Combat. It can be positively ID'd by looking at the 2nd photo showing inside the exhaust stack. The Combat version has a huge exhaust port cut in the liner as shown, the bottom edge being flush with the inside bottom edge of the stack. The VECO 35 Stunt has a smaller port, the lower edge being set well up from the bottom of the stack.
Thanks very much T/S! Welcome to the forum!


roddie- Top Poster
- Posts : 8268
Join date : 2013-07-17
Age : 64
Location : N. Smithfield, Rhode Island -
» Veco .19 with T.C.C.
» Veco 19 RC
» Veco 1 3/4" Wheels
» Various Cox Engines In VECO GP -19 Box
» The Bipe has arrived. Thanks Roger....
» Veco 19 RC
» Veco 1 3/4" Wheels
» Various Cox Engines In VECO GP -19 Box
» The Bipe has arrived. Thanks Roger....
Page 1 of 1
Permissions in this forum:
You cannot reply to topics in this forum