Log in
Search
Latest topics
» Golden Bee basic running problemby roddie Yesterday at 10:51 pm
» Simple Gliders
by rdw777 Yesterday at 6:25 pm
» Foam hand kids glider converted to 0.049 CL
by rdw777 Yesterday at 6:11 pm
» Weird search for a single comic from an old Mad Magazine
by Kim Yesterday at 1:44 pm
» Scientific "Zipper" Build...Zipper Flys!.
by getback Yesterday at 7:27 am
» Cox .049 Tee Dee engines back in stock (limited availablility)
by GallopingGhostler Yesterday at 1:05 am
» Very off-topic.........Time passes and not always for the best......
by rsv1cox Thu Jul 25, 2024 2:47 pm
» Roddie-Rigger.. a 2005 original design
by roddie Wed Jul 24, 2024 11:48 pm
» Jim Walker Bonanza etc.
by rsv1cox Wed Jul 24, 2024 6:30 pm
» Throttles for Cox Tee Dee .049 / .020 / .010 engines --- videos
by sosam117 Wed Jul 24, 2024 8:54 am
» Introducing our Cox .049 TD Engines
by Admin Tue Jul 23, 2024 2:00 am
» Project Cox .049 r/c & Citabrian Champion
by getback Mon Jul 22, 2024 4:14 pm
Cox Engine of The Month
July-2024
robot797's
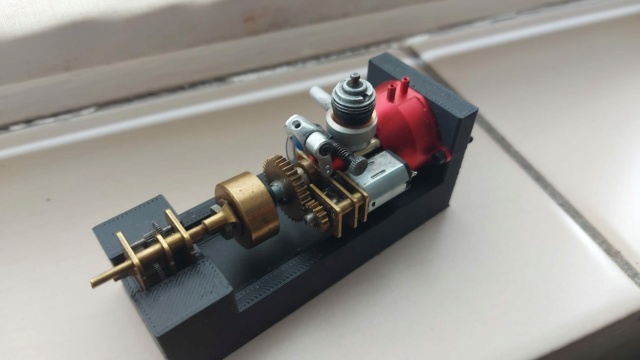
"ULTIMITE COX 010: it has a clutch, E starter, throttle, exhaust, aluminum tank, aluminum venturi, gearbox with forward and reverse, and now its on a custom drawn and printed stand"

PAST WINNERS
robot797's

"ULTIMITE COX 010: it has a clutch, E starter, throttle, exhaust, aluminum tank, aluminum venturi, gearbox with forward and reverse, and now its on a custom drawn and printed stand"

PAST WINNERS
T-Bee-D1 (a Rod-de-sign)
Page 3 of 8
Page 3 of 8 •  1, 2, 3, 4, 5, 6, 7, 8
 Re: T-Bee-D1 (a Rod-de-sign)
Hi Roddie, I gotta get a set of scales 
 Ive noticed yourself and many others who do build logs and are very experienced, use scales. I guess its (weight) a critical parameter and the only way to know where the trade-offs are, is if you know what the weights are. I just cant find any at the cheapo price I wanted. Might have to get off of the 'bay' or one of the china equiv sites. I suspect they are an important tool in the process
GaryB
'Yabby'

GaryB
'Yabby'

Yabby- Platinum Member


Posts : 711
Join date : 2021-06-08
Location : Yorke Peninsula South Australia
 Re: T-Bee-D1 (a Rod-de-sign)
I'm giving "Chancey" (CEF member new222) credit for this step.......... 
I use wooden toothpicks in my building.. as well as maintenance on a model. Consider a radial mount for 1/2A and smaller engines. Usually consists of #3 or #4 wood-screws.. into a thin (? 1/8" 3/32") plywood firewall.. with streamlined balsa cheek-blocks behind....
I have used toothpicks; cut short enough to fit into engine-mount holes that are stripped-out for their wood-screws. Wire-cutters or good sharp scissors will cut a wooden toothpick.
Here's a tip......... keep a gallon (3.78L) size clear-plastic bag handy in your shop.. for when you cut materials that you need small pieces of. Perform the cutting operation within the bag if possible. The bag will catch the piece.. which may otherwise take flight. Stay tuned please. Thanks
 Re: T-Bee-D1 (a Rod-de-sign)
Yabby wrote:............I just cant find any at the cheapo price I wanted. Might have to get off of the 'bay' or one of the china equiv sites. I suspect they are an important tool in the process
GaryB
'Yabby'
Gary --
I use a set of inexpensive kitchen scales that will weigh in both grams and ounces. Current pricing at one of our general merchandise stores (Walmart) is about $15.00 USD. I also have a digital scale for weighing small, fiddly pieces such as servos and small lipo's.
If you can't source one locally, either the 'bay' or Amazon would be a good source.
a--
 Re: T-Bee-D1 (a Rod-de-sign)
roddie wrote:I'm giving "Chancey" (CEF member new222) credit for this step..........
I use wooden toothpicks in my building.. as well as maintenance on a model. Consider a radial mount for 1/2A and smaller engines. Usually consists of #3 or #4 wood-screws.. into a thin (? 1/8" 3/32") plywood firewall.. with streamlined balsa cheek-blocks behind....
I have used toothpicks; cut short enough to fit into engine-mount holes that are stripped-out for their wood-screws. Wire-cutters or good sharp scissors will cut a wooden toothpick.
Here's a tip......... keep a gallon (3.78L) size clear-plastic bag handy in your shop.. for when you cut materials that you need small pieces of. Perform the cutting operation within the bag if possible. The bag will catch the piece.. which may otherwise take flight. Stay tuned please. Thanks
Two great tips! The big plastic bag trick is good for all kinds of repair, build, maint work on all kinds of things not just models.

GaryB
'Yabby'

Yabby- Platinum Member


Posts : 711
Join date : 2021-06-08
Location : Yorke Peninsula South Australia
 Re: T-Bee-D1 (a Rod-de-sign)
andrew wrote:Yabby wrote:............I just cant find any at the cheapo price I wanted. Might have to get off of the 'bay' or one of the china equiv sites. I suspect they are an important tool in the process
GaryB
'Yabby'
Gary --
I use a set of inexpensive kitchen scales that will weigh in both grams and ounces. Current pricing at one of our general merchandise stores (Walmart) is about $15.00 USD. I also have a digital scale for weighing small, fiddly pieces such as servos and small lipo's.
If you can't source one locally, either the 'bay' or Amazon would be a good source.
a--
Hi Andrew, yes thats the price range I was expecting. thats say Oz $25.00 or so. I need to go looking harder in the big stores similar to your Walmart. Or as you suggested, just get one off the net. All the ones I found in electronics places and such cost the earth and had insane resolution. I dont think they were for weighing models!
 But your post tells me you also use scales and strengthens my understanding that I also need to start using them and thinking more in weight terms.
GaryB
'Yabby'

Yabby- Platinum Member


Posts : 711
Join date : 2021-06-08
Location : Yorke Peninsula South Australia
 Re: T-Bee-D1 (a Rod-de-sign)
Gary. If you're looking for digital scales they have them pretty frequently as a "Special Buys" at ALDI. Nor sure if you have an ALDI anywhere near you, but some of that sort of stuff that they have isn't too bad.
Rod.
Rod.

Oldenginerod- Top Poster

- Posts : 3985
Join date : 2012-06-15
Age : 61
Location : Drouin, Victoria
 Re: T-Bee-D1 (a Rod-de-sign)
roddie wrote:So... I plan to cut the pieces for the sheet-wing. It's constant-chord is X2 the width of the stock I'm using.. which equals 3.5". The span is 21" at the trailing tip and 20" at the leading tip. This computes to 71.75 sq. in. and will use the 1/8" wood. It will be X4 pieces; 2@ 16"L. and X2@ 5"L. using staggered butt-joints fastened with thick/Gel CA glue. I use recycled wax-paper that I save......... for just such an occasion. A nice flat table-top with wax-paper works very well for butt-jointing your work pieces together.. without any sticking to the table.
The stabilizer will be 1/2 the chord of the wing @1.75". The span is a planned 11". The elevator span is the same as the stab. with a chord measuring 50% (or .875")
Interesting method of forming the wing with the pieces to maximise the use of a sheet. The wax paper idea is good.! I have used plastic food wrap but find it tends to sometimes get caught in the join whereas wax paper wont do that. I like the sizing and ratios you have posted for your design. Are the ratios sort of known good ratios that are a good general guidline? or are they ones you have found work well over the years?
GaryB
'Yabby'

Yabby- Platinum Member


Posts : 711
Join date : 2021-06-08
Location : Yorke Peninsula South Australia
 Re: T-Bee-D1 (a Rod-de-sign)
Oldenginerod wrote:Gary. If you're looking for digital scales they have them pretty frequently as a "Special Buys" at ALDI. Nor sure if you have an ALDI anywhere near you, but some of that sort of stuff that they have isn't too bad.
Rod.
Excellent Thanks Rod!

GaryB
'Yabby'

Yabby- Platinum Member


Posts : 711
Join date : 2021-06-08
Location : Yorke Peninsula South Australia
 Re: T-Bee-D1 (a Rod-de-sign)
Yabby wrote:roddie wrote:So... I plan to cut the pieces for the sheet-wing. It's constant-chord is X2 the width of the stock I'm using.. which equals 3.5". The span is 21" at the trailing tip and 20" at the leading tip. This computes to 71.75 sq. in. and will use the 1/8" wood. It will be X4 pieces; 2@ 16"L. and X2@ 5"L. using staggered butt-joints fastened with thick/Gel CA glue. I use recycled wax-paper that I save......... for just such an occasion. A nice flat table-top with wax-paper works very well for butt-jointing your work pieces together.. without any sticking to the table.
The stabilizer will be 1/2 the chord of the wing @1.75". The span is a planned 11". The elevator span is the same as the stab. with a chord measuring 50% (or .875")
Interesting method of forming the wing with the pieces to maximise the use of a sheet. The wax paper idea is good.! I have used plastic food wrap but find it tends to sometimes get caught in the join whereas wax paper wont do that. I like the sizing and ratios you have posted for your design. Are the ratios sort of known good ratios that are a good general guidline? or are they ones you have found work well over the years?
GaryB
'Yabby'
Hi Gary, The ratios/proportions that I arrived at for this design are purely experimental. As I mentioned; I wanted to try to build this one "lighter".. and hope to integrate it into my launch dolly design. This will require "notching" the belly of the fuse near or directly "on" the CG.. and providing adequate clearance for the bellcrank, pushrod and elev. horn, so that the belly of the fuse fits down between the two rails on the dolly.. while allowing the controls to be free from binding.
If this doesn't work out.. I can either have a mechanic "hand-launch" the model.. or make an inverted "V" music-wire two-wheel main-gear, that mounts between the engine and firewall. We'll just have to see how it works out.
 Re: T-Bee-D1 (a Rod-de-sign)
Yea.. so I mentioned that I'm pretty sure that CEF member New222 "Chancey" gave me this idea for "pinning" my engine-mount blocks through the fuse, for added strength. I had some round birch toothpicks for just such a purpose. Their diameter is .078" (approx. 2mm).. so I cut the point-tapers off three of them and drilled-through my hardwood blocks with a #47 (.078") drill... using my drill-press.
A tight fit...
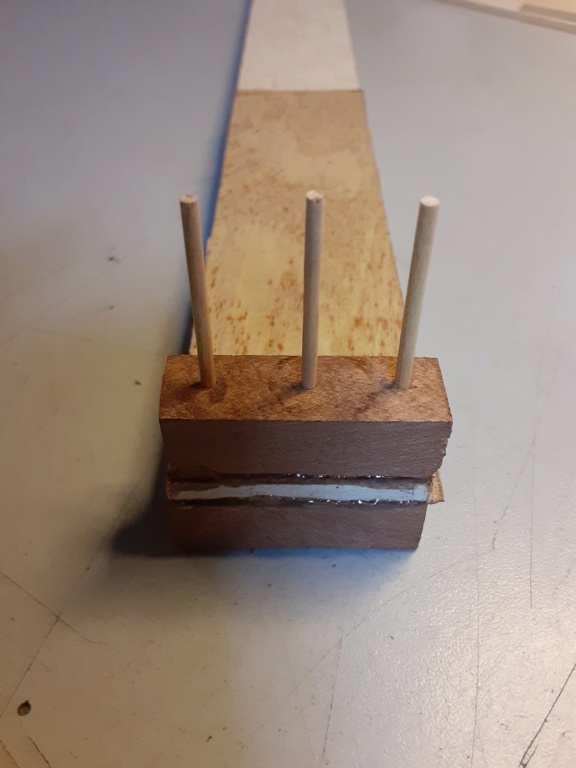
A few light taps with my little nylon-faced hammer.. and the hardwood "pins" sank nicely down through and bottomed-out on my work table.
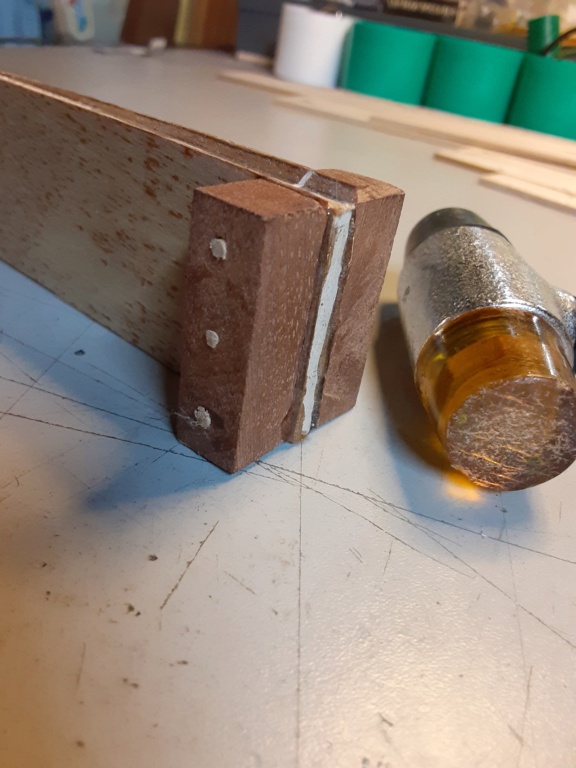
I placed a few drops of thin CA glue around each pin on both sides..
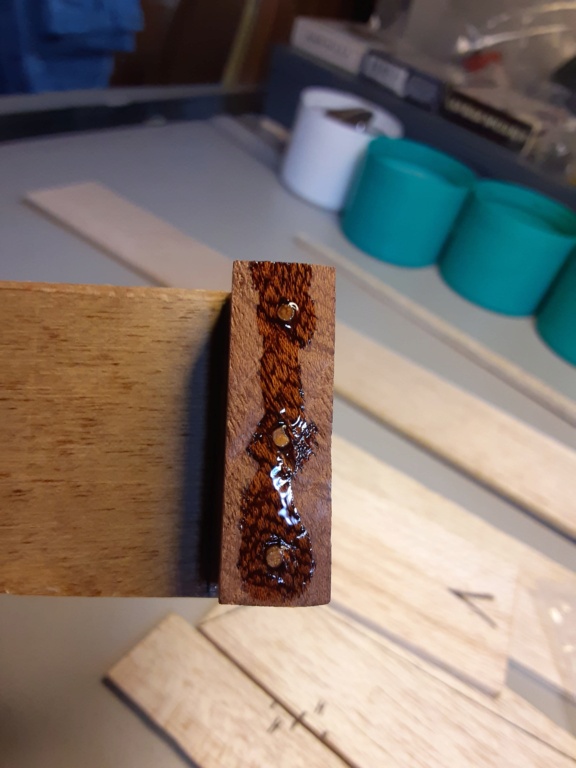
... then I "puffed" some bicarbonate of soda.. using my "puffer" made from a recycled "denture adhesive powder" container... over the area as an accelerant to cure the CA glue.
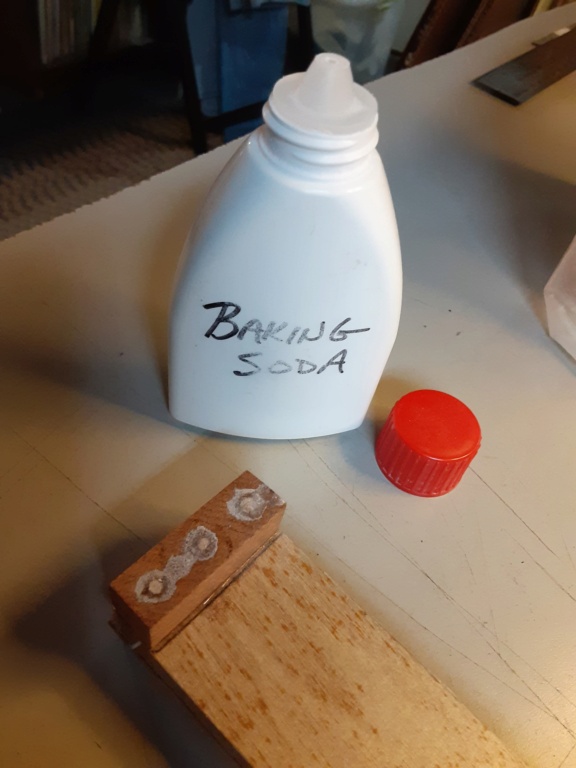
I'll be sanding the nose smooth tonight.. after letting it all settle for the last few days. I'm not "under the gun" to get this finished.. but I'm enjoying working on it in my spare time.. (I'll have a lot more of that in just a few days..
A tight fit...

A few light taps with my little nylon-faced hammer.. and the hardwood "pins" sank nicely down through and bottomed-out on my work table.

I placed a few drops of thin CA glue around each pin on both sides..

... then I "puffed" some bicarbonate of soda.. using my "puffer" made from a recycled "denture adhesive powder" container...

I'll be sanding the nose smooth tonight.. after letting it all settle for the last few days. I'm not "under the gun" to get this finished.. but I'm enjoying working on it in my spare time.. (I'll have a lot more of that in just a few days..
 Re: T-Bee-D1 (a Rod-de-sign)
I just did some sanding to the nose.. to even-out the doubler over-lap top/bottom.. then the engine-mount blocks. I used a 1/4-sheet electric palm-sander with 180 grit abrasive paper.
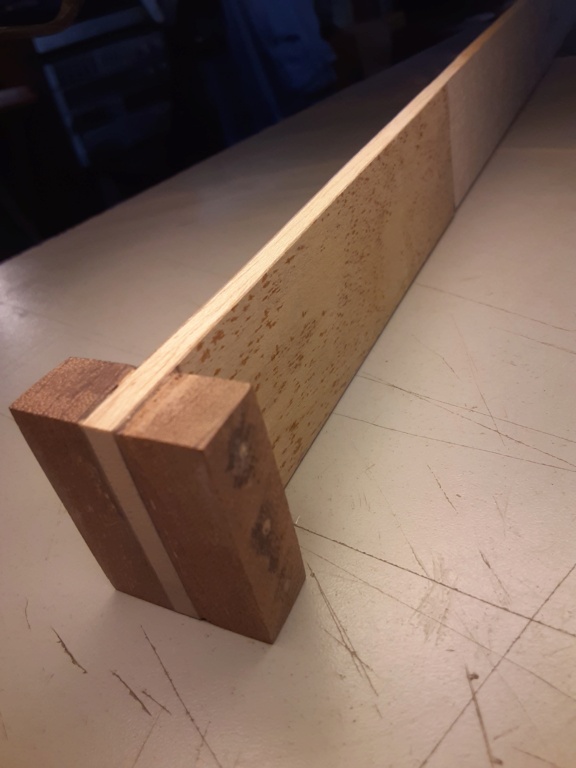
The 180 grit paper smoothed-out the epoxy leakage in short-order.

Excess CA glue is a bit tougher.. but the sanding overall, went quite quickly.
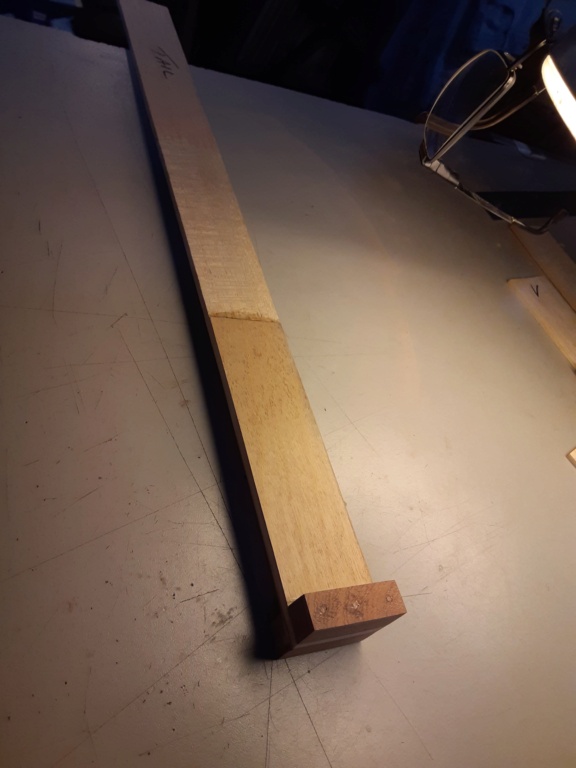
The tail-moment is going to be cut-back WAY shorter.. and the wing-slot will be moved forward; so that the existing-length 1/64" ply nose-doublers will extend all the way back to the wing's trailing-edge. I'll need to revise my drawing.

The 180 grit paper smoothed-out the epoxy leakage in short-order.

Excess CA glue is a bit tougher.. but the sanding overall, went quite quickly.

The tail-moment is going to be cut-back WAY shorter.. and the wing-slot will be moved forward; so that the existing-length 1/64" ply nose-doublers will extend all the way back to the wing's trailing-edge. I'll need to revise my drawing.
 tail-moments TBD1
Yea.. so... my "seat of the pants" designing skills have me sawing the tail off of my fuselage..  and moving the wing-slot forward by 1.75". The "tail-moment" will get somewhat dialed-in when I mount an engine.. but............ I imagined a few moments.. and took photos.
LONG
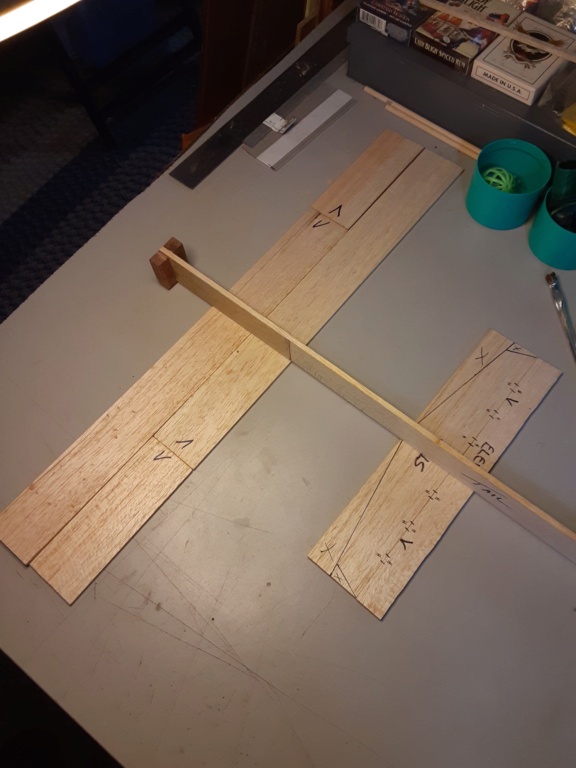
MEDIUM
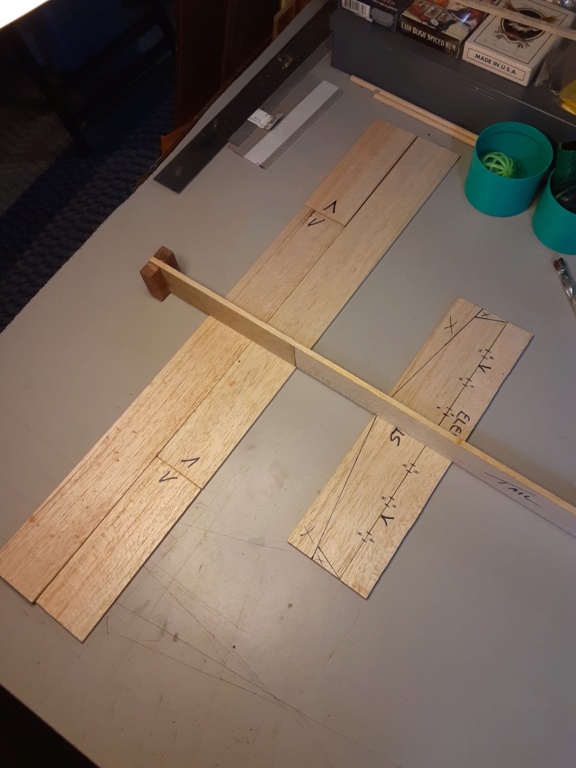
SHORT

I'm leaning toward the short-coupling.. seeing that the nose-moment has "decreased" by the same 1.75" in moving the wing slot forward.
LONG

MEDIUM

SHORT

I'm leaning toward the short-coupling.. seeing that the nose-moment has "decreased" by the same 1.75" in moving the wing slot forward.
 Re: T-Bee-D1 (a Rod-de-sign)
roddie wrote:Yea.. so I mentioned that I'm pretty sure that CEF member New222 "Chancey" gave me this idea for "pinning" my engine-mount blocks through the fuse, for added strength. I had some round birch toothpicks for just such a purpose. Their diameter is .078" (approx. 2mm).. so I cut the point-tapers off three of them and drilled-through my hardwood blocks with a #47 (.078") drill... using my drill-press.
... then I "puffed" some bicarbonate of soda.. using my "puffer" made from a recycled "denture adhesive powder" container...over the area as an accelerant to cure the CA glue.
Hey Roddie, the idea with the pinned mounting blocks looks really good. well done to @NEW222 "Chancey" for passing the idea on. I like it. Its one I will definitely use.

GaryB
'Yabby'

Yabby- Platinum Member


Posts : 711
Join date : 2021-06-08
Location : Yorke Peninsula South Australia
 TBD1-wing assy. glue-up
Tonight I decided to put my slab-wing together... and met with some resistance while attempting to butt-together the panels with gel-type CA glue. It should be noted.. that I buy the cheapest CA that I can find; in true control-line modeler fashion... 
more about that later............ I made sure that I had air-circulation via a box-fan "on" during CA application.
The "gel" CA wasn't kickin'.. (joints failing) influencing me to spread "thin" CA over the joints.
... so now I'm spreading thin CA.. over the butt-joints. Pulling the wax-paper "over" the wet-joint.. and "smoothing-out" the thin CA seems to be working. I have my puffer though.. (where's the puffer emoji?) and I "puff" baking soda over the glued area. It's already smooth from the wax-paper. A light dusting/sanding takes care of it in short-order.
It works.. and it sets hard.. once it sets. Segmented slab-wings are less-prone to warping.
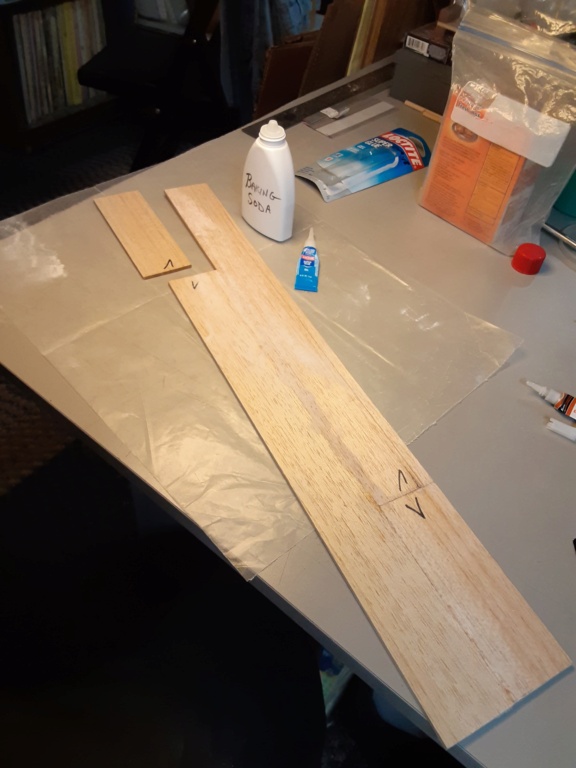
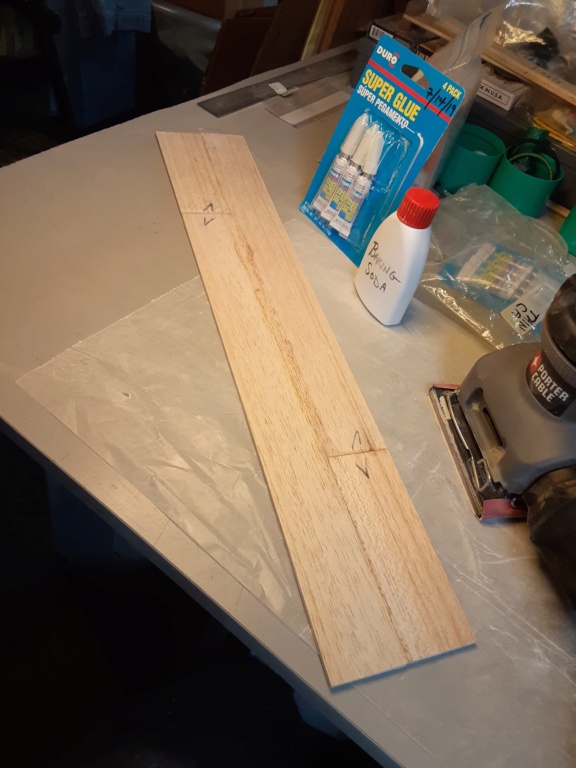
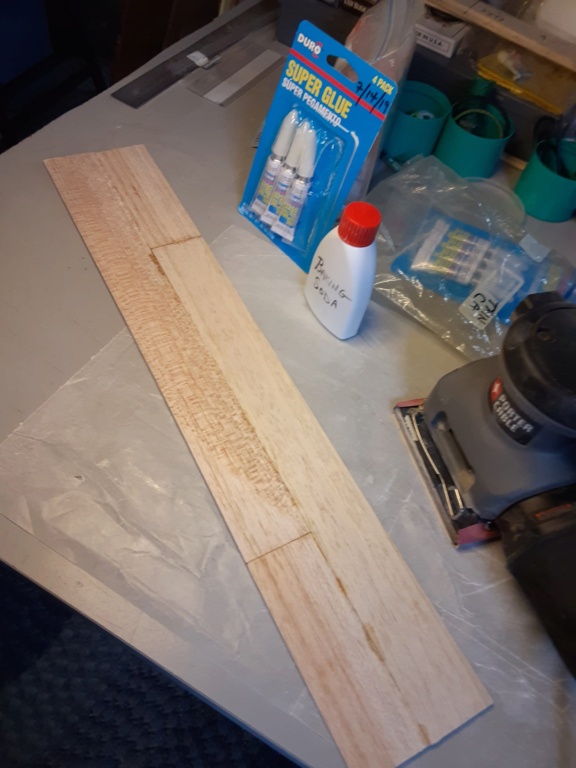
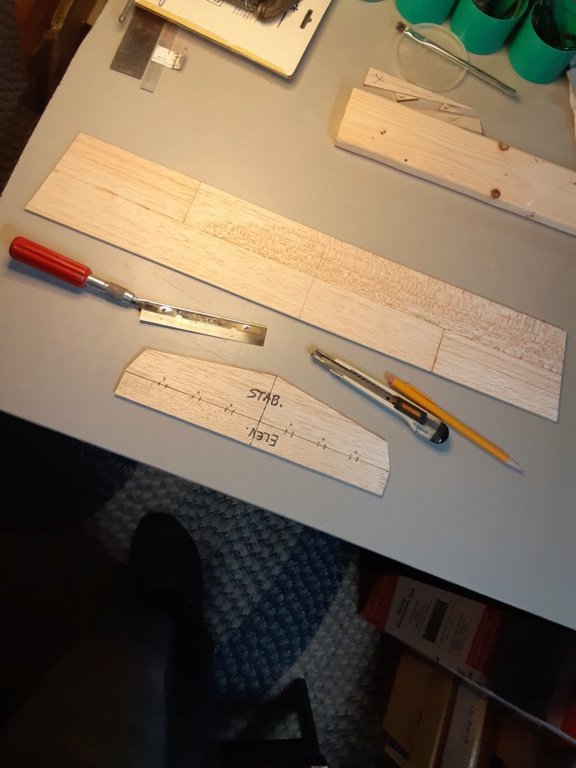
OK.. now I've got my slab-wing "blank"................... and now I need to cut the wing-tip profiles.
more about that later............ I made sure that I had air-circulation via a box-fan "on" during CA application.
The "gel" CA wasn't kickin'.. (joints failing) influencing me to spread "thin" CA over the joints.
... so now I'm spreading thin CA.. over the butt-joints. Pulling the wax-paper "over" the wet-joint.. and "smoothing-out" the thin CA seems to be working. I have my puffer though.. (where's the puffer emoji?) and I "puff" baking soda over the glued area. It's already smooth from the wax-paper. A light dusting/sanding takes care of it in short-order.
It works.. and it sets hard.. once it sets. Segmented slab-wings are less-prone to warping.


OK.. now I've got my slab-wing "blank"................... and now I need to cut the wing-tip profiles.
 Re: T-Bee-D1 (a Rod-de-sign)
roddie wrote:Tonight I decided to put my slab-wing together... and met with some resistance while attempting to butt-together the panels with gel-type CA glue. It should be noted.. that I buy the cheapest CA that I can find; in true control-line modeler fashion...
more about that later............ I made sure that I had air-circulation via a box-fan "on" during CA application.
Hey Roddie, as usual lots of interesting tips, such as that segmented slab wings being less prone to warping. Did you build the wing segmented for that very reason? or also because it works out well with the balsa sheet use?
The baking soda is intersting, I had heard blokes talking about it at work, using it with CA to repair things that normally were very difficult to repair and they would build up layers of CA and baking soda till they formed the shape or filles the crack etc.
I am also very interested in your comment about using a fan during CA application. Do you use the fan due to Toxins risk or is it to help it dry or just cos you dont like the smell?
GaryB
'Yabby'

Yabby- Platinum Member


Posts : 711
Join date : 2021-06-08
Location : Yorke Peninsula South Australia
 Re: T-Bee-D1 (a Rod-de-sign)
Yabby wrote:
The baking soda is interesting, I had heard blokes talking about it at work, using it with CA to repair things that normally were very difficult to repair and they would build up layers of CA and baking soda till they formed the shape or filles the crack etc.
I use thin CA exclusively, but sometimes need to fill a small void or crack, since baking soda works well as an accelerator and as a filler. Recently, I read an article where the author used a 50/50 mixture of baking soda and graphite (pencil lead scrapings were his source). He had some evidence that the mixture was significantly stronger than using baking soda alone.
a--
 Re: T-Bee-D1 (a Rod-de-sign)
hey Andrew @andrew you could almost use thodes materials as a form of 3d printing an use the graphite and the CA, you wouldnt, but gee it makes you think about its application space in combinations like that. Thanks for posting. 
GaryB
'Yabby'

GaryB
'Yabby'

Yabby- Platinum Member


Posts : 711
Join date : 2021-06-08
Location : Yorke Peninsula South Australia
 Re: T-Bee-D1 (a Rod-de-sign)
Yabby wrote:roddie wrote:Tonight I decided to put my slab-wing together... and met with some resistance while attempting to butt-together the panels with gel-type CA glue. It should be noted.. that I buy the cheapest CA that I can find; in true control-line modeler fashion...
more about that later............ I made sure that I had air-circulation via a box-fan "on" during CA application.
Hey Roddie, as usual lots of interesting tips, such as that segmented slab wings being less prone to warping. Did you build the wing segmented for that very reason? or also because it works out well with the balsa sheet use?
The baking soda is intersting, I had heard blokes talking about it at work, using it with CA to repair things that normally were very difficult to repair and they would build up layers of CA and baking soda till they formed the shape or filles the crack etc.
I am also very interested in your comment about using a fan during CA application. Do you use the fan due to Toxins risk or is it to help it dry or just cos you dont like the smell?
GaryB
'Yabby'
Hi Gary, Regarding segmented slab-wing construction; many of my designs feature root wing-chords of at least 4 inches/100mm. I generally purchased my sheet balsa in maximum widths of 3"/75mm.. requiring the addition of wood to arrive at the design-chord of my wings. I could have sourced wider sheet-wood.. but I didn't very often.
I've also made several "flat-framed" (open frame) sheet-wings that I've covered using iron-on film. See this thread; Flat-Framed construction
My theory is; that contrasting wood-grains in opposing butt-joints can help to prevent warping. The contrasting grain-directions in my flat-framed wings take this theory to a higher level.. but those wings take much more time to build.
I have also used harder-wood "strip-spars" in my balsa sheet-wings. My F8F-2 has a strip of 1/8" X 3/4" X 8" dark-wood (might be walnut) which I positioned on-center, near the leading-edge.. for the purpose of supporting the main gear-strut blocks (X2) at 6" apart. Not something I would do, if just using balsa only. I wasn't concerned with the added weight of that spar.. because the model was built purely for roundy-round operation. (The 1st CEF Reed-Speed contest) My F8F-2 wing is actually made-up of X8 segments.
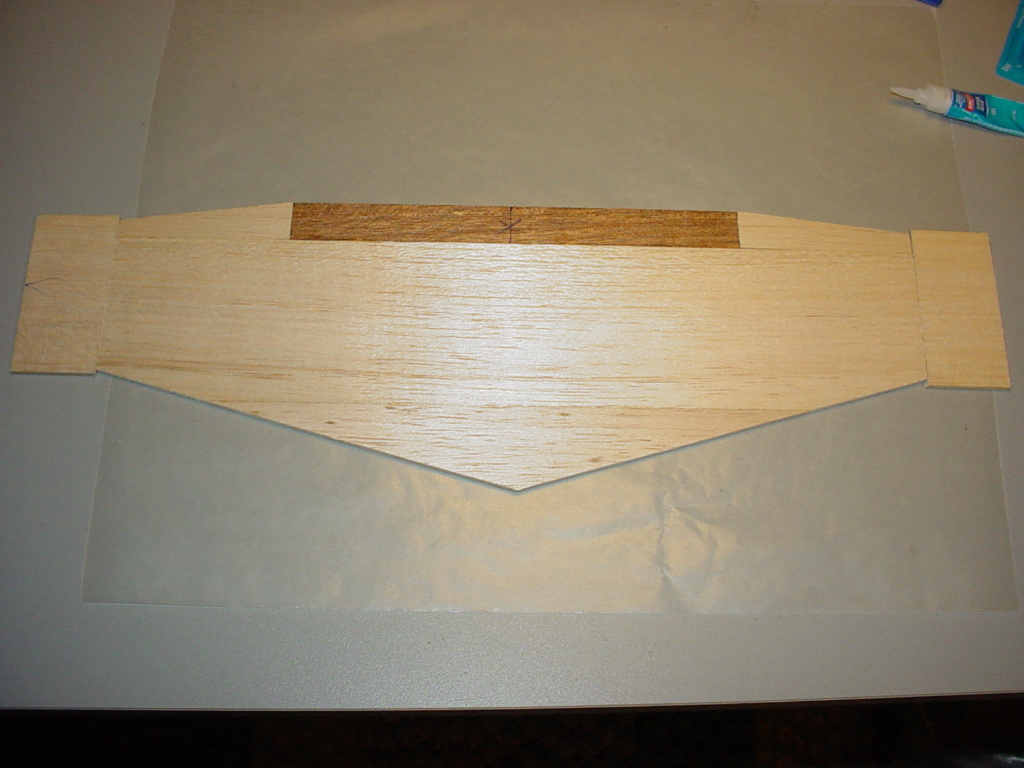
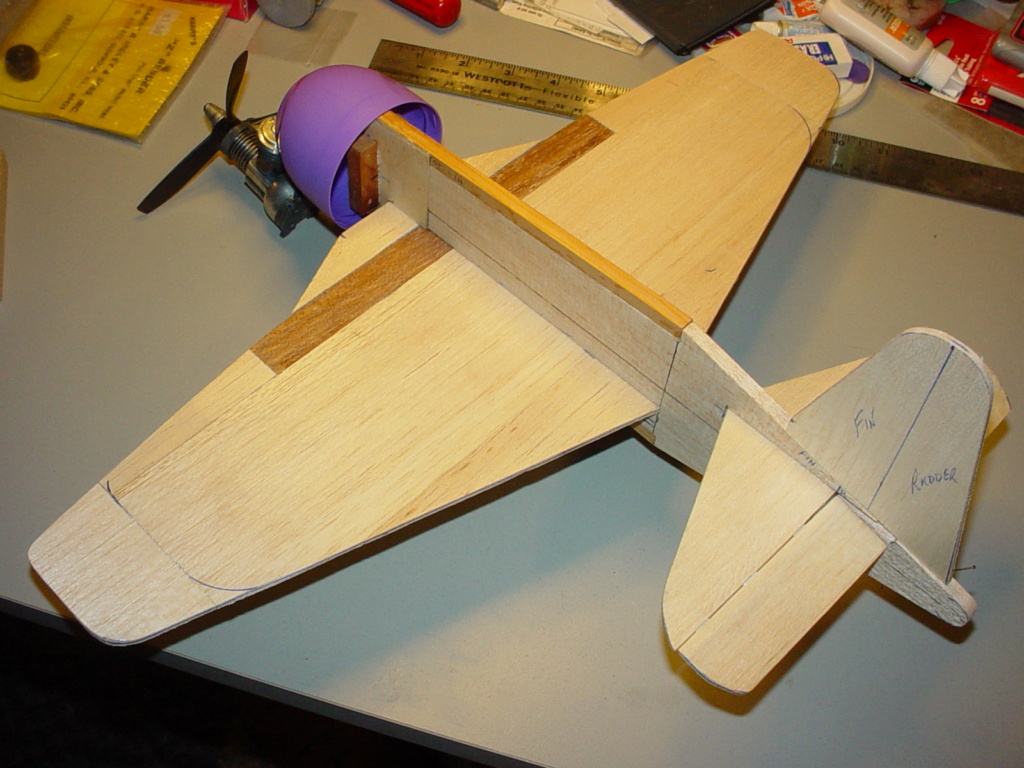
That model probably weighs as much as a rtf Jr. Flite Streak..

Regarding my use of CA and the box-fan. The fan is to help blow the CA vapors away from the work-area.. but this was not enough for me.. as I still had an unpleasant allergic reaction. I get severe sinus-congestion when exposed to enough of the CA vapor. I was having trouble with the CA not being "instant"... and having to work with it longer than expected.
 Re: T-Bee-D1 (a Rod-de-sign)
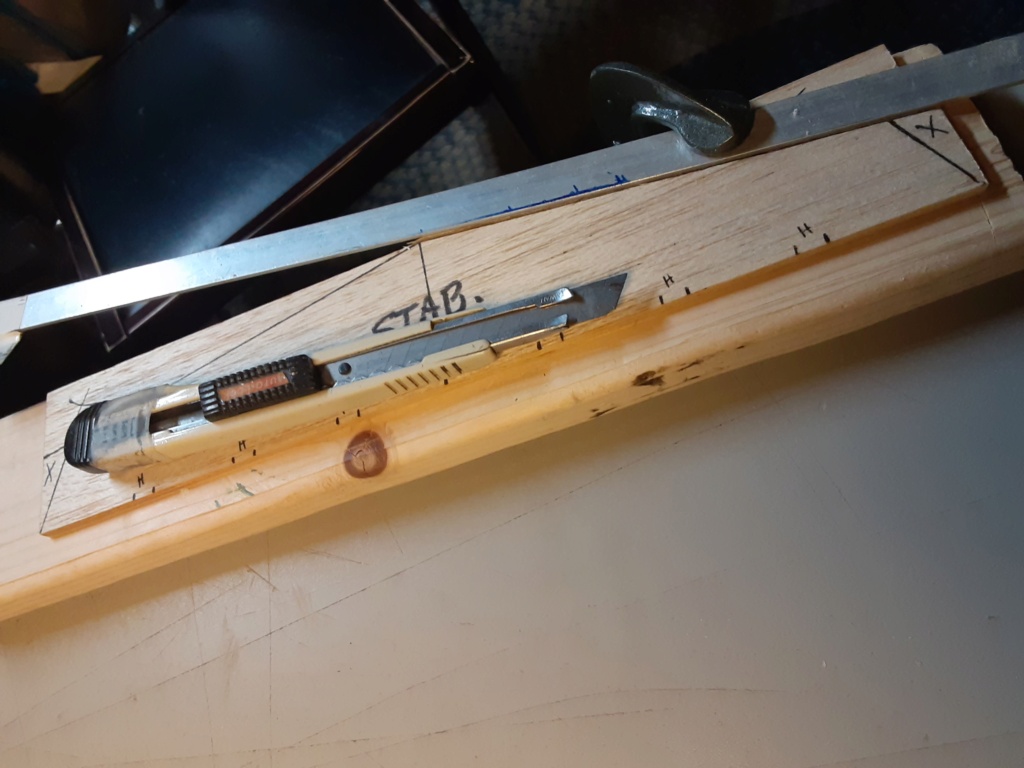
Here's a hinge-slotting method that I've posted about on previous builds, which will use Sig-brand "CA" type hinges.
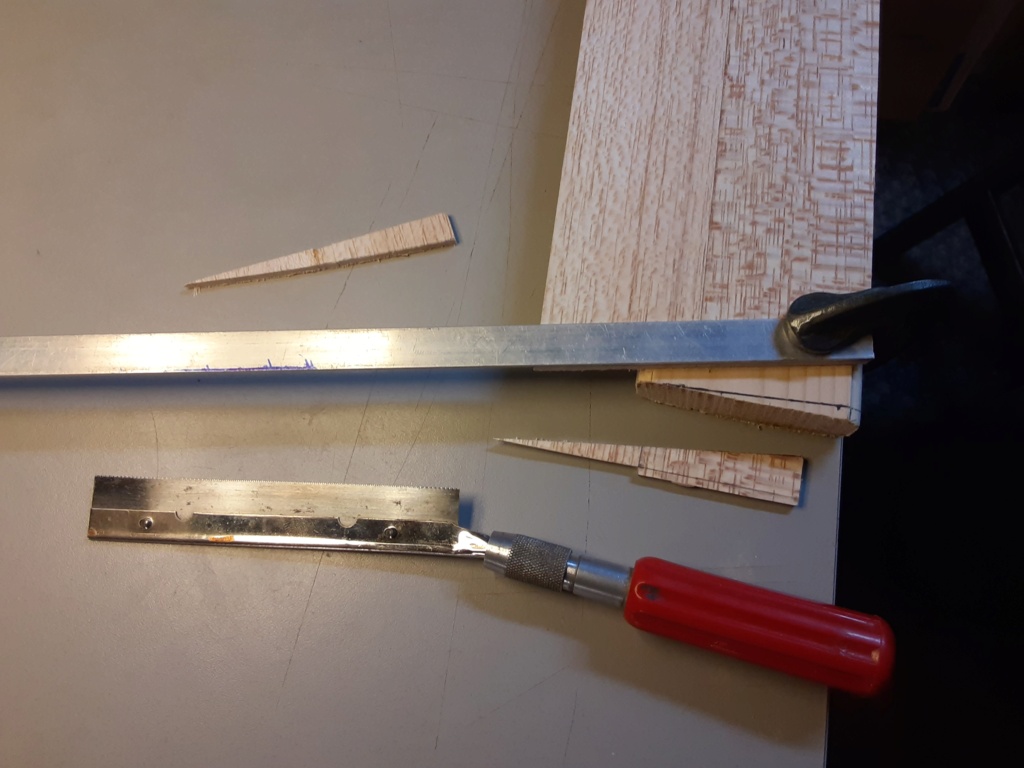
After laying-out the locations, I use a #17 X-Acto "chisel" blade and a piece of flat-stock "half the thickness" of my balsa, which "centers" the blade. I then push the blade into the wood with a firm rocking/side-to-side motion.. whilst keeping downward-pressure on the flat-stock. A large "C-clamp" and block of hardwood for a fence to keep my work-piece from sliding back.
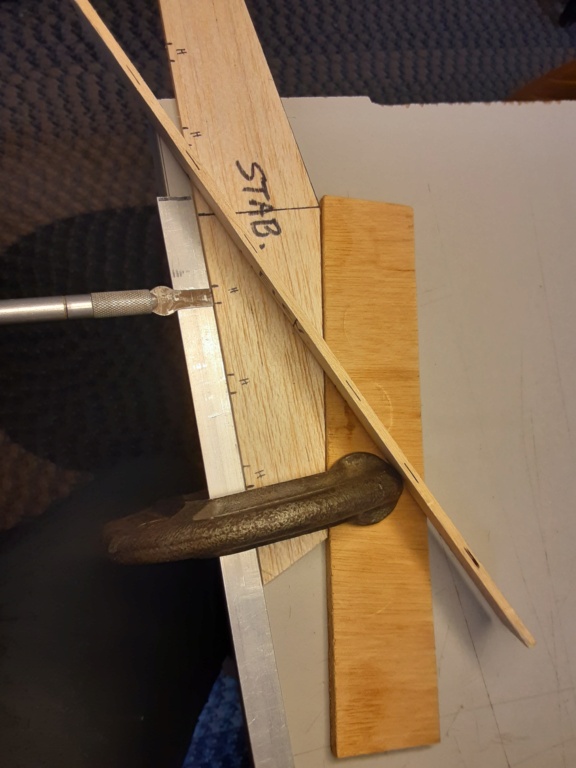
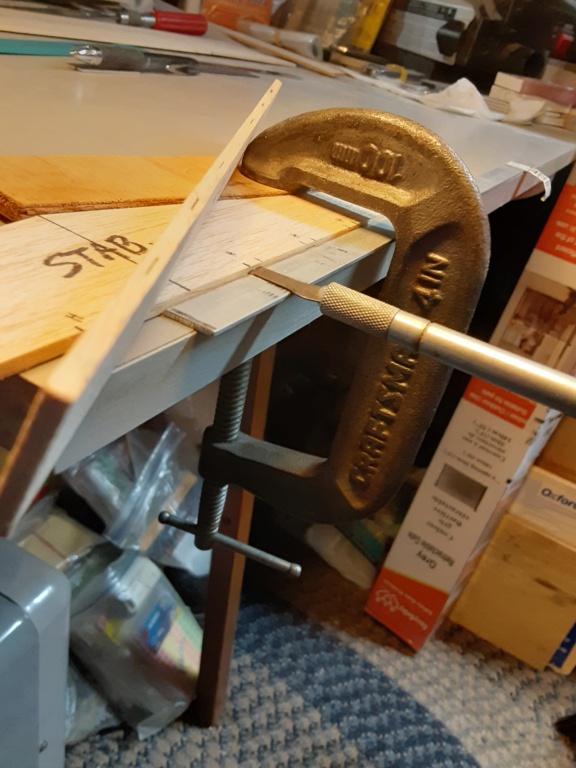
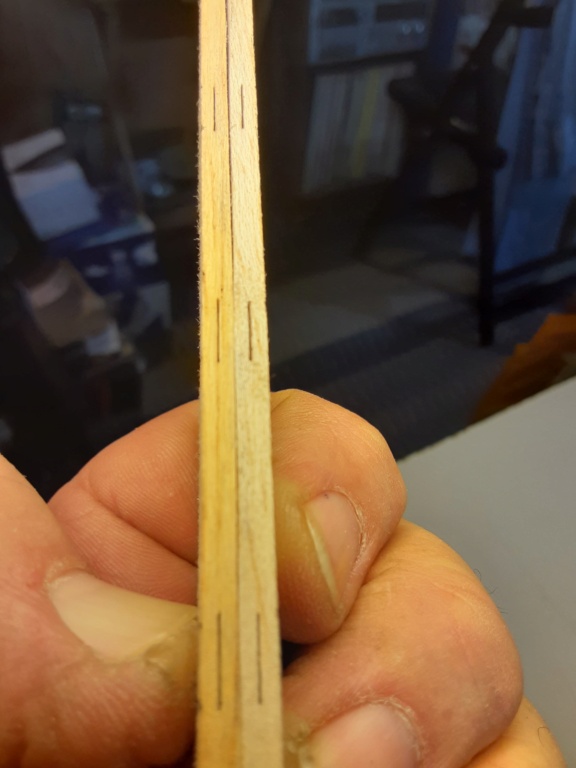
I then use a type of knife-sharpener to form a taper on the hinge-lines of both pieces.. and all the way around the wing also.
Photos below are from a previous (P-38) build.. but will show the process.
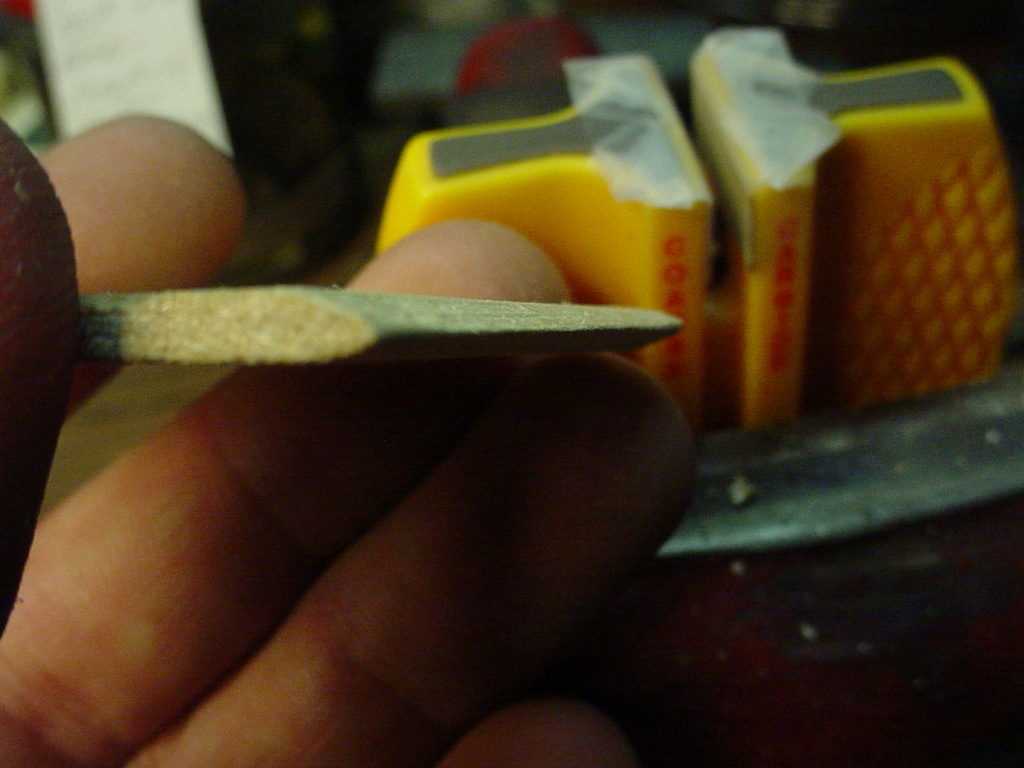
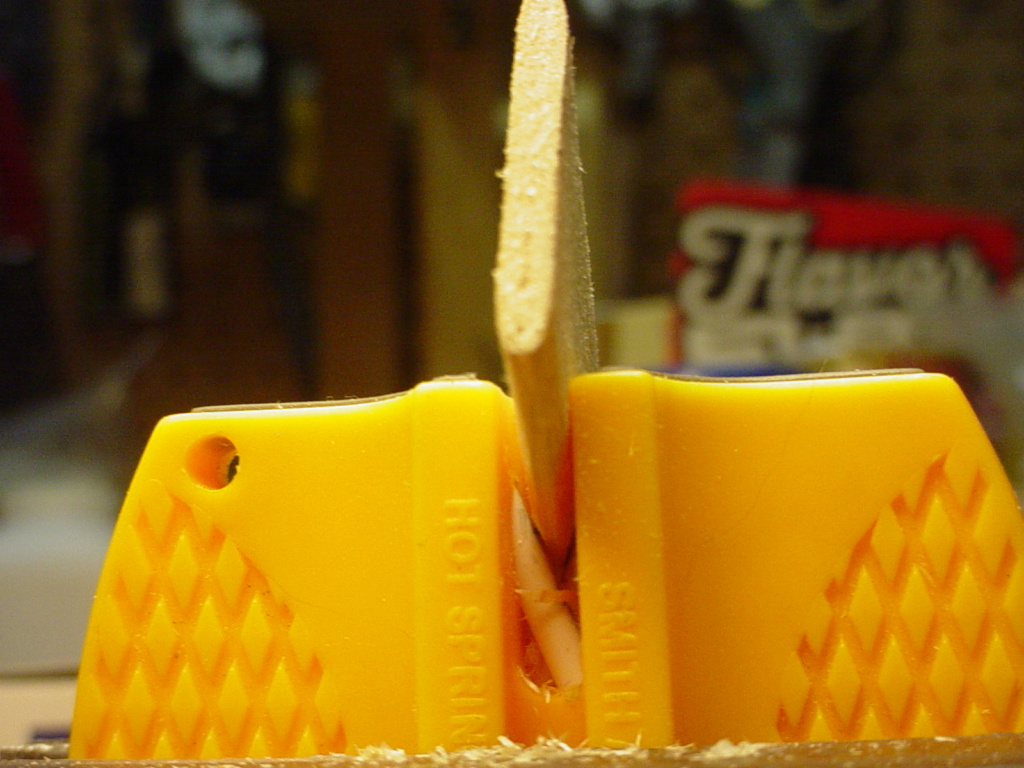
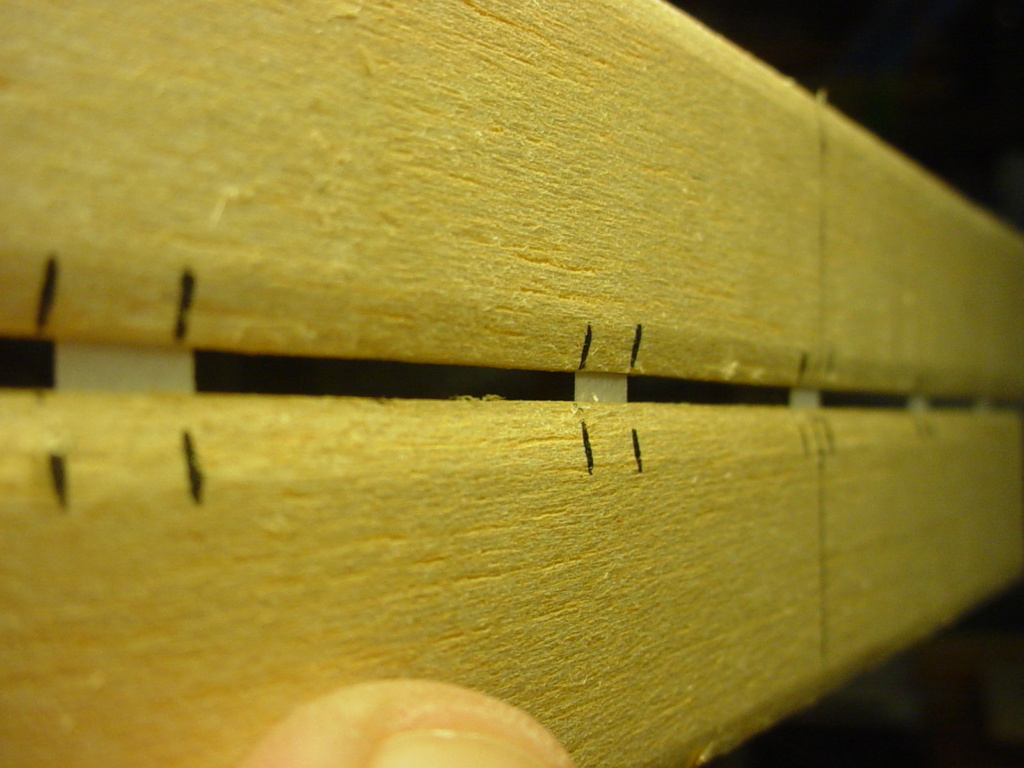
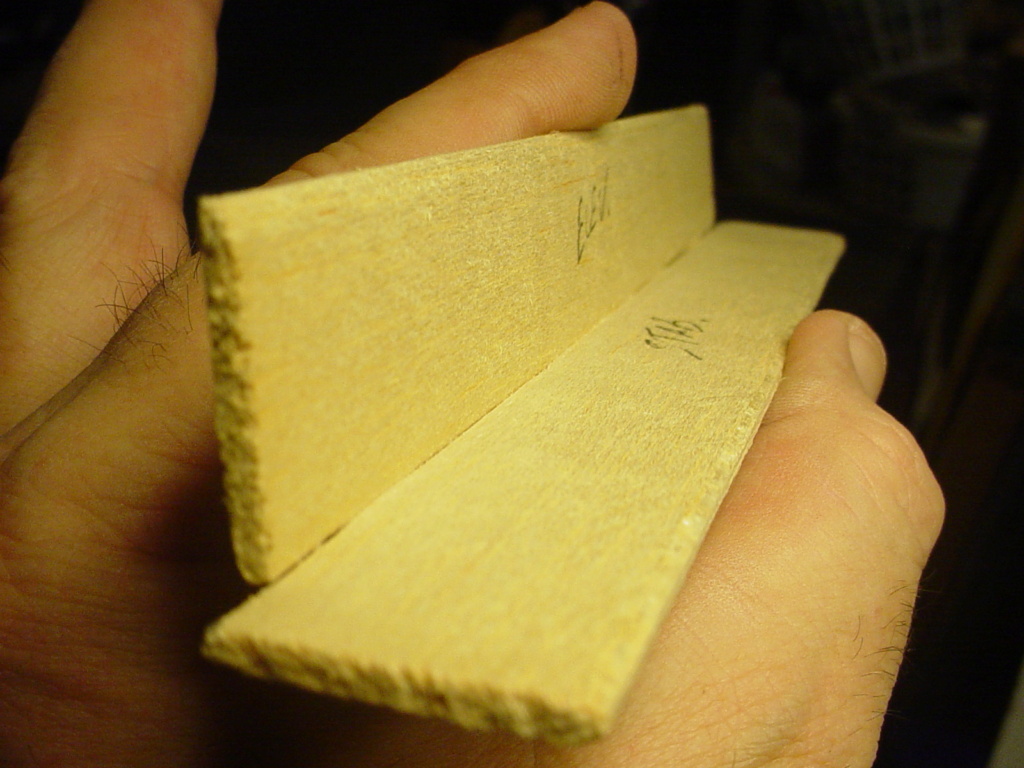
This can also be done by locking scissor-blades in a vise to form the desired taper.. and then drawing (pulling) the work-piece "toward you" whilst keeping it vertical.
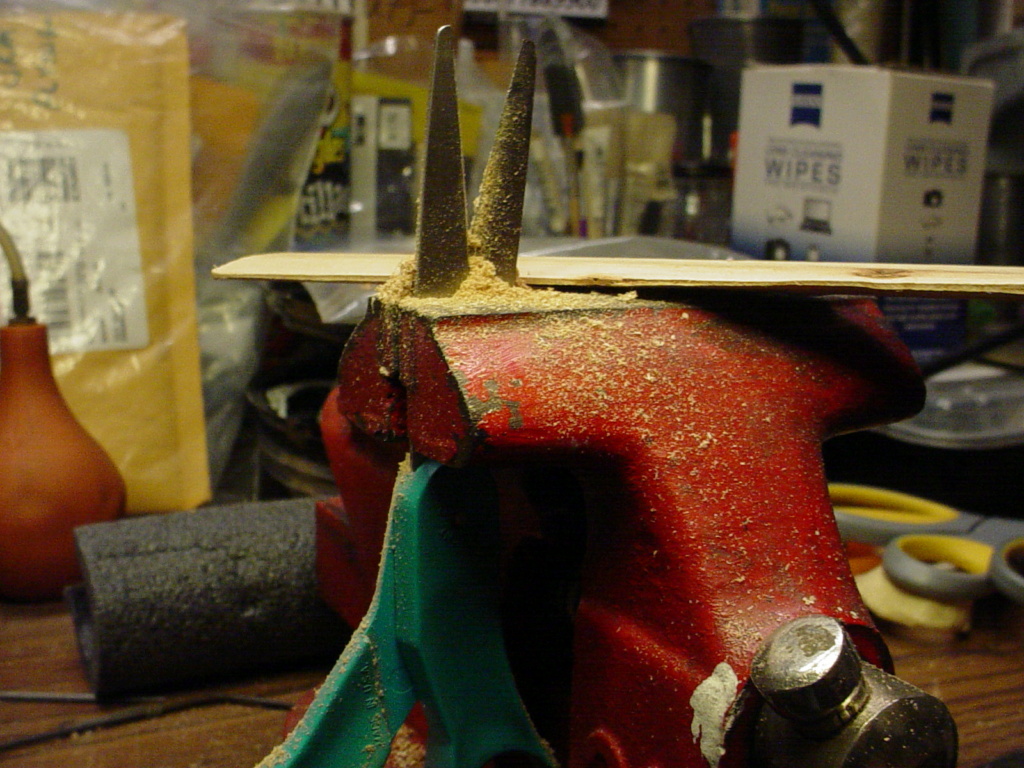
Give it a try with a piece of scrap balsa.. and you'll see how easy it can be (with a little care and patience..) to form tapered leading/trailing-edges on your thin sheet-balsa.
After laying-out the locations, I use a #17 X-Acto "chisel" blade and a piece of flat-stock "half the thickness" of my balsa, which "centers" the blade. I then push the blade into the wood with a firm rocking/side-to-side motion.. whilst keeping downward-pressure on the flat-stock. A large "C-clamp" and block of hardwood for a fence to keep my work-piece from sliding back.


I then use a type of knife-sharpener to form a taper on the hinge-lines of both pieces.. and all the way around the wing also.
Photos below are from a previous (P-38) build.. but will show the process.


This can also be done by locking scissor-blades in a vise to form the desired taper.. and then drawing (pulling) the work-piece "toward you" whilst keeping it vertical.

Give it a try with a piece of scrap balsa.. and you'll see how easy it can be (with a little care and patience..) to form tapered leading/trailing-edges on your thin sheet-balsa.
 Re: T-Bee-D1 (a Rod-de-sign)
Hi roddie,
Sweet hinge tutorial, I do basicly, the same.
Thanks.
My friend taught me how to grind down a #11 blade and put a 'hook' on it. To clear out the slot.
Hinges are a challenge, but part of the fun...
Thanks for taking us,
On this internet ride,
Dave
Sweet hinge tutorial, I do basicly, the same.
Thanks.
My friend taught me how to grind down a #11 blade and put a 'hook' on it. To clear out the slot.
Hinges are a challenge, but part of the fun...
Thanks for taking us,
On this internet ride,
Dave

HalfaDave- Platinum Member

- Posts : 608
Join date : 2022-12-06
Location : Oakville, Ontario
 Re: T-Bee-D1 (a Rod-de-sign)
excellent elevator and stab tapper solution. I knew there had to be a good way of doing other than my way of just carving it out afterwards with modelling knife. 

Also thanks for the link to the thread on formed slab wings. It was really interesting. Never seen anything like it before. Will give one a try. But first of all current models get finished.

thinking of doing an RC Slab wing Pylon Racer for an 049. Im going to base it around the Half A Scorpion on OZ https://outerzone.co.uk/plan_details.asp?ID=5973 which has a sanded airfoyle and flies really well.
GaryB
'Yabby'

Also thanks for the link to the thread on formed slab wings. It was really interesting. Never seen anything like it before. Will give one a try. But first of all current models get finished.

thinking of doing an RC Slab wing Pylon Racer for an 049. Im going to base it around the Half A Scorpion on OZ https://outerzone.co.uk/plan_details.asp?ID=5973 which has a sanded airfoyle and flies really well.
GaryB
'Yabby'

Yabby- Platinum Member


Posts : 711
Join date : 2021-06-08
Location : Yorke Peninsula South Australia
 Re: T-Bee-D1 (a Rod-de-sign)
HalfaDave wrote:Hi roddie,
Sweet hinge tutorial, I do basicly, the same.
Thanks.
My friend taught me how to grind down a #11 blade and put a 'hook' on it. To clear out the slot.
Hinges are a challenge, but part of the fun...
Thanks for taking us,
On this internet ride,
Dave
Hi Dave! Oh man............ I bought the Dubro #216 "Kwik-Hinge Slotter" and centering-guide for one of my first designs; a "flapped" C/L 1/2A slab-wing job circa 1992.. where I used the Dubro sm. nylon pinned-hinges on the flaps X6.. and the elevator X4. A labor of love.. and the first model that I was able to loop into an inverted flight and then back again after a couple of laps. I believe there was a Cox "Golden Bee" with a Cox grey 6 X 3 pulling on the firewall.
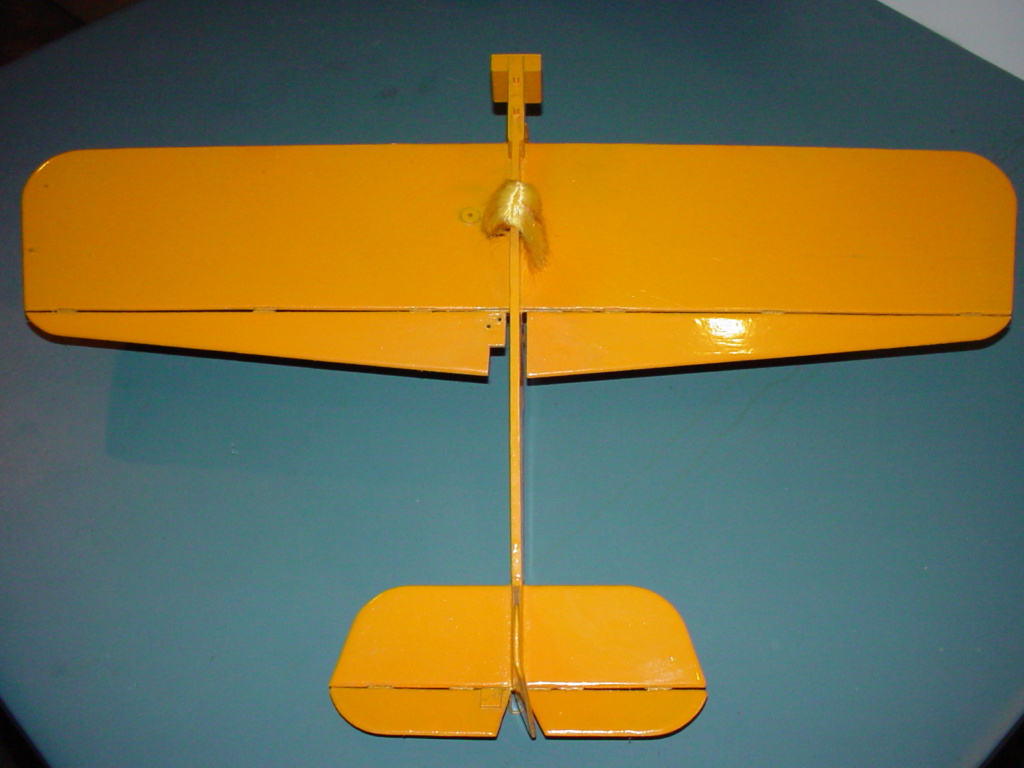
Engine-mount look familiar?
 Re: T-Bee-D1 (a Rod-de-sign)
That pilot I named "Barbie".. because Barbie could do anything.. and she still can..
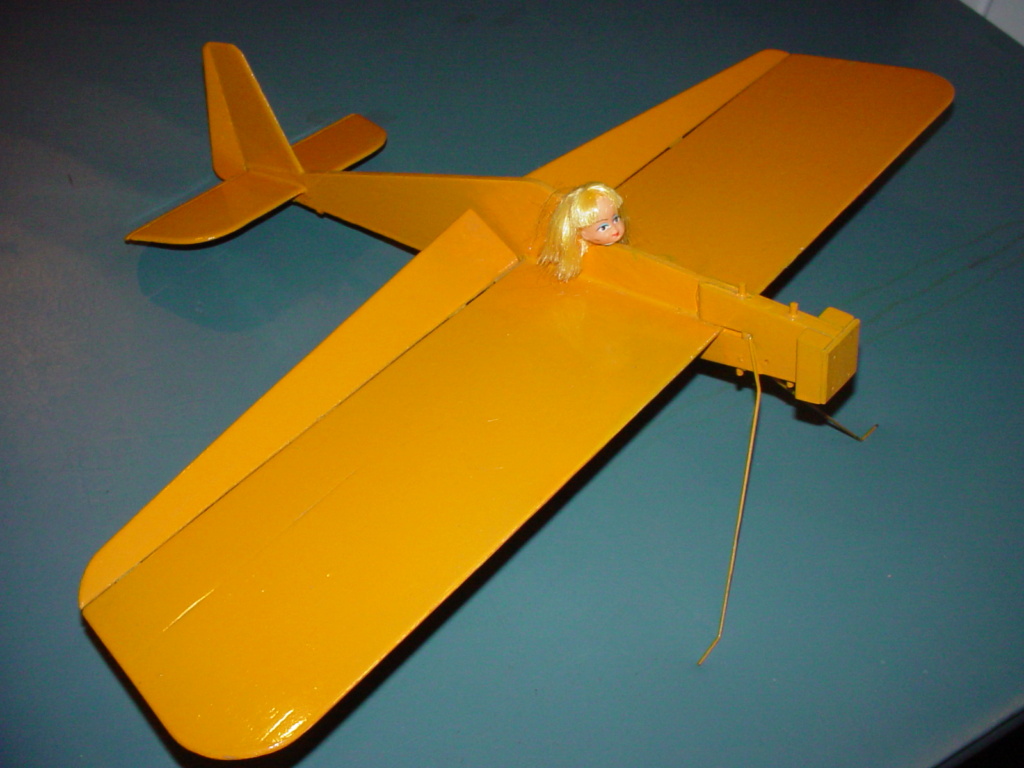
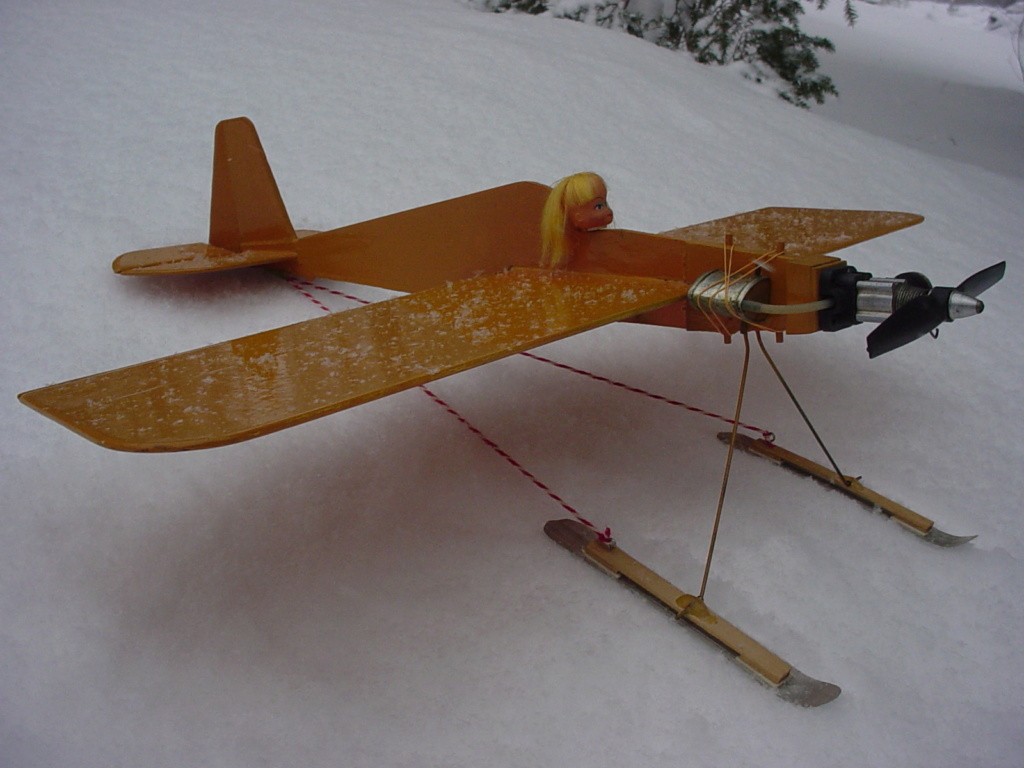
actually.. the "nose" on that airplane needed to be rebuilt following a crash only a few years after being built. It hasn't been flown with the new nose, which features Midwest 1/16" 5-ply birch doublers. The snow-skis are my own design.. but have never been flight-tested.


actually.. the "nose" on that airplane needed to be rebuilt following a crash only a few years after being built. It hasn't been flown with the new nose, which features Midwest 1/16" 5-ply birch doublers. The snow-skis are my own design.. but have never been flight-tested.
Page 3 of 8 •  1, 2, 3, 4, 5, 6, 7, 8
 Similar topics
» ***The World's Smallest Traveling Engine*** SIGN UP!
» Sign of the times
» Brodak Stop Sign
» ***The Traveling Engine TD .049*** SIGN UP!
» Can't sign up for Yahoo - But Comet RTF question
» Sign of the times
» Brodak Stop Sign
» ***The Traveling Engine TD .049*** SIGN UP!
» Can't sign up for Yahoo - But Comet RTF question
Page 3 of 8
Permissions in this forum:
You cannot reply to topics in this forum

 Rules
Rules


 so I'm working on my airplane..